MISSION ENTERTAINMENT CONSOLE - L.L. Bean
MISSION ENTERTAINMENT CONSOLE - L.L. Bean
MISSION ENTERTAINMENT CONSOLE - L.L. Bean

Create successful ePaper yourself
Turn your PDF publications into a flip-book with our unique Google optimized e-Paper software.
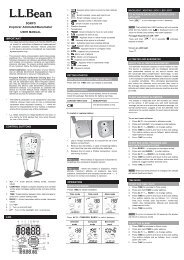
<strong>MISSION</strong> <strong>ENTERTAINMENT</strong> <strong>CONSOLE</strong>Thank you for purchasing our Mission Entertainment Console. Assembly of this productrequires a Phillips screwdriver and a hammer. We have found it helpful to have a secondperson present in at least one step of the assembly.0GBU1080530
STEP 1Read through these instructions thoroughly beforebeginning assembly. We have found this to be of greatvalue when first assembling this product.STEP 2Remove all parts and hardware from packing material.Wooden pieces should be placed on a non-abrasivesurface (like the carton or carpet) to prevent damage tothe finish.STEP 3Identify all parts using diagram at right andlist below.PARTSTop Assembly (A)Left Divider (B)Right Divider (C)(2) Doors (D)Bottom Assembly (E)(2) End Assembly (F)Cabinet Shelf (G)STEP 4Identify and count hardware using diagram at right.Assembly of this product requires a Phillipsscrewdriver and a hammer. We have found ithelpful to have a second person present in at leastone step of the assembly.0GBU1080530
STEP 5Lay Top (A) with cleats facing up onnon-abrasive surface (carpet or carton).Mount the magnet to cleat using twopan head screws provided. This is thefront of unit. Attach 6 cam pegs into thepredrilled holes in the cleats.STEP 6Insert three camlocks into the the Left Divider (B).Ensure that the arrow on the face of the camlock'points' to the hole in the edge of the divider. Pressfirmly into place. Align the divider over the campegs on the left side of the Top Assembly (A).Secure the divider by turning camlocks at least 1/2turn clockwise with a Phillips screwdriver.Note: the position of holes in divider. The largerspace from edge of divider to hole goes towardsthe front.Repeat same steps for the Right Divider (C).STEP 7Mount one catch plate to the back of each Door (D)using ½” #5 screws. Attach door pulls by threadingpulls through door fronts and secure with machinescrews.0GBU1080530
• If you are receiving the HOPE scholarshipor other financial aid, check with theOffice of Student Financial Aid beforewithdrawing from any courses.• To be sure your coverage will not beaffected, check with your automobile andhealth insurance agents before withdrawingfrom courses.Earning a Franklin College Degree• Choose a degree program.• Follow the appropriate checksheet.• Work with your Advisor.• Specify a major by 60 semester hours.• Use all information sources:o The University Bulletino The Interneto On-campus resources• Learn the requirements for your degree.• Be referred to a department.Earning Degrees in Other UGASchools and Colleges• If you are completely undecided aboutyour degree or major, see bulletin.uga.eduand www.career.uga.edu for moreinformation.• To transfer within UGA, visit the otherschool/college for information.• The requirements may be different foryour new major.Special Note for Transfer StudentsChanging schools and majors can change your degreerequirements and expected graduation date. Carefullyreview with your Academic Advisor any informationthat has been sent to you by the Admissions Office.You may have to work with individual departments toget the maximum credit toward graduation from yourtransfer work. The University and its schools/collegesalways have the final say in how your credits willtransfer. If you have not received a final evaluationof all transfer credits, take copies of your gradereports to your advising appointment. If you havetransferred from another University System ofGeorgia institution, you are responsible for providingthe information for Core-to-Core transfer (seewww.usg.edu/academic_programs/information/core_curriculum/ for more information). If you havecompleted the hours and entrance requirements foryour major, you will be advised in the Office ofAcademic Advising during Orientation and thenreferred to your major department.Email @ UGA• Your @uga.edu email address is used for allofficial University of Georgia correspondence,including advising information.• Set up your @uga.edu account as part of thisOrientation.• You can forward your @uga.edu mail to anyother email accounts (aol, Yahoo, gmail, etc.)you might use.Campus Resourcesaskadvic@uga.edu – E-mail for answers to questions aboutthe Franklin College.Career Center 706-542-3375 http://www.career.uga.edu/Counseling & Psychological Services (CAPS)706-542-1162 http://www.uhs.uga.edu/CAPS/Division of Academic Enhancement 706-542-5436http://www.uga.edu/dae/Office of Undergraduate Admissions 706-542-2112https://www.admissions.uga.edu/Pre-Professional AdvisingPre-Law 706-542-5836http://prelaw.uga.edu/Pre-Medical Studies 706-542-0444http://premed.uga.edu/Registrar 706-542-4040www.reg.uga.edu/Student Activities Office 706-542-7774http://www.uga.edu/campuslife/Student Financial Aid/HOPE 706-542-6147http://www.uga.edu/osfa/index.htmlStudent Support Services 706-542-8220 or 706-542-3564http://www.uga.edu/studentsupport/Testing Center 706-542-3183 http://testing.uga.edu/UGA Libraries 706-542-7501 http://www.libs.uga.edu/University Health Center 706-542-1162http://www.uhs.uga.edu/ADVISINGin theFRANKLIN COLLEGE OF ARTS & SCIENCESLower Division(0 — 59 semester hours earned)AB, BS, pre-ABJ, pre-BBA — advised in Memorial HallDeclare major by 30—60 semester hours earned2 nd Year AB/BFA Art & AB/BMUS Music —advised in departmentsUpper Division(60—121 semester hours earned)Advised in the departments(Some departments will take students earlier.)Graduation Certification(80 semester hours earned)Review of degree requirements & approved major coursesOFFICE OF ACADEMIC ADVISING114 MEMORIAL HALLATHENS, GA 30602706-542-1412FAX: 706-542-3426The University of Georgia is an Affirmative Action/EqualOpportunity institution. If you have a disability which requiresaccommodation, please inform the Office of Academic Advising.©Franklin College of Arts & SciencesUniversity of GeorgiaMay 2011/LLH
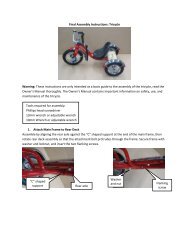
STEP 11Insert four 1 ¼” #8 screws in bottom of shelf and insertthem into predrilled holes in bottom of right and leftdividers. Tighten screws.STEP 12Align End Assembly (F) up to the cleats on the topand bottom shelf. Insert four 1 ¼” #8 screws andscrew them into predrilled holes in the cleats. Tapwood plugs into place to cover screws.Repeat with End Assembly to other side.STEP 13Turn unit right-side up and insert the four brass shelfpins into the predrilled holes inside the cabinet.Make sure the flat side of pin is facing up. Align thegrooves in the Cabinet Shelf (G) to lay flat on theshelf pins.0GBU1080530
CAREDust as needed with a soft cloth. Clean with dampcloth and mild solution of dish soap. Polish withsoft cloth and polish that contains no pigments orsilicone.www.llbean.comProduct Support 1 800 341 43410GBU1080530