
You also want an ePaper? Increase the reach of your titles
YUMPU automatically turns print PDFs into web optimized ePapers that Google loves.
2005 Commercial Driver’s License Manual<br />
<strong>Section</strong> 5<br />
<strong>AIR</strong> <strong>BRAKES</strong><br />
This <strong>Section</strong> Covers<br />
• Air Brake System Parts<br />
• Dual Air Brake Systems<br />
• Inspecting Air Brakes<br />
• Using Air Brakes<br />
This section tells you about air brakes. If you want<br />
to drive a truck or bus with air brakes, or pull a<br />
trailer with air brakes, you need to read this<br />
section. If you want to pull a trailer with air brakes,<br />
you also need to read <strong>Section</strong> 6, Combination<br />
Vehicles. An air brake endorsement is only<br />
required if your vehicle needs a CDL.<br />
Air brakes use compressed air to make the brakes<br />
work. Air brakes are a good and safe way of<br />
stopping large and heavy vehicles, but the brakes<br />
must be well maintained and used properly.<br />
Air brakes are really three different braking<br />
systems: service brake, parking brake, and<br />
emergency brake.<br />
• The service brake system applies and releases<br />
the brakes when you use the brake pedal<br />
during normal driving.<br />
• The parking brake system applies and<br />
releases the parking brakes when you use the<br />
parking brake control.<br />
• The emergency brake system uses parts of the<br />
service and parking brake systems to stop the<br />
vehicle in a brake system failure.<br />
The parts of these systems are discussed in<br />
greater detail below.<br />
5.1 – The Parts of an Air Brake System<br />
There are many parts to an air brake system. You<br />
should know about the parts discussed here.<br />
5.1.1 – Air Compressor<br />
The air compressor pumps air into the air storage<br />
tanks (reservoirs). The air compressor is<br />
connected to the engine through gears or a v-belt.<br />
The compressor may be air cooled or may be<br />
cooled by the engine cooling system. It may have<br />
its own oil supply or be lubricated by engine oil. If<br />
the compressor has its own oil supply, check the<br />
oil level before driving.<br />
5.1.2 – Air Compressor Governor<br />
The governor controls when the air compressor will<br />
pump air into the air storage tanks. When air tank<br />
pressure rises to the "cut-out" level (around 125<br />
pounds per-square-inch or "psi"), the governor<br />
stops the compressor from pumping air. When the<br />
tank pressure falls to the "cut-in" pressure (around<br />
100 psi), the governor allows the compressor to<br />
start pumping again.<br />
5.1.3 – Air Storage Tanks<br />
Air storage tanks are used to hold compressed air.<br />
The number and size of air tanks varies among<br />
vehicles. The tanks will hold enough air to allow<br />
the brakes to be used several times, even if the<br />
compressor stops working.<br />
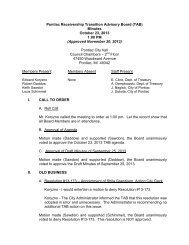
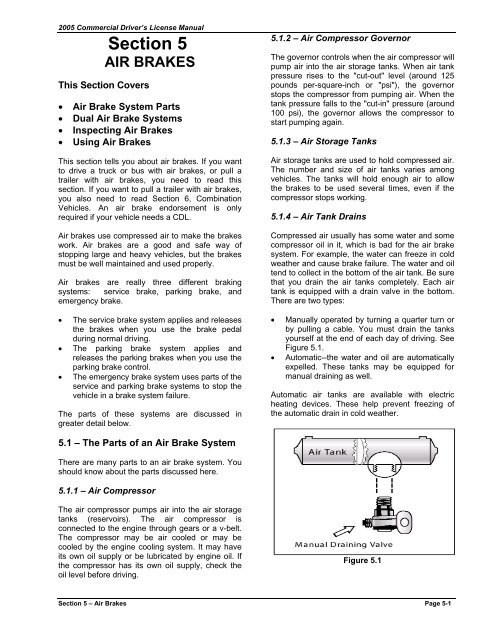
5.1.4 – Air Tank Drains<br />
Compressed air usually has some water and some<br />
compressor oil in it, which is bad for the air brake<br />
system. For example, the water can freeze in cold<br />
weather and cause brake failure. The water and oil<br />
tend to collect in the bottom of the air tank. Be sure<br />
that you drain the air tanks completely. Each air<br />
tank is equipped with a drain valve in the bottom.<br />
There are two types:<br />
• Manually operated by turning a quarter turn or<br />
by pulling a cable. You must drain the tanks<br />
yourself at the end of each day of driving. See<br />
Figure 5.1.<br />
• Automatic--the water and oil are automatically<br />
expelled. These tanks may be equipped for<br />
manual draining as well.<br />
Automatic air tanks are available with electric<br />
heating devices. These help prevent freezing of<br />
the automatic drain in cold weather.<br />
Figure 5.1<br />
<strong>Section</strong> 5 – Air Brakes Page 5-1
2005 Model Commercial Driver’s License Manual<br />
5.1.5 – Alcohol Evaporator<br />
Some air brake systems have an alcohol<br />
evaporator to put alcohol into the air system. This<br />
helps to reduce the risk of ice in air brake valves<br />
and other parts during cold weather. Ice inside the<br />
system can make the brakes stop working.<br />
Check the alcohol container and fill up as<br />
necessary, every day during cold weather. Daily air<br />
tank drainage is still needed to get rid of water and<br />
oil. (Unless the system has automatic drain<br />
valves.)<br />
5.1.6 – Safety Valve<br />
A safety relief valve is installed in the first tank the<br />
air compressor pumps air to. The safety valve<br />
protects the tank and the rest of the system from<br />
too much pressure. The valve is usually set to<br />
open at 150 psi. If the safety valve releases air,<br />
something is wrong. Have the fault fixed by a<br />
mechanic.<br />
5.1.7 – The Brake Pedal<br />
You put on the brakes by pushing down the brake<br />
pedal. (It is also called the foot valve or treadle<br />
valve.) Pushing the pedal down harder applies<br />
more air pressure. Letting up on the brake pedal<br />
reduces the air pressure and releases the brakes.<br />
Releasing the brakes lets some compressed air go<br />
out of the system, so the air pressure in the tanks<br />
is reduced. It must be made up by the air<br />
compressor. Pressing and releasing the pedal<br />
unnecessarily can let air out faster than the<br />
compressor can replace it. If the pressure gets too<br />
low, the brakes won't work.<br />
5.1.8 – Foundation Brakes<br />
Foundation brakes are used at each wheel. The<br />
most common type is the s-cam drum brake. The<br />
parts of the brake are discussed below.<br />
Brake Drums, Shoes, and Linings. Brake drums<br />
are located on each end of the vehicle's axles. The<br />
wheels are bolted to the drums. The braking<br />
mechanism is inside the drum. To stop, the brake<br />
shoes and linings are pushed against the inside of<br />
the drum. This causes friction, which slows the<br />
vehicle (and creates heat). The heat a drum can<br />
take without damage depends on how hard and<br />
how long the brakes are used. Too much heat can<br />
make the brakes stop working.<br />
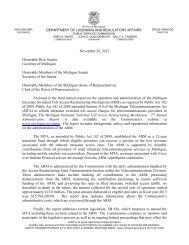
S-cam Brakes. When you push the brake pedal,<br />
air is let into each brake chamber. Air pressure<br />
pushes the rod out, moving the slack adjuster, thus<br />
twisting the brake camshaft. This turns the s-cam<br />
(so called because it is shaped like the letter "S").<br />
The s-cam forces the brake shoes away from one<br />
another and presses them against the inside of the<br />
brake drum. When you release the brake pedal,<br />
the s-cam rotates back and a spring pulls the brake<br />
shoes away from the drum, letting the wheels roll<br />
freely again. See Figure 5.2.<br />
Figure 5.2<br />
Wedge Brakes. In this type of brake, the brake<br />
chamber push rod pushes a wedge directly<br />
between the ends of two brake shoes. This shoves<br />
them apart and against the inside of the brake<br />
drum. Wedge brakes may have a single brake<br />
chamber, or two brake chambers, pushing wedges<br />
in at both ends of the brake shoes. Wedge type<br />
brakes may be self-adjusting or may require<br />
manual adjustment.<br />
Disc Brakes. In air-operated disc brakes, air<br />
pressure acts on a brake chamber and slack<br />
adjuster, like s-cam brakes. But instead of the scam,<br />
a "power screw" is used. The pressure of the<br />
brake chamber on the slack adjuster turns the<br />
power screw. The power screw clamps the disc or<br />
rotor between the brake lining pads of a caliper,<br />
similar to a large c-clamp.<br />
Wedge brakes and disc brakes are less common<br />
than s-cam brakes.<br />
5.1.9 – Supply Pressure Gauges<br />
Page 5-2 <strong>Section</strong> 5 – Air Brakes
2005 Commercial Driver’s License Manual<br />
All vehicles with air brakes have a pressure gauge<br />
connected to the air tank. If the vehicle has a dual<br />
air brake system, there will be a gauge for each<br />
half of the system. (Or a single gauge with two<br />
needles.) Dual systems will be discussed later.<br />
These gauges tell you how much pressure is in the<br />
air tanks.<br />
5.1.10 – Application Pressure Gauge<br />
This gauge shows how much air pressure you are<br />
applying to the brakes. (This gauge is not on all<br />
vehicles.) Increasing application pressure to hold<br />
the same speed means the brakes are fading. You<br />
should slow down and use a lower gear. The need<br />
for increased pressure can also be caused by<br />
brakes out of adjustment, air leaks, or mechanical<br />
problems.<br />
5.1.11 – Low Air Pressure Warning<br />
A low air pressure warning signal is required on<br />
vehicles with air brakes. A warning signal you can<br />
see must come on before the air pressure in the<br />
tanks falls below 60 psi. (Or one half the<br />
compressor governor cutout pressure on older<br />
vehicles.) The warning is usually a red light. A<br />
buzzer may also come on.<br />
Another type of warning is the "wig wag." This<br />
device drops a mechanical arm into your view<br />
when the pressure in the system drops below 60<br />
psi. An automatic wig wag will rise out of your view<br />
when the pressure in the system goes above 60<br />
psi. The manual reset type must be placed in the<br />
"out of view" position manually. It will not stay in<br />
place until the pressure in the system is above 60<br />
psi.<br />
On large buses it is common for the low pressure<br />
warning devices to signal at 80-85 psi.<br />
5.1.12 – Stop Light Switch<br />
Drivers behind you must be warned when you put<br />
your brakes on. The air brake system does this<br />
with an electric switch that works by air pressure.<br />
The switch turns on the brake lights when you put<br />
on the air brakes.<br />
5.1.13 – Front Brake Limiting Valve<br />
Some older vehicles (made before 1975) have a<br />
front brake limiting valve and a control in the cab.<br />
The control is usually marked "normal" and<br />
"slippery." When you put the control in the<br />
"slippery" position, the limiting valve cuts the<br />
"normal" air pressure to the front brakes by half.<br />
Limiting valves were used to reduce the chance of<br />
the front wheels skidding on slippery surfaces.<br />
However, they actually reduce the stopping power<br />
of the vehicle. Front wheel braking is good under<br />
all conditions. Tests have shown front wheel skids<br />
from braking are not likely even on ice. Make sure<br />
the control is in the "normal" position to have<br />
normal stopping power.<br />
Many vehicles have automatic front wheel limiting<br />
valves. They reduce the air to the front brakes<br />
except when the brakes are put on very hard (60<br />
psi or more application pressure). These valves<br />
cannot be controlled by the driver.<br />
5.1.14 – Spring Brakes<br />
All trucks, truck tractors, and buses must be<br />
equipped with emergency brakes and parking<br />
brakes. They must be held on by mechanical force<br />
(because air pressure can eventually leak away).<br />
Spring brakes are usually used to meet these<br />
needs. When driving, powerful springs are held<br />
back by air pressure. If the air pressure is<br />
removed, the springs put on the brakes. A parking<br />
brake control in the cab allows the driver to let the<br />
air out of the spring brakes. This lets the springs<br />
put the brakes on. A leak in the air brake system,<br />
which causes all the air to be lost, will also cause<br />
the springs to put on the brakes.<br />
Tractor and straight truck spring brakes will come<br />
fully on when air pressure drops to a range of 20 to<br />
45 psi (typically 20 to 30 psi). Do not wait for the<br />
brakes to come on automatically. When the low air<br />
pressure warning light and buzzer first come on,<br />
bring the vehicle to a safe stop right away, while<br />
you can still control the brakes.<br />
The braking power of spring brakes depends on<br />
the brakes being in adjustment. If the brakes are<br />
not adjusted properly, neither the regular brakes<br />
nor the emergency/parking brakes will work right.<br />
5.1.15 – Parking Brake Controls<br />
In newer vehicles with air brakes, you put on the<br />
parking brakes using a diamond-shaped, yellow,<br />
push-pull control knob. You pull the knob out to put<br />
the parking brakes (spring brakes) on, and push it<br />
in to release them. On older vehicles, the parking<br />
brakes may be controlled by a lever. Use the<br />
parking brakes whenever you park.<br />
Caution. Never push the brake pedal down when<br />
the spring brakes are on. If you do, the brakes<br />
could be damaged by the combined forces of the<br />
springs and the air pressure. Many brake systems<br />
<strong>Section</strong> 5 – Air Brakes Page 5-3
2005 Model Commercial Driver’s License Manual<br />
are designed so this will not happen. But not all<br />
systems are set up that way, and those that are<br />
may not always work. It is much better to develop<br />
the habit of not pushing the brake pedal down<br />
when the spring brakes are on.<br />
Modulating Control Valves. In some vehicles a<br />
control handle on the dash board may be used to<br />
apply the spring brakes gradually. This is called a<br />
modulating valve. It is spring-loaded so you have a<br />
feel for the braking action. The more you move the<br />
control lever, the harder the spring brakes come<br />
on. They work this way so you can control the<br />
spring brakes if the service brakes fail. When<br />
parking a vehicle with a modulating control valve,<br />
move the lever as far as it will go and hold it in<br />
place with the locking device.<br />
Dual Parking Control Valves. When main air<br />
pressure is lost, the spring brakes come on. Some<br />
vehicles, such as buses, have a separate air tank<br />
which can be used to release the spring brakes.<br />
This is so you can move the vehicle in an<br />
emergency. One of the valves is a push-pull type<br />
and is used to put on the spring brakes for parking.<br />
The other valve is spring loaded in the "out"<br />
position. When you push the control in, air from the<br />
separate air tank releases the spring brakes so you<br />
can move. When you release the button, the spring<br />
brakes come on again. There is only enough air in<br />
the separate tank to do this a few times. Therefore,<br />
plan carefully when moving. Otherwise, you may<br />
be stopped in a dangerous location when the<br />
separate air supply runs out. See Figure 5.3.<br />
5.1.16 – Antilock Braking Systems (ABS)<br />
Truck tractors with air brakes built on or after<br />
March 1, 1997, and other air brakes vehicles,<br />
(trucks, buses, trailers, and converter dollies) built<br />
on or after March 1, 1998, are required to be<br />
equipped with antilock brakes. Many commercial<br />
vehicles built before these dates have been<br />
voluntarily equipped with ABS. Check the<br />
certification label for the date of manufacture to<br />
determine if your vehicle is equipped with ABS.<br />
ABS is a computerized system that keeps your<br />
wheels from locking up during hard brake<br />
applications.<br />
Vehicles with ABS have yellow malfunction lamps<br />
to tell you if something isn’t working.<br />
Tractors, trucks, and buses will have yellow ABS<br />
malfunction lamps on the instrument panel.<br />
Trailers will have yellow ABS malfunction lamps on<br />
the left side, either on the front or rear corner.<br />
Dollies manufactured on or after March 1, 1998 are<br />
required to have a lamp on the left side.<br />
Figure 5.3<br />
On newer vehicles, the malfunction lamp comes on<br />
at start-up for a bulb check, and then goes out<br />
quickly. On older systems, the lamp could stay on<br />
until you are driving over five mph.<br />
If the lamp stays on after the bulb check, or goes<br />
on once you are under way, you may have lost<br />
ABS control at one or more wheels.<br />
In the case of towed units manufactured before it<br />
was required by the Department of Transportation,<br />
it may be difficult to tell if the unit is equipped with<br />
ABS. Look under the vehicle for the electronic<br />
control unit (ECU) and wheel speed sensor wires<br />
coming from the back of the brakes.<br />
Page 5-4 <strong>Section</strong> 5 – Air Brakes
2005 Commercial Driver’s License Manual<br />
ABS is an addition to your normal brakes. It does<br />
not decrease or increase your normal braking<br />
capability. ABS only activates when wheels are<br />
about to lock up.<br />
Subsection 5.1<br />
Test Your Knowledge<br />
1. Why must air tanks be drained?<br />
2. What is a supply pressure gauge used for?<br />
3. All vehicles with air brakes must have a<br />
low air pressure warning signal. True or<br />
False?<br />
4. What are spring brakes?<br />
5. Front wheel brakes are good under all<br />
conditions. True or False?<br />
6. How do you know if your vehicle is<br />
equipped with antilock brakes?<br />
These questions may be on your test. If you can’t<br />
answer them all, re-read subsection 5.1.<br />
ABS does not necessarily shorten your stopping<br />
distance, but it does help you keep the vehicle<br />
under control during hard braking.<br />
Figure 5.4<br />
5.2 – Dual Air Brake<br />
Most heavy-duty vehicles use dual air brake<br />
systems for safety. A dual air brake system has<br />
two separate air brake systems, which use a single<br />
set of brake controls. Each system has its own air<br />
tanks, hoses, lines, etc. One system typically<br />
operates the regular brakes on the rear axle or<br />
axles. The other system operates the regular<br />
brakes on the front axle (and possibly one rear<br />
axle). Both systems supply air to the trailer (if there<br />
is one). The first system is called the "primary"<br />
system. The other is called the "secondary"<br />
system. See Figure 5.4.<br />
Before driving a vehicle with a dual air system,<br />
allow time for the air compressor to build up a<br />
minimum of 100 psi pressure in both the primary<br />
and secondary systems. Watch the primary and<br />
secondary air pressure gauges (or needles, if the<br />
system has two needles in one gauge). Pay<br />
attention to the low air pressure warning light and<br />
buzzer. The warning light and buzzer should shut<br />
off when air pressure in both systems rises to a<br />
<strong>Section</strong> 5 – Air Brakes Page 5-5
2005 Model Commercial Driver’s License Manual<br />
value set by the manufacturer. This value must be<br />
greater than 60 psi.<br />
The warning light and buzzer should come on<br />
before the air pressure drops below 60 psi in either<br />
system. If this happens while driving, you should<br />
stop right away and safely park the vehicle. If one<br />
air system is very low on pressure, either the front<br />
or the rear brakes will not be operating fully. This<br />
means it will take you longer to stop. Bring the<br />
vehicle to a safe stop, and have the air brakes<br />
system fixed.<br />
5.3 – Inspecting Air Brake Systems<br />
You should use the basic seven-step inspection<br />
procedure described in <strong>Section</strong> 2 to inspect your<br />
vehicle. There are more things to inspect on a<br />
vehicle with air brakes than one without them.<br />
These things are discussed below, in the order<br />
they fit into the seven-step method.<br />
5.3.1 – During Step 2 Engine Compartment<br />
Checks<br />
Check Air Compressor Drive Belt (if compressor is<br />
belt-driven). If the air compressor is belt-driven,<br />
check the condition and tightness of the belt. It<br />
should be in good condition.<br />
5.3.2 – During Step 5 Walkaround<br />
Inspection<br />
Check Slack Adjusters on S-cam Brakes. Park on<br />
level ground and chock the wheels to prevent the<br />
vehicle from moving. Turn off the parking brakes<br />
so you can move the slack adjusters. Use gloves<br />
and pull hard on each slack adjuster that you can<br />
reach. If a slack adjuster moves more than about<br />
one inch where the push rod attaches to it, it<br />
probably needs adjustment. Adjust it or have it<br />
adjusted. Vehicles with too much brake slack can<br />
be very hard to stop. Out-of-adjustment brakes are<br />
the most common problem found in roadside<br />
inspections. Be safe. Check the slack adjusters.<br />
All vehicles built since 1991 have automatic slack<br />
adjustors. Even though automatic slack adjustors<br />
adjust themselves during full brake applications,<br />
they must be checked.<br />
Automatic adjusters should not have to be<br />
manually adjusted except when performing<br />
maintenance on the brakes and during installation<br />
of the slack adjusters. In a vehicle equipped with<br />
automatic adjusters, when the pushrod stroke<br />
exceeds the legal brake adjustment limit, it is an<br />
indication that a mechanical problem exists in the<br />
adjuster itself, a problem with the related<br />
foundation brake components, or that the adjuster<br />
was improperly installed.<br />
The manual adjustment of an automatic adjuster to<br />
bring a brake pushrod stroke within legal limits is<br />
generally masking a mechanical problem and is<br />
not fixing it. Further, routine adjustment of most<br />
automatic adjusters will likely result in premature<br />
wear of the adjuster itself. It is recommended that<br />
when brakes equipped with automatic adjusters<br />
are found to be out of adjustment, the driver take<br />
the vehicle to a repair facility as soon as possible<br />
to have the problem corrected.<br />
The manual adjustment of an automatic adjuster<br />
should only be used as a temporary measure to<br />
correct the adjustment in an emergency situation<br />
as it is likely the brake will soon be back out of<br />
adjustment since this procedure usually does not<br />
fix the underlying adjustment problem. The<br />
manual adjustment of automatic slack adjusters is<br />
dangerous because it may give the driver a false<br />
sense of security regarding the effectiveness of the<br />
braking system.<br />
(Note: Automatic slack adjusters are made by<br />
different manufacturers and do not all operate the<br />
same. Therefore, the specific manufacturer’s<br />
Service Manual should be consulted prior to<br />
troubleshooting a brake adjustment problem.)<br />
Check Brake Drums (or Discs), Linings, and<br />
Hoses. Brake drums (or discs) must not have<br />
cracks longer than one half the width of the friction<br />
area. Linings (friction material) must not be loose<br />
or soaked with oil or grease. They must not be<br />
dangerously thin. Mechanical parts must be in<br />
place, not broken or missing. Check the air hoses<br />
connected to the brake chambers to make sure<br />
they aren't cut or worn due to rubbing.<br />
5.3.3 – Step 7 Final Air Brake Check<br />
Do the following checks instead of the hydraulic<br />
brake check shown in <strong>Section</strong> 2, Step 7: Check<br />
Brake System.<br />
Test Low Pressure Warning Signal. Shut the<br />
engine off when you have enough air pressure so<br />
Page 5-6 <strong>Section</strong> 5 – Air Brakes
2005 Commercial Driver’s License Manual<br />
that the low pressure warning signal is not on. Turn<br />
the electrical power on and step on and off the<br />
brake pedal to reduce air tank pressure. The low<br />
air pressure warning signal must come on before<br />
the pressure drops to less than 60 psi in the air<br />
tank (or tank with the lowest air pressure, in dual<br />
air systems). See Figure 5.5.<br />
If the warning signal doesn't work, you could lose<br />
air pressure and you would not know it. This could<br />
cause sudden emergency braking in a singlecircuit<br />
air system. In dual systems the stopping<br />
distance will be increased. Only limited braking can<br />
be done before the spring brakes come on.<br />
Figure 5.5<br />
Check Spring Brakes Come On Automatically.<br />
Continue to fan off the air pressure by stepping on<br />
and off the brake pedal to reduce tank pressure.<br />
The tractor protection valve and parking brake<br />
valve should close (pop out) on a tractor-trailer<br />
combination vehicle and the parking brake valve<br />
should close (pop out) on other combination and<br />
single vehicle types when the air pressure falls to<br />
the manufacturer’s specification (20 – 40 psi). This<br />
will cause the spring brakes to come on.<br />
Check Rate of Air Pressure Buildup. When the<br />
engine is at operating rpms, the pressure should<br />
build from 85 to 100 psi within 45 seconds in dual<br />
air systems. (If the vehicle has larger than<br />
minimum air tanks, the buildup time can be longer<br />
and still be safe. Check the manufacturer's<br />
specifications.) In single air systems (pre-1975),<br />
typical requirements are pressure buildup from 50<br />
to 90 psi within 3 minutes with the engine at an idle<br />
speed of 600-900 rpms.<br />
If air pressure does not build up fast enough, your<br />
pressure may drop too low during driving, requiring<br />
an emergency stop. Don't drive until you get the<br />
problem fixed.<br />
Test Air Leakage Rate. With a fully-charged air<br />
system (typically 125 psi), turn off the engine,<br />
release the parking brake, and time the air<br />
pressure drop. The loss rate should be less than<br />
two psi in one minute for single vehicles and less<br />
than three psi in one minute for combination<br />
vehicles. Then apply 90 psi or more with the brake<br />
pedal. After the initial pressure drop, if the air<br />
pressure falls more than three psi in one minute for<br />
single vehicles (more than four psi for combination<br />
vehicles), the air loss rate is too much. Check for<br />
air leaks and fix before driving the vehicle.<br />
Otherwise, you could lose your brakes while<br />
driving.<br />
Check Air Compressor Governor Cut-in and<br />
Cut-out Pressures. Pumping by the air<br />
compressor should start at about 100 psi and stop<br />
at about 125 psi. (Check manufacturer's<br />
specifications.) Run the engine at a fast idle. The<br />
air governor should cut-out the air compressor at<br />
about the manufacturer's specified pressure. The<br />
air pressure shown by your gauge(s) will stop<br />
rising. With the engine idling, step on and off the<br />
brake to reduce the air tank pressure. The<br />
compressor should cut-in at about the<br />
manufacturer's specified cut-in pressure. The<br />
pressure should begin to rise.<br />
If the air governor does not work as described<br />
above, it may need to be fixed. A governor that<br />
does not work properly may not keep enough air<br />
pressure for safe driving.<br />
Test Parking Brake. Stop the vehicle, put the<br />
parking brake on, and gently pull against it in a low<br />
gear to test that the parking brake will hold.<br />
Test Service Brakes. Wait for normal air<br />
pressure, release the parking brake, move the<br />
vehicle forward slowly (about five mph), and apply<br />
<strong>Section</strong> 5 – Air Brakes Page 5-7
2005 Model Commercial Driver’s License Manual<br />
the brakes firmly using the brake pedal. Note any<br />
vehicle "pulling" to one side, unusual feel, or<br />
delayed stopping action.<br />
This test may show you problems, which you<br />
otherwise wouldn't know about until you needed<br />
the brakes on the road.<br />
Subsections 5.2 and 5.3<br />
Test Your Knowledge<br />
1. What is a dual air brake system?<br />
2. What are the slack adjusters?<br />
3. How can you check slack adjusters?<br />
4. How can you test the low pressure warning<br />
signal?<br />
5. How can you check that the spring brakes<br />
come on automatically?<br />
6. What are the maximum leakage rates?<br />
These questions may be on your test. If you can’t<br />
answer them all, re-read subsections 5.2 and 5.3.<br />
5.4 – Using Air Brakes<br />
5.4.1 – Normal Stops<br />
Push the brake pedal down. Control the pressure<br />
so the vehicle comes to a smooth, safe stop. If you<br />
have a manual transmission, don't push the clutch<br />
in until the engine rpm is down close to idle. When<br />
stopped, select a starting gear.<br />
5.4.2 – Braking with Antilock Brakes<br />
When you brake hard on slippery surfaces in a<br />
vehicle without ABS, your wheels may lock up.<br />
When your steering wheels lock up, you lose<br />
steering control. When your other wheels lock up,<br />
you may skid, jackknife, or even spin the vehicle.<br />
ABS helps you avoid wheel lock up. The computer<br />
senses impending lockup, reduces the braking<br />
pressure to a safe level, and you maintain control.<br />
You may or may not be able to stop faster with<br />
ABS, but you should be able to steer around an<br />
obstacle while braking, and avoid skids caused by<br />
over braking.<br />
Having ABS on only the tractor, only the trailer, or<br />
even on only one axle, still gives you more control<br />
over the vehicle during braking. Brake normally.<br />
When only the tractor has ABS, you should be able<br />
to maintain steering control, and there is less<br />
chance of jackknifing. But, keep your eye on the<br />
trailer and let up on the brakes (if you can safely do<br />
so) if it begins to swing out.<br />
When only the trailer has ABS, the trailer is less<br />
likely to swing out, but if you lose steering control<br />
or start a tractor jackknife, let up on the brakes (if<br />
you can safely do so) until you gain control.<br />
When you drive a tractor-trailer combination with<br />
ABS, you should brake as you always have. In<br />
other words:<br />
• Use only the braking force necessary to stop<br />
safely and stay in control.<br />
• Brake the same way, regardless of whether<br />
you have ABS on the tractor, the trailer, or<br />
both.<br />
• As you slow down, monitor your tractor and<br />
trailer and back off the brakes (if it is safe to do<br />
so) to stay in control.<br />
There is only one exception to this procedure, if<br />
you always drive a straight truck or combination<br />
with working ABS on all axles, in an emergency<br />
stop, you can fully apply the brakes.<br />
Without ABS, you still have normal brake functions.<br />
Drive and brake as you always have.<br />
Remember, if your ABS malfunctions, you still<br />
have regular brakes. Drive normally, but get the<br />
system serviced soon.<br />
5.4.3 – Emergency Stops<br />
If somebody suddenly pulls out in front of you, your<br />
natural response is to hit the brakes. This is a good<br />
response if there's enough distance to stop, and<br />
you use the brakes correctly.<br />
You should brake in a way that will keep your<br />
vehicle in a straight line and allow you to turn if it<br />
becomes necessary. You can use the "controlled<br />
braking" method or the "stab braking" method.<br />
Controlled Braking. With this method, you apply<br />
the brakes as hard as you can without locking the<br />
wheels. Keep steering wheel movements very<br />
Page 5-8 <strong>Section</strong> 5 – Air Brakes
2005 Commercial Driver’s License Manual<br />
small while doing this. If you need to make a larger<br />
steering adjustment or if the wheels lock, release<br />
the brakes. Re-apply the brakes as soon as you<br />
can.<br />
Stab Braking<br />
• Apply your brakes all the way.<br />
• Release brakes when wheels lock up.<br />
• As soon as the wheels start rolling, apply the<br />
brakes fully again. (It can take up to one<br />
second for the wheels to start rolling after you<br />
release the brakes. If you re-apply the brakes<br />
before the wheels start rolling, the vehicle won't<br />
straighten out.)<br />
5.4.4 – Stopping Distance<br />
Stopping distance was described in <strong>Section</strong> 2<br />
under "Speed and Stopping Distance." With air<br />
brakes there is an added delay--the time required<br />
for the brakes to work after the brake pedal is<br />
pushed. With hydraulic brakes (used on cars and<br />
light/medium trucks), the brakes work instantly.<br />
However, with air brakes, it takes a little time (one<br />
half second or more) for the air to flow through the<br />
lines to the brakes. Thus, the total stopping<br />
distance for vehicles with air brake systems is<br />
made up of four different factors.<br />
Perception Distance + Reaction Distance + Brake<br />
Lag Distance + Effective Braking Distance = Total<br />
Stopping Distance<br />
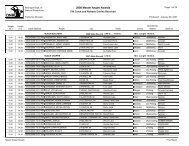
The air brake lag distance at 55 mph on dry<br />
pavement adds about 32 feet. So at 55 mph for an<br />
average driver under good traction and brake<br />
conditions, the total stopping distance is over 450<br />
feet. See Figure 5.6.<br />
Miles Per<br />
Hour<br />
Stopping Distance Chart<br />
How Far<br />
The Rig<br />
Will<br />
Travel in<br />
One<br />
Second<br />
Driver<br />
Reaction<br />
Distance<br />
Vehicle<br />
Braking<br />
Distance<br />
Total<br />
Stopping<br />
Distance<br />
15 mph 22 ft. 17 ft. 29 ft. 46 ft.<br />
30 mph 44 ft. 33 ft. 115 ft. 148 ft.<br />
45 mph 66 ft. 50 ft. 260 ft. 310 ft.<br />
50 mph 73 ft. 55 ft. 320 ft. 375 ft.<br />
55 mph 81 ft. 61 ft. 390 ft. 451 ft.<br />
Figure 5.6<br />
5.4.5 – Brake Fading or Failure<br />
Brakes are designed so brake shoes or pads rub<br />
against the brake drum or disks to slow the vehicle.<br />
Braking creates heat, but brakes are designed to<br />
take a lot of heat. However, brakes can fade or fail<br />
from excessive heat caused by using them too<br />
much and not relying on the engine braking effect.<br />
Excessive use of the service brakes results in<br />
overheating and leads to brake fade. Brake fade<br />
results from excessive heat causing chemical<br />
changes in the brake lining, which reduce friction,<br />
and also causing expansion of the brake drums.<br />
As the overheated drums expand, the brake shoes<br />
and linings have to move farther to contact the<br />
drums, and the force of this contact is reduced.<br />
Continued overuse may increase brake fade until<br />
the vehicle cannot be slowed down or stopped.<br />
Brake fade is also affected by adjustment. To<br />
safely control a vehicle, every brake must do its<br />
share of the work. Brakes out of adjustment will<br />
stop doing their share before those that are in<br />
adjustment. The other brakes can then overheat<br />
and fade, and there will not be enough braking<br />
available to control the vehicle(s). Brakes can get<br />
out of adjustment quickly, especially when they are<br />
hot. Therefore, check brake adjustment often.<br />
5.4.6 – Proper Braking Technique<br />
Remember. The use of brakes on a long and/or<br />
steep downgrade is only a supplement to the<br />
braking effect of the engine. Once the vehicle is in<br />
the proper low gear, the following is the proper<br />
braking technique:<br />
• Apply the brakes just hard enough to feel a<br />
definite slowdown.<br />
• When your speed has been reduced to<br />
approximately five mph below your "safe"<br />
speed, release the brakes. (This application<br />
should last for about three seconds.)<br />
• When your speed has increased to your "safe"<br />
speed, repeat steps 1 and 2.<br />
For example, if your "safe" speed is 40 mph, you<br />
would not apply the brakes until your speed<br />
reaches 40 mph. You now apply the brakes hard<br />
enough to gradually reduce your speed to 35 mph<br />
and then release the brakes. Repeat this as often<br />
as necessary until you have reached the end of the<br />
downgrade.<br />
5.4.7 – Low Air Pressure<br />
If the low air pressure warning comes on, stop and<br />
safely park your vehicle as soon as possible. There<br />
<strong>Section</strong> 5 – Air Brakes Page 5-9
2005 Model Commercial Driver’s License Manual<br />
might be an air leak in the system. Controlled<br />
braking is possible only while enough air remains<br />
in the air tanks. The spring brakes will come on<br />
when the air pressure drops into the range of 20 to<br />
45 psi. A heavily loaded vehicle will take a long<br />
distance to stop because the spring brakes do not<br />
work on all axles. Lightly loaded vehicles or<br />
vehicles on slippery roads may skid out of control<br />
when the spring brakes come on. It is much safer<br />
to stop while there is enough air in the tanks to use<br />
the foot brakes.<br />
5.4.8 – Parking Brakes<br />
Any time you park, use the parking brakes, except<br />
as noted below. Pull the parking brake control<br />
knob out to apply the parking brakes, push it in to<br />
release. The control will be a yellow, diamondshaped<br />
knob labeled "parking brakes" on newer<br />
vehicles. On older vehicles, it may be a round blue<br />
knob or some other shape (including a lever that<br />
swings from side to side or up and down).<br />
Don't use the parking brakes if the brakes are very<br />
hot (from just having come down a steep grade), or<br />
if the brakes are very wet in freezing temperatures.<br />
If they are used while they are very hot, they can<br />
be damaged by the heat. If they are used in<br />
freezing temperatures when the brakes are very<br />
wet, they can freeze so the vehicle cannot move.<br />
Use wheel chocks to hold the vehicle. Let hot<br />
brakes cool before using the parking brakes. If the<br />
brakes are wet, use the brakes lightly while driving<br />
in a low gear to heat and dry them.<br />
If your vehicle does not have automatic air tank<br />
drains, drain your air tanks at the end of each<br />
working day to remove moisture and oil.<br />
Otherwise, the brakes could fail.<br />
Never leave your vehicle unattended<br />
without applying the parking brakes or<br />
chocking the wheels. Your vehicle might<br />
roll away and cause injury and damage.<br />
Subsection 5.4<br />
Test Your Knowledge<br />
1. Why should you be in the proper gear before<br />
starting down a hill?<br />
2. What factors can cause brakes to fade or<br />
fail?<br />
3. The use of brakes on a long, steep<br />
downgrade is only a supplement to the<br />
braking effect of the engine. True or False?<br />
4. If you are away from your vehicle only a short<br />
time, you do not need to use the parking<br />
brake. True or False?<br />
5. How often should you drain air tanks?<br />
6. How do you brake when you drive a tractortrailer<br />
combination with ABS?<br />
7. You still have normal brake functions if your<br />
ABS is not working. True or False?<br />
These questions may be on your test. If you can’t<br />
answer them all, re-read subsection 5.4.<br />
Page 5-10 <strong>Section</strong> 5 – Air Brakes