VTP-100 OPERATING MANUAL.cdr - Mastering Mansion
VTP-100 OPERATING MANUAL.cdr - Mastering Mansion
VTP-100 OPERATING MANUAL.cdr - Mastering Mansion

Create successful ePaper yourself
Turn your PDF publications into a flip-book with our unique Google optimized e-Paper software.
EDAXAudio labs<strong>OPERATING</strong> <strong>MANUAL</strong>Vacuum Tube MicrophonePreamplifierPEAKHOLD(Re-AmpTube)EDAXAudio labsMin Max LINEVacuum Tube MicrophonePreamplifierWWW.EDAXAUDIO.COM
SAFETY AND <strong>OPERATING</strong> PRECAUTIONImportant Information:This symbol indicates the presence of dangerous voltage within the productenclosure that presents the risk of electric shock injury. When this symbolappears next to an operation discussed in this manual, only qualifiedtechnical personnel should perform that operation.This symbol indicates important operating or maintenance instructions thatshould be read carefully. Failure to observe these instructions could result indamage to the product or other property.WARNINGS:To reduce the risk of electric shock injury, do not remove the top cover or rearpanel. Uninsulated dangerous voltage exists within the product’s enclosure.Refer servicing to qualified personnelDo not defeat the earth ground connection in the AC power cable.Do not operate this unit in the presence of rain, liquids or condensing moisture. Liquidentering the product enclosure presents the risk of electric shock injury. Do not touchthe AC plug or enclosure with wet hands.Do not defeat intended AC power connection polarization.Do not use a damaged or excessively worn cord to connect this unit to AC power.CHECK LINE VOLTAGE SETTINGThe <strong>VTP</strong>-<strong>100</strong> has been set from the factory to operate at the voltage required foryour part of the world. However, it's important to double-check this in order to ensure nodamage will come to the unit if power is applied while the setting is incorrect.CAUTIONS:Severe damage may be caused to your unit if it is connected to an 230VAC/50HzAC power if the voltage switch is setting in 115VAC position.Important: Failure caused by improper voltage application will not be covered underwarranty.This product is designed to operate in an ambient temperature environment not toexceed 50°C (122°F). Please ensure that this unit is mounted in such a way that ventsare not blocked and ambient temperature does not exceed 50°C.1
CONTENTSSAFETY and <strong>OPERATING</strong> PRECAUTIONS...........................................................................1INTRODUCTION......................................................................................................................2TABLE OF CONTENTS...........................................................................................................3FEATURES..............................................................................................................................4INSTALLATION........................................................................................................................55.1 Unpacking and Inspection.................................................................................................. 55.2 Rack mounting................................................................................................................... 55.3 Ventilation........................................................................................................................... 55.4 Power Requirements.......................................................................................................... 55.5 Servicing............................................................................................................................. 5FRONT PANEL........................................................................................................................6REAR PANEL ......................................................................................................................... 7PREAMPLIFIER OPERATION................................................................................................88.1 Turning the power ON........................................................................................................ 88.2 Setting the gain.................................................................................................................. 88.3 Using the <strong>VTP</strong>-<strong>100</strong> as a DI-BOX........................................................................................ 88.4 Using the <strong>VTP</strong>-<strong>100</strong> as a Re-Amp-Tube.............................................................................. 8REPLACING THE TUBES.......................................................................................................9SPECIFICATIONS...................................................................................................................10REGISTRATION and WARRANTY ........................................................................................ 11FREQUENCY RANGE CHART...............................................................................................123
FEATURES* Pure class A Tube design with 4 cell parallel triodes.* Fully balanced transformerless mic input and outputs.* High headroom +32dB.* Discrete output stage headphone amplifier.* Hi-Z Reamp-Tube output with variable trim.* High precision active balanced output circuit.* High impedance instrument input Vacuum Tube Direct-Box* 11 position sealed rotary gain switch 4dB steps* 11 position sealed rotary passive 12dB/Oct HP Filter (20-250Hz).* High quality conductive plastic output attenuator.* Aluminium knobs.* Ultra clean 48 Volt phantom power.* LED peak meter show peak conditions.* All signal routing with sealed relays.* Soft-start warm-up with relay output muting.* Large illuminated VU meter.* Line and output VU/PPM read meter with PPM HOLD.* Minimal internal signal wiring.* Fully regulated high voltage,phantom,filament and dc power supplies.* Gold plated Neutrik XLR input and output and jack connectors.* Custom toroidal power transformer with shield for minimum hum.* Dual voltage AC selector.* Single-sided pc boards to minimize capacitive interaction.* Sturdy construction and housing makes it ideal for use in live applications.4
INSTALLATION5.1 Unpacking and InspectionWe recommend that you inspect your <strong>VTP</strong>-<strong>100</strong> upon unpacking it from the factoryshipping carton. In the unlikely event that the unit exhibits any physical damage, DONOT connect it to the AC mains power, but contact your dealer immediately.The shipping carton should contain the following items: the <strong>VTP</strong>-<strong>100</strong> Preamp,an IEC 3Prong power cord, and this operating manual.We recommend that you keep the shipping carton and supports in the event thatthe unit must be shipped at some time in the future.DO NOT package the unit inpacking peanuts” or similar material as it will settle duringShipping and damage will likely occur.If original packing materials cannot be located, wrap the unit with a liberal amount ofPlastic “bubble wrap” material extending at least 2” beyond the extremities of the <strong>VTP</strong>-<strong>100</strong>enclosure.5.2 MountingThe <strong>VTP</strong>-<strong>100</strong> can be mounted in any standard 19 inch (483mm) equipment rack usingMR-1Mono (single channel) 19 inch rack mount kit or the SR-2 Stereo (two channel) 19 inchrack mount kitIf the <strong>VTP</strong>-<strong>100</strong> is mounted in a mobile rack or road case, it is important that the rear of thechassis is supported to prevent possible damage from mechanical shock and vibration.Excessive shock and vibration can cause damage or premature failure of the vacuum tubes,or cause them to shaken loose from their sockets.Please avoid rough handling.5.3 VentilationFor proper operation, it is very important that adequate ventilation is provided.Vacuum tubes produce a significant amount of heat that must be removed frominside the chassis. The top panel vents should never be blocked in any wayWe recommend that you provide adequate ventilation so that the air temperaturesurrounding the unit does not exceed 55°C (122°F). If multiple units are to be mountedin a poorly ventilated rack or travel case, a 1 3/4” blank space should be located afterevery two units (two units mounted together, blank space, two more units, etc.).5.4 Power RequirementsThe <strong>VTP</strong>-<strong>100</strong> is equipped with a 3-prong IEC power connector and detachable cord.Never operate the <strong>VTP</strong>-<strong>100</strong> with the ground on the power cord defeated.This unit operates from 115V/60 Hz and 230V/50Hz.The ac fuse and the voltage switch are accessibles from the rear panel.To check or replace the fuse, make sure the unit is unplugged.5.5 ServicingOther than changing the tubes, the user should not attempt to service the <strong>VTP</strong>-<strong>100</strong> beyondthat described in this manual. Never remove the covers or attempt to replace the tubesuntil the unit has been disconnected from the ac power source, and all circuits inside havebeen allowed to discharge for a period of at least 30 minutes.Since potentially lethal voltages are present inside the unit, it should only be opened byQualified service personnel. Refer all servicing, or any questions about servicing, to EdaxAudio Labs.5
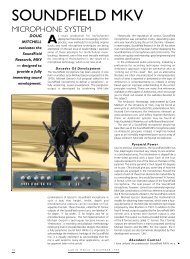
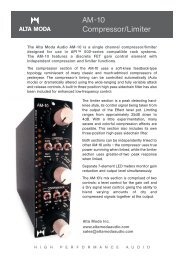
FRONT PANEL1 2 3 4 5 6 7 8PEAKHOLD(Re-AmpTube)EDAXAudio labsMin Max LINEVacuum Tube MicrophonePreamplifier9 10 11 12 131) GAIN Mic/Line: An 11 position rotary switch that controls the gain of the discrete input stage.2) Ovl led: The Red Led iluminate when the input level exceeds the maximum XLR input levelwhich is 3 dB below the overload point.3) Phantom led: The Yellow Led iluminate when the phantom power is on.4) PAD: Selects between the MIC input (via the XLR input connectors on the rear panel) and Lineor DI input signals (via the rear Combo Neutrik 1/4" input jacks).5) +48V: Supplies 48 volts to the XLR inputs for condenser microphones requiring phantompower. Avoid selecting phantom power if you are using a dynamic, ribbon or tube mics.6) POWER: The meter light indicates that the unit is on.7) PPM HOLD: When the switch meter are in PPM mode allowsto freeze the meter needle at maximum peaks.8) METER: Allows select VU/PPM input and VU/PPM output modes.Important:The meter is balanced connected direct to XLR IN/OUT connectorsand the measurement is in line levels Factory Cal:0dB Ref:+4dBu9) HPF: An 11 position rotary switch that provides 12dB/octave low frequency rolloff with 11 userselectableturnover frequencies 20 to 250Hz.10) HPH: Filter Switch11) METER INSTRUMENT12) PHASE: Phase reverse switch,where '+' is normal phase (input pin 2 hot), and '-' is invertedphase (input pin 3 hot).13) Output level control.6
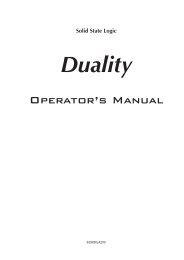
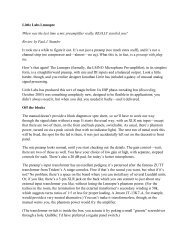
REAR PANEL CONTROL2 3 4 7email:contact@edaxaudio.comhttp://www.edaxaudio.comVOLTAGE SELECTOR115V 230V+/-20% VAC, 50/60HzLINE VOLTAGEAC POWER ONLYTO REDUCE RISK OFFIRE, REPLACE FUSES ONLYWITH SAME TYPE AS SHOW.500mA115VAC- SLOW BLOW250mA230VAC- SLOW BLOW<strong>VTP</strong>-<strong>100</strong>VACUUM TUBE MICROPHONEPREAMPLIFIERTO REDUCE RISK OF FIREOR ELECTRIC SHOCK DO NOTEXPOSE THIS UNIT TORAIN OR MOISTUREDATE:SERIAL:LEAD FREESOLDERPbRoHsCOMPLIMENTMADE WITH FOREIGN ANDDOMESTIC PARTSUNDER SPECIFICATIONS OFEDAX AUDIO LABSHEADPHONEAMPLIFIER54 63210 10GAIN54 6789RE-AmpTubeOnly with balancedXLR line inputs372190 10HIGH- ZTRIMERADJUSTEMENTUNBALANCEDOUTPUTXLR:BALANCEDMIC/LINE INPUTPUSHLINE/RE-AmpTubePIN1:GNDPIN2:(+) HOTPIN3: (-) COLD1/4": HI Z INPUTDIRECT-BOXTIP:HI-Z INPUTRING:GNDSLEEVE:GNDXLR:BALANCEDOUTPUTPIN1:GNDPIN2:(+) HOTPIN3: (-) COLDTRANSFORMERLESSINPUT AND OUTPUT DESIGN1 5 6 81)Main connector & fuse2) AC line voltage selector.3) Headphone output level4) Headphone output5) Re-AmpTube trim output level6) Re-AmpTube Hi-Z output7) XLR:Mic/Line(Re-AmpTube) input1/4” Jack DIRECT-BOX Input8)Transformerless balanced output.7
PREAMPLIFIER OPERATION8.1 Turning the power ONThe power switch is located on the <strong>VTP</strong>-<strong>100</strong> front panel.Turn on the power switch,the meter iluminates red.The <strong>VTP</strong>-<strong>100</strong> has a 30 seg Soft-start warm-up with relay output muting after this timethe unit are ready to work.8.2 Setting the gainFirst, turn the gain control fully counter-clockwise and check that the 48V phantom power is off.Connect a microphone and then turn on the phantom power if required.Simply increase the Gain Mic/Line until the optimum level is reached with the output level in 5.If the peak indicator flashes red excessively with the gain control in the fullycounterclockwise position or engage the -20dB attenuator.The input meter indicate only line levels,set the meter in VU or PPM output reading tocheck optimum level output.,use the PPM HOLD to view maximum peaks if it is desire.8.2 Using the <strong>VTP</strong>-<strong>100</strong> as a DI-BOXThe 1/4” jack combo connector on the rear panel is used as vacuum tube direct box.This input has an impedance of 1M ohms and can accommodate a wide variety of highimpedance input sources, including bass guitar, keyboards, electric guitars, piezotransducers etc.In this mode, the GAIN Mic/Line that controls the gain of the discrete input stage,the -20 dB Pad, the Phantom power and the input line meter are not available.The HPF,phase reverse switch,the level output, the output meter and the PPM switchare active.8.3 Using the <strong>VTP</strong>-<strong>100</strong> as a Re-AmpTubeThe 1/4”jack Hi-z output connector on the rear panel is available only with thePad in -20d (Re-Amp Tube) in this mode all the function are active, the trimer adjustementcontrol is designed to mimic Hi-Z guitar levels.The <strong>VTP</strong>-<strong>100</strong> in this mode convert +4dB line level outputs to guitar hi impedance level,to can connecting to guitar input amplifiers,The Re-Amp Tube mode pass the audio signal thru a Class - A tube amplifierthis is veryusefull to increase the 2°harmonic content response.A guitar player can record a flat direct guitar track to tape or hard disk andRe-Amp Tube later into any instrument amplifier.8
REPLACING THE TUBESThe vacuum tubes become very hot once the unit has been turned on, and they shouldnot be touched until they have cooled to room temperature.There are a large variety of ECC82/12AU7s available, each type has slightlydifferent internal structure and design.Consequently, each type has its own sonic signature.For the design of the <strong>VTP</strong>-<strong>100</strong> we have chosen an especial tube modele this gives tothe <strong>VTP</strong>-<strong>100</strong> its special sound characteristic.When you need to replace the vacuum tubes use allways original EDAX tubes.All vacuum tubes have a limited life due to reduced electron emissionfrom the oxide coating on the cathode and/or a buildup of impurity gases is the bulb.Due to the hi quality of the tubes in the <strong>VTP</strong>-<strong>100</strong> the life is estimated to beseveral years.If you notice the sound quality deteriorating - higher distortion, muddiness,or microphonic behavior - it's time to change the tubes.Allways we recommend changing the 2 tubes at once.If you are uncomfortable with replacing the tubes yourself, please haveIt done by qualified service personnel.1) Unplug the <strong>VTP</strong>-<strong>100</strong> and wait at least 30 minutes for the high voltage in the unitto discharge and for the tubes to cool to room temperature.2) Only remove the top cover by removing the seven #8-32 Phillips-head screws.It is not necesary to remove the bottom cover.3) Note the position of the two tubes (V1-V2) in the porcelain socketsThe tubes are ECC82/12AU74) Remove each tube and replace with the new one.5) Reinstall the top cover and screws.9
SPECIFICATIONSInput Impedance(microphone): 2k2 ohm,nominal.Input Impedance(direct input):1Mohms (Instrument).Maximum input level:+23dBu into 10Kohms.Maximum input level(DI-BOX):+10dBu.Maximum output level:+32dBu into 10Kohms.Output impedance:47ohms x 2.Frequency Response: -1.0dB 20Hz and 20kHz with 10Kohm load.Noise: EIN than -125dBu with 150 ohm input load, unweighted.Distortion: THD+N less than 0.02%, +35dB gainMeter: Line input VU/PPM and VU/PPM output level and PPM Hold.(Factory Cal (In and Outs) = +4dBu)Phantom Power:+48Vdc applied to pins 2 and 3, +/- 1Vcc.Mic Pad: -20dB attenuation.Mic Phase switch: inverts the phase 180 degrees at the transformerless output.Phase desviation: 0.2% at 2KHz, 0.4 at 20KHz ,+20 dBu output.Hi Pass Filter : Passive 12 dB/octave rolloff from 20-250Hz in 11 steps.Polarity: input and output XLR connectors are pin 2 hot.Vacuum Tubes: (2) ECC82/12AU7,4 cell.Power: <strong>100</strong>VAC to 240VAC, 50/60Hz, selectable.Power consuption:40 watts maximum.Power Supplies: All internal voltage fully regulated with soft-start warm-up.Dimensions: 2U enclosure, 8.5" x 3.5" x 12.5" (21.6 x 8.9 x 29.5 cm).Weight: 3.93Kg.Net Weight: 4.8Kg.Notes: 0 dBu = 0.775 Vrms.All noise measurements are unweighted, 20 - 20,000 Hz bandwidth.All specifications are subject to change without notice.10
WARRANTYEdax Audio Labs warrants to the first purchaser of a new <strong>VTP</strong>-<strong>100</strong> Vacuum tubepreamplifier that the unit is free of manufacturing defects in materials and workmanshipfora period of one (1) year from the date of purchase. Edax Audio Labs sole obligationunder this warranty shall be to provide, without charge, parts and labor necessary toremedy defects, if any, which appear within one (1) year from the date of purchase. Allwarranties expressed or implied made byEdax Audio Labs, including warranties ofmerchantability and fitness, are limited to the period of this warranty. Edax Audio Labsis not responsible for indirect, incidental or consequential damages arising from theuse or failure of this product, including injury to persons or property.This warranty does not cover damage due to: misuse, abuse, modification, accident ornegligence. The warranty does not apply if the unit is repaired or altered by personsunauthorized by Edax Audio Labs in such a manner as to injure, in Edax Audio Labssole judgment, the performance, stability or reliability of the unit. The warranty doesnot apply if the unit is connected, installed or used otherwise than in accordance with theinstructions furnished byEdax Audio Labs There is no warranty on vacuum tubes.If the equipment requires warranty repair, return authorization must be obtained fromEdax Audio Labs prior to shipment. Equipment should not be shipped to Edax Audio Labsuntil return authorization and the proper shipping address is obtained from us.The equipment (with all its components parts and connecting cables) must be suitablypackaged, including a note with the owner's name, address, telephone number and adescription of the reason for return. The owner pays two-way shipping , and we suggestthat the shipment be insured for its full value.This limited warranty is in lieu of all other warranties, expressed or implied, and norepresentative or person is authorized to represent or assume for us any liability inconnection with the sale of our products than set forth herein.11
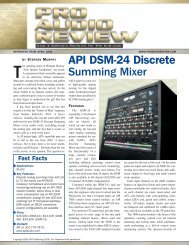
E DAXAudio labsFREQUENCY RANGE CHARTFREQUENCY20 25 31 40 50 63 80 <strong>100</strong> 125 160 200 250 315 400 500 630 800 1K 1K25 1K6 2K 2K5 3K15 4K 5K 6K3 8K 10K 12K5 16K 20KTOMSPercussioninstrumentsBASS DRUMCONGASWoodwindinstrumentsCYMBALSFLUTETRUMPETBrassinstrumentsTENOR SAXALTO SAXTROMBONEVIOLINStringinstrumentsCELLOGUITARE. BASSHumanvoiceFEMALEMALEPIANOHuman hearingrangeC D E F G A B C D E F G A B C D E F G A B C D E F G A B C D E F G A B C D E F G A B C D E F G A B C D E F G A B C16.3518.3520.6021.8324.5027.5030.8732.7036.7141.2043.6549.0055.0061.7465.4173.4282.4187.3198.00110.00123.47130.81146.83164.81174.61196.00220.00246.94261.63293.66329.63349.23392.00440.00493.88523.25587.33659.26698.46783.99880.00987.771,046.501,174.661,318.511,396.911,567.981,760.001,975.532,093.002,349.322,637.022,793.833,135.963,520.003,951.074,186.0112