Configuration Guide Using Auto-Config in AOS - ADTRAN Support ...
Configuration Guide Using Auto-Config in AOS - ADTRAN Support ...
Configuration Guide Using Auto-Config in AOS - ADTRAN Support ...

You also want an ePaper? Increase the reach of your titles
YUMPU automatically turns print PDFs into web optimized ePapers that Google loves.
61200560L1-29.2BJanuary 2013<strong><strong>Config</strong>uration</strong> <strong>Guide</strong><strong>Us<strong>in</strong>g</strong> <strong>Auto</strong>-<strong>Config</strong> <strong>in</strong> <strong>AOS</strong>This configuration guide provides an overview of the automaticself-configuration feature (referred to as <strong>Auto</strong>-<strong>Config</strong>) <strong>in</strong> the <strong>ADTRAN</strong>Operat<strong>in</strong>g System (<strong>AOS</strong>). This guide outl<strong>in</strong>es the configuration optionsavailable to configure and use <strong>Auto</strong>-<strong>Config</strong> <strong>in</strong> multiple networksituations. Troubleshoot<strong>in</strong>g <strong>in</strong>formation and additional documentationresources are provided at the end of this guide. Appendix A expla<strong>in</strong>s howto create a configuration file for use with the <strong>Auto</strong>-<strong>Config</strong> feature.This guide consists of the follow<strong>in</strong>g sections:• <strong>Auto</strong>-<strong>Config</strong> Overview on page 2• Hardware and Software Requirements and Limitations on page 4• Logg<strong>in</strong>g Into the <strong>AOS</strong> CLI on page 4• <strong>Config</strong>ur<strong>in</strong>g <strong>Auto</strong>-<strong>Config</strong> on page 5• Zero-Touch Provision<strong>in</strong>g on page 9• <strong><strong>Config</strong>uration</strong> Examples on page 12• <strong>Auto</strong>-<strong>Config</strong> Command Summary on page 21• Troubleshoot<strong>in</strong>g on page 22• Additional Resources on page 26• Appendix A: Creat<strong>in</strong>g <strong><strong>Config</strong>uration</strong> Files <strong>in</strong> <strong>AOS</strong> on page 27
<strong>Auto</strong>-<strong>Config</strong> <strong>Auto</strong>-<strong>Config</strong> Overview<strong>Auto</strong>-<strong>Config</strong> OverviewThe <strong>Auto</strong>-<strong>Config</strong> feature provides an automated method for configur<strong>in</strong>g a new <strong>AOS</strong> unit. It enables anewly deployed <strong>AOS</strong> unit to download and apply configuration parameters automatically from asecondary configuration file. However, <strong>Auto</strong>-<strong>Config</strong> does require some preparation and plann<strong>in</strong>g toperform these configuration actions correctly. This guide provides the necessary <strong>in</strong>formation for proper<strong>Auto</strong>-<strong>Config</strong> setup and operation.In this document, three different network scenarios are used as examples to describe the flexibility<strong>Auto</strong>-<strong>Config</strong> provides to configure an <strong>AOS</strong> product. The first method is standard operation and is best used<strong>in</strong> an enterprise network, us<strong>in</strong>g Trivial File Transfer Protocol (TFTP) to download a specific configurationfile. The second method is enhanced <strong>Auto</strong>-<strong>Config</strong> and is best used <strong>in</strong> a service provider environment whereHypertext Transfer Protocol (HTTP) or Hypertext Transfer Protocol Secure (HTTPS) is used to downloada specific configuration file. <strong>Us<strong>in</strong>g</strong> these enhanced sett<strong>in</strong>gs also allows redirect<strong>in</strong>g to a second server forfurther configuration sett<strong>in</strong>gs. The third method is Zero-Touch Provision<strong>in</strong>g and requires remov<strong>in</strong>g thestartup configuration prior to boot<strong>in</strong>g up the unit. Once the unit is booted without a startup configuration, itautomatically downloads the necessary configuration sett<strong>in</strong>gs from a host unit through TFTP.<strong>Auto</strong>-<strong>Config</strong> AttributesThere are several attributes that determ<strong>in</strong>e the way <strong>Auto</strong>-<strong>Config</strong> functions when it is <strong>in</strong>itiated. Many ofthese attributes are optional and may not perta<strong>in</strong> to your specific needs. This section provides an<strong>in</strong>troduction and brief explanation of each attribute. For more details, refer to <strong>Config</strong>ur<strong>in</strong>g <strong>Auto</strong>-<strong>Config</strong> onpage 5.File Transfer MethodsThe file transfer method specifies which of three methods to use when transferr<strong>in</strong>g configuration files forthe purpose of automatically configur<strong>in</strong>g the unit. The methods supported are TFTP, HTTP, and HTTPS.The default method is TFTP. Specify<strong>in</strong>g HTTP or HTTPS may require additional authenticationparameters and is expla<strong>in</strong>ed below.Authentication MethodsIf your file system requires authentication when us<strong>in</strong>g HTTP or HTTPS to transfer the configuration files,an authentication user name and password will need to be provided. If required, this <strong>in</strong>formation must betransmitted from the local unit to the HTTP(S) server to allow the configuration file to download. Tosupport a variety of needs, <strong>AOS</strong> allows the user name to be entered us<strong>in</strong>g system variables. These systemvariables represent system parameters such as: system name, serial number, description, software version,and medium access control (MAC) address. Authentication is expla<strong>in</strong>ed <strong>in</strong> detail <strong>in</strong> Specify<strong>in</strong>g anAuthentication User Name and Password on page 6.Another method of authentication that can be used is a specific MAC Address. This method requiresenter<strong>in</strong>g the MAC address or an <strong>in</strong>terface, and enabl<strong>in</strong>g the MAC address authentication mode. The MACaddress will be <strong>in</strong>cluded <strong>in</strong> the HTTP user agent header. This option is expla<strong>in</strong>ed <strong>in</strong> <strong>Us<strong>in</strong>g</strong> the MACAddress for Authentication on page 6.<strong><strong>Config</strong>uration</strong> Server SpecificationsThe configuration server is a network server or another <strong>AOS</strong> device that provides the configuration filesnecessary to complete <strong>Auto</strong>-<strong>Config</strong>. Locat<strong>in</strong>g the server is accomplished by enter<strong>in</strong>g the static IPv461200560L1-29.2B © 2013 <strong>ADTRAN</strong>, Inc. 2
<strong>Auto</strong>-<strong>Config</strong> <strong>Auto</strong>-<strong>Config</strong> Overviewaddress (or host name) of the server, or learn<strong>in</strong>g the address through Dynamic Host <strong><strong>Config</strong>uration</strong> Protocol(DHCP). DHCP Options 66 or 160 can also be used to specify the server address. When us<strong>in</strong>g eitherOption 66 or 160, the DHCP server must have the appropriate option def<strong>in</strong>ed <strong>in</strong> order to successfullylocate the configuration server. These sett<strong>in</strong>gs are expla<strong>in</strong>ed <strong>in</strong> Step 2: Specify the configuration serverlocation (optional) on page 5.File Name OptionsThe file name refers to the configuration file that is downloaded to the local unit and applied to the runn<strong>in</strong>gconfiguration. This file must exist on the host unit <strong>in</strong> order for it to be successfully downloaded. The filecan be specified as a file name or a system variable. To support a variety of needs, <strong>AOS</strong> allows the filename to be entered us<strong>in</strong>g system variables. These system variables represent system parameters such as;system name, serial number, description, software version, and MAC address. DHCP Option 67 can alsobe used to specify the file name. These options are expla<strong>in</strong>ed <strong>in</strong> detail <strong>in</strong> Step 5: <strong>Config</strong>ure the file name onpage 7.<strong><strong>Config</strong>uration</strong> Sett<strong>in</strong>gs ApplicationWhen a new unit retrieves configuration sett<strong>in</strong>gs from a host unit through TFTP, HTTP, or HTTPS, thenew configuration sett<strong>in</strong>gs can either be appended to the exist<strong>in</strong>g runn<strong>in</strong>g configuration (and savedmanually), or completely overwrite the exist<strong>in</strong>g startup configuration. This behavior is specified us<strong>in</strong>g theauto-config apply-config command as expla<strong>in</strong>ed <strong>in</strong> Step 7: Specify whether to append or replace theconfiguration file on page 8.Trigger<strong>in</strong>g MethodsThere are a number of different triggers to <strong>in</strong>voke <strong>Auto</strong>-<strong>Config</strong> <strong>in</strong> <strong>AOS</strong> if <strong>Auto</strong>-<strong>Config</strong> is currently off (ordisabled).1. The auto-config command can be manually entered from the Global <strong><strong>Config</strong>uration</strong> Mode on the unitconsole.2. The auto-config restart command can be manually entered from the Enable Command Mode on theunit console.3. The auto-config command can be <strong>in</strong>cluded <strong>in</strong> the unit’s startup configuration file. Upon bootup whenthe startup configuration file is processed, <strong>Auto</strong>-<strong>Config</strong> will <strong>in</strong>itiate. This method is often used when astartup configuration file is downloaded from a host unit and applied to the exist<strong>in</strong>g runn<strong>in</strong>gconfiguration.4. <strong>Auto</strong>-<strong>Config</strong> can be <strong>in</strong>itiated when the unit receives a SIP NOTIFY with check-sync event. This methodis only available on certa<strong>in</strong> <strong>AOS</strong> units. The unit must be configured with a SIP user to accept check-syncevents (us<strong>in</strong>g the auto-config sip-notify user command). When received, the check-sync eventrestarts <strong>Auto</strong>-<strong>Config</strong>.5. <strong>Auto</strong>-<strong>Config</strong> can be <strong>in</strong>itiated us<strong>in</strong>g Zero-Touch Provision<strong>in</strong>g, so called because no one directly drivesthe process. This method is only available on certa<strong>in</strong> <strong>AOS</strong> units. <strong>Auto</strong>-<strong>Config</strong> will <strong>in</strong>itiate when a unitboots up with no startup configuration file present on the local file system. Not all units trigger<strong>Auto</strong>-<strong>Config</strong> when booted without a startup configuration file. This method is expla<strong>in</strong>ed <strong>in</strong> Zero-TouchProvision<strong>in</strong>g on page 9.61200560L1-29.2B © 2013 <strong>ADTRAN</strong>, Inc. 3
<strong>Auto</strong>-<strong>Config</strong> <strong>Config</strong>ur<strong>in</strong>g <strong>Auto</strong>-<strong>Config</strong>• <strong>Config</strong>ur<strong>in</strong>g <strong>Auto</strong>-<strong>Config</strong> on page 5• Zero-Touch Provision<strong>in</strong>g on page 9<strong>Config</strong>ur<strong>in</strong>g <strong>Auto</strong>-<strong>Config</strong>It is recommended to review all the follow<strong>in</strong>g steps and the examples provided <strong>in</strong> <strong><strong>Config</strong>uration</strong> Exampleson page 12 before attempt<strong>in</strong>g to configure and use <strong>Auto</strong>-<strong>Config</strong>. This will provide the greatestunderstand<strong>in</strong>g of the options available and how they apply to your specific needs.Step 1: Specify the file transfer methodThis step <strong>in</strong>dicates the file transfer method to use when transferr<strong>in</strong>g the configuration file from a server tothe <strong>AOS</strong> device. The default file transfer method is TFTP. Unless your file server requires HTTPS orHTTP as the file transfer protocol, you do not need to change the default method. To change the method toHTTPS or HTTP, enter the auto-config method https or auto-config method http command from theGlobal <strong><strong>Config</strong>uration</strong> mode prompt. If no port is specified, the default port number is used when eithercommand is entered, HTTP port 80 and HTTPS port 443. Enter the command as follows:(config)#auto-config method tftporor(config)#auto-config method https(config)#auto-config method httpTo use a port number other than the default HTTP or HTTPS port, enter the commands as follows:(config)#auto-config method https port or(config)#auto-config method http port The valid range for is 1 through 65535.Step 2: Specify the configuration server location (optional)The configuration server is located through DHCP us<strong>in</strong>g either Option 66 or Option 160, or by specify<strong>in</strong>gthe host name or IPv4 address. By default, if this step is not configured, <strong>Auto</strong>-<strong>Config</strong> attempts to locate theserver us<strong>in</strong>g DHCP Option 66. When us<strong>in</strong>g either <strong>in</strong>stance of Option 66 or 160, the DHCP server musthave the appropriate option def<strong>in</strong>ed <strong>in</strong> order to successfully locate the configuration server. Enter thecommand from the Global <strong><strong>Config</strong>uration</strong> mode prompt as follows:(config)#auto-config server dhcpor(config)#auto-config server dhcp option 66or61200560L1-29.2B © 2013 <strong>ADTRAN</strong>, Inc. 5
<strong>Auto</strong>-<strong>Config</strong> <strong>Config</strong>ur<strong>in</strong>g <strong>Auto</strong>-<strong>Config</strong>(config)#auto-config server dhcp option 160or(config)#auto-config server [ | ]Step 3: <strong>Config</strong>ure the authentication for HTTP/HTTPS only (optional)HTTP or HTTPS file transfer methods allow authentication to occur before the transfer is allowed. Add<strong>in</strong>gan authentication user name and password for the file transfer <strong>in</strong>creases the system security. Anotheroption is to use the MAC address of the new unit to confirm the identity of the unit request<strong>in</strong>g the files.Each of these authentication methods are optional and depend on your specific needs.Specify<strong>in</strong>g an Authentication User Name and PasswordA specific user name and password can be specified us<strong>in</strong>g the follow<strong>in</strong>g command:(config)#auto-config authname password The default user name is adtran and the default password is adtran.For more flexibility, the user name can also be specified us<strong>in</strong>g the follow<strong>in</strong>g system variables to <strong>in</strong>dicatesystem parameters:$SYSTEM_NAME - the host name of the system$SYSTEM_SERIAL_NUMBER - the serial number of the system$SYSTEM_DESCRIPTION - the product name and software version$SYSTEM_SOFTWARE_VERSION - the runn<strong>in</strong>g software version$AUTH_MAC_ADDRESS - MAC address for MAC authenticationIn the follow<strong>in</strong>g example, $SYSTEM_NAME is used to def<strong>in</strong>e the user name, and a password is provided:(config)#auto-config authname $SYSTEM_NAME password fRiax&crOus9I#p<strong>Us<strong>in</strong>g</strong> the MAC Address for AuthenticationAuthentication can also be provided us<strong>in</strong>g a MAC address. To use this method, enable the MAC addressmode to <strong>in</strong>clude the MAC address <strong>in</strong> the HTTP User Agent header, and specify the MAC address or an<strong>in</strong>terface from which to use the assigned MAC address. Enter the commands as follows:(config)#auto-config mac-auth mode http-user-agent(config)#auto-config mac-auth address or(config)#auto-config mac-auth mode http-user-agent(config)#auto-config mac-auth <strong>in</strong>terface To disable MAC address authentication, enter the follow<strong>in</strong>g command:(config)#auto-config mac-auth mode none61200560L1-29.2B © 2013 <strong>ADTRAN</strong>, Inc. 6
<strong>Auto</strong>-<strong>Config</strong> <strong>Config</strong>ur<strong>in</strong>g <strong>Auto</strong>-<strong>Config</strong>Step 4: <strong>Config</strong>ure the HTTP authentication modeThere are two HTTP authentication modes that can be enabled or disabled <strong>in</strong>dividually. By default, bothmodes are enabled. The basic mode uses clear text authentication, and digest uses encrypted textauthentication. To enable the authentication mode, enter the commands as follows:(config)#auto-config http-auth basic(config)#auto-config http-auth digestAt least one mode must be enabled at all times. An error will occur if both authenticationmodes are disabled.To disable either of the authentication modes, enter the no form of the command as follows:(config)#no auto-config http-auth basic(config)#no auto-config http-auth digestStep 5: <strong>Config</strong>ure the file nameOnce triggered, <strong>Auto</strong>-<strong>Config</strong> searches for a file on the file server to provide <strong>in</strong>structions on how to boot up.When found, the file is downloaded from the file server us<strong>in</strong>g the method def<strong>in</strong>ed <strong>in</strong> Step 1: Specify the filetransfer method on page 5. The file name can be retrieved us<strong>in</strong>g the default method from DHCP Option 67or the file name can be specified us<strong>in</strong>g the auto-config filename command (<strong>in</strong>clud<strong>in</strong>g the filepath is optional). Additionally, the file name can be def<strong>in</strong>ed with an exact file name or us<strong>in</strong>g the follow<strong>in</strong>gsystem parameters represent<strong>in</strong>g system values:$SYSTEM_NAME - the host name of the system$SYSTEM_SERIAL_NUMBER - the serial number of the system$SYSTEM_DESCRIPTION - the product name and software version$SYSTEM_SOFTWARE_VERSION - the runn<strong>in</strong>g software version$AUTH_MAC_ADDRESS - MAC address for MAC authenticationTo configure the unit to retrieve the file name accord<strong>in</strong>g to the DHCP Option 67 (which is the defaultsett<strong>in</strong>g), enter the command as follows:(config)#auto-config filename dhcpWhen us<strong>in</strong>g DHCP Option 67, the DHCP server must have Option 67 def<strong>in</strong>ed <strong>in</strong> ordersuccessfully locate the file name.To def<strong>in</strong>e the file name us<strong>in</strong>g one of the system parameters, enter the command as follows:(config)#auto-config filename $SYSTEM_NAME.cfgTo def<strong>in</strong>e a file name us<strong>in</strong>g a system parameter and <strong>in</strong>clude the file path, enter the command as follows:(config)#auto-config filename config/adtran/$SYSTEM_NAME.cfg61200560L1-29.2B © 2013 <strong>ADTRAN</strong>, Inc. 7
<strong>Auto</strong>-<strong>Config</strong> <strong>Config</strong>ur<strong>in</strong>g <strong>Auto</strong>-<strong>Config</strong>To def<strong>in</strong>e a specific file name, enter the auto-config filename command as follows:(config)#auto-config filename AUTO_CONFIG.cfgTo def<strong>in</strong>e a specific file name and <strong>in</strong>clude the file path, enter the command as follows:(config)#auto-config filename config/adtran/AUTO_CONFIG.cfgStep 6: Specify retry attempts (optional)Use the auto-config retry-count command to specify the maximum number of retries allowed todownload a configuration file. By default, the number of retries is set to 0 allow<strong>in</strong>g the feature tocont<strong>in</strong>uously retry until the <strong>Auto</strong>-<strong>Config</strong> is disabled. To set the number of retries to 100, enter thecommand as follows:(config)#auto-config retry-count 100Valid range is 0 to 1000.Step 7: Specify whether to append or replace the configuration fileOnce the configuration file is obta<strong>in</strong>ed by <strong>Auto</strong>-<strong>Config</strong>, the new configuration sett<strong>in</strong>gs can be appended tothe exist<strong>in</strong>g runn<strong>in</strong>g configuration us<strong>in</strong>g the auto-config apply-config append command, or replace theexist<strong>in</strong>g startup configuration file us<strong>in</strong>g the auto-config apply-config replace command. Replac<strong>in</strong>g thestartup configuration will automatically reboot the unit so that the new startup configuration will be used.The default sett<strong>in</strong>g is to append the runn<strong>in</strong>g configuration file. Enter the command as follows:(config)#auto-config apply-config appendor(config)#auto-config apply-config replace<strong>Us<strong>in</strong>g</strong> the append keyword only appends the parameters to the currently runn<strong>in</strong>gconfiguration. It does not affect the startup configuration file. The appended parameterswill not be reta<strong>in</strong>ed if the unit is rebooted. To store the runn<strong>in</strong>g configuration as the startupconfiguration after <strong>Auto</strong>-<strong>Config</strong> is done, make certa<strong>in</strong> the last l<strong>in</strong>e of the configuration isthe do write command.Step 8: Trigger <strong>Auto</strong>-<strong>Config</strong>Once all of the <strong>Auto</strong>-<strong>Config</strong> sett<strong>in</strong>gs are configured, a method to trigger the <strong>Auto</strong>-<strong>Config</strong> process must be<strong>in</strong>itiated. This trigger can be performed by one of several methods as expla<strong>in</strong>ed previously <strong>in</strong> Trigger<strong>in</strong>gMethods on page 3. These methods are expla<strong>in</strong>ed below:To restart the <strong>Auto</strong>-<strong>Config</strong> process, issue the auto-config restart command from the Enable Mode prompt.Enter the commands as follows:(config)#exit#auto-config restart61200560L1-29.2B © 2013 <strong>ADTRAN</strong>, Inc. 8
<strong>Auto</strong>-<strong>Config</strong> Zero-Touch Provision<strong>in</strong>g<strong>Auto</strong>-<strong>Config</strong> can be triggered by halt<strong>in</strong>g <strong>Auto</strong>-<strong>Config</strong> and then restart<strong>in</strong>g it from the Global <strong><strong>Config</strong>uration</strong>mode. To stop (halt) <strong>Auto</strong>-<strong>Config</strong> processes once they have begun, enter the Global <strong><strong>Config</strong>uration</strong> modeand enter the no auto-config command, followed by restart<strong>in</strong>g the <strong>Auto</strong>-<strong>Config</strong> processes us<strong>in</strong>g theauto-config command. Enter the commands as follows:#configure term<strong>in</strong>al(config)#no auto-config(config)#auto-config<strong>Auto</strong>-<strong>Config</strong> can also be triggered by a SIP NOTIFY message. The SIP NOTIFY (check-sync event) canbe configured to trigger the restart of <strong>Auto</strong>-<strong>Config</strong> us<strong>in</strong>g the auto-config sip-notify user command. This command specifies a SIP user to receive the SIP NOTIFY (check-sync event) whichtriggers the <strong>Auto</strong>-<strong>Config</strong> process. Enter the command as follows:(config)#auto-config sip-notify user Only certa<strong>in</strong> <strong>AOS</strong> devices support SIP NOTIFY check-sync events. In order for the SIPNOTIFY message to be received, the <strong>AOS</strong> platform must support ip sip (this excludesswitches and routers without SIP proxy), and have it enabled <strong>in</strong> the configuration. Thefirewall must be provisioned to allow the unit to receive SIP messages from the server.Zero-Touch Provision<strong>in</strong>gAnother method for us<strong>in</strong>g <strong>Auto</strong>-<strong>Config</strong> is to allow the <strong>AOS</strong> device to self-configure upon bootup,receiv<strong>in</strong>g the necessary configuration sett<strong>in</strong>gs from a DHCP client on the host. This method is referred toas Zero-Touch Provision<strong>in</strong>g because the user does not supply any of the unit’s configuration sett<strong>in</strong>gs.Zero-Touch Provision<strong>in</strong>g can be used to replace a unit that has already been <strong>in</strong> service, with a new device.Zero-Touch Provision<strong>in</strong>g is not available on all <strong>AOS</strong> products. Refer to the <strong>AOS</strong> FeatureMatrix, available onl<strong>in</strong>e at <strong>ADTRAN</strong>’s <strong>Support</strong> Forum, https://supportforums.adtran.comfor a complete list of the platforms capable of us<strong>in</strong>g this method.This method does not require chang<strong>in</strong>g any of the default sett<strong>in</strong>gs for <strong>Auto</strong>-<strong>Config</strong>. Instead, the <strong>AOS</strong> unitis rebooted after remov<strong>in</strong>g the startup configuration file. The unit goes through the <strong>Auto</strong>-<strong>Config</strong> processand f<strong>in</strong>ds the network device from which to download its configuration file. The steps to <strong>in</strong>itiateZero-Touch Provision<strong>in</strong>g and the process which occurs, is outl<strong>in</strong>ed below.1. Remove the startup configuration.To remove the startup configuration, enter the erase startup-configuration command from the EnableMode prompt:(config)#erase startup-configurationEras<strong>in</strong>g a startup configuration file will permanently destroy all the data <strong>in</strong> that file!61200560L1-29.2B © 2013 <strong>ADTRAN</strong>, Inc. 9
<strong>Auto</strong>-<strong>Config</strong> Zero-Touch Provision<strong>in</strong>g2. Reboot the unit.To reboot the unit once the startup configuration is removed, enter the reload command from theEnable Mode prompt:(config)#reloadThe follow<strong>in</strong>g example shows the output of a NetVanta 1534 boot<strong>in</strong>g up without a startup configurationfile.<strong>ADTRAN</strong>, Inc., NetVanta 1534 (1702590G1)<strong>AOS</strong> Version: R10.04.00, Checksum 5F091215, Wed Jul 27 13:26:46 2012Cause of reset: External Hard Resetvfs: NONVOL: 240 tracks, 64 sectors/track, 1024 bytes/sector.SNMP Agent: Start<strong>in</strong>g: Success!FTP server: Start<strong>in</strong>g service on first mounted drive.cli: start<strong>in</strong>g user <strong>in</strong>terfaceGigabit switch chip <strong>in</strong>itializ<strong>in</strong>gNo startup-config found.Start<strong>in</strong>g <strong>Auto</strong>-<strong>Config</strong>, press enter to beg<strong>in</strong> or...You have 60 seconds to press escape to halt <strong>Auto</strong>-<strong>Config</strong>.Once the unit discovers that it does not have a startup configuration file (highlighted <strong>in</strong> l<strong>in</strong>e 9), <strong>AOS</strong>triggers <strong>Auto</strong>-<strong>Config</strong>, but allows the user 60 seconds respond to the prompt. There are two valid keyresponses. Each have different outcomes as expla<strong>in</strong>ed below.• Escape key - Cancels <strong>Auto</strong>-<strong>Config</strong> and <strong>AOS</strong> boots without any startup configuration file hav<strong>in</strong>g beenloaded.• Enter key - Aborts the rema<strong>in</strong><strong>in</strong>g portion of the 60-second wait<strong>in</strong>g period and the unit immediatelyproceeds to boot<strong>in</strong>g with <strong>Auto</strong>-<strong>Config</strong> active.If neither key is pressed at the prompt, the timer expires with<strong>in</strong> 60 seconds and the unit cont<strong>in</strong>ues with the<strong>Auto</strong> <strong>Config</strong> process.Once <strong>Auto</strong>-<strong>Config</strong> is triggered, the follow<strong>in</strong>g message displays:2005.10.12 12:59:52 AUTOCONFIG Started. To halt enter config-mode and type "no auto-config".Events That Occur Once <strong>Auto</strong>-<strong>Config</strong> is Triggered for Zero Touch Provision<strong>in</strong>gOnce <strong>Auto</strong>-<strong>Config</strong> is triggered, a series of events occurs. The follow<strong>in</strong>g <strong>in</strong>formation is provided to assistwith understand<strong>in</strong>g the process and what occurs on the unit.<strong>Auto</strong>-<strong>Config</strong> alters a unit’s configuration ONLY if the unit is booted without a startupconfiguration file. If <strong>Auto</strong>-<strong>Config</strong> is triggered by other means, it assumes the unit’s runn<strong>in</strong>gconfiguration allows network connectivity to download the file and does not change thesett<strong>in</strong>gs.61200560L1-29.2B © 2013 <strong>ADTRAN</strong>, Inc. 10
<strong>Auto</strong>-<strong>Config</strong> Zero-Touch Provision<strong>in</strong>gWhen <strong>Auto</strong>-<strong>Config</strong> term<strong>in</strong>ates, it does not automatically undo any of the sett<strong>in</strong>gs. If it isdesired that the unit’s f<strong>in</strong>al runn<strong>in</strong>g configuration not reta<strong>in</strong> any of the sett<strong>in</strong>gs added <strong>in</strong>this step, the user must either disable them manually or add commands that disable themto the file downloaded and applied by <strong>Auto</strong>-<strong>Config</strong>.1. <strong>Auto</strong>-<strong>Config</strong> enables basic IP connectivity to ensure the steps that follow will complete successfully.For example, on a switch this means that <strong>Auto</strong>-<strong>Config</strong> enables VLAN 1 with all switchports <strong>in</strong>VLAN 1, and enables the DHCP client for the <strong>in</strong>terface. The equivalent <strong>AOS</strong> commands issued wouldbe as follows:<strong>in</strong>t vlan 1ip address dhcpno shutdown2. <strong>Auto</strong>-<strong>Config</strong> enables all non-switch Ethernet ports and activates a DHCP client on these ports. Forexample, on a NetVanta 3305 (a router with two Ethernet ports), the equivalent <strong>AOS</strong> commands issuedwould be as follows:<strong>in</strong>terface ethernet 0/1ip address dhcpno shutdownexit<strong>in</strong>terface ethernet 0/2ip address dhcpno shutdown3. One of the DHCP clients should obta<strong>in</strong> a lease from a DHCP server on the network. The lease should<strong>in</strong>clude a file name (DHCP option 67) and a TFTP server address (DHCP Option 66) as well as thelessee’s IPv4 address. <strong>Auto</strong>-<strong>Config</strong> uses this <strong>in</strong>formation to download the configuration file.There can be multiple DHCP clients operat<strong>in</strong>g on a s<strong>in</strong>gle <strong>Auto</strong>-<strong>Config</strong> host. <strong>AOS</strong> keeps DHCP clientsordered <strong>in</strong>ternally, and <strong>Auto</strong>-<strong>Config</strong> uses data from the first DHCP client that provides both options 66and 67.4. <strong>Auto</strong>-<strong>Config</strong> uses TFTP to attempt to download the configuration file. If all the necessary data ispresent, the file is downloaded from the host. The current status displays Download<strong>in</strong>g as shown <strong>in</strong> thefollow<strong>in</strong>g show auto-config command output:#show auto-config<strong>Auto</strong>-<strong>Config</strong> is enabled, current status: Download<strong>in</strong>g.File transfer method is TFTP<strong>Config</strong> Server is 10.10.10.1<strong>Config</strong> filename is TESTFILEMaximum retry count is 0 (repeat <strong>in</strong>def<strong>in</strong>itely), total retries is 0Last failure: HTTP: Could not send <strong>in</strong>itial message to HTTP serverThe show auto-config command (entered from the Enable Mode prompt) displays thecurrent state of the <strong>Auto</strong>-<strong>Config</strong> feature. For a complete explanation of the outputdisplayed, see Troubleshoot<strong>in</strong>g on page 22.61200560L1-29.2B © 2013 <strong>ADTRAN</strong>, Inc. 11
<strong>Auto</strong>-<strong>Config</strong> <strong><strong>Config</strong>uration</strong> ExamplesIf TFTP fails to download the file, <strong>Auto</strong>-<strong>Config</strong> waits for 60 seconds and re-attempts the download.The current status displays Download Pend<strong>in</strong>g as shown <strong>in</strong> the follow<strong>in</strong>g show auto-configcommand output:#show auto-config<strong>Auto</strong>-<strong>Config</strong> is enabled, current status: Download Pend<strong>in</strong>g.File transfer method is TFTP<strong>Config</strong> Server is not set<strong>Config</strong> filename is not setMaximum retry count is 0 (repeat <strong>in</strong>def<strong>in</strong>itely), total retries is 0Last failure: <strong>Config</strong> filename is not knownThe maximum number of retries is set to 0 by default, which means downloads will repeat <strong>in</strong>def<strong>in</strong>itelyuntil a successful download occurs. If <strong>Auto</strong>-<strong>Config</strong> is unable to download the configuration file with<strong>in</strong>the maximum number of retries, a failure is declared and <strong>Auto</strong>-<strong>Config</strong> is halted. The current statusdisplays as Download failed as shown <strong>in</strong> the follow<strong>in</strong>g show auto-config command output:#show auto-config<strong>Auto</strong>-<strong>Config</strong> is enabled, current status: Download failed.File transfer method is TFTP<strong>Config</strong> Server is myServer<strong>Config</strong> filename is myFile.cfgMaximum retry count is 0 (repeat <strong>in</strong>def<strong>in</strong>itely), total retries is 0Last failure: DNS could not resolve host nameThe download process may not resolve on the first attempt and could require subsequentattempts to resolve successfully.5. If the configuration file is successfully received, <strong>Auto</strong>-<strong>Config</strong> proceeds to apply the configuration fileto the unit’s runn<strong>in</strong>g configuration. Apply<strong>in</strong>g the configuration file affects the runn<strong>in</strong>g configurationonly, not the startup configuration file. To store the runn<strong>in</strong>g configuration as the startup configurationafter <strong>Auto</strong>-<strong>Config</strong> is complete, make certa<strong>in</strong> the last command of the downloaded file is do write.<strong><strong>Config</strong>uration</strong> ExamplesThe example scenarios conta<strong>in</strong>ed <strong>in</strong> this section are designed to enhance understand<strong>in</strong>g of <strong>Auto</strong>-<strong>Config</strong>configurations on <strong>AOS</strong> products. The examples describe some of the common real-world configurations.All configurations provided <strong>in</strong> this section use the CLI.The configuration parameters entered <strong>in</strong> these examples are sample configurations only.These applications should be configured <strong>in</strong> a manner consistent with the needs of yourparticular network. CLI prompts have been removed from the configuration examples toprovide a method of copy<strong>in</strong>g and past<strong>in</strong>g configurations directly from this configurationguide <strong>in</strong>to the CLI. These configurations should not be copied without first mak<strong>in</strong>g thenecessary adjustments to ensure they will function properly <strong>in</strong> your network.61200560L1-29.2B © 2013 <strong>ADTRAN</strong>, Inc. 12
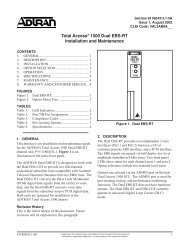
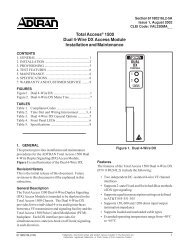
<strong>Auto</strong>-<strong>Config</strong> <strong><strong>Config</strong>uration</strong> ExamplesExample 1: Standard <strong>Auto</strong>-<strong>Config</strong> with TFTP MethodIn this example, a Total Access 916 automatically configures itself from a NetVanta 3305 follow<strong>in</strong>g astandard <strong>Auto</strong>-<strong>Config</strong> approach us<strong>in</strong>g TFTP to transfer the configuration file and DHCP server to assign anIPv4 address. Only a few of the <strong>Auto</strong>-<strong>Config</strong> default sett<strong>in</strong>gs are changed <strong>in</strong> this example, allow<strong>in</strong>g betterunderstand<strong>in</strong>g of how <strong>Auto</strong>-<strong>Config</strong> functions. The connectivity between these two units is shown <strong>in</strong> FigureFigure 1 on page 13, as well as the events that occur dur<strong>in</strong>g the automatic configuration process.Total Access 916<strong>Auto</strong>-<strong>Config</strong> New UnitDHCP Clienteth 0/1192.168.62.1eth 0/1NetVanta 3305DHCP and TFTP ServerUnit boots up with <strong>Auto</strong>-<strong>Config</strong>sett<strong>in</strong>gs entered by user.Interface comes upDHCP client enabledResolve host name SERV1<strong>Auto</strong>-<strong>Config</strong> is triggeredApply default file name configurationto the runn<strong>in</strong>g configuration.DHCP client requests IPv4 addressDHCP server response, conta<strong>in</strong>s:DHCP option 67 (file name)DHCP option 66 (TFTP server)Contacts SERV1Requests default file name via TFTPDownload default file name*Apply<strong>in</strong>g the configuration file affectsthe runn<strong>in</strong>g configuration only and not thestartup configuration file. To store therunn<strong>in</strong>g configuration as the startupconfiguration after <strong>Auto</strong>-<strong>Config</strong> is done,make certa<strong>in</strong> the last l<strong>in</strong>e of the downloadedfiles is do write.Figure 1. Example of <strong>Auto</strong>-<strong>Config</strong> <strong>Us<strong>in</strong>g</strong> a TFTP and DHCP ServerThe Total Access 916 is a new unit on the network and will use a startup configuration file(CONFIG-TA916.cfg) to prepare itself through automatic configuration. The NetVanta 3305 acts as theDHCP and TFTP servers.The follow<strong>in</strong>g example shows the configuration of the Total Access 916:Total Access 916 <strong><strong>Config</strong>uration</strong>The follow<strong>in</strong>g commands are entered <strong>in</strong>to the Total Access 916:#config term<strong>in</strong>al!<strong>in</strong>terface eth 0/1ip address dhcpmedia-gateway ip primaryno shutdownexit!auto-config!end61200560L1-29.2B © 2013 <strong>ADTRAN</strong>, Inc. 13
<strong>Auto</strong>-<strong>Config</strong> <strong><strong>Config</strong>uration</strong> ExamplesNetVanta 3305 <strong><strong>Config</strong>uration</strong>The follow<strong>in</strong>g output shows the pert<strong>in</strong>ent <strong>in</strong>formation from the runn<strong>in</strong>g configuration of the NetVanta3305:#show runn<strong>in</strong>g-configBuild<strong>in</strong>g configuration...!hostname "Router3305"!<strong>in</strong>terface eth 0/1ip address 192.168.62.1 255.255.255.0no shutdown!ip route 0.0.0.0 0.0.0.0 10.20.20.2!ip dhcp-server pool "POOL1"network 192.168.62.0 255.255.255.0option 66 ascii 192.168.62.1option 67 ascii CONFIG-TA916.cfg!endS<strong>in</strong>ce the NetVanta 3305 is also act<strong>in</strong>g as the TFTP server, its file system must conta<strong>in</strong> the configurationfile (CONFIG-TA916.cfg) for the new unit to download. The configuration file will configure the unit.The Total Access 916 obta<strong>in</strong>s the TFTP server address and TFTP file name via DHCP.The follow<strong>in</strong>g are the contents of the file CONFIG-TA916.cfg:Router3305#show file CONFIG-TA916.cfgvoice feature-mode network!voice dial-plan 1 local NXX-XXXXvoice dial-plan 2 long-distance 1-NXX-NXX-XXXX!voice class-of-service GLOBALcall-privilege all!voice codec-list GLOBALdefaultcodec g729codec g711ulaw!voice trunk T01 type sipsip-server primary 10.0.0.1registrar primary 10.0.0.1!voice grouped-trunk MAINtrunk T01accept $ cost 061200560L1-29.2B © 2013 <strong>ADTRAN</strong>, Inc. 14
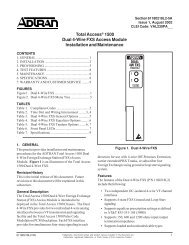
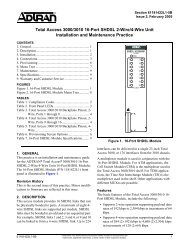
<strong>Auto</strong>-<strong>Config</strong> <strong><strong>Config</strong>uration</strong> Examplesvoice user 1001connect fxs 0/1cos day "GLOBAL"sip-identity 1001 T01 register auth-name USER1 password PASSWORD1codec-group GLOBAL!voice user 1002connect fxs 0/2cos day "GLOBAL"sip-identity 1002 T01 register auth-name USER2 password PASSWORD2codec-group GLOBAL!ip sip!l<strong>in</strong>e telnet 0 4log<strong>in</strong>password adtran!auto-config!do write!Example 2: Enhanced <strong>Auto</strong>-<strong>Config</strong> for Broadsoft Device ManagementIn this example, a Total Access 916 is a new unit to be <strong>in</strong>stalled and the host unit is a NetVanta 3305configured as both the DHCP and HTTPS server. The Total Access 916 is manually configured with theEthernet <strong>in</strong>terface (eth 0/1) set to DHCP, the auto-config apply-config is set to replace, the auto-configtransfer method is set to HTTPS with authentication credentials provided, and accepts SIP NOTIFY totrigger a restart of the <strong>Auto</strong>-<strong>Config</strong>. When the Total Access 916 requests a DHCP address, it receivesOption 66 and 67 from the host unit.The connectivity between these two units is shown <strong>in</strong> Figure 2 on page 16, as well as the events that occurdur<strong>in</strong>g the automatic configuration process.61200560L1-29.2B © 2013 <strong>ADTRAN</strong>, Inc. 15
<strong>Auto</strong>-<strong>Config</strong> <strong><strong>Config</strong>uration</strong> ExamplesTotal Access 916<strong>Auto</strong>-<strong>Config</strong> New UnitDHCP Clienteth 0/1192.168.62.1eth 0/1NetVanta 3305DHCP and HTTPS ServerUnit boots up with <strong>Auto</strong>-<strong>Config</strong>sett<strong>in</strong>gs entered by user.Interface comes upDHCP client requests IPv4 addressDHCP server response, conta<strong>in</strong>s:DHCP Option 66 (HTTPS server)DHCP Option 67 (file nameResolve host name SERV1<strong>Auto</strong>-<strong>Config</strong> is triggeredContacts SERV1Requests default file name via HTTPSSends authentication challengeResponds with credentialsCompares configuration files(recognizes files are different)Unit reboots*Compares configuration files(recognizes files are same)no action taken<strong>Auto</strong>-<strong>Config</strong> is restartedAccepts credentialsDownload default file nameSend SIP NOTIFY with check-sync eventRequests default file name via HTTPSSends authentication challengeApply default file name configurationCompares configuration files(recognizes files are different)Unit reboots*Compares configuration files(recognizes files are same)no action takenResponds with credentialsAccepts credentialsDownload default file name*Each time the unit reboots, <strong>Auto</strong>-<strong>Config</strong>restarts and the configuration file istransferred. If set to replace the startupconfiguration, the unit will compare the newlydownloaded file with its current startupconfiguration file for differences. If the files areidentical, no action is taken and <strong>Auto</strong>-<strong>Config</strong>is done. If the files are different, the unitoverwrites the current startup configuration filewith the new file and reboots the unit.Figure 2. Application Example for Broadsoft Device ManagementThe configuration of both units <strong>in</strong> this scenario are provided below, as well as the configuration file that isdownloaded from the host unit to the Total Access 916.Total Access 916 <strong><strong>Config</strong>uration</strong>The follow<strong>in</strong>g commands are entered <strong>in</strong>to the Total Access 916:#config term<strong>in</strong>al!<strong>in</strong>terface eth 0/1ip address dhcpmedia-gateway ip primaryno shutdown61200560L1-29.2B © 2013 <strong>ADTRAN</strong>, Inc. 16
<strong>Auto</strong>-<strong>Config</strong> <strong><strong>Config</strong>uration</strong> Examplesexit!auto-configauto-config apply replaceauto-config authname $SYSTEM_SERIAL_NUMBER password fRiax&crOus9I#pauto-config method https!!endNetVanta 3305 <strong><strong>Config</strong>uration</strong>The follow<strong>in</strong>g output shows the pert<strong>in</strong>ent <strong>in</strong>formation from the runn<strong>in</strong>g configuration of the NetVanta3305:#show runn<strong>in</strong>g-configBuild<strong>in</strong>g configuration...!hostname "Router3305"!<strong>in</strong>terface eth 0/1ip address 192.168.62.1 255.255.255.0no shutdown!ip route 0.0.0.0 0.0.0.0 10.20.20.2!ip dhcp-server pool "POOL1"network 192.168.62.0 255.255.255.0option 66 ascii 192.168.62.1option 67 ascii CONFIG-TA916.cfg!endContents of CONFIG-TA916.cfg <strong><strong>Config</strong>uration</strong> FileThe follow<strong>in</strong>g output shows the pert<strong>in</strong>ent <strong>in</strong>formation from the configuration file:voice trunk T01 type sipsip-server CORPORATEvoice grouped-trunk TOBROADSOFTtrunk T01accept $voice user 2001connect fxs 0/1sip-identity 2001 T01 register auth-name JSMITH password fRiax&crOus9I#p61200560L1-29.2B © 2013 <strong>ADTRAN</strong>, Inc. 17
STAT1 2 3 4 5 6 7 8 9 10 11 12 13 14 15 16 17 18 19 20 21 22 23 241 3 579 11 13 1517 19 21 232 4 6 810 12 14 1618 20 22 2425 26NetVanta 1534<strong>Auto</strong>-<strong>Config</strong> <strong><strong>Config</strong>uration</strong> Examples!auto-configauto-config apply replaceauto-config authname $SYSTEM_SERIAL_NUMBER password fRiax&crOus9I#pauto-config http-auth basicauto-config http-auth digestauto-config method httpsauto-config sip-notify user 2001!Example 3: Zero-Touch Provision<strong>in</strong>g, No Startup-<strong>Config</strong>In the follow<strong>in</strong>g example, a NetVanta 3305 is configured as both the DHCP and TFTP server. TheNetVanta 1534 is the new unit and uses <strong>Auto</strong>-<strong>Config</strong> to automatically configure itself with the <strong>in</strong>formationprovided from the host unit (NetVanta 3305). Initially, the NetVanta 1534 must have the startupconfiguration manually removed. The unit is then rebooted and allowed to automatically self-configure.The connectivity between the two units and the events that occurs dur<strong>in</strong>g the automatic configuration areshown <strong>in</strong> Figure 3 on page 18.NetVanta 1534<strong>Auto</strong>-<strong>Config</strong> New UnitNetVanta 3305DHCP and TFTP ServerDHCP Clientgiga-swx 0/110.10.10.5eth 0/1Startup configuration removedUnit rebootsInterface comes upResolve host name SERV1<strong>Auto</strong>-<strong>Config</strong> is triggeredApply TESTFILE configurationDHCP client requests IPv4 addressDHCP server response, conta<strong>in</strong>s:DHCP option 67 (file name)DHCP option 66 (TFTP server)<strong>Auto</strong>-<strong>Config</strong> contacts SERV1<strong>Auto</strong>-<strong>Config</strong> requests TESTFILEvia TFTPDownload TESTFILEFigure 3. Application Example for Zero-Touch Provision<strong>in</strong>gEras<strong>in</strong>g a startup configuration file will permanently destroy all the data <strong>in</strong> that file!61200560L1-29.2B © 2013 <strong>ADTRAN</strong>, Inc. 18
<strong>Auto</strong>-<strong>Config</strong> <strong><strong>Config</strong>uration</strong> ExamplesThe follow<strong>in</strong>g <strong>in</strong>itial commands are entered on the NetVanta 1534 to remove the startup configuration andreboot the unit:NetVanta 1534(config)#erase startup-configErase startup-configuration? [y or n]yStartup configuration erased.(config)#(config)#reloadThe follow<strong>in</strong>g output shows the pert<strong>in</strong>ent sections from the runn<strong>in</strong>g configuration of the NetVanta 3305:NetVanta 3305#show runn<strong>in</strong>g-configBuild<strong>in</strong>g configuration...!hostname "Router"no enable password!ip subnet-zeroip classlessip doma<strong>in</strong>-proxyip host SERV1 10.10.10.5ip rout<strong>in</strong>g!ip dhcp-server excluded-address 10.10.10.5!ip dhcp-server pool "POOL1"network 10.10.10.0 255.255.255.0dns-server 10.10.10.5netbios-node-type h-nodedefault-router 10.10.10.5tftp-server SERV1bootfile TESTFILE!<strong>in</strong>terface eth 0/1ip address 10.10.10.5 255.255.255.0no shutdown!ip tftp server61200560L1-29.2B © 2013 <strong>ADTRAN</strong>, Inc. 19
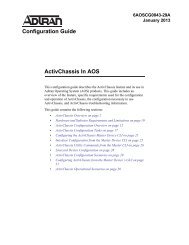
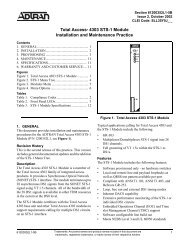
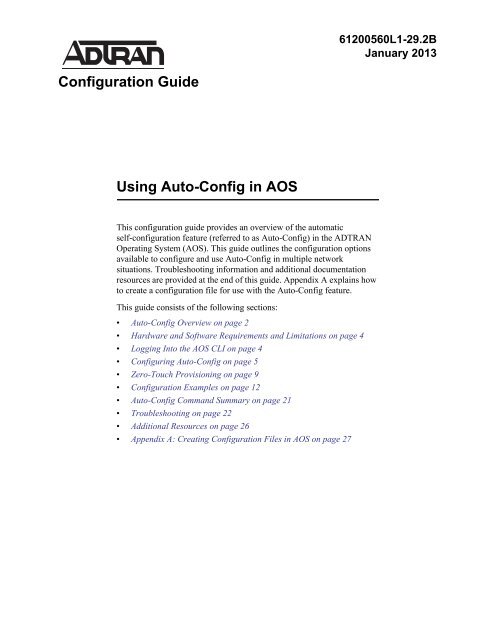
<strong>Auto</strong>-<strong>Config</strong> <strong><strong>Config</strong>uration</strong> ExamplesOn the NetVanta 3305, the DHCP pool POOL1 lists a bootfile option (67) called TESTFILE. For thisexample, TESTFILE must also reside on the NetVanta 3305 which is shown by the follow<strong>in</strong>g output fromthe show flash command:#show flash4690344 NV3305A-11-01-00.biz1280 startup-config119 TESTFILE4842824 bytes used, 1737400 available, 6580224 totalIn our example, the TESTFILE consists of commands to create two VLANs, disable <strong>Auto</strong>-<strong>Config</strong>, andsave the configuration us<strong>in</strong>g the do write command at the end of the file. When TESTFILE is applied tothe NetVanta 1534, all of these commands will be executed. The contents of TESTFILE are shown <strong>in</strong> thefollow<strong>in</strong>g example:#show file TESTFILE<strong>Us<strong>in</strong>g</strong> 120 bytesvlan 100vlan 101exitno auto-configdo writeOnce the NetVanta 1534 boots up and discovers that it does not have a startup configuration file, <strong>AOS</strong>triggers <strong>Auto</strong>-<strong>Config</strong> but allows the user 60 seconds to respond to the prompt to cancel the process orcont<strong>in</strong>ue. There are two valid key responses, press the Escape or Enter key. (This behavior is described <strong>in</strong>further detail <strong>in</strong> Zero-Touch Provision<strong>in</strong>g on page 9.) The NetVanta 1534 obta<strong>in</strong>s a DHCP lease with datapert<strong>in</strong>ent to <strong>Auto</strong>-<strong>Config</strong>. It resolves the host name SERV1 <strong>in</strong>to IP address 10.10.10.5. It then proceeds todownload TESTFILE from 10.10.10.5. Once the download is complete, <strong>Auto</strong>-<strong>Config</strong> applies theconfiguration to the unit.After the application of the TESTFILE contents on the NetVanta 1534, the runn<strong>in</strong>g configuration showsthe new sett<strong>in</strong>gs as follows:#show runn<strong>in</strong>g-configBuild<strong>in</strong>g configuration...!!no auto-configauto-config server SERV1auto-config filename TESTFILE!!vlan 100name "VLAN0100"vlan 101name "VLAN0101"!end61200560L1-29.2B © 2013 <strong>ADTRAN</strong>, Inc. 20
<strong>Auto</strong>-<strong>Config</strong> <strong>Auto</strong>-<strong>Config</strong> Command Summary<strong>Auto</strong>-<strong>Config</strong> Command SummaryThe CLI commands used to configure <strong>Auto</strong>-<strong>Config</strong> are summarized <strong>in</strong> Table 1.Table 1. <strong>Auto</strong>-<strong>Config</strong> CommandsPrompt Command Description(config)# auto-config method tftp Specifies us<strong>in</strong>g the TFTP file transfer methodwhen transferr<strong>in</strong>g the configuration file. This isthe default file transfer method for <strong>Auto</strong>-<strong>Config</strong>.(config)#(config)#auto-config method [http | https][port ]auto-config server dhcpauto-config server dhcpoption [66 | 160]Specifies us<strong>in</strong>g the HTTP(S) file transfer methodwhen transferr<strong>in</strong>g the configuration file. It isoptional to specify a port number.Specifies us<strong>in</strong>g DHCP to automatically learn theconfiguration server sett<strong>in</strong>gs. Optionally, if Option66 or 160 are specified, this <strong>in</strong>dicates us<strong>in</strong>g oneof these methods to def<strong>in</strong>e the DHCP serverlocation.(config)# auto-config server [ |]Specifies the IPv4 address or host name of TFTPserver from which to retrieve <strong>Auto</strong>-<strong>Config</strong>parameters.(config)#(config)#(config)#(config)#(config)#auto-config authname password auto-config mac-auth mode[http-user-agent | none]auto-config mac-auth addressauto-config mac-auth <strong>in</strong>terfaceauto-config http-auth basicauto-config http-auth digestSpecifies the authentication user name andpassword to access the host server. The username can also be def<strong>in</strong>ed us<strong>in</strong>g a systemvariable and is expla<strong>in</strong>ed is Step 3: <strong>Config</strong>ure theauthentication for HTTP/HTTPS only (optional)on page 6.Specifies the MAC authentication mode.Currently the only choices are http-user-agentor none. The parameter none <strong>in</strong>dicates no MACauthentication mode is used.Enables us<strong>in</strong>g the MAC address mode forauthentication and specifies the MAC address.Specifies an <strong>in</strong>terface from which to use the MACaddress for authentication.Enables the HTTP(S) authentication modesbasic and/or digest. By default, both areenabled.(config)# auto-config filename Specifies the configuration file name (<strong>in</strong>clud<strong>in</strong>gthe file path is optional) to download. The filename can also be def<strong>in</strong>ed us<strong>in</strong>g systemparameters and is expla<strong>in</strong>ed <strong>in</strong> Step 5: <strong>Config</strong>urethe file name on page 7. The default for thiscommand is auto-config filename dhcp.61200560L1-29.2B © 2013 <strong>ADTRAN</strong>, Inc. 21
<strong>Auto</strong>-<strong>Config</strong> Troubleshoot<strong>in</strong>gTable 1. <strong>Auto</strong>-<strong>Config</strong> Commands (Cont<strong>in</strong>ued)Prompt Command Description(config)# auto-config filename dhcp Specifies us<strong>in</strong>g DHCP Option 67 to learn theconfiguration file name. The default sett<strong>in</strong>g isdhcp which requires DHCP Option 67 to bedef<strong>in</strong>ed on the DHCP server or auto-config willnot download a configuration file.(config)# auto-config retry-count Specifies the maximum number of retries allowedto automatically configure the unit. Range is 0 to1000. The default is set to 0, allow<strong>in</strong>g the featureto cont<strong>in</strong>uously retry until <strong>Auto</strong>-<strong>Config</strong> isdisabled.(config)# auto-config apply-config [append |replace]Specifies whether to append the exist<strong>in</strong>g runn<strong>in</strong>gconfiguration or replace the startup configurationwith the new configuration sett<strong>in</strong>gs. The defaultsett<strong>in</strong>g is to append to the runn<strong>in</strong>g configuration.# auto-config restart Restarts the <strong>Auto</strong>-<strong>Config</strong> process if it has beenpreviously halted. This command is executedfrom the Enable Mode prompt.(config)# [no] auto-config Enables the automatic self-configuration feature.Use the no form of this command to halt theautomatic configuration process once started.(config)# auto-config sip-notify user Specifies the SIP user to whom SIP NOTIFY(check-sync events) are sent. This is one of themethods that can be used to trigger the<strong>Auto</strong>-<strong>Config</strong> process.Troubleshoot<strong>in</strong>gThere are several show command and debug commands that can be entered from the Enable Mode promptto assist with troubleshoot<strong>in</strong>g the <strong>Auto</strong>-<strong>Config</strong> feature.Show CommandsThe follow<strong>in</strong>g show commands can be used to display specific portions of the configuration.The show auto-config command displays the current state of the <strong>Auto</strong>-<strong>Config</strong> feature. It displays thecurrent method, current server, file name, last attempt status, number of retries attempted, and reason forthe last failure. This output changes depend<strong>in</strong>g on the status of the function while it is runn<strong>in</strong>g.61200560L1-29.2B © 2013 <strong>ADTRAN</strong>, Inc. 22
<strong>Auto</strong>-<strong>Config</strong> Troubleshoot<strong>in</strong>gFor example, the command is entered while the <strong>Auto</strong>-<strong>Config</strong> function is actively download<strong>in</strong>g aconfiguration file:>enable#show auto-config<strong>Auto</strong>-<strong>Config</strong> is enabled, current status: Download<strong>in</strong>g.File transfer method is TFTP<strong>Config</strong> Server is 10.10.10.1<strong>Config</strong> filename is <strong>ADTRAN</strong>_CONFIG.cfgMaximum retry count is 0 (repeat <strong>in</strong>def<strong>in</strong>itely), total retries is 0Last failure: HTTP: Could not send <strong>in</strong>itial message to HTTP serverThe available states displayed by <strong>Auto</strong>-<strong>Config</strong> are described <strong>in</strong> Table 2.Table 2. <strong>Auto</strong>-<strong>Config</strong> Current StatusCurrent StatusApply<strong>in</strong>g configuration.Download<strong>in</strong>gDownload error.Download failed.Download pend<strong>in</strong>g.IdleSuccessDescription<strong>Auto</strong>-<strong>Config</strong> is <strong>in</strong> the process of apply<strong>in</strong>g new configuration sett<strong>in</strong>gs from thedownloaded configuration file.<strong>Auto</strong>-<strong>Config</strong> is <strong>in</strong> the process of download<strong>in</strong>g the configuration file.An error was experienced dur<strong>in</strong>g the previous download attempt. <strong>Auto</strong>-<strong>Config</strong>is wait<strong>in</strong>g to retry the download attempt.An error was encountered dur<strong>in</strong>g the previous download attempt and themaximum number of retries has been reached.A download is pend<strong>in</strong>g, wait<strong>in</strong>g on a timer.When compar<strong>in</strong>g the configuration file with the startup configuration, the fileswere the same. No further action will be taken.<strong>Auto</strong>-<strong>Config</strong> was successful <strong>in</strong> download<strong>in</strong>g the configuration file.The show flash command can be useful to confirm the configuration files that exist on the device prior tocreat<strong>in</strong>g any new configuration files:>enable#show flash5970 startup-config5710 startup-config.bak13439188 T9162A-R10-4-M-5-E.biz13795810 T9162A-R10-5-0-2-E.biz27611341 bytes used, 4157714 available, 31769055 totalIf a file name already exists on a unit and an attempt is made to save a new one with thesame name, it will overwrite the file with the new contents. This will destroy the oldcontents. Always confirm the file system prior to sav<strong>in</strong>g new configuration files.61200560L1-29.2B © 2013 <strong>ADTRAN</strong>, Inc. 23
<strong>Auto</strong>-<strong>Config</strong> Troubleshoot<strong>in</strong>gThe show runn<strong>in</strong>g-config auto-config command shows the <strong>Auto</strong>-<strong>Config</strong> sett<strong>in</strong>gs of the current runn<strong>in</strong>gconfiguration:>enable#show runn<strong>in</strong>g-config auto-configBuild<strong>in</strong>g configuration...!!auto-configauto-config filename <strong>ADTRAN</strong>_CONFIG.cfgauto-config http-auth basicno auto-config http-auth digestauto-config server 10.17.220.1!EndDebug CommandsThe debug auto-config command activates debug messages associated with <strong>Auto</strong>-<strong>Config</strong> events. Debugmessages are displayed <strong>in</strong> real time. Use the no form of this command to disable the debug messages.Turn<strong>in</strong>g on a large amount of debug <strong>in</strong>formation can adversely affect the performance ofyour unit.The debug auto-config command displays the <strong>Auto</strong>-<strong>Config</strong> processes as they occur and is an excellenttool for assist<strong>in</strong>g with troubleshoot<strong>in</strong>g this feature. The follow<strong>in</strong>g is sample output displays the<strong>Auto</strong>-<strong>Config</strong> features is started:>enable#debug auto-config1970.01.01 12:12:05 AUTOCONFIG.STATUS Beg<strong>in</strong>n<strong>in</strong>g1970.01.01 12:12:05 AUTOCONFIG.TIMER Load<strong>in</strong>g timer with 500 milliseconds#1970.01.01 12:12:05 AUTOCONFIG Started. To halt enter config-mode and type "no auto-config".1970.01.01 12:12:05 AUTOCONFIG.STATUS Pend<strong>in</strong>g1970.01.01 12:12:05 AUTOCONFIG.TIMER Load<strong>in</strong>g timer with 40 seconds#The follow<strong>in</strong>g sample output displays that the <strong>in</strong>itial sett<strong>in</strong>gs have been applied and the first configurationfile (TA916_BOOTSTRAP.cfg) is downloaded. Once the TA916_BOOTSTRAP.cfg file is applied,<strong>Auto</strong>-<strong>Config</strong> is restarted (due to the bootstrap configuration file configuration).>enable#debug auto-config1970.01.01 12:12:45 AUTOCONFIG.STATUS Download: TA916_BOOTSTRAP.CFG from 10.17.220.11970.01.01 12:12:45 AUTOCONFIG.TIMER Load<strong>in</strong>g timer with 1 seconds1970.01.01 12:12:46 AUTOCONFIG.STATUS Apply<strong>in</strong>g <strong><strong>Config</strong>uration</strong>1970.01.01 12:12:47 AUTOCONFIG.TIMER Load<strong>in</strong>g timer with 500 milliseconds61200560L1-29.2B © 2013 <strong>ADTRAN</strong>, Inc. 24
<strong>Auto</strong>-<strong>Config</strong> Troubleshoot<strong>in</strong>g1970.01.01 12:12:47 AUTOCONFIG.STATUS Done1970.01.01 12:12:47 AUTOCONFIG.TIMER Load<strong>in</strong>g timer with 500 milliseconds1970.01.01 12:12:47 AUTOCONFIG Done. File: TA916_BOOTSTRAP.CFG applied to runn<strong>in</strong>g-config.1970.01.01 12:12:47 AUTOCONFIG.STATUS Beg<strong>in</strong>n<strong>in</strong>g1970.01.01 12:12:47 AUTOCONFIG.TIMER Load<strong>in</strong>g timer with 500 milliseconds1970.01.01 12:12:47 AUTOCONFIG Delayed Restart from event config entry1970.01.01 12:12:48 AUTOCONFIG Started. To halt enter config-mode and type "no auto-config".The follow<strong>in</strong>g sample output displays the new <strong>Auto</strong>-<strong>Config</strong> sett<strong>in</strong>gs (applied from theTA916_BOOTSTRAP.CFG file) are executed:>enable#debug auto-config1970.01.01 12:12:48 AUTOCONFIG.STATUS Pend<strong>in</strong>g1970.01.01 12:12:48 AUTOCONFIG.TIMER Load<strong>in</strong>g timer with 20 seconds1970.01.01 12:13:08 AUTOCONFIG.STATUS Download: AUTO_CONFIG_FINAL.CFG from 10.17.220.11970.01.01 12:13:08 AUTOCONFIG.TIMER Load<strong>in</strong>g timer with 1 seconds1970.01.01 12:13:09 AUTOCONFIG.STATUS Apply<strong>in</strong>g <strong><strong>Config</strong>uration</strong>1970.01.01 12:13:09 AUTOCONFIG.STATUS Done1970.01.01 12:13:09 AUTOCONFIG.TIMER Load<strong>in</strong>g timer with 500 milliseconds1970.01.01 12:13:10 AUTOCONFIG Done. File: AUTO_CONFIG_FINAL.CFG applied to runn<strong>in</strong>g-config.The debug http client command activates debug messages associated with HTTP client operation <strong>in</strong> <strong>AOS</strong>.This debug command is useful only when us<strong>in</strong>g the HTTP(S) file transfer method. The output displays thecommands be<strong>in</strong>g sent to the server. In the follow<strong>in</strong>g example, the server could not be reached:>enable#debug http client13:07:04 HTTP_CLIENT GET str<strong>in</strong>g:GET /<strong>ADTRAN</strong>_CONFIG.cfg HTTP/1.1Authorization: Basic YWR0cmFuOmFkdHJhbg==Connection: closeHost: 10.10.10.1User-Agent: TA916/Total Access 916 (2nd Gen)13:07:04 HTTP_CLIENT Resolved hostname 10.10.10.1 to 10.10.10.113:07:04 HTTP_CLIENT Connect<strong>in</strong>g to service at 10.10.10.1:801970.01.01 13:07:24 HTTP_CLIENT Timeout connect<strong>in</strong>g to service at 10.10.10.1The debug ip tftp client packets command activates debug messages associated with TFTP clientpackets. This debug command is useful only when us<strong>in</strong>g a TFTP server to retrieve configuration files. Theoutput displays the commands be<strong>in</strong>g sent to the server. In the follow<strong>in</strong>g example, the file was successfullytransferred:>enable#debug ip tftp client packets1970.01.01 13:17:37 TFTP.CLIENT TX Read Request (retry 0) to ::FFFF:10.17.220.1 for file"<strong>ADTRAN</strong>_CONFIG.cfg"1970.01.01 13:17:37 TFTP.CLIENT RX block 1 from ::FFFF:10.17.220.1:6277561200560L1-29.2B © 2013 <strong>ADTRAN</strong>, Inc. 25
<strong>Auto</strong>-<strong>Config</strong> Additional Resources1970.01.01 13:17:37 TFTP.CLIENT TX ACK for block 1 (retry 0) to ::FFFF:10.17.220.1:627751970.01.01 13:17:37 TFTP.CLIENT Received "<strong>ADTRAN</strong>_CONFIG.cfg" from ::FFFF:10.17.220.1:62775successfully. Saved as local file "auto-config-download".1970.01.01 13:17:39 AUTOCONFIG Done. File: <strong>ADTRAN</strong>_CONFIG.cfg applied to runn<strong>in</strong>g-config.Additional ResourcesThere are additional resources available to aid <strong>in</strong> configur<strong>in</strong>g your <strong>ADTRAN</strong> unit. The documents listedbelow are available onl<strong>in</strong>e at <strong>ADTRAN</strong>’s <strong>Support</strong> Forum at https://supportforums.adtran.com.• <strong>AOS</strong> Command Reference <strong>Guide</strong>• Upgrad<strong>in</strong>g Firmware <strong>in</strong> <strong>AOS</strong>61200560L1-29.2B © 2013 <strong>ADTRAN</strong>, Inc. 26
<strong>Auto</strong>-<strong>Config</strong> Appendix A: Creat<strong>in</strong>g <strong><strong>Config</strong>uration</strong> Files <strong>in</strong> <strong>AOS</strong>Appendix A: Creat<strong>in</strong>g <strong><strong>Config</strong>uration</strong> Files <strong>in</strong> <strong>AOS</strong>A configuration file is an ASCII text file that conta<strong>in</strong>s valid <strong>AOS</strong> commands. For the <strong>Auto</strong>-<strong>Config</strong> feature,these files are usually short and can be created us<strong>in</strong>g any text editor program. Alternatively, you can createa configuration file on an <strong>AOS</strong> device directly, especially if the device is a TFTP server used by<strong>Auto</strong>-<strong>Config</strong> hosts. This is the method used for this example.This example shows how to create a configuration file named TESTFILE on an <strong>AOS</strong> device.1. Verify that there is not a file named TESTFILE already on the unit’s file system us<strong>in</strong>g the show flashcommand.#show flash5970 startup-config5710 startup-config.bak13439188 T9162A-R10-4-M-5-E.biz13795810 T9162A-R10-5-0-2-E.biz27611341 bytes used, 4157714 available, 31769055 total2. S<strong>in</strong>ce a file with this name does not exist on the file system, it is safe to create one. <strong>Us<strong>in</strong>g</strong> the copyconsole command at the Enable Mode prompt, create the file and use <strong>AOS</strong> to compose thecontents. After each command is composed, press the Enter key. While <strong>in</strong> this mode, the Backspacekey deletes a character and moves the cursor back one space. However, edit<strong>in</strong>g is done l<strong>in</strong>e by l<strong>in</strong>e so<strong>AOS</strong> does not allow the user to edit to a previous l<strong>in</strong>e once Enter is pressed. When f<strong>in</strong>ished enter<strong>in</strong>gthe contents of the configuration file, enter Ctrl-D.#copy console TESTFILEEnter text to be saved to "TESTFILE".Type CTRL+D to f<strong>in</strong>ish.! This is a comment. Comments are not processed!<strong>in</strong>terface ethernet 0/2no shutdownexitip tftp serverenable password qwertybanner motd !This is the message of the day!do write61200560L1-29.2B © 2013 <strong>ADTRAN</strong>, Inc. 27
<strong>Auto</strong>-<strong>Config</strong> Appendix A: Creat<strong>in</strong>g <strong><strong>Config</strong>uration</strong> Files <strong>in</strong> <strong>AOS</strong>3. Verify that the file was created on the file system us<strong>in</strong>g the show flash command.#show flash186 TESTFILE5970 startup-config5710 startup-config.bak13439188 T9162A-R10-4-M-5-E.biz13795810 T9162A-R10-5-0-2-E.biz27611527 bytes used, 4157528 available, 31769055 total4. To display the contents of the file, use the show file command.#show file TESTFILE<strong>Us<strong>in</strong>g</strong> 187 bytes! This is a comment. Comments are not processed!<strong>in</strong>terface ethernet 0/2no shutdownexitip tftp serverenable password qwertybanner motd !This is the message of the day!do write61200560L1-29.2B © 2013 <strong>ADTRAN</strong>, Inc. 28