25) milking procedure - Babcock Institute - University of Wisconsin ...
25) milking procedure - Babcock Institute - University of Wisconsin ...
25) milking procedure - Babcock Institute - University of Wisconsin ...

Create successful ePaper yourself
Turn your PDF publications into a flip-book with our unique Google optimized e-Paper software.
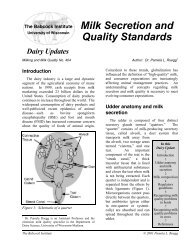
Dairy Essentials - Lactation and Milkingparlors, the foremilk can be strippeddirectly onto the floor and flushed awaywith water as soon as it has been observed.—Milk <strong>of</strong> cows with clinical signs <strong>of</strong>mastitis must be discarded.3) Wash teats with a warm sanitizingsolution.—Wash and massage all teats with warmwater containing a mild disinfectant.—Use water sparingly and avoid wettingmuch <strong>of</strong> the udder as water draining downonto the teats increases the risk <strong>of</strong> mastitisand the number <strong>of</strong> bacteria in the milk.—Use a single cloth or paper towel foreach cow. Use <strong>of</strong> the same cloth from onecow to the next increases the risk <strong>of</strong>contamination and transmission <strong>of</strong> mastitiscausingbacteria from cow to cow.4) Dip teats with a safe and effectivedisinfectant (optional).—“Predipping,” if allowed by the law, isan effective practice that reduces thenumber <strong>of</strong> new infections by environmentalmicroorganisms. Only products tested forpredipping should be used. Predippingconsists <strong>of</strong> immersing the teats in adisinfectant. To be effective, most predipdisinfectants must remain in contact withthe teats 20 to 30 seconds.5) Dry teats thoroughly.—Dry the teat thoroughly. Single usedisposable paper towels are the best way todry the teats, but are expensive. Cloths areacceptable when used only for one cow andprovided they are laundered between<strong>milking</strong>s. Residual moisture on the teat,and water on the side <strong>of</strong> the udder, isloaded with bacteria and will eventuallycontaminate the liner, the teat, and the milk,creating risk <strong>of</strong> mastitis and lowering milkquality. In addition, dry teats minimizeslippage <strong>of</strong> the <strong>milking</strong> unit during <strong>milking</strong>.—The cow’s milk let-down reflex isinitiated as the teats were cleaned,massaged and dried.6) Attach teatcup within one minute.—Attach the <strong>milking</strong> unit to the teatswithin one minute after the start <strong>of</strong>preparation. Each teatcup should beslipped onto the teat with minimal entrance<strong>of</strong> air into the <strong>milking</strong> unit.7) Check milk flow and adjust <strong>milking</strong>unit as needed.—Check that milk flows from each teat.—Adjust the position <strong>of</strong> the <strong>milking</strong> unit.Rapid and complete <strong>milking</strong> is possibleonly when the <strong>milking</strong> unit is properlyaligned. Usually, the front teatcups need tobe positioned slightly higher than the backteatcups. Some <strong>milking</strong> machinemanufacturers recommend a support armon which to rest the long milk and vacuumtubes and to adjust the <strong>milking</strong> unit into itsbest fitting position. Improperly aligned<strong>milking</strong> units slip <strong>of</strong>ten and milk flow maybe restricted, both <strong>of</strong> which contribute tothe development <strong>of</strong> mastitis.—Do not leave a <strong>milking</strong> unit squawking.—Readjust <strong>milking</strong> unit as needed during<strong>milking</strong>. Air entering the teatcup maycause tiny droplets <strong>of</strong> milk to back flush athigh speed into the teat canal. Ifcontaminated, these droplets allow bacteriato enter the udder and cause mastitis. Thisprocess occurs more <strong>of</strong>ten near the end <strong>of</strong><strong>milking</strong>, when milk flow is decreasing.8) At the end <strong>of</strong> <strong>milking</strong>, shut <strong>of</strong>f thevacuum before removing teatcups.—Do not overmilk. The majority <strong>of</strong> cowswill milk out in 4 to 5 minutes. The forequarters are usually milked out earlier thanthe rear quarters, which produce moremilk. Thus the fore quarters tend to beslightly overmilked. Usually, this is not aproblem; one or two minutes <strong>of</strong> over<strong>milking</strong> with a properly functioningmachine does not predispose the udder tomastitis.—Avoid stripping. In the past, it was acommon practice to massage the udderwith the <strong>milking</strong> machine in place to collect98 The <strong>Babcock</strong> <strong>Institute</strong>
<strong>25</strong> – Milking Procedurethe last milk (stripping). This practiceshould be completely abandoned because itincreases the stress on the teat tissue andthe risk <strong>of</strong> air admission in the unit, therebyincreasing the risk <strong>of</strong> mastitis.—Shut <strong>of</strong>f the vacuum to the <strong>milking</strong> unitbefore detaching the teatcups from theteats. Pulling a teat from a teatcup undervacuum increases the risk <strong>of</strong> teat damageand infection because it creates a massiveliner slip.9) Dip or spray teats with a safe andeffective disinfectant (teat dip) .—Dip or spray the bottom two-thirds <strong>of</strong>each teat with a mild disinfectant.Solutions that will not chap or irritate theteats include many commercial products,chlorhexidine (0.5%), iodine (0.5-1%) low inphosphoric acid, and hypochlorite (4%) lowin sodium hydroxide.10) Disinfect <strong>milking</strong> units (optional).—To prevent the spread <strong>of</strong> infectionbetween cows, it is becoming morecommon to disinfect teatcup liners beforeusing them for the next cow. The preferred<strong>procedure</strong> is to dip the teatcup liners in abucket filled with clear water to rinse milkresidue. Then, the teatcups are submergedin a bucket with water and a milddisinfectant (15 to <strong>25</strong> milligrams iodine perkg <strong>of</strong> water, that is, a 15 to <strong>25</strong> ppm iodinesolution) for 2.5 minutes. Finally, the linermust be dried before attaching the <strong>milking</strong>unit to the next cow. If not done properly,this step may enhance more than hinder thespread <strong>of</strong> mastitis. Many <strong>milking</strong> machinemay be equipped with an automatic systemto disinfect liners rapidly and effectively(backflushing).HANDLING THE COLLECTED MILKThe collected milk should be filtered,cooled and stored in a separate, clean milkroom. The milk can be filtered using an inlinefilter as the milk is pumped out <strong>of</strong> themachine or by passing the milk collected ina <strong>milking</strong> bucket through a filter manually.If the filter is disposable, it should be usedonly once. Alternatively, a cloth filter maybe used, washed and disinfected after each<strong>milking</strong>. The filter retains milk clots andother large particles, and after usage itsinspection helps to evaluate the overallhygiene <strong>of</strong> <strong>milking</strong>—in particular, thethoroughness <strong>of</strong> carrying out Steps 2 and 3above.Prompt refrigeration <strong>of</strong> the milk aftercollecting is vital to prevent multiplication<strong>of</strong> bacteria and loss <strong>of</strong> quality. Ifrefrigeration facilities are not available,milk should be cooled to within 2 o C <strong>of</strong> thetemperature <strong>of</strong> the local water supply.Cooled milk should be stored ideally at 4 o Cuntil transported to the processing plant.Note that even good quality milkcontaining less than 10,000 bacteria/mlcannot be stored more than two days at 4 o Cwithout risk <strong>of</strong> quality deterioration. Milknot stored at 4 o C should be transported to amilk processing plant as soon as possible.CLEANING THE EQUIPMENTA <strong>milking</strong> machine functions properlyonly when cleaned thoroughly after eachuse. An impeccably clean machine isnecessary to harvest a milk <strong>of</strong> high qualitythat is safe and flavorful for humanconsumption, and that remains stable for along time (long keeping time or shelf life).When a <strong>milking</strong> machine is designed, theease <strong>of</strong> cleaning must be taken into account:• The material used to constructpipelines must be smooth (aluminum,stainless steel, etc.), durable and resistthe corrosion <strong>of</strong> acids and alkalinesolutions;• The machine must be constructed witha minimum <strong>of</strong> right angles (joints) toreduce flow disturbance and theformation <strong>of</strong> deposits;• All pipelines need to be adequatelysloped to provide drainage after<strong>milking</strong> and cleaning.<strong>University</strong> <strong>of</strong> <strong>Wisconsin</strong>-Madison 99
Dairy Essentials - Lactation and MilkingTable 1: Basic steps in cleaning <strong>milking</strong> equipment.StepWater Durationtemp (min.)Action and comments1-Pre wash 35 o to 45 o C Remove the bulk <strong>of</strong> the residual milk in the <strong>milking</strong> machine;“Pre-warm” the equipment for better action <strong>of</strong> the cleaningsolutions.2-Wash(alkalinedetergent 1 )3-Water rinsemin. 50 o Cmax. 75 o C10 A chlorinated product helps remove protein; the alkalinityremoves the fat, and a complexing agent (EDTA) prevents theformation <strong>of</strong> salt deposits depending on water hardness.(optional)4-Acid rinse 2 35 o to 45 o C 5 Neutralizes chlorine and alkaline residues (prolongs life <strong>of</strong>rubber parts); prevents mineral deposits and helps preventmilkstones; kills bacteria.5-Water rinseWarm water helps the equipment dry faster.6-SanitationBefore using the equipment again, a sanitizing solution <strong>of</strong>hypochlorite (200 mg per kg <strong>of</strong> water, or 200 ppm) reduces thenumber <strong>of</strong> bacteria on the equipment.1Examples <strong>of</strong> active agents in alkaline detergents: sodium hydroxide, sodium carbonate, trisodiummonophosphate, and polyphosphates. Dilution rate must be as indicated by manufacturer’s label.2Examples <strong>of</strong> acids: phosphoric acids or organic acids (acetic acid, citric acid, etc.). Most acid products containcorrosion inhibitors. Dilution rate must be as indicated by manufacturer’s label.Cleaning the outside <strong>of</strong> <strong>milking</strong> unitsWhen <strong>milking</strong> is finished, all visible dirtand milk deposits must be removed fromthe outside <strong>of</strong> the <strong>milking</strong> units and theflexible tubes by scrubbing and rinsing inclean water.Washing the pipelines and the inside<strong>of</strong> the <strong>milking</strong> unitsStrong flow turbulence <strong>of</strong> milk passingthrough a right angled pipeline and heatmay cause milk components (protein) toprecipitate and form “milkstones.”The basic steps to adequately clean a<strong>milking</strong> machine manually or with a“clean-in-place” system are summarized inTable 1. It is not possible to combine all thenecessary properties <strong>of</strong> a cleanser in onepreparation because elimination <strong>of</strong> fat andprotein film normally requires alkalinedetergent, whereas an acid solution isneeded for mineral deposits. Thusalternative use <strong>of</strong> alkaline detergents andacids is recommended. In addition, toassure the proper cleaning action <strong>of</strong> manydetergents, the following must also be part<strong>of</strong> the cleansing process:1) A mechanical action (manualscrubbing) or a high velocity flow(“clean-in-place” system) are neededfor a sufficient amount <strong>of</strong> time (contacttime) to lift and carry particles away;2) The total volume <strong>of</strong> water used mustbe sufficient to ensure contact betweenthe detergent solution and theequipment;3) The concentration <strong>of</strong> detergent mustbe adequate to obtain the desiredcleaning action;4) The water temperature must not betoo high or too low; temperaturedictates the effectiveness <strong>of</strong> manydetergents.100 The <strong>Babcock</strong> <strong>Institute</strong>