SelCom 8012 SelCom 4040 - Team Electronic
SelCom 8012 SelCom 4040 - Team Electronic
SelCom 8012 SelCom 4040 - Team Electronic

You also want an ePaper? Increase the reach of your titles
YUMPU automatically turns print PDFs into web optimized ePapers that Google loves.
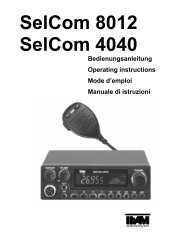
<strong>SelCom</strong> <strong>8012</strong><br />
<strong>SelCom</strong> <strong>4040</strong><br />
Bedienungsanleitung<br />
Operating instructions<br />
Mode d’emploi<br />
Manuale di istruzioni
Inhalt, Contents, Contenu, Contenuto Seite, Page, Page, Pagina<br />
Bedienelemente 3 / 4<br />
Controls 3 / 12<br />
Eléments de commande 3 / 26<br />
Comandi 3 / 33<br />
Bedienungsanleitung 5 - 11<br />
Operating instructions 13 - 18<br />
Mode d’emploi 27 - 32<br />
Manuale di istruzioni 33 - 39<br />
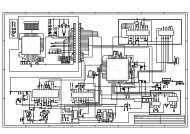
Bestückungspläne und Platinenlayouts /<br />
Components locations and PCB Layouts 19 - 21<br />
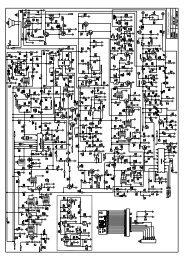
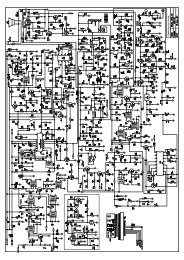
Schaltplan / Schematic Diagram /<br />
Schéma de principe / Schema elettrico ( Main PCB ) 22 - 23<br />
Schaltplan / Schematic Diagram /<br />
Schéma de principe / Schema elettrico ( Front PCB ) 24<br />
Blockschaltbild / Block Diagram 25<br />
Technische Daten / Technical Data / <strong>SelCom</strong> <strong>8012</strong> 40<br />
Technische Daten / Technical Data / <strong>SelCom</strong> <strong>4040</strong> 41<br />
Ersatzteile / Spare parts 42 - 43<br />
- 2 -
TEAM <strong>SelCom</strong> <strong>8012</strong> / <strong>SelCom</strong> <strong>4040</strong><br />
1 2 3 4<br />
SQUELCH<br />
5<br />
ON<br />
6<br />
VOLUME<br />
CALL<br />
TEAM<br />
<strong>SelCom</strong> <strong>8012</strong><br />
SET 1 2 3 4<br />
7<br />
8<br />
9<br />
10<br />
ANT<br />
11<br />
CHANNEL<br />
SC A/F DW FRQ CH9<br />
12<br />
13<br />
14<br />
15<br />
16<br />
17 18 19<br />
- 3 -<br />
EXT SP<br />
EXT S-<br />
METER<br />
DC 13.8V<br />
20
TEAM <strong>SelCom</strong> <strong>4040</strong><br />
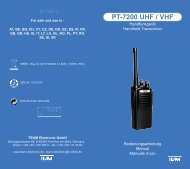
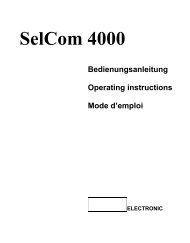
OPERATION CONTROLS, DISPLAYS AND CONNECTORS<br />
( 1 ) Squelch control [ SQUELCH ]<br />
( 2 ) Volume control / ON switch [ VOLUME / ON ]<br />
( 3 ) LCD display window for channel number, frequency, functions and<br />
S-meter<br />
( 4 ) Rotary switch for channel selection [ CHANNEL ]<br />
( 5 ) Microphone connector 6 pin for any microphone with or without<br />
UP/DOWN channel selection and amplifier<br />
( 6 ) Call and encoding button for transmitting of the DTMF selective call<br />
[ CALL ]<br />
( 7 ) Standby and encoding button for receiving of the DTMF selective call<br />
[ SET ]<br />
( 8 ) Channel memory [ 1 ] and encoding button for DTMF dual tone No. 1.<br />
( 9 ) Channel memory [ 2 ] and encoding button for DTMF dual tone No. 2.<br />
( 10 ) Channel memory [ 3 ] and encoding button for DTMF dual tone No. 3.<br />
( 11 ) Channel memory [ 4 ] and encoding button for DTMF dual tone No. 4.<br />
( 12 ) Button for occupied channel search function ( SCAN ) [ SC ]<br />
( 13 ) Toggle switch button for AM or FM mode [ A/F ]<br />
( 14 ) Button for dual watch function [ DW ]<br />
( 15 ) Toggle switch button for channel or frequency display [ FRQ ]<br />
( 16 ) Priority channel selector button [ CH9 ]<br />
( 17 ) Antenna connector SO239 [ ANT ]<br />
( 18 ) Socket for external speaker 3.5 mm [ EXT SP ]<br />
( 19 ) Connector for DC supply cord ( 3 pin ) [ DC 13.8V ]<br />
( 20 ) Socket for external S-meter 2.5 mm [ EXT S-METER ]<br />
- 12 -
wise and adjust it to a comfortable listening level. If the transceiver is on a clear<br />
channel and not muted by the squelch function a noise should be heard from the<br />
speaker now. The back illumination of the display ( 3 ) and the front panel will<br />
light up. When the unit is switched on the first time or after being disconnected<br />
for a longer period the first channel will be channel 9 in FM mode. The display<br />
will show [ 9, FM and SRF ]. If the power source is not disconnected after<br />
switching off, the settings and functions will be stored ( memory backup ). All correct<br />
entries will be confirmed by a receipt tone.<br />
2. Squelch function [ SQUELCH ] :<br />
Rotate the squelch control ( 1 ) [ SQUELCH ] slowly clockwise until the background<br />
noise just disappears while any incoming signal will be heard. The<br />
squelch control should only be turned up enough to stop the background noise<br />
on an unused channel. Turning the control further clockwise will increasingly<br />
suppress interfering signals as well as weak stations. The setting should be<br />
made on an unused channel.<br />
3. Channel selection [ CHANNEL ] :<br />
Select the desired channel 1 - 40 with the channel selector switch ( 4 )<br />
[ CHANNEL ]. The display ( 3 ) shows the actual channel. The CH9 function<br />
must not be activated which will be indicated by a flashing 9 in the display. In<br />
parallel the channels can be controlled by the built-in UP/DOWN buttons of the<br />
microphone. The channel numbers step in a ring like system UP from 40 to 1<br />
and DOWN from 1 to 40.<br />
It is also possible to show the actual frequency ( in MHz ) in the display instead<br />
of the channel numbers by pressing the button ( 15 ) [ FRQ ]. This has no influence<br />
on the following described functions. By pressing the button ( 15 ) [ FRQ ]<br />
a second time the channel number will appear in the display again.<br />
Radio operation is only possible with the counter station at coinciding channel<br />
numbers and modulations. By pressing the instant channel key ( 16 ) [ CH9 ]<br />
channel 9 can be selected for transmit and receive immediately. A flashing 9 will<br />
appear in the display. No channel selection is possible now. Pressing ( 16 )<br />
[ CH9 ] again will cancel this function and the unit returns to the previous selected<br />
channel.<br />
4. Modulation selection [ A/F ] :<br />
By pushing the key ( 13 ) [ A/F ] the transceiver will toggle between AM and FM<br />
mode. The actual modulation type is indicated by the symbols [ FM, AM ] in the<br />
display ( 3 ).<br />
With the TEAM <strong>SelCom</strong> <strong>4040</strong> all 40 channels can be selected both in AM and<br />
in FM mode. In FM mode the transmit output power is 4 W and in AM mode it is<br />
1 W.<br />
- 13 -
wise and adjust it to a comfortable listening level. If the transceiver is on a clear<br />
channel and not muted by the squelch function a noise should be heard from the<br />
speaker now. The back illumination of the display ( 3 ) and the front panel will<br />
light up. When the unit is switched on the first time or after being disconnected<br />
for a longer period the first channel will be channel 9 in FM mode. The display<br />
will show [ 9, FM and SRF ]. If the power source is not disconnected after<br />
switching off, the settings and functions will be stored ( memory backup ). All correct<br />
entries will be confirmed by a receipt tone.<br />
2. Squelch function [ SQUELCH ] :<br />
Rotate the squelch control ( 1 ) [ SQUELCH ] slowly clockwise until the background<br />
noise just disappears while any incoming signal will be heard. The<br />
squelch control should only be turned up enough to stop the background noise<br />
on an unused channel. Turning the control further clockwise will increasingly<br />
suppress interfering signals as well as weak stations. The setting should be<br />
made on an unused channel.<br />
3. Channel selection [ CHANNEL ] :<br />
Select the desired channel 1 - 40 with the channel selector switch ( 4 )<br />
[ CHANNEL ]. The display ( 3 ) shows the actual channel. The CH9 function<br />
must not be activated which will be indicated by a flashing 9 in the display. In<br />
parallel the channels can be controlled by the built-in UP/DOWN buttons of the<br />
microphone. The channel numbers step in a ring like system UP from 40 to 1<br />
and DOWN from 1 to 40.<br />
It is also possible to show the actual frequency ( in MHz ) in the display instead<br />
of the channel numbers by pressing the button ( 15 ) [ FRQ ]. This has no influence<br />
on the following described functions. By pressing the button ( 15 ) [ FRQ ]<br />
a second time the channel number will appear in the display again.<br />
Radio operation is only possible with the counter station at coinciding channel<br />
numbers and modulations. By pressing the instant channel key ( 16 ) [ CH9 ]<br />
channel 9 can be selected for transmit and receive immediately. A flashing 9 will<br />
appear in the display. No channel selection is possible now. Pressing ( 16 )<br />
[ CH9 ] again will cancel this function and the unit returns to the previous selected<br />
channel.<br />
4. Modulation selection [ A/F ] :<br />
By pushing the key ( 13 ) [ A/F ] the transceiver will toggle between AM and FM<br />
mode. The actual modulation type is indicated by the symbols [ FM, AM ] in the<br />
display ( 3 ).<br />
With the TEAM <strong>SelCom</strong> <strong>4040</strong> all 40 channels can be selected both in AM and<br />
in FM mode. In FM mode the transmit output power is 4 W and in AM mode it is<br />
1 W.<br />
- 14 -
5. Occupied channel search ( SCAN ) [ SC ] :<br />
Before selecting the SCAN function set the squelch control ( 1 ) [ SQUELCH ]<br />
according to Para 2 of this chapter because this function does not work with unmuted<br />
receiver. Depress the key ( 12 ) [ SC ] now. In the display appears [ SC ]<br />
and the channels are stepping upwards. SCAN stops on the first occupied channel,<br />
where a signal can trigger the squelch threshold. It continues 10 seconds after<br />
the signal falls below the squelch threshold.<br />
Depressing the key ( 12 ) [ SC ] again or any other, except ( 15 ) [ FRQ ], will<br />
stop the SCAN function.<br />
6. Dual Watch [ DW ] :<br />
This function allows to watch activity on a second channel. Before selecting the<br />
DW function set the squelch control ( 1 ) [ SQUELCH ] according to Para 2. Select<br />
now the first channel which you want to survey and then depress briefly the<br />
button ( 14 ) [ DW ]. In the display appears a flashing [ DW ] sign. Start within 5<br />
seconds selecting the second channel which you want to survey otherwise the<br />
DW function will stop automatically. After having reached the desired channel<br />
press the button ( 14 ) [ DW ] another time and the symbol [ DW ] will appear<br />
permanently. Now the DW function is completely activated.<br />
The DW function will remain on this channel if the incoming signal can open the<br />
squelch and is not longer interrupted than 10 seconds. Otherwise the unit will<br />
tune to the other channel. If no signal is found there the radio will step every<br />
second to the other channel.<br />
Depressing the key ( 14 ) [ DW ] again or any other, except ( 15 ) [ FRQ ], will<br />
stop the DW function.<br />
7. Transmit ( Push To Talk / PTT ) :<br />
To transmit depress and hold the PTT key on the microphone. In the display appears<br />
[ TX ] and together with the symbol [ SRF ] = ( Signal Radio Frequency )<br />
the relative output power will be shown in form of a progressively increasing<br />
number of bar sections. The microphone sensitivity has been set to give good<br />
results speaking normally at a distance of 2 - 4 inches. Speaking too loudly will<br />
cause distortion and make the signal difficult to understand especially in case of<br />
amplifier or echo microphones. While the set is in the transmitting mode there is<br />
no key entry possible and the receiver is muted. On completion of the transmission<br />
release the PTT key and the set will revert to receiving mode.<br />
8. S-meter [ EXT S-METER ] :<br />
Behind the letters [ SRF ] the relative transmit power and received fieldstrength<br />
will be displayed in the window ( 3 ), forming progressive bar sections. The<br />
TEAM <strong>SelCom</strong> <strong>4040</strong> has on its rear panel a socket ( 20 ) EXT S-METER for the<br />
connection of an additional S-meter with a 2.5 mm plug.<br />
- 15 -
9. External speaker [ EXT SP ] :<br />
The TEAM <strong>SelCom</strong> <strong>4040</strong> has on its rear panel a socket ( 18 ) [ EXT SP ] for an<br />
external speaker of 4 - 8 ohm impedance with 3.5 mm plug. At 4 ohms the dissipation<br />
of the speaker can be up to 2 watts.<br />
10. Channel memory keys [ 1 - 4 ] :<br />
The TEAM <strong>SelCom</strong> <strong>4040</strong> can store up to 4 frequently used channels and their<br />
modulations. The default settings of the memories 1 - 4 are the channels 1, 9,<br />
19, 40. These memories can be overwritten with other channel numbers. In case<br />
of data loss the default settings will be stored in the memories again.<br />
To save a new channel first select it with the channel selector switch ( 4 )<br />
[ CHANNEL ]. Then depress one of the memory keys ( 8 - 11 ) [ 1 - 4 ] for 4 or 5<br />
seconds until a second receipt tone indicates the overwriting of the new channel<br />
number into the corresponding memory.<br />
To call a saved channel depress briefly the corresponding memory key. On the<br />
left side of the display the actual memory number is displayed in case of data<br />
storage or recall. The memory number disappears by selecting a new channel.<br />
11. DTMF Selective Call System [ CALL / SET ] :<br />
General :<br />
The DTMF selective call system ( = Dual Tone Modulation Frequency ) enables<br />
the radio operator to open one or more muted receiver by transmitting a specially<br />
coded tone sequence. This is only possible on condition that all partners use the<br />
same channel, modulation mode and selective call system. The transceivers<br />
must be switched on and operate normally and the selective call system has to<br />
be set into standby mode to receive the coded tone calls. This will mute the<br />
loudspeaker of the receiver until the detection of a coded tone sequence, which<br />
corresponds with the own reception code of the transceiver. This will open the<br />
receiver and it will remain unmuted even when the calling station stops transmitting.<br />
So all activities on this channel can be heard, and those stations which are<br />
not equipped with a selective call system, too. It is also possible to communicate<br />
with them. They are only unable to open a receiver muted by a selective call system.<br />
The TEAM <strong>SelCom</strong> <strong>4040</strong> selective call system uses 4 dual tones in succession.<br />
There are 4 different dual tones. So there are 256 combinations possible. The<br />
reception code and the transmission code can be programmed separately from<br />
each other. For individual call it is recommended for each participant to program<br />
his own reception code. Example : 4 Partners, consisting of head office and 3<br />
mobile stations: Head office = 1111 / Jack mobile = 1112 / Susan mobile = 1113<br />
/ John mobile = 1114. In case of group call all members have the same reception<br />
code. This will open all receivers if the transmitted code is sent out interferencefree<br />
and free of noise. In all cases the transmission code of the<br />
- 16 -
calling station and the reception code of the listening station have to match. In<br />
our example the head office has to change its transmission code to reach every<br />
participant in case of individual call. The same applies to the mobile stations if<br />
they want to reach each other. If the communication is made with the help of the<br />
head office all mobile stations need only the transmission code 1111.<br />
Entry of the reception code :<br />
Depress briefly the button ( 7 ) [ SET ] so that the symbol “music note“ appears<br />
in the display on the top right of the channel number. The receiver is now muted.<br />
Depress the key ( 7 ) [ SET ] again but hold it for 3 or 4 seconds until a second<br />
receipt tone indicates that the radio is ready for data input. The display shows<br />
now [ 0000 ] with a flashing first digit. Begin now entering within 3 - 4 seconds<br />
the reception code with the keys ( 8 - 11 ) [ 1 - 4 ]. With every new entry the<br />
flashing digit moves one step further to the right. After entering the last digit the<br />
inputs will be saved 3 - 4 seconds later automatically and the display will revert<br />
to the normal mode. The same procedure applies when you overwrite previous<br />
entries.<br />
Entry of the transmission code :<br />
Depress briefly the button ( 7 ) [ SET ] so that the symbol “music note“ appears<br />
in the display. Then depress the key ( 6 ) [ CALL ] and hold it for 3 or 4 seconds<br />
until a second receipt tone indicates the readiness for data input. The display<br />
shows again [ 0000 ] with a flashing first digit. Begin now entering within 3 - 4<br />
seconds the transmission code with the keys ( 8 - 11 ) [ 1 - 4 ]. With every new<br />
entry the flashing digit moves one step further to the right. After entering the last<br />
digit the inputs will be saved 3 - 4 seconds later automatically and the display will<br />
revert to the normal mode. The same procedure applies when you overwrite previous<br />
entries.<br />
Radio operation with the DTMF selective call system :<br />
To activate the DTMF selective call system depress briefly the button ( 7 )<br />
[ SET ] so that the symbol “music note“ appears in the display. This will mute the<br />
receiver and make it ready to decode received selective tone calls on the actual<br />
channel. In case of a previous sent out transmission code or recognition of a selective<br />
tone call the receiver will be opened. The symbol “music note“ will remain<br />
in the display instead. If you want to make it silent again you have to cancel the<br />
DTMF function ( “music note“ disappears ) and to reactivate it again by pressing<br />
the button ( 7 ) [ SET ] two times.<br />
A transmission of a selective tone call is only possible with the activated DTMF<br />
function ( symbol “music note“ ) in the display. To start the transmission depress<br />
the button ( 6 ) [ CALL ] briefly. The radio will switch over to transmission mode<br />
and starts sending out the transmission code. When the tone sequence is sent<br />
out completely it will revert to not muted receiving mode. If the channel is clear<br />
- 17 -
and the counter station within the range its receiver will be opened, too. The<br />
communication can begin now. DTMF operation is possible in both types of<br />
modulation. We recommend the use of FM because of the better safety against<br />
disturbance.<br />
12. Battery backup :<br />
As long as the TEAM <strong>SelCom</strong> <strong>4040</strong> is connected without any interruption to a<br />
car battery or a switched on power supply the memory contents of selective call<br />
codes and channels will be kept stored, even when it is switched off at ( 2 )<br />
[ VOLUME / ON ]. In addition it contains an built-in rechargeable button cell<br />
which will only be charged when the unit is in operation. According to the periods<br />
of running and the periods of not working the charging condition may be quite<br />
different. So it is recommended to keep an eye on a reasonable charging time<br />
before writing to the memories. A completely charged battery can keep the<br />
memory contents stored for up to 100 hours even when the unit is disconnected<br />
from every power source.<br />
13. Servicing the TEAM <strong>SelCom</strong> <strong>4040</strong> :<br />
There are no user adjustable or user serviceable parts inside the radio. The casing<br />
must not be opened. Independent repairs or adjustments must not be carried<br />
out, since each modification or unauthorised intervention will immediately cancel<br />
all and any guarantee or repair claims, they are also likely to result in nonconformity<br />
to approval regulations which will render the set illegal. In the event of a<br />
defect becoming apparent, contact a properly equipped and authorised dealer.<br />
- 18 -
TECHNISCHE DATEN / TECHNICAL DATA<br />
TEAM <strong>SelCom</strong> <strong>8012</strong><br />
Kanalnummern und Frequenzen nach BAPT 222 ZV 102 / 104 ( 80 Kanäle )<br />
Kanal Nr.- Frequenz<br />
Channel Nbr. - Frequency<br />
Kanal Nr. - Frequenz<br />
Channel Nbr.- Frequency<br />
Kanal Nr. - Frequenz<br />
Channel Nbr. -<br />
Frequency<br />
Kanal Nr. - Frequenz<br />
Channel Nbr. -<br />
Frequency<br />
01 26.965 MHz FM 21 27.215 MHz FM 41 26.565 MHz FM 61 26.765 MHz FM<br />
02 26.975 MHz FM 22 27.225 MHz FM 42 26.575 MHz FM 62 26.775 MHz FM<br />
03 26.985 MHz FM 23 27.255 MHz FM 43 26.585 MHz FM 63 26.785 MHz FM<br />
04 27.005 MHz FM/AM 24 27.235 MHz FM 44 26.595 MHz FM 64 26.795 MHz FM<br />
05 27.015 MHz FM/AM 25 27.245 MHz FM 45 26.605 MHz FM 65 26.805 MHz FM<br />
06 27.025 MHz FM/AM 26 27.265 MHz FM 46 26.615 MHz FM 66 26.815 MHz FM<br />
07 27.035 MHz FM/AM 27 27.275 MHz FM 47 26.625 MHz FM 67 26.825 MHz FM<br />
08 27.055 MHz FM/AM 28 27.285 MHz FM 48 26.635 MHz FM 68 26.835 MHz FM<br />
09 27.065 MHz FM/AM 29 27.295 MHz FM 49 26.645 MHz FM 69 26.845 MHz FM<br />
10 27.075 MHz FM/AM 30 27.305 MHz FM 50 26.655 MHz FM 70 26.855 MHz FM<br />
11 27.085 MHz FM/AM 31 27.315 MHz FM 51 26.665 MHz FM 71 26.865 MHz FM<br />
12 27.105 MHz FM/AM 32 27.325 MHz FM 52 26.675 MHz FM 72 26.875 MHz FM<br />
13 27.115 MHz FM/AM 33 27.335 MHz FM 53 26.685 MHz FM 73 26.885 MHz FM<br />
14 27.125 MHz FM/AM 34 27.345 MHz FM 54 26.695 MHz FM 74 26.895 MHz FM<br />
15 27.135 MHz FM/AM 35 27.355 MHz FM 55 26.705 MHz FM 75 26.905 MHz FM<br />
16 27.155 MHz FM 36 27.365 MHz FM 56 26.715 MHz FM 76 26.915 MHz FM<br />
17 27.165 MHz FM 37 27.375 MHz FM 57 26.725 MHz FM 77 26.925 MHz FM<br />
18 27.175 MHz FM 38 27.385 MHz FM 58 26.735 MHz FM 78 26.935 MHz FM<br />
19 27.185 MHz FM 39 27.395 MHz FM 59 26.745 MHz FM 79 26.945 MHz FM<br />
20 27.205 MHz FM 40 27.405 MHz FM 60 26.755 MHz FM 80 26.955 MHz FM<br />
Allgemein / General<br />
Betriebsspannung / Supply Voltage 13.2 Volt nominal ( 11 - 15 Volt Betrieb / operating )<br />
Stromaufnahme<br />
Current Consumption<br />
RX = 490 mA ( inklusive Nachtlicht )<br />
TX = 1370 mA ( FM ) inklusive Nachtlicht<br />
820 mA ( AM ) “ “<br />
Gewicht, Weight ca. 750 gr. ohne Zubehör und Verpackung<br />
Maße, Dimensions B 158, T 135, H 48 mm ( Gehäuse / Cabinet )<br />
RX - Empfänger / Receiver<br />
Empfindlichkeit / Sensitivity 1.2 µV / 1.2 KHz Hub / Deviation. 20 dB (S+N+D)/N<br />
Zwischenfrequenz<br />
1. ZF 10.695 MHz<br />
Intermediate Frequency<br />
2. ZF 455 KHz<br />
Selektivität,/ Adjacent Channel Rejection => 60 dB / ETS 300 135<br />
Intermodulationsdämpfung<br />
Intermodulation Response Rejection<br />
=> 54 dB / ETS 300 135<br />
NF - Ausgangsleistung / Audio Output Power 2.0 Watt / 8 Ohm ( 10% THD )<br />
Sendeleistung<br />
RF Output Power<br />
Modulationshub ( FM ) Modulation Deviation<br />
Modulationsgrad ( AM ) Modulation Degree<br />
Betriebsart / Type of Emission<br />
Oberwellenunterdrückung / Harmonics Rejection<br />
Nebenwellenunterdrückung / Spurious Rejection<br />
TX - Sender / Transmitter<br />
4.0 Watt / 50 Ohm ( FM )<br />
1.0 Watt / 50 Ohm ( AM )<br />
2 KHz max. ( begrenzt )<br />
90% max. ( begrenzt )<br />
F3E ( Frequenzmodulation / Frequency Modulation )<br />
A3E ( Amplitudenmodulation / Amplitude Modulation )<br />
- 40 -<br />