
Create successful ePaper yourself
Turn your PDF publications into a flip-book with our unique Google optimized e-Paper software.
OPTION PARTTHINGS REQUIRED FOR OPERATIONOPTION THINGS NEED BESIDES THE KIT3.5 cc (21 Class) ENGINEREAR EXHAUSTOFNA/PiccoP7-EVO3#51216Glow Plug Heat with Battery & Charger# 10227....$$19.95(please note OFNA Glow Heats available)Bottle’s with spout# 10160 - large 500cc# 10161 - large 500 ccAuto Stop# 10162 - small 250cc# 10164 - CNC spout 500CC# 10167 - CNC spout 800CCOff-Road Starter Box, 12V motor# 10250 - 1/8 scale Starter Box# 10253 - 1/8 scale Starter Box w/ PanelOff-Road Starter Box, two 550 motors# 10248 - 1/8 scale Starter Box# 10249 - 1/8 scale Starter Box,RTROptional Parts# 92571 - Power Panel Glow Heater# 92572 - Cable for Glow Plug12V Battery for Starter Box(must have)AA Batteries ( 12 pcs ) for radioRADIO CONTROL UNITNote: Carefully read the instruction manual of your2 channel radio controller before using.SUITABLE SERVO SIZE36mm-41mm15mm - 21mm29mm - 42mmRadio must be set at neutral positionbefore installing in the kit.SEQUENCE TO SET NEUTRALInstall AA batteries in Radio.Extend the antenna.(Transmitter)Install batteries into Car receiver .After installing the battery, connect thebattery box.Extend the antenna. (Receiver)Set the trim-lever at center.Turn on the switch. (Transmitter)Turn on the switch. (Receiver)Make sure the servos are in command.When the operation stick is in neutral,servo horns must be in neutral as well.*Adjustment can be made by reinstallingthe servo horn.11 Turn off the switch. (Receiver)12 Turn off the switch. (Transmitter)13 Retract the antenna. (Transmitter)More Optional Parts . . .#102011700 NimH Battery HumpPack .. $34.95# 10214 NiMh Battery PackCharger.. $7.95# 51007 or 08 OFNA/PicooGlow Plug .. $13.95TOOLS NOT INCLUDED IN KITCutterInstant CementPhillips Type Screw Drivers ( L )Curved ScissorsMasking TapeINCLUDED WITH KIT5mmHex WrenchPhillips Type Screw Drivers ( S )BrushCross Wrench#17109 $3.953mmHex Wrench2.5mmHex WrenchNeedle Nose PliersPaints1.5mmHex WrenchKnifeGlow Plug & 17MM Cross Wrench#10801 $6.95Grease7mm and 5.5mmHex Wrench
THINGS NEEDEDRTR KITS - REQUIRED FOR OPERATIONYou will need to buy a few items to start the engine and run the car.• Use 20% nitro CAR fuel. Do not use airplane or heli fuels, they willover heat the engine.• Buy LONG glow plugs, like OFNA/PICCO Plug (#51007 or 51008).Use plugs WITHOUT idle bar. Do NOT use plugs, like the MC-59 orOS-8In your box you will find..• #10163 - Bottle, spout top• #10219 - Red “D” size glow heaterAA Batteries ( 12 pcs )You need to get batteries for the radio transmitter and the car receiver packs.• Radio TX needs (8) eight AA batteries.• Car needs (4) four AA Alkaline., Alkaline type batteries will work, but braking will bereduced and 30 minute life. The best for car, is to use a 5 cell hump receiver pack forincreased voltage and longer life..#102021700 Ni-Mh Hump Pack,Recommended Option:You may want to upgrade the car battery pack to a Ni-Cad or Ni-Mh 5 celltype(600AE). This will give more run time. OFNA #10202 1700Ni-Mh Hump Packand Ni-Mh Battery Charger #1021410214Over-niteChargerTOOLS NOT INCLUDED IN KIT,BUT NEEDED TO MAINTAIN YOUR CAR.CutterInstant CementPhillips Type Screw Drivers ( L )Curved Scissors#91009 $5.95GreasePhillips Type Screw Drivers ( S )Cross Wrench#17109 $3.95Needle Nose PliersKnifeGlow Plug & 17MM Cross Wrench#10801 $6.95
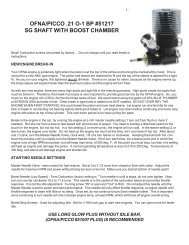
MUST READ THIS BEFORE RUNNINGRunning a nitro kit is fun and easy, but to make this a safeand good experience you must observe a few rules. Thiskit is extremely fast, easily over 40MPH, and can seriouslyinjure someone if you are not careful.Where to run car?• Any running area you choose must be dry. Do not runcar near any water or wet dirt.• Do not run on public streets. It is very easy to have thecar run over or damaged by hitting the curb.• Do not operate car in tight confined places. The car isvery fast and will easily hit something.• Do not run near people or animals. The car is very fastand will too easily hit someone.• Due to noise, you will want to consider the surroundingarea when operating the car.• Do not operate the car at night. You will not be able todrive it without hitting something.• Do not operate the car indoors. Engine exhaust is nothealthy.Glow Fuel• Glow fuel is poisonous!• Glow fuel is flammable!• Do not leave in fuel bottle with lid off at any time.• Do not use any fuel other than glow fuel in this engine.First Time Starting the EngineCaution! When starting engine make sure the following isobserved.• Set engine Master needle to 3 turns (rich setting)• Do not do this alone, get an experienced friend to help atfirst.• Fill fuel tank, try not to spill fuel. Do not spill fuel onreceiver• Hold car off the ground, so it will not runaway when firststarted• Turn on Radio and check the linkage before startingengine.• Turn on car receiver battery switch.• Always have an air filter on the carburetor to keep dirtout of engine.Engine Break-in• See Engine Page.Emergency Stopping Engine When Running• Remove air filter and cover carb. intake.• Squeeze fuel line and hold until engine stops.• With a rag, cover exhaust outlet.Storing Car After Running• Remove fuel from tank and fuel lines• Turn off radio in car• Put a few drops of after run in engine to keep it fromrusting.• Clean oil and dirt from chassis with a degreaser likeSimple Green.Precautions• This kit is not a toy. Always run car with a secondperson as a spotter and pitman.• Hot Parts - The pipe, manifold, engine and head are veryhot and will cause burns.• Rotating Parts - Keep hands away from the drive train,wheels, and engine when engine is running.• Radio - Check batteries life before running the car. Ifradio does not have full control of the car with steeringand/or throttle/brake do not run until corrected. Failure tocorrect this will result in possible injury and damage to thecar or property.• Glow fuel - Do not leave the glow fuel unattended withthe lid off. Fuel contains Methanol and Nitro Methaneboth are flammable and poisonous.•Store fuel in cool ventilated location. Refer to the glowfuel label for additional precautions.• Car Fuel tank - Never store fuel in car tank, it will ruin theengine if left in tank.• Always turn off the car BEFORE turning off radio.• DAMAGE DUE CAR RUN AWAY IS NOT A WARRANTYISSUE.IF YOU DO NOT BREAK-IN ENGINECORRECTLY, MAINLY AT LOW RPM,YOU WILL BREAK THE CONNECTINGROD!FAILURE TO NOT READ ANDFOLLOW BREAK-IN ENGINEINSTRUCTIONS WILL VOIDWARRANTY!CHECK RADIO SETTING,LINKAGE BEFORE STARTING.
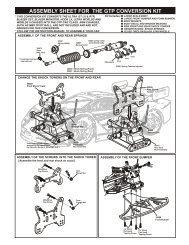
PLASTIC PARTS USED40538DIFF. CASE40536FRONT C HUB40533FRONT AND REAR GEAR BOX40668FRONT AND REAR LOWER ARM40669BUMPER30802Throttle Linkage Plastic40643SHOCK PLASTIC PARTS40643Shock CapWasher40643Shock PlasticBall End(Short)40643Shock PlasticBall End(Long)41053FRONT UPPER ARM41036CENTER DIFF. MOUNT40534ARM HOLDER41008SHOCK PLASTIC PARTS
PLASTIC PARTS FOR USE41034CHASSIS BRACE41052SERVO SAVER34026SERVO FIXING PLASTIC PARTS40540REAR UPPER RIGHT/FRONT BUMPER40542WIN STAY41033STONE GUARD16015WING40541RECEIVER BOX
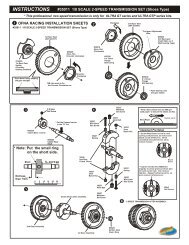
1ASSEMBLY OF THE FRONT AND REAR DIFF.Builds two differentials for front and rear.BAGNO.1Step 1 Step 2400102.5x13.8mm Pin.....x440513Oil940344x4mmSet Screw.....x23605340009 4103140596405383605340009P6 O-Ring.....x440010400094001040596360538x16mm Ball Bearing.....x44x4mm40513Oil2ASSEMBLY OF THE FRONT AND REAR DIFF.BAGNO.13x12mmStep 1 Step 2Tighten307764x10mm Washer.....x1630774Tight the diff screws in this order.307764051313940203x12mmDi ff. O il40011307744mmAlum. Cross Pin.....x43ASSEMBLY OF THE CENTER DIFF.Flat Head Hex Screẉ ....x8142*Put the Diff. Oil #7000 for frontand the #3000 for rear.*Fill the Diff. case to approx. 80%with the Diff. Oil.BAGNO.1Step 1 Step 2400102.5x13.8mm Pin.....x240513940344x4mmSet Screw.....x1Oil3605340009 4051840009P6 O-Ring.....x240605400104053840009400103605340605360538x16mm Ball Bearing.....x24x4mm40513Oil
4ASSEMBLY OF THE CENTER DIFF.BAGNO.13x12mmStep 1 Step 2Tighten307764x10mm Washer.....x8307764051330774Tight the diff screws in this order.13940203x12mmFlat Head Hex Screẉ ....x4Di ff.Oil4001142307744mmAlum. Cross Pin.....x4* Use 10000 weight diff. oil in thecenter.* Fill the Diff. Case to approx. 80%with the Diff.Oil.5ASSEMBLY OF THE FRONT GEAR CASEBAGNO.2Step 1Step 2405334002413x16x0.2mm Shim.....x43605340024ApplyGrease36053360538x16mm Ball Bearing .....x241032400244x16mm40533940114x16mm Hex Screw.....x2Adjust the backlash withthe shims.4x35mm40688940154x35mm Hex Screw.....x26ASSEMBLY OF THE FRONT ARMS HOLDERBAGNO.2ACaster angle canbe changed withA or B40534ANB. use only as matched set "A"with"A"and "B" with "B".940365x4mmSet Screw.....x1Sc rewC e men tSteeringCharacteristics5x4mm40589ACaster(High/22 Degree)Steering responsebecomes milder.940264x12mmFlat Head Hex Screw.....x24x16mmBCaster(Low/20 Degree)Steering responsebecomes quicker.940274x16mmFlat Head Hex Screw.....x2410444x12mm2
ScrewCement7ASSEMBLY OF THE FRONT SHOCK STAYBAGNO.2Step 1 Step 2410093x10mm940033x10mmHex Screw.....x441035410094x10mm940094x10mmHex Screw.....x441010406913x10mm3x10mm410093x28mmCap Screw.....x28ASSEMBLY OF THE KNUCKLE ARMSBAGNO.236053Assemble both right and left sidesStep 1Step 2940344x4mmSet Screw.....x2405364052740570940424mmNylon Nut.....x4Tighten36053405264x4mm40527Knuckle ArmBushing.....x4Step 34mmStep 436055360552.5x16.8mmPin.....x2405284065740528King Pin Screw.....x4Tighten4mm9ASSEMBLY OF THE KNUCKLE ARMS INTO FRONT LOWER ARMSAssemble both right and left sidesBAGNO.24x10mmSet Screw4mm*A 4x10mm set screw is usedto adjust ride-height.307764x10mm Washer.....x14x10mm940413mmNylon Nut.....x2Approx 2mm40604940424mmNylon Nut.....x230776Insert two 30776 washerinto arm shaft beforeassembly.4066840602(Short)368704x10mmSet Screw.....x23mm3
10 ASSEMBLY OF THE FRONT UPPER ARMSBAGNO.2Assembly for both right and left side.368507mmBall and Socket.....x211¡GApprox. 9mm4105336861366903685011 ASSEMBLY OF THE FRONT STABILIZERBAGNO.2Assembly for both right and left side.3mm940413mmNylon Nut.....x4406023mmTighten940083x25mmHex Screw.....x2Insert the drive shaftinto cap joint beforeassembly.3x25mm12ASSEMBLY OF THE FRONT STABILIZERAssembly for both right and left side.BAGNO.2940353x8mmSet Screw.....x2Makes two rods for leftand righthand-side.940063x18mmHex Screw.....x230341405403x8mm30403405403x18mm4
13 ASSEMBLY OF THE FRONT STABILIZERBAGNO.23x3mm3x3mm940333x3mmSet Screw.....x40.5mm940353x8mmHex Screw.....x4405333x8mm3x3mm3x8mm405334068514ASSEMBLY OF THE SERVO SAVERBAGNO.4Step 1 Step 240037307764x10mm Washer.....x240024400343077640073Do NotOver Tighten40037400734x8mm Ball Bearing.....x24002441040405603x10mm3077640073400243x8mm Washer.....x24105241052EnsureFreeMovement3x10mm41052Oil40037Steering Plat Screw.....x23x10x1.0mmWasher .....x240677* Notice the direction of the servo saver connecting plate.15 ASSEMBLY OF THE SERVO SAVERBAGNO.4Step 1 405684x10mmStep 23x10mm940413mmNylon Nut.....x2400744x10mm40074400746x10mm Ball Bushing .....x44007441034940094x10mmHex Screw.....x2405113mm40074940033x10mmHex Screw.....x1405113mm5
16 ASSEMBLY OF THE STEERING TIE-RODBAGNO.4Assembly for both right and left side.Step 1Step2Tighten400393m Tapper Washer.....x2400383670040548Nylon Nut(Thin Type).....x240548406604003840039400387mm Ball.....x4367003x16mm940213x15mmFlat Head Hex Screw.....x211¡G66.5 mm17ASSEMBLY OF THE STEERING TIE-RODONTO GEAR BOXBAGNO.4400393m Tapper Washer.....x240533Front Plate badFrontScrewCe m ent3x15mm940094x10mmHex Screw.....x240039940213x15mmFlat Head Hex Screw.....x23x15mmScrew Cem e nt4003918ASSEMBLY OF THE REAR GEAR CASEBAGNO.5Step 1Step 240533360534002413x16x0.2mm Shim.....x440024ApplyGrease360534x16mm360538x16mm Ball Bearing .....x2410324002440533940114x16mm Hex Screw.....x240575Adjust the backlashwith the shims.4x40mm940314x40mm Flat Head Hex Screw.....x26
19ASSEMBLY OF THE REAR UNIVERSALJOINTBAGNO.54x12mmStep 1 Step 25x4mmSet Screw.....x141035Tighten4x12mmHex Screw.....x45x4mmScrewCement410444x12mm 4068920ASSEMBLY OF THE REAR SHOCKSTAYBAGNO.5Step 1 Step 24100940542410103x10mm410093x10mm3x10mmHex Screw.....x341010410093x28mm Cap Screw.....x2406923x10mm21 ASSEMBLY OF THE WING STAYBAGNO.53x16mm405423x12mmHex Screw.....x23x12mm405423x16mmHex Screw.....x440542LongShort4054240542405423x12mm3x16mm405427
19ASSEMBLY OF THE REAR UNIVERSALJOINTBAGNO.54x12mmStep 1 Step 2940365x4mmSet Screw.....x1Tighten41035940104x12mmHex Screw.....x45x4mmScrewCement410434x12mm 4068920ASSEMBLY OF THE REAR SHOCKSTAYBAGNO.5Step 1 Step 24100940542410103x10mm410093x10mm940033x10mmHex Screw.....x341010410093x28mm Cap Screw.....x2406933x10mm21 ASSEMBLY OF THE WING STAYBAGNO.53x16mm40542940043x12mmHex Screw.....x23x12mm40542940053x16mmHex Screw.....x44054240542LongShort40542405423x12mm3x16mm405427
22 ASSEMBLY OF THE WING STAYBAGNO.4NO.5Step 1 Step 2940413mmNylon Nut.....x2940094x10mmHex Screw.....x14x20mm4x10mm940114x16mmHex Screw.....x44x16mm41034940124x20mmHex Screw.....x13mm3mm23ASSEMBLY OF THE REAR WHEEL HUBS NO.2BAGNO.5Step 1 Step 2Assemble both right and left sides940344x4mmSet Screw940413mmNylon Nut.....x2.....x2406574x10mm40540Wheelbaseadjust washer368704x10mmSet Screw.....x240540360552.5x16mm Pin.....x2360533605340526406683mm40540Screw Cement360538x16mm Ball Bearing.....x4360554x4mm40603(Long)24ASSEMBLY OF THE REAR SUSPENSION ARMSAssemble both right and left sidesBAGNO.54x10mmSet Screw940424mmNylon Nut.....x2*A 4x10mm set screw is usedto adjust the ride-height.307764x10mm Washer.....x14mmNylon Nut*Insert the drive shaftinto the cap joint beforeassembly.40604Approx 2mm30776Insert two 30776 washerinto arm shaft beforeassembly.8
25 ASSEMBLY OF THE REAR SUSPENSION ARMSBAGNO.5405403mm3685040540940413mmNylon Nut.....x44066136850368507mm Ball.....x4940053x16mmHex Screw.....x23x16mm3mm940083x25mmHex Screw.....x2Use this ball end on the wheel side.The left and righthand side are the same. (Note the cut out.)55 mm3x25mm0 10 20 30 40 50 6026ASSEMBLY OF THE REAR STABILIZERRODSAssembly for both right and left side.BAGNO.5940353x8mmSet Screw.....x2Makes two rods for leftand righthand-side.940223x18mmHex Screw.....x230341405403x8mm30403405403x18mm27ASSEMBLY OF THE REAR STABILIZER3x3mmBAGNO.53x3mm940333x3mmSet Screw.....x4Approx 7mm.940023x8mmHex Screw.....x440686405333x8mm3x3mm3x8mm405339
28ASSEMBL Y OF THE STONE GUARD AND BRACEBAGNO.6NO.11Assembly for both right and left side.Step 13mm3mmStep 2410424104141035410333mmNut.....x2*Drill two 3mmholes for mounting41035.940183x5mmFlat Head Hex Screw.....x23x5mm3x10mm940193x10mmFlat Head Hex Screw.....x93x10mm3x10mm3x10mm3x10mm29 ASSEMBLY OF THE BRAKE CAM INTO CENTER DIFF.BAGNO.63x8mm3x8mmStep 1Approx 3mm.Step 2940333x3mmSet Screw.....x13x3mm3017130212302125x8mmFlange Ball Bearing.....x240614Builds two brake upper partsfor front and rear.410463021240613940173x8mmFlat Head Hex Screw.....x4Approx. 3.5mm940043x12mmHex Screw.....x4410363x12mm3666030 ASSEMBLY OF THE CENTER DIFF. MOUNTNO.63x30mmBAGDo not over tightenor brake cam willStep 1 Step 2bind. Step 3301713x3mm410363x30mm41036940333x3mmSet Screw.....x1410363x10mm410363x10mm40591940193x10mmFlat Head Hex Screw .....x2Insert Brake DiskFirst before assembly.Approx 4mm.940243x30mmHex Screw.....x44059110
31 ASSEMBLY OF THE FRONT GEAR CASE ONTO CHASSISBAGNO.2NO.4940193x10mmFlat Head Hex Screw.....x1940394x10mmFlat Head Hex Screw.....x2940274x16mmFlat Head Hex Screw.....x24x16mmScrew CementScrew4x10mmScrewCementCement4x10mm3x10mm32ASSEMBLY OF THE CENTER DIFF. ONTO CHASSISBAGNO.6940264x12mmFlat Head Hex Screw.....x44x12mm4x12mm33ASSEMBLY OF THE REAR GEAR CASE ONTO CHASSISBAGNO.5940193x10mmFlat Head Hex Screw.....x2940284x20mmFlat Head Hex Screw.....x4410354x20mm4x20mm3x10mm11
34 ASSEMBLY OF THE FRONT SERVOBAGNO.7Step 1Step 24054134026940403x8mm Washer.....x4*Adjust 34026 Servo Washer inaccordance with use of servo.34026940013x5mmHex Screw.....x340541Sensor(Option)3x8mm940033x10mmHex Screw.....x23x10mm3x18mm3x5mm34026340261.5mm Servo Washer940063x18mmHex Screw.....x43x5mm3x5mm3x18mm3x8mm35ASSEMBLY OF THE RADIO TRAYBAGNO.7Step 1 Step 23x12mm3x18mm3x8mm940403x8mm Washer.....x43x8mm3x12mm304116mm Ball.....x230411410453x8mm3x8mm940023x8mmHex Screw.....x33828030411940043x12mmHex Screw940063x18mmHex Screw.....x3.....x230661Use the screw providedwith your servo.306613040120mm1¡G 134026340264054136ASSEMBLY OF THE RADIO TRAY AND RECEIVER BOXBAGNO.74054130560* Connect the switchwire to receiver.Step 1 Step 1Step 32x8mm*Use the screw providewith your switch4054140541Switch40580405803x10mm37410374104054140855Battery Case102822x8mmScrew.....x4Receiver940033x10mmHex Screw.....x240541 *Put the servo wire intoreceiver box and connect toreceiver.Use the original battery case orrechargeable hump pack battery.Connect battery wire to switch.12
37 ASSEMBLY OF THE RADIO TRAY ONTO CHASSISBAGNO.73mm940413mmNylon Nut.....x13x12mm940193x10mmFlat Head Hex Screw.....x73x10mm940043x12mmHex Screw.....x13x10mm3x10mm3x10mm38ASSEMBLY OF THE FUEL TANKBAGNO.5NO.9Step 1 41035Step 2 Step 341035*Cut onthese line.* Choose the rightlength for your car.4105140620BK3x10mm40620BK41037940033x10mmHex Screw.....x139ASSEMBLY OF THE FUEL TANK POSTONTO CHASSISBAGNO.9940193x10mmFlat Head Hex Screw.....x241035410353x10mm3x10mm13
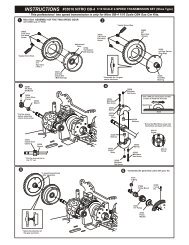
40 ASSEMBLY OF THE FUEL TANK ONTO CHASSISBAGNO.93741041ASSEMBLY OF THE CLUTCHBAGNO.8Step 1 Step 2*Fit the flywheel using a pair of theplIer and cross wrench.*Place the clutch shoes with the clutchsprings over the 3 pins of the flywheel.*Using a FLAT screw driver or needlenose pliers and bend the small end ofthe clutch spring behind the pilot shaft10098 than press down.101014057338313wSecrCement100132.6x5mmWasher1009842 ASSEMBLY OF THE CLUTCH AND ENGINE MOUNT3x5mmSpring Washer.....x4341105x10x4mmBall Bearing.....x2BAGNO.8Step 1 Step 23x12mm3x5mmSpringWasher3x12mm3x5mmSpringWasher3x8mmWasher.....x15x9x0.3mmWasher.....x15x9x0.3mm3x5mmCap Screw10098.....x13x8mm10399341103x12mmCap Screw94038.....x43x5mm341104057414
43 ASSEMBLY OF THE ENGINE ONTO CHASSISBAGNO.8Note book Paper.101145mmEngine Mount Screw .....x4*Use note book paper to set gear backlashbetween spur gear and clutch bell gear,applying pressure while retightening theengine.*If the space is not correct the spur gearwill be damaged.101141011444ASSEMBLY OF THE MANIFOLD AND MUFFLERBAGNO.8Step 1Step 2940344x4mmSet Screw.....x1*The muffler and manifold maynot included from different kit.10129Manifold(Option)940365x4mmSet Screw.....x1957001/8 Spring(Option)940394x10mmFlat Head Hex Screw.....x1957001/8 SiliconeSeal(Option)101204x4mm 957005x4mm1/8 SiliconeSeal(Option)10129Muffler(Option)410504x10mm1005245 ASSEMBLY OF THE THROTTLE LINKAGEBAGNO.7Step 1 Step 2940333x3mmSet Screw.....x22x8mm400603x3mm3x3mm361402mmNut.....x2306613080230802406173017240060Nylon Nut.....x1*Adjust the height with3x6.4x1mm washer.4061730172361402x8mmScrew.....x22mmCut off the servo saver as shown.308022.6x18mmScrew.....x12.6x18mm15
46 ASSEMBLY OF THE THROTTLE LINKAGES INTO BRAKE LEVERBAGNO.7Step 1 Step 23x3mmSnap On3x3mm3x3mm#15830802#1583x3mm 30802A-53AFuel Tube301723x10mm#1583x3mmSet Screw.....x4* Use the screwprovided withyour servo .3x10mmHex Screw.....x13066147ADJUSTING THE ENGINE CONTROL LINKAGES(Neutral) (Throttle High) (Brake)Approx. 0.5mm#158Idling adjustingScrew36140Approx. 1mm gapCarburetor is Opening fullyTurn on the Transmitter then Receiver and set theEngine Control Servo Trim to the neutral position.Adjust the idling adjusting screw on the Carburetorto be open approx. 1mm gap.Adjust both of the 10300 Engine Control and Brake linkageaccordingly.Adjust the Engine while it is not running.Adjust the Servo-Horn mounting position for theCarburetor to be full open.Change the pivot mounting position on the servohorn in case the Carburetor is not opening fully orif it is opening excessively. Or if available on theTransmitter, adjust the Throttle high end point.Adjust so the brakes work smoothly.If the brakes apply too much or not enough,adjust 30800 accordingly. Or if available on theTransmitter, adjust the High-End Brakeadjustment.Adjust 30800 to Change the front or Rear Brake.48ASSEMBLY OF THE AIR FILTERBAGNO.9Step 1 Step 2940023x8mmHex Screw.....x13x8mm40128*Apply filter oil to thefoam before use.4012740127A-81*Apply filter oil to thefoam before use.4012840129ZIP TIE16
28mm37.5 m m49 ASSEMBLY OF THE FRONT SHOCKS*Assemble 2 sets for frontBAGNO.10Fit the o-ring intogroove beforeStep 1 Step 2assembly.Step 3Do NotOver Tighten40060410082.6x5mm410121mm Washer410123.5mm O-Ring.....x2.....x44100341012410124101241019410064100741006Oil*Use Short ball endfor front.40643(Short)410112.6x5mm40054(Short)Be careful not todamage shock shaft.CORRECT SHOCK ASSEMBLY410122mm Washer304036mm Ball.....x2.....x2Step 4 Step 5 Step 6Step 7Fill the shocks withoil #60.410054101741013OK4101910mmx1mm O-Ring.....x21.Pull down piston and pour oil into shockcylinder.2.To remove air bubbles by slowly movingpiston up and down.3.Pull down piston, attach pressure top andclean shock oil overflow with tissue paper.40058*Cut 7mm for front.4100830403Carefully screw the shock shaft intothe bottom of the plastic ball enduntill the distance between the ballend and the shock body is 28mmfor the front .N.B. Do not over tighten as theplastic will strip.0 10 20 30 4050 ASSEMBLY OF THE REAR SHOCKS*Assemble 2 sets for rear410121mm Washer410123.5mm O-Ring.....x2.....x4Fit the o-ring intogroove beforeassembly.Step 1 Step 2 Step 341012#387B41012410084101241019BAG41006NO.10Oil4100741006*Use long ball endfor rear.40643(Long)Do NotOver Tighten400602.6x5mm410112.6x5mm40055(Long)Be careful not todamage shock shaft.CORRECT SHOCK ASSEMBLY410122mm Washer.....x2Step 4Fill the shocks withoil #50.Step 5 Step 6 Step 74101741005304036mm Ball.....x241013OK4101910mmx1mm O-Ring.....x21.Pull down piston and pour oil into shockcylinder.2.To remove air bubbles by slowly movingpiston up and down.3.Pull down piston, attach pressure top andclean shock oil overflow with tissue paper.400584100830403Carefully screw the shock shaft intothe bottom of the plastic ball enduntill the distance between the ballend and the shock body is 37.5mmfor the rear .N.B. Do not over tighten as theplastic will strip.0 10 20 30 4017
51 ASSEMBLY OF THE FRONT SHOCK ABSORBER940413mmNylon Nut.....x2Anti-Clockwise940403x8mm Washer.....x2RotateDirection4055940643940073x20mmHex Screw.....x1Use left threadscrew on the frontright arm.3mm3x8mm40559Left Thread Hex Screw(Siliver).....x13x20mmAssembly for both right and left side.52ASSEMBLY OF THE REAR SHOCK ABSORBER940413mmNylon Nut.....x2Anti-Clockwise940403x8mm Washer.....x2RotateDirection4055940643940073x20mmHex Screw.....x1Use left threadscrew on the rearleft arm.3mm3x8mm40559Left Thread Hex Screw(Siliver).....x13x20mmAssembly for both right and left side.53ASSEMBLY OF THE FRONT BUMPER3x12mmStep 13x10mm3x10mmStep 23x10mm4066940669940033x10mmHex Screw.....x64066940669940043x12mmHex Screw.....x3Front bumper assembly.3x12mm4x16mm940274x16mm.....x2Flat Head Hex Screw18
54 ASSEMBLY OF THE FUEL TUBE AND PRESSURE TUBEConnect to carbulater.Connect to fuel tank nipple.10177Connect to fuel nipple.Connect to fuel filter.Connect to pressure nipple.55 ASSEMBLY OF THE WINGBody Reamer (Not included)3x12mm405423x12mm4054216015Drill two 7mm holes for mounting.940043x12mmHex Screw.....x256ASSEMBLY OF THE TIRES AND WHEELSStep 1 Step 2Step 3Apply instant glue into the groove of the wheel.INSTANTGLUE80022811068610619
57 ASSEMBLY OF THE TIRE ONTO FRONT KNUCKLE AND REAR HUBAssembly for both right and left side.Tire and Wheel assembly.4055040550Wheel Nut.....x44055058 ASSEMBLY OF THE BODY AND PAINTINGCut out the body as shown.Use a neutral detergent to remove any dirt and oil.40687Before cutting and making holes on the body,put the unpainted body on the chassisto confirm the mounting position andlocation for holes and cutouts.Mask the windows from the inside with masking tape.Body Reamer( Not included)Paint the body with polycarbonate spray paints.Making two holes on the front andone hole on the rear for body posts.7mmSpray Paint7mmCut out for engine.Hole for fuel tank.20
59 MOUNTING BODY31159Body Clip31159Body Clip60 STARTING OF THE ENGINEHow to start the engine:1. Turn on transmitter and then receiver.2. Fill fuel tank with fuel bottle.3. Connect 1.2V glow plug starter.4. Start engine with 12V starter.( Note the direction of the starter.)5. After the engine be started, remove the1.2V glow plug starter.12V Starter and StarterRing ( Not Included)Starter rubber ring for car.( Insert starter rubberring on the 12V starter.)Glow Plug (Not Included)Normal Plug1.2V Glow Plug Igniter(Not Included)1.2VGlow PlugIgniterTurbo Plug* Follow the engine manufacturer instructionmanuals regarding engine set-up, carburetorand maintenance.12V StarterThere is 2 types of glow plug available"NORMAL or Turbo" depending of thetype of the engine.*To start the car, attach a glow plug igniterto the glow plug, and use either an electricstarter or starter box applied to the flywheelexposed through the chassis.1.2V12V .Note the direction ofthe starter.Connect with12V battery.Starter Box(Not Included)21
Driver:_________________Track:_______________/____________________<strong>X2</strong>-CRT Set-Up SheetAir Temp:_____80F_____Track Size Traction Surfaceopen High SmoothMedium Medium MediumTight Low BumpyFront Suspension1 2 3Steering Ackerman LocationShock Spring: _______Blue___________1Shock Piston: Standard DrilledShock Oil wt: ________50__________Shock Length( Center to Center) _______105.5mm______Toe-IN:_________12365423Front Sway Bar PreloadToe-Out:________Front Ride Height: _____________mmmmSway Bar: 2mm 2.3mm 2.5mmCamber:Neg: ______Pos: ______Caster Block: ______ A/A ______ B/BWheelAB1 23REBOUND STOPABNotes:_________________________________________________________________________________________Rear SuspensionShock Spring: _______Blue___________1234 5Shock Piston: Standard DrilledShock Oil wt: ________50__________67Shock Length( Center to Center) _______123.5mm______Rear Ride Height: ________mmSway Bar: 2.3mm 2.5mm 2.8mm______ NoneCamber:Neg: ______Pos: ______4891012321Rear Hub/Wheelbase: Forward MiddleBackRear Toe-In PlateAnti-Squat Plate561 1 12 222.52.52.5Wheel3 33123REBOUND STOPDifferentialFront Type: STD Torsen Oil_____KCenter Type: STD Torsen Oil_____KTiresFront Type:___________Compound_____STD____Rear Type:___________Compound_____STD____Foam:_______STD STIFF_____Foam:_______STD STIFF_____Rear Type : STD Torsen Oil_____KNote:_______________________________________________________________________________EngineType:______________Head Clearance___.025" Port:______Pipe:____________Fuel:_________%Plug__________ Turbo NormalCLUTCHShoe Brand:________________Compound:________ ALUM: Blue RedSpring Brand:_______________Tension:________SiILVER HVY 1mm_________Gearing:____13T____14T TO ____46T___48TClutch Shoes:2 Shoes3Shoes4 Shoes______Note:_______________________________________________________________________________
Driver:_________________Track:_______________/____________________<strong>X2</strong>-CRT Set-Up SheetAir Temp:_____80F_____Track Size Traction Surfaceopen High SmoothMedium Medium MediumTight Low BumpyFront Suspension1 2 3Steering Ackerman LocationShock Spring: _______Blue___________1Shock Piston: Standard DrilledShock Oil wt: ________50__________Shock Length( Center to Center) _______105.5mm______Toe-IN:_________12365423Front Sway Bar PreloadToe-Out:________Front Ride Height: _____________mmmmSway Bar: 2mm 2.3mm 2.5mmCamber:Neg: ______Pos: ______Caster Block: ______ A/A ______ B/BWheelAB1 23REBOUND STOPABNotes:_________________________________________________________________________________________Rear SuspensionShock Spring: _______Blue___________1234 5Shock Piston: Standard DrilledShock Oil wt: ________50__________67Shock Length( Center to Center) _______123.5mm______Rear Ride Height: ________mmSway Bar: 2.3mm 2.5mm 2.8mm______ NoneCamber:Neg: ______Pos: ______4891012321Rear Hub/Wheelbase: Forward MiddleBackRear Toe-In PlateAnti-Squat Plate561 1 12 222.52.52.5Wheel3 33123REBOUND STOPDifferentialFront Type: STD Torsen Oil_____KCenter Type: STD Torsen Oil_____KTiresFront Type:___________Compound_____STD____Rear Type:___________Compound_____STD____Foam:_______STD STIFF_____Foam:_______STD STIFF_____Rear Type : STD Torsen Oil_____KNote:_______________________________________________________________________________EngineType:______________Head Clearance___.025" Port:______Pipe:____________Fuel:_________%Plug__________ Turbo NormalCLUTCHShoe Brand:________________Compound:________ ALUM: Blue RedSpring Brand:_______________Tension:________SiILVER HVY 1mm_________Gearing:____13T____14T TO ____46T___48TClutch Shoes:2 Shoes3Shoes4 Shoes______Note:_______________________________________________________________________________
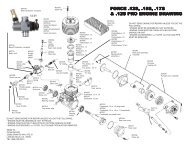
34964 JAMMIN <strong>X2</strong> PRO TRUGGY PARTS LISTOFNA DESCRIPTION RETAIL OFNA DESCRIPTION RETAIL10013 SHOES,ALUM SILVER-1.7gW/SPRING 29.95 40560 SERVO SAVER CON. PLATE H.C. 12.510098 CLUTCH NUT, SG SHAFT 4.95 40568 FRONT PLATE GRAPHITE 31.9510101 SPRINGS,CLUTCH,GOLD 1.1M 3PCS 4.95 40570 STEERING KNUCKLE CNC H.C. 99.9510114 FLAT HEAD ENGINE MOUNT SCREWS 7.95 40573 FLYWHEEL 35mm 3 PIN 19.9510120 SPRING, MANIFOLD, R.PORT .21 4.95 40574 ENGINE MOUNT (Lower) X-1CR,CRT 18.9510177 FUEL LINE 3FT. GRAY/BLACK 1.95 40575 CNC REAR TOE-IN PLATE 2.5 19.9510282 SWITCH COVER, SILICONE BLACK 3.95 40580 PROTECTIVE FOAM FOR RCV. BOX 1.9510300 ALUM. STOPPER KIT, 6 PCS. 4.95 40589 CNC FRONT ARM HLD LOWER B TYPE 24.9510399 CLUTCH BELL W/BEARINGS, 13T 19.95 40591 BRAKE DISK, FIBER X1-CR/CRT 14.9516015 HI FORCE WING, 1/8 WHITE 15.95 40596 DIFF. CAP JOINT (LIGHT W EIGHT) 17.9516016 HI FORCE WING, 1/8 YELLOW 15.95 40602 ARM SHAFTS, SCREW, 3x46mm 14.9516017 HI FORCE WING, 1/8 RED 15.95 40603 ARM SHAFTS, SCREW, 3x51.2mm 14.9516018 HI FORCE WING, 1/8 BLACK 15.95 40604 ARM SHAFTS, SCREW, 4x77mm 19.9516019 HI FORCE WING, 1/8 ORANGE 15.95 40605 DIFF. BRAKE CAP JOINT (L.W.) 17.9530171 LEVER, BRAKE 1.95 40613 CNC, BRAKE CAM LONG 9.9530172 RODS, BRAKES, 2 PCS. 1.50 40614 CNC BRAKE CAM SHORT 9.9530212 BEARING 5x8, FLANGE, 2 PCS. 5.95 40617 WASHER, PLASTIC, BLACK 8PCS. 3.9530341 BALL END WITH COLLAR, 6mm 3.95 40620BK TANK LID OPENER BLACK 4.9530403 6mm BALL, STEEL (NO COLLAR) 4.95 40620BL TANK LID OPENER BLUE 4.9530411 6mm BALLS w/COLLAR,STEERING 6P 4.95 40620R TANK LID OPENER RED 4.9530531 SPRING, THROTTLE LINKAGE 2.95 40643 PLASTIC SHOCK PARTS,13/16mm 9.9530560 ANT TUBE AND MOUNT 2.95 40657 UNIVERSAL JOINT,FRorRR TRUGGY 44.9530661 SERVO HORN HEAVY DUTY BLACK 4.95 40660 TURNBUCKLE 4x80mm 9.9530774 CROSS PIN AXLES, 4mm ALUM 6PCS 9.95 40661 TURNBUCKLE 5x80mm 9.9530776 WASHER, 4x10x0.2mm 4PCS. 1.95 41053 FRONT UPPER ARM 9.9530802 LINKAGE, 2 THROTTLE LINKAGE 7.95 40668 ARMS LOWER, FRONT/REAR TRUGGY 19.9531159 BODY CLIPS, CHROME 4.95 40669 BUMPER TRUGGY 14.9534026 LAYDOWN SERVO MOUNTINGS 7.95 40677 SERVO SAVER TUBE, H.C. 10.9534110 BEARING, 5x10, 2 PCS 6.95 40685 FRONT STABILIZER 2.5mm TRUGGY 4.9536053 BEARING, 8x16mm, PAIR 12.95 40686 REAR STABILIZER 2.8mm TRUGGY 4.9536055 PIN, 2.5x17mm, HEX HUBS, 4PCS 3.95 40688 FRONT LOWER ARM HOLDER H.C. 13.9536140 KNOB, BRAKE ADJUSTER, 2PCS 1.95 40689 REAR LOWER ARM HOLDER H.C. 13.9536660 BRAKE PAD, 4PCS. 3.95 40691 SHOCK TWR FR 4mm CNC 7075 PRO 34.9536690 UPPER BALL END, 7mm 6PCS 6.95 40693 GRAPHITE RADIO TRAY 2.0 39.9536700 STEERING BALL END, 7mm, 8PCS. 6.95 40855 ANT. TUBE FIXING NUT (BROWN) 2.9536850 7mm BALL, 6 PCS. 3.95 41001 SHOCK BIG BORE FRONT 16MM PAIR 79.9536861 5x40mm TURNBUCKLES, 2 PCS BLK 6.95 41002 SHOCK BIG BORE REAR 16MM PAIR 79.9537410 BODY CLIPS, 10 PCS. SMALL 3.95 41003 SHOCK BODY FRONT 16MM PAIR 29.9538280 TURNBUCKLES, 3X36MM 2PCS 5.95 41004 SHOCK BODY REAR 16MM PAIR 29.9538313 CONE, TAPERED 7mm, SG 2.95 41005 SHOCK CAP 16MM 4PCS. 22.9540009 SEAL, P-6 O-RING, DIFF, 2PCS 2.95 41006 SHOCK SPRING ADJ. 16MM 4PCS. 14.9540010 PIN, 2.5X13.8MM, DIFF, 2PCS 2.95 41007 O-RING 19x1.5MM 16MM 4PCS. 4.9540011 GASKET, DIFF 3PCS 3.95 41008 PLASTIC SHOCK PARTS 16MM SET 12.9540024 SHIM, 13X16XO.2MM, DIFF GEAR,4 2.95 41009 CAP SCREWS 3<strong>X2</strong>8MM 4PCS. 2.9540034 ALUM. RING, SERVO SAVER ADJ.RI 5.95 41010 SHOCK BALL END POST LONG 4PCS 11.9540037 SCREWS, SERVO PLATE 5.95 41011 SHOCK PISTON 16MM 8PCS. 10.9540038 BALLS, 7MM 4PCS. 9.95 41012 REPAIR KIT FOR 16MM SHOCK 9.9540039 CONE, ALUM. 3MM, 4PCS. 3.95 41013 PRESSURE TOP ORANGE 16MM 4PCS. 7.9540051 WIRE, PIPE MOUNT, L-SHAPE 4.95 41017 SPRING 16MM HARD GRAY SET 17.9540054 SHAFTS,3.5m FR 13/16mm SHOCK 7.95 41019 O-RING 1OMMx1MM FOR 16MM SHOCK 2.9540055 SHAFTS,3.5m RR 13/16mm SHOCK 7.95 41031 GEAR, BEVEL GEAR,LARGE 45T <strong>X2</strong>T 39.9540058 COVERS, SHOCK SHAFTS, SILICONE 9.95 41032 GEAR, BEVEL SPIRAL SML 10T <strong>X2</strong>T 15.9540060 NYLOK NUT, 2.5, PISTON NUT, 4 4.95 41033 STONE GUARDS <strong>X2</strong>T 15.9540073 BEARING, 4x8 FLANGE, 2 PCS. 12.95 41034 BRACE, CHASSIS, PLASTIC <strong>X2</strong>T 12.9540074 BEARING, 6X10mm, 4 PCS. 17.95 41035 SKID PLATE,BODY & TANK PST <strong>X2</strong>T 15.9540127 AIR FILTER SET, X-1 9.95 41036 DIFF MOUNT CENTER PLASTIC <strong>X2</strong>T 15.9540128 FOAM, REPLACEMENT FOR 40127 5.95 41037 FUEL TANK <strong>X2</strong>T 22.9540129 CONNECTOR, RUBBER FOR 40127 5.95 41039 SCREW BAGS <strong>X2</strong>T 19.9540240 WRENCH, MT WHEELS, TITAN 5.95 41040 SPRING SERVO SAVER NEW <strong>X2</strong>T 3.9540511 SERVO SAVER SPRING POST 6.95 41041 CNC 7075 CHASSIS TRUGGY <strong>X2</strong>T 149.9540513 DIFF. GEAR (small & large)ALUM 16.95 41042 CNC BRACE, LINKAGE TYPE <strong>X2</strong>T 25.9540518 STEEL SPUR GEAR 48T 36.95 41043 CNC 7075 CHASSIS BRACE <strong>X2</strong>T 59.9540526 WHEEL HUB 5mm 11.95 41044 UNIVERSAL, FRONT/REAR <strong>X2</strong>T 59.9540527 KNUCKLE ARM BUSHING 4.95 41045 RADIO TRAY, GRAPHITE <strong>X2</strong>T 39.9540528 KING PIN SCREW 1.95 41046 PLATE, CNT DIFF GRAPHITE <strong>X2</strong>T 32.9540533 GEAR CASE 11.95 41047 UNIVERSAL, L.W . 3.5mm F/R <strong>X2</strong>T 79.9540534 ARMS HOLDER 9.95 41048 UNIVERSAL, L.W. 3.5mm CNT <strong>X2</strong>T 79.9540536 FRONT C HUB 11.95 41049 DIFF. SET CENTER PLASTIC <strong>X2</strong>T 55.9540538 DIFF CASE F&R 9.95 41050 POST, MUFFLER <strong>X2</strong> 6.9540540 REAR UP RHT & UPR ARM, BUMPER 9.95 41051 FUEL FILTER H.C. JAMMIN <strong>X2</strong> 12.9540541 RECEIVER BOX, NEW TYPE 14.95 41052 SERVO SAVER NEW TYPE PLST ONLY 7.9540542 WING STAY SET, BUGGY & TRUGGY 11.95 86106 WHEELS,3.7 1/2OFFSET LPR WHT4P 28.9540548 NUT M3 NYLON (Thin Type) 1.95 86107 WHEELS,3.7 1/2OFFSET LPR YEL4P 28.9540549 MUFFLER STAY 4.95 86108 WHEELS,3.7 1/2OFFSET LPR BLK4P 28.9540550 WHEEL NUT 5mm 4.95 86109 WHEELS,3.7 1/2OFFSET LPR ORG4P 28.9540559 SCREWS, CCW FOR SHOCKS 4PCS 2.95
OWNER’S REGISTRATION CARDOFNA Racing congratulates you on your purchase of our fine OFNA Product. With proper maintenance and handlingthis kit will provide many hours of enjoyment.The registration card should be filled out and mailed to OFNA Racing within 10 days of purchase date.In the event that the kit is incomplete or component parts are broken due to error in manufacturer, contact yourdealer from which you purchased the kit for replacement part or call OFNA at (949) 586-2910 for your nearest dealerlocation. Other items such as radio and engine other covered by individual warranties.IMPORTANT!Please print or type, filling in the information listed below and mail immediatelyMAIL TO:OFNA RACING7 VANDERBILTIRVINE, CA. 92618TEL: (949) 586-2910REGISTRATION CARDWrite in Your Model Name and Part NumberRACER’S NAME TEL:( )ADDRESSCITY STATE ZIPDEALER’S NAME TEL: ( )ADDRESSCITY STATE ZIPOFNA7 VanderbiltIrvine, Ca. 92618