Sport Coil Springs 19101 - Dodge Magnum, Chrysler 300C 19107 ...
Sport Coil Springs 19101 - Dodge Magnum, Chrysler 300C 19107 ...
Sport Coil Springs 19101 - Dodge Magnum, Chrysler 300C 19107 ...

Create successful ePaper yourself
Turn your PDF publications into a flip-book with our unique Google optimized e-Paper software.
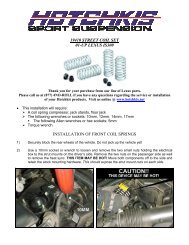
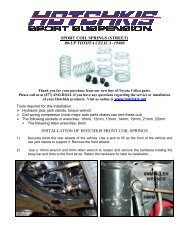
<strong>Sport</strong> <strong>Coil</strong> <strong>Springs</strong><strong>19101</strong> - <strong>Dodge</strong> <strong>Magnum</strong>, <strong>Chrysler</strong> <strong>300C</strong><strong>19107</strong> - <strong>Dodge</strong> Challenger SRT-819108 - <strong>Dodge</strong> Challenger R/TThank you for your purchase from our new line of <strong>Magnum</strong>/<strong>300C</strong> parts.Please call us at (877) 4NO-ROLL if you have any questionsregarding the service or installation of your Hotchkis Performance products.Visit us online @ www.hotchkis.netWarning: This installation should be performed by a trained professional. The installation requireslowering of the rear cradle from the vehicle for spring removal and reinstallation.Tools Required for this Installation- Hydraulic jack, jack stands, torque wrench (4 post lift or alignment rack preferable)- <strong>Coil</strong> spring compressor (most major auto parts chains can rent these out)- The following sockets or wrenches: 10mm, 13mm, 15mm, 16mm, 18mm, 21mmINSTALLATION OF HOTCHKIS FRONT COIL SPRINGS1) Secure the rear wheels with blocks and jack the front up until the front wheels are off the ground.Support the front of the vehicle with jack stands on the frame.2) Remove the front wheels using a 21mm socket.
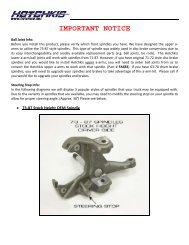
3) Loosen the upper control arm ball joint bolt (do not remove yet). Apply some WD-40 or similarpenetrating lubricant to soak the tapered stud. Use a hammer to smack the control arm flat spot inorder to break loose the ball joint stud. Once loose, you may remove the ball joint nut. Do not let thesteering knuckle hang by the brake line. Use a wire or string to hold the knuckle up. Retain hardwarefor reinstallation.4) Loosen and remove the lower shock bolt using a 18mm socket or wrench. Retain hardware forreinstallation.5) Loosen and remove the bolt holding the sway bar end link to the shock using a 21mm wrench and a10mm wrench for the stud end. Retain hardware for reinstallation.
6) Open the hood of the vehicle and pop off the plastic shock caps. Once exposed, remove the 3remaining bolts that hold the shock to the vehicle using a 13mm socket. Retain hardware forreinstallation.7) Once the shock is out of the car, mark the shock top hat and lower perch with whiteout or other markingtool. This will ensure proper orientation for reinstallation.
8) Secure the spring/shock assembly in your spring compressor and remove the shaft nut using a 18mmsocket. Retain hardware for reinstallation.9) Remove the top hat, stock bumpstop, and stock spring at this time. Sometimes the bumpstop ispressed into the top hat, in which case, remove the stock bumpstop from the top hat boot.
10) Place your new Hotchkis polyurethane bumpstop into the top hat boot assembly as shown in thepicture.11) Place your new Hotchkis coil spring onto the shock. Make sure the smaller pigtail end is on the bottom.
12) Before compressing the spring, test fit the top hat onto the shock shaft and see if your marks line up. Ifnot, rotate the coil spring until they align.13) Once aligned, compress the coil spring and install the shaft nut back on. Fully tighten hardware.14) Reinstall the spring shock assembly in the same manner as removal. When installing the lower shockbolt make sure the hole lines up with the shock clevis. Make sure the threads start correctly bythreading the bolt by hand. Once properly threaded fully tighten hardware.15) Perform steps 1-6 in reverse order to complete the installation.You are now finished with the front coil spring installation! Make sure that all hardware is fully tightened beforedriving the vehicle. Let’s move on to the rear spring installation.
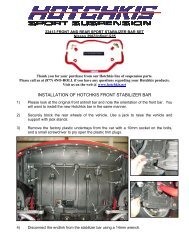
INSTALLATION OF HOTCHKIS REAR COIL SPRINGS1) Secure the front wheels with blocks and jack the rear up until the front wheels are off the ground.Support the rear of the vehicle with jack stands on the factory jack points.2) Remove the rear wheels using a 21mm socket.3) Begin removing the rear shocks by removing the lower nut and bolt using a 18mm wrench and 15mmsocket respectively. Remove the 2 upper shock bolts using a 16mm socket.
4) Pull back the plastic splash guard and remove the bolt that holds the brake line to the frame using a10mm wrench or socket.5) Next, you will need to drop the exhaust system for clearance. Unbolt the mid-brace removing the 4bolts using a 13mm socket. Spray the rubber hangers in the picture with WD-40 and slide the rubberhanger off the exhaust support. Unbolt the remaining rear hangers using a 13mm socket. Be careful,for the exhaust will drop down once these bolts are out.
6) Support the rear axle pumpkin housing with a jack. Try to use wood or a rubber pad to cushion thecontact point of the jack and housing. Remember the jack stands should still be supporting the rear ofthe vehicle.7) Once the axle is supported, you can unbolt the 4 bolts that secure the rear cradle to the frame using a18mm socket.8) Lower the jack that supports the axle about 4-5 inches. Make sure not lower it too much to avoiddamaging the rear brake hardline.
9) You should now be able to easily remove the rear shocks and stock springs. Keep track of the rubberspring isolators located on the top and bottom of the spring. You will be using them for reinstallation.10) For each shock, unbolt the shaft nut using a 15mm socket. Remove the washer, top hat, and the bootto reveal the stock bumpstop. Replace the bumpstop with the provided Hotchkis polyurethanebumpstop in the same manner. Reassemble the shock. Fully tighten the shaft nut.
11) Place your new Hotchkis coil springs in the same position as the stock springs were.Note: The lower rubber isolator is shaped to lay in a specific position. Make sure to install the springwith this in mind.
12) Once everything is in place, raise the rear axle into position. Do not raise all the way up! You will stillneed some wiggle room to line up the cradle bolt holes. Start each bolt by hand to ensure properthreading. Once thread started, fully tighten the cradle bolts using a 18mm socket. Torque bolts to 133ft·lbs.14) Perform steps 1-6 in reverse order to finish the installation.You are now finished with the rear coil spring installation! Make sure that all hardware is fully tightened beforedriving the vehicle. Enjoy your new sport coil spring set!
<strong>Sport</strong> <strong>Coil</strong> <strong>Springs</strong> <strong>19101</strong><strong>Dodge</strong> <strong>Magnum</strong>, <strong>Chrysler</strong> <strong>300C</strong>Hotchkis P/N Item Description Quantity1 19830321 Front <strong>Coil</strong> <strong>Springs</strong> 22 19930321 Rear <strong>Coil</strong> <strong>Springs</strong> 23 27810321 Front Polyurethane Bumpstops 24 27910321 Rear Polyurethane Bumpstops 2<strong>Sport</strong> <strong>Coil</strong> <strong>Springs</strong> <strong>19107</strong><strong>Dodge</strong> Challenger SRT-8Hotchkis P/N Item Description Quantity1 19830375 Front <strong>Coil</strong> <strong>Springs</strong> 22 19930375 Rear <strong>Coil</strong> <strong>Springs</strong> 23 27810321 Front Polyurethane Bumpstops 24 n/a n/a<strong>Sport</strong> <strong>Coil</strong> <strong>Springs</strong> 19108<strong>Dodge</strong> Challenger R/THotchkis P/N Item Description Quantity1 19830321 Front <strong>Coil</strong> <strong>Springs</strong> 22 19930322 Rear <strong>Coil</strong> <strong>Springs</strong> 23 27810321 Front Polyurethane Bumpstops 24 n/a n/a
Hotchkis Performance LLCReturn Policy & Limited WarrantyEffective December 1, 2010 all Hotchkis products must be registered to qualify for warranty atwww.hotchkis.net or via the mail-in warranty card, included with the product, within 30 days of theoriginal purchase date.IMPORTANT: This warranty supersedes all other warranties included with this product.Return PolicyWe want you to be completely satisfied with your Hotchkis Performance product. For products, presenting signs ofshipping damage please contact the freight carrier immediately. All our products are guaranteed to be free frommanufacturer’s defects. If your order arrives with a manufacture defect, please contact our Customer Service Departmentat (562) 907-7757. You will be assigned a Returned Goods Authorization Number (RGA). The package you return mustshow the RGA on the outside of the package, include the original invoice and be shipped prepaid to our facility. Theproduct has to be unused and in its original packaging materials. Exchanges or refunds made after 30 days will besubject to a 20% restocking charge. If you purchased your Hotchkis Performance product from an authorizeddealer, you are still covered by this return policy. All returns however, should be made to your dealer, not toHotchkis Performance directly.Limited WarrantyHotchkis Performance offers a Limited Warranty against defects in materials and workmanship for the term of 36 months(3 years) from the date of purchase of this product. This Warranty only applies to the original retail purchaser who retainsownership of the vehicle on which the product was originally installed. If the product is determined to be defective,Hotchkis Performance will repair, replace or refund the purchase price of the defective product at Hotchkis Performance'ssole discretion, which shall fully satisfy and discharge any and all warranty claims. Any repaired or replaced product willbe returned to the sender excluding the cost of freight. Products must be registered to qualify for warranty atwww.hotchkis.net or via the mail-in warranty card, included with the product, within 30 days of the originalpurchase date.Exclusions from WarrantyItems offered but not manufactured by Hotchkis Performance are warranted according to the manufacturer's terms andare not covered by this limited warranty. Hotchkis Performance shall not be responsible for any labor, removal,installation, re-installation or maintenance costs. This warranty does not cover the cosmetic finish or plating of anyproduct or any normal wear and tear to any product including, but not limited to bushings, brackets, end-links, hardware,steering components, shocks or springs. In addition, this warranty does not apply to any products that have been:• Improperly installed or installed by someone other than a qualified, licensed auto mechanic experienced in theinstallation and removal of suspension products;• Improperly serviced, misused, or modified, altered or subjected to abuse, negligence, accident or collision;• Installed in any vehicle that has been modified;• Installed on any vehicle that has carried loads in excess of automobile manufacturer suggested weight limits; or• Installed on any vehicle that has been subject to abnormal or excessive use, including rallying, racing, or racing-typeactivities or off-road use.Limitation of WarrantyThis limited warranty is the entire and only warranty for the products and may not be modified or supplemented by anyother person or company in any form. Any description of the products, by anyone, is for the sole purpose of identifyingthem and is not part of the basis of the bargain, and does not constitute a warranty that the products will conform to thatdescription. The statements of any salesperson do not constitute part of this limited warranty and cannot be relied uponas a warranty.THERE ARE NO WARRANTIES, EXPRESSED OR IMPLIED, INCLUDING ANY IMPLIED WARRANTIES OFMERCHANTABILITY OR FITNESS FOR A PARTICULAR PURPOSE, WHICH EXTEND BEYOND THE
DESCRIPTION ON THE FACE HEREOF. ANY IMPLIED WARRANTIES ARE DISCLAIMED TO THEFULLEST EXTENT PERMITTED BY LAW. THIS WARRANTY DOES NOT COVER CONSEQUENTIALDAMAGES, LOSS OF TIME OR REVENUES, INCONVENIENCE, LOSS OF USE OF THE VEHICLE,DAMAGE TO THE VEHICLE OR COMPONENTS OF THE VEHICLE, ANY OTHER TYPE OFCONSEQUENTIAL DAMAGES, OR OTHER INCIDENTAL OR INDIRECT DAMAGES. HOTCHKIS’MAXIMUM LIABILITY UNDER THIS WARRANTY SHALL IN NO EVENT EXCEED THE PURCHASE PRICEOF THE PRODUCT. Some states do not allow limitations on how long an implied warranty lasts or the exclusion orlimitation of incidental or consequential damages and in such states the above limitations or exclusions may not apply.This limited warranty gives the purchaser specific legal rights and the purchaser may have other rights that may vary fromstate to state.Technical InformationHotchkis Performance makes every effort to ensure that you are provided with the most accurate and up-to-date technicalinformation. However, all technical information is approximate and may vary upon application. Additional suspensioncomponents may be needed in some applications, depending upon the make, model, engine and chassis of the vehicle.Hotchkis Performance is not responsible for any consequences resulting from manufacturer’s technical mid-year changes.Hotchkis Performance products should only be installed by a qualified, licensed auto mechanic experienced in theinstallation of such products.Warranty Claim Procedure:The answer to ALL the following questions should be YES before making a warranty claim:• Did you register the product at www.hotchkis.net or via the mail-in warranty card within 30 days of purchase?• Is the product appropriate to your application?• Did you carefully and thoroughly read the instructions provided along with the product?• Do you have the original invoice or sales receipt?• Is the return date within 36 months from the purchase date?• Are you the original purchaser?• Was the product properly installed by a qualified, licensed auto mechanic?• Has the product been installed on the original vehicle on which it was installed at all times?• Is the product unmodified and clean?• Is the reason for return a legitimate product defect?If the answer to all these questions is YES, please contact our Customer Service Department at (562) 907-7757. You willbe given a Returned Goods Authorization Number (RGA) valid for 60 days. You will also be asked to ship the productprepaid to our facility. All shipments MUST be (i) prepaid, (ii) include the original invoice or sales receipt, (iii) show theRGA on the outside of the package and (iv) include your name, address, make and model of the vehicle, and a briefdescription of the claimed defect, including the circumstances under which the defect occurred. If the warranty claim isdeemed valid then Hotchkis will estimate shipping costs to return the repaired or replacement part and contact you forpayment. Hotchkis’s Limited warranty requires that any repaired or replaced product will be returned to the senderexcluding the cost of freight. Warranty related inquires should be sent to the following address:HOTCHKIS PERFORMANCE, LLCC/O CUSTOMER SERVICE8633 Sorensen AvenueSANTA FE SPRINGS, CA 90670Hotchkis Performance will not accept product returns without the RGA number, receipt and the information describedabove. C.O.D. or collect shipments will be refused. Once the returns are received at Hotchkis Performance, we willevaluate the products, verify the sales receipt, and investigate the warranty claim. Any repaired or replaced product willbe returned to the sender.Effective December 1, 2010. This return policy and limited warranty supersedes all previous policy andwarranty statements. Policies and warranties are subject to change without notice. HotchkisPerformance is not responsible for printing errors.