The Universal Sundial Ring Assembly Instructions for ... - AstroMedia
The Universal Sundial Ring Assembly Instructions for ... - AstroMedia
The Universal Sundial Ring Assembly Instructions for ... - AstroMedia

You also want an ePaper? Increase the reach of your titles
YUMPU automatically turns print PDFs into web optimized ePapers that Google loves.
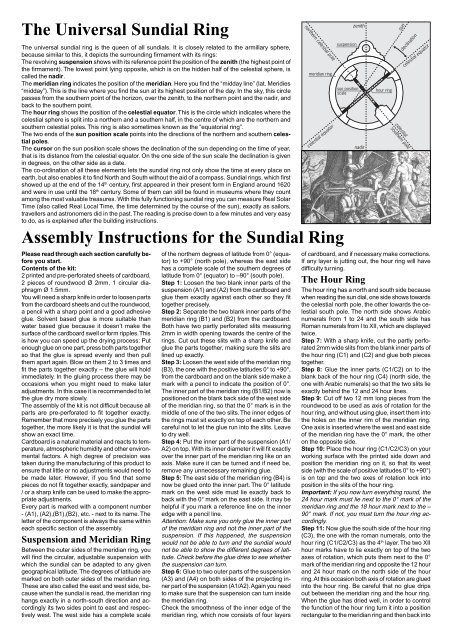
<strong>The</strong> <strong>Universal</strong> <strong>Sundial</strong> <strong>Ring</strong><strong>The</strong> universal sundial ring is the queen of all sundials. It is closely related to the armillary sphere,because similar to this, it depicts the surrounding firmament with its rings:<strong>The</strong> revolving suspension shows with its reference point the position of the zenith (the highest point ofthe firmament). <strong>The</strong> lowest point lying opposite, which is on the hidden half of the celestial sphere, iscalled the nadir.<strong>The</strong> meridian ring indicates the position of the meridian. Here you find the “midday line” (lat. Meridies“midday”). This is the line where you find the sun at its highest position of the day. In the sky, this circlepasses from the southern point of the horizon, over the zenith, to the northern point and the nadir, andback to the southern point.<strong>The</strong> hour ring shows the position of the celestial equator. This is the circle which indicates where thecelestial sphere is split into a northern and a southern half, in the centre of which are the northern andsouthern celestial poles. This ring is also sometimes known as the “equatorial ring”.<strong>The</strong> two ends of the sun position scale points into the directions of the northern and southern celestialpoles.<strong>The</strong> cursor on the sun position scale shows the declination of the sun depending on the time of year,that is its distance from the celestial equator. On the one side of the sun scale the declination is givenin degrees, on the other side as a date.<strong>The</strong> co-ordination of all these elements lets the sundial ring not only show the time at every place onearth, but also enables it to find North and South without the aid of a compass. <strong>Sundial</strong> rings, which firstshowed up at the end of the 14 th century, first appeared in their present <strong>for</strong>m in England around 1620and were in use until the 18 th century. Some of them can still be found in museums where they countamong the most valuable treasures. With this fully functioning sundial ring you can measure Real SolarTime (also called Real Local Time, the time determined by the course of the sun), exactly as sailors,travellers and astronomers did in the past. <strong>The</strong> reading is precise down to a few minutes and very easyto do, as is explained after the building instructions.<strong>Assembly</strong> <strong>Instructions</strong> <strong>for</strong> the <strong>Sundial</strong> <strong>Ring</strong>Please read through each section carefully be<strong>for</strong>eyou start.Contents of the kit:2 printed and pre-per<strong>for</strong>ated sheets of cardboard,2 pieces of roundwood Ø 2mm, 1 circular diaphragmØ 1.5mm.You will need a sharp knife in order to loosen partsfrom the cardboard sheets and cut the roundwood,a pencil with a sharp point and a good adhesiveglue. Solvent based glue is more suitable thanwater based glue because it doesn’t make thesurface of the cardboard swell or <strong>for</strong>m ripples. Thisis how you can speed up the drying process: Putenough glue on one part, press both parts togetherso that the glue is spread evenly and then pullthem apart again. Blow on them 2 to 3 times andfit the parts together exactly – the glue will holdimmediately. In the gluing process there may beoccasions when you might need to make lateradjustments. In this case it is recommended to letthe glue dry more slowly.<strong>The</strong> assembly of the kit is not difficult because allparts are pre-per<strong>for</strong>ated to fit together exactly.Remember that more precisely you glue the partstogether, the more likely it is that the sundial willshow an exact time.Cardboard is a natural material and reacts to temperature,atmospheric humidity and other environmentalfactors. A high degree of precision wastaken during the manufacturing of this product toensure that little or no adjustments would need tobe made later. However, if you find that somepieces do not fit together exactly, sandpaper and/ or a sharp knife can be used to make the appropriateadjustments.Every part is marked with a component number- (A1), (A2),(B1),(B2), etc. - next to its name. <strong>The</strong>letter of the component is always the same withineach specific section of the assembly.Suspension and Meridian <strong>Ring</strong>Between the outer sides of the meridian ring, youwill find the circular, adjustable suspension withwhich the sundial can be adapted to any givengeographical latitude. <strong>The</strong> degrees of latitude aremarked on both outer sides of the meridian ring.<strong>The</strong>se are also called the east and west side, becausewhen the sundial is read, the meridian ringhangs exactly in a north-south direction and accordinglyits two sides point to east and respectivelywest. <strong>The</strong> west side has a complete scaleof the northern degrees of latitude from 0° (equator)to +90° (north pole), whereas the east sidehas a complete scale of the southern degrees oflatitude from 0° (equator) to –90° (south pole).Step 1: Loosen the two blank inner parts of thesuspension (A1) and (A2) from the cardboard andglue them exactly against each other so they fittogether precisely.Step 2: Separate the two blank inner parts of themeridian ring (B1) and (B2) from the cardboard.Both have two partly per<strong>for</strong>ated slits measuring2mm in width opening towards the centre of therings. Cut out these slits with a sharp knife andglue the parts together, making sure the slits arelined up exactly.Step 3: Loosen the west side of the meridian ring(B3), the one with the positive latitudes 0° to +90°,from the cardboard and on the blank side make amark with a pencil to indicate the position of 0°.<strong>The</strong> inner part of the meridian ring (B1/B2) now ispositioned on the blank back side of the west sideof the meridian ring, so that the 0° mark is in themiddle of one of the two slits. <strong>The</strong> inner edges ofthe rings must sit exactly on top of each other. Becareful not to let the glue run into the slits. Leaveto dry well.Step 4: Put the inner part of the suspension (A1/A2) on top. With its inner diameter it will fit exactlyover the inner part of the meridian ring like on anaxis. Make sure it can be turned and if need be,remove any unnecessary remaining glue.Step 5: <strong>The</strong> east side of the meridian ring (B4) isnow be glued onto the inner part. <strong>The</strong> 0° latitudemark on the west side must lie exactly back toback with the 0° mark on the east side. It may behelpful if you mark a reference line on the inneredge with a pencil line.Attention: Make sure you only glue the inner partof the meridian ring and not the inner part of thesuspension. If this happened, the suspensionwould not be able to turn and the sundial wouldnot be able to show the different degrees of latitude.Check be<strong>for</strong>e the glue dries to see whetherthe suspension can turn.Step 6: Glue to two outer parts of the suspension(A3) and (A4) on both sides of the projecting innerpart of the suspension (A1/A2). Again you needto make sure that the suspension can turn insidethe meridian ring.Check the smoothness of the inner edge of themeridian ring, which now consists of four layersof cardboard, and if necessary make corrections.If any layer is jutting out, the hour ring will havedifficulty turning.<strong>The</strong> Hour <strong>Ring</strong><strong>The</strong> hour ring has a north and south side becausewhen reading the sun dial, one side shows towardsthe celestial north pole, the other towards the celestialsouth pole. <strong>The</strong> north side shows Arabicnumerals from 1 to 24 and the south side hasRoman numerals from I to XII, which are displayedtwice.Step 7: With a sharp knife, cut the partly per<strong>for</strong>ated2mm wide slits from the blank inner parts ofthe hour ring (C1) and (C2) and glue both piecestogether.Step 8: Glue the inner parts (C1/C2) on to theblank back of the hour ring (C4) (north side, theone with Arabic numerals) so that the two slits lieexactly behind the 12 and 24 hour lines.Step 9: Cut off two 12 mm long pieces from theroundwood to be used as axis of rotation <strong>for</strong> thehour ring, and without using glue, insert them intothe holes on the inner rim of the meridian ring.One axis is inserted where the west and east sideof the meridian ring have the 0° mark, the otheron the opposite side.Step 10: Place the hour ring (C1/C2/C3) on yourworking surface with the printed side down andposition the meridian ring on it, so that its westside (with the scale of positive latitudes 0° to +90°)is on top and the two axes of rotation lock intoposition in the slits of the hour ring.Important: If you now turn everything round, the24 hour mark must lie next to the 0° mark of themeridian ring and the 18 hour mark next to the –90° mark. If not, you must turn the hour ring accordingly.Step 11: Now glue the south side of the hour ring(C3), the one with the roman numerals, onto thehour ring (C1/C2/C3) as the 4 th layer. <strong>The</strong> two XIIhour marks have to lie exactly on top of the twoaxes of rotation, which puts them next to the 0°mark of the meridian ring and opposite the 12 hourand 24 hour mark on the north side of the hourring. At this occasion both axis of rotation are gluedinto the hour ring. Be careful that no glue dripsout between the meridian ring and the hour ring.When the glue has dried well, in order to controlthe function of the hour ring turn it into a positionrectangular to the meridian ring and then back into
XXISAJJJI0°its neutral position. If necessary sand down theouter edge of the hour ring a little to allow <strong>for</strong>smooth turning.Step 12: (optional): When the sundial is finished,the time will be read off the inner rim of the hourring. Reading will be easier, if you connect theends of all hour lines and half hour lines acrossthe inner rim with a thin black marker pen.Northern and SouthernScale Holder<strong>The</strong> scale holders consist of a bridge and, gluedonto it, the bearing <strong>for</strong> the scale axis. <strong>The</strong>y willlater be glued onto the meridian ring and will holdthe revolving sun position scale in the inner ringof the sundial. <strong>The</strong> northern scale holder is recognisedby the “Die <strong>Ring</strong>-Sonnenuhr” printed onthe bridge, the bridge of the southern scale holderreads “Astromedia...”Step 13: Glue the outer bridge (D1) precisely ontothe blank side of the inner bridge of the northernscale holder (D2).Step 14: Glue the blank lower axle bearing (D3)onto the lower white half of inner side of the bridge(D1/D2). Make sure the edge with the small curvesand angles sits right on top of the identically cutedge of the bridge.Step 15: With a sharp knife, completely cut outthe 2mm wide pre-per<strong>for</strong>ated slits from both ofthe blank inner axle bearings (D4) and (D5), thenglue them one on top of the other and onto thelower axle bearing. <strong>The</strong> edges of the inner andlower axle bearings cover each other exactly.Step 16: Glue the upper axle bearing (D6) ontothe inner axle bearing. At one end of the northernscale holder there is now a complete axle bearingwith a square hole.Step 17: Assemble the southern scale holder inthe same way, using the parts (E1) to (E6).Step 18: Cut two 12mm long pieces from theroundwood, to act as axes of rotation <strong>for</strong> the sunscale,and glue them into the square holes of theaxle bearings of both scale holders.Important: <strong>The</strong> axles shouldn’t jut out less than4.0 mm from the holes and not more than 4.3 mm.Step 19: Glue the northern scale holder onto themarked position of the meridian ring, so that theaxis juts into the inner ring of the sundial. On theoutside, its edge should be level with that of themeridian ring. On the inside, the axle bearinggrasps around the hour ring, which still is able tobe turned in one direction. <strong>The</strong> thin line on theaxle bearing points exactly to the VI hour mark ofthe hour ring.Step 20: In the same way glue the southern scaleholder opposite it, on the marked position on theother side of the meridian ring. Here the line onthe axle bearing points to the 18 hour mark of thehour ring.<strong>The</strong> CursorStep 21: Glue the circular diaphragm made fromwhite plastic material over the hole in the blankback side of the inner part of the cursor (F1). <strong>The</strong>holes of the cursor and the diaphragm must lieexactly over each other.Step 22: Glue the other inner part of the cursor(F2) with its blank back side onto the diaphragm.Make sure that both the inner parts’ edges areexactly on top of one another and that the hole ofthe diaphragm is in the centre on both sides ofthe cursor.Step 23: Glue the outer parts (F3) and (F4) ontothe two sides of the inner part of the cursor. Onceagain the holes have to be exactly on top of each.Now from the left and right sides of the cursor, awing juts out, which will slide inside the inner frameof the sun position scale.<strong>The</strong> Sun Position ScaleStep 24: Cut out both of the pre-per<strong>for</strong>ated slitsin the two ends of the inner frame (G1). Do thesame with the other inner frame (G2), then glueboth parts one on top of the other and onto theblank back side of the outer frame of the scalebearing the names of the months (G3). Make surethat cursor can move easily inside the two layersof the inner frame. If necessary, shorten the wingsof the cursor slightly with a knife.Step 25: Place the sundial ring on your work surfacewith the west side of the meridian ring (scaleof positive latitudes 0° to +90°) face down. <strong>The</strong>side of the hour ring with the roman numeralsshould likewise be lying face down and the northernscale holder facing upwards.Now place the sun position scale under the sundial,making sure the scale with the date inscriptionsis lying on the work surface and the openinner frame is facing upwards. Important: <strong>The</strong> endof the scale marked Jun must lie next to the northernscale holder, the other end marked Dez nextto the southern scale holder. Both of the axlesjutting out from the scale holders snap into theslits of the inner frame. If the scale is too long to fitexactly between the scale holders, it is possibleto shorten both ends of the scale with the knife.Step 26: Now place the cursor with the side bearing“Datum” (date) facing downwards into theframe. Glue the outer frame of the scale (G4) ontothe inner frame so that the positive numbers of23.44° point to the northern and the negativeHow to use the sundial ring1. Adjust the sundial to the geographical latitude of your position. In one handhold the meridian ring on the inside, and with the other hand move thesuspension until the small square pointer shows the wanteddegree. If you do not know your latitude, look it up in an atlas ortake the one of the town nearest to you which you find printedon the meridian ring.VIIIIXVIINÖRDLICHE ERDHALBKUGELXIXIINÖRDLICHE ERDHALBKUGELVIIVIIIVIIIIII90° 80° 70° 60° 50° 40° 30° 20° 10°JJASJIVIIM A M F J DONVVIXIIVII90° 80° 70° 60° 50° 40° 30° 20° 10°DIXI0°VIII0°IX2. Adjust the runner on the date scale to the correct date bymoving it up or down. On the back it will automatically showthe corresponding declination of the sun, that is its angle tothe celestial equator.3. Open the hour ring until it touches the stoppers and standsexactly at a right angle to the meridian ring.4. Hold the sundial by the cord in the suspension. Hold it to the sun and turn itslowly, until a ray of light comes through the hole in the cursor and falls into thecentre of the inner rim of the hour ring. Here you can read Real Local Time. Ifnecessary turn the face of the sun scale a little towards the sun.Special Properties of the universal <strong>Ring</strong> sundial:numbers to the southern scale holder. This willplace 23.44° back to back with Jun and –23.44°with Dez. Make sure there is no glue either in theinside of the frame, or in the bearings of the axes,otherwise the cursor cannot be moved and thescale turned.Hour <strong>Ring</strong> StoppersStep 27: Glue the front side of the stopper (H1)onto the back side (H5) with their blank sides backto back. Do the same with the front and back sidesof the other stoppers (H2) + (H6), (H3) + (H7) and(H4) + (H8).Step 28: Turn the hour ring so that it <strong>for</strong>ms anexact right angle with the meridian ring. This canbe controlled very easily with a corner of the cardboardsheet. Glue the four stoppers onto themarked positions of the meridian ring, so that theypoint into the inner part of the sundial and theirbroad, straight edges lock the hour ring into positionwhen it is opened up at a right angle. It willthen only turn 90° and no further.Now your <strong>Universal</strong> <strong>Sundial</strong> <strong>Ring</strong> is complete.Congratulations!In order to make your sundial easier to use, pull apiece of cord through the hole in the suspension– this will help the sundial to hang in an exactdownward position.90° 80° 70°VI60° 50° 40° 30° 20° 10°1. This sundial always offers a set of two times, a morning and an afternoon time, both of which are atthe same distance from 12 o’clock (<strong>for</strong> example 10:15 and 13:45). In the majority of cases there is noproblem in deciding on the correct one.2. Around the 21 st March and the 23 rd September, the spring and autumn equinoxes, the hole in thecursor is level with the hour ring, so no ray of light can fall into the inner edge. Nevertheless it ispossible to determine the time by turning the sundial a little to the left and a little to the right until the rayof light touches the top and at the bottom of the inner rim. From there it is possible to estimate thecentre point.3. Keep in mind that the sundial does not show the GMT (Greenwich Mean Time) nor Central EuropeanTime (CET) but Real Local Time (RLT). <strong>The</strong> latter is valid only at a specific location and all placesdirectly north and south of it. RLT is defined by the position of the sun: it is always precisely 12 o’clockwhen the sun reaches its highest point in the south. Real Local Time differs in the east – west direction,because in a place further in the east the sun reaches its midday position earlier, and in a place furtherin the west later. <strong>The</strong> difference is 4 minutes <strong>for</strong> every degree of longitude. For example in Newport/Wales (+3°) the sun is in its midday position 3 x 4 = 12 minutes later than in Greenwich/London (0°) and13 x 4 = 52 minutes later than in Hamburg/Germany (-10°). In comparison Greenwich Mean Time(GMT) is an artificial time standard valid by agreement in a larger area. It is based on the noon timesmeasured at Greenwich but levelling out the slightly slower or faster movement of the sun, as comparedwith a clockwork, a difference which can sum up to ±15 minutes.4. If the sundial ring shows the correct time, the meridian ring hangs automatically in a north-southdirection. So, if you know the date and geographical latitude, you can easily determine the cardinalpoints.XXIXIIIINÖRDLICHE ERDHALBKUGELIXIIIIVVIIIVIINÖRDLICHE ERDHALBKUGELVONDVIVIIVM A M F J DIVVIIIIIIIX90° 80° 70° 60° 50° 40° 30° 20° 10°JJASJM A M F J DONDIIXIX0°XII