Qubit 2.0 Fluorometer Manual
Qubit 2.0 Fluorometer Manual
Qubit 2.0 Fluorometer Manual

Create successful ePaper yourself
Turn your PDF publications into a flip-book with our unique Google optimized e-Paper software.
<strong>Qubit</strong> ® <strong>2.0</strong> <strong>Fluorometer</strong>Catalog no. Q32866Rev. Date: 4 October 2010MAN0003231User <strong>Manual</strong>
ContentsProduct Contents...........................................................................................................3Safety Information ........................................................................................................4Introduction.......................................................................................... 5Description of <strong>Qubit</strong> ® <strong>2.0</strong> <strong>Fluorometer</strong>......................................................................5Product Specifications ..................................................................................................8Methods ................................................................................................ 9Getting Started...............................................................................................................9Guidelines for Using the <strong>Qubit</strong> ® <strong>2.0</strong> <strong>Fluorometer</strong> .................................................13Calibrating the <strong>Qubit</strong> ® <strong>2.0</strong> <strong>Fluorometer</strong>...................................................................14Reading Samples .........................................................................................................19Calculating the Original Sample Concentration....................................................22Cleaning and Maintenance........................................................................................29Troubleshooting ..........................................................................................................30Appendix ............................................................................................ 33Critical <strong>Qubit</strong> Assay Considerations.....................................................................33Accessory Products.....................................................................................................36Regulatory Requirements ..........................................................................................37Technical Support .......................................................................................................38Purchaser Notification................................................................................................392
Product Contents<strong>Qubit</strong> ® <strong>2.0</strong><strong>Fluorometer</strong>The <strong>Qubit</strong> ® <strong>2.0</strong> <strong>Fluorometer</strong> is shipped with the componentslisted below:ComponentQuantity<strong>Qubit</strong> ® <strong>2.0</strong> <strong>Fluorometer</strong> 1Universal Power Cord with 4 adaptor plugs1(for U.S./E.U./U.K./Australia)<strong>Qubit</strong> ® <strong>2.0</strong> USB drive1(includes the instruction manual)<strong>Qubit</strong> ® <strong>2.0</strong> <strong>Fluorometer</strong> Quick Reference Card1(QRC)Certificate of Conformity (COC) 1The complete instruction manual is also available on our websiteat www.invitrogen.com/qubit.See pages 5–8 for the description and specifications of the<strong>Qubit</strong> ® <strong>2.0</strong> <strong>Fluorometer</strong>.Upon Receivingthe InstrumentExamine the instrument carefully for damage incurred duringtransit. Ensure that all parts of the instrument, includingaccessories listed above, are included with the product. Damageclaims must be filed with the carrier; the warranty does not coverin-transit damage.See page 9 to install the instrument.Registering YourInstrumentVisit probes.invitrogen.com/qubit to register your instrument.You will be asked to supply the serial number, your name, andyour contact details. Registering your instrument ensures thatyou will receive notifications of software upgrades andinformation on new assays for use with the <strong>Qubit</strong> ® <strong>2.0</strong><strong>Fluorometer</strong>.Intended UseFor research use only. Not intended for any animal or humantherapeutic or diagnostic use.3
Safety InformationSafetyPrecautionsReview and follow the safety instructions below. Do not install the instrument in heavy humidity, such as in agreenhouse or an incubator, to avoid a danger of electricshock. If water or other material enters the instrument, theadaptor, or power inlet, disconnect the power cord andcontact a service person. For operating environment, refer toProduct Specifications (page 8). Do not touch the main plug or power cord with wet hands. Always ensure that the power-supply input voltage matchesthe voltage available in your location. Do not install the instrument on a slant or a place prone tovibrations; vibrations increase the risk of instrumentmalfunction or damage. Plug the power cord firmly into the wall outlet and ACadapter. To avoid potential shock hazard, make sure that the powercord is properly grounded. Be sure to position the equipment so that it is easy todisconnect the instrument. Turn off the instrument before unplugging the power cordand/or moving the instrument. If the instrument is broken or dropped, disconnect the powercord and contact a service person. Do not disassemble theinstrument. Use only authorized accessories (adaptor, power cord, andUSB drive).4
IntroductionDescription of <strong>Qubit</strong> ® <strong>2.0</strong> <strong>Fluorometer</strong><strong>Qubit</strong> ® <strong>2.0</strong><strong>Fluorometer</strong>The <strong>Qubit</strong> ® <strong>2.0</strong> <strong>Fluorometer</strong> is a benchtop fluorometer for thequantitation of DNA, RNA, and protein, using the highly sensitiveand accurate fluorescence-based <strong>Qubit</strong> quantitation assays. Useof the state-of-the-art dyes selective for dsDNA, RNA, and proteinminimizes the effects of contaminants in your sample that affectthe quantitation. Further, the very latest illumination anddetection technologies used in the <strong>Qubit</strong> ® <strong>2.0</strong> <strong>Fluorometer</strong> forattaining the highest sensitivity allow you to use as little as 1 μL ofsample and still achieve high levels of accuracy, even with verydilute samples.FeaturesImportant features of the <strong>Qubit</strong> ® <strong>2.0</strong> <strong>Fluorometer</strong> are: Provides a user-friendly, benchtop design for simple, fast, andhighly accurate quantitation of DNA, RNA, and protein inless than 5 seconds per sample (with sample incubation timesof 2 minutes for DNA and RNA, and 15 minutes for proteins). Uses the <strong>Qubit</strong> assays that contain advanced dyes that onlyfluoresce when bound to DNA, RNA, or protein. Thisspecificity allows you to get very accurate results because<strong>Qubit</strong> technology only reports the concentration of themolecule of interest, not contaminants. Uses disposable assay tubes that eliminate washing steps andcross contamination between samples. Presents comprehensive data with graphic reports and a .CSV(comma separated value) file for sample comparisons.Continued on next page5
Description of <strong>Qubit</strong> ® <strong>2.0</strong> <strong>Fluorometer</strong>, ContinuedInstrumentExteriorComponentsThe image below shows the location of the various parts of the<strong>Qubit</strong> ® <strong>2.0</strong> <strong>Fluorometer</strong>.Power Inlet connects the <strong>Qubit</strong> ® <strong>2.0</strong> <strong>Fluorometer</strong> to an electricaloutlet using the supplied power cord and the appropriate plug,based on the electrical outlet configuration in your country.Touchscreen located in the front of the instrument is the userinterface containing the buttons for all the functions needed anddisplays data from the assays.Sample chamber is used to insert the assay tube containing thesample into the fluorometer for analysis.USB port allows you to transfer and save data to your computerfor record keeping and printing purposes. The <strong>Qubit</strong> ® <strong>2.0</strong> USBdrive supplied with the instrument or any other standard USBdrive is inserted into the USB port for data transfer.Continued on next page6
Description of <strong>Qubit</strong> ® <strong>2.0</strong> <strong>Fluorometer</strong>, ContinuedUser InterfaceUse the touch screen of the <strong>Qubit</strong> ® <strong>2.0</strong> <strong>Fluorometer</strong> to operate theinstrument. The touch screen consists of: The touch screen buttons to operate the instrument, includingalphanumeric buttons to enter sample names. The digital display showing the data and graphs for thestandards and sample.7
Product Specifications<strong>Qubit</strong> ® <strong>2.0</strong><strong>Fluorometer</strong>SpecificationsEnvironmental ConditionsOperating power:100–240 VAC, 0.4 AFrequency:50–60 HzElectrical output:9 VDC, 1.33 AInstallation site:Indoor use onlyOperating temperature:15–40°CMaximum relative humidity: 20–80%, non-condensingInstrument SpecificationsInstrument type:Benchtop fluorometerInstrument dimensions:5.3” (w) × 8.5” (l) × 1.6” (h)(13.3 cm × 21.3 cm × 4 cm);oval shapedWeight: 11.5 oz (340 g)Dynamic range:5 orders of magnitudeProcessing time:≤ 5 seconds/sampleLight sources:Blue LED (max ~470 nm)Red LED (max ~635 nm)Excitation filters:Blue 430–495 nmRed 600–645 nmEmission filters:Green 510–580 nmRed 665–720 nmDetectors:Photodiodes: measurementcapability from 300–1,000 nmCalibration type:2- or 3-point standardTube type:0.5 mL Real Time PCR(polypropylene) tubesWarm-up time:2 seconds<strong>Qubit</strong> ® <strong>2.0</strong> USB Drive:2 Gigabyte8
MethodsGetting StartedInstalling the<strong>Qubit</strong> ® <strong>2.0</strong><strong>Fluorometer</strong>The <strong>Qubit</strong> ® <strong>2.0</strong> <strong>Fluorometer</strong> is a stand-alone instrument that doesnot require a connection to a computer.1. After unpacking the instrument, place the instrument on a flat,level, dry surface.2. Plug one end of the supplied power cord into the <strong>Qubit</strong> ® <strong>2.0</strong><strong>Fluorometer</strong>. To the other end attach the appropriate plugadaptor, based on the electrical outlet configuration in yourcountry.3. Plug the power cord into the electrical outlet. Be sure to useonly the power cord supplied with your instrument. Poweringthe instrument with an unapproved power cord may damagethe instrument.4. The instrument is automatically powered on when it isplugged in.5. To power down the <strong>Qubit</strong> ® <strong>2.0</strong> <strong>Fluorometer</strong>, unplug theinstrument.Continued on next page9
Getting Started, ContinuedSleep ModeThe <strong>Qubit</strong> ® <strong>2.0</strong> <strong>Fluorometer</strong> has an auto-standby (i.e., sleep) modethat is triggered after 30 minutes of inactivity. You can also triggerthe stand-by mode by touching the Power button ( ) located onthe top left of the touch screen.To recover from the standby mode, touch anywhere on the touchscreen. Recovery from standby mode returns you to the samescreen present when sleep mode commenced. After 7.5 hours ofinactivity, touching the screen returns you to the Home Screen(see below).Home ScreenWhen the instrument is turned on, the Home Screen is displayed.From the Home Screen, you can proceed immediately to thequantitation assays (DNA, RNA, or protein), choose to calibratethe instrument with the appropriate standards, access the saveddata, set up the date and time, or adjust the screen brightness.Continued on next page10
Getting Started, ContinuedDate and TimeSetupThe date and time is already preset when you receive theinstrument. To reset the date and time, follow these steps:1. Press Date/Time. The Date/Time Properties Screen contains6 roller wheels that respond to movement of a finger across thescreen as if they were wheels.2. Select the date and time by bringing the desired value to thecenter position on the roller wheel. Press Set to make thedate/time changes. The updated date/time is displayed on thetop of the window.Note: If you select Cancel, your changes are not saved and theinstrument returns to the screen that was last displayed.AdjustingScreenBrightnessTo adjust the screen brightness, press the Brightness button ( )located on the top right of the touch screen and move the slider barto the desired brightness level.11Continued on next page
Getting Started, ContinuedUpdating theFirmwareTo update your <strong>Qubit</strong> ® <strong>2.0</strong> <strong>Fluorometer</strong> with the latest firmwareavailable from Invitrogen, follow these steps:1. Download the latest firmware to your USB drive from ourwebsite (www.invitrogen.com/qubit).2. Press the Version button located on the top portion of thetouch screen. The Version Screen is displayed.3. Insert the USB drive into the USB port and press Update.Note: A green dot on the Update button indicates that the instrumentrecognizes the USB drive; a red dot indicates that the USB drive is notinserted into the USB port or that the instrument does not recognizethe USB drive.After the successful update of the firmware, the followingscreen is displayed before the instrument returns to the HomeScreen. You can now proceed to setting your standards andquantitating your samples.12
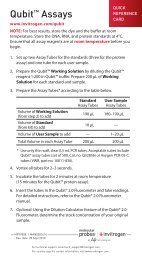
Guidelines for Using the <strong>Qubit</strong> ® <strong>2.0</strong> <strong>Fluorometer</strong>RECOMMENDATIONTo obtain the best results, follow the recommendations below.For more information, see Critical <strong>Qubit</strong> Assay Considerationsin the Appendix, pages 33–35.Do not operate the instrument in direct sunlight.Wear gloves during sample handling.Use the <strong>Qubit</strong> ® <strong>2.0</strong> <strong>Fluorometer</strong> at room temperature only(22–28ºC). Store all kit reagents at room temperature and insert allassay tubes into the <strong>Qubit</strong> ® <strong>2.0</strong> <strong>Fluorometer</strong> only for as muchtime as it takes for the instrument to measure thefluorescence. Do not hold the assay tubes in your hand before performinga measurement. Make sure that you have calibrated the <strong>Qubit</strong> ® <strong>2.0</strong><strong>Fluorometer</strong> using the appropriate standards. Incubate the tubes for the <strong>Qubit</strong> DNA and RNA assays for2 minutes after mixing the sample or standard with theworking solution. Incubate the tubes for the <strong>Qubit</strong> protein assays for 15minutes after mixing the sample or standard with theworking solution. If you are performing multiple readings of a single tube,remove the tube from the instrument and let it equilibrate toroom temperature for 30 seconds before taking anotherreading. Visit www.invitrogen.com/qubit for additional applicationnotes, technical notes, citations, firmware updates, and a listof validated <strong>Qubit</strong> assays that have been tested using the<strong>Qubit</strong> ® <strong>2.0</strong> <strong>Fluorometer</strong>.Assay Tubesfor the<strong>Qubit</strong> ® <strong>2.0</strong><strong>Fluorometer</strong>Only thin-wall, clear 0.5 mL PCR tubes are appropriate for use inthe <strong>Qubit</strong> ® <strong>2.0</strong> <strong>Fluorometer</strong>. Acceptable tubes include <strong>Qubit</strong> ® assaytubes (Cat. no. Q32856, 500 tubes) or Axygen PCR-05-C tubes(VWR, part number 10011-830). The minimum assay volume mustbe 200 μL for an accurate read.13
Calibrating the <strong>Qubit</strong> ® <strong>2.0</strong> <strong>Fluorometer</strong>IntroductionFor each assay, you have the choice to run new standards forcalibrating the <strong>Qubit</strong> ® <strong>2.0</strong> <strong>Fluorometer</strong> or to use the values fromthe previous calibration (for more information, see Calibrating the<strong>Qubit</strong> ® <strong>2.0</strong> <strong>Fluorometer</strong> in the Appendix, page 35). This sectionprovides instructions for running new calibration standards andfor using the last calibration.Note: When the fluorometer is used for the first time, there will not be anoption to use the last calibration.Calibration of the <strong>Qubit</strong> ® <strong>2.0</strong> <strong>Fluorometer</strong> requires the preparationof the appropriate standard solutions. For instructions on thepreparation of these standards, see the instructions thataccompany the assay you are using.MaterialsNeededAppropriate standards for the assay you are performingNote: Incubate the standards for the appropriate amount of time aftermixing them with the working solution (2 minutes for the <strong>Qubit</strong> DNA and RNA assays, 15 minutes for the <strong>Qubit</strong> protein assay).<strong>Qubit</strong> ® assay tubes or other appropriate 0.5 mL assay tubesOptional: <strong>Qubit</strong> ® <strong>2.0</strong> USB drive for data transfer, supplied withthe instrument or available separatelyRunning NewStandards forCalibration1. On the Home Screen, choose the type of assay for which youwant to run the standards. Standards Screen is automaticallydisplayed.14Continued on next page
Calibrating the <strong>Qubit</strong> ® <strong>2.0</strong> <strong>Fluorometer</strong>, ContinuedRunning NewStandards forCalibration,continued2. If you have already performed a calibration for the selectedassay, <strong>Qubit</strong> ® <strong>2.0</strong> <strong>Fluorometer</strong> will prompt you to choosebetween reading new standards and using the previouscalibration.Note: You can also press Standards to go to the Standards Screenfrom any other screen.3. Press Yes to read new standards. A prompt to insertStandard #1 appears on the screen.Continued on next page15
Calibrating the <strong>Qubit</strong> ® <strong>2.0</strong> <strong>Fluorometer</strong>, ContinuedRunning NewStandards forCalibration,continued4. Insert Standard #1 into the Sample Chamber and press Read.Ensure that you are using the Standard #1 appropriate for theassay you are performing. The reading takes approximately3 seconds.5. Insert Standard #2, and press Read. Ensure that you are usingthe Standard #2 appropriate for the assay you are performing.6. If you are performing the <strong>Qubit</strong> protein assay, whichrequires a three-point calibration, insert Standard #3 whenprompted, and then press Read.The calibration is complete after Standard #2 is read (or afterStandard #3 is read for the <strong>Qubit</strong> protein assay). The newstandards graph with data points for standards connected bya line appears on the screen.Continued on next page16
Calibrating the <strong>Qubit</strong> ® <strong>2.0</strong> <strong>Fluorometer</strong>, ContinuedIn the Fluorescence vs. Concentration graph, open circlesrepresent correct standards, black circles represent samplesthat fall within the assay's range, and red circles representsamples or standards that are not within the assay’s range.The most recent sample is signified by a large black circle.A “Standards Incorrect” message indicates an error. Checkingthe calibration values may help you to determine the source ofyour error. See Checking Standards, next page.Using the LastCalibrationYou can choose to apply the previous calibration to your samplereadings by pressing No when the <strong>Qubit</strong> ® <strong>2.0</strong> <strong>Fluorometer</strong> promptsyou to choose between reading new standards and using theprevious calibration. You are then directed to insert the assay tubecontaining your sample.Continued on next page17
Calibrating the <strong>Qubit</strong> ® <strong>2.0</strong> <strong>Fluorometer</strong>, ContinuedCheckingStandardsThe Check Standards Screen displays the raw fluorescence valuesfor Standard #1, Standard #2, Standard #3 (if applicable), and thelast measurement taken for a given assay. These values can assistyou in making a judgment regarding the performance of the<strong>Qubit</strong> ® <strong>2.0</strong> <strong>Fluorometer</strong> and whether or not the samples you usedwere within range.For the <strong>Qubit</strong> dsDNA BR, <strong>Qubit</strong> dsDNA HS, <strong>Qubit</strong> ssDNA, <strong>Qubit</strong> RNA, and <strong>Qubit</strong> RNA BR assays, the readinggiven by Standard #2 should be much higher than that ofStandard #1, and the reading of your sample should fallsomewhere between that of the two Standards.For the <strong>Qubit</strong> protein assay, the reading given by Standard#3 should be much higher than that of Standard #2, and thereading of your sample should be no more than 50% greaterthan Standard #3.To access the Check Standards Screen, press Check Stds. onthe Standards Screen. The raw fluorescence values for thestandards and the last sample will be displayed on the screen.18
Reading SamplesIntroduction After you have completed the calibration of the <strong>Qubit</strong> ® <strong>2.0</strong><strong>Fluorometer</strong> by running the appropriate standards for the assayyou want to use or have accepted the values from the previouscalibration, you are ready to read your samples. This sectionprovides instructions for using the <strong>Qubit</strong> ® <strong>2.0</strong> <strong>Fluorometer</strong> toquantitate your DNA, RNA, or protein samples with theappropriate <strong>Qubit</strong> assay.It is important to prepare the sample correctly before a reading istaken. For instructions on the preparation of your samples, see theinstructions that accompany the assay you are using.MaterialsNeeded<strong>Qubit</strong> assay kit you want to use to quantitate your samples(see page 33 for available <strong>Qubit</strong> assay kits and orderinginformation)Your DNA, RNA, or protein samplesNote: Incubate the samples for the appropriate amount of time aftermixing them with the working solution (2 minutes for the <strong>Qubit</strong> DNA and RNA assays, 15 minutes for the <strong>Qubit</strong> protein assay).<strong>Qubit</strong> ® assay tubes or other appropriate 0.5 mL assay tubesOptional: <strong>Qubit</strong> ® <strong>2.0</strong> USB drive for data transfer, supplied withthe instrument or available separatelyReadingSamples1. Choose Sample to go to the Sample Screen.19Continued on next page
Reading Samples, ContinuedReadingSamples,continued2. Insert a sample into the Sample Chamber and press Read. Themeasurement takes approximately 3 seconds.Upon the completion of the measurement, the result isdisplayed on the screen. The number displayed is theconcentration of the nucleic acid or protein in the assay tube.To calculate the concentration of your original sample, seeCalculating the Original Sample Concentration, page 22.3. To read the next sample, remove the sample from the SampleChamber, insert the next sample, and press Read NextSample.4. Repeat sample readings until all samples have been read.Continued on next page20
Reading Samples, ContinuedNotes on UsingGraphsPressing Hide Graph hides the Fluorescence vs. Concentrationgraph and the screen only displays the latest measurement.Note that the Hide Graph function is not available on theStandards Screen.Pressing Show Graph brings the graph back onto the screen.Pressing Clear Graph removes all sample data from theFluorescence vs. Concentration graph, but keeps the standardsdata.<strong>Qubit</strong> ® <strong>2.0</strong> <strong>Fluorometer</strong> automatically stores numeric datafrom all reads, but does not store graphic data or calculations.To save all data and calculations to the <strong>Qubit</strong> ® <strong>2.0</strong> USB Drive,see Saving the Data to the <strong>Qubit</strong> ® <strong>2.0</strong> USB Drive on page 27.21
Calculating the Original Sample ConcentrationIntroductionThe Dilution Calculator feature of the <strong>Qubit</strong> ® <strong>2.0</strong> <strong>Fluorometer</strong>calculates the concentration of your original sample based on thevolume of sample you have added to the assay tube.DilutionCalculator1. To calculate the concentration of your original sample, pressCalculate Stock Conc.The Dilution Calculator Screen containing the volume rollerwheel is displayed.2. Using the volume roller wheel, select the volume of youroriginal sample that you have added to the assay tube. Whenyou stop scrolling, the <strong>Qubit</strong> ® <strong>2.0</strong> <strong>Fluorometer</strong> calculates theoriginal sample concentration based on the measured assayconcentration.Continued on next page22
Calculating the Original Sample Concentration,ContinuedDilutionCalculator,continued3. To change the units in which the original sampleconcentration is displayed, press ng/mL. A pop-up windowshowing the current unit selection (as indicated by an adjacentred dash) opens.4. Select the unit for your original sample concentration bytouching the desired unit in the unit selection pop-upwindow. To close the unit selection pop-up window, touchanywhere on the screen outside the pop-up.The <strong>Qubit</strong> ® <strong>2.0</strong> <strong>Fluorometer</strong> automatically converts the unitsto your selection when the unit selection pop-up window isclosed.Note: The unit button next to your sample concentration reflects thechange in the units (e.g., if you change the unit to pg/μL, the buttondisplays pg/μL).5. To save the data from your calculation, see Saving theCalculation to the <strong>Qubit</strong> ® <strong>2.0</strong> <strong>Fluorometer</strong>, next page.6. To exit the Dilution Calculator Screen, press any navigatorbutton on the bottom of the screen or Read Next Sample.Note: When you navigate away from the Dilution Calculator Screen,the <strong>Qubit</strong> ® <strong>2.0</strong> <strong>Fluorometer</strong> saves the last values for the samplevolume and the units in the Dilution Calculator Screen only.Returning to the Dilution Calculator Screen displays these lastselected values.Continued on next page23
Calculating the Original Sample Concentration,ContinuedSaving theCalculation tothe <strong>Qubit</strong> ® <strong>2.0</strong><strong>Fluorometer</strong>1. To save the data from your calculation to the <strong>Qubit</strong> ® <strong>2.0</strong><strong>Fluorometer</strong>, press Save on the Dilution Calculator Screen.The last calculated value of your measurement is saved in the.CSV file and tagged with a time and date stamp.2. To review, rename, and save the data to the <strong>Qubit</strong> ® <strong>2.0</strong> USBdrive, see Data Handling, next page.24
Data HandlingIntroductionThe <strong>Qubit</strong> ® <strong>2.0</strong> <strong>Fluorometer</strong> presents comprehensive data withgraphic reports, and it allows saving of data as a .CSV (commaseparated value) file for sample comparisons. Each measurementdata point in the .CSV file is numbered and exhibits a time anddate stamp.Reviewing theData1. To review the data saved on the <strong>Qubit</strong> ® <strong>2.0</strong> <strong>Fluorometer</strong>, pressData on any screen. The Data Screen displays the data in aspreadsheet format with additional data columns hidden tothe right. The most recent data point is displayed in the firstline of the spreadsheet.2. Drag the scrollbars with a finger to move continuously acrossthe spreadsheet to access the data columns hidden to the right.Continued on next page25
Data Handling, ContinuedRenaming DataFiles1. Select the data file to rename by touching the correspondingline of the spreadsheet on the Data Screen. The selected linewill be highlighted. If no lines are selected, you are promptedto select a line or multiple lines to rename.Note: To select multiple files, highlight each line by-one-one or pressthe column headers to highlight all files. To deselect all rows, simplypress the column header again.2. Press Rename to enter a name for the selected line. AlphabetKeys Screen is displayed. To switch to the Numeric KeysScreen, press 123.3. Enter the file name using the keypad buttons displayed on theSave menu. The maximum number of characters you can enteris 20.Note: If you have selected to rename multiple lines at once, files willbe differentiated by numbers at the end of the name. The numbers willappear in ascending order, with the most recent sample starting with 1(e.g., SAMPLE_1, SAMPLE_2, etc.).4. Press OK to save the name you have entered as the file nameand to go back to the Data Screen.Continued on next page26
Data Handling, ContinuedSaving theData to the<strong>Qubit</strong> ® <strong>2.0</strong> USBDriveThe <strong>Qubit</strong> ® <strong>2.0</strong> <strong>Fluorometer</strong> is designed for stand-alone use; it doesnot require the use of an external computer. However, to archivedata and generate reports, you may transfer the numeric datastored in the .CSV file to your computer using the USB drive andimport the file into any spreadsheet program. To archive yourdata:1. Insert the <strong>Qubit</strong> ® <strong>2.0</strong> USB drive into the USB port.2. Press Data to access the Data Screen.Note: A green dot on the USB icon indicates that the instrumentrecognizes the USB drive; a red dot indicates that the USB drive is notinserted into the USB port or that the instrument does not recognizethe USB drive.Continued on next page27
Data Handling, ContinuedSaving theData to the<strong>Qubit</strong> ® <strong>2.0</strong> USBDrive, continued3. Select the data file to save by touching the corresponding lineof the spreadsheet on the Data Screen. The selected line ishighlighted.Note: By default, the entire .CSV file will be saved to the USB drive ifno lines are selected4. Save your data on the USB drive by pressing the USB icon.The numeric data is automatically saved as a .CSV file that canbe opened with any spreadsheet program.5. To delete all data from the .CSV file and start with a blank file,press the Clear Data button.6. Transfer the <strong>Qubit</strong> ® <strong>2.0</strong> USB drive to the USB port on your PC.You may open the .CSV file using a spreadsheet program.28
Cleaning and MaintenanceCleaning andMaintenanceThe <strong>Qubit</strong> ® <strong>2.0</strong> <strong>Fluorometer</strong> does not need regular maintenance. Totroubleshoot problems with the instrument, contact TechnicalSupport (page 38). Do not perform any repairs or service on the<strong>Qubit</strong> ® <strong>2.0</strong> <strong>Fluorometer</strong> to avoid damaging the instrument. Do not expose the <strong>Qubit</strong> ® <strong>2.0</strong> <strong>Fluorometer</strong> to direct sunlight. Clean the surface of the <strong>Qubit</strong> ® <strong>2.0</strong> <strong>Fluorometer</strong> with a dampcloth. To clean the touch screen, turn off the <strong>Qubit</strong> ® <strong>2.0</strong> <strong>Fluorometer</strong>,disconnect the power cable, and clean the touch screen with asoft cloth lightly moistened with LCD cleansing detergent.Cleaning the screen with excessive force can damage the touchscreen. Wipe the screen dry immediately.29
TroubleshootingHandlingSamplesThe calibration standards included in the <strong>Qubit</strong> RNA and<strong>Qubit</strong> RNA BR Assay Kits are high-quality rRNA standards.The integrity and concentration of these standards is critical tothe optimal performance of the <strong>Qubit</strong> RNA assay. We highlyrecommend treating the rRNA standards as you would anyother precious RNA. Use appropriate RNAse-free handlingtechniques, including RNAse-free gloves, pipette tips, andtubes. Keep the tube lids closed whenever possible; do nottouch the pipet to the inside wall of the tube whenwithdrawing a sample, and return the rRNA standard to therefrigerator as soon as possible after use.Ensure that the assay tubes are at room temperature at thetime the reading is taken. Do not hold assay tubes in yourhand and do not leave assay tubes in the <strong>Qubit</strong> ® <strong>2.0</strong><strong>Fluorometer</strong> for longer than it takes to read the fluorescence.See Assay Temperature on page 34.Be careful not to spill sample into the sample chamber.Promptly wipe any spills.The <strong>Qubit</strong> assays are very sensitive and even small amountsof material from a previous sample may result in errors. Use aclean 0.5 mL PCR tube for each reading.The tube must be clean and dry on the outside when takingreadings. Moisture and condensation on the tube surface canlead to reading errors.Minute bubbles in samples will cause errors in readings. Besure not to introduce bubbles into samples. Slight tapping onthe tube wall or brief centrifugation will often help dissipatebubbles.Continued on next page30
Troubleshooting, ContinuedLow ReadingYour sample is out of range. Use a sample that is moreconcentrated or use a lower dilution (i.e., 20 μL in 180 μLinstead of 10 μL in 190 μL).View the Check Standards Screen to confirm that the valuesfor the samples fall between the values of the standards (seepage 18).Ensure that you have prepared the <strong>Qubit</strong> working solutioncorrectly (1:200 dilution using the buffer provided in the kit).Ensure that you have prepared the standard tubes correctly(10 μL of each standard in 190 μL of <strong>Qubit</strong> working solution).Ensure that the standard and sample tubes are filled to 200 μL.Protect the <strong>Qubit</strong> reagent and working solutions from light.Select the correct <strong>Qubit</strong> ® <strong>2.0</strong> <strong>Fluorometer</strong> assay for the <strong>Qubit</strong> assay you are performing and calibrate the fluorometercorrectly. Standards must be used in the correct order.Ensure that the assay is performed entirely at roomtemperature.Continued on next page31
Troubleshooting, ContinuedHigh ReadingYour sample is out of range. Use a sample that is lessconcentrated.View the Check Standards Screen to confirm that the valuesfor the samples fall between the values of the standards (seepage 18).Ensure that the lid is closed while reading standards andsamples.Prepare samples and standards according to the instructionsin the <strong>Qubit</strong> assay kit you are using.Ensure that the assay is performed entirely at roomtemperature.32
AppendixCritical <strong>Qubit</strong> Assay ConsiderationsHow the<strong>Qubit</strong> ® <strong>2.0</strong><strong>Fluorometer</strong>CalculatesConcentrationThe <strong>Qubit</strong> ® <strong>2.0</strong> <strong>Fluorometer</strong> generates concentration data based onthe relationship between the two Standards used in calibration(three for the <strong>Qubit</strong> protein assay). The plot below shows the linecorresponding to the curve-fitting algorithm (a modified Hill plot)used in the calculation of concentration data for the <strong>Qubit</strong> RNAassay. For reference, the positions of the Standards and a set of datapoints from an actual experiment are shown superimposed onto theline. This plot demonstrates that the curve-fitting algorithm givesaccurate values for quantitation.Figure 1. The curve-fitting algorithm used to determine concentration in the<strong>Qubit</strong> RNA assay. Data for the <strong>Qubit</strong> dsDNA BR, <strong>Qubit</strong> dsDNA HS,<strong>Qubit</strong> ssDNA, <strong>Qubit</strong> RNA BR, and <strong>Qubit</strong> protein assays are generatedby similar algorithms.Continued on next page33
Critical <strong>Qubit</strong> Assay Considerations, ContinuedAssayTemperatureThe <strong>Qubit</strong> assays were designed to be performed at roomtemperature (22–28°C), and temperature fluctuations can influencethe accuracy of the assay. To minimize temperature fluctuations,store all kit reagents at room temperature and insert all assay tubesinto the <strong>Qubit</strong> ® <strong>2.0</strong> <strong>Fluorometer</strong> only for as much time as it takesfor the instrument to measure the fluorescence, because the<strong>Qubit</strong> ® <strong>2.0</strong> <strong>Fluorometer</strong> can raise the temperature of the assaysolution significantly, even over a period of a few minutes. Do nothold the assay tubes in your hand before a measurement, becauseholding the tubes warms the solution and results in a low reading.Figure 2. Effect of temperature on the <strong>Qubit</strong> dsDNA BR assay. <strong>Qubit</strong> dsDNA HS, <strong>Qubit</strong> ssDNA, <strong>Qubit</strong> RNA, <strong>Qubit</strong> RNA BR, and <strong>Qubit</strong> protein assays show similar sensitivities over the same range.IncubationTimeTo allow the <strong>Qubit</strong> assay to reach maximum fluorescence,incubate the tubes for the DNA and RNA assays for 2 minutesafter mixing the sample or standard with the working solution.After this incubation period, the fluorescence signal is stable for3 hours at room temperature, for all nucleic acid assays except the<strong>Qubit</strong> ssDNA assay, which is stable for up to 30 minutes. The<strong>Qubit</strong> protein assay requires 15 minutes of incubation for a stablesignal. For greatest accuracy of the protein assay, the incubationtime of the samples should be within 10 minutes of the incubationtime of the standards.Continued on next page34
Critical <strong>Qubit</strong> Assay Considerations, ContinuedPhotobleachingof <strong>Qubit</strong> ReagentsThe <strong>Qubit</strong> reagents exhibit high photostability in the <strong>Qubit</strong> ® <strong>2.0</strong><strong>Fluorometer</strong>, showing
Accessory Products<strong>Qubit</strong> ® <strong>2.0</strong>ProductsThe following products can be used with the <strong>Qubit</strong> ® <strong>2.0</strong> <strong>Fluorometer</strong>and are available separately from Invitrogen.For more information, visit www.invitrogen.com or contactTechnical Support (page 38).Product Quantity Catalog no.<strong>Qubit</strong> ® <strong>2.0</strong> <strong>Fluorometer</strong> 1 each Q32866<strong>Qubit</strong> ® Quantitation Starter Kit 1 kit Q32871<strong>Qubit</strong> ® Quantitation Lab Starter Kit 1 kit Q32872<strong>Qubit</strong> ® <strong>2.0</strong> <strong>Fluorometer</strong> USB 1 each Q32867<strong>Qubit</strong> ® <strong>2.0</strong> <strong>Fluorometer</strong> InternationalPower Cord (replacement)1 each Q32868<strong>Qubit</strong> ® Assay Tubes 500 tubes Q32856<strong>Qubit</strong> ® RNA BR Assay Kit*20–1,000 ng*100 assays500 assaysQ10210Q10211<strong>Qubit</strong> ® ssDNA Assay Kit *1–200 ng* 100 assays Q10212<strong>Qubit</strong> ® dsDNA BR Assay Kit*2–1,000 ng*<strong>Qubit</strong> ® dsDNA HS Assay Kit*0.2–100 ng*<strong>Qubit</strong> ® RNA Assay Kit *5–100 ng*<strong>Qubit</strong> ® Protein Assay Kit *0.25–5 μg*100 assays500 assays100 assays500 assays100 assays500 assays100 assays500 assaysQ32850Q32853Q32851Q32854Q32852Q32855Q33211Q3321236
Regulatory RequirementsThe <strong>Qubit</strong> ® <strong>2.0</strong> <strong>Fluorometer</strong> has been tested and complies with thefollowing regulatory requirements:U.S. and Canadian Safety StandardsUL 61010-1:2004 for U.S.CAN/CSA-C22.2 No.61010-1:2004 for CanadaU.S. and Canadian EMC RequirementsFCC CFR 47, Part 15 Sections 15.107 and 15.109 (Class B)Industry Canada Interference Causing Equipment StandardICES-003 Issue 4, Sections 5.3 and 5.5. (Digital apparatus)European Safety and EMC Standards2006/95/EC Low Voltage directive (EN 61010-1:2001, EN 6101-2-081:2001/A1:2003)2004/108/EC EMC Directive (EN 61326-1:2006)2002/95/EC RoHS directive2002/96/EC WEEE directiveDo not dispose in the regular household garbage.Dispose the battery into the special waste for batteries.Australian DirectivesThe Australian Communication Authority (ACA) requirements forISM Equipment AS/NZS 2064 (equivalent to EN 55011 or CISPR 11)PSE Mark for JapanProtection Class II double insulationCCC Mark for China37
Technical SupportWeb ResourcesVisit the Invitrogen website at www.invitrogen.com for:Technical resources, including manuals, vector maps andsequences, application notes, MSDSs, FAQs, formulations,citations, handbooks, etc.Complete technical support contact informationAccess to the Invitrogen Online CatalogAdditional product information and special offersContact UsFor more information or technical assistance, call, write, fax, oremail. Additional international offices are listed on our website(www.invitrogen.com).Corporate Headquarters:5791 Van Allen WayCarlsbad, CA 92008 USATel: 1 760 603 7200Tel (Toll Free): 1 800 955 6288Fax: 1 760 602 6500E-mail:tech_support@invitrogen.comJapanese Headquarters:LOOP-X Bldg. 6F3-9-15, KaiganMinato-ku, Tokyo 108-0022Tel: 81 3 5730 6509Fax: 81 3 5730 6519E-mail:jpinfo@invitrogen.comEuropean Headquarters:Inchinnan Business Park3 Fountain DrivePaisley PA4 9RF, UKTel: +44 (0) 141 814 6100Tech Fax: +44 (0) 141 8146117E-mail:eurotech@invitrogen.com38
Purchaser NotificationLimited UseLabel LicenseNo. 358:Research UseOnlyThe purchase of this product conveys to the purchaser the limited,non-transferable right to use the purchased amount of the productonly to perform internal research for the sole benefit of the purchaser.No right to resell this product or any of its components is conveyedexpressly, by implication, or by estoppel. This product is for internalresearch purposes only and is not for use in commercial services ofany kind, including, without limitation, reporting the results ofpurchaser’s activities for a fee or other form of consideration. Forinformation on obtaining additional rights, please contactoutlicensing@lifetech.com or Out Licensing, Life TechnologiesCorporation, 5791 Van Allen Way, Carlsbad, California 92008.Continued on next page39
Purchaser Notification, ContinuedInstrumentWarrantyInvitrogen (a part of Life Technologies Corporation) warrants to theoriginal purchaser (“Purchaser”) that the Instrument (“Instrument”)will be free from defects in materials and workmanship for a period ofone (1) year from the date of delivery. Invitrogen agrees, as its soleresponsibility under this limited warranty, and upon prompt notice ofa defect, to repair, replace or credit the purchase price, at its discretion,any Instrument discovered to be defective within the warranty period.Invitrogen will credit the account within 30 days of purchase, if theinstrument is in original condition. After 30 days, Invitrogen will onlyreplace the instrument for up to a year and no credit will be issued.Invitrogen will not accept any returned instrument that was used inHIV or other infectious disease labs.This warranty does not include repair, replacement, or refundnecessitated by accident, abuse, neglect, misuse, unauthorized repair,or modification of the Instrument. The warranty will be voided if theinstrument is disassembled or a customer attempted to repair theinstrument. In the event that Invitrogen determines that theInstrument is in need of repair and not replacement, this StandardWarranty includes replacement parts and labor for the Instrument.This Standard Warranty does not include shipment of the Instrumentto and from service location or travel cost of service engineer, the costsof which shall be borne by the Purchaser.This Warranty and the remedies set forth herein are exclusive and inlieu of all other express or implied warranties (including impliedwarranties of merchantability, fitness for a particular purpose andnon-infringement), and no other warranties shall be binding uponInvitrogen. In no event shall Invitrogen be liable for any special,incidental or consequential damages resulting from the use ormalfunction of this Instrument or the system with which it is used,even if such damages could be anticipated by Life TechnologiesCorporation.To obtain service during the warranty period, contact InvitrogenTechnical Support for further instruction.OUT OF WARRANTY SERVICEContact Invitrogen Technical Support. We will be happy to assist youby phone at no charge. Repair service, if needed, will be billeddepending on the parts replaced and labor hours needed to repairyour instrument. You will be billed for shipment of the instrument tothe recommended service facility.©2010 Life Technologies Corporation. All rights reserved. The trademarksmentioned herein are the property of Life Technologies Corporation ortheir respective owners.40
Corporate Headquarters5791 Van Allen WayCarlsbad, CA 92008T: 1 760 603 7200F: 1 760 602 6500E: tech_support@invitrogen.comFor country-specific contact information visit our web site at www.invitrogen.com