
You also want an ePaper? Increase the reach of your titles
YUMPU automatically turns print PDFs into web optimized ePapers that Google loves.
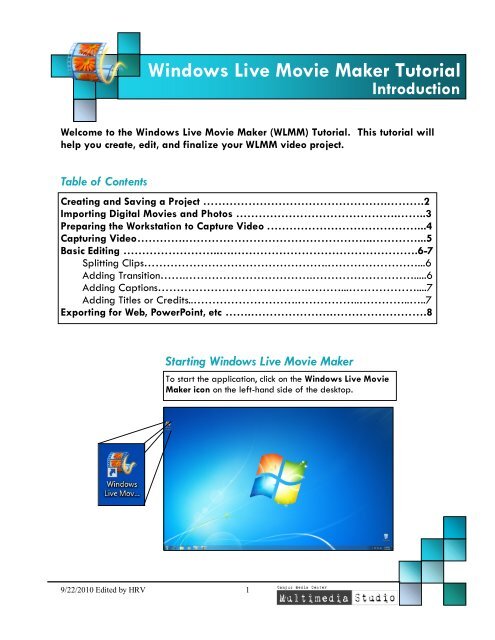
<strong>Windows</strong> <strong>Live</strong> <strong>Movie</strong> <strong>Maker</strong> <strong>Tutorial</strong><br />
Welcome to the <strong>Windows</strong> <strong>Live</strong> <strong>Movie</strong> <strong>Maker</strong> (WLMM) <strong>Tutorial</strong>. This tutorial will<br />
help you create, edit, and finalize your WLMM video project.<br />
Table of Contents<br />
9/22/2010 Edited by HRV 1<br />
Starting <strong>Windows</strong> <strong>Live</strong> <strong>Movie</strong> <strong>Maker</strong><br />
To start the application, click on the <strong>Windows</strong> <strong>Live</strong> <strong>Movie</strong><br />
<strong>Maker</strong> icon on the left-hand side of the desktop.<br />
Introduction<br />
Creating and Saving a Project ………………………………………….……….2<br />
Importing Digital <strong>Movie</strong>s and Photos …………………………………….……..3<br />
Preparing the Workstation to Capture Video .…………………………………...4<br />
Capturing Video………….…………………………………………..…………...5<br />
Basic Editing ……………………..….………………………………………….6-7<br />
Splitting Clips………………………………………….……………………...6<br />
Adding Transition…….…………………………….……………………….....6<br />
Adding Captions………………………………….………...………………....7<br />
Adding Titles or Credits..……………………….……………..…………..…..7<br />
Exporting for Web, PowerPoint, etc …….………………….…………………….8
1<br />
2<br />
<strong>Windows</strong> <strong>Live</strong> <strong>Movie</strong> <strong>Maker</strong> <strong>Tutorial</strong><br />
Prior to starting work on your movie, you should first save<br />
your project.<br />
Click the main file menu button<br />
and then click Save Project As...<br />
Type in a meaningful name for the<br />
project and then click Save.<br />
9/22/2010 Edited by HRV 2<br />
Creating and Saving a Project<br />
NOTE: To ensure that you don’t lose any information, save your project<br />
OFTEN by selecting the Save Project option under the main file menu or<br />
clicking the button in the upper left-hand corner.
1<br />
2<br />
3<br />
<strong>Windows</strong> <strong>Live</strong> <strong>Movie</strong> <strong>Maker</strong> <strong>Tutorial</strong><br />
Click the Home tab and then click<br />
Add Videos and Photos.<br />
Now browse to your external storage<br />
device, select the file(s) you would like<br />
to import, and click Open.<br />
Alternatively, you can also just drag<br />
and drop video clips and photos into<br />
<strong>Movie</strong> <strong>Maker</strong> from a file browser<br />
window of your external storage<br />
device.<br />
9/22/2010 Edited by HRV 3<br />
Importing Digital <strong>Movie</strong>s and Photos
1<br />
2<br />
3<br />
<strong>Windows</strong> <strong>Live</strong> <strong>Movie</strong> <strong>Maker</strong> <strong>Tutorial</strong><br />
Preparing the Workstation to Capture Video<br />
The touch screen allows you to import media from DVD, VHS,<br />
and MiniDV.<br />
Use the touch screen, press the import<br />
button.<br />
In the import window press the<br />
appropriate button for the desired<br />
playback device.<br />
Cue your video watching the display<br />
monitor above the computer screen.<br />
Use the remote control on the touch<br />
screen to stop right before the<br />
desired frame.<br />
KEY<br />
9/22/2010 Edited by HRV 4<br />
Touch Screen Switcher<br />
DVD DVD Player/Recorder<br />
VHS/MiniDV VCR
1<br />
2<br />
3<br />
4<br />
<strong>Windows</strong> <strong>Live</strong> <strong>Movie</strong> <strong>Maker</strong> <strong>Tutorial</strong><br />
Capturing video from a device for your movie maker project.<br />
Click the main file menu button<br />
and then click Import from<br />
device.<br />
Type a name you will remember for<br />
your video clip, then click Next.<br />
Play your video then click the Import<br />
button to start the capture. Click Stop<br />
when you are done. Then click Finish.<br />
The clip you just captured will<br />
automatically show up in the <strong>Windows</strong><br />
<strong>Live</strong> Photo Gallery window. Now you<br />
can drag and drop the clip into your<br />
<strong>Movie</strong> <strong>Maker</strong> project.<br />
9/22/2010 Edited by HRV 5<br />
Capturing Video
1<br />
2<br />
3<br />
<strong>Windows</strong> <strong>Live</strong> <strong>Movie</strong> <strong>Maker</strong> <strong>Tutorial</strong><br />
After you have imported all the clips that you want, you can begin<br />
to build your video project on the storyboard.<br />
Splitting Video Clips<br />
Drag and drop the clip into the<br />
timeline.<br />
Drag the black bar where you want<br />
to split the clips.<br />
Go to the Edit tab and click Split.<br />
Adding Transitions<br />
Select the Animations tab. Hover<br />
1 your mouse over any transition to<br />
preview it on your clip.<br />
2<br />
Once you have chosen a transition,<br />
click on the beginning of the video clip<br />
or photo that you want to add the<br />
transition to. Then click the transition<br />
you want, to apply it.<br />
9/22/2010 Edited by HRV 6<br />
Basic Editing
1<br />
2<br />
1<br />
2<br />
<strong>Windows</strong> <strong>Live</strong> <strong>Movie</strong> <strong>Maker</strong> <strong>Tutorial</strong><br />
After you have imported all the clips that you want, you can begin<br />
to build your video project on the storyboard.<br />
Adding Captions<br />
Click on the photo or clip that you<br />
want the caption to be on. Then click<br />
on the Home tab, and then click<br />
Caption.<br />
A text box will appear on the lower<br />
part of your image or video. Click<br />
inside the text box and enter your<br />
text.<br />
Adding Titles or Credits<br />
Click on the Home tab, and then click<br />
either Title or Credits.<br />
A black slide will appear. Click inside<br />
the text box and enter your text.<br />
3 Note that the title will default to a<br />
slow zoom and the credits will<br />
default to downward scrolling<br />
through the text. However you can<br />
add different motion to the slide with<br />
the various options in the upper right<br />
corner, on the Format tab.<br />
9/22/2010 Edited by HRV 7<br />
Basic Editing
1<br />
2<br />
3<br />
4<br />
<strong>Windows</strong> <strong>Live</strong> <strong>Movie</strong> <strong>Maker</strong> <strong>Tutorial</strong><br />
9/22/2010 Edited by HRV 8<br />
Exporting for Web, PowerPoint, etc<br />
You can export your movie to a file format that is compatible with<br />
Microsoft PowerPoint.<br />
Click the main file menu button<br />
and then click Save movie<br />
Then select Standard-definition (unless<br />
you filmed in HD, in which case you<br />
should select the appropriate HD<br />
resolution), type a meaningful file<br />
name and then click Save.<br />
Once it has finished saving, follow the<br />
prompt and Play the final movie<br />
through, just to make sure it looks<br />
exactly the way you want.<br />
Once you are satisfied, copy the<br />
finalized WMV file over to your<br />
external device for uploading to the<br />
Web or use in another project, like a<br />
PowerPoint presentation.