Texecom Series - WebWayOne
Texecom Series - WebWayOne
Texecom Series - WebWayOne

You also want an ePaper? Increase the reach of your titles
YUMPU automatically turns print PDFs into web optimized ePapers that Google loves.
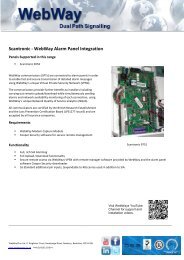
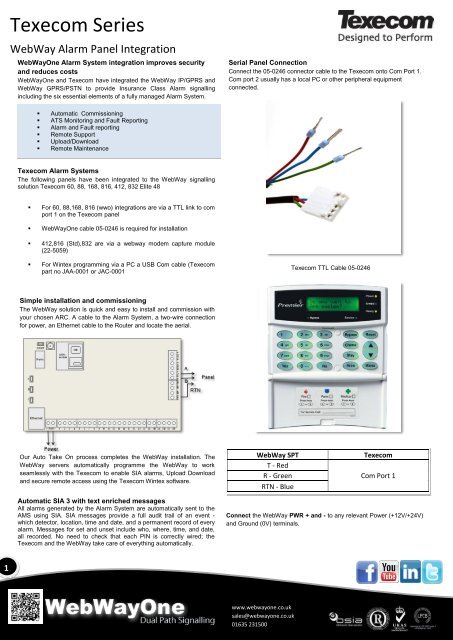
<strong>Texecom</strong> <strong>Series</strong>WebWay Alarm Panel Integration<strong>WebWayOne</strong>AlarmAlarmMon-itorinSystemtintegration improves securityand reduces costs<strong>WebWayOne</strong> and <strong>Texecom</strong> have integrated the WebWay IP/GPRS andWebWay GPRS/PSTN to provide Insurance Class Alarm signallingincluding the six essential elements of a fully managed Alarm System.Serial Panel ConnectionConnect the 05-0246 connector cable to the <strong>Texecom</strong> onto Com Port 1.Com port 2 usually has a local PC or other peripheral equipmentconnected.• Automatic Commissioning• ATS Monitoring and Fault Reporting• Alarm and Fault reporting• Remote Support• Upload/Download• Remote Maintenance<strong>Texecom</strong> Alarm SystemsThe following panels have been integrated to the WebWay signallingsolution <strong>Texecom</strong> 60, 88, 168, 816, 412, 832 Elite 48• For 60, 88,168, 816 (wwo) integrations are via a TTL link to comport 1 on the <strong>Texecom</strong> panel• <strong>WebWayOne</strong> cable 05-0246 is required for installation• 412,816 (Std),832 are via a webway modem capture module(22-5059)• For Wintex programming via a PC a USB Com cable (<strong>Texecom</strong>part no JAA-0001 or JAC-0001<strong>Texecom</strong> TTL Cable 05-0246Simple installation and commissioningThe WebWay solution is quick and easy to install and commission withyour chosen ARC. A cable to the Alarm System, a two-wire connectionfor power, an Ethernet cable to the Router and locate the aerial.Our Auto Take On process completes the WebWay installation. TheWebWay servers automatically programme the WebWay to workseamlessly with the <strong>Texecom</strong> to enable SIA alarms, Upload Downloadand secure remote access using the <strong>Texecom</strong> Wintex software.WebWay SPTT - RedR - GreenRTN - Blue<strong>Texecom</strong>Com Port 1Automatic SIA 3 with text enriched messagesAll alarms generated by the Alarm System are automatically sent to theAMS using SIA. SIA messages provide a full audit trail of an event -which detector, location, time and date, and a permanent record of everyalarm. Messages for set and unset include who, where, time, and date,all recorded. No need to check that each PIN is correctly wired; the<strong>Texecom</strong> and the WebWay take care of everything automatically.Connect the WebWay PWR + and - to any relevant Power (+12V/+24V)and Ground (0V) terminals.1www.webwayone.co.uksales@webwayone.co.uk01635 231500
<strong>Texecom</strong> <strong>Series</strong><strong>Texecom</strong> 88/168/60 <strong>Series</strong>The <strong>Texecom</strong> panel configuration is uploaded via the Wintex software and downloaded to the panel on com port 2 from a local PC. The followingrequires configuring in the panel,Communications MenuIn Options1. Enable communicator must be ticked2. UDL passcode (set in the panel) must match.3. Dial attempts 1, ring before answer 3Important: The WebWay should be connected to Com port 1.In ARC’s1. Account number (site ID)2. SIA Level 2/33. Connect Via IP - ticked4. Send SIA text – tickedIn Radio-Pad and Com Port options1. Com Port 1 – <strong>WebWayOne</strong> module2. Local IP address 127.0.0.13. Local IP port 505614. Gateway 127.0.0.15. Subnet Mask 255.255.255.06. Name/SMG port 50561All other settings are done by the Wintex Communications menu (7 th option down on the left side of the Wintex program labeled Comms). This can beconfigured on a local PC plugged on to Com Port 2 with the WebWay unit running on Com Port 1.Wintex SettingsImportant: The WebWay SPT should be connected to Com port 1.All settings are configured with the Wintex Communications menu (7 th option down on the left side of the Wintex program labeled Comms). This canbe configured on a local PC plugged on to Com Port 2 with the WebWay unit running on Com Port 1. (In keypad settings leave Com Port 2 asunassigned, when the PC cable is connected it will automatically detect and allow you to configure settings).2www.webwayone.co.uksales@webwayone.co.uk01635 231500
<strong>Texecom</strong> <strong>Series</strong><strong>Texecom</strong> 88/168/60<strong>Series</strong>“Account No:” should match the ARC Site/Chip ID and tick the relevant trigger event boxes relevant to the premises.If the SMS call centre is utilised the engineer should enter the appropriate number and it should be configured under:UDL/Digi Options – Radio/SMS Option – SMS Centre Pri.The SMS centre telephone number is used to send SMS text messages to mobile phones. (Default = 07860980480).Note if the <strong>Texecom</strong> is being programmed with a laptop on com port 2, and the WebWay is connected to com port 1 the SPT will be lost from thepanel until the Wintex session is closed.3www.webwayone.co.uksales@webwayone.co.uk01635 231500
<strong>Texecom</strong> <strong>Series</strong><strong>Texecom</strong> Premier 816 (WWO Version)A special version of the 816 known as the “Premier 816 WWO” isshipped with special software which allows it to communicate with the2424 SPT, however it does not have a dialer which means that it canonly be used with the 2424 system.Note that a cable assembly is required , which <strong>WebWayOne</strong> can supplyalthough any 5-Way Molex type connecter can be modified.The <strong>Texecom</strong> main board assembly has only 1 Com port on the PCBwith a 5-pin connection interface. This connects to the TTL R, T andgnd terminals of the <strong>WebWayOne</strong> 2424 panel interface. This meansthat a local PC and the 2424 SPT cannot be connected to the panel atthe same time. When connecting the local PC, leave the SPTdisconnected for about 30 seconds before connecting to the PC. Thisshould ensure that the panel recognizes that the SPT has beendisconnected.If there are problems establishing communications with the local PC,try entering user code + menu + 7 on the panel keypad (abort allcommunications).The connection details are as follows:WebWay SPTT - RedR - GreenRTN - BluePanel configurationEnter Programming OptionsMenu 70: Communicator Options<strong>Texecom</strong>Com Port 1Menu 76: Download Menu5: Com1 equipment type 003 - ComIP Module6: Com IP-address & port 12700000000150562Enter full octet (***.***.***.***) with no periods. Port should always be50561Example, IP 192.168.0.101 Port 50561: Enter as 19216800010150561Note that 127.0.0.1 is interpreted by the SPT as ’use DHCP’.7: LAN gateway IP (the local router) 127000000001Enter full octet (***.***.***.***) with no periods.Example, IP 192.168.0.1: enter as 192168000001Note that 127.0.0.1 is interpreted by the SPT as ’use DHCP’.8: Netmask 8 (255.255.255.0)This is selected from a list (see the Premier manual for full details).DHCP settings for IP & LAN gateway will override this setting.9: IP & port for main MCTEnter full octet (***.***.***.***) with no periods. Port should always be50561.Example, IP 85.200.242.12 Port 50561: Enter as 08520024201250561Configuration can also be done via the Wintex program1: Enable Communicator ENABLED2: Enable DTMF Dialing DISABLED3: Pulse after 3 rd attempt DISABLED4: European Pulse Dialing DISABLED5: Enable Test Transmission OPTIONAL6: Enable Cancel Call Waiting DISABLED7: Enable Backup to ARC DISABLED8: Enable Blind Dialing DISABLEDMenu 71: ARC 1 Menu0: Phone number Leave blank1: Account number Site Chip Number2: Protocol SIA Level 2/33: Dial Attempts 94: Partition Options 1234 (optional)5: Reporting Options 12345678 (optional)48: Protocol Options * * * * * * * 8 – Connect Via IPwww.webwayone.co.uksales@webwayone.co.uk01635 231500
<strong>Texecom</strong> <strong>Series</strong><strong>Texecom</strong> 412,816 (Standard Edition),832The following models are integrated via a modem capture module,provided by WebWay. This type of integration does not supportUpload/Download functionality.Panel configuration can also be completed with <strong>Texecom</strong>swintex program.In the comms menu set the following in Options;The modem capture board needs wiring as follows to the <strong>Texecom</strong>panel.WebWay Modem CaptureAB<strong>Texecom</strong>TRIn the comms menu set the following in ARCs;Panel configurationEnter Programming OptionsMenu 70: Communicator Options1: Enable Communicator ENABLED2: Enable DTMF Dialing ENABLED3: Pulse after 3 rd attempt DISABLED4: European Pulse Dialing DISABLED5: Enable Test Transmission OPTIONAL6: Enable Cancel Call Waiting DISABLED7: Enable Backup to ARC DISABLED8: Enable Blind Dialing ENABLEDMenu 71: ARC 1 Menu0: Phone number 01635 2315141: Account number Partiton 1Site Chip Number(Ensure reporting for partition(s) is enabled)2: Protocol SIA Level 2/33: Dial Attempts 94: Partition Options 1234 (optional)5: Reporting Options 12345678 (optional)8: Protocol Options All blank5www.webwayone.co.uksales@webwayone.co.uk01635 231500
<strong>Texecom</strong> <strong>Series</strong><strong>Texecom</strong> Elite 48• Requirements for the <strong>Texecom</strong> Elite 48:• For Wintex access via a PC or remote manager version 6Build 2• For Wintex programming via a PC a USB Com cable(<strong>Texecom</strong> part no JAA-0001 or JAC-0001• <strong>Texecom</strong> TTL Cable 05-0246If Upload/Download is needed ensure the settings below are configuredConnect to the <strong>Texecom</strong> Panel is as follows,WebWay SPTT - RedR - GreenRTN - Blue<strong>Texecom</strong>Com Port 1In ARCs ensure that,• Account no matches the Chip ID for the site• Protocol in SIA Level 2/3 is selected• User Area accounts is ticked• Connect Via IP is ticked• Send SIA text is tickedWintex ProgrammingSimple Configuration can be achieved with <strong>Texecom</strong>s Wintex programand a suitable comms cable. To allow communications simply connectthe cables to com port two on the device and then Config a account asusual with the following settings in comms.(In keypad settings leave Com Port 2 as unassigned, when the PCcable is connected it will automatically detect and allow you toconfigure settings).In optionsEnable Communicator must be tickedEnsure any reporting settings are set as required6www.webwayone.co.uksales@webwayone.co.uk01635 231500
<strong>Texecom</strong> <strong>Series</strong><strong>Texecom</strong> Elite 48Radio Pad and Com port settingsEnsure Com Port 1 is set to <strong>WebWayOne</strong>/Emizon ModuleFinally Send the update back to the panel.To set up via keypadEnter Engineer passwordPress MenuScroll to UDL/Digi Options (7)Select Digi OptionsEnsure the first option is set to E*****(Enable Communicator)Select UDL OptionsScroll to UDL password isSet this to match the <strong>Texecom</strong> Wintex Application UDL Password(Default 1234)<strong>Texecom</strong>48 EliteIn Area Accounts set the Area ids to match the site Chip NumberSelect Program DigiSet Arc 1 Protocol to SIA level IIPrimary and Secondary Number are blankSet Account Number as the Chip numberDialling Attempts as 2Reporting Areas as requiredReports as requiredSet config as A*****ITA –Use Area AccountsI – Connect via IPT- Send SIA TextIn com port Options select Com Port 1, set this to Emizon/<strong>WebWayOne</strong>7www.webwayone.co.uksales@webwayone.co.uk01635 231500