vortex viper pst rifle scope manual - EuroOptic.com
vortex viper pst rifle scope manual - EuroOptic.com
vortex viper pst rifle scope manual - EuroOptic.com

You also want an ePaper? Increase the reach of your titles
YUMPU automatically turns print PDFs into web optimized ePapers that Google loves.
PRECISIONSHOOTINGTACTICALSECOND FOCAL PLANE RIFLESCOPESOwner’s Manual1–4x24 Rifle<strong>scope</strong>sSpecifically designed for the military, law enforcement and®<strong>com</strong>mitted precision shooting <strong>com</strong>munities, the Viper PSTSeries <strong>rifle</strong><strong>scope</strong>s offer the highest levels of performanceand reliability. With features such as matched turret/reticlesubtensions, CRS zero stop mechanisms and precisionranging reticles, the Viper PSTs are ready for any situation.This Viper PST <strong>rifle</strong><strong>scope</strong> uses a second focal plane reticle.This style of reticle always maintains the identical visualsize regardless of magnification. The advantage to thisstyle of reticle is that it will not be<strong>com</strong>e too large and“heavy” at high magnifications.Features . . . . . . . . . . . . . . . . . . . . . . . . . . . . . . 2Adjustments . . . . . . . . . . . . . . . . . . . . . . . . . 3Mounting . . . . . . . . . . . . . . . . . . . . . . 10Maintenance . . . . . . . . . . . . . . . . . . . . 18Troubleshooting . . . . . . . . . . . . . . . . . . 19Vortex Service and Repair Policy . . . . . . . . . . 201
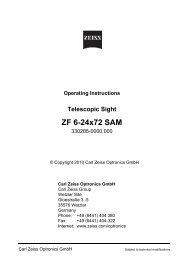
Rifle<strong>scope</strong> AdjustmentsThe Vortex Viper PST Rifle<strong>scope</strong>Fast FocusEyepieceIllumination KnobMagViewElevationAdjustment KnobReticle FocusMagnificationAdjustment RingWindageAdjustment KnobObjectiveLensTurret CapRetaining ScrewsRadius BarZero ReferenceLinesReticle FocusVortex Viper PST <strong>rifle</strong><strong>scope</strong>s use a fast focus eyepiece designedto quickly and easilyadjust the focus on the<strong>rifle</strong><strong>scope</strong>’s reticle.To adjust the reticlefocus:1. Look through the<strong>rifle</strong><strong>scope</strong> at a blank whitewall or up at the sky.Adjust the reticle focus2. Turn the eyepiece focusknob in or out until the reticle image is as crisp as possible.Note: Try to make this particular adjustment quickly, as the eyewill try to <strong>com</strong>pensate for an out-of-focus reticle.Once this adjustment is <strong>com</strong>plete, it will not be necessaryto re-focus every time you use the <strong>rifle</strong><strong>scope</strong>. However,because your eyesight may change over time, you shouldre-check this adjustment periodically.WarningLooking directly at the sun through a rifl e<strong>scope</strong>, or any opticalinstrument, can cause severe and permanent damage to your eyesight.Dual Use: Shooting Tactical / Hunting2 3
Windage and Elevation AdjustmentsVortex Viper PST <strong>rifle</strong><strong>scope</strong>s incorporate precision fingeradjustable elevation and windage Elevationdials with audible clicks.KnobTo make adjustments:1. Turn the adjustment knob in theappropriate direction: Up/Downor Left/Right as indicated by thearrows.2. Move the knobs in the directionyou wish the bullet’s point-ofimpactto change.WindageKnobMOA or MRADDepending on which version you have purchased, your ViperPST <strong>rifle</strong><strong>scope</strong> will feature adjustments scaled in MOAs ormrads. If you are unsure of which scale is used, reference thetop of the adjustment turret.If the adjustment is in MOAs, If the adjustment is in mrads,the turret will displaythe turret will display“1 Click = ½ MOA”.“1 Click = .2 mrad”.Both minute-of-angle (MOA) and milliradian (mrad) unit ofarc scales are effective when using subtension measurements forranging and bullet trajectory drop <strong>com</strong>pensation in reticles.MOA AdjustmentsMOA unit of arc measurements are based on degrees andminutes. There are 360 degrees in a circle, 60 minutes in adegree for a total of 21,600 minutes in a circle. A minute ofangle will subtend 1.05 inches at a distance of 100 yards. TheViper PST 1–4x24 <strong>rifle</strong><strong>scope</strong> with MOA adjustments use1/2-minute clicks which subtend .52 inches at 100 yards, 1.04inches at 200 yards, 1.56 inches at 300 yards, etc.Example: With each click of the Viper PST moving the point-of-impact1/2 MOA, it will take four clicks of the knob to move a bullet’s point-ofimpact2.10 inches at a 100 yard sight-in distance.MRAD AdjustmentsMrad unit of arc measurements are based on the radian. Aradian is the angle subtended at the center of a circle by anarc that is equal in length to the radius of the circle. Thereare 6.283 radians in all circles and 1000 milliradian in aradian for a total of 6283 milliradians (mrads) in a circle. Anmrad will subtend 3.6 inches at a distance of 100 yards. TheViper PST 1–4x24 <strong>rifle</strong><strong>scope</strong> with mrad adjustments use.2 mrad clicks which subtend .72 inches at 100 yards, 1.44inches at 200 yards (4 cm at 200 meters), 2.16 inches at 300yards (6 cm at 300 meters), etc.Example: With each click of the Viper PST moving the point-of-impact.2 mrad (.72 inches), four clicks will move the bullet’s point-of-impact2.88 inches at a 100 yard sight-in distance. At 100 meters, four clickswill move the point-of-impact eight centimeters.4 5
About ParallaxThis Viper PST <strong>rifle</strong><strong>scope</strong> does not have a parallax focus.The focus is factory pre-set at a distance of 100 yards.Parallax is a phenomenon that results when the targetimage does not quite fall on the same optical plane as thereticle within the <strong>scope</strong>. When the shooter’s eye is notprecisely centered in the eyepiece, there can be apparentmovement of the target in relation to the reticle, which cancause a small shift in the point of aim. Parallax error is mostproblematic for precision shooters using high magnification.At distances over 100 yards parallax error is minimal; usinggood consistent shooting form and cheek weld will preventmost error problems with parallax.Variable Power AdjustmentsTo change magnifications, turn the magnificationring to the desiredlevel. The patentedVortex MagViewwill provide a lowlight referencefor magnificationlevel.SubtensionMultiplier MarkingsMagnificationMarkingsMagViewCustomizable Rotational Stop (CRS)Vortex Viper PST <strong>rifle</strong><strong>scope</strong> elevation turrets incorporate theunique CRS rotation stop feature. After the <strong>rifle</strong> is sighted in,the design of the CRS allows a shooter to quickly and easilyreturn to an original zero point when using the elevation turretto dial-in temporary bullet drop corrections.The CRS feature is particularly useful when dialing largemulti-revolution elevation corrections. Without this feature,the shooter must pay very careful attention when dialing theselarge corrections. If the shooter loses track of the number ofrevolutions, the original zero point may be<strong>com</strong>e lost whenreturning the adjustment. Viper PST <strong>rifle</strong><strong>scope</strong>s equipped withthe CRS allow the elevation dial to be quickly spun back tooriginal zero without having to carefully count revolutions orclicks.Once the CRS shims are installed after sight-in, the elevationdial will stop turning shortly past the original zero point whenbeing returned (turning clockwise direction) from a temporaryelevation adjustment. The shooter can then turn the elevationknob a partial turn in a counter-clockwise direction until thezero reference and radius bar are correctly aligned—achievingthe original zero point.See CRS shim installation in theBore Sighting and Final RangeSight-in sections.CRS Shims6 7
Turret RotationVortex Viper PST <strong>rifle</strong><strong>scope</strong>s incorporate Vortex’s patentedRadius Bar to visually assist inkeeping track of turret rotations.The radius bar provides a quickvisual reference that allows theshooter to confirm:• Knob orientation is correctand has not shifted as a result ofaccidental contact.Radius Bar• Knob orientation is at the zero point when using the CRSfeature.• By watching the position of the bar while making elevationadjustments, the shooter is able to quickly track full, half andquarter rotations.To get these benefits from the Radius Bar, the “0” markon the turret must be indexed with the zero reference lineon turret post. See the section on Setting the CRS Stop andIndexing Elevation Knob.Illumination AdjustmentsThe Vortex Viper PST <strong>rifle</strong><strong>scope</strong>s use a variable intensityreticle illuminationsystem to aid in low lightperformance. To activatethe illumination, rotatethe adjustment knob ineither direction.The illumination knoballows for 10 levels ofbrightness intensity; anoff click between eachMagViewIlluminationKnoblevel allows the shooter to turn the illumination off andreturn to a favored intensity level with just one click. Thetop five settings (6, 7, 8, 9 and 10) are visible in the daytime,depending on the background color. Settings below 6 are forlow light use when the user’s eyes have adjusted to lower lightlevels. Lowest settings are for use with night vision devices.Replacing the Illumination BatteryBattery Cap1. Unscrew the outer cap with a coin.2. Remove the battery.3. Replace with a new CR2032 battery.8 9
Rifle<strong>scope</strong> MountingTo get the best performance from your Vortex Viper PST<strong>rifle</strong><strong>scope</strong>, propermounting is essential.Although not difficult,the correct steps mustbe followed. If you areunsure of your abilities,it would be best touse the services of aqualified gunsmith.Rings and BasesMount an appropriate base and matching rings to your <strong>rifle</strong>according to the manufacturer’s instructions. The VortexViper PST <strong>rifle</strong><strong>scope</strong>s require 30mm rings.Vortex Optics highly re<strong>com</strong>mends using the Vortex OpticsPrecision Matched 30mm ring sets which may be purchasedfrom an authorized Vortex <strong>rifle</strong><strong>scope</strong> dealer. These rings willmount to any Picatinny spec base.Note: If the fi rearm is not already equipped with a Picatinny base, theseare readily available for most rifl es at larger fi rearms retailers.Centering of the ReticleThe Vortex Viper PST <strong>rifle</strong><strong>scope</strong> is pre-set from the factorywith the reticle in the center of the adjustment ranges.If you have changed the settings and wish to approximatelyreset the reticle to the center, this can be done easily:1. Turn the windage or elevation dial as far as possible in eitherdirection. Do not force the dial. As soon as any any resistance is felt,stop turning.2. Carefully count the dial rotations while turning the dial backin the opposite direction. Stop turning as soon as resistance is felt.3. Turn the dial the other direction to half the amount ofrotations counted in step one.Complete this procedure for both windage and elevationdials to approximately center the reticle.Use 30mm rings with the Viper PST.If using an aftermarket base and ring setup, use the lowestring height that will provide <strong>com</strong>plete clearance of <strong>scope</strong> and<strong>rifle</strong>—avoiding any contact with barrel, receiver, bolt handleor any other part of the <strong>rifle</strong>. A low mounting will help assureproper cheek weld, aid in establishing a solid shooting position,and promote fast target acquisition.10 11
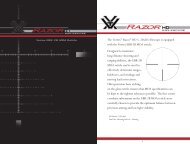
Eye Relief and Reticle AlignmentAfter installing the bottom ring halves on the mounting base,place the <strong>rifle</strong><strong>scope</strong> on the bottom ring halves and loosely installthe upper ring halves. Before tightening the <strong>scope</strong> ring screws,adjust for maximum eye relief to avoid injury from recoil:1. Set the <strong>rifle</strong><strong>scope</strong> to the middle of its magnification range.2. Slide the <strong>rifle</strong><strong>scope</strong> as far forward as possible in the rings.3. While viewing through the <strong>rifle</strong><strong>scope</strong> in a normalshooting position, slowly slide the <strong>rifle</strong><strong>scope</strong> back towardsthe shooter’s face—paying attention to the field of view. Justas the full view is visible, stop.4. Without disturbing the front-back placement, rotatethe <strong>rifle</strong><strong>scope</strong> until the vertical crosshair exactly matchesthe vertical axis of the <strong>rifle</strong>. Use of a reticle leveling tool, aweight hung on a rope, or an adjustable set of feeler gaugeswill help with this procedure.Bore SightingInitial bore sighting of the <strong>rifle</strong><strong>scope</strong> will save time andmoney at the range. This can be done by using a mechanicalor laser bore sighter according to the manufacturer’sinstructions or by removing the bolt and sighting throughthe barrel on some <strong>rifle</strong>s.To visually bore sight a <strong>rifle</strong>:1. Place the <strong>rifle</strong> solidly on a rest and remove the bolt.2. Sight through the bore at a target approximately 100 yardsaway.3. Move the <strong>rifle</strong> and rest until the target is visually centeredinside the barrel.4. With the target centered in the bore, make windage andelevation adjustments until the reticle crosshair is also centeredover the target.5. After aligning the reticle, tighten and torque the ringscrews down per the manufacturer’s instructions.Use of an adjustable set of feelergauges between a one-piecebase and fl at bottom sectionof the rifl e<strong>scope</strong> to square therifl e<strong>scope</strong> (and reticle) to thebase.Visually bore-sighting a rifl e.12 13
Final Range Sight-In and CRS Stop SetAfter the <strong>rifle</strong><strong>scope</strong> has been bore-sighted, final sight-in andCRS stop set should be done at the range using the exactammunition expected to be used while shooting. Sight in andzero the <strong>rifle</strong><strong>scope</strong> at the preferred distance. 100 yards is themost <strong>com</strong>mon zero distance, although a 200 yard zero may bepreferred for long range applications.Be sure the reticle is in focus (see Reticle Focus) and set theparallax adjustment to match the distance being used forsight-in:Setting the CRS Stop and Indexing Elevation KnobAfter obtaining a satisfactory zero, the CRS stop can be setif desired:1. Loosen the three turret cap retaining screws on theelevation turret. Gently pull the turret cap straight up and offof the turret post, being careful not to rotate the turret post.2. Slide the CRS shims on the center section of the turret postbelow the V-grooved part.Place CRS shimsin this groove.1. Following all safe shooting practices, fire a three-shot groupas precisely as possible.2. Next, adjust the reticle to match the approximate center ofthe shot group (see section on Windage and Elevation Adjustment).Note: If the rifl e is very solidly mounted and cannot be moved, simplylook through the <strong>scope</strong> and adjust the reticle until it is centered on thefi red group.3. Carefully fire another three-shot group and see if the bulletgroup is centered on the bullseye.Alternate shim installation direction180 degrees with each shim.This procedure can be repeated as many times as necessaryto achieve a perfect zero.Use as many shims as necessary to<strong>com</strong>pletely fi ll up the space. Donot try to force in a last shim oncethe clearance is very close—a tinyremaining gap is normal.14 15
1. After filling the center gap on the post with shims, replace theelevation cap.2. Align the turret cap so the “0” mark on the cap matches upwith the “0” reference line on the turret post. Again, be sure notto rotate the actual turret mechanism in the process.3. Re-tighten the retainingscrews, but do not overtighten.Use of thumb and forefinger onthe short end of the hex wrenchwill provide sufficient force.Align the elevation turret cap.Using the CRS Zero StopOnce the CRS shims are installed, the elevation dial willstop turning shortly past the original zero point when beingreturned (turning clockwise direction) from a temporaryelevation adjustment.Point at which theknob stops turning.Indexing the Windage Knob1. Loosen the three retaining screws on windage turret cap.2. Carefully rotate the cap until the “0” mark on the capmatches up with the “0” reference line on the turret post. Besure that the cap is freely turning and that you don’t rotate theactual turret mechanism.3. Re-tighten the windage knob retaining screws, but do notovertighten. Use of thumb and forefinger on the short endof the hex wrench will providesufficient force.Turn the elevation knob a partial turn in a counter-clockwisedirection until the Radius Bar is correctly aligned with <strong>scope</strong>axis and zero marks match. This setting will match theoriginal zero point.Correct alignment forzero point.Once the windage and elevationknobs are correctly indexed to thezero mark, temporary correctionscan be safely dialed into the<strong>scope</strong> without worry of losing theoriginal zero.Align the windage turret cap.If re-zeroing at a future time, be sure to remove all CRSshims before sight-in.16 17
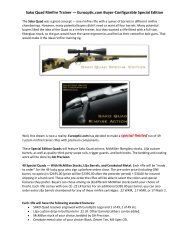
430 C H A PT ER I 3 • SPINAL CONTROL OF MOVEMENTInput from spinalinterne uronsthe brainAlpha motorneuronFIGURE 13.8An alpha motor neu ron and its th reesources of input.motor neurons , and lar ge m otor units have large alpha m otor neurThus, one way that orderly recruitment m ight occur is if small neurons,a consequence of the geome try of their soma and den drites, were IIIeasily excited by signals descending from the brain . Th e idea that the ordrec ruitment of motor neurons is due to variations in alpha mo tor neusize, first proposed in the late 1950s by Harvard Unive rsity neurophysigist Elw ood Henneman, is called the size principle.Inputs to Alpha Motor Neurons. Alpha motor neurons excite skelmuscles. Therefore, to understand the control of muscles, w e mu st unstand what regu lates mo tor neurons. Lower mo tor neurons are controby synaptic in puts in th e ventral horn. There are only three major soureinput to an alpha motor neuron, as sh own in Figure 13.8. The first sourdorsal roo t ganglion cells with axons that innervate a specialized senap pa ratus embedded w ithin the muscle know n as a m uscle spindle. Asshall se e, thi s input provides fee dba ck about muscle length. The sesource of input to an alpha motor neuron de rives from upper motor neuin th e motor cortex an d brain stem. This in put is important for the inition and contro l of voluntary m ovement and will be discus sed in moretail in Cha pter 14. The third and largest input to an alph a m otor neuderives from interneurons in th e spina l cord. This input may be excitator inhibitory and is pan of the circuitry that generates th e spinal mprograms.Type s of Motor UnitsIf you have ever eat en different pa rts of chicken, you know that nom us cle is the sam e; the leg has dark meat and the brea st and wingw hite meat. The different appearance, and tast e, of the various musclesdue to the bioch em istry of th e constituent m us cle fibers. The red Im us cle fibers are char acterized by a large number of mi tochondria andzymes specialized for oxidative energy metabolism. These fibers aretively slow to con tract bu t can sus tain contraction for a lon g time wifatigu e. They are typic ally fo und in the antigra vity m uscles of the legin the fligh t mu scles of birds that fly (as opposed to dom esticated chickIn contrast, the pale (white) muscle fibers contain fewer mitoc hondriarely mainly on anaerobic (without oxygen) metabolism. The se fiberstract rapidly and powerfully, bu t they also fatigu e rapidly. They are tof m uscles in volved in escape reflexes; for example, th e ju mping muof frogs an d rabbits. In h umans , th e arm m uscles contain a large nuof wh ite fibe rs.Even though bot h type s of muscle fiber can (and usu ally do) cin a given muscle, each m otor un it co ntains muscle fibe rs of onlyagle typ e. Thus, fast m o t or u nit s con tain rapidly fatiguing white Iiand slow motor units con tain slowly fatiguing red fibers. Just asm uscle fibers of the two types of u nits diffe r, so do many of the prties of alpha m otor n e uro n s. For example, th e motor n eurons ofunits are gen erally bigger an d have larg er-di am eter, faster-conduax ons; slow units have sm alle r-diameter, m ore slowly conducting axThe firing prope rties of the two typ es of motor neuron also differ.m otor ne uron s ten d to generat e occasional high -frequency bu rsts ofapotentials (30-60 im pulses per se cond), where as slow motor neuronsch aracterized by relatively steady, low-frequency activity (10-20 impper secon d) .