15540 UpRight SL20 - Facelift
15540 UpRight SL20 - Facelift
15540 UpRight SL20 - Facelift
You also want an ePaper? Increase the reach of your titles
YUMPU automatically turns print PDFs into web optimized ePapers that Google loves.
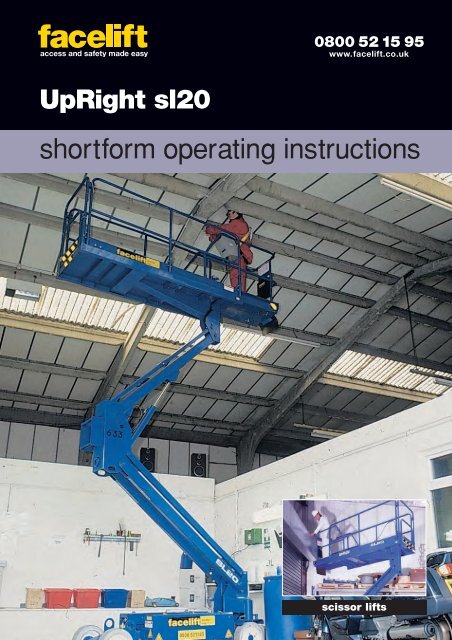
0800 52 15 95www.facelift.co.uk<strong>UpRight</strong> sl20shortform operating instructionsscissor lifts
This book is designed as a guide to enable you to start work quickly and safely. It is not intendedto replace the full manufacturer’s operating instructions (a copy of which should be with yourmachine) which should be read and understood by anyone operating the machine.SAFETY TIPSALWAYS• Inspect your machine before use.• Check all operations including ground controls.• Check ground conditions.• Check clearance from overhead obstructions (powercables, building projections etc).• Plan your task/job.• Use sole boards under your outriggers at all timesregardless of ground conditions.• Stabilise and level machine before use.• Wear a safety harness connected to a suitableanchorage point inside the platform.• Operate all controls smoothly.• Warn other people that you are there by means offlashing lights, sign and cones.• MAKE SAFETY YOUR No.1 PRIORITY.NEVER• Use an unsafe machine.• Use an access platform to hoist loads like a crane.• Overload cage/platform.• Operate in strong winds (Check manufacturer’srecommendation).• Rest the cage on a structure or object to gainextra support.• Attach your safety harness to a structure outside ofthe platform.• Throw or drop anything from the platform.• Use boxes, ladders or stand on handrails to gain additionalheight, if you can’t reach, you need a bigger machine.• Let an untrained person operate the access platform.• Take unnecessary risks (hospitals and graveyards arefull of dead heroes!)In the unlikely event that your machine develops a faultplease contact the <strong>Facelift</strong> Tech Team on 01444 881100CONTENTSSafety Rules ..........................................................1Pre-Operation and Safety Inspection ....................1Platform Extension ................................................2Travel with Platform Lowered ................................2Steering ................................................................2Lowering the Platform ..........................................2Emergency Lowering ............................................2Travel with the Platform Elevated ..........................3After Use Each Day ..............................................3Notes ....................................................................4Elevating the Platform............................................2
SAFETY RULESUSE OF THE AERIAL WORK PLATFORM: This aerial workplatform is intended to lift persons and their tools as well as thematerial used for the job. It is designed for repair and assemblyjobs and assignments at overhead workplaces (ceilings, cranesroof structures, buildings etc.). All other uses of the aerial workplatform are prohibitedNEVER operate the machine without first surveying the work areafor surface hazards such as holes, drop-offs, bumps and debris.NEVER operate the machine if the guardrails are not properly inplace and secured with all fasteners properly torqued. Operatingthe machine with the door open is prohibited.CLOSE the door after mounting platform. Dismantling guardrails or door is prohibited.NEVER use ladders or scaffolding on the platform.NEVER atach overhanging loads or increase platform size.Installation of wind force increasing parts or altering the machineis prohibited.LOOK up, down and around for overhead obstructions andelectrical conductors.DO NOT exceed maximum carrying load. Distribute all loadsevenly on the platform.NEVER operate the machine when wind speeds exceed 45km/h (28 mph = 12.5 m/sec, Beaufort scale 6).NEVER use damaged equipment (Contact the <strong>Facelift</strong> TechTeam for instructions).NEVER modify operating or safety systems. Deactivating safetysystems is prohibited.INSPECT the machine thoroughly for cracked welds, loosehardware, hydraulic leaks, damaged control cable, loose wireconnections and wheel bolts.NEVER climb down elevating assembly with the platform elevated.NEVER recharge batteries near sparks or open flame. Batteriesthat are being charged emit highly explosive hydrogen gas.AFTER USE secure the work platform against unauthorised useby turning key switch off and removing key.USING the machine as a crane is prohibitedINSTALLATION or use of components or parts that are notprovided by <strong>UpRight</strong> Inc. is prohibited.PRE-OPERATION ANDSAFETY INSPECTIONNOTE: CAREFULLY READ, UNDERSTAND ANDFOLLOW ALL SAFETY RULES AND OPERATINGINSTRUCTIONS. PEFORM THE FOLLOWINGSTEPS EVERY DAY BEFORE USE.1) Open module covers and inspect for damage, pil leaks ormissing parts.2) Check the level of the hydraulic oil with the platform fullylowered. Oil should be visible to full line on tank. Addhydraulic fluid if necessary.3) Check that fluid level in the batteries is correct.4) Verify that the batteries have been charged.5) Check that AC extension cord has been disconnectedfrom charger.6) Check that all guardrails are in place with fastenersproperly tightened.7) Carefully inspect the entire work platform for damage suchas cracked welds or structural members, loose or missingparts, oil leaks, damaged cables or hoses, looseconnections or tyre damage.8) Move machine, if necessary, to unobstructed area to allowfor full elevation.9) Pull out chassis emergency stop switch ON.10) Pull out platform emergency stop switch ON.11) Turn and hold the Chassis Key Switch to CHASSIS. Pushchassis lift switch to lift position and fully elevate platform.12) Visually inspect the elevating assembly, lift cylinder, cablesand hoses for damage or erratic operation. Check formissing or loose parts.13) Verify that depression mechanism supports have rotatedinto position under each module.14) Turn and hold the Chassis Key Switch to CHASSIS.Partially lower the platform by pushing the chassis liftswitch to LOWER and check operation of the audiblelowering alarm.15) Pull out on the emergency lowering knob to check forproper operation. Once the platform is fully lowered,release the knob.16) Turn the chassis key switch to PLATFORM.17) Close and secure module covers.18) Check that route is clear of obstacles (persons,obstructions, holes and drop-offs), is level and is capable ofsupporting the wheel loads.19) Mount the platform and latch the gate across the entrance.20) PLATFORM CONTROLS. Turn the selector switch to drive.While holding the interlock switch, move handle toFORWARD, then REVERSE, to check for speed control.Figure 1: Chassis ControlsFigure 2: Emergency Lowering Knob1
Figure 3: Platform Controls21) Push steering switch RIGHT, then LEFT, to check forsteering control.22) Turn selector switch to LIFT. Grasp the control handle,depress the interlock switch and push it forward to checkplatform lift controls. Raise the platform to full elevation.23) Pull back on the Control Handle. Platform should descendand an audible lowering alarm should sound.24) The machine will descend to a Loading Clearance Heightand stop. Check around the base of the platform to insurethat no one is in contact with the machine.25) Press the Loading Clearance Lowering Button to lowerplatform completely.26) Push the platform emergency stop switch button to checkfor proper operation. All the machine functions should bedisabled. Pull out to resume.PLATFORM EXTENSIONNOTE: BEFORE OPERATING THE WORK PLATFORM,ENSURE THAT THE PRE-OPERATION AND SAFETYINSPECTION HAS BEEN COMPLETED, ANY DEFICIENCIESHAVE BEEN CORRECTED AND THE OPERATOR HASBEEN THOROUGHLY TRAINED ON THIS MACHINE.1) Mount the platform and latch the gate across the entrance.2) Depress the foot lever at the rear of the platform extension.Push the platform extension toward the front of the machineuntil the pin engages the front stop.3) To retract, depress the lever and pull the platform extensiontoward the rear of the machine until the pin engages therear stop.2) Verify that chassis key switch is turned to PLATFORM andthat chassis emergency stop switch is on (Pulled out).3) After mounting the platform, latch the gate acrossthe entrance.4) Check clearances above, below and to the sides ofthe platform.5) Pull platform emergency stop button out to the ON position.6) Position the drive/lift switch to DRIVE.7) Hold in the interlock switch and move the control Handle toFORWARD or REVERSE to travel in the desired direction.The speed of the machine will depend on the position ofthe handle.STEERING1) Turn rotary selector switch to DRIVE.2) While holding the interlock switch, push the steering switchto RIGHT or LEFT to turn wheels in the desired direction.Observe the tyres while operating the machine to ensurethe proper direction.NOTE: STEERING IS NOT SELF-CENTERING. WHEELSMUST BE RETURNED TO THE STRAIGHT AHEADPOSITION BY OPERATING THE STEERING SWITCH.ELEVATING THE PLATFORM1) Position the rotary switch to LIFT.2) While holding the interlock switch , push the joystick up.3) If the machine is not level the tilt alarm will sound and themachine will not lift or drive. If the tilt alarm sounds theplatform must be lowered and the machine moved to alevel location before attempting to re-elevate the platform.NOTE: DEPRESSION MECHANISM SUPPORTS WILLDEPLOY AUTOMATICALLY WHEN PLATFORM ELEVATESAND WILL RETRACT WHEN MACHINE IS LOWEREDCOMPLETELY AND DRIVEN.LOWERING PLATFORM1) Position selector switch to LIFT.2) Grasp the Control Lever so that the Interlock Switch isdepressed. Move handle to DOWN position. A warningalarm will sound while lowering. The machine will descendto loading clearance height, then stop.3) The operator must look around the base of the platformand be sure that no one is in contact with the machine.4) Press the Loading Clearance Release button on theplatform control box. Platform will now lower completely.EMERGENCY LOWERINGFigure 4: Platform ExtensionTRAVEL WITH PLATFORM LOWERED1) Check that the route is clear of people, obstructions, holesand drop-offs, is level and is capable of supporting thewheel loads.2
IF THE PLATFORM SHOULD FAIL TO LOWER, NEVERCLIMB DOWN THE ELEVATING ASSEMBLY.The emergency lowering valve knob is located at the rear ofthe chassis.1) Open the emergency lowering valve by pulling and holdingthe knob.2) To close, release the knob. NOTE: The platform will notelevate if the emergency valve is open.TRAVEL WITH THEPLATFORM ELEVATEDNOTE: WORK PLATFORM WILL TRAVEL ATREDUCED SPEED WHEN PLATFORM IS ELEVATED.1) Check that route is clear of persons, obstructions, holesand drop-offs, is level and capable of supporting thewheel loads.2) Check clearances above, below and to the sides of platform.3) Turn selector to DRIVE position.4) Push joystick FORWARD or REVERSE for desired directionof travel.5) If the machine is not level the tilt alarm will sound and themachine will not lift or drive. If the tilt alarm sounds, theplatform must be lowered and the machine moved to alevel location before attempting to re-elevate the platform.AFTER USE EACH DAY1) Ensure that the platform is fully lowered.2) Park the machine on level ground, preferably under cover,secure against vandals, children and unauthorised operation.3) Turn the key switch to OFF and remove the key to preventunauthorised operation.THIS MACHINE IS NOT INSULATED. FOLLOW YOURNATIONAL SAFETY STANDARDS AND MAINTAIN THEREQUIRED SAFETY DISTANCE WHEN WORKING NEARENERGISED EQUIPMENT.3
NOTES4
NOTES5
0800 52 15 95www.facelift.co.ukoperator training centreWhen hiring access equipment westrongly recommend takingadvantage of one of our one dayoperator training coursesAs <strong>Facelift</strong> is an accreditedIPAF (Independent PoweredAccess Federation) trainingcentre you can be sure thatyour staff will be trained toa high standard andreceive an internationallyrecognised qualification.Courses can take place on your own premises or at one of our trainingcentres, situated in Hickstead, Iver, Southampton and Liverpool.We can train your personnel on any of the following equipment:(SL) Scissor Lift(SPB) Self Propelled Boom(VMP26) Truck/Van mounted to 26m(VMP200) Truck mounted over 26m(VPP) Vertical Personnel Platform(TP) Trailer/Push aroundThe one day course* covers site safety, practical demonstration, soleusage and site risks and includes a theory test.*(two day course for VMP200)Successful candidates are issued with the IPAF PAL card, widelyaccepted by both the CITB and Health And Safety Executive.For further information or to arrange a training course call us today on:0800 0 72 55 72


