Securing Tornado, C3, High h Batch, and Encore Ovens ... - Turbochef
Securing Tornado, C3, High h Batch, and Encore Ovens ... - Turbochef
Securing Tornado, C3, High h Batch, and Encore Ovens ... - Turbochef

You also want an ePaper? Increase the reach of your titles
YUMPU automatically turns print PDFs into web optimized ePapers that Google loves.
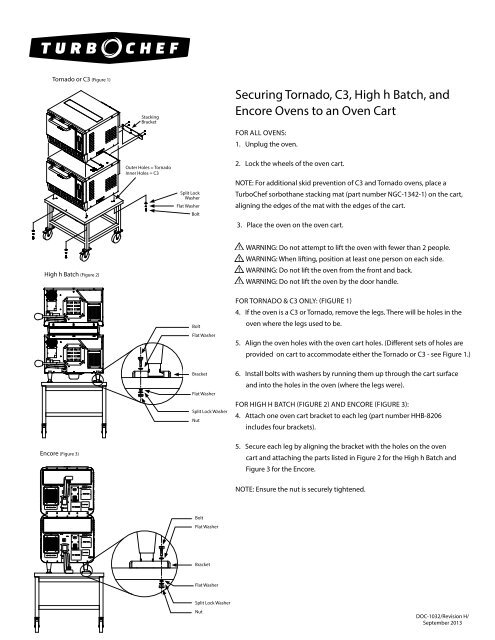
<strong>Tornado</strong> or <strong>C3</strong> (Figure 1)StackingBracket<strong>Securing</strong> <strong>Tornado</strong>, <strong>C3</strong>, <strong>High</strong> h <strong>Batch</strong>, <strong>and</strong><strong>Encore</strong> <strong>Ovens</strong> to an Oven CartFOR ALL OVENS:1. Unplug the oven.Outer Holes = <strong>Tornado</strong>Inner Holes = <strong>C3</strong>Split LockWasherFlat WasherBolt2. Lock the wheels of the oven cart.NOTE: For additional skid prevention of <strong>C3</strong> <strong>and</strong> <strong>Tornado</strong> ovens, place aTurboChef sorbothane stacking mat (part number NGC-1342-1) on the cart,aligning the edges of the mat with the edges of the cart.3. Place the oven on the oven cart.<strong>High</strong> h <strong>Batch</strong> (Figure 2)WARNING: Do not attempt to lift the oven with fewer than 2 people.WARNING: When lifting, position at least one person on each side.WARNING: Do not lift the oven from the front <strong>and</strong> back.WARNING: Do not lift the oven by the door h<strong>and</strong>le.BoltFlat WasherFOR <strong>Tornado</strong> & <strong>C3</strong> ONLY: (Figure 1)4. If the oven is a <strong>C3</strong> or <strong>Tornado</strong>, remove the legs. There will be holes in theoven where the legs used to be.5. Align the oven holes with the oven cart holes. (Different sets of holes areprovided on cart to accommodate either the <strong>Tornado</strong> or <strong>C3</strong> - see Figure 1.)BracketFlat WasherSplit Lock WasherNut6. Install bolts with washers by running them up through the cart surface<strong>and</strong> into the holes in the oven (where the legs were).FOR <strong>High</strong> H <strong>Batch</strong> (Figure 2) <strong>and</strong> encore (figure 3):4. Attach one oven cart bracket to each leg (part number HHB-8206includes four brackets).<strong>Encore</strong> (Figure 3)5. Secure each leg by aligning the bracket with the holes on the ovencart <strong>and</strong> attaching the parts listed in Figure 2 for the <strong>High</strong> h <strong>Batch</strong> <strong>and</strong>Figure 3 for the <strong>Encore</strong>.NOTE: Ensure the nut is securely tightened.BoltFlat WasherBracketFlat WasherSplit Lock WasherNutDOC-1032/Revision H/September 2013
Stacking HhC 2020 <strong>Ovens</strong>WARNING: DO NOT use this appliance without the legs installed on the bottom oven.WARNING: Make sure all HhC 2020 ovens are unplugged before stacking.WARNING: DO NOT stack ovens more than 3 high.WARNING: DO NOT attempt to lift the oven with fewer than 2 people.1. Remove the legs from the oven(s) that are going to be stacked on top.2. Cover the leg holes with the abrasive pads provided with kit HCT-3001.3a. If the front panel on each oven contains side hinges, skip to step 4.3b. If the front panel on the ovens that are going to be stacked on top containbottom hinges (adjacent), ensure that a thumb screw is installed on each sideto allow for front panel removal. If the oven has security screws, replace themwith the thumb screws provided with kit HCT-3001.4. Stack the top oven on the bottom oven. If stacking three ovens, stack only themiddle oven at this point.5. Remove the 6 screws marked A or B in the illustration below.Step 3b: Must beThumb Screw6. Align each bracket with the holes in the bottom oven <strong>and</strong> reinstall the screws marked A in the illustration below.7. Align each bracket with the holes in the top oven <strong>and</strong> reinstall the screws marked B in the illustration below.8. If stacking three ovens, repeat steps 2-6 above to stack the top oven to the middle oven.9. Ensure each stacked oven is secured to the oven beneath it via two stacking brackets – one on each side.BBBracketAABracketAAStacking HhC 3240 <strong>Ovens</strong>Follow all instructions in the Installation Manual (part number HHC-6651), included with each oven.DOC-1032/Revision H/September 2013