
Create successful ePaper yourself
Turn your PDF publications into a flip-book with our unique Google optimized e-Paper software.
<strong>Sony</strong> <strong>NXCAM</strong> Product<br />
<strong>Workflow</strong>s<br />
in Apple Final Cut Pro7
Table of Contents<br />
<strong>Sony</strong> <strong>NXCAM</strong> <strong>Workflow</strong>s in Apple Final Cut Pro7<br />
1– Introduction . . . . . . . . . . . . . . . . . . . . . . . . . . . . . . . . . . . . . . . . . . . . .3<br />
HXR-NX5U and the <strong>NXCAM</strong> Product Line . . . . . . . . . . . . . . . . . . . . . . . . . . .3<br />
Flexible Selection of Recording Media . . . . . . . . . . . . . . . . . . . . . . . . . . . . . .3<br />
Dual Memory Card Slots . . . . . . . . . . . . . . . . . . . . . . . . . . . . . . . . . . . . . .3<br />
HYBRID Recording with the <strong>Sony</strong> HXR-FMU128 . . . . . . . . . . . . . . . . . . . . . . . . .3<br />
Flexible Recording Format Selection . . . . . . . . . . . . . . . . . . . . . . . . . . . . . . .5<br />
Recording Time . . . . . . . . . . . . . . . . . . . . . . . . . . . . . . . . . . . . . . . . . . .6<br />
<strong>NXCAM</strong> Folder Structure and File Names . . . . . . . . . . . . . . . . . . . . . . . . . . . .6<br />
Archiving Original <strong>NXCAM</strong> Media . . . . . . . . . . . . . . . . . . . . . . . . . . . . . . . .8<br />
Archiving Example . . . . . . . . . . . . . . . . . . . . . . . . . . . . . . . . . . . . . . . . .8<br />
2– Key workflow features in Final Cut Pro7 . . . . . . . . . . . . . . . . . . . . . . . . .9<br />
Supported <strong>NXCAM</strong> Recording Modes . . . . . . . . . . . . . . . . . . . . . . . . . . . . . .9<br />
System Requirements . . . . . . . . . . . . . . . . . . . . . . . . . . . . . . . . . . . . . . . .9<br />
Connections . . . . . . . . . . . . . . . . . . . . . . . . . . . . . . . . . . . . . . . . . . . . .9<br />
3– <strong>Workflow</strong> Overview . . . . . . . . . . . . . . . . . . . . . . . . . . . . . . . . . . . . . . .10<br />
Creating a Final Cut Pro ® Project . . . . . . . . . . . . . . . . . . . . . . . . . . . . . . . .10<br />
Log and Transfer Overview . . . . . . . . . . . . . . . . . . . . . . . . . . . . . . . . . . .11<br />
Importing AVCHD Data Files Using Log and Transfer . . . . . . . . . . . . . . . . . . . . .13<br />
Sequence Preparation . . . . . . . . . . . . . . . . . . . . . . . . . . . . . . . . . . . . . .15<br />
Adding Clips to the Timeline . . . . . . . . . . . . . . . . . . . . . . . . . . . . . . . . . . .17<br />
4– Project Output . . . . . . . . . . . . . . . . . . . . . . . . . . . . . . . . . . . . . . . . . . . . . . . .18<br />
Blu-ray Disc . . . . . . . . . . . . . . . . . . . . . . . . . . . . . . . . . . . . . . . . . . .19<br />
High Quality Movie File Export . . . . . . . . . . . . . . . . . . . . . . . . . . . . . . . . . .20<br />
HDV Video Tape Export . . . . . . . . . . . . . . . . . . . . . . . . . . . . . . . . . . . .21<br />
Output to an HD Recorder via HD-SDI . . . . . . . . . . . . . . . . . . . . . . . . . . . . .22<br />
5– Notes . . . . . . . . . . . . . . . . . . . . . . . . . . . . . . . . . . . . . . . . . . . . . . . . .23<br />
1 – Introduction<br />
2 – Key <strong>Workflow</strong> Features<br />
in Final Cut Pro7<br />
5 – Notes 4 – Project Output 3 – <strong>Workflow</strong> Overview<br />
2
1 – Introduction<br />
<strong>Sony</strong> <strong>NXCAM</strong> <strong>Workflow</strong>s in Apple Final Cut Pro7<br />
The HXR-NX5U is <strong>Sony</strong>'s first <strong>NXCAM</strong> branded camcorder. This document explains how to edit<br />
video recorded by this camcorder using Apple Final Cut Pro.<br />
HXR-NX5U and the <strong>NXCAM</strong> Product Line<br />
<strong>NXCAM</strong> is <strong>Sony</strong>'s newest product line designed for professionals. <strong>NXCAM</strong> provides powerful<br />
features for professional video production, such as HD-SDI output, flexible media selection,<br />
and stunning AVCHD picture quality.<br />
The HXR-NX5U camcorder incorporates cutting-edge technologies, such as G Lens, an<br />
Exmor CMOS sensor, built-in GPS receiver, and a new Active SteadyShot ® mode.<br />
Flexible Selection of Recording Media<br />
Various recording media are available in the HXR-NX5U:<br />
• Memory Stick PRO Duo(Mark2) media, Memory Stick PRO-HG Duo media,<br />
Memory Stick PRO-HG Duo HX media*<br />
• SD/SDHC Memory Card**<br />
• Flash Memory Unit (<strong>Sony</strong> HXR-FMU128)<br />
*Compatible "Memory Stick" type: For AVCHD recording / Capacity: more than 1GB, For standard definition<br />
recording / Capacity: more than 512MB<br />
**Recommended Speed Class For AVCHD recording / Class 4 or higher, For standard definition recording /<br />
Class 2 or higher<br />
Dual Memory Card Slots<br />
The HXR-NX5U has two memory card media slots for recording. Use of <strong>Sony</strong>'s Memory Stick<br />
PRO Duo and Memory Stick PRO Duo HG media cards are recommended media cards.<br />
The HXR-NX5U records to one memory card slot at a time. With two memory cards installed,<br />
the camcorder provides continuous, seamless recording of long scenes, and maximizes the<br />
utilization of each card's storage capacity.<br />
As the card in Slot A reaches its capacity, recording is automatically switched to the card in<br />
Slot B. The card in Slot A may then be removed and replaced. When the card in Slot B fills to<br />
capacity, another seamless switch back to Slot A occurs.<br />
This unique dual slot configuration provides continuous recording.<br />
1 – Introduction<br />
Table of Contents<br />
3
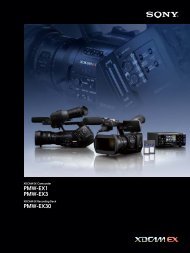
HYBRID Recording with the <strong>Sony</strong> HXR-FMU128<br />
<strong>Sony</strong> <strong>NXCAM</strong> <strong>Workflow</strong>s in Apple Final Cut Pro7<br />
The <strong>Sony</strong> HXR-FMU128, an optional flash memory recording unit specially designed for the<br />
HXR-NX5U, mounts to the camcorder without the need for any external cabling. Built around<br />
a 128 GB solid state flash memory drive, the HXR-FMU128 offers significantly longer recording<br />
time than a single memory card.<br />
When the HXR-FMU128 is used in conjunction with memory cards, <strong>Sony</strong>'s unique HYBRID<br />
recording capability is enabled, allowing a combination of HD and SD resolutions to be<br />
recorded simultaneously. The operator is free to choose which resolution is recorded on each<br />
media type, and may even set the camcorder to record to both media types simultaneously.<br />
There are many benefits to HYBRID recording, including:<br />
• Edit system ingest time for HD files stored on the HXR-FMU128 is typically faster than<br />
from memory cards.<br />
• HD files simultaneously recorded on memory cards provide a time and costeffective<br />
method of archiving.<br />
• SD files may be used for quick preview on a laptop or for SD deliverables, such as<br />
web-based movies.<br />
Note: Recording SD simultaneously to both media types is not supported.<br />
Important: The filenames of corresponding HD and SD clips are different.<br />
1 – Introduction<br />
Table of Contents<br />
4
Flexible Recording Format Selection<br />
HD (AVCHD)<br />
Video Compression<br />
• FX mode (1920x1080 or 1280x720, 21 Mbps*)<br />
• FH mode (1920x1080 or 1280x720, 16 Mbps)<br />
• HQ mode (1440x1080 or 1280x720, 9 Mbps)<br />
• LP mode (1440x1080 or 1280x720, 5 Mbps)<br />
*Including audio and ancillary data the total data rate is 24Mbps<br />
Frame Rate, 60i models<br />
• 1080/60i (59.94i)<br />
• 1080/30p (29.97p)<br />
• 1080/24p (23.98p)<br />
• 720/60p (59.94p)<br />
Frame Rate, 50i models<br />
• 1080/50i<br />
• 1080/25p<br />
• 720/50p<br />
Audio<br />
• Linear PCM (uncompressed)<br />
• AC-3 (compressed)<br />
<strong>Sony</strong> <strong>NXCAM</strong> <strong>Workflow</strong>s in Apple Final Cut Pro7<br />
SD (MPEG2) Currently not supported in Final Cut Pro or QuickTime ®<br />
Video Compression<br />
• MPEG2 Program Stream, approx. 9Mbps<br />
• NTSC (720x480) or PAL (720x576)<br />
• 4:3 or 16:9 selectable<br />
Frame Rate, 60i models<br />
• 480/60i (59.94i)<br />
• 480/30p scan: 30p scanned image is recorded as 60i<br />
• 480/24p scan: 24p scanned image is recorded as 60i with 2-3 pulldown.<br />
Frame Rate, 50i models<br />
• 576/50i<br />
• 576/25p scan: 25p scanned image is recorded as 50i<br />
Audio<br />
• AC-3 only<br />
1 – Introduction<br />
Table of Contents<br />
5
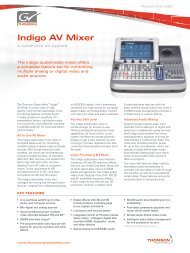
Recording Time<br />
<strong>Sony</strong> <strong>NXCAM</strong> <strong>Workflow</strong>s in Apple Final Cut Pro7<br />
Refer to the charts below to determine the approximate maximum recording time for each<br />
media type and quality setting.<br />
HD MOVIE w/Linear<br />
PCM 2ch<br />
8GB Memory Stick PRO<br />
Duo media<br />
16GB Memory Stick PRO<br />
Duo media<br />
32GB Memory Stick PRO<br />
Duo media<br />
AVCHD<br />
(FX)<br />
AVCHD<br />
(FH)<br />
AVCHD<br />
(HQ)<br />
AVCHD<br />
(LP)<br />
40 min 55 min 95 min 150 min<br />
85 min 110 min 190 min 300 min<br />
170 min 225 min 385 min 605 min<br />
HXR-FMU128 (128GB) 700 min 930 min 1570 min 2490 min<br />
SD Movie w/Dolby<br />
Digital 2ch<br />
8GB Memory Stick PRO<br />
Duo media<br />
16GB Memory Stick PRO<br />
Duo media<br />
32GB Memory Stick PRO<br />
Duo media<br />
MPEG2-SD 9M<br />
(HQ)<br />
115 min<br />
235 min<br />
475 min<br />
HXR-FMU128 (128GB) 1960 min<br />
<strong>NXCAM</strong> Format Folder Structure and File Names<br />
Below is a brief overview of the folder structure and file naming conventions recorded on<br />
memory cards or the optional HXR-FMU128 flash memory recorder.<br />
1 – Introduction<br />
Table of Contents<br />
6
<strong>Sony</strong> <strong>NXCAM</strong> <strong>Workflow</strong>s in Apple Final Cut Pro7<br />
.MTS file<br />
This is the high quality AVCHD video stream data. During long recordings, the clip is<br />
automatically divided (spanned) into 2GB segments. Spanned files are seamlessly merged<br />
while transferring to Final Cut Pro via the Log & Transfer window.<br />
.MPG file<br />
This is the SD quality MPEG2 file. During long recordings, the clip is automatically divided<br />
(spanned) into 2GB segments.<br />
Note: Final Cut Pro does not currently support MPEG2 files in the timeline.<br />
AVF_INFO, MEMSICK.IND<br />
These folders/files are administrative in nature.<br />
Important: Do not move or copy individual clips via Windows Explorer ® or the Macintosh ®<br />
Finder, as this will result in unusable media on the target drive.<br />
For copying individual clips to hard disk, use the <strong>Sony</strong> Content Management<br />
Utility (CMU).<br />
Windows Explorer or the Macintosh Finder may be used to do an archive of<br />
the entire contents of either a memory card or HXR-FMU128, as long as all<br />
ancillary and hidden files are included in the transfer.<br />
When archiving on a Windows system (or a Windows boot on a Macintosh<br />
computer), always select “Show hidden files and folders” in the Folder Options<br />
“View” tab, as shown below.<br />
1 – Introduction<br />
Table of Contents<br />
7
Archiving Original <strong>NXCAM</strong> Media<br />
<strong>Sony</strong> <strong>NXCAM</strong> <strong>Workflow</strong>s in Apple Final Cut Pro7<br />
Final Cut Pro7 imports clips from either memory card or HXR-FMU128 via the integrated Log<br />
and Transfer utility. Upon ingest, the camera-native AVCHD clips are automatically converted<br />
to a user-selectable Apple ProRes422 format, and spanned clips are seamlessly joined.<br />
Performing an archive of all camera-original material is highly recommended.<br />
Copying individual clips via Windows Explorer or the Macintosh Finder will result in<br />
unusable media on the target drive. When archiving the contents of either a memory<br />
card or HXR-FMU128, always copy the entire contents of the volume, including all ancillary<br />
files, as outlined below.<br />
Archiving Example<br />
When working with multiple memory cards and/or cameras, an organized archival workflow<br />
should be employed. Below is a typical workflow for archiving <strong>NXCAM</strong> media:<br />
1 – After shooting with a memory card, provide a unique physical label, such as<br />
“091231-CAM1-1”, which is the date, camera number, and card number.<br />
2 – Load the memory card in a card reader connected to your computer.<br />
3 – When using the Windows OS, always choose the “Show hidden files and folders”<br />
option located in the Folder Options pane ( Start > Control Panel > Folder Options ><br />
View).<br />
4 – Make a new folder in the storage drive. Rename the folder to match the project<br />
name, such as “Holiday Event.”<br />
5 – Inside the above folder, create a child folder. Rename that folder to match the label<br />
on the memory card, in this example: “091231-CAM1-1”.<br />
6 – Copy all data including the hidden folders/files from the memory card to<br />
the child folder.<br />
7 – Repeat the above for all subsequent cards (omit Step 4), providing unique<br />
label/folder names for each memory card. For example, the second card from the<br />
same camera could be labeled “091231-CAM1-2”.<br />
Note: The same procedure should be followed when using the HXR-FMU128<br />
1 – Introduction<br />
Table of Contents<br />
8
<strong>Sony</strong> <strong>NXCAM</strong> <strong>Workflow</strong>s in Apple Final Cut Pro7<br />
2 – Key workflow features in Final Cut Pro7<br />
Supported <strong>NXCAM</strong> Recording Modes<br />
The following <strong>NXCAM</strong> recording modes are supported:<br />
• AVCHD: 1080 50i/60i/24p/25p/30p, 720 50p/60p<br />
System Requirements<br />
• Apple OS X 10.5.6+<br />
• Apple Final Cut Pro7 (included in Final Cut Studio 3.0 package)<br />
For more details about Final Cut Pro, please visit the Apple website.<br />
• USB 2.0 connection<br />
• <strong>NXCAM</strong> compatible memory cards<br />
• HXR-FMU128 (optional)<br />
Connections<br />
• When using memory cards, connect a generic USB 2.0 memory card reader to<br />
your computer. The file transfer speed may vary based on the card reader's<br />
specifications and connection method. A direct connection (not through a USB<br />
hub) is recommended.<br />
• When using the <strong>Sony</strong> HXR-FMU128, connect via a USB 2.0 compatible cable. As with<br />
the memory card reader, a direct connection to the computer is recommended.<br />
Table of Contents 2 – Key <strong>Workflow</strong> Features in<br />
Final Cut Pro7<br />
9
3 – <strong>Workflow</strong> Overview<br />
Creating a Final Cut Pro Project<br />
1 – Launch the Final Cut Pro application.<br />
<strong>Sony</strong> <strong>NXCAM</strong> <strong>Workflow</strong>s in Apple Final Cut Pro7<br />
2 – If not adding any video material to an existing FCP Project, create a new<br />
Project by simultaneously pressing + Shift + N. Alternatively, use the mouse<br />
to select File > New Project. This will create a new project initially entitled<br />
“Untitled Project”.<br />
3 – Save the Project to the computer hard drive. The standard location for this is in<br />
the /Users/username/Documents/Final Cut Pro Documents/ folder. During the<br />
Save process, change “Untitled Project” to something meaningful.<br />
4 – Verify the FCP Scratch Disk location and set according to your preference.<br />
Press Shift + Q to access this menu.<br />
Note: The previous step is not an essential part of AVCHD import, but is recommended<br />
as a “best practice” of media management.<br />
Table of Contents 3 – <strong>Workflow</strong> Overview<br />
10
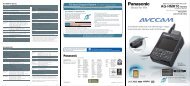
Log and Transfer Overview<br />
<strong>Sony</strong> <strong>NXCAM</strong> <strong>Workflow</strong>s in Apple Final Cut Pro7<br />
Final Cut Pro requires that AVCHD clips be converted to ProRes422 QuickTime Movie files and<br />
copied (typically) to the designated Capture Scratch location. This is accomplished with<br />
Final Cut Pro's integrated Log and Transfer tool. A brief overview of the interface is below.<br />
Transfer status Click for Log and Transfer Actions Preview Window<br />
Click to enable automatic transfer<br />
Current Logging Bin. Click on icon to reveal Bin. Loggin Pane<br />
Log and Transfer provides native support for AVCHD without the need for any additional<br />
plugin software.<br />
Log and Transfer automatically scans for connected media, and displays clips in the Clip List.<br />
Alternatively, archived <strong>NXCAM</strong> media folders may be mounted by clicking the “Add Volume”<br />
button, located at the top left corner of the window.<br />
Prior to transfer, additional logging information may be entered for a clip, along with<br />
preferences for Video and Audio import. The Preview Window is also available to set IN/OUT<br />
points for partial clip transfer.<br />
Table of Contents 3 – <strong>Workflow</strong> Overview<br />
11
<strong>Sony</strong> <strong>NXCAM</strong> <strong>Workflow</strong>s in Apple Final Cut Pro7<br />
As part of the transfer operation, Final Cut Pro7 can use the embedded clip metadata to<br />
create custom file names. Custom names are typically more recognizable to the user than<br />
the <strong>NXCAM</strong>-generated file names.<br />
Custom names are set and/or selected via the Logging pane's Name Preset drop list.<br />
Select a Preset from the list, or choose “Edit” or “New” to create a custom setting.<br />
The Naming Presets window will open.<br />
To create a custom preset, drag metadata labels from the “Include:” pane to the “Format”<br />
line. If the camera-original <strong>NXCAM</strong> file contains the corresponding metadata, the file name of<br />
the converted ProRes clip will be set to match.<br />
For more detailed information, please consult the Final Cut Pro7 Operations <strong>Guide</strong><br />
Table of Contents 3 – <strong>Workflow</strong> Overview<br />
12
Importing AVCHD Data Files Using Log and Transfer<br />
<strong>Sony</strong> <strong>NXCAM</strong> <strong>Workflow</strong>s in Apple Final Cut Pro7<br />
Log and Transfer automatically scans for the presence of mounted card media (or the<br />
HXR-FMU128), and displays clips in the Clip List. Additional AVCHD media folders (such as those<br />
created when archiving from card to hard disc) may be added to the Clip List by selecting<br />
the Add Folder button, located in the top left corner of the window.<br />
Prior to transfer, logging data may be entered for a clip, along with preferences for Video and<br />
Audio import.<br />
Upon transfer, the clips are automatically rewrapped as QuickTime.<br />
1 – Select Log and Transfer from Final Cut Pro's File drop menu, or by pressing + Shift + 8.<br />
2 – To import a clip(s), select and drag either to:<br />
• The Import Queue below, which registers the clips in the selected Logging Bin of the<br />
Final Cut Pro project.<br />
• Directly to a specific Bin.<br />
Table of Contents 3 – <strong>Workflow</strong> Overview<br />
13
To create and import a subclip, do the following:<br />
1 – Select a clip from the Clip List.<br />
2 – Navigate the clip in the Preview Window.<br />
3 – Set In and Out points.<br />
4 – Click the Add Clip to Queue button.<br />
<strong>Sony</strong> <strong>NXCAM</strong> <strong>Workflow</strong>s in Apple Final Cut Pro7<br />
Table of Contents 3 – <strong>Workflow</strong> Overview<br />
14
Sequence Preparation<br />
<strong>Sony</strong> <strong>NXCAM</strong> <strong>Workflow</strong>s in Apple Final Cut Pro7<br />
Although not mandatory, it is typically best to set the FCP Sequence Settings to match the clip<br />
settings associated with the majority of your media; putting less demand on the computer's<br />
CPU and reducing rendering time. As mentioned in the previous section, <strong>NXCAM</strong>-native<br />
AVCHD files are converted to a user-defined Apple ProRes format during import.<br />
To verify/alter Final Cut Pro's Sequence Settings, do the following:<br />
1 – From within the Final Cut Pro Browser, select the default Sequence (Sequence 1),<br />
or create a new Sequence by pressing + N.<br />
2 – From the Sequence drop menu, select Settings.<br />
3 – Adjust the settings for Frame Size, Pixel Aspect, Compressor, etc. to match the majority<br />
of the project's media. Typical settings for <strong>NXCAM</strong> media are as follows:<br />
For 1080/60i media:<br />
Table of Contents 3 – <strong>Workflow</strong> Overview<br />
15
For 1080/24p media:<br />
For 1080/30p media:<br />
For 720/60p media:<br />
<strong>Sony</strong> <strong>NXCAM</strong> <strong>Workflow</strong>s in Apple Final Cut Pro7<br />
4 – If unsure of the proper settings to use, FCP will configure the Sequence automatically.<br />
For empty Sequences only, FCP analyzes the first clip that is entered in the Timeline<br />
and compares it against the current Sequence Settings. If there is a mismatch, the<br />
following will be displayed:<br />
In most cases, select Yes.<br />
Table of Contents 3 – <strong>Workflow</strong> Overview<br />
16
Adding Clips to the Timeline<br />
<strong>Sony</strong> <strong>NXCAM</strong> <strong>Workflow</strong>s in Apple Final Cut Pro7<br />
There are a variety of methods for placing clips in the Timeline. For purposes of illustration,<br />
below are just a few methodologies:<br />
To add a clip to a Sequence without trimming, simply drag the clip from the Bin to<br />
the Timeline.<br />
To trim a clip prior to adding it to the Sequence:<br />
1 – Double-click on a clip in the Browser. This will load the media into the<br />
Viewer window.<br />
2 – Play the clip by pressing either the spacebar or the L key.<br />
3 – Select the yellow Viewer Playhead and scrub to an exact In point. Press I to mark<br />
the In point.<br />
4 – Select the yellow Viewer Playhead and scrub to an exact Outpoint. Press O to<br />
mark the Outpoint.<br />
5 – Click and drag the image in the Viewer over to the Canvas window. (Notice<br />
that a thumbnail image appears under the cursor) An Edit Overlay will appear<br />
in the Canvas.<br />
6 – Continue dragging the thumbnail onto the red “Overwrite” section of the overlay,<br />
then release. The clip will be added to the Timeline.<br />
For more detailed information, please consult the Final Cut Pro7 Operations <strong>Guide</strong><br />
Table of Contents 3 – <strong>Workflow</strong> Overview<br />
17
4 – Project Output<br />
The finished project may be output in a variety of ways.<br />
• To Blu-ray Disc<br />
• To a high quality movie file<br />
• To an HDV video tape<br />
• To an HD recorder via HD-SDI<br />
<strong>Sony</strong> <strong>NXCAM</strong> <strong>Workflow</strong>s in Apple Final Cut Pro7<br />
A general overview of the output process for each of the above follows on the next few<br />
pages. For more detailed information, please refer to the Final Cut Pro7 Operations <strong>Guide</strong><br />
and/or the Operations <strong>Guide</strong> for the specific output device or interface.<br />
4 – Project Output<br />
Table of Contents<br />
18
Blu-ray Disc<br />
1 – Select File > Share. The Share window will open.<br />
<strong>Sony</strong> <strong>NXCAM</strong> <strong>Workflow</strong>s in Apple Final Cut Pro7<br />
2 – Choose “Blu-ray” and check the “Create Blu-ray disc” option.<br />
3 – Confirm the Output Device and other settings, as appropriate, for the project.<br />
4 – Insert a blank BD-R/BD-RE disc into the drive.<br />
5 – Click Export.<br />
4 – Project Output<br />
Table of Contents<br />
19
High Quality Movie File Export<br />
<strong>Sony</strong> <strong>NXCAM</strong> <strong>Workflow</strong>s in Apple Final Cut Pro7<br />
Final Cut Pro supports the creation of high quality movie files in QuickTime format, as well as<br />
movies compatible with the iPod and YouTube.<br />
1 – Select File > Share. The Share window will open.<br />
2 – Choose “Other” from the drop-down list. The Setting window will open.<br />
3 – Select an appropriate preset, then click OK.<br />
4 – If the selected preset includes any options, set the check boxes as required.<br />
5 – Select a destination for the file(s).<br />
6 – Click Export.<br />
4 – Project Output<br />
Table of Contents<br />
20
<strong>Sony</strong> <strong>NXCAM</strong> <strong>Workflow</strong>s in Apple Final Cut Pro7<br />
HDV Video Tape Export<br />
1 – Connect an HDV deck to the computer with an i.LINK ® cable.<br />
2 – Select File > Export > QuickTime Movie.<br />
3 – Choose an HDV preset from the Setting drop-down list.<br />
4 – Specify the destination folder and output file name.<br />
5 – Click Save. A Final Cut Pro movie file will be created in the HDV format.<br />
6 – Create a new sequence in the current project.<br />
7 – Import the created movie file to the project.<br />
8 – Drag the movie file to the timeline. Final Cut Pro may prompt with the<br />
following message:<br />
9 – Click Yes.<br />
10 – Select File > Print to Video.<br />
11 – Choose options to suite the particular project.<br />
12 – Click OK.<br />
4 – Project Output<br />
Table of Contents<br />
21
Output to an HD Recorder via HD-SDI<br />
<strong>Sony</strong> <strong>NXCAM</strong> <strong>Workflow</strong>s in Apple Final Cut Pro7<br />
Final Cut Pro is compatible with several series of HD-SDI card interface cards, supporting high<br />
quality output of the project timeline to an HD deck, such as XDCAM HD ® , HDCAM ® etc.<br />
The procedures for output vary with the specific interface product installed. Please refer to the<br />
operations guides of the specific interface product and/or the Final Cut Pro Operations <strong>Guide</strong><br />
for detailed setup and operational procedures.<br />
4 – Project Output<br />
Table of Contents<br />
22
5 – Notes<br />
<strong>Sony</strong> <strong>NXCAM</strong> <strong>Workflow</strong>s in Apple Final Cut Pro7<br />
©2009 <strong>Sony</strong> Electronics Inc. All rights reserved. Reproduction in whole or in part without written permission is prohibited. <strong>Sony</strong>, <strong>NXCAM</strong>, DVCAM,<br />
XDCAM HD, HDCAM, Memory Stick PRO Duo, Memory Stick PRO DUO HG, Blu-ray and i.LINK are trademarks of <strong>Sony</strong>. HDV and the HDV logo are<br />
trademarks of <strong>Sony</strong> Corporation and the Victor Company of Japan. CompactFlash is a trademark of the CompactFlash Association. Apple,<br />
Macintosh, QuickTime and Final Cut Pro are trademarks of Apple. Windows Explorer is a trademark of Microsoft Corporation.<br />
5 – Notes<br />
Table of Contents<br />
23