POWER TOOL CABINET: PROJECT LEVEL SILVER TOOLS ... - Ryobi
POWER TOOL CABINET: PROJECT LEVEL SILVER TOOLS ... - Ryobi
POWER TOOL CABINET: PROJECT LEVEL SILVER TOOLS ... - Ryobi

Create successful ePaper yourself
Turn your PDF publications into a flip-book with our unique Google optimized e-Paper software.
<strong>TOOL</strong>S YOU’LL<br />
WANT TO USE<br />
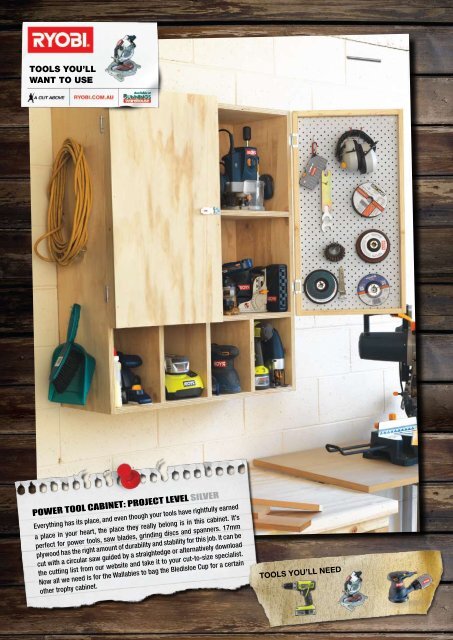
<strong>POWER</strong> <strong>TOOL</strong> <strong>CABINET</strong>: <strong>PROJECT</strong> <strong>LEVEL</strong> <strong>SILVER</strong><br />
Everything has its place, and even though your tools have rightfully earned<br />
a place in your heart, the place they really belong is in this cabinet. It’s<br />
perfect for power tools, saw blades, grinding discs and spanners. 17mm<br />
plywood has the right amount of durability and stability for this job. It can be<br />
cut with a circular saw guided by a straightedge or alternatively download<br />
the cutting list from our website and take it to your cut-to-size specialist.<br />
Now all we need is for the Wallabies to bag the Bledisloe Cup for a certain<br />
other trophy cabinet.<br />
<strong>TOOL</strong>S YOU’LL NEED
<strong>POWER</strong> <strong>TOOL</strong><br />
<strong>CABINET</strong><br />
<strong>PROJECT</strong> <strong>LEVEL</strong> <strong>SILVER</strong><br />
1.<br />
2.<br />
Division<br />
3.<br />
4.<br />
5.<br />
Bottom<br />
Side<br />
Plywood<br />
Bottom<br />
Top<br />
Side<br />
Lower Shelf<br />
Bottom<br />
Lower Shelf<br />
Back<br />
Upper shelf<br />
Side<br />
Top<br />
Side<br />
Divisions<br />
1. Outer shell<br />
Glue and screw the sides to the<br />
top and bottom by pre-drilling<br />
with a 3mm pilot hole then<br />
securing with two 50 x 8g screws<br />
approximately 70mm in from the<br />
edges. Repeat for the<br />
opposite side.<br />
2. Lower shelf<br />
To assist with the correct<br />
positioning of the lower shelf, place<br />
a division temporarily against the<br />
side. Hold the shelf against the<br />
division while drilling and screwing<br />
the shelf in position.<br />
3. Divisions<br />
Slide the divisions across, insert third<br />
division. Space equally or to own<br />
personal requirements and fix in<br />
position by screwing from the underside<br />
of the bottom. Stand the unit upright<br />
and screw through the lower shelf into<br />
the divisions.<br />
4. Back<br />
Screw the upper shelf midway<br />
between the top and lower shelf.<br />
Screw on back, ensuring it is flush,<br />
starting from one side andworking<br />
your way around. Space screws at<br />
approximately 200mm.<br />
5. Door Frame<br />
Glue and nail the longer side frame to<br />
the top and bottom. Two 40 x 1.8mm<br />
nails will do the trick. Punch the nail<br />
heads below the surface. <strong>Ryobi</strong>’s tip:<br />
Pre-drilling a 2mm hole through the side<br />
frame only prior to nailing will help with<br />
the alignment. Glue and nail plywood<br />
face panel.<br />
mATERIAL LIST<br />
mATERIAL SIzE (mm) NO. UNIT<br />
COST<br />
CUTTING LIST<br />
ITEm mATERIAL SIzE H x W x T mm NO.<br />
Sides 17mm BC plywood 1000 x 295 x 17 2<br />
Top, bottom & shelves 17mm BC plywood 764 x 295 x 17 4<br />
Divisions 17mm BC plywood 250 x 295 x 17 3<br />
Back 12mm BC plywood 1000 x 800 x 12 1<br />
Door panels 12mm BC plywood 730 x 398 x 12 2<br />
Pegboard spacers 12mm pine 356 x 30 x 12 4<br />
Door frames 18mm pine 730 x 40 x 18 4<br />
<strong>TOOL</strong> LIST<br />
Cordless drill driver<br />
Mitre saw<br />
Tape measure<br />
3mm drill bit<br />
Combination square<br />
Random orbit sander<br />
Wood glue<br />
TOTAL<br />
COST<br />
BC Plywood 2400 x 1200 x 17 1 66.00 66.00<br />
BC Plywood 2400 x 1200 x 12 1 42.00 42.00<br />
Pine 2400 x 42 x 19 2 3.02 6.04<br />
Pegboard 1220 x 915 1 26.50 26.50<br />
Non-Mortice hinge 50 2 3.27 pkt2 6.54<br />
Particleboard screws 50 x 8 gauge pkt 50 4.88 4.88<br />
20 x 6 gauge pkt 50 3.58 3.58<br />
Bullet head nails 40 x 1.6 pkt 150 3.78 3.78<br />
Latch 65 1 3.49 3.49<br />
Total 162.81<br />
18mm pine 358 x 40 x 18 4<br />
Pegboard Hardboard 690 x 356 x 5 2<br />
PPE (personal protective<br />
equipment)<br />
Hammer<br />
Nail punch
<strong>POWER</strong> <strong>TOOL</strong><br />
<strong>CABINET</strong><br />
6.<br />
7.<br />
8.<br />
Pegboard<br />
spacer<br />
9.<br />
10.<br />
100mm<br />
6. Hinges<br />
Screw the wider leaf portion of the hinge to<br />
the door frame 100mm down from the top and<br />
bottom of the door. Fold the smaller portion of<br />
the hinge down against the door to help with<br />
positioning.<br />
7. Doors<br />
Hang the completed door<br />
assembly to the cabinet by<br />
screwing the smaller leaf portion<br />
of the hinge to the front edge.<br />
Standing the cabinet top down<br />
on a flat surface will assist with<br />
aligning the top of the door with<br />
the top of the cabinet.<br />
292<br />
8. Pegboard<br />
Glue and screw the pegboard 17<br />
spacers to the inside of the door<br />
frame with 19mm x 6g screws.<br />
Attach the pegboard to the<br />
spacers with one 19 x 6g screw in<br />
each corner.<br />
9. Lockable<br />
A number of locking/<br />
latching options are<br />
available. Use a small<br />
hasp and staple.<br />
This was secured to<br />
the doors with the<br />
screws provided and<br />
positioned in<br />
the centre.<br />
10. Finish<br />
The choice of finish<br />
is entirely a personal<br />
one. You may prefer<br />
a paint finish to match<br />
your location. We chose<br />
a clear lacquer finish both for<br />
protection and to enhance the grain.<br />
Either way though, you should have no<br />
excuse now for misplacing your power<br />
tools or their accessories!<br />
17<br />
340<br />
17<br />
340<br />
17<br />
17<br />
17<br />
340<br />
17<br />
340<br />
17<br />
292<br />
17<br />
398<br />
17<br />
398<br />
800<br />
800<br />
398<br />
= 17 = 17 = 17 =<br />
398<br />
17<br />
12<br />
= 17 = 17 = 17 =<br />
17<br />
12<br />
295<br />
42 12<br />
54<br />
295<br />
730<br />
42 12<br />
1000<br />
54<br />
730<br />
1000