
Create successful ePaper yourself
Turn your PDF publications into a flip-book with our unique Google optimized e-Paper software.
®<br />
<strong>Cayman</strong>, <strong>Cayman</strong> S<br />
Owner’s Manual
WKD 987 621 10 5/09<br />
© Dr. Ing. h.c. F. Porsche AG<br />
Porsche, the Porsche crest, PCCB, PCM, PDK,<br />
PSM and Tequipment are registered trademarks<br />
and the distinctive shapes of Porsche automobiles<br />
are trademarks of<br />
Dr. Ing. h.c. F. Porsche AG.<br />
All rights reserved.<br />
Printed in Germany<br />
Orientation guides in the<br />
Owner’s Manual<br />
The orientation guides in the Owner’s Manual are<br />
highlighted in yellow.<br />
Overall Table of Contents<br />
At the start of the Owner’s Manual you will find an<br />
overview of the overall contents of the Owner’s<br />
Manual.<br />
Section Contents<br />
There is a summary of topics with the corresponding<br />
page numbers at the beginning of each<br />
main chapter.<br />
Index<br />
There is a detailed, alphabetical index at the end<br />
of this Owner’s Manual.<br />
1
Dear Owner,<br />
We would like to thank you for your purchase of a<br />
Porsche Sports car.<br />
Judging by the car you have chosen, you are a motorist<br />
of a special breed, and you are probably no<br />
novice when it comes to automobiles.<br />
Remember however, as with any vehicle, you<br />
should take time to familiarize yourself with your<br />
Porsche and its performance characteristics. Always<br />
drive within your own unique capabilities as<br />
a driver and your level of experience with your<br />
Porsche. Ensure that anyone else driving your<br />
Porsche does the same. To prevent or minimize injury,<br />
always use your safety belts. Never consume<br />
alcohol or drugs before or during the operation of<br />
your vehicle.<br />
This Owner’s Manual contains a host of useful information.<br />
Please take the time to read this manual<br />
before you drive your new Porsche. Become familiar<br />
with the operation of your Porsche car for<br />
maximum safety and operating pleasure. The better<br />
you know your Porsche, the more pleasure you<br />
will experience driving your new car.<br />
Always keep your Owner’s Manual in the car, and<br />
give it to the new owner if you ever sell your<br />
Porsche.<br />
2<br />
A separate Maintenance Booklet explains how<br />
you can keep your Porsche in top driving condition<br />
by having it serviced regularly.<br />
A separate Warranty and Customer Information<br />
Booklet contains detailed information about<br />
the warranties covering your Porsche.<br />
For U.S. only:<br />
If you believe that your vehicle has a fault which<br />
could cause a crash, injury or death, you should<br />
immediately inform the National Highway Traffic<br />
Safety Administration (NHTSA) in addition to notifying<br />
Porsche Cars North America, Inc. (Porsche<br />
Cars N.A.).<br />
If NHTSA receives similar complaints, it may open<br />
an investigation, and if it finds that a safety problem<br />
exists in a group of vehicles, it may order a recall<br />
and remedy campaign. However, NHTSA cannot<br />
become involved in individual problems between<br />
you and your dealer, or Porsche Cars N.A..<br />
To contact NHTSA, you may call the Vehicle Safety<br />
Hotline toll-free at 1-888-327-4236 (TTY: 1-800-<br />
424-9153); go to http://www.safercar.gov; or<br />
write to: Administrator, NHTSA, 400 Seventh<br />
Street, SW., Washington, DC 20590.<br />
You can also obtain other information about motor<br />
vehicle safety from http://www.savercar.gov.<br />
Your car has thousands of parts and components<br />
which have been designed and manufactured in<br />
accordance with Porsche’s high standards of<br />
engineering quality and safety.<br />
Warning!<br />
Any alteration or misuse of the vehicle can<br />
lead to accidents and severe or fatal<br />
personal injuries.<br />
Any alteration of the vehicle may negate or<br />
interfere with those safety features built into<br />
the vehicle. Modifications may be carried out<br />
on your vehicle only if approved by Porsche.<br />
Your Porsche is intended to be used in a safe<br />
manner obeying the local laws and in the<br />
light of driving conditions faced by you, and<br />
in accordance with the instructions provided<br />
in this Owner’s Manual.<br />
f Do not misuse your Porsche by ignoring those<br />
laws and driving conditions, or by ignoring the<br />
instructions in this manual.<br />
Caution!<br />
The fitting of racing tires (e.g. slicks) for<br />
sporting events is not approved by Porsche.<br />
Very high cornering speeds can be achieved<br />
with racing tires. However, the resulting<br />
transverse acceleration values would jeopardize<br />
the adequate supply of oil to the engine.<br />
Porsche therefore will not accept any<br />
warranty or accept any liability for damage<br />
occurring as a result of non-compliance with<br />
this provision.<br />
f Do not fit racing tires (e.g. slicks) for sporting<br />
events on your vehicle.
Regularly check your vehicle for signs of<br />
damage.<br />
Damaged or missing aerodynamic components<br />
such as spoilers or underside panels<br />
affect the driving behavior and therefore<br />
must be replaced immediately.<br />
Your car may have all or some of the components<br />
described in this manual.<br />
Should you have difficulty understanding any of<br />
the explanations of features or equipment installed<br />
in your vehicle, contact your authorized Porsche<br />
dealer. He/She will be glad to assist you. Also<br />
check with your dealer on other available options<br />
or equipment.<br />
Throughout this booklet, left is designated as the<br />
driver’s side of the vehicle, and right as the passenger’s<br />
side of the vehicle.<br />
Text, illustrations and specifications in this manual<br />
are based on the information available at the time<br />
of printing.<br />
It has always been Porsche’s policy to continuously<br />
improve its products. Porsche, therefore, reserves<br />
the right to make changes in design and<br />
specification, and to make additions or improvements<br />
in its product without incurring any obligation<br />
to install them on products previously manufactured.<br />
We wish you many miles of safe and pleasurable<br />
driving in your Porsche.<br />
Warning!<br />
For your own protection and longer service life of<br />
your car, please follow all operating instructions<br />
and special warnings. These special warnings use<br />
the safety alert symbol, followed by the words<br />
Danger, Warning and Caution. These special<br />
warnings contain important messages regarding<br />
your safety and/or the potential for damage to<br />
your Porsche. Ignoring them could result in serious<br />
mechanical failure, serious personal injury or<br />
death.<br />
f Do not alter your Porsche. Any alteration could<br />
create dangerous conditions or defeat safety<br />
engineering features built into your car.<br />
f Do not misuse your Porsche. Use it safely, and<br />
consistently with the law, according to the driving<br />
conditions, and the instructions in this manual.<br />
Alteration or misuse of your Porsche could<br />
cause accidents and serious personal injury<br />
or death.<br />
Note to owners<br />
In Canada, this manual is also available in French.<br />
To obtain a copy contact your dealer or write to:<br />
Note aux proprietaires<br />
Au Canada on peut se procurer un exemplaire de<br />
ce Manuel en français auprès du concessionaire<br />
ou du:<br />
Porsche Cars Canada, Ltd.<br />
Automobiles Porsche Canada, LTEE<br />
5925 Airport Road<br />
Suite 420<br />
Mississauga, Ontario<br />
Canada L4V 1W1<br />
Telephone number for customer assistance:<br />
1-800-PORSCHE / Option 3<br />
3
Porsche Ceramic Composite Brake<br />
(PCCB)<br />
f Please see the chapter “BRAKES” on Page 56.<br />
The high-performance brake system is designed<br />
for optimal braking effect at all speeds and<br />
temperatures.<br />
Certain speeds, braking forces and ambient<br />
conditions (such as temperature and humidity)<br />
therefore might cause brake noises.<br />
Wear on the different components and braking<br />
system, such as brake pads and brake discs,<br />
depends to a great extent on the individual driving<br />
style and the conditions of use and therefore<br />
cannot be expressed in actual miles on the road.<br />
The values communicated by Porsche are based<br />
on normal operation adapted to traffic. Wear<br />
increases considerably when the vehicle is driven<br />
on race tracks or through an aggressive driving<br />
style.<br />
f Please consult an authorized Porsche dealer<br />
about the current guidelines in effect before<br />
such use of your vehicle.<br />
4<br />
Setting and operating vehicle<br />
components when driving<br />
Warning!<br />
There is a danger of accident if you set or operate<br />
the on-board computer, radio, navigation<br />
system, telephone or other equipment<br />
when driving.<br />
This could distract you from the traffic and<br />
cause you to lose control of the vehicle resulting<br />
in serious personal injury or death.<br />
f Operate the components while driving only if<br />
the traffic situation allows you to do so safely.<br />
f Carry out any complicated operating or setting<br />
procedures only with the vehicle stationary.<br />
Portable Fuel Containers<br />
Danger!<br />
Portable fuel containers may leak, whether<br />
they are full or partially empty. Fuel leaking<br />
from a portable container carried in your vehicle<br />
could, in case of an accident, cause a<br />
fire or explosion, resulting in serious personal<br />
injury or death.<br />
f Never carry additional fuel in portable containers<br />
in your vehicle.<br />
Ground Clearance<br />
Caution!<br />
Risk of damage. The vehicle may touch the<br />
ground as a result of reduced ground clearance.<br />
f Drive carefully and slowly on steep slopes (e.g.<br />
parking lots, curbs, uneven roads, lifting platforms<br />
etc.).<br />
f Avoid steep ramps.
Engine Exhaust<br />
Danger!<br />
Engine exhaust is dangerous if inhaled.<br />
Engine exhaust fumes have many components<br />
which you can smell. They also contain<br />
carbon monoxide (CO), which is a colorless<br />
and odorless gas.<br />
Carbon monoxide can cause unconsciousness<br />
and even death if inhaled.<br />
f Never start or let the engine run in an enclosed,<br />
unventilated area.<br />
It is not recommended to sit in your car for prolonged<br />
periods with the engine on and the car<br />
not moving.<br />
California Proposition 65 Warning<br />
Warning!<br />
Engine exhaust, some of its constituents, and certain<br />
vehicle components contain or emit chemicals<br />
known to the State of California to cause cancer<br />
and birth defects or other reproductive harm.<br />
In addition, certain fluids contained in vehicles and<br />
certain products of component wear contain or<br />
emit chemicals known to the State of California to<br />
cause cancer and birth defects or other reproductive<br />
harm.<br />
Hot Exhaust Pipes<br />
Warning!<br />
Risk of burn injury when standing near or<br />
coming into contact with the exhaust pipe.<br />
The exhaust pipe is hot when the vehicle is running<br />
and remains hot for some time after the vehicle is<br />
turned off.<br />
f To prevent injury, make a point of noting where<br />
your vehicle’s exhaust pipe is, avoid placing<br />
your legs near the exhaust pipe, and closely<br />
supervise children around the vehicle when the<br />
exhaust pipe could be hot.<br />
A hot exhaust pipe can cause serious burns.<br />
5
Table of Contents<br />
Porsche Ceramic Composite Brake (PCCB)...... 4<br />
Setting and operating vehicle components<br />
when driving.................................................. 4<br />
Portable Fuel Containers ................................ 4<br />
Ground Clearance .......................................... 4<br />
Engine Exhaust.............................................. 5<br />
Before driving off................................. 8<br />
Before driving off........................................... 8<br />
Break in hints for the first<br />
2,000 miles/3,000 kilometers...................... 10<br />
Operation, Safety............................... 13<br />
Keys .......................................................... 15<br />
Security Wheel Bolts ....................................15<br />
Doors .........................................................18<br />
Central Locking in Cars without Alarm System 19<br />
Central Locking in Cars with Alarm System ...21<br />
Alarm System,<br />
Passenger Compartment Monitoring .............25<br />
Power Windows ...........................................27<br />
Mirrors ........................................................29<br />
Rear Window Defogger, Door Mirror Heating ..31<br />
Seat Adjustment and Head Restraints ............32<br />
Seat Memory ...............................................35<br />
Heated Seats ..............................................37<br />
Seat Ventilation ............................................38<br />
Steering Wheel Adjustment ...........................38<br />
Steering Wheel Heating ................................39<br />
Multi-Functional Steering Wheel .....................40<br />
6 Table of Contents<br />
Sun Visors ...................................................41<br />
Safety Belts .................................................42<br />
Airbag Systems ...........................................44<br />
Child Restraint Systems ................................50<br />
LATCH System<br />
Child seat bracket on the passenger’s seat ....53<br />
Child Restraint Anchorage .............................54<br />
Sports Exhaust System ................................55<br />
Parking Brake ..............................................55<br />
Brakes .......................................................56<br />
ABS Brake System (Antilock Brake System) ...59<br />
Clutch Pedal ................................................60<br />
Sport Mode .................................................61<br />
Porsche Stability Management (PSM) .............63<br />
Porsche Active Suspension Management ............<br />
(PASM) ........................................................66<br />
Rear Spoiler ...............................................67<br />
Fixed rear spoiler .........................................68<br />
Interior lights ...............................................69<br />
Parking Aids ...............................................70<br />
Ignition/Starter Switch with<br />
anti-theft Steering Lock .................................72<br />
Starting Procedures .....................................75<br />
Stopping Engine ..........................................76<br />
Emergency Flasher Switch ............................77<br />
Light Switch on Vehicles<br />
with Bi-Xenon Headlights ...............................78<br />
Light Switch on Vehicles<br />
with Halogen Headlights ...............................80<br />
Turn Signal / Headlight Dimmer /Parking light /<br />
Flasher Lever ...............................................81<br />
Windshield Wiper/ Washer Lever ...................82<br />
Fire Extinguisher ......................................... 85<br />
Automatic Speed Control ............................. 86<br />
Cupholder ................................................... 88<br />
Ashtray ....................................................... 89<br />
Cigarette Lighter ......................................... 90<br />
Storage in the Passenger Compartment ........ 91<br />
Front Luggage Compartment Lid .................. 93<br />
Front Luggage Compartment ....................... 94<br />
Rear Lid ..................................................... 95<br />
Rear luggage compartment .......................... 96<br />
Trunk Entrapment ..................................... 100<br />
Porsche Communication Management (PCM) 101<br />
Car Telephone and Aftermarket Alarms ...... 103<br />
iPod, USB and AUX .................................... 104<br />
Roof Transport System .............................. 105<br />
HomeLink ................................................. 106<br />
Automatic Air Conditioning System,<br />
Heated Rear Window/<br />
Door Mirror Heating......................... 109<br />
Air conditioning ......................................... 110<br />
Automatic Air Conditioning System ............. 113<br />
Central and Side Vents .............................. 116<br />
Fresh-air Intake ......................................... 116<br />
Heated Rear Window/<br />
Door Mirror Heating................................... 117<br />
Instruments, On-Board Computer,<br />
Warnings ........................................ 119<br />
Instrument Panel USA Models ..................... 120
Instrument Panel Canada Models .................122<br />
Automatic Speed Control Indicator light .......124<br />
Instrument Illumination ................................124<br />
Trip Odometer ...........................................125<br />
Speedometer ............................................126<br />
Changing over between Miles / Kilometers ..126<br />
Tachometer ...............................................127<br />
Turn Signal Indicator Light ..........................127<br />
High Beam Indicator Light ...........................127<br />
Gear Shift Indicator<br />
(in vehicles with manual transmission) ..........127<br />
Cooling System .........................................128<br />
Porsche Doppelkupplung (PDK) ...................129<br />
Fuel ..........................................................130<br />
Clock ........................................................131<br />
Outside Temperature .................................131<br />
Check Engine (Emission Control) .................133<br />
On-Board Computer (BC) ............................134<br />
Warnings on the instrument panel and<br />
the on-board computer ...............................166<br />
Shifting Gears.................................. 175<br />
Manual Transmission, Clutch....................... 176<br />
Drive-Off Assistant ..................................... 177<br />
Porsche Doppelkupplung (PDK)................... 178<br />
Maintenance, Car Care .................... 185<br />
Exercise Extreme Caution when Working<br />
on your Vehicle ..........................................186<br />
Coolant Level .............................................187<br />
Engine Oil .................................................188<br />
Engine Oil Level ........................................189<br />
Engine Oil Recommendation ........................190<br />
Brake Fluid Level ........................................192<br />
Fuel Economy ............................................194<br />
Operating your Porsche in other Countries ...194<br />
Fuel Recommendations ..............................196<br />
Portable Fuel Containers ............................197<br />
Fuel Evaporation Control ............................ 197<br />
Emission Control System ............................198<br />
How Emission Control Works ......................199<br />
Washer Fluid ..............................................200<br />
Power Steering...........................................201<br />
Air Filter ....................................................201<br />
Combination Filter ......................................201<br />
Fluids/Oils for Manual Transmission<br />
and Porsche Doppelkupplung (PDK) .............201<br />
Wiper Blades ............................................202<br />
Car Care Instructions ................................203<br />
Practical Tips, Emergency Service .... 211<br />
Exercise Extreme Caution when Working<br />
on your Vehicle .........................................212<br />
Tires/Wheels ............................................213<br />
Loading Information ...................................224<br />
Wheel Bolts ..............................................226<br />
Changing a wheel .......................................227<br />
Flat Tire .....................................................229<br />
Lifting the Vehicle with a Lifting Platform<br />
or Garage Lift ........................................... 232<br />
Spacers ................................................... 233<br />
Electrical System ..................................... 235<br />
Battery .................................................... 239<br />
Replacing the remote-control battery ......... 244<br />
Emergency Starting with Jumper Cables ..... 245<br />
Bulb chart ................................................. 247<br />
Lights, Replacing Bulbs ............................. 247<br />
Headlights ................................................ 248<br />
Number Plate Light .................................... 256<br />
Changing Light-Emitting Diodes and<br />
Long-Life Bulbs ......................................... 256<br />
Adjusting Headlights .................................. 257<br />
Towing ..................................................... 259<br />
Vehicle Identification,<br />
Technical Data ................................ 263<br />
Vehicle Identification .................................. 264<br />
Technical Data .......................................... 266<br />
Tire Pressure for Cold Tires ...................... 267<br />
Tires, Rims, Tracks .................................. 268<br />
Driving Performance .................................. 270<br />
Capacities ................................................ 271<br />
Weights ................................................... 272<br />
Dimensions .............................................. 272<br />
Diagrams ................................................. 273<br />
Table of Contents 7
Dear Porsche Owner<br />
A lot has gone into the manufacture of your<br />
Porsche, including advanced engineering, rigid<br />
quality control and demanding inspections.<br />
These engineering and safety features will be<br />
enhanced by you...<br />
the safe driver...<br />
– who knows his/her car and all controls,<br />
– who maintains the vehicle properly,<br />
– who uses driving skills wisely and always<br />
drives within her/his own capabilities and the<br />
level of familiarity with the vehicle.<br />
You will find helpful hints in this manual on how to<br />
perform most of the checks listed on the following<br />
pages.<br />
If in doubt, have these checks performed by your<br />
authorized Porsche dealer.<br />
8 Before driving off...<br />
Before driving off...<br />
Check the following items first<br />
f Turn the engine off before you attempt any<br />
checks or repairs on the vehicle.<br />
f Be sure the tires are inflated correctly.<br />
Check tires for damage and tire wear.<br />
f See that wheel bolts are properly tightened<br />
and not loose or missing.<br />
f Check engine oil level, add if necessary.<br />
Make it a habit to have engine oil checked with<br />
every fuel filling.<br />
f Check all fluid levels such as windshield<br />
washer and brake fluid levels.<br />
f Be sure the vehicle battery is well charged and<br />
cranks the engine properly.<br />
f Check all doors and lids for proper operation<br />
and latch them properly.<br />
f Check, and if necessary replace worn or<br />
cracked wiper blades.<br />
f See that all windows are clear and unobstructed.<br />
f Check air intake slots and area between luggage<br />
compartment lid and windshield. Ensure<br />
that these areas are free of snow and ice, so<br />
the heater and the windshield wipers work<br />
properly.<br />
f If a child will be riding in the vehicle, check<br />
child seat/child seat restraint system to ensure<br />
that restraints are properly adjusted.<br />
f Child restraint systems will not fit into the<br />
Sports bucket seat.<br />
Do not install a child restraint system in the<br />
Sports bucket seat.<br />
The Sports bucket seat cannot be equipped<br />
with the LATCH system and thus the airbag<br />
system cannot be manually deactivated.<br />
f Check all exterior and interior lights for operation<br />
and that the lenses are clean.<br />
f Check the headlights for proper aim, and if<br />
necessary, have them adjusted.<br />
f Check under the vehicle for leaks.<br />
f Be sure all luggage is stowed securely.<br />
Emergency equipment<br />
It is good practice to carry emergency equipment<br />
in your vehicle.<br />
Some of the items you should have are:<br />
window scraper, snow brush, container or bag of<br />
sand or salt, emergency light, small shovel, firstaid<br />
kit, etc.
In the driver’s seat...<br />
f Check operation of the horn.<br />
f Position seat for easy reach of foot pedals and<br />
controls.<br />
To reduce the possibility of injury from the<br />
airbag deployment, you should always sit back<br />
as far from the steering wheel as is practical,<br />
while still maintaining full vehicle control.<br />
f Adjust the inside and outside rear view mirrors.<br />
f Buckle your safety belts.<br />
f Check operation of the foot and parking brake.<br />
f Check all warning and indicator lights with<br />
ignition on and engine not running.<br />
f Start engine and check all warning displays for<br />
warning symbols.<br />
f Never leave an idling car unattended.<br />
f Lock doors from inside, especially with children<br />
in the car to prevent inadvertent opening<br />
of doors from inside or outside.<br />
Drive with doors locked.<br />
On the road...<br />
f Never drive after you have consumed alcohol<br />
or drugs.<br />
f Always have your safety belt fastened.<br />
f Always drive defensively.<br />
Expect the unexpected.<br />
f Use signals to indicate turns and lane changes.<br />
f Turn on headlights at dusk or when the driving<br />
conditions warrant it.<br />
f Always keep a safe distance from the vehicle in<br />
front of you, depending on traffic, road and<br />
weather conditions.<br />
f Reduce speed at night and during inclement<br />
weather.<br />
Driving in wet weather requires caution and reduced<br />
speeds, particularly on roads with<br />
standing water, as the handling characteristics<br />
of the vehicle may be impaired due to hydroplaning<br />
of the tires.<br />
f Always observe speed limits and obey road<br />
signs and traffic laws.<br />
f When tired, get well off the road, stop and take<br />
a rest. Turn the engine off. Do not sit in the vehicle<br />
with engine idling.<br />
Please see the chapter “ENGINE EXHAUST” on<br />
Page 5.<br />
f When parked, always set the parking brake.<br />
Move the PDK selector lever to ”P“ or the gearshift<br />
lever to reverse or first gear.<br />
On hills also turn the front wheels toward the<br />
curb.<br />
f When emergency repairs become necessary,<br />
move the vehicle well off the road. Turn on the<br />
emergency flasher and use other warning devices<br />
to alert other motorists. Do not park or<br />
operate the vehicle in areas where the hot exhaust<br />
system may come in contact with dry<br />
grass, brush, fuel spill or other flammable material.<br />
f Make it a habit to have the engine oil checked<br />
with every refueling.<br />
Before driving off... 9
Break in hints for the first<br />
2,000 miles/3,000 kilometers<br />
The following tips will be helpful in obtaining optimum<br />
performance from your new Porsche.<br />
Despite the most modern, high-precision manufacturing<br />
methods, the moving parts must still wear<br />
in with each other. This wearing-in occurs mainly in<br />
the first 2,000 miles/3,000 kilometers.<br />
Therefore:<br />
f Preferably take longer trips.<br />
f Avoid frequent cold starts with short-distance<br />
driving whenever possible.<br />
f Avoid full throttle starts and abrupt stops.<br />
f Do not exceed maximum engine speed of<br />
4,200 rpm (revolutions per minute).<br />
f Do not run a cold engine at high rpm either in<br />
Neutral or in gear.<br />
f Do not let the engine labor, especially when<br />
driving uphill. Shift to the next lower gear in<br />
time (use the most favorable rpm range).<br />
f Never lug the engine in high gear at low<br />
speeds. This rule applies at all times, not just<br />
during the break-in period.<br />
10 Before driving off...<br />
f Do not participate in motor racing events,<br />
sports driving schools, etc. during the first<br />
2,000 miles/3,000 kilometers.<br />
There may be a slight stiffness in the steering,<br />
gear-shifting or other controls during the break-in<br />
period which will gradually disappear.<br />
Break in brake pads and brake discs<br />
New brake pads and discs have to be “broken in”,<br />
and therefore only attain optimal friction when the<br />
car has covered several hundred miles or km.<br />
The slightly reduced braking ability must be compensated<br />
for by pressing the brake pedal harder.<br />
This also applies whenever the brake pads and<br />
brake discs are replaced.<br />
New tires<br />
New tires do not have maximum traction. They<br />
tend to be slippery.<br />
f Break in new tires by driving at moderate<br />
speeds during the first 60 to 120 miles/100 to<br />
200 km. Longer braking distances must be anticipated.<br />
Engine oil and fuel consumption<br />
During the break-in period oil and fuel consumption<br />
may be higher than normal.<br />
As always, the rate of oil consumption depends on<br />
the quality and viscosity of oil, the speed at which<br />
the engine is operated, the climate and road conditions,<br />
as well as the amount of dilution and oxidation<br />
of the lubricant.<br />
f Make a habit of checking engine oil with every<br />
refueling, add if necessary.
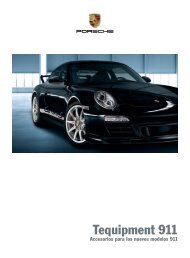
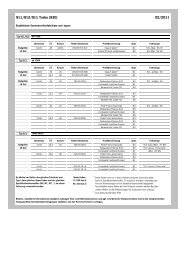
1 Inner door handle, Page 18<br />
2 Power windows, Page 27<br />
3 Door mirror control, Page 29<br />
4 Hands-free microphone<br />
5 Seat memory, Page 35<br />
6 Diagnostic socket (OBD)<br />
7 Front and rear lid release, Page 93, 95<br />
8 Steering-wheel adjustment, Page 38<br />
9 Seat adjustment, Page 32<br />
Before driving off... 11
12 Before driving off...<br />
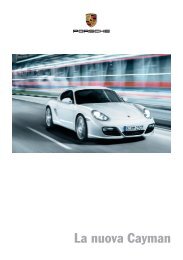
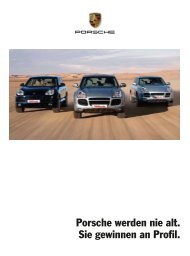
1 Light switch, Page 78, 80<br />
2 Ignition/starter switch, Page 72<br />
3 Turn signal/headlight dimmer,<br />
flasher lever, Page 81<br />
4 Lever for on-board computer, Page 134<br />
5Horn<br />
6 Lever for automatic speed control, Page 86<br />
7 Wiper/washer lever, Page 82<br />
8 Stopwatch, Page 144<br />
9 Interior temperature sensor<br />
10 Emergency flasher switch, Page 77<br />
11 Central locking button, Page 20, 23<br />
12 Cupholder, Page 88<br />
13 Seat heating/ventilation left/right,<br />
Page 37, 38<br />
14 Operating panel for air conditioning, Page 110<br />
15 Sport/Sport Plus program, Page 61<br />
Rear spoiler, Page 67<br />
Porsche Active Suspension Management<br />
(PASM), Page 66<br />
Porsche Stability Management<br />
(PSM), Page 63<br />
Sports exhaust system, Page 55<br />
16 Operating panel for Porsche Communication<br />
Management (PCM), see separate operating<br />
instructions
Keys .......................................................... 15<br />
Security Wheel Bolts ....................................15<br />
Doors .........................................................18<br />
Central Locking in Cars without Alarm System 19<br />
Central Locking in Cars with Alarm System ...21<br />
Alarm System,<br />
Passenger Compartment Monitoring .............25<br />
Power Windows ...........................................27<br />
Mirrors ........................................................29<br />
Rear Window Defogger, Door Mirror Heating ..31<br />
Seat Adjustment and Head Restraints ............32<br />
Seat Memory ...............................................35<br />
Heated Seats ..............................................37<br />
Seat Ventilation ............................................38<br />
Steering Wheel Adjustment ...........................38<br />
Steering Wheel Heating ................................39<br />
Multi-Functional Steering Wheel .....................40<br />
Sun Visors ...................................................41<br />
Safety Belts .................................................42<br />
Airbag Systems ...........................................44<br />
Child Restraint Systems ...............................50<br />
LATCH System<br />
Child seat bracket on the passenger’s seat ....53<br />
Child Restraint Anchorage ............................54<br />
Sports Exhaust System ................................55<br />
Parking Brake ..............................................55<br />
Brakes .......................................................56<br />
ABS Brake System (Antilock Brake System) ...59<br />
Clutch Pedal ................................................60<br />
Sport Mode .................................................61<br />
Porsche Stability Management (PSM) .............63<br />
Porsche Active Suspension Management ............<br />
(PASM) ........................................................66<br />
Retractable Spoiler .....................................67<br />
Fixed rear spoiler .........................................68<br />
Interior lights ...............................................69<br />
Parking Aids ...............................................70<br />
Ignition/Starter Switch with<br />
anti-theft Steering Lock ................................72<br />
Starting Procedures .....................................75<br />
Stopping Engine .........................................76<br />
Emergency Flasher Switch ............................77<br />
Light Switch on Vehicles<br />
with Bi-Xenon Headlights ...............................78<br />
Light Switch on Vehicles<br />
with Halogen Headlights ...............................80<br />
Turn Signal / Headlight Dimmer /Parking light /<br />
Flasher Lever ...............................................81<br />
Windshield Wiper/ Washer Lever ...................82<br />
Fire Extinguisher ..........................................85<br />
Automatic Speed Control ..............................86<br />
Cupholder ...................................................88<br />
Ashtray .......................................................89<br />
Cigarette Lighter ..........................................90<br />
Storage in the Passenger Compartment ........91<br />
Front Luggage Compartment Lid ...................93<br />
Front Luggage Compartment ........................94<br />
Rear Lid ......................................................95<br />
Rear luggage compartment ..........................96<br />
Trunk Entrapment .....................................100<br />
Porsche Communication Management (PCM) 101<br />
Car Telephone and Aftermarket Alarms .......103<br />
iPod, USB and AUX ....................................104<br />
Operation, Safety<br />
Roof Transport System ...............................105<br />
HomeLink ..................................................106<br />
Operation, Safety 13
Never invite car theft!<br />
An unlocked car with the key in the ignition lock<br />
invites car theft.<br />
A steering wheel lock and a gong alarm are<br />
standard equipment in your Porsche.<br />
The gong alarm will sound if you open the driver’s<br />
door while the key is still in the ignition lock. It is<br />
your reminder to pull the key out of the ignition<br />
lock and to lock the doors.<br />
Warning!<br />
Any uncontrolled movement of the vehicle<br />
may result in property damage, serious personal<br />
injury or death.<br />
Never leave your vehicle unattended with the<br />
key in the ignition lock, especially if children<br />
and/or pets are left unattended in the vehicle.<br />
They can operate power windows and<br />
other controls. If the engine is left running,<br />
they may accidentally engage the shift lever.<br />
Serious personal injury or death could result<br />
from loss of control of the vehicle.<br />
f Always remove the ignition key.<br />
f Always set the parking brake.<br />
f Lock the doors with the remote control.<br />
14 Operation, Safety<br />
Warning!<br />
Risk of a serious accident.<br />
The steering column will lock when you remove<br />
the key while you are driving or as the<br />
car is rolling to a stop. You will not be able to<br />
steer the car.<br />
Serious personal injury or death could result<br />
from loss of control of the vehicle.<br />
f Never remove the key from the steering lock<br />
while you are driving.<br />
To protect your vehicle and your possessions<br />
from theft, you should always proceed as<br />
follows when leaving your vehicle:<br />
f Close windows.<br />
f Lock glove compartment.<br />
f Remove ignition key.<br />
f Close storage tray between the seats.<br />
f Remove valuables (e.g. car documents, cell<br />
phones, house keys) from the car.<br />
f Lock doors.
Keys<br />
f Please see the chapter “ALARM SYSTEM, PAS-<br />
SENGER COMPARTMENT MONITORING” on<br />
Page 25.<br />
f Please see the chapter “CENTRAL LOCKING IN<br />
CARS WITHOUT ALARM SYSTEM” on Page 19.<br />
f Please see the chapter “CENTRAL LOCKING IN<br />
CARS WITH ALARM SYSTEM” on Page 21.<br />
Two car keys are supplied with your Porsche.<br />
These keys operate all the locks on your vehicle.<br />
f Be careful with your car keys: do not part with<br />
them except under exceptional circumstances.<br />
f To avoid battery run-down, always remove the<br />
ignition key from the ignition lock.<br />
Emergency operation<br />
f Please see the chapter “EMERGENCY OPERA-<br />
TION – PULLING OUT THE IGNITION KEY” on<br />
Page 74.<br />
Replacement keys<br />
Replacement car keys can be obtained only from<br />
your authorized Porsche dealer, and this can<br />
sometimes be very time-consuming.<br />
You should therefore always keep a spare key on<br />
your person.<br />
Keep it in a safe place (e.g. wallet), but under no<br />
circumstances in or on the vehicle.<br />
The key codes of new keys have to be “reported”<br />
to the car control unit by your authorized Porsche<br />
dealer.<br />
A total of 6 car keys can be reported to the control<br />
unit.<br />
Disabling key codes<br />
If a key is lost, the key codes can be disabled by<br />
an authorized Porsche dealer.<br />
All the remaining car keys are required for this purpose.<br />
Disabling the code ensures that the car can be<br />
started only using authorized keys.<br />
Note<br />
f Please note that the other locks can still be<br />
opened with the disabled key.<br />
Immobilizer<br />
There is a transponder (an electronic component)<br />
in the key grip, containing a stored code.<br />
When the ignition is switched on, the ignition lock<br />
checks the code.<br />
The immobilizer can be deactivated and the engine<br />
started only using an authorized ignition key.<br />
Switching off the immobilizer<br />
f Insert the ignition key into the ignition lock.<br />
If the ignition is left on for more than 2 minutes<br />
without the engine being started, the immobilizer<br />
is switched on again.<br />
f If this happens, turn the ignition key back to<br />
position 3 (ignition off) before starting the<br />
engine. The immobilizer is switched off again,<br />
and the engine can be started.<br />
f Please see the chapter “IGNITION/STARTER<br />
SWITCH WITH ANTI-THEFT STEERING LOCK”<br />
on Page 72.<br />
Switching on the immobilizer<br />
f Remove ignition key.<br />
Security Wheel Bolts<br />
f If wheels have to be removed during a workshop<br />
visit, do not forget to hand over the socket<br />
for the security wheel bolts along with the<br />
car key.<br />
Operation, Safety 15
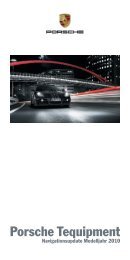
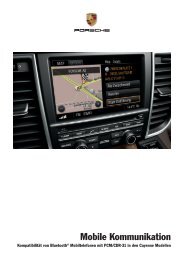
1 - Central locking button<br />
2 - Front luggage compartment lid button<br />
3 -Rear lid button<br />
4 - Light-emitting diode<br />
16 Operation, Safety<br />
Key with Radio Remote Control<br />
Unlocking the vehicle<br />
f Press button 1.<br />
Locking the vehicle<br />
f Press button 1.<br />
Switching off the alarm system if it is<br />
triggered accidentally<br />
f Press button 1.<br />
Unlocking front luggage compartment lid<br />
f Press button 2 for approx. two seconds.<br />
Unlocking rear lid<br />
f Press button 3 for approx. two seconds.<br />
If the vehicle was locked, it is unlocked simultaneously<br />
with the luggage compartment.<br />
In vehicles with seat memory the stored seat and<br />
door mirror positions are automatically set.<br />
The vehicle will be locked again approx.<br />
80 seconds after the luggage compartment is<br />
closed if none of the doors was opened.<br />
Note<br />
Your authorized Porsche dealer can program further<br />
types of unlocking.<br />
Type 1<br />
The relocking time of the doors can be adjusted to<br />
suit your individual requirements:<br />
10 - 100 seconds.<br />
Type 2<br />
The doors stay locked when the luggage compartment<br />
is unlocked.
Malfunction of the remote control<br />
The remote control may not function correctly due<br />
to local radio wave interference. The vehicle will<br />
then not lock properly.<br />
This can be identified by the missing locking<br />
sound and the missing check-back signal of the<br />
emergency flasher.<br />
If this should occur:<br />
f Lock the vehicle with the key in the door.<br />
The remote-control standby function<br />
switches off after 7 days<br />
If the vehicle is not started or unlocked with the remote<br />
control within 7 days, the remote control<br />
standby function is switched off (to prevent discharging<br />
of the vehicle battery).<br />
1. In this case, unlock the driver’s door with the<br />
key at the door lock.<br />
Leave the door closed in order to prevent the<br />
alarm system from being triggered.<br />
2. Press button 1 on the remote control.<br />
The remote control is now activated again and<br />
the alarm system is switched off.<br />
Operational readiness of the remote<br />
control interrupted<br />
Encoded data is transmitted to the vehicle each<br />
time the wireless remote control is operated. If the<br />
remote control is operated too often outside the<br />
range of the vehicle, this can result in the central<br />
locking system no longer responding.<br />
In this case, the remote control and vehicle must<br />
be synchronized.<br />
Carrying out the synchronization<br />
1. Unlock the driver's door with the key at the<br />
door lock.<br />
2. Open driver’s door and insert the ignition key<br />
into the ignition lock within 10 seconds to<br />
prevent the alarm system from being<br />
triggered.<br />
3. With the key inserted, press and hold button 1<br />
on the remote control for approx. 5 seconds.<br />
The synchronization is now complete.<br />
Operation, Safety 17
Doors<br />
If the door windows are closed, they will be automatically<br />
opened by a few millimeters when the<br />
doors are opened and, when the doors are closed,<br />
they will be closed again. This makes it easier to<br />
open and close the doors and protects the seals.<br />
f Therefore, you should pull the door handle<br />
slowly so that the door window can be lowered<br />
before the door is opened.<br />
Opening doors from outside<br />
f Unlock vehicle with the remote control.<br />
f Slowly pull door handle A.<br />
18 Operation, Safety<br />
Opening unlocked doors from inside<br />
f Slowly pull door handle B.<br />
Opening locked doors from inside<br />
f Slowly pull door handle B twice.<br />
f Please see the chapter “LOCKING CONDITI-<br />
ONS” on Page 22.<br />
Door storage tray<br />
Opening storage tray<br />
f Open the cover C.<br />
Keep the door storage tray C closed while driving<br />
for safety reasons.
Central Locking in Cars without<br />
Alarm System<br />
This device complies with:<br />
Part 15 of the FCC Rules<br />
RSS-210 of Industry Canada.<br />
Operation is subject to the following two conditions:<br />
1. This device may not cause harmful interference,<br />
and<br />
2. this device must accept any interference<br />
received, including interference that may<br />
cause undesired operation.<br />
Note<br />
The manufacturer is not responsible for any radio<br />
or TV interference caused by unauthorized modifications<br />
to this equipment.<br />
Such modification could void the user’s authority<br />
to operate the equipment.<br />
Warning!<br />
Any changes or modifications not expressly<br />
approved by Porsche could void the user’s<br />
authority to operate this equipment.<br />
f Please see the chapter “LOAD SWITCH-OFF AF-<br />
TER 2 HOURS OR 7 DAYS” on Page 236.<br />
f Please see the chapter “SEAT MEMORY” on<br />
Page 35.<br />
Both car doors and the filler flap can be centrally<br />
unlocked or locked with the remote control.<br />
Any person remaining in the locked car can<br />
open the door with the inner door handle:<br />
1. Pull inner door handle once to unlock door<br />
lock.<br />
2. Pull inner door handle again to open door.<br />
Automatic relocking<br />
If the car is unlocked by remote control and none<br />
of the car doors is opened within approx.<br />
100 seconds, automatic relocking takes place.<br />
This relocking time can be adapted to your individual<br />
requirements (10 - 100 seconds) by an authorized<br />
Porsche dealer.<br />
Emergency operation – opening<br />
f Unlock the driver’s door with the key at the<br />
door lock.<br />
Emergency operation – closing<br />
f Lock the driver’s door with the key at the door<br />
lock.<br />
If there is a defect in the central locking<br />
system, all functioning elements of the central<br />
locking system will be locked.<br />
The fault should be remedied immediately at an<br />
authorized Porsche dealer.<br />
Indication by emergency flasher<br />
If the remote control is used for unlocking or<br />
locking, a response is provided by the emergency<br />
flasher:<br />
– Unlocking – single flash.<br />
– Locking – double flash.<br />
Overload protection<br />
If the central locking system is operated more<br />
than ten times within a minute, further operation is<br />
blocked for 30 seconds.<br />
Operation, Safety 19
Central locking switch<br />
The central locking switch on the dashboard lets<br />
you lock and unlock both doors electrically.<br />
Note<br />
If the doors are locked with the key or remote<br />
control, they can not be opened by pressing the<br />
central locking switch.<br />
20 Operation, Safety<br />
Locking<br />
f Press the rocker-switch.<br />
Indicator light in the rocker switch lights up if<br />
ignition is on.<br />
If the doors were locked with the central<br />
locking switch, they can be opened by pulling<br />
the inner door handle twice.<br />
Unlocking<br />
f Press the rocker-switch.<br />
Indicator light goes off.<br />
Automatic door locking<br />
Your authorized Porsche dealer can program<br />
diverse types of automatic door locking in the<br />
control unit of the central locking system.<br />
Type 1<br />
Doors lock automatically when the ignition is<br />
switched on.<br />
Type 2<br />
Doors lock automatically when a speed of<br />
3 - 6 mph (5 - 10 km/h) is exceeded.<br />
Type 3<br />
Doors lock automatically when the ignition is<br />
switched on. If doors are opened with the engine<br />
running, they lock again automatically when a<br />
speed of 3 - 6 mph (5 - 10 km/h) is exceeded.<br />
Type 4<br />
The doors do not lock automatically.<br />
Note<br />
Automatically locked doors can be unlocked with<br />
the central locking button or opened by pulling on<br />
the inside door handle twice.<br />
On vehicles with the Sport Chrono Package Plus,<br />
the PCM can be used to activate automatic door<br />
locking.<br />
f Please see the chapter ”Individual Memory“ in<br />
the separate PCM operating instructions.<br />
Warning!<br />
In an emergency situation where you need to<br />
exit the car through an automatically locked<br />
door, remember the following procedure to<br />
open the door.<br />
f Unlock the doors by pressing the central<br />
locking button or<br />
f pull the inside door handle twice to open the<br />
door.
Central Locking in Cars with Alarm<br />
System<br />
This device complies with:<br />
Part 15 of the FCC Rules<br />
RSS-210 of Industry Canada.<br />
Operation is subject to the following two conditions:<br />
1. This device may not cause harmful interference,<br />
and<br />
2. this device must accept any interference received,<br />
including interference that may cause<br />
undesired operation.<br />
Note<br />
The manufacturer is not responsible for any radio<br />
or TV interference caused by unauthorized modifications<br />
to this equipment.<br />
Such modification could void the user’s authority<br />
to operate the equipment.<br />
Warning!<br />
Any changes or modifications not expressly approved<br />
by Porsche could void the user’s authority to<br />
operate this equipment.<br />
f Please see the chapter “LOAD SWITCH-OFF AF-<br />
TER 2 HOURS OR 7 DAYS” on Page 236.<br />
f Please see the chapter “SEAT MEMORY” on<br />
Page 35.<br />
Both car doors and the filler flap can be centrally<br />
unlocked or locked with the remote control.<br />
A short signal from the alarm horn will draw<br />
your attention to the fact that the following<br />
components are not completely closed when you<br />
try to lock the vehicle:<br />
– Driver’s door (The vehicle cannot be locked if<br />
the driver’s door is not completely closed)<br />
– Passenger’s door<br />
– Luggage compartment lids<br />
– Glove compartment<br />
Unlocking the vehicle by using the key in the door<br />
lock and opening the door may activate the alarm<br />
system within 10 seconds.<br />
Note<br />
On vehicles with the Sport Chrono Package Plus,<br />
the PCM can be used to activate automatic door<br />
locking.<br />
f Please see the chapter ”Individual Memory“ in<br />
the separate PCM operating instructions.<br />
Automatic relocking<br />
If the car is unlocked by remote control and none<br />
of the car doors is opened within approx.<br />
100 seconds, automatic relocking takes place.<br />
This relocking time can be adapted to your individual<br />
requirements (10 - 100 seconds) by an authorized<br />
Porsche dealer.<br />
Operation, Safety 21
Locking conditions<br />
f Lock car once.<br />
The doors cannot be opened from the outside.<br />
Alarm system and passenger compartment<br />
monitoring are switched on.<br />
If a person or animal remains in the vehicle:<br />
f Quickly lock car twice:<br />
The doors cannot be opened from the outside.<br />
The passenger compartment monitoring is<br />
switched off.<br />
Unlocking the door with the inner door<br />
handle<br />
Any person remaining in the locked car can open<br />
the door with the inner door handle:<br />
1. Pull inner door handle once to unlock door<br />
lock.<br />
2. Pull inner door handle again to open door.<br />
Note<br />
f Inform any person remaining in the car that the<br />
alarm system will be triggered if the door is<br />
opened.<br />
22 Operation, Safety<br />
Emergency operation – opening<br />
f Unlock the driver’s door with the key at the<br />
door lock.<br />
Open door within 20 seconds and insert the<br />
ignition key into the ignition lock within<br />
10 seconds to prevent the alarm system from<br />
being triggered.<br />
Note on operation<br />
If the door is not opened within approx.<br />
20 seconds, automatic relocking takes place.<br />
The alarm system will be triggered by the next<br />
unlocking of the door:<br />
f Insert the ignition key into the ignition lock to<br />
switch off the alarm system.<br />
Emergency operation – closing<br />
f Lock the driver’s door with the key at the door<br />
lock.<br />
If there is a defect in the central locking<br />
system, all functioning elements of the central<br />
locking system will be locked.<br />
The alarm system is switched on.<br />
The passenger compartment monitoring<br />
system is switched off.<br />
The fault should be remedied immediately at an<br />
authorized Porsche dealer.
Indication by emergency flasher and<br />
alarm horn<br />
If the remote control is used for unlocking or<br />
locking, a response is provided by the emergency<br />
flasher:<br />
– Unlocking – single flash.<br />
– Locking – double flash.<br />
– Locking twice – continuous illumination for<br />
approx. 2 seconds. The passenger compartment<br />
monitoring is switched off.<br />
Central locking switch<br />
The central locking switch on the dashboard lets<br />
you lock and unlock both doors electrically.<br />
Note<br />
If the doors are locked with the key or remote<br />
control, they can not be opened by pressing the<br />
central locking switch.<br />
Locking<br />
f Press the rocker-switch.<br />
Indicator light lights up if ignition is on.<br />
Unlocking<br />
f Press the rocker-switch.<br />
Indicator light goes out.<br />
If the doors were locked with the central locking<br />
switch, they can be opened by pulling the inner<br />
door handle:<br />
1. Pull inner door handle once to unlock door<br />
lock.<br />
2. Pull inner door handle again to open door.<br />
Operation, Safety 23
Automatic door locking<br />
Your authorized Porsche dealer can program<br />
diverse types of automatic door locking in the<br />
control unit of the central locking system.<br />
Type 1<br />
Doors lock automatically when the ignition is<br />
switched on.<br />
Type 2<br />
Doors lock automatically when a speed of<br />
3 - 6 mph (5 - 10 km/h) is exceeded.<br />
Type 3<br />
Doors lock automatically when the ignition is<br />
switched on. If doors are opened with the engine<br />
running, they lock again automatically when a<br />
speed of 3 - 6 mph (5 - 10 km/h) is exceeded.<br />
Type 4<br />
The doors do not lock automatically.<br />
24 Operation, Safety<br />
Note<br />
Automatically locked doors can be unlocked with<br />
the central locking button or opened by pulling on<br />
the inside door handle twice.<br />
On vehicles with the Sport Chrono Package Plus,<br />
the PCM can be used to activate automatic door<br />
locking.<br />
f Please see the chapter ”Individual Memory“ in<br />
the separate PCM operating instructions.<br />
Warning!<br />
In an emergency situation where you need to<br />
exit the car through an automatically locked<br />
door, remember the following procedure to<br />
open the door.<br />
f Unlock the doors by pressing the central<br />
locking button or<br />
f pull the inside door handle twice to open the<br />
door.<br />
Fault indication<br />
A double horn signal during locking indicates a<br />
defect in the central locking or alarm system.<br />
f Have the defect remedied at an authorized<br />
Porsche dealer.<br />
Overload protection<br />
If the central locking system is operated more<br />
than ten times within a minute, further operation is<br />
blocked for 30 seconds.
A - Light-emitting diode for alarm system<br />
Alarm System,<br />
Passenger Compartment<br />
Monitoring<br />
This device complies with:<br />
Part 15 of the FCC Rules<br />
RSS-210 of Industry Canada.<br />
Operation is subject to the following two conditions:<br />
1. This device may not cause harmful interference,<br />
and<br />
2. this device must accept any interference received,<br />
including interference that may cause<br />
undesired operation.<br />
Note<br />
The manufacturer is not responsible for any radio<br />
or TV interference caused by unauthorized modifications<br />
to this equipment.<br />
Such modification could void the user’s authority<br />
to operate the equipment.<br />
Warning!<br />
Any changes or modifications not expressly approved<br />
by Porsche could void the user’s authority<br />
to operate this equipment.<br />
The alarm system and passenger compartment<br />
monitoring system are switched on when the<br />
doors are locked with the key or remote control.<br />
f Please see the chapter “CENTRAL LOCKING IN<br />
CARS WITH ALARM SYSTEM” on Page 21.<br />
Unlocking the vehicle by using the key in the<br />
door lock and opening the door may activate<br />
the alarm system within 10 seconds.<br />
Switching off the alarm system if it is<br />
triggered accidentally<br />
f Unlock the vehicle with the remote control by<br />
pressing button 1.<br />
The alarm system and passenger compartment<br />
monitoring system are switched off automatically<br />
when the doors are unlocked.<br />
Function indication<br />
If the alarm system is activated, light-emitting<br />
diode A in the central locking switch flashes.<br />
If, after locking, the light-emitting diode does not<br />
flash or, after ten seconds, it emits double flashes,<br />
then not all alarm contacts are closed.<br />
Additionally, a brief horn signal sounds.<br />
When the doors are unlocked, the alarm system<br />
and passenger compartment monitoring system<br />
are switched off and the light-emitting diode goes<br />
off.<br />
Operation, Safety 25
When the alarm is armed, the following<br />
areas are monitored<br />
– Doors<br />
– Front and rear lids<br />
– Glove compartment<br />
– Passenger compartment<br />
If one of these alarm contacts is interrupted, the<br />
alarm horn sounds for approximately 3 minutes.<br />
Additionally, the emergency flasher flashes and<br />
the passenger compartment light lightes for approximately<br />
five minutes.<br />
When the alarm is triggered, the light-emitting<br />
diode changes over to double flashes.<br />
In order not to limit the action range of the passenger<br />
compartment monitoring system:<br />
f Do not fold the seat backrests forward.<br />
26 Operation, Safety<br />
Deactivating the passenger compartment<br />
monitoring system for one locking<br />
process<br />
If a person or animal remains in the car while it is<br />
locked, the passenger compartment monitoring<br />
system must be switched off.<br />
f Quickly lock car twice.<br />
The doors are locked but can be opened from<br />
the inside:<br />
1. Pull inner door handle once to unlock door<br />
lock.<br />
2. Pull inner door handle again to open door.<br />
Note<br />
f Inform any person remaining in the car that the<br />
alarm system will be triggered if the door is<br />
opened.<br />
Fault indication<br />
A double horn signal during locking indicates a<br />
defect in the central locking or alarm system.<br />
f Have the defect remedied at an authorized<br />
Porsche dealer.
A - Power window in driver’s door<br />
B - Power window in passenger’s door<br />
Power Windows<br />
Warning!<br />
Risk of injury when the door windows close.<br />
This applies especially if the windows are<br />
closed with the one-touch operation, because<br />
with this function the window goes up<br />
automatically.<br />
f Make sure that fingers, hands, arms or other<br />
parts are not in the way when the windows are<br />
closed.<br />
f Remove the ignition key to shut off power to<br />
the window switches when the vehicle is not<br />
attended by a responsible person. Uninformed<br />
persons could injure themselves by operating<br />
the power windows.<br />
f In case of danger, release the button on the<br />
car key immediately.<br />
f Do not leave children in the car unattended.<br />
Risk of an accident.<br />
f Do not put anything on or near the windows<br />
that may interfere with the driver’s vision.<br />
Readiness for operation of power windows<br />
– When the ignition is switched on<br />
(engine switched on or off) or<br />
– with doors closed and ignition key withdrawn,<br />
but only until door is first opened.<br />
One-touch operation for closing the door<br />
windows is available only when the ignition is<br />
switched on.<br />
Opening/closing windows<br />
The two rocker switches A and B in the driver’s<br />
door and the switch in the passenger’s door have<br />
a two-stage function:<br />
Opening<br />
f Press the rocker switch down to the first stage<br />
until the window has reached the desired<br />
position.<br />
Closing<br />
f Press the rocker switch upwards to the first<br />
stage until the window has reached the desired<br />
position.<br />
One-touch operation<br />
f Press the rocker switch upwards or<br />
downwards to the second stage.<br />
Window moves to its final position.<br />
Press again to stop the window in the desired<br />
position.<br />
One-touch operation for closing the passenger’s<br />
window is available once the window is approximately<br />
half-way closed.<br />
Operation, Safety 27
Anti-crushing protection<br />
If a side window is blocked during closing, it will<br />
stop and open again by about an inch.<br />
Warning!<br />
Risk of serious personal injuries.<br />
If the rocker switch is pressed again within<br />
10 seconds of the window being blocked, the<br />
window will close with its full closing force.<br />
Anti-crushing protection is disabled.<br />
f Once the anti-crushing protection acts to stop<br />
the window and opens it slightly, do not press<br />
the rocker switch again within 10 seconds<br />
without checking to make sure that nothing is<br />
blocking the path of the window.<br />
The window will close with full closing force.<br />
One-touch operation is disabled for 10 seconds<br />
after blockage of a side window.<br />
28 Operation, Safety<br />
Automatic window lowering<br />
f Please see the chapter “DOORS” on Page 18.<br />
Storing end position of the windows<br />
If the battery is disconnected and reconnected,<br />
the windows will not be raised automatically when<br />
the door is closed.<br />
1. Close the windows with the rocker switch<br />
once.<br />
2. Press the rocker switch upwards again to store<br />
the end position of the windows in the control<br />
unit.
Mirrors<br />
Inside mirror<br />
When the mirror is being adjusted, the anti-glare<br />
lever A must point forward.<br />
Basic position: lever forward<br />
Anti-glare position: lever back<br />
Door mirrors<br />
Before driving the vehicle, adjust the outside and<br />
inside mirrors.<br />
It is important for safe driving that you have clear,<br />
unobstructed vision to the rear.<br />
Warning!<br />
Risk of an accident, resulting in serious personal<br />
injury or death.<br />
f Do not put anything on or near the windows or<br />
the mirrors that may interfere with the driver’s<br />
vision.<br />
Risk of damage to the door mirrors when<br />
washing the vehicle in a car wash.<br />
f Fold in door mirrors before using the car wash.<br />
Adjusting door mirrors<br />
1. Switch on ignition.<br />
2. By turning the control switch A, select the driver’s<br />
side or the passenger’s side.<br />
3. Move the door mirror glasses in the appropriate<br />
direction by tilting the control switch.<br />
If the electrical adjustment facility fails<br />
f Adjust mirror by pressing on the mirror face.<br />
Automatically swivelling down mirror on<br />
the passenger’s side<br />
f Please see the chapter “PARKING AIDS” on<br />
Page 70.<br />
f Please see the chapter “SEAT MEMORY” on<br />
Page 35.<br />
Operation, Safety 29
Folding in door mirrors<br />
Warning!<br />
Danger of injury to fingers if the mirror<br />
accidentally flips back when being folded in.<br />
f Exercise extreme caution when folding in mirror<br />
by hand. Do not let go of the mirror before<br />
the locking lever is locked or the mirror is fully<br />
unfolded.<br />
30 Operation, Safety<br />
1. Push mirror towards the door window and<br />
continue to hold it (high spring force).<br />
2. Swivel the locking lever up to the stop and<br />
slowly let go of the mirror.<br />
Unfolding door mirrors<br />
1. Push mirror towards the door window and<br />
continue to hold it (high spring force). The<br />
locking lever disengages automatically.<br />
2. Move mirror back to unfolded position by hand.<br />
Do not let go of the mirror beforehand.<br />
A -Sensor<br />
B - Switch for automatic anti-glare operation<br />
C - Light-emitting diode<br />
Automatic Anti-Glare Interior<br />
Mirror and Door Mirror<br />
Sensors on the front and rear sides of the interior<br />
mirror measure the incident light.<br />
The mirrors automatically change to anti-glare position<br />
or revert to their normal state, depending on<br />
the light intensity.<br />
When reverse gear is selected, automatic antiglare<br />
operation is switched off.
Note<br />
The incident light in the area of the sensors must<br />
not be restricted, e.g. by stickers on the windshield.<br />
Switching off the automatic anti-glare<br />
operation<br />
f Press switch B.<br />
Light-emitting diode C goes out.<br />
Switching on the automatic anti-glare<br />
operation<br />
f Press switch B.<br />
Light-emitting diode C lights up.<br />
Warning!<br />
Risk of injury. Electrolyte fluid can emerge<br />
from a broken mirror glass.<br />
This fluid irritates the skin and eyes.<br />
f If the electrolyte fluid should come into contact<br />
with the eyes or skin, immediately rinse it off<br />
with clean water.<br />
See a doctor if necessary.<br />
Risk of damage to the paintwork, leather and<br />
plastic parts. Electrolyte fluid can be<br />
removed only while it is still wet.<br />
f Clean the affected parts with water.<br />
Rear Window Defogger,<br />
Door Mirror Heating<br />
The mirror heater is ready for operation when the<br />
ignition is on.<br />
Switching on<br />
f Press button.<br />
The light-emitting diode in the button lights up.<br />
After approx. 15 minutes, the heater switches off<br />
automatically.<br />
The heater can be switched back on by pressing<br />
the button again.<br />
Switching off<br />
f Press button.<br />
The light-emitting diode in the button goes out.<br />
Operation, Safety 31
Seat Adjustment and Head<br />
Restraints<br />
Warning!<br />
The seat may move unexpectedly if you<br />
attempt to adjust while driving. This could<br />
cause sudden loss of control, resulting in serious<br />
personal injury or death.<br />
f Do not adjust seats while the vehicle is in motion.<br />
The backrest locks must be engaged at all<br />
times while the vehicle is in motion.<br />
Safety belts only offer protection when the<br />
backrest is upright and the belts are properly<br />
positioned on the body.<br />
Improperly positioned safety belts or safety<br />
belts worn by passengers in an excessively<br />
reclined position can cause serious personal<br />
injury or death in an accident.<br />
f Do not operate the car with the driver or<br />
passenger backrests excessively reclined<br />
(see “Seat position”).<br />
Risk of injury if persons or animals are in the<br />
movement range of the seat during seat<br />
adjustment.<br />
f Adjust the seat so that no-one is put at risk.<br />
32 Operation, Safety<br />
Caution!<br />
Risk of damage to windshield, sun visor, etc.<br />
when the seat is adjusted or folded back or<br />
forward.<br />
f Adjust the seat so that the seat backrest is not<br />
in contact with any other object.<br />
The driver and passenger seats provide<br />
integrated head restraints in the backrests. The<br />
head restraints are not adjustable.<br />
Warning!<br />
All occupants, including the driver, should not<br />
operate a vehicle or sit in a vehicle's seat until the<br />
head restraints and backrests, respectively, are<br />
placed in their proper positions so that the risk of<br />
neck injuries is minimized in the event of a crash.<br />
For proper positioning of the head restraint, the<br />
seatback's inclination should be adjusted such<br />
that the head restraint is in an upright position.<br />
Driver and passenger should be seated upright<br />
and in the center of their seats.<br />
Seat position<br />
An ergonomically correct sitting position is<br />
important for safe and fatigue-free driving.<br />
We recommend the following procedure for adjusting<br />
the driver’s seat to suit individual<br />
requirements:<br />
1. Vehicles with manual transmission:<br />
Adjust the seat until, with the clutch pedal fully<br />
depressed, your leg remains at a slight angle.<br />
Vehicles with Porsche Doppelkupplung<br />
(PDK):<br />
Adjust the seat until, with your left foot on the<br />
footrest, your left leg remains at a slight angle.<br />
2. Rest your outstretched arm on the steering<br />
wheel.<br />
Set the backrest angle (not applicable for<br />
Sports bucket seat) and the steering-wheel<br />
position so that your wrist rests on the outer<br />
rim of the steering wheel. At the same time,<br />
the shoulders must still be in noticeable<br />
contact with the backrest.<br />
3. Adjust the seat height (not applicable for<br />
Sports bucket seat) to give yourself enough<br />
headroom and a good overview of the vehicle.<br />
4. Electrically adjustable seat:<br />
Adjust the seat angle until your thighs rest<br />
lightly on the seat cushion.
Standard seat/sports seat<br />
A Seat height<br />
f Use lever A in a pumping movement:<br />
Upwards – seat moves upwards<br />
Downwards – seat moves downwards<br />
B Fore and aft<br />
f Raise locking lever B.<br />
Move seat to desired position and release<br />
lever.<br />
Ensure that the seat engages correctly.<br />
C Backrest angle<br />
f Operate switch C until the desired backrest<br />
angle is reached.<br />
Comfort seat with driver seat memory/<br />
Adaptive sports seat with driver seat<br />
memory<br />
f Press the switch in the direction indicated by<br />
the arrow until the desired setting is reached.<br />
A Seat height adjustment<br />
B Fore-and-aft position adjustment<br />
C Seat angle adjustment<br />
D Backrest angle adjustment<br />
E Lumbar support<br />
(pelvis and spinal column support)<br />
To permit a relaxed sitting posture, the backrest<br />
curvature is continuously adjustable in vertical and<br />
horizontal directions for individual pelvis and<br />
spinal column support.<br />
f Press the switch in the direction indicated by<br />
the arrow until the desired backrest curvature<br />
is reached.<br />
F Adjusting the backrest side bolsters<br />
(adaptive sports seat only)<br />
f Push forward or pull backward switch F until<br />
the side bolsters are adjusted to the shape of<br />
the body.<br />
G Adjusting the seat cushion side bolsters<br />
(adaptive sports seat only)<br />
f Push forward or pull backward switch G until<br />
the side bolsters are adjusted to the shape of<br />
the body.<br />
Seat backrest<br />
Folding forward<br />
f Pull up lever H in the side part of the backrest<br />
and fold the backrest forward.<br />
Folding back<br />
f Tilt back and engage the backrest so that it<br />
cannot tip forward when the car is braked.<br />
Operation, Safety 33
Sports bucket seat<br />
f Do not install a child restraint system in<br />
the Sports bucket seat.<br />
The Sports bucket seat cannot be<br />
equipped with the LATCH system.<br />
A Fore and aft adjustment<br />
f Raise locking lever A.<br />
Move seat to desired position and release<br />
lever.<br />
Ensure that the seat engages correctly.<br />
34 Operation, Safety<br />
B Backrest<br />
Folding forward<br />
f Pull loop B in the side part of the backrest and<br />
fold the backrest forward.<br />
Folding back<br />
f Tilt back and engage the backrest so that it<br />
cannot tip forward when the car is braked.
M - Memory button<br />
1 - Key button<br />
2, 3 - Person buttons<br />
Seat Memory<br />
Individual seat and door mirror settings can be<br />
stored and recalled for the driver’s position.<br />
You cannot store the position of the side bolsters<br />
of the adaptive sports seat.<br />
Further individual setting options are available in<br />
vehicles with the Sport Chrono Package Plus.<br />
f Please observe the chapter “Individual<br />
Memory” in the separate PCM operating<br />
instructions.<br />
Warning!<br />
Risk of crushing due to uncontrolled recall of<br />
a seat setting.<br />
f Cancel automatic adjustment by pressing any<br />
of the seat adjustment buttons.<br />
f Do not leave children in the vehicle unattended.<br />
Operation with person buttons 2, 3<br />
Storing seat position<br />
1. Switch on ignition.<br />
Reverse gear must not be engaged.<br />
2. Set the desired seat and door-mirror positions.<br />
3. Keep memory button M depressed and also<br />
press person button 2 or 3 until an audible<br />
signal confirms that the position has been<br />
stored.<br />
The individual setting is now stored under the<br />
desired person button.<br />
Recalling seat position<br />
The seat position can only be called up when the<br />
vehicle is stationary.<br />
1. Switch on the ignition or<br />
open the driver’s door.<br />
2. Press person button until the seat has reached<br />
its final position.<br />
The setting of door mirrors and lumbar<br />
support will be completed even if the person<br />
button is not kept depressed.<br />
Note<br />
Automatic seat adjustment can be interrupted<br />
immediately by releasing the button.<br />
Operation, Safety 35
Operating with the remote control of the<br />
vehicle key<br />
Each remote control (up to six) can be assigned an<br />
individual seat and door mirror position.<br />
The stored seat and door mirror position is set automatically<br />
when the vehicle is unlocked using the<br />
corresponding remote control.<br />
Storing seat position<br />
1. Switch the ignition on with the desired car key.<br />
Reverse gear must not be engaged.<br />
2. Set the desired seat and door-mirror positions.<br />
3. Keep memory button M depressed and also<br />
press key button 1 until an audible signal<br />
confirms that the position has been stored.<br />
The individual setting is now assigned to this<br />
remote control and to the key button.<br />
It is necessary to wait for at least 15 seconds<br />
between locking and unlocking the door.<br />
36 Operation, Safety<br />
Storing individual lowered position of the<br />
passenger’s door mirror as a parking aid<br />
Once the driver's seat setting has been stored, an<br />
individual lowered position of the passenger's<br />
door mirror may be stored for driving in reverse:<br />
1. Apply the handbrake.<br />
2. Switch the ignition on with the desired car key.<br />
3. Engage reverse gear.<br />
4. Select passenger side with mirror switch.<br />
The passenger’s mirror swivels downwards.<br />
5. Set passenger’s door mirror to desired final<br />
position.<br />
6. Keep memory button M depressed and also<br />
press key button 1 until an audible signal<br />
confirms that the position has been stored.<br />
The individual setting is now assigned to this<br />
remote control and to the key button.<br />
Recalling seat position<br />
f Unlock the locked vehicle or the luggage<br />
compartment with the remote control.<br />
The stored seat position is automatically set.<br />
The seat position assigned to a remote control<br />
can also be recalled with the key button 1 if the<br />
corresponding key was used to switch on the<br />
ignition.<br />
If no seat position has been assigned to a remote<br />
control, the key button will not work.<br />
Note on operation<br />
Automatic seat adjustment can be interrupted<br />
immediately:<br />
f by switching on the ignition,<br />
f by pressing the central locking button,<br />
f by pressing any memory or seat adjustment<br />
button.<br />
Clearing the stored seat position<br />
1. Switch the ignition on with the desired car key.<br />
2. Press memory button twice and key button 1<br />
once consecutively.
A - Seat heating, left<br />
B -Seat heating, right<br />
Heated Seats<br />
Two-stage seat heating is ready for operation<br />
when the engine is running.<br />
The yellow light-emitting diodes in the button show<br />
witch stage is currently activated.<br />
Switching on<br />
High heating power<br />
f Press button once.<br />
Both yellow light-emitting diodes in the button<br />
light up.<br />
Low heating power<br />
f Press button twice.<br />
One yellow light-emitting diode in the button<br />
lights up.<br />
Switching off<br />
f Press button as often as necessary until the<br />
light-emitting diodes go out.<br />
Operation, Safety 37
Seat Ventilation<br />
The three-stage seat ventilation is ready for operation<br />
when the engine is running and from an<br />
ambient cabin temperature of 58 °F (15 °C).<br />
The three stages are controlled with the buttons<br />
on the control panel for the air conditioning.<br />
The blue light-emitting diodes in the buttons show<br />
which stage is currently activated.<br />
Note<br />
The full effect of the seat ventilation can be<br />
achieved only if you are wearing breathable<br />
clothing.<br />
Seat ventilation and seat heating can be used at<br />
the same time and provide excellent seating<br />
comfort when used in the right combination.<br />
f Do not use protective seat covers.<br />
Switching on seat ventilation<br />
High ventilation<br />
f Press button once.<br />
Three light-emitting diodes light up.<br />
Medium ventilation<br />
f Press button twice.<br />
Two light-emitting diodes light up.<br />
38 Operation, Safety<br />
A - Seat ventilation, left<br />
B - Seat ventilation, right<br />
Low ventilation<br />
f Press button three times.<br />
One light-emitting diode lights up.<br />
Switching off seat ventilation<br />
f Press button as often as necessary until all<br />
light-emitting diodes go out.<br />
Steering Wheel Adjustment<br />
Warning!<br />
Risk of accident.<br />
The steering wheel may move further than<br />
desired if you attempt to adjust it when<br />
driving.<br />
You can lose control of the vehicle, causing<br />
serious personal injury or death.<br />
f Do not adjust the steering wheel when driving.
Adjusting steering wheel height and<br />
longitudinal direction<br />
1. Insert ignition key fully into ignition lock.<br />
2. Push the locking lever downwards.<br />
3. Adjust steering wheel to fit the chosen<br />
backrest angle and your seat position by<br />
moving the steering wheel up or down and<br />
longitudinally.<br />
4. Swivel locking lever back until you feel it engage.<br />
If necessary, move steering wheel slightly longitudinally.<br />
Steering Wheel Heating<br />
The steering wheel heating can be switched on<br />
and off with the button on the rear of the steering<br />
wheel when the ignition is switched on.<br />
Switching on steering wheel heating<br />
f Press button.<br />
The message “Steering wheel heating ON”<br />
is displayed on the on-board computer for<br />
2seconds.<br />
Switching off steering wheel heating<br />
f Press button.<br />
The message “Steering wheel heating OFF”<br />
is displayed on the on-board computer for<br />
2seconds.<br />
Operation, Safety 39
Multi-Functional Steering Wheel<br />
Warning!<br />
There is a danger of accident if you set or<br />
operate the on-board computer, radio,<br />
navigation system, telephone or other<br />
equipment when driving.<br />
Operating these devices while driving could<br />
distract you from traffic and cause you to<br />
lose control of the vehicle.<br />
f Operate these components while driving only if<br />
the traffic situation allows you to do so safely.<br />
f Carry out any complicated operating or setting<br />
procedures only while the vehicle is stationary.<br />
Depending on the equipment in your vehicle, you<br />
can use the function keys of the multi-functional<br />
steering wheel to operate the following Porsche<br />
communication systems:<br />
– PCM<br />
– Telephone<br />
– Radio with CD-Drive<br />
– CD-Audio<br />
40 Operation, Safety<br />
Readiness for operation of multifunctional<br />
steering wheel<br />
The multi-functional steering wheel is ready for<br />
operation when the ignition and PCM are switched<br />
on.<br />
Operating the function keys<br />
f Please read the separate PCM operating<br />
instructions before operating the function<br />
keys.<br />
The rotary knobs at the top left and right of the<br />
steering wheel can also be pressed.<br />
Turn volume control<br />
Upwards – increase volume.<br />
Downwards – decrease volume.<br />
Press volume control<br />
To switch volume/mute on and off.<br />
Turn rotary knob<br />
To select/mark function in the PCM within<br />
a menu. To do this, turn the rotary knob<br />
upward or downward.<br />
Press rotary knob<br />
To activate selected function.<br />
Press screen button<br />
To call the stored PCM function.<br />
The button can be assigned the desired<br />
function in the PCM.<br />
Press Back button<br />
To move back in the PCM menu.<br />
Press Handset Pickup button<br />
To accept a telphone call.<br />
Press Handset Hangup button<br />
To end or refuse a telephone call.
Sun Visors<br />
f Swing the sun visors down to prevent glare<br />
from the front.<br />
Vanity mirror<br />
The vanity mirror on the rear of the sun visor is<br />
covered by a lid.<br />
Warning!<br />
Risk of injury in an accident or risk of damage<br />
to mirror lid.<br />
f Keep the lid closed while driving.<br />
Risk of damage.<br />
f Do not force the lid beyond its end position.<br />
The vanity mirror illumination is switched on automatically<br />
when the cover is opened (arrow).<br />
Operation, Safety 41
Safety Belts<br />
Warning!<br />
Always make sure your and your passenger’s<br />
safety belts are properly fastened while the<br />
vehicle is in motion.<br />
Failure to follow safety belt warnings may result<br />
in serious personal injury or death.<br />
f For your and your passenger’s protection, use<br />
safety belts at all times while the vehicle is in<br />
motion.<br />
f Use appropriate child restraint systems for all<br />
small children.<br />
Proper wearing of safety belts<br />
f Safety belts must be positioned on the body as<br />
to restrain the upper body and lap from sliding<br />
forward. Improperly positioned safety belts<br />
can cause serious personal injury or death in<br />
case of an accident.<br />
f The shoulder belt should always rest on your<br />
upper body. The shoulder belt should never be<br />
worn behind your back or under your arm.<br />
f For maximum effectiveness, the lap belt<br />
should be worn low across the hips.<br />
f Pregnant women should position the belt as<br />
low as possible across the pelvis. Make sure it<br />
is not pressing against the abdomen.<br />
42 Operation, Safety<br />
f Belts should not be worn twisted.<br />
f Do not wear belts over rigid or breakable objects<br />
in or on your clothing, such as eye glasses,<br />
pens, keys, etc. as these may cause injury.<br />
f Several layers of heavy clothing may interfere<br />
with proper positioning of belts.<br />
f Belts must not rub against sharp objects or<br />
damage may occur to the belt.<br />
f Two occupants should never share the same<br />
belt at the same time.<br />
Care and maintenance<br />
f Keep belt buckles free of any obstruction that<br />
may prevent a secure locking.<br />
f Belts that have been subjected to excessive<br />
stretch forces in an accident must be inspected<br />
or replaced to ensure their continued effectiveness<br />
in restraining you.<br />
The same applies to belt tensioner systems<br />
which have been triggered.<br />
In addition, the anchor points of the belts<br />
should be checked.<br />
f If safety belts do not work properly, see your<br />
authorized Porsche dealer immediately.<br />
f If the belts show damage to webbing, bindings,<br />
buckles or retractors, they should be replaced<br />
to ensure safe operation.<br />
f Do not modify or disassemble the safety belts<br />
in your vehicle.<br />
f The belts must be kept clean or the retractors<br />
may not work properly.<br />
Please see the chapter “CAR CARE INSTRUC-<br />
TIONS” on Page 203.<br />
f Never bleach or dye safety belts.<br />
f Do not allow safety belts to retract until they<br />
are completely dry after cleaning or this may<br />
cause damage to the belt.<br />
Belt tensioner<br />
Depending on the force of an impact, fastened<br />
safety belts are tightened in an accident.<br />
The belt tensioners are triggered in:<br />
– Front, side and rear impacts of sufficient<br />
severity.<br />
Note<br />
The belt-tensioner system can be triggered only<br />
once; the system must be replaced afterward.<br />
If there is a fault in the belt-tensioner system, the<br />
airbag warning light lights up.<br />
Work may be performed on the belt-tensioner system<br />
only by an authorized Porsche dealer.<br />
Smoke is released when the belt tensioners are<br />
triggered. This does not indicate a fire in the<br />
vehicle.
Safety Belt Warning System<br />
An audio-visual warning system is interconnected<br />
with the driver’s safety belt.<br />
Every time the ignition is turned on, the gong will<br />
sound for about 6 seconds to remind driver and<br />
passenger to buckle up.<br />
In addition, the gong will sound for approx. 90 seconds<br />
if vehicle speed exceeds 15 mph/24 km/h.<br />
The safety belt warning lights in the instrument<br />
panel and on-board computer will go off as soon<br />
as the driver has buckled up.<br />
Inertia reel retractor<br />
The combination lap/shoulder belt with inertia reel<br />
locking mechanism adjusts automatically to your<br />
size and movements as long as the pull on the belt<br />
is slow.<br />
Rapid deceleration during hard braking or a collision<br />
locks the belt. The belt will also lock when you<br />
drive up or down a steep hill or in a sharp curve,<br />
otherwise, the shoulder belt will not inhibit your<br />
upper body movement.<br />
Fastening the safety belt<br />
f Assume a comfortable sitting position.<br />
f Please see the chapter “SEAT POSITION” on<br />
Page 32.<br />
f The shoulder belt should always rest on your<br />
upper body. The shoulder belt should never be<br />
worn behind your back or under your arm.<br />
f Grasp belt and pull the belt in a continuous<br />
slow motion across your chest and lap.<br />
f Insert belt tongue into buckle on inboard side<br />
of seat. Push down until it securely locks with<br />
an audible click. Pull the belt to check.<br />
f Pull shoulder section to make sure belt fits<br />
snugly across the pelvis.<br />
f Belts should fit snugly across the pelvis and<br />
chest. Make sure there is no slack in the belt.<br />
Releasing the safety belt<br />
f Push in release button (arrow) on buckle. Belt<br />
tongue will spring out of buckle.<br />
f To release a latched belt, lean back to take the<br />
body pressure off the belt.<br />
f To store lap/shoulder belt, allow the belt to retract<br />
as you guide the latch to its stowed position.<br />
f Please see the chapter “AUTOMATIC LOCKING<br />
RETRACTOR” on Page 52.<br />
Cleaning the safety belts<br />
If it becomes necessary to clean the belts, you<br />
can use any mild washing agent. Allow the belts to<br />
dry prior to retracting, but avoid direct sunlight.<br />
f Only use suitable cleaners. If unsuitable<br />
cleaners are used or any attempt is made to<br />
dye or bleach the belts, the webbing may be<br />
weakened and thus constitute a safety risk.<br />
Operation, Safety 43
Airbag Systems<br />
The airbags in combination with the safety belts<br />
make up a safety system which offers the driver<br />
and the passenger the greatest known protection<br />
from injuries in case of accident.<br />
Your vehicle is equipped with a weight sensing system<br />
for the passenger's seat in accordance with<br />
U.S. Federal Motor Vehicle Safety Standard 208.<br />
Even if your vehicle is equipped with airbags, the<br />
safety belts must be worn at all times,<br />
because the front airbag system is only deployed<br />
by frontal collisions with an impact of sufficient<br />
severity.<br />
Below the deployment threshold of the airbag system,<br />
and during types of collisions which do not<br />
cause the actuation of the system, the safety belts<br />
provide the primary protection to the occupants<br />
when correctly worn.<br />
Therefore, all persons within the vehicle<br />
must wear safety belts at all times (in many<br />
states, state law requires the use of safety belts).<br />
f Please see the chapter “SAFETY BELTS” on<br />
Page 42.<br />
The front airbags are located under the padded<br />
steering wheel panel on the driver’s side and, on<br />
the passenger's side, in the dashboard.<br />
The side airbags are installed on the side in the<br />
seat backrests.<br />
The head airbags are installed in the door linings.<br />
44 Operation, Safety<br />
Danger!<br />
To provide optimal occupant protection, airbags<br />
must inflate at very high speed. If you<br />
are not wearing your safety belt or are too<br />
close to the airbag when it is deployed, inflating<br />
airbags can result in serious personal injury<br />
or death.<br />
f Make sure there are no people, animals or objects<br />
between the driver or passenger and the<br />
area into which the airbag inflates.<br />
f Sit back as far from the dashboard or steering<br />
wheel as is practical, while still maintaining full<br />
vehicle control.<br />
f Always hold the steering wheel by the outer<br />
rim. Never rest your hands on the airbag panel.<br />
f Always fasten seat belts because triggering<br />
of the airbag system depends on the force and<br />
angle of impact.<br />
f Do not transport heavy objects on or in front of<br />
the passenger’s seat. These could impair the<br />
function of the airbag, the seat belts, and<br />
weight sensing.<br />
f Do not hang objects (e.g. jackets, coats, coat<br />
hangers) over the backrest.<br />
f Always keep the lid of the door storage compartment<br />
closed. Objects must not protrude<br />
out of the door storage compartment.<br />
f No changes may be made to the wiring or<br />
components of the airbag system.<br />
f Do not add any additional coverings or stickers<br />
to the steering wheel or in the area of the passenger<br />
airbag, side airbags and head airbags.<br />
Doing so may adversely affect the functioning<br />
of the airbag system or cause harm to the occupants<br />
if the airbag system should deploy.<br />
Do not use protective seat covers.<br />
f Do not modify the seat coverings. Do not attach<br />
additional cushions, protective coverings,<br />
or pillows to the passenger's seat. Do not affix<br />
things to the passenger's seat or cover it with<br />
other materials. Do not cover the back of the<br />
backrest. Do not make changes to the passenger's<br />
seat and to the seat base frame.<br />
f Do not undertake any wiring for electrical accessory<br />
equipment in the vicinity of the airbag<br />
wiring harnesses. Doing so may disable the airbag<br />
system or cause inadvertent inflation.<br />
f If the warning light comes on, the airbag system<br />
should be repaired immediately by your<br />
authorized Porsche dealer.<br />
f Always keep feet in the footwell while driving.<br />
Do not put feet on the dashboard or the seat<br />
area. Do not lean against the inside of the door<br />
or outside the window while the vehicle is moving.
f Using accessories not approved by Porsche<br />
can cause the weight sensing system to be impaired.<br />
f Do not squeeze objects, such as the fire extinguisher,<br />
or first aid kit under the seat.<br />
f Only have seats removed and installed by an<br />
authorized Porsche dealer so that weight sensing<br />
components will not be damaged.<br />
f Give your passenger all of the information in<br />
this chapter.<br />
Note<br />
Airbag components (e.g. steering wheel, door lining,<br />
seats) may be disassembled only by an authorized<br />
Porsche dealer.<br />
When disposing of a used airbag unit, our safety<br />
instructions must be followed. These instructions<br />
can be obtained at any authorized Porsche dealer.<br />
Function of the airbag system<br />
Airbags are a supplemental safety system. Your<br />
primary protection comes from your safety belts.<br />
The front airbags are triggered during a frontal<br />
collision of sufficient force and direction.<br />
In the event of a side impact of corresponding<br />
force, the side airbag on the impact side is<br />
triggered.<br />
The inflation process generates the amount of gas<br />
required to fill the airbags at the necessary pressure<br />
in fractions of a second.<br />
Airbags help to protect the head and upper body,<br />
while simultaneously damping the motion of the<br />
driver and passenger in the impact direction in the<br />
event of a frontal impact or side impact.<br />
In order to help provide protection in severe collisions<br />
which can cause death and serious injury,<br />
airbags must inflate extremely rapidly. Such high<br />
speed inflation has a negative but unavoidable<br />
side effect, which is that it can and does cause injuries,<br />
including facial and arm abrasions, bruising<br />
and broken bones. You can help minimize such injuries<br />
by always wearing your safety belts.<br />
There are many types of accidents in which airbags<br />
are not expected to deploy. These include<br />
accidents where the airbags would provide no benefit,<br />
such as a rear impact against your vehicle.<br />
Other accidents where the airbags are designed<br />
not to deploy are those where the risk of injury<br />
from the airbag deployment could exceed any protective<br />
benefits, such as in low speed accidents or<br />
higher speed accidents where the vehicle decelerates<br />
over a long time. Since airbag deployment<br />
does not occur in all accidents, this further emphasizes<br />
the need for you and your passenger to<br />
always wear safety belts.<br />
Your vehicle is equipped with a crash sensing and<br />
diagnostic module. This module will record the<br />
use of the seat belt restraint system by the driver<br />
and passenger when the airbags and/or belt tensioner<br />
work.<br />
Advanced Airbag<br />
Your vehicle is equipped with a weight sensing system<br />
for the passenger's seat in accordance with<br />
U.S. Federal Motor Vehicle Safety Standard 208.<br />
Depending on the weight acting on the passenger's<br />
seat, the passenger's airbag will automatically<br />
be switched on and off.<br />
Depending on the angle and force of impact, the<br />
passenger's airbag which is activated will be triggered<br />
during a collision.<br />
Precondition for switching the passenger's airbag<br />
on and off, depending on weight:<br />
– Vehicles equipped with key-operated airbag<br />
deactivation device:<br />
Switch position AUTO.<br />
– Ignition key is inserted.<br />
Improper handling of the weight sensing<br />
system can unintentionally impair switching<br />
the passenger's airbag off and on.<br />
Operation, Safety 45
Seat adjustment for the passenger's seat<br />
Danger!<br />
Safety belts only offer protection when the<br />
backrest is upright and the belts are properly<br />
positioned on the body. Improperly positioned<br />
safety belts can cause serious personal<br />
injury or death in an accident.<br />
f Do not operate the car with the driver or passenger<br />
backrest excessively reclined.<br />
f Porsche recommends the use of L.A.T.C.H.<br />
(Lower Ancorage and Tether for Children)<br />
equipped Porsche child seat.<br />
Do not install a child restraint system in<br />
the Sports bucket seat.<br />
The Sports bucket seat cannot be<br />
equipped with the LATCH system.<br />
If the seat is in an extreme position (e.g., the backrest<br />
is in contact with the engine compartment<br />
wall), the backrest can warp. Warping of the backrest<br />
can lead to malfunctions.<br />
f Correct the seat adjustment.<br />
Ensure that the seat is not jammed and is selfsupporting.<br />
Ensure that the backrest is in the upright position.<br />
46 Operation, Safety<br />
f Do not transport a load and objects behind and<br />
under the passenger's seat.<br />
If the load or objects are under the seat, it can<br />
cause malfunctions.<br />
If the weight on the passenger's seat is reduced<br />
significantly, e.g., by supporting weight on the<br />
armrest, the passenger's airbag can be switched<br />
off.<br />
f Select an upright seat position, and do not support<br />
weight on the armrests or lean out of the<br />
window.<br />
Always keep feet in the footwell while driving.<br />
Do not put feet on the dashboard or the seat<br />
area. Do not lean against the inside of the door<br />
or outside the window while the vehicle is moving.<br />
If the passenger's seat is warped significantly, a<br />
message is displayed on the on-board computer:<br />
f Correct the seat adjustment.<br />
f Please see the chapter “WARNINGS ON THE<br />
INSTRUMENT PANEL AND THE ON-BOARD<br />
COMPUTER” on Page 166.<br />
Vehicle modifications to accommodate<br />
persons with disabilities<br />
Because modifications to your vehicle could compromise<br />
your advanced airbag system, please call<br />
1-800-PORSCHE prior to having your vehicle modified.<br />
Automatic deactivation of the passenger’s<br />
airbags<br />
Danger!<br />
The use of a child restraint system in the passenger<br />
seat can result in serious personal<br />
injury or death to the child from an airbag<br />
deployment.<br />
f Please see the chapter “PASSENGER AIRBAG<br />
OFF INDICATOR LAMP DOES NOT LIGHT UP”<br />
on Page 47.<br />
f Before transporting a child on the passenger’s<br />
seat:<br />
Please see the chapter “CHILD RESTRAINT<br />
SYSTEMS” on Page 50.<br />
f Do not install a child restraint system in<br />
the Sports bucket seat.<br />
– When an up to one-year old child is seated<br />
in the child restraint system, the front airbag is<br />
automatically deactivated on the passenger<br />
side.<br />
– When an adult is seated in the front seat the<br />
front airbag remains active on the passenger‘s<br />
side.
PASSENGER AIRBAG OFF indicator lamp<br />
Note on operation<br />
Although not desired, it can occur in the case of<br />
heavier children that the passenger’s airbag<br />
remains active or, in the case of very light adults<br />
or young persons, that the passenger airbag is<br />
deactivated.<br />
The condition of the passenger’s front airbag is<br />
shown by the indicator lamp.<br />
If in doubt:<br />
f Please see the chapter “PASSENGER AIRBAG<br />
OFF INDICATOR LAMP DOES NOT LIGHT UP”<br />
on Page 47.<br />
f Please see the chapter “KEY-OPERATED AIR-<br />
BAG DEACTIVATION DEVICE” on Page 49.<br />
f Please see the chapter “CHILD RESTRAINT<br />
SYSTEMS” on Page 50.<br />
f Please see the chapter “LATCH SYSTEM<br />
CHILD SEAT BRACKET ON THE PASSENGER’S<br />
SEAT” on Page 53.<br />
Note<br />
f After inserting the ignition key, the PASSEN-<br />
GER AIRBAG OFF warning light lights up for a<br />
few seconds as a bulb check.<br />
PASSENGER AIRBAG OFF indicator lamp<br />
lights up<br />
– The passenger's airbag is switched off.<br />
PASSENGER AIRBAG OFF indicator lamp<br />
does not light up<br />
– The passenger's airbag is active and ready for<br />
operation.<br />
– If the passenger's seat is not occupied, the<br />
PASSENGER AIRBAG OFF indicator lamp will<br />
also not light up, even though the passenger's<br />
airbag is switched off.<br />
Danger!<br />
Risk of serious personal injury or death due<br />
to the passenger airbag triggering unintentionally.<br />
When the ignition key is inserted and the up<br />
to one-year old child is seated in the child restraint<br />
system on the passenger’s seat, the<br />
indicator lamp ”PASSENGER AIRBAG OFF“<br />
must be on.<br />
If the ”PASSENGER AIRBAG OFF“ indicator<br />
lamp does not light up, it could indicate a<br />
fault in the system.<br />
In this case:<br />
f On vehicles with key-operated airbag deactivation<br />
device: Switch to position OFF.<br />
f On vehicles without key-operated airbag deactivation<br />
device: Do not drive.<br />
f Have the fault remedied at your nearest authorized<br />
Porsche dealer.<br />
Operation, Safety 47
Note<br />
The key switch for switching off the passenger’s<br />
airbag in combination with the LATCH attachment<br />
bracket are not installed at the factory. They can<br />
be retrofitted.<br />
f Please see your authorized Porsche dealer.<br />
Warning light and warning<br />
message<br />
Faults are indicated by a warning light in the instrument<br />
panel and a message on the on-board computer.<br />
f Please see the chapter “WARNINGS ON THE<br />
INSTRUMENT PANEL AND THE ON-BOARD<br />
COMPUTER” on Page 166.<br />
f In the following cases you should immediately<br />
consult an authorized Porsche<br />
dealer in order to assure the airbag system<br />
is functioning properly:<br />
– If the warning light does not light up when the<br />
ignition key is inserted or<br />
– If the warning light does not go out once the<br />
engine is running or<br />
– If the warning light appears while driving.<br />
48 Operation, Safety<br />
Airbag maintenance<br />
In order to ensure long-term functioning, the airbag<br />
system must be inspected by an authorized<br />
Porsche dealer at the intervals recommended in<br />
your Maintenance Booklet.<br />
Important information<br />
If you sell your Porsche, notify the purchaser that<br />
the vehicle is equipped with airbags, and refer<br />
them to the chapter, “Airbag Systems“, in the<br />
Owner's Manual (safety and disposal rules).<br />
Further information on the airbag system can be<br />
found on stickers attached to the sun visors.<br />
For special recommendations on the use of child<br />
restraints:<br />
f Please see the chapter “CHILD RESTRAINT<br />
SYSTEMS” on Page 50.
Key-operated airbag deactivation device<br />
In case your vehicle is equipped with LATCH, you<br />
can switch off (OFF) the passenger’s front airbag<br />
manually. In the automatic mode (AUTO), the airbag<br />
will be switched on or off automatically depending<br />
on the weight on the passenger seat.<br />
f Switch off the passenger’s airbag on the key<br />
switch using the vehicle key.<br />
A Switch position AUTO – passenger’s front<br />
airbag is active<br />
B Switch position OFF – passenger’s front airbag<br />
is switched off<br />
PASSENGER AIRBAG OFF indicator lamp<br />
Danger!<br />
Risk of serious personal injury or death for<br />
passenger if passenger’s airbag remains<br />
switched off after the child restraint system<br />
is removed.<br />
f Make sure that the key switch is switched to<br />
AUTO once the child seat has been removed,<br />
in order to provide protection to the adult<br />
occupants.<br />
Warning light ”PASSENGER AIRBAG OFF“<br />
If the airbag on the passenger’s side is switched<br />
off:<br />
– Warning light “PASSENGER AIRBAG OFF” is<br />
continuously lit when the ignition key is<br />
inserted.<br />
Danger!<br />
Risk of serious personal injury or death from<br />
the passenger’s airbag.<br />
If the ”PASSENGER AIRBAG OFF“ warning<br />
light is not lit when the ignition key is inserted<br />
and the Airbag OFF switch is switched to the<br />
OFF-Position, this could indicate a fault in the<br />
system.<br />
f Do not install a child restraint system on the<br />
passenger’s seat.<br />
f Have the fault remedied immediately.<br />
Please see your authorized Porsche dealer.<br />
Note<br />
f Do not install a child restraint system in<br />
the Sports bucket seat.<br />
The key switch for switching off the passenger’s<br />
airbag in combination with the LATCH attachment<br />
bracket are not installed at the factory. They can<br />
be retrofitted (not on vehicles with Sports bucket<br />
seats).<br />
f Please see your authorized Porsche dealer.<br />
Operation, Safety 49
Child Restraint Systems<br />
f Do not install a child restraint system in<br />
the Sports bucket seat.<br />
The Sports bucket seat cannot be<br />
equipped with the LATCH system.<br />
Porsche recommends that all infants and children<br />
be restrained in child restraint systems at all times<br />
while the vehicle is in motion in accordance with<br />
applicable laws.<br />
Use only child restraint systems with the LATCHsystem<br />
recommended by Porsche. These systems<br />
have been tested and adjusted to the interior<br />
of your Porsche and the appropriate child weight<br />
groups. Other systems have not been tested and<br />
could entail an increased risk of injury or death.<br />
You can obtain child seats that are LATCH compatible<br />
at your authorized Porsche dealer.<br />
f Always see the separate installation<br />
instructions for your child seat.<br />
The use of infant or child restraints is required by<br />
law in all 50 states of the U.S. and all Canadian<br />
provinces. The child restraint system should be<br />
one that complies with U.S. Federal Motor Vehicle<br />
Safety Standards and should be secured by a lap<br />
belt or lap belt portion of a lap-shoulder belt or for<br />
child seats equipped with the LATCH sytem (Lower<br />
Anchorage and Tether for Children, also<br />
known as ISOFIX) to the LATCH anchorages.<br />
A statement by the seat manufacturer of compliance<br />
with this standard can be found on the instruction<br />
label on the restraint and in the instruc-<br />
50 Operation, Safety<br />
tion manual provided with the restraint.<br />
Danger!<br />
The use of a child restraint system in the passenger<br />
seat can result in serious personal injury<br />
or death to the child from an airbag<br />
deployment.<br />
To reduce risk of injury from an inflating airbag<br />
in an accident, Porsche strongly recommends:<br />
f Please see the chapter “PASSENGER AIRBAG<br />
OFF INDICATOR LAMP DOES NOT LIGHT UP”<br />
on Page 47.<br />
f Please see the chapter “CHILD RESTRAINT<br />
SYSTEMS” on Page 50.<br />
f Do not install a child restraint system in<br />
the Sports bucket seat.<br />
The Sports bucket seat cannot be<br />
equipped with the LATCH system.<br />
Note<br />
The key switch for switching off the passenger’s<br />
airbag and the LATCH attachment bracket are not<br />
installed at the factory. They can be retrofitted (not<br />
on vehicles with Sports bucket seats).<br />
f Please see your authorized Porsche dealer.<br />
Danger!<br />
Risk of serious personal injury or death to the<br />
child.<br />
f Follow all child restraint instructions and<br />
warnings in this manual.<br />
– When using an infant or child restraint system,<br />
be sure to follow all manufacturer's instructions<br />
on installation and use.<br />
– Infants and small children should never be held<br />
on the lap, nor should they share a safety belt<br />
with another occupant while the vehicle is in<br />
motion.<br />
– Children too big for child restraint systems<br />
should use regular safety belts. A shoulder belt<br />
can be used providing it does not cross the<br />
face or the neck of the child.<br />
– Choose a child restraint system according to<br />
the weight of the child.<br />
– Child restraint systems that are damaged or<br />
have been heavily stressed in an accident must<br />
be replaced immediately.<br />
– Children could be endangered in a crash if their<br />
child restrains are not properly secured in the<br />
vehicle.<br />
– Do not affix things to child restraint systems or<br />
cover it with other materials.
– Your authorized Porsche dealer will be glad to<br />
advise you about the installation possibility for<br />
a Porsche child restraint system which allows<br />
a key-operated airbag deactivation of the passenger’s<br />
airbag.<br />
– The key-operated airbag deactivation device<br />
installation requires special programming<br />
available only from your authorized Porsche<br />
dealer.<br />
f Please see the chapter “KEY-OPERATED AIR-<br />
BAG DEACTIVATION DEVICE” on Page 49.<br />
Direction of installation for child restraint<br />
systems<br />
Group 0 and 0+: Children up to 29 lbs (13 kg)<br />
Children of this weight must be transported in a<br />
restraint system which is installed on the passenger’s<br />
seat facing rearward.<br />
Group I: Children between 20 lbs (9 kg) and<br />
40 lbs<br />
Children of this weight are held in child restraint<br />
systems facing forward.<br />
Group II: Children in between 33 lbs (15 kg)<br />
and 55 lbs (25 kg)<br />
Children of this weight are held in child restraint<br />
systems facing forward.<br />
Group III: Children in between 49 lbs (22 kg)<br />
and 80 lbs (36 kg)<br />
Children of this weight are held in child restraint<br />
systems facing forward.<br />
f The vehicle seat must be adjusted so that it is<br />
in its lower rear position.<br />
Using child restraint systems in the<br />
passenger seat<br />
f Do not install a child restraint system in<br />
the Sports bucket seat.<br />
Danger!<br />
The use of a child restraint system in the passenger<br />
seat can result in serious personal<br />
injury or death to the child from an airbag<br />
deployment.<br />
To reduce risk of injury from an inflating airbag<br />
in an accident, Porsche strongly recommends:<br />
f Please see the chapter “PASSENGER AIRBAG<br />
OFF INDICATOR LAMP DOES NOT LIGHT UP”<br />
on Page 47.<br />
f Please see the chapter “CHILD RESTRAINT<br />
SYSTEMS” on Page 50.<br />
f Do not install a child restraint system in<br />
the Sports bucket seat.<br />
The Sports bucket seat cannot be<br />
equipped with the LATCH system.<br />
Child restraint system for up to one-year old<br />
children<br />
– Make sure that the PASSENGER AIRBAG OFF<br />
indicator lamp lights up.<br />
– Adjust the passenger's seat as far away from<br />
the airbag as possible.<br />
Danger!<br />
Risk of serious personal injury or death due<br />
to the passenger airbag triggering unintentionally.<br />
When the ignition is on and the up to oneyear<br />
old child is seated in the child restraint<br />
system on the passenger seat the indicator<br />
lamp ”PASSENGER AIRBAG OFF“ must be on.<br />
If the ”PASSENGER AIRBAG OFF“ indicator<br />
lamp does not light up, it could indicate a<br />
fault in the system.<br />
In this case:<br />
f Do not use a child restraint system on the passenger’s<br />
seat.<br />
f On vehicles with key-operated airbag deactivation<br />
device: Switch to position OFF.<br />
f On vehicles without key-operated airbag<br />
deactivation device: Do not drive.<br />
f Have the fault remedied at your nearest authorized<br />
Porsche dealer.<br />
Operation, Safety 51
Child restraint system for children older than<br />
one year<br />
Your vehicle is equipped with a weight sensing system<br />
for the passenger's seat in accordance with<br />
U.S. Federal Motor Vehicle Safety Standard 208.<br />
Depending on the weight acting on the passenger's<br />
seat, the passenger's airbag will automatically<br />
be switched on or off.<br />
Small adult passengers<br />
Make sure that the PASSENGER AIRBAG OFF indicator<br />
lamp does not light up.<br />
Danger!<br />
Risk of serious personal injury or death due<br />
to the passenger airbag not triggering.<br />
When the ignition key is inserted on and the<br />
small adult passenger is seated on the passenger’s<br />
seat, the indicator lamp ”PASSEN-<br />
GER AIRBAG OFF“ must be off.<br />
If the ”PASSENGER AIRBAG OFF“ indicator<br />
lamp lights up, it could indicate a fault in the<br />
system.<br />
In this case:<br />
f Do not carry a passenger in the passenger’s<br />
seat.<br />
f Have the fault remedied at the nearest authorized<br />
Porsche dealer.<br />
52 Operation, Safety<br />
Automatic locking retractor<br />
f Do not install a child restraint system in<br />
the Sports bucket seat.<br />
The Sports bucket seat cannot be<br />
equipped with the LATCH system.<br />
The safety belt for the passenger is equipped with<br />
an automatic locking retractor for securing the<br />
child restraint system. When activated, this retractor<br />
allows you to securely fasten the child restraint<br />
system in place so that inadvertent movements<br />
will not occur.<br />
Before transporting a child on the passenger seat:<br />
f Please see the chapter “CHILD RESTRAINT<br />
SYSTEMS” on Page 50.<br />
Danger!<br />
Risk of serious personal injury or death to the<br />
child, when excessive force is acting on the<br />
passenger's seat due to the seat belt.<br />
In such cases, the passenger's airbag can be<br />
switched on unintentionally.<br />
f After fastening the child restraint system, do<br />
not adjust the seat.<br />
f Check the condition of the passenger’s airbag<br />
shown by the indicator lamp in the central console.<br />
Activating the automatic locking retractor<br />
1. If a child restraint system must be fastened to<br />
the passenger's seat, adjust the passenger's<br />
seat as far away from the airbag as possible.<br />
2. Fasten child seat.<br />
3. Pull the safety belt retractor completely out. At<br />
this point the locking mechanism is activated.<br />
4. Insert the safety belt tongue into the buckle<br />
and make certain that it is properly latched.<br />
Make no more adjustments to the seat.<br />
5. Allow the safety belt to retract until it is tight on<br />
the child restraint system. You may further tighten<br />
the belt by pulling on it to allow more of it<br />
to retract.<br />
Make sure that excessive seat belt forces do<br />
not occur by moving the seat with the child<br />
seat installed.<br />
Releasing the safety belt<br />
1. Unbuckle the safety belt latch.<br />
2. Then make certain that the belt has fully retracted.<br />
At this point the automatic locking feature<br />
will be disengaged.<br />
Seek appropriate advice from your authorized<br />
Porsche dealer about the possible installation<br />
of a Porsche child restraint system.<br />
f
LATCH System<br />
Child seat bracket on the passenger’s<br />
seat<br />
f Do not install a child restraint system in<br />
the Sports bucket seat.<br />
The Sports bucket seat cannot be<br />
equipped with the LATCH system.<br />
The key switch for switching off the passenger’s<br />
airbag and the LATCH attachment bracket are not<br />
installed at the factory. They can be retrofitted (not<br />
on vehicles with Sports bucket seats).<br />
f Please see your authorized Porsche dealer.<br />
Porsche recommends the use of a Porsche Child<br />
Seat with Lower Anchorage and Tether for Children<br />
system (LATCH).<br />
These systems have been tested and adjusted to<br />
the interior of your Porsche and the appropriate<br />
child weight groups. Other systems have not been<br />
tested and could entail an increased risk of injury.<br />
You can obtain child seats that are LATCH compatible<br />
at your authorized Porsche dealer.<br />
f Always see the separate installation instructions<br />
for your child seat.<br />
f Please see the chapter “CHILD RESTRAINT<br />
SYSTEMS” on Page 50.<br />
Installing a LATCH child seat system<br />
1. Secure the child seat to retaining lugs A as outlined<br />
in the instruction manual for the child<br />
seat.<br />
2. Pull the child seat to check that both fastening<br />
points are engaged correctly.<br />
Note<br />
f Make sure that the key switch is switched to<br />
AUTO once the child seat has been removed,<br />
in order to provide protection to the adult<br />
occupants.<br />
Operation, Safety 53
Child Restraint Anchorage<br />
f Please see the chapter “AUTOMATIC LOCKING<br />
RETRACTOR” on Page 52.<br />
f Do not install a child restraint system in<br />
the Sports bucket seat.<br />
The Sports bucket seat cannot be<br />
equipped with the LATCH system..<br />
If your child restraint seat requires the use of a<br />
tether strap, you will want to use the anchor point<br />
behind the passenger’s seat under the carpet.<br />
f To ensure proper installation, see your authorized<br />
Porsche dealer.<br />
54 Operation, Safety<br />
Note<br />
If a child seat with top tether is adapted for use on<br />
the passenger’s seat, the anchor point must be<br />
used for anchoring the top tether.<br />
Warning!<br />
The child restraint anchorage is designed to<br />
withstand only the load imposed by a correctly<br />
fitted child restraint.<br />
Under no circumstances is the anchorage to<br />
be used for adult safety belt or harness. Such<br />
use could result in serious personal injury or<br />
death.<br />
f Do not misuse the child restraint anchorage.<br />
This is not designed to withstand a load<br />
imposed by an adult.
Sports Exhaust System<br />
Switching on and off<br />
The sports exhaust system can be switched on<br />
and off when the ignition is switched on using the<br />
button.<br />
When the sports exhaust system is switched on,<br />
the light-emitting diode in the button lights up.<br />
Parking Brake<br />
Parking brake force is mechanically transferred to<br />
the rear wheels by means of cables.<br />
f Use the parking brake only after the vehicle<br />
has come to a full stop.<br />
Setting the parking brake<br />
f Pull the lever all the way up (arrow).<br />
With the ignition on, the parking brake warning<br />
lights in the instrument panel and on-board<br />
computer will come on if the lever is even<br />
slightly raised. A firm pull upward is required to<br />
properly engage the parking brake.<br />
If the brake is not fully set, the vehicle may roll<br />
without control.<br />
f Move the selector lever to “P” (PDK) or move<br />
the gearshift lever to reverse or first gear<br />
(Manual transmission).<br />
f Before exiting the vehicle, make sure that the<br />
parking brake is fully set and the vehicle is not<br />
moving at all.<br />
Danger!<br />
Risk of serious personal injury or death. A<br />
partially engaged parking brake may allow<br />
the vehicle to roll, causing serious personal<br />
injury or death to any person in its path.<br />
f Engage the parking brake fully.<br />
Releasing the parking brake<br />
f Pull the lever slightly up as you depress the release<br />
button, and then push the lever all the<br />
way down.<br />
Operation, Safety 55
Parking brake warning light USA<br />
Parking brake warning light<br />
Canada<br />
The warning lights in the instrument panel and onboard<br />
computer will go out after the parking brake<br />
is fully released.<br />
The warning lights are not an indicator that the<br />
parking brake is fully set; it is only intended to be<br />
a warning to release the parking brake before<br />
driving the car.<br />
Caution!<br />
A partially engaged brake will overheat the<br />
rear brakes, reduce their effectiveness and<br />
cause excessive wear.<br />
f Release the parking brake fully.<br />
f When parking your car, always set the parking<br />
brake by pulling all the way up on the lever.<br />
f Move the selector lever to “P” (PDK) or move<br />
the gearshift lever to reverse or first gear<br />
(Manual transmission).<br />
f On hills also turn the front wheels towards the<br />
curb.<br />
56 Operation, Safety<br />
Brakes<br />
f Make it a habit to check the operation of your<br />
brakes before driving.<br />
Keep in mind that the braking distance increases<br />
very rapidly as the speed increases. At 60 mph or<br />
100 km/h, for example, it is not twice but four<br />
times longer than 30 mph or 50 km/h. Tire traction<br />
is also less effective when the roads are wet<br />
or slippery.<br />
f Therefore, always maintain a safe distance<br />
from the car in front of you.<br />
Vehicles without Porsche Ceramic Composite<br />
Brake (PCCB)<br />
Even though the brake discs consist of alloyed<br />
grey cast iron, they will unavoidably start to corrode<br />
if your car is parked for an extended period.<br />
The brakes will tend to “rub” as a result.<br />
The nature, extent and effects of corrosion depend<br />
on the amount of time the vehicle was<br />
parked, whether granular or liquid road salt was<br />
spread and whether grease-dissolving agents<br />
were used in car washes.<br />
To prevent corrosion of the brake discs, ”brake<br />
them dry“ before parking the car.<br />
If the braking comfort is noticeably impaired, we<br />
recommend having the brake system checked by<br />
experts at an authorized Porsche dealer.<br />
Brake system function<br />
Your Porsche is equipped with a power assisted<br />
hydraulic dual circuit brake system with disc<br />
brakes at the front and rear.<br />
Both circuits function independently. One brake<br />
circuit operates the front and the other operates<br />
the rear.<br />
If one brake circuit has failed, the other will still operate.<br />
However, you will notice an increased pedal<br />
travel when you apply the brakes.<br />
Failure of one brake circuit will cause the stopping<br />
distance to increase.<br />
Warning!<br />
Risk of an accident, resulting in serious personal<br />
injury or death.<br />
In the unlikely event of hydraulic failure of<br />
one brake circuit:<br />
f Push the brake pedal down firmly and hold it in<br />
that position.<br />
A mechanical linkage activates the second circuit,<br />
and you will be able to bring the vehicle to<br />
a stop.<br />
f After bringing your vehicle to a complete stop,<br />
avoid driving the vehicle and instead have it<br />
towed to the nearest authorized Porsche dealer<br />
for repair.
Brake system warning light<br />
You can check the functionality of the brake<br />
system warning light by switching the ignition to<br />
the "On" position and verifying that the warning<br />
light illuminates.<br />
Brake warning light USA<br />
Brake warning light Canada<br />
If the warning lights in the instrument panel and onboard<br />
computer go on while driving, the brake fluid<br />
level may be too low, or (if the brake pedal travel<br />
has increased) one of the two brake circuits may<br />
have failed.<br />
A greater braking pressure will be required, stopping<br />
distances will be longer and the braking behavior<br />
will change, particularly in curves.<br />
With correctly adjusted brakes, and a correctly<br />
working brake system, the pedal travel to the<br />
point of brake actuation should be 1-3/16 in. to<br />
1-9/16 in. or 30 to 40 mm.<br />
Whenever the brake pedal travel exceeds this distance,<br />
have the brake system checked.<br />
Brake pedal<br />
Warning!<br />
Risk of an accident, resulting in serious personal<br />
injury or death.<br />
Any obstruction of the brake pedal could<br />
increase the stopping distance.<br />
f Always check the movement of the brake pedal<br />
before driving and make sure that it is not obstructed<br />
by a floor mat or any other object.<br />
f Secure the floor mat to prevent it from sliding<br />
into positions that could interfere with the safe<br />
operation of your vehicle.<br />
Your Porsche dealer will be glad to offer you<br />
nonskid floor mats of the correct size.<br />
Note<br />
In case one of the two brake circuits fails, increased<br />
pedal travel is required to bring your<br />
vehicle to a full stop.<br />
Warning!<br />
To avoid overheating and premature wear of<br />
the brakes:<br />
f Before descending a steep grade, reduce<br />
speed and shift the transmission into a lower<br />
gear or driving position to control speed.<br />
f Do not “ride the brakes” by resting your foot on<br />
the pedal when not intending to apply brake<br />
pressure.<br />
f Do not hold the pedal down too long or too<br />
often.<br />
This could cause the brakes to get hot and not<br />
function properly.<br />
f Please see the chapter “DRIVE-OFF ASSIS-<br />
TANT” on Page 177.<br />
Operation, Safety 57
Brake booster<br />
The brake booster assists braking only when<br />
the engine is running.<br />
When the car is moving while the engine is not running,<br />
or if the brake booster is defective, more<br />
pressure on the brake pedal is required to bring<br />
the car to a stop.<br />
If this happens, ABS and PSM will also not operate.<br />
Moisture or road salt on brakes affects braking.<br />
Brakes will dry after a few cautious brake applications.<br />
Warning!<br />
Risk of an accident, resulting in serious personal<br />
injury or death.<br />
Driving through water may reduce the traction.<br />
Moisture on brakes from road water, car<br />
wash, or coating of road salt may affect<br />
braking efficiency.<br />
f Cautiously apply brakes to test brakes after exposure<br />
to road water, etc.<br />
58 Operation, Safety<br />
Brake wear<br />
Your car has excellent brakes, but they are still<br />
subject to wear. The rate at which they wear depends<br />
on how the brakes are used.<br />
f Have the brake system inspected at the<br />
intervals recommended in your Maintenance<br />
Booklet.<br />
Brake system warning light<br />
You can check the functionality of the brake<br />
system warning light by switching the ignition to<br />
the "On" position and verifying that the warning<br />
light illuminates.<br />
Warning light USA<br />
Warning light Canada<br />
If the warning lights in the instrument panel and onboard<br />
computer stay on when the engine is running<br />
or come on while driving, the brake pads are<br />
worn excessively.<br />
f Do not continue to operate the vehicle.<br />
Have your authorized Porsche dealer inspect<br />
or replace the brake pads.<br />
Brake pads and brake discs<br />
Wear on the brake pads and brake discs depends<br />
to a great extent on the driving style and the conditions<br />
of use and therefore cannot be expressed<br />
in actual miles on the road.<br />
The high-performance brake system is designed<br />
for optimal braking effect at all speeds and temperatures.<br />
Certain speeds, braking forces and ambient<br />
conditions (such as temperature and humidity)<br />
therefore might cause “brake noises”.<br />
New brake pads or linings<br />
New brake pads and brake discs have to be “broken<br />
in”, and therefore only attain optimal friction<br />
when the car has covered several hundred miles<br />
or km.<br />
The slightly reduced braking ability must be compensated<br />
for by pressing the brake pedal harder.<br />
This also applies whenever the brake pads and<br />
brake discs are replaced.
ABS Brake System<br />
(Antilock Brake System)<br />
The ABS system represents a major contribution<br />
to the enhancement of active safety in your vehicle.<br />
This system prevents the wheels from locking<br />
in a panic stop on almost all road surfaces.<br />
With the ABS system in your vehicle, the<br />
following areas are enhanced:<br />
Steering, vehicle remains steerable under all<br />
braking forces when ABS is engaged.<br />
Good directional control, no swerving caused<br />
by locking of wheels under braking conditions.<br />
Shorter stopping distance, stopping distances<br />
are usually reduced because controlled braking is<br />
maximized.<br />
Prevention of wheel lock up, no brake- induced<br />
sliding and thus no localized tire wear from emergency<br />
braking.<br />
The crucial advantage of the ABS system over a<br />
conventional brake system is in the area of maintaining<br />
directional control and maneuverability of<br />
the car in emergency situations.<br />
Warning!<br />
The increased control that is provided should<br />
not induce you to take greater risks with your<br />
safety. The limits dictated by the laws of<br />
physics cannot be overcome, even with ABS.<br />
The risk of accidents due to inappropriate<br />
speed cannot be reduced, even by the ABS.<br />
The driver bears the responsibility for all<br />
driving maneuvers.<br />
f Adapt your driving style to the prevailing road<br />
and weather conditions.<br />
f Obey all traffic laws.<br />
Other vehicles not equipped with the ABS<br />
system may not be able to maintain control,<br />
especially on wet or poor road surfaces and<br />
thus may be more likely to impact you from<br />
behind.<br />
f To minimize that risk, use your ABS system to<br />
increase your ability to maneuver to avoid dangerous<br />
situations and not merely to try to stop<br />
in the shortest distance possible.<br />
Operation of the ABS system<br />
A wheel speed sensor is mounted to each of the<br />
four wheels. If wheel lock-up of either of the front<br />
wheels or the rear wheels is sensed during braking,<br />
the brake pressure is adjusted automatically<br />
until the wheel no longer slips.<br />
If braking forces approach the wheel lock-up point<br />
for all wheels (panic braking) the ABS system will<br />
intervene to provide a rapid rythmic braking. The<br />
proper operation of ABS is perceived by the driver<br />
as a pulsating brake pedal in conjunction with audible<br />
noise and perhaps some vibration.<br />
f If you experience these sensations while driving<br />
or a road surface with questionable traction,<br />
reduce vehicle speed appropriate for the<br />
prevailing road conditions.<br />
f If full braking should be necessary, press the<br />
brake pedal all the way down throughout the<br />
entire braking procedure, regardless of the pulsating<br />
pedal. Do not ease up on pressure applied<br />
to the pedal.<br />
The functional readiness of all the main electrical<br />
components of the ABS is checked by an<br />
electronic monitoring system both before and<br />
while you drive.<br />
Operation, Safety 59
Warning light USA<br />
Warning light Canada<br />
When the ignition is switched on the ABS warning<br />
light will light up while the system is electronically<br />
interrogated and goes out when the engine is<br />
started if the check is not yet complete.<br />
If the ABS warning lamp fails to go out, this indicates<br />
that ABS has been deactivated due to a<br />
fault. If the warning lights in the instrument panel<br />
and on-board computer light up while you are driving,<br />
this indicates that a fault has occurred. In both<br />
cases, normal braking, as in vehicles without ABS,<br />
is still retained.<br />
The ABS system should, however, be examined at<br />
an authorized Porsche dealer immediately to prevent<br />
the occurrence of further faults.<br />
f If the ABS system becomes inoperative, take<br />
your vehicle to your authorized Porsche dealer<br />
immediately.<br />
60 Operation, Safety<br />
Warning!<br />
Risk of an accident, resulting in serious personal<br />
injury or death.<br />
The control unit of the ABS brake system is<br />
set for standard tire size. If non-standard<br />
tires are installed, the control unit may misinterpret<br />
the speed of the vehicle, because of<br />
the variant data it receives from the sensors<br />
on the axles.<br />
f Use only tire makes and types tested by<br />
Porsche.<br />
Clutch Pedal<br />
The clutch pedal must be depressed fully<br />
before the starter will engage.<br />
Warning!<br />
Risk of an accident, resulting in serious personal<br />
injury or death.<br />
f Always check the movement of the clutch pedal<br />
before driving and make sure that it is not<br />
obstructed by a floor mat or any other object.<br />
f Secure the floor mat to prevent it from sliding<br />
into positions that could interfere with the safe<br />
operation of your vehicle.<br />
Your Porsche dealer will be glad to offer you<br />
nonskid floor mats of the correct size.<br />
To avoid damage to the clutch and transmission:<br />
f Always depress the clutch pedal fully when<br />
changing gears.<br />
f Do not hold the car on a steep grade with the<br />
clutch pedal partially depressed.<br />
Should the free travel of the clutch pedal suddenly<br />
become larger, it could mean a malfunction of the<br />
clutch.<br />
f See your Porsche dealer for correction.
Sport Mode<br />
A sportier car set-up is obtained when Sport mode<br />
is switched on. Interventions by the Porsche<br />
control systems are intentionally shifted towards<br />
greater agility and driving performance:<br />
– PASM (Porsche Active Suspension Management)<br />
is automatically changed to Sport mode,<br />
resulting in a stiffer suspension setup.<br />
– When Sport mode is active, the PDK transmission<br />
switches to a sporty gear-changing map<br />
and shortens the gear shifting times. Gear<br />
changes take place faster, but fuel consumption<br />
is also increased.<br />
PSM (Porsche Stability Management) control<br />
gives a sportier road-feel to the vehicle. PSM<br />
interventions take place later than in Normal<br />
mode. The driver can maneuver the vehicle<br />
with greater agility at its performance limits,<br />
without having to dispense with the assistance<br />
of PSM in emergency situations. This helps to<br />
achieve optimal lap times, particularly on race<br />
circuits with a dry road surface.<br />
– The electronic accelerator pedal reacts<br />
sooner, and the engine is more responsive to<br />
throttle inputs. When Sport mode is switched<br />
on, this function is activated only after the<br />
driver has floored the accelerator pedal or<br />
released it briefly.<br />
– The rpm limiter characteristic is “harder”, i.e.<br />
the engine is immediately throttled when the<br />
performance limits are reached (only in manual<br />
selection mode for vehicles with PDK transmission).<br />
f Please observe the chapters on PSM, PASM<br />
and PDK.<br />
Switching Sport mode on and off<br />
Switching Sport mode on and off simultaneously<br />
activates and deactivates the Sport mode in<br />
PASM.<br />
If PASM Sport mode was activated with the PASM<br />
button, PASM remains active.<br />
After the ignition is switched off, Sport mode is<br />
automatically reset to Normal mode.<br />
SPORT button<br />
f Press SPORT button A in the center console.<br />
When Sport mode is switched on, the lightemitting<br />
diode in the SPORT button is lit.<br />
A sporty gear-changing map is enabled and the<br />
gear shifting times are shortened for the PDK<br />
transmission.<br />
A sporty driving style is recognized more quickly<br />
and the gear-changing speeds are adapted to<br />
driving performance.<br />
Deceleration downshifts are commenced earlier.<br />
Downshifts are made during slight decelerations,<br />
even at higher engine speeds.<br />
f Please see the chapter “SPORT MODE<br />
(“SPORT” AND “SPORT PLUS” MODES)” on<br />
Page 180.<br />
SPORT PLUS button<br />
(only on vehicles with PDK transmission)<br />
In “Sport Plus” mode, the PDK transmission<br />
changes to a shift program designed for driving<br />
on race circuits. 7th gear is not selected.<br />
The gear-changing performance is enhanced<br />
significantly again compared with “Sport” mode.<br />
f Please see the chapter “SPORT MODE<br />
(“SPORT” AND “SPORT PLUS” MODES)” on<br />
Page 180.<br />
f Press SPORT PLUS button B in the center<br />
console.<br />
When Sport mode is switched on, the lightemitting<br />
diode in the SPORT PLUS button is lit.<br />
Operation, Safety 61
When mode “Sport” is switched on, the logo<br />
SPORT appears next to the digital speedometer.<br />
62 Operation, Safety<br />
When mode “Sport Plus” is switched on, the logo<br />
SPORT PLUS appears next to the digital<br />
speedometer.
Porsche Stability Management<br />
(PSM)<br />
PSM is an active control system for stabilization of<br />
the vehicle approaching the performance limits of<br />
driving maneuvers.<br />
Warning!<br />
Risk of an accident, resulting in serious personal<br />
injury or death.<br />
The increased control that is provided should<br />
not induce you to take greater risks with your<br />
safety. The limits dictated by the laws of<br />
physics cannot be overcome, even with PSM.<br />
The risk of accidents due to inappropriate<br />
speed cannot be reduced, even by PSM.<br />
The driver bears the responsibility for all<br />
driving maneuvers.<br />
f Adapt your driving style to the prevailing road<br />
and weather conditions.<br />
f Obey all traffic laws.<br />
Sensors at the wheels, brakes, steering system<br />
and engine continuously measure:<br />
– Speed<br />
– Direction of travel (steering angle)<br />
– Lateral acceleration<br />
– Rate of turn about the vertical axis<br />
– Longitudinal acceleration<br />
PSM uses these values to determine the direction<br />
of travel indicated by the driver.<br />
PSM intervenes and helps to correct the course if<br />
the actual direction of motion deviates from the<br />
chosen course (steering-wheel position):<br />
It brakes individual wheels as needed. In addition,<br />
the engine power may be manipulated in order to<br />
stabilize the vehicle.<br />
The events below inform the driver of PSM control<br />
operations and warn him/her to adapt his/her<br />
driving style to the road conditions:<br />
– The multifunctional information light on the<br />
instrument panel flashes.<br />
– Hydraulic noises can be heard.<br />
– The vehicle decelerates and steering-wheel<br />
forces are altered as the PSM controls the<br />
brakes.<br />
– Reduced engine power.<br />
– The brake pedal pulsates and its position is<br />
changed during braking.<br />
In order to achieve full vehicle deceleration,<br />
foot pressure must be increased after the<br />
brake pedal has begun vibrating.<br />
Examples of PSM control operations<br />
– If the front wheels of the vehicle drift on a<br />
bend, the rear wheel on the inside of the bend<br />
is braked and the engine power is reduced if<br />
necessary.<br />
– If the rear of the vehicle swings out on a bend,<br />
the front wheel on the outside of the bend is<br />
braked.<br />
Additional braking functions<br />
– Pre-filling the brake system:<br />
The brake system is prepared for possible<br />
subsequent emergency braking if the accelerator<br />
pedal is released suddenly and quickly.<br />
The brake system is prefilled and the brake<br />
pads are already applied gently to the brake<br />
discs.<br />
– Brake booster:<br />
In the event of an emergency braking operation<br />
where the pedal force is insufficient, a brake<br />
booster provides the braking pressure necessary<br />
for maximum deceleration at all 4 wheels.<br />
Advantages of PSM<br />
– Best possible traction and lane-holding ability<br />
in all driving situations – even on road surfaces<br />
with varying friction.<br />
Operation, Safety 63
– The system compensates for undesired lateral<br />
vehicle reactions when the driver releases the<br />
accelerator pedal or brakes when cornering.<br />
This compensation functions up to the<br />
maximum lateral acceleration.<br />
– PSM actively stabilizes the vehicle as required<br />
during dynamic driving maneuvers (e.g. rapid<br />
steering movements, during lane changes or<br />
on alternating bends).<br />
– Improved braking stability on bends and on<br />
different or varying road surfaces.<br />
– It improves braking function and shortens<br />
stopping distance in the event of emergency<br />
braking.<br />
Readiness for operation<br />
PSM is switched on automatically every time you<br />
start the engine.<br />
PSM should always be switched on during<br />
“normal” driving.<br />
However, it may be advantageous to switch off<br />
PSM temporarily in exceptional situations, for<br />
example:<br />
– On a loose surface or in deep snow,<br />
– When “rocking” the vehicle free and<br />
– When using snow chains.<br />
64 Operation, Safety<br />
Switching off PSM<br />
f Press PSM OFF button.<br />
PSM is switched off after a short delay.<br />
The light-emitting diode in the button is lit up.<br />
When the PSM is switched off, the PSM multifunctional<br />
light on the instrument panel is lit<br />
and a message is shown on the on-board<br />
computer.<br />
An acoustic signal also sounds.<br />
Note<br />
When PSM is switched off, the additional braking<br />
functions are deactivated. Automatic reactivation<br />
in emergency situations is linked to the PSM<br />
control.<br />
The following functions stabilize the vehicle in<br />
emergency situations, even with PSM switched<br />
off:<br />
– When PSM is off, the vehicle is stabilized as<br />
soon as one of the two front wheels enters the<br />
ABS control range.<br />
– When PSM is off and Sport mode is on, the<br />
vehicle is stabilized as soon as both front<br />
wheels enter the ABS control range.<br />
One-sided spinning of the wheels is prevented,<br />
even with PSM switched off.<br />
Switching PSM back on<br />
f Press PSM OFF button.<br />
PSM is switched on after a short delay.<br />
The light-emitting diode in the button and the<br />
PSM multifunctional light on the instrument<br />
panel go out.<br />
The on-board computer shows a message.
Sport mode<br />
A sportier car set-up is obtained when Sport or<br />
Sport Plus mode is switched on.<br />
PSM interventions are later than in Normal mode;<br />
the vehicle can be maneuverd with greater agility<br />
at its performance limits, without dispensing with<br />
the assistance of PSM in emergency situations.<br />
This helps to achieve optimal lap times, particularly<br />
on race circuits and a dry road surface.<br />
PSM multifunctional light<br />
– The multifunctional light on the instrument<br />
panel lights up for a lamp check when the<br />
ignition is switched on.<br />
– The light indicates a control operation by<br />
flashing, including when PSM is switched off<br />
(brake control in the event of one-sided wheel<br />
spin).<br />
– In conjunction with a message on the on-board<br />
computer, the light indicates that PSM is<br />
switched off.<br />
An acoustic signal also sounds.<br />
– The light indicates a fault in conjunction with a<br />
message on the on-board computer.<br />
PSM is out of order.<br />
f Please have the fault remedied at an authorized<br />
Porsche dealer.<br />
f Please see the chapter “PUTTING VEHICLE<br />
INTO OPERATION” on Page 241.<br />
Towing<br />
f Please see the chapter “TOWING” on<br />
Page 259.<br />
Checks on test stands<br />
Brake tests<br />
Brake tests must be performed only on plate-type<br />
test stands or roller test stands.<br />
The ignition must be switched off.<br />
The following limit values must not be exceeded<br />
on roller test stands:<br />
– Testing speed 5 mph (8 km/h)<br />
– Test duration 20 seconds<br />
Handbrake tests<br />
Handbrake tests on the roller test stand must be<br />
performed only with the ignition switched off.<br />
Operation, Safety 65
Porsche Active Suspension<br />
Management (PASM)<br />
PASM makes two running-gear setups available to<br />
the driver: “Normal” and “Sport”.<br />
The selection is made via a button on the center<br />
console.<br />
In Normal mode the running gear is in a comfortable<br />
setup.<br />
Sport mode offers very sporty shock absorber<br />
tuning.<br />
The variable suspension system selects the appropriate<br />
damping level for each wheel according to<br />
the situation and driving conditions.<br />
Example:<br />
If the vehicle is driven in a very sporty manner in<br />
Normal mode, PASM automatically adapts the<br />
shock-absorber behavior to the driving situation<br />
accordingly.<br />
66 Operation, Safety<br />
Switching on PASM Sport mode<br />
f Press PASM button in the center console.<br />
When PASM Sport mode is switched on, the<br />
light-emitting diode in the button is lit up and a<br />
message is shown on the on-board computer.<br />
Switching off PASM Sport mode<br />
f Press PASM button in the center console.<br />
The light-emitting diode in the button goes out<br />
and the on-board computer displays a<br />
message.<br />
After the ignition is switched off, PASM is<br />
automatically reset to Normal mode.
Rear Spoiler<br />
The rear spoiler improves driving stability, especially<br />
at higher speeds.<br />
Warning!<br />
Risk of accident, resulting in serious personal<br />
injury or death.<br />
If the spoiler cannot be extended, driving stability<br />
will be adversely affected by increased<br />
rear axle lift, which could lead to loss of control.<br />
f Adapt your driving style and speed to the<br />
changed driving conditions.<br />
f Have the fault remedied at an authorized<br />
Porsche dealer.<br />
Risk of injury during manual retraction or<br />
extension of the spoiler with the vehicle<br />
stationary.<br />
f Make sure that no persons or objects are<br />
within the range of movement of the rear<br />
spoiler.<br />
Risk of damage from pushing the vehicle by<br />
the rear spoiler.<br />
f Do not push the vehicle at the rear spoiler.<br />
Automatic control<br />
(automatic mode)<br />
The rear spoiler extends at approx. 75 mph<br />
(120 km/h) and retracts again at approx. 50 mph<br />
(80 km/h).<br />
If the automatic control fails, the warning light<br />
lights up.<br />
Warning light<br />
The warning light in the on-board computer lights<br />
up when the rear spoiler does not extend over<br />
75 mph (120 km/h) or its end position is not<br />
reached.<br />
Manual control<br />
(manual mode)<br />
When the ignition is on, the rear spoiler can be<br />
extended and retracted manually using the button<br />
in the center console.<br />
Note<br />
When the rear spoiler is extended manually, the automatic<br />
control does not operate and the rear<br />
spoiler must be manually retracted.<br />
Operation, Safety 67
Extending<br />
f Press button briefly.<br />
The spoiler extends to its final position.<br />
The light-emitting diode in the button lights up.<br />
The rear spoiler remains extended even after<br />
switching off ignition.<br />
Retracting<br />
f at speeds between 0 and 20 mph<br />
(0 and 30 km/h):<br />
Press and hold button until the rear spoiler has<br />
reached its final position.<br />
The light-emitting diode in the button goes out.<br />
The rear spoiler changes to automatic mode.<br />
68 Operation, Safety<br />
f at speeds between 20 and 60 mph<br />
(30 and 100 km/h):<br />
Press button briefly.<br />
The rear spoiler retracts, the light-emitting<br />
diode in the button goes out.<br />
The rear spoiler changes to automatic mode.<br />
f at speeds over 60 mph (100 km/h):<br />
Press button briefly.<br />
The rear spoiler remains extended, the lightemitting<br />
diode in the button goes out.<br />
The rear spoiler changes to automatic mode.<br />
Manually retracting an extended rear spoiler<br />
after switching on the ignition again<br />
1. Press button briefly.<br />
The light-emitting diode in the button lights up.<br />
The rear spoiler is now in manual mode.<br />
2. Press and hold button until the rear spoiler has<br />
reached its final position.<br />
The light-emitting diode in the button goes out.<br />
The rear spoiler changes to automatic mode.<br />
Fixed rear spoiler<br />
Caution!<br />
Risk of damage to rear spoiler.<br />
f Please consult the operator before using automatic<br />
car washes.<br />
f Do not push the vehicle by the spoiler.
A - Switch for interior, footwell and luggage compartment<br />
lights<br />
B - Orientation light<br />
C - Reading light<br />
Interior lights<br />
f Please see the chapter “LOAD SWITCH-OFF AF-<br />
TER 2 HOURS OR 7 DAYS” on Page 236.<br />
Switching on lights<br />
f Switch position 1.<br />
Switching on driver’s side:<br />
Interior lights on driver’s side, footwell and<br />
luggage compartment lights on.<br />
Switching on passenger’s side:<br />
Reading light on passenger’s side on.<br />
Switching off lights<br />
f Switch position 2.<br />
Switching off driver’s side:<br />
Interior lights on driver’s side, footwell and<br />
luggage compartment lights off.<br />
Switching off passenger’s side:<br />
Reading light on passenger’s side off.<br />
Switching lights on and off automatically<br />
f Switch position 0.<br />
Lights are switched on when a door or rear lid<br />
is unlocked or opened or when the ignition key is<br />
withdrawn from the ignition lock.<br />
The lights are switched off with a delay of approx.<br />
2 minutes after the door is closed.<br />
The lights go out immediately as soon as the ignition<br />
key is inserted in the ignition lock or the vehicle<br />
is locked.<br />
Orientation light<br />
The light-emitting diode in the interior light improves<br />
your orientation inside the vehicle when it is<br />
dark.<br />
Note on operation<br />
On vehicles with Sport Chrono Package Plus, the<br />
brightness of the orientation light can be changed<br />
in PCM.<br />
f Please see the chapter ”Individual Memory“ in<br />
the separate PCM operating instructions.<br />
Operation, Safety 69
Parking Aids<br />
Parking assistant<br />
When the driver backs up, the parking assistant<br />
system indicates the distance between the car<br />
and a large obstacle behind it, by means of signal<br />
tones.<br />
Warning!<br />
Risk of serious personal injury or death.<br />
Parking assistant cannot detect small objects<br />
such as children and pets.<br />
Despite use of the parking assistant system,<br />
the driver is still responsible for taking due<br />
care and assessing obstacles when backing<br />
up.<br />
f Make sure that no persons, especially small<br />
children, animals or obstacles are within the<br />
maneuvering area.<br />
The parking assistant system is activated automatically<br />
when reverse gear is selected and the ignition<br />
is on.<br />
Note<br />
Be aware that the parking assistant system is<br />
not switched on if the car rolls backward without<br />
reverse gear being engaged.<br />
70 Operation, Safety<br />
Ultrasound sensors<br />
Sensors<br />
Four ultrasound sensors in the rear bumper measure<br />
the distance to the closest obstacle.<br />
– Range middle sensors around 60 in./150 cm<br />
– Range outer sensors around 24 in./60 cm<br />
Obstacles cannot be detected in the “blind” sensor<br />
area (e.g. near the ground).<br />
Note<br />
The sensors must always be kept free of dirt, ice<br />
and snow in order to ensure that they are fully<br />
functional.<br />
Caution!<br />
To avoid damaging the sensors:<br />
f Maintain sufficient distance when cleaning with<br />
steam-jet units.<br />
Signal tones/function<br />
When reverse gear is selected, the parking<br />
assistant confirms that it is switched on by issuing<br />
a short signal tone.<br />
A detected obstacle is signalled by an intermittent<br />
tone. The intervals decrease as the obstacle<br />
is approached.<br />
A continuous tone sounds when the distance<br />
becomes less than one foot. This continuous tone<br />
can stop if the obstacle is approached closer than<br />
one foot.<br />
The radio volume should not be so loud as to<br />
drown out the signal tones.
Limits of ultrasonic measurement<br />
The parking assistant system cannot detect:<br />
– sound-absorbing obstacles (e.g. powder<br />
snow),<br />
– sound-reflecting obstacles (e.g. glass surfaces,<br />
flat painted surfaces)<br />
– and very thin obstacles.<br />
– Other ultrasound sources (e.g. pneumatic<br />
brakes of other vehicles, jackhammers) can<br />
interfere with detection of obstacles.<br />
Fault indication<br />
The parking assistant system indicates a fault in<br />
two ways:<br />
– After reverse gear has been selected, the<br />
short signal tone is followed by a continuous<br />
tone of the same pitch:<br />
This indicates that sensors are soiled or covered<br />
with ice.<br />
– After reverse gear has been selected, the<br />
short signal tone is followed by a continuous<br />
tone with a much lower pitch:<br />
This indicates a general system fault.<br />
Please have the fault remedied at an authorized<br />
Porsche dealer.<br />
A - Control switch for door mirror adjustment<br />
Swivelling down mirror glass as a parking<br />
aid<br />
f Please see the chapter “SEAT MEMORY” on<br />
Page 35.<br />
– When reverse gear is engaged, the mirror<br />
glass on the passenger’s side swivels down<br />
slightly to show the curb area.<br />
Preconditions<br />
– Vehicle must be equipped with seat memory.<br />
– Set the control switch A to “passenger’s side”.<br />
– Reverse gear must be engaged.<br />
Returning mirror glass to its original position<br />
f Drive forwards with a speed of over 4 mph<br />
(6 km/h) or<br />
f Set the control switch A to “driver’s side”.<br />
Operation, Safety 71
O - Initial position<br />
1 - Ignition on<br />
2 - Start engine<br />
3 - Ignition off<br />
Ignition/Starter Switch with<br />
anti-theft Steering Lock<br />
The ignition lock has a total of four ignition lock positions.<br />
The ignition key rebounds to the initial position<br />
from every ignition lock position.<br />
f For your safety, fasten safety belts.<br />
f Please see the chapter “IMMOBILIZER” on<br />
Page 15.<br />
72 Operation, Safety<br />
f Please see the chapter “KEY WITH RADIO RE-<br />
MOTE CONTROL” on Page 16.<br />
Before starting the engine<br />
f Apply the footbrake.<br />
f Manual transmission:<br />
Fully depress the clutch pedal and put the gearshift<br />
lever into neutral.<br />
The clutch pedal must be depressed fully<br />
before the starter will engage.<br />
f In vehicles with PDK transmission:<br />
Move PDK selector lever to position P or N.<br />
f Do not press the accelerator pedal.<br />
Switch position 0<br />
Initial position<br />
The ignition key cannot be withdrawn when the<br />
ignition is switched on or when the engine has<br />
been started.<br />
To withdraw the ignition key:<br />
f Stop the vehicle.<br />
f In vehicles with PDK transmission:<br />
Move PDK selector lever to position P.<br />
f Switch ignition off.<br />
f Remove ignition key.<br />
Switch position 1<br />
Ignition on<br />
f Turn ignition key to position 1.<br />
Ignition is switched on.<br />
Note on operation<br />
All electrical equipment can be switched on.<br />
f Please see the chapter “WARNINGS ON THE<br />
INSTRUMENT PANEL AND THE ON-BOARD<br />
COMPUTER” on Page 166.
Switch position 2<br />
Start engine<br />
f Turn ignition key to ignition lock position 2.<br />
f Please see the chapter “STARTING PROCEDU-<br />
RES” on Page 75.<br />
Switch position 3<br />
Ignition off<br />
f Turn ignition key to ignition lock position 3.<br />
Note on operation<br />
The vehicle battery discharges if the ignition key is<br />
left inserted.<br />
If the vehicle battery is dead, the key can only be<br />
pulled out of the ignition lock if the emergency<br />
operation is performed:<br />
f Please see the chapter “EMERGENCY OPERA-<br />
TION – PULLING OUT THE IGNITION KEY” on<br />
Page 74.<br />
Locking the steering column<br />
Automatic locking<br />
The steering column is automatically locked when<br />
the ignition key is withdrawn from the ignition lock.<br />
Warning!<br />
Risk of an accident, resulting in serious personal<br />
injury or death.<br />
The steering wheel will lock and will cause<br />
loss of steering.<br />
f Never remove key from the ignition lock or turn<br />
the key off while the vehicle is moving.<br />
f Always withdraw the ignition key when<br />
leaving the vehicle.<br />
Automatic unlocking<br />
The steering column is unlocked when the vehicle<br />
is unlocked with the radio remote control.<br />
Note<br />
f To avoid discharging the battery, always remove<br />
the ignition key from the ignition lock.<br />
Please see the chapter “BATTERY” on<br />
Page 239.<br />
Gong<br />
If you leave the key in the ignition/steering lock, a<br />
gong will sound when the driver’s door is opened.<br />
This is a reminder to remove the key.<br />
Operation, Safety 73
Emergency operation – pulling out the<br />
ignition key<br />
If the vehicle battery is dead, the key can be pulled<br />
out only if the emergency operation is performed.<br />
1. Grasp the fuse box cover at the finger hole and<br />
pull it off.<br />
2. Unclip metal hook A on the inside of the cover.<br />
74 Operation, Safety<br />
3. Use metal hook A to remove the plastic lid B<br />
from the ignition lock. Make sure that plastic lid<br />
B is not lost.<br />
4. Turn ignition key counter-clockwise as far as it<br />
will go.<br />
5. Press metal hook A into opening C.<br />
An unlocking sound will be heard.<br />
6. Turn the ignition key to initial position (0) and<br />
remove.<br />
7. Re-fit the plastic lid B.
Starting Procedures<br />
f Please see the chapter “IMMOBILIZER” on<br />
Page 15.<br />
f Please see the chapter “EMISSION CONTROL<br />
SYSTEM” on Page 198.<br />
Warning!<br />
Serious injury or death may result if you are<br />
involved in a collision without having fastened<br />
the safety belts.<br />
f Fasten safety belts before driving away.<br />
Before starting the engine<br />
f Apply the footbrake.<br />
f Manual transmission:<br />
Fully depress the clutch pedal and put the gearshift<br />
lever into neutral.<br />
The clutch pedal must be depressed fully<br />
before the starter will engage.<br />
f In vehicles with PDK transmission:<br />
Move PDK selector lever to position P or N.<br />
Temperature sensors on the engine automatically<br />
provide the correct fuel/air mixture required for<br />
starting.<br />
Therefore, it is not necessary to depress the<br />
accelerator pedal while starting a cold or a<br />
warm engine.<br />
Starting the engine<br />
f Turn ignition key to ignition lock position 2.<br />
f As soon as the engine starts, release the ignition<br />
key.<br />
The first operation of the starter is ended automatically<br />
when the engine starts.<br />
If the engine does not start, subsequent starter<br />
operations will not be ended automatically.<br />
If the engine fails to start after 10 or 15 seconds<br />
of cranking:<br />
f Wait about 10 seconds before engaging the<br />
starter again.<br />
f When starting the engine, be ready to drive<br />
immediately.<br />
Drive vehicle at moderate speeds and avoid<br />
engine speeds above 4,200 rpm during the<br />
first 5 minutes.<br />
f Do not let the engine idle to warm up.<br />
Danger!<br />
Engine exhaust fumes have many components<br />
which you can smell. They also contain<br />
carbon monoxide (CO), which is a colorless<br />
and odorless gas.<br />
Carbon monoxide can cause unconsciousness<br />
and even death if inhaled.<br />
f Never start or let the engine run in an<br />
enclosed, unventilated area.<br />
It is not recommended to sit in your car for<br />
prolonged periods with the engine on and the<br />
car not moving.<br />
An unattended vehicle with a running engine<br />
is potentially hazardous.<br />
If warning lights should come on to indicate<br />
improper operation, they would go unnoticed.<br />
f Never leave the engine idling unattended.<br />
Danger of fire.<br />
f Do not park or operate the vehicle in areas<br />
where the hot exhaust system may come in<br />
contact with dry grass, brush, fuel spill or other<br />
flammable material.<br />
f If your car catches on fire for any reason, call<br />
the fire department.<br />
Do not endanger your life by attempting to put<br />
out the fire.<br />
Risk of burn injury when standing near or<br />
coming into contact with the exhaust pipe.<br />
The exhaust pipe is hot when the vehicle is running<br />
and remains hot for some time after the vehicle is<br />
turned off.<br />
f To prevent injury, make a point of noting where<br />
your vehicle’s exhaust pipe is, avoid placing<br />
your legs near the exhaust pipe, and closely<br />
supervise children around the vehicle when the<br />
exhaust pipe could be hot.<br />
A hot exhaust pipe can cause serious burns.<br />
Operation, Safety 75
Stopping Engine<br />
f Turn key back to position 3.<br />
f Do not stop engine immediately after hard or<br />
extended driving.<br />
Keep engine running at increased idle for<br />
about two minutes to prevent excessive heat<br />
build-up before turning off engine.<br />
f To avoid discharging the battery, always remove<br />
the ignition key from the ignition lock.<br />
f When leaving the car, always remove the ignition<br />
key, apply the parking brake and engage<br />
1st gear or reverse gear on vehicles with manual<br />
transmission or move the selector lever to<br />
position P on vehicles with PDK transmission.<br />
f Engage the steering lock by moving the steering<br />
wheel to the left or right.<br />
Turn the steering wheel to the locking position<br />
before you switch off the engine so that you<br />
don’t have to exert yourself when locking or<br />
unlocking the steering.<br />
Warning!<br />
Danger of injury. Hot engine compartment<br />
components can burn skin on contact.<br />
f Before working on any part in the engine<br />
compartment, turn the engine off and let it cool<br />
down sufficiently.<br />
76 Operation, Safety<br />
Risk of burn injury when standing near or<br />
coming into contact with the exhaust pipe.<br />
The exhaust pipe is hot when the vehicle is running<br />
and remains hot for some time after the vehicle is<br />
turned off.<br />
f To prevent injury, make a point of noting where<br />
your vehicle’s exhaust pipe is, avoid placing<br />
your legs near the exhaust pipe, and closely<br />
supervise children around the vehicle when the<br />
exhaust pipe could be hot.<br />
A hot exhaust pipe can cause serious burns.<br />
Engine-compartment blower,<br />
radiator fan<br />
The radiator and radiator fans are in the front of<br />
the car.<br />
The engine-compartment blower is mounted in the<br />
engine compartment.<br />
Warning!<br />
Risk of injury.<br />
After the engine is switched off, the enginecompartment<br />
temperature is monitored for<br />
approx. 30 minutes.<br />
During this period, and depending on temperature,<br />
the engine-compartment blower<br />
may continue to run or start to run.<br />
f Carry out work in these areas only with the engine<br />
off, the ignition off, and exercise extreme<br />
caution.<br />
Risk of injury. The radiator fans in the front<br />
end of the car may be operating or<br />
unexpectedly start operating when the<br />
engine is switched on.<br />
f Carry out work in these areas only with the engine<br />
switched off.<br />
Automatic garage door<br />
The ignition system in your Porsche may interfere<br />
with your electronically operated garage door.<br />
f To check this, drive your Porsche close to the<br />
garage door. Make sure not to interfere with<br />
the operating range of the door.<br />
f Run the engine at different speeds.<br />
f If the garage door opens or closes without you<br />
operating the garage door unit in your car,<br />
contact the dealer who installed the automatic<br />
garage door to have the frequency and/or<br />
coding of the garage door signal changed or<br />
modified.
Emergency Flasher Switch<br />
Operational readiness of the emergency flasher<br />
does not depend on the ignition lock and turn signal<br />
lever position.<br />
f If your car is disabled or parked under emergency<br />
conditions switch on the emergency<br />
flasher in the dashboard.<br />
All turn signals and the indicator light in the<br />
switch flash with the same frequency.<br />
Warning!<br />
Risk of an accident, resulting in serious personal<br />
injury or death.<br />
f Whenever stalled or stopped for emergency repairs,<br />
move the car well off the road. Switch on<br />
the emergency flasher and mark the car with<br />
road flares or other warning devices.<br />
f Do not remain in the car. Someone approaching<br />
from the rear may not realize your vehicle<br />
is stopped and cause a collision.<br />
Danger of fire.<br />
f Do not park or operate the vehicle in areas<br />
where the hot exhaust system may come in<br />
contact with dry grass, brush, fuel spill or<br />
other flammable material.<br />
Hot engine compartment components can<br />
burn skin on contact.<br />
f Before working on any part in the engine<br />
compartment, turn the engine off and let it cool<br />
down sufficiently.<br />
Operation, Safety 77
Light Switch on Vehicles with<br />
Bi-Xenon Headlights<br />
Lights switched off<br />
Daytime driving lights are switched on<br />
when the engine is running.<br />
Welcome Home Function<br />
Daytime driving lights are switched on<br />
when the engine is running.<br />
78 Operation, Safety<br />
Parking lights, side marker lights,<br />
license plate light, instrument illumination,<br />
daytime driving lights switched off<br />
Canada: daytime driving lights switched<br />
on<br />
Low beam, high beam<br />
Only with ignition on,<br />
daytime driving lights switched off<br />
Rear fog light<br />
Pull switch to second click.<br />
Indicator light on.<br />
Warning chime<br />
If the ignition key is withdrawn and the door is<br />
opened while the lights (not the Welcome Home<br />
lighting) are on, a chime warns of possible battery<br />
discharge.<br />
In some countries, differences are possible<br />
due to provisions of law.<br />
Daytime driving lights<br />
The daytime driving lights are integrated in the<br />
front auxiliary headlights. These lights are<br />
switched on only when the engine is running and<br />
with the light switch in the positions OFF or HOME.<br />
Low beam headlights must be switched on when<br />
driving through tunnels or at dusk, for example.<br />
Operation of the daytime driving lights may vary<br />
depending on country-specific regulations.<br />
Canada only:<br />
In addition to the auxiliary headlights the parking<br />
lights are switched on.<br />
USA only:<br />
The daytime driving lights can be deactivated in<br />
the on-board computer.<br />
f Please see the chapter “ON-BOARD<br />
COMPUTER (BC)” on Page 134.<br />
Vehicles with the Sport Chrono Package Plus<br />
Further individual light functions are available in vehicles<br />
with the Sport Chrono Package Plus.<br />
f Please observe the chapter “Individual Memory”<br />
in the separate PCM operating instructions.<br />
Cornering light<br />
The dynamic cornering light is activated above<br />
speeds of 6 mph (10 km/h).
Automatic Headlight Beam Adjustment<br />
Vehicles with Bi-Xenon headlights feature<br />
dynamic headlight beam adjustment.<br />
When the ignition is switched on, the level of the<br />
headlight beam automatically changes in accordance<br />
with the vehicle load.<br />
The level of the headlight beam is automatically<br />
kept constant during acceleration and braking.<br />
Checking operation<br />
1. Switch the low beam on.<br />
2. Insert ignition key and switch ignition on.<br />
The light beam first dips all the way down and<br />
is then adapted to the vehicle load.<br />
If this test item is not met, the headlight beam<br />
adjustment system must be checked by an authorized<br />
Porsche dealer.<br />
Welcome Home Lighting<br />
Switching on<br />
f Move light switch to the HOME position.<br />
For improved visibility and security when you get<br />
in and out of the car, the daytime driving lights and<br />
the tail lights remain on for a certain period of<br />
time:<br />
– When you get out of the car, the lights are<br />
turned on for approx. 30 seconds after the<br />
door is opened. The off-delay time resumes<br />
when the vehicle is locked.<br />
On vehicles with the Sport Chrono Package<br />
Plus, the PCM can be used to set the off-delay<br />
time. This setting also changes the lighting<br />
period for unlocking the vehicle.<br />
Please observe the chapter “Individual<br />
Memory” in the separate PCM operating<br />
instructions.<br />
– The lights are turned on for approx.<br />
30 seconds when the vehicle is unlocked.<br />
The lights go out if the ignition is switched on<br />
or when leaving the Welcome Home lighting.<br />
Operation, Safety 79
Light Switch on Vehicles with<br />
Halogen Headlights<br />
Lights switched off<br />
Welcome Home Function<br />
Parking lights, side marker lights,<br />
license plate light, instrument illumination<br />
Low beam, high beam<br />
Only with ignition on<br />
80 Operation, Safety<br />
Fog light in addition to parking lights or<br />
low beam<br />
Pull switch to first click.<br />
Indicator light on.<br />
Rear fog light in addition to fog lights<br />
Pull switch to second click.<br />
Indicator light on.<br />
Warning chime<br />
If the ignition key is withdrawn and the door is<br />
opened while the lights (not the Welcome Home<br />
lighting) are on, a chime warns of possible battery<br />
discharge.<br />
In some countries, differences are possible<br />
due to provisions of law.<br />
Vehicles with the Sport Chrono Package Plus<br />
Further individual light functions are available in vehicles<br />
with the Sport Chrono Package Plus.<br />
f Please observe the chapter “Individual<br />
Memory” in the separate PCM operating<br />
instructions.<br />
Daytime driving lights<br />
USA only:<br />
The daytime driving lights can be activated/deactivated<br />
in the on-board computer.<br />
f Please see the chapter “ON-BOARD<br />
COMPUTER (BC)” on Page 134.<br />
Welcome Home Lighting<br />
Switching on<br />
f Move light switch to the HOME position.<br />
For improved visibility and security when you get<br />
in and out of the car, the fog lights and the tail<br />
lights remain on for a certain period of time:<br />
– When you get out of the car, the lights are<br />
turned on for approx. 30 seconds after the<br />
door is opened. The off-delay time resumes<br />
when the vehicle is locked.<br />
On vehicles with the Sport Chrono Package<br />
Plus, the PCM can be used to set the off-delay<br />
time. This setting also changes the lighting<br />
period for unlocking the vehicle.<br />
Please observe the chapter “Individual<br />
Memory” in the separate PCM operating<br />
instructions.<br />
– The lights are turned on for approx.<br />
30 seconds when the vehicle is unlocked.<br />
The lights go out if the ignition is switched on<br />
or when leaving the Welcome Home lighting.
Turn Signal / Headlight Dimmer /<br />
Parking light / Flasher Lever<br />
Turn signals, low beam and high beam are ready<br />
for operation when the ignition is on.<br />
1 – Turn signal left<br />
2 – Turn signal right<br />
Push the lever to the upper or lower pressure<br />
point – turn signals flash three times<br />
3 – High beam<br />
4 – Headlight flasher<br />
Lever in center position – Low beam<br />
When high beam and headlight flasher are selected,<br />
the blue indicator light in the tachometer is lit.<br />
The turn signal lever turns off automatically when<br />
the steering wheel is straightened out after completing<br />
a turn.<br />
Lane changer<br />
f To indicate your intention when changing lanes<br />
on the freeway, slightly lift or depress the lever<br />
to the resistance point.<br />
The lever will return to the OFF position when<br />
released.<br />
f If the frequency of the display becomes noticeably<br />
faster, check the operation of the turn signal<br />
bulbs.<br />
Headlight flasher<br />
(With ignition on or off)<br />
f To flash the headlights to oncomming motorists,<br />
slightly pull the lever toward the steering<br />
wheel and then release it.<br />
The blue indicator light in the tachometer will<br />
go on/off as you pull/release the lever.<br />
Parking light<br />
The parking light can only be switched on when<br />
the ignition is switched off.<br />
f Move the lever up or down to switch on the<br />
right or left parking light.<br />
Individual Light Functions<br />
Further individual light functions are available in<br />
vehicles with Sport Chrono Plus package.<br />
f Please refer to the chapter ”Individual Memory“<br />
in the separate PCM operating instructions.<br />
Operation, Safety 81
Windshield Wiper/ Washer Lever<br />
Warning!<br />
Danger of injury when the windshield wipers<br />
operate unintentionally, e.g. in intermittent<br />
or rain sensor operation.<br />
Risk of damage to the windshield, wiper system<br />
and headlight washer.<br />
f Avoid running the wiper blades over a dry<br />
windshield to prevent scratching the glass.<br />
Spray washer fluid on the windshield first.<br />
A scratched windshield will reduce visibility.<br />
f Always loosen wiper blades from frozen glass<br />
before operating wipers to prevent damage to<br />
the wiper motor or blades.<br />
f Always switch off windshield wipers in car<br />
wash to prevent them wiping unintentionally<br />
(intermittent or sensor operation).<br />
f Always switch off windshield wipers before<br />
cleaning the windshield to avoid unintentional<br />
operation (intermittent or sensor operation).<br />
f Do not operate the headlight washer in car<br />
washes.<br />
f Do not operate headlight washer when it is<br />
frozen.<br />
82 Operation, Safety<br />
Wiper and headlight washer system<br />
0 – Windshield wipers off<br />
1 – Intermittent/rain sensor operation for<br />
front windshield wipers<br />
f Move wiper lever upwards to the first click.<br />
Please see the chapter “RAIN SENSOR” on<br />
Page 83.<br />
2 – Windshield wipers slow<br />
f Move wiper lever upwards to the second click.<br />
3 – Windshield wipers fast<br />
f Move wiper lever upwards to the third click.<br />
4 – Windshield wiper – one-touch operation:<br />
f Move wiper lever downwards. The windshield<br />
wipers wipe once.<br />
5 – Windshield wipers and washer system:<br />
f Pull wiper lever towards the steering wheel.<br />
The washer system sprays and wipes while the<br />
lever is pulled towards the steering wheel.<br />
When the wiper lever is released, a few drying<br />
wipes are executed.<br />
A - Headlight washer (Vehicles with Bi-Xenon<br />
headlights):<br />
The washer sprays only while low beam or high<br />
beam is switched on.<br />
f Briefly push button A to operate headlight<br />
washer system.<br />
f If heavily soiled, repeat wash.<br />
The headlight washer system automatically sprays<br />
once for every ten times the front windshield<br />
washer system is operated.<br />
Note<br />
The windshield washer nozzles are heated<br />
when the ignition is on, as a precaution against<br />
freezing.
Wipe interval control<br />
On vehicles without a rain sensor, the wiping<br />
intervals can be adjusted in four steps.<br />
Decreasing intervals<br />
f Adjust switch A upwards.<br />
The setting is confirmed by one wipe of the<br />
windshield.<br />
Increasing intervals<br />
f Adjust switch A downwards.<br />
Rain sensor<br />
In vehicles with a rain sensor the amount of rainfall<br />
(snowfall too) which has settled on the windshield<br />
is measured. Wiper speed is automatically adjusted<br />
accordingly.<br />
Switching on<br />
f Move wiper lever upwards to the first click.<br />
Switching off<br />
f Move wiper lever to position 0.<br />
The rain sensor remains switched off if the wiper<br />
lever is already in position 1 when the ignition is<br />
switched on.<br />
To switch the rain sensor on again:<br />
f Move wiper lever to position 0 and then to<br />
position 1 or<br />
f Operate windshield washer system 5 or<br />
f Change the sensitivity of the rain sensor with<br />
four-stage switch A.<br />
Switch-on is confirmed by one wipe of the windshield.<br />
On vehicles with the Sport Chrono Package Plus,<br />
further rain sensor functions can be selected via<br />
the PCM.<br />
f Please see the chapter ”Individual Memory“ in<br />
the separate PCM operating instructions.<br />
Changing the sensitivity of the rain sensor<br />
Sensitivity can be set with switch A in 4 stages:<br />
f Adjust switch A upwards –<br />
high sensitivity.<br />
The setting is confirmed by one wipe of the<br />
windshield.<br />
f Adjust switch A downwards –<br />
low sensitivity.<br />
Maintenance note<br />
f Periodically clean the wiper blades with a window<br />
cleaner, especially after the vehicle has<br />
been washed in a car wash. We recommend<br />
Porsche window cleaner. If they are very dirty<br />
(e.g. with insect remains), they can be cleaned<br />
with a sponge or cloth.<br />
If the wiper blades rub or squeak, this may be as<br />
a result of the following:<br />
If the vehicle is washed in an automatic car wash,<br />
wax residues may be adhering to the windshield.<br />
These wax residues can only be removed by using<br />
a window cleaner concentrate.<br />
f Please see the chapter “WASHER FLUID” on<br />
Page 200.<br />
f Please contact your authorized Porsche dealer<br />
for further information.<br />
The wiper blades may be damaged or worn.<br />
f Replace wiper blades as soon as possible.<br />
Operation, Safety 83
Rear wiper<br />
6 – Rear window wiper - intermittent operation:<br />
f Move wiper lever forwards to the first click.<br />
The rear window wiper wipes at preset intervals.<br />
The rear wiper is automatically switched off when<br />
a speed of 130 mph (210 km/h) is exceeded.<br />
It is switched on again when the speed falls below<br />
118 mph (190 km/h).<br />
84 Operation, Safety<br />
f On vehicles with the Sport Chrono Package<br />
Plus, further rear wiper functions can be selected<br />
via the PCM.<br />
f Please see the chapter ”Individual Memory“ in<br />
the separate PCM operating instructions.
Fire Extinguisher<br />
In cars equipped with a fire extinguisher, the extinguisher<br />
is fitted to the front of the driver’s seat.<br />
Taking out fire extinguisher<br />
1. Hold fire extinguisher with one hand and press<br />
the PRESS button on the fastening strap with<br />
the other hand (arrow).<br />
2. Remove fire extinguisher from mounting.<br />
Inserting fire extinguisher<br />
1. Place fire extinguisher in the mounting.<br />
2. Engage fastening strap lug A in the tension<br />
jack and close tension jack (arrow).<br />
Note<br />
f Pay attention to the final control date on the<br />
fire extinguisher.<br />
If the fire extinguisher is used after its expiration<br />
date has elapsed, it may not operate<br />
properly.<br />
f Follow the operating instructions on the fire<br />
extinguisher.<br />
f The functional ability of the fire extinguisher<br />
should be checked by a specialist workshop<br />
every 1-2 years.<br />
f After use, have the fire extinguisher refilled.<br />
Operation, Safety 85
A - Automatic speed control readiness off/on<br />
1 - +SPEED/SET (accelerate/store)<br />
2 - –SPEED (decelerate)<br />
3 - OFF (interrupt)<br />
4 -RESUME<br />
Automatic Speed Control<br />
The automatic speed control maintains any<br />
selected speed between 15 mph and 145 mph<br />
(30 km/h and 240 km/h) without you having to<br />
use the accelerator pedal.<br />
The automatic speed control is operated with the<br />
lever on the steering wheel.<br />
86 Operation, Safety<br />
Vehicles with PDK<br />
Downshifts are carried out to help maintain the<br />
pre-selected speed (especially when driving downhill).<br />
Warning!<br />
Risk of an accident resulting in serious personal<br />
injury or death. A constant speed may<br />
not be safe in heavy traffic, or on winding or<br />
slippery roads.<br />
With the speed control system engaged, the<br />
engine speed will not return to idle when removing<br />
the foot from the accelerator pedal.<br />
f Do not use the speed control when it may be<br />
unsafe to keep the car at a constant speed.<br />
f Observe all local and national speed limits.<br />
Switch automatic speed control<br />
readiness on<br />
f Press button A on the automatic speed control<br />
lever.<br />
This green indicator light in the<br />
speedometer now indicates readiness<br />
Hold and store speed<br />
f Bring the car to the desired speed with the<br />
accelerator.<br />
f Then briefly push the operating lever forward<br />
(position 1).<br />
Accelerating (e.g. to overtake)<br />
Option 1<br />
f Increase the speed as usual with the<br />
accelerator.<br />
When you ease off the accelerator, the<br />
previously saved value is set again.<br />
Option 2<br />
f Push operating lever forward (position 1) until<br />
the desired speed is reached.<br />
The speed reached is maintained and stored<br />
when the lever is released.<br />
Option 3<br />
f Push lever slightly forwards (position 1)<br />
(a maximum of 10 times).<br />
The speed is increased by 1 mph (1.6 km/h),<br />
each time the lever is pushed forwards.<br />
Note on operation<br />
Speed control operation is automatically interrupted<br />
if the speed is increased by more than approx.<br />
16 mph (25 km/h ) for longer than 20 seconds.
Decelerating<br />
Option 1<br />
f Pull operating lever towards the steering wheel<br />
(position 2) until the desired speed is reached.<br />
The speed reached is maintained and stored<br />
when the lever is released.<br />
Option 2<br />
f Briefly move lever towards the steering wheel<br />
(position 2) (a maximum of 10 times).<br />
The speed is reduced by 1 mph (1.6 km/h),<br />
each time the lever is moved towards the<br />
steering wheel.<br />
Vehicles with PDK<br />
Downshifts are carried out to improve deceleration<br />
(especially when driving downhill).<br />
Interrupting automatic speed control<br />
operation<br />
f Pull operating lever downwards briefly<br />
(position 3) or<br />
f Operate brake or clutch pedal or<br />
f Switch PDK to selector lever position N.<br />
f Please see the chapter “PORSCHE DOPPEL-<br />
KUPPLUNG (PDK)” on Page 178.<br />
The speed driven before the interruption remains<br />
stored in the memory.<br />
Automatic speed control operation is<br />
interrupted automatically:<br />
– If the set vehicle speed is exceeded by more<br />
than approx. 16 mph (25 km/h) for longer than<br />
20 seconds.<br />
– If the actual vehicle speed falls to approx.<br />
37 mph (60 km/h) below the set vehicle speed<br />
for longer than 60 seconds (upward slopes).<br />
– For PSM control operations.<br />
Resuming the stored speed<br />
f Briefly push operating lever upwards<br />
(position 4).<br />
The speed control accelerates/decelerates<br />
the vehicle to the stored speed.<br />
The stored speed should only be recalled when<br />
traffic conditions and the road surface so permit.<br />
Switching automatic speed control<br />
readiness off<br />
f Press button A on the automatic speed control<br />
lever.<br />
The green readiness light in the speedometer<br />
goes off.<br />
Note<br />
The stored speed value is cleared when the<br />
vehicle is parked and the ignition is switched off.<br />
Important note<br />
On upward or downward slopes, the set speed<br />
cannot always be maintained by the automatic<br />
speed control.<br />
f To obtain sufficient engine braking or a better<br />
engine-speed range, a lower gear needs to be<br />
selected.<br />
Operation, Safety 87
The cupholder extends<br />
out.Cupholder<br />
(holder for drink cans and cups)<br />
f Keep the cupholder closed while driving.<br />
Warning!<br />
Risk of scalding or damage due to spilling<br />
drinks.<br />
f Only use beverage containers which fit.<br />
f Never put overfull containers in the cupholder.<br />
f Never place hot drinks in the cupholder.<br />
88 Operation, Safety<br />
Extending cupholder<br />
f Press the panel.<br />
The panel opens.<br />
f Press the symbol for the respective cupholder.<br />
The cupholder extends out.<br />
f Close panel in the middle.<br />
The cupholder diameter can be increased by pulling<br />
it out to hold larger containers.
Pulling cupholder out<br />
f Pull out holder (arrow).<br />
f Insert container.<br />
f Carefully slide holder inwards to adjust it to the<br />
container size.<br />
Closing cupholder<br />
f Push cupholder drawer in.<br />
f Open panel in the middle.<br />
f Close and engage the cupholder.<br />
f Close panel in the middle.<br />
Ashtray<br />
Opening<br />
f Open ashtray lid.<br />
Emptying<br />
f Open ashtray and carefully pull out ash insert.<br />
f Leave ashtray lid open.<br />
Push in ash insert.<br />
Warning!<br />
Danger of fire.<br />
f Never use ashtray for waste paper disposal,<br />
as it could pose a fire hazard.<br />
Operation, Safety 89
Danger!<br />
Danger of fire in engine compartment due to<br />
burning cigars or cigarettes.<br />
Serious personal injury or death could result<br />
from fire in the engine compartment.<br />
f Do not throw any lit cigars or cigarettes out of<br />
the vehicle.<br />
They can be blown into the air inlets A by the<br />
air flow and cause a fire in the engine compartment.<br />
90 Operation, Safety<br />
Cigarette Lighter<br />
Warning!<br />
Danger of fire and burning.<br />
The cigarette lighter is ready for use, regardless<br />
of the ignition lock position.<br />
f Never leave unsupervised children in the car.<br />
f Never touch the heating element or sides of<br />
the lighter.<br />
f Hold the lighter by the knob only.<br />
Heating lighter<br />
f Open ashtray lid.<br />
f Push in knob of the cigarette lighter.<br />
When ready for use, the lighter will snap back.<br />
Note on operation<br />
The lighter receptacle is not to be used for<br />
electrical accessories (except for the tire filling<br />
compressor).<br />
Maximum power consumption: 150 W<br />
f Please see the chapter “SOCKETS” on<br />
Page 235.
Storage in the Passenger<br />
Compartment<br />
Warning!<br />
Unsecured luggage and heavy objects may<br />
come loose during braking, rapid directional<br />
changes or in an accident and cause serious<br />
personal injury or death.<br />
f Do not transport any heavy objects in the<br />
storage trays.<br />
f Do not carry unsecured luggage or objects in<br />
the passenger compartment.<br />
Additional storage possibilities<br />
– in the doors,<br />
– in the door sill next to the passenger’s seat,<br />
– in the center console,<br />
– storage tray with coin holder between seats,<br />
– glove compartment with CD and pen holder,<br />
– clothes hook on back of seat backrests<br />
(depending on vehicle equipment),<br />
– side storage compartments behind the seats.<br />
Storage tray between the seats<br />
Opening<br />
f Press release button and lift the lid.<br />
There is a coin holder in the forward part of the<br />
storage tray.<br />
f Please see the chapter “SOCKETS” on<br />
Page 235.<br />
Operation, Safety 91
Glove compartment<br />
Warning!<br />
Risk of injury by the glove compartment lid in<br />
case of an accident.<br />
f Keep the glove compartment closed while<br />
driving.<br />
Opening<br />
f Pull the catch and open the lid.<br />
Locking<br />
f Lock the catch to secure the contents against<br />
unauthorized access.<br />
92 Operation, Safety<br />
CD holder<br />
Occupied drawers are indicated by a red window.<br />
Opening drawers<br />
f Push the button of the drawer you wish to<br />
open.<br />
Closing drawers<br />
f Fold up CD drawer and close until it engages.<br />
Pen holder<br />
A pen can be clipped in on the right side of the CD<br />
holder.<br />
Side storage compartments behind the<br />
seats<br />
Warning!<br />
Danger of injury during braking, rapid direction<br />
changes or in an accident.<br />
f Do not carry items of luggage or objects in the<br />
passenger compartment unsecured.<br />
f Do not transport any heavy objects in the oddments<br />
tray.<br />
Opening<br />
f Lift lid on the handhold.
A - Opening front luggage compartment lid<br />
B - Opening rear luggage compartment lid<br />
Front Luggage Compartment Lid<br />
Unlocking the lid<br />
f Operate pull-button A next to the driver’s seat<br />
or corresponding button of the remote control.<br />
When the lid is open, the luggage compartment<br />
is lit.<br />
f Please see the chapter “LOAD SWITCH-OFF AF-<br />
TER 2 HOURS OR 7 DAYS” on Page 236.<br />
f Please see the chapter “KEYS” on Page 15.<br />
Important Note<br />
If the vehicle battery is discharged, the front luggage<br />
compartment lid can be opened only by connecting<br />
an external electrical power source.<br />
f Please see the chapter “EMERGENCY UNLO-<br />
CKING OF THE FRONT LUGGAGE COMPART-<br />
MENT LID” on Page 238.<br />
or the description inside the fuse box lid.<br />
Warning message<br />
A warning message in the on-board computer<br />
comes on if the lids are not completely closed.<br />
f Fully close the lid.<br />
Opening front luggage compartment lid<br />
Caution!<br />
Risk of damage to luggage compartment lid<br />
or windshield wipers.<br />
f Make sure that the windshield wipers are not<br />
folded out forwards when opening the lid.<br />
f Raise lid slightly and unlatch the safety catch<br />
with the red lever (arrow).<br />
Operation, Safety 93
Closing front and rear luggage<br />
compartment lid<br />
f Lower the lid and close it.<br />
f Push the lid closed with the palm of your hand<br />
in the area of the lock.<br />
Check that the lid has correctly engaged in the<br />
lock.<br />
Warning!<br />
Risk of loss of control or an accident,<br />
resulting in serious personal injury or death.<br />
f Should you notice at any time while driving that<br />
one of the lids is not secured properly, please<br />
stop immediately in a suitable place and close<br />
it.<br />
The front lid may fly up impairing vision.<br />
94 Operation, Safety<br />
Front Luggage Compartment<br />
Access covers A and B<br />
Caution!<br />
Risk of injury or damage.<br />
f Do not store any objects behind the access<br />
covers A and B.<br />
Tool box<br />
Opening<br />
f Unlock turn-locks C.<br />
E - Adapter for security wheel bolts<br />
F - Tire filling compressor<br />
G -Towing hook<br />
H -Tool kit<br />
I -Tire sealant<br />
f Open tool box and place it on the floor of the<br />
luggage compartment.<br />
Closing<br />
f Insert tool box into the guide pegs in the luggage<br />
compartment floor.<br />
f Close tool box and lock the turn-locks C.
A - Opening front luggage compartment lid<br />
B - Opening rear luggage compartment lid<br />
Rear Lid<br />
Releasing the rear lid<br />
f Operate pull-button B next to the driver’s seat<br />
or corresponding button of the remote control.<br />
Opening the rear lid<br />
Caution!<br />
Risk of damage to the paint on the rear lid if<br />
this touches the load transported on the roof<br />
rack when opening.<br />
f Only open the rear lid if this cannot touch the<br />
load.<br />
The rear lid can be held open in 2 positions.<br />
The luggage compartment is illuminated when the<br />
respective lid is open.<br />
f Please see the chapter “LOAD SWITCH-OFF AF-<br />
TER 2 HOURS OR 7 DAYS” on Page 236.<br />
f Position 1: Raise rear lid up to pressure point.<br />
f Position 2: Raise rear lid beyond the pressure<br />
point.<br />
Closing the rear lid<br />
f Pull down the rear lid on the handle and allow it<br />
to fall into the lock.<br />
Check that the rear lid has correctly engaged<br />
in the lock.<br />
A warning message in the on-board computer<br />
comes on if the lids are not completely closed.<br />
f Fully close the lid.<br />
Warning message<br />
Operation, Safety 95
A - Topping up engine oil<br />
B - Checking coolant level or topping up<br />
Rear luggage compartment<br />
Service flap<br />
f Press catch button on the service flap and<br />
open flap.<br />
96 Operation, Safety<br />
Luggage net, tie-down rings<br />
Warning!<br />
Unsecured luggage and heavy objects may<br />
come loose during braking, rapid directional<br />
changes or in an accident and cause serious<br />
personal injury or death.<br />
f Do not carry items of luggage or objects in the<br />
passenger compartment unsecured. Secure<br />
load against sliding.<br />
f Do not transport heavy objects under the luggage<br />
net.<br />
f Hang the luggage net on the 4 tie-down rings<br />
around the engine cover or in the rear luggage<br />
compartment.
Cargo partition<br />
Warning!<br />
Unsecured luggage and heavy objects may<br />
come loose during braking, rapid directional<br />
changes or in an accident and cause serious<br />
personal injury or death.<br />
f Do not carry items of luggage or objects in the<br />
passenger compartment unsecured. Secure<br />
load against sliding using the cargo partition.<br />
Removing the cargo partition<br />
1. Turn both turn-locks to ”Lock open“ from the<br />
passenger compartment.<br />
2. Lift the cargo partition somewhat from the luggage<br />
compartment and disengage on both sides<br />
from the upper hooks B and hold.<br />
3. Put cargo partition at an angle and lift out from<br />
the lower mounts A.<br />
Operation, Safety 97
Installing cargo partition<br />
1. Turn both turn-locks to ”Lock open“ on the<br />
cargo partition.<br />
2. Engage opened locks in the lower mounts A.<br />
3. Lift cargo partition somewhat and engage in<br />
the upper hooks B on both sides.<br />
4. Turn both turn-locks to ”Lock closed“ on the<br />
cargo partition.<br />
98 Operation, Safety<br />
Folding cargo partition forward<br />
The luggage net must be disengaged before folding<br />
the cargo partition forward.<br />
1. Turn both turn-locks to ”Lock open“ on the<br />
cargo partition.<br />
2. Lift the cargo partition somewhat and disengage<br />
on both sides from the upper hooks B<br />
and hold.<br />
3. Fold the cargo partition forward carefully (do<br />
not press down with force) and lay it on the carpet.<br />
Make sure that the partition does not slip out<br />
of the lower mounts.<br />
4. Turn both turn-locks to ”Lock closed“ on the<br />
cargo partition.
Luggage cover<br />
The luggage cover protects luggage in the rear<br />
storage area from direct sunlight and curious<br />
eyes.<br />
Caution!<br />
Risk of damage to luggage cover from<br />
sharp-edged or sliding pieces of luggage.<br />
f Always remove luggage cover when pieces of<br />
luggage can damage the luggage cover.<br />
Removing the luggage cover<br />
f Hold luggage cover with one hand and loosen<br />
both turn-locks. Remove the luggage cover<br />
using both hands.<br />
Installing the luggage cover<br />
f Place luggage cover into the mountings with<br />
both hands, hold it with one hand and lock both<br />
turn-locks.<br />
Operation, Safety 99
Front luggage compartment<br />
Trunk Entrapment<br />
Your vehicle is equipped with an internal front trunk<br />
release mechanism.<br />
A person trapped in the front luggage compartment<br />
can release the lid from the inside using<br />
unlocking handle A.<br />
The handle A is fluorescent and glows in the dark.<br />
100 Operation, Safety<br />
Note<br />
f When loading the luggage compartment, make<br />
sure that items of luggage or other objects<br />
cannot become caught on handle A.<br />
This could cause the luggage compartment to<br />
open unintentionally.<br />
A warning message in the on-board computer<br />
lights up when unlocking handle A is operated.<br />
f Stop the vehicle immediately when the warning<br />
message lights up.<br />
f Check the luggage compartment.<br />
f Close the lid.<br />
Warning message<br />
Function with vehicle stationary<br />
If the luggage compartment lid is unlocked with<br />
unlocking handle A, the lid can be opened from the<br />
inside immediately.<br />
Function with vehicle in motion<br />
If the luggage compartment lid is unlocked with<br />
unlocking handle A when a speed of 2 mph<br />
(3 km/h) is exceeded, the warning message in the<br />
on-board computer lights up.<br />
At the same time, the lid is unlocked and the latch<br />
striker pops into the catch-hook position.<br />
Danger!<br />
Risk of accident.<br />
If the warning message in the on-board computer<br />
lights up when the vehicle is in motion,<br />
the lid may impact in front of the windshield<br />
and can tear off.<br />
You can lose control of the vehicle, and<br />
serious personal injury or death may result.<br />
f Stop the vehicle immediately when the warning<br />
message lights up.<br />
f Check the luggage compartment.<br />
f Close the lid.<br />
Note<br />
f The front lid cannot be opened from the inside<br />
if the battery is disconnected or empty.<br />
Safety reasons therefore require that you<br />
unscrew the latch striker of the front lid<br />
lock if you plan to put the vehicle out of<br />
operation for an extended period.<br />
f Please consult your authorized Porsche<br />
dealer.<br />
They will advise you about the necessary<br />
measures.
Porsche Communication<br />
Management (PCM)<br />
f Refer to the separate operating instructions<br />
before putting the PCM into operation.<br />
f Please see the chapter “LOAD SWITCH-OFF<br />
AFTER 2 HOURS OR 7 DAYS” on Page 236.<br />
Warning!<br />
There is a danger of accident if you set or<br />
operate the on-board computer, radio, navigation<br />
system, telephone or other equipment<br />
when driving.<br />
This could distract you from the traffic and<br />
cause you to lose control of the vehicle resulting<br />
in serious personal injury or death.<br />
f Operate the components while driving only if<br />
the traffic situation allows you to do so safely.<br />
f Carry out any complicated operating or setting<br />
procedures only with the vehicle stationary.<br />
The reception conditions for the radio module<br />
integrated in the PCM change continuously as you<br />
drive. Interference from buildings, terrain and the<br />
weather is unavoidable.<br />
FM stereo reception is particularly susceptible to<br />
varying reception conditions.<br />
Electronic accessories should only be retrofitted<br />
by your authorized Porsche dealer.<br />
Accessories which have not been tested and<br />
approved by Porsche may impair radio function<br />
and reception.<br />
Navigation<br />
When put into operation for the first time, a<br />
distance of approx. 30 miles (50 km) must be<br />
driven in order for the navigation system to<br />
complete the process of fine calibration.<br />
The same applies when the tires are changed (e.g.<br />
summer/snow tires) or new tires fitted.<br />
Full location accuracy is not yet achieved during<br />
the fine-calibration process.<br />
If the vehicle has been transported (e.g. ferry, car<br />
train), the system may take a few minutes to determine<br />
the current location after it has been<br />
switched on.<br />
Serious tire slip (e.g. spinning wheels on snow)<br />
may result in temporarily inaccurate navigation.<br />
When the battery has been disconnected, it may<br />
take up to 15 minutes before the navigation<br />
system is operational again.<br />
Car Audio Operation/Tips<br />
For radio operation see your radio manual<br />
which is included with your on-board literature.<br />
f Please see the chapter “LOAD SWITCH-OFF AF-<br />
TER 2 HOURS OR 7 DAYS” on Page 236.<br />
FM reception<br />
A vehicle is not an ideal place to listen to a radio.<br />
Because the vehicle moves, reception conditions<br />
are constantly changing.<br />
Buildings, terrain, signal distance and noise from<br />
other vehicles are all working against good reception.<br />
Some conditions affecting FM may appear to be<br />
problems when they are not.<br />
The following characteristics are completely normal<br />
for a given reception area, and they do not indicate<br />
any problem with the radio itself.<br />
Note<br />
Electronic accessories should only be installed by<br />
your authorized Porsche dealer.<br />
Equipment which has not been tested and approved<br />
by Porsche may impair radio reception.<br />
Operation, Safety 101
Fading and drifting<br />
FM range is limited to about 25 miles (40 km),<br />
except for some high power stations.<br />
If a vehicle is moving away from the desired station’s<br />
transmitter, the signal will tend to fade and/<br />
or drift. This condition is more prevalent with FM<br />
than AM, and is often accompanied by distortion.<br />
Fading and drifting can be minimized to a certain<br />
degree by careful attention to fine tuning or selection<br />
of a stronger signal.<br />
Static and fluttering<br />
When the line-of-sight link between a transmitter<br />
and vehicle is blocked by large buildings or mountains,<br />
the radio sound may be accompanied with<br />
static or fluttering because of the characteristic of<br />
FM.<br />
In a similar effect, a fluttering noise is sometimes<br />
heard when driving along a tree-lined road.<br />
This static and fluttering can be reduced by adjusting<br />
the tone control for greater bass response until<br />
the disturbance has passed.<br />
Multipath<br />
Because of the reflecting characteristics of FM,<br />
direct and reflected signals may reach the antenna<br />
at the same time (multipath) and cancel each other<br />
out.<br />
As a vehicle moves through these electronic dead<br />
spots, the listener may hear a momentary flutter<br />
or loss of reception.<br />
102 Operation, Safety<br />
Station swapping<br />
When two FM stations are close to each other, and<br />
an electronic dead spot, such as static or multipath<br />
area, interrupts the original signal, sometimes<br />
the stronger second signal will be selected<br />
automatically until the original one returns.<br />
This swapping can also occur as you drive away<br />
from the selected station and approach another<br />
station of a stronger signal.<br />
Compact disc player<br />
Caution!<br />
To avoid damage to compact disc player and<br />
discs.<br />
f Use only compact discs labeled as shown, having<br />
no dirt, damage or warpage.<br />
f Never attempt to disassemble or oil any part<br />
of the player unit.<br />
Do not insert any object other than a disc into<br />
the slot.<br />
Remember there are no user-serviceable parts<br />
inside the compact disc player.<br />
f Do not allow the disc to sustain any fingerprints,<br />
scrapes or stickers on the surfaces.<br />
This may cause poor sound quality.<br />
Hold the disc only on the edge or center hole.<br />
f When not in use, take the disc out of the player,<br />
put the disc back into its case and store it<br />
away from dust, heat, damp and direct<br />
sunlight.<br />
Leaving the disc on the dashboard in the sun<br />
can damage the disc.<br />
f If the disc gets dirty, clean the disc by wiping<br />
the surfaces from the center to the outside in<br />
a radial direction with a soft cloth.<br />
Do not use a conventional record cleaner or<br />
anti-static record preservative.<br />
Disc cleaners are available in audio stores.
Car Telephone and<br />
Aftermarket Alarms<br />
Important legal and safety information<br />
regarding the use of cellular telephones<br />
Some states may prohibit the use of cellular telephones<br />
while driving a vehicle. Check the laws and<br />
regulations on the use of cellular telephones in the<br />
areas where you drive.<br />
Danger!<br />
Risk of an accident.<br />
Severe personal injury or death can result in<br />
the event of an accident.<br />
Looking away from the road or turning your<br />
attention away from your driving can cause<br />
an accident and serious or fatal injury.<br />
When using your cellular telephone, you should always:<br />
f Give full attention to your driving - pull off the<br />
road and park before making or answering a<br />
call if traffic conditions so require; and<br />
f Keep both hands on the steering wheel - use<br />
hands-free operation (if available) - pull off the<br />
road and park before using a hand-held telephone.<br />
It is essential to observe the telephone<br />
manufacturer's instructions before operating<br />
the telephone.<br />
Any portable telephone or radio transmitter which<br />
is used in a Porsche must be properly installed in<br />
accordance with the technical requirements of<br />
Porsche.<br />
The transmission power must not exceed<br />
10 W.<br />
The devices must possess a type approval for<br />
your vehicle and have an “e” symbol.<br />
If you should require equipment with transmission<br />
power values greater than 10 W, please consult<br />
your authorized Porsche dealer for this purpose.<br />
The dealer is familiar with the technical requirements<br />
for installing devices of this kind.<br />
The antennas for all radios and telephones with a<br />
transmitting antenna must be externally mounted.<br />
The improper installation of radios or telephones<br />
or use of a radio or telephone with a transmitting<br />
antenna inside the car may cause the warning<br />
lights to come on.<br />
Improper installation of such equipment can create<br />
a discharged battery or excessive current<br />
draw from added equipment.<br />
If aftermarket systems are installed by non-dealership<br />
technicians or outside the selling dealer,<br />
problems may result. Installation of aftermarket<br />
equipment is not covered under the New Car Warranty.<br />
f Consult your authorized Porsche dealer about<br />
the installation of non Porsche approved equipment.<br />
Reception quality<br />
The reception quality of your car telephone will<br />
change constantly when you are driving. Interference<br />
caused by buildings, landscape and weather<br />
is unavoidable. It may become particularly difficult<br />
to hear when using the hands-free function due to<br />
external noise such as engine and wind noise.<br />
Automatic car-wash<br />
f Unscrew external antennas before using an automatic<br />
car-wash.<br />
Operation, Safety 103
Antenna<br />
f Always unscrew the external antenna before<br />
using an automatic car-wash.<br />
104 Operation, Safety<br />
Hands-free microphone<br />
Hands-free microphones installed at the factory<br />
must be adapted to the type of telephone in use.<br />
Your authorized Porsche dealer will be pleased to<br />
advise you.<br />
iPod, USB and AUX<br />
The interfaces for iPod, USB and AUX are located<br />
in the storage tray between the seats.<br />
f Please refer to the chapter “External Audio<br />
Source” in the separate PCM/CDR operating<br />
instructions.<br />
Note<br />
Do not leave an iPod, USB storage device or an<br />
external audio source in the vehicle for a<br />
prolonged period as extreme ambient conditions<br />
(temperature fluctuations, air humidity) can occur<br />
in the vehicle.
Roof Transport System<br />
f Please follow the separate instructions for fitting<br />
the Roof Transport System.<br />
f Only use Roof Transport Systems from the<br />
Porsche Tequipment product range or Roof<br />
Transport Systems which have been tested<br />
and approved for your car by Porsche. Fitting<br />
normal commercially available luggage racks<br />
is not possible.<br />
The Porsche Roof Transport System allows you<br />
to carry various sports and hobby equipment.<br />
Your Porsche partner will be pleased to tell you<br />
about the various different uses of the Roof Transport<br />
System.<br />
Caution!<br />
f Risk of damage to the paint on the rear lid.<br />
Only open the rear lid if this cannot touch the<br />
load.<br />
f Completely remove the Roof Transport System<br />
before using an automatic car wash - risk of damage<br />
to the vehicle!<br />
f Do not exceed the maximum permitted payload<br />
of 132 lbs. (60 kg), the maximum permitted<br />
gross weight and the maximum permitted<br />
axle loads.<br />
f Please see the chapter “WEIGHTS” on<br />
Page 272.<br />
f Distribute load evenly, storing heavy items as<br />
low as possible. Items of luggage must not<br />
project beyond the side of the load area.<br />
f Fix and secure every item to the basic carrier<br />
with a rope or lashing strap (do not use elastic<br />
rubber tensioners).<br />
f Before every trip, and at regular intervals<br />
during long trips, check that Roof Transport<br />
System and load are secure. Re-tighten if necessary<br />
and secure additionally by locking.<br />
f When the Roof Transport System is loaded, the<br />
maximum speed depends on the nature, size<br />
and weight of the load being carried. But never<br />
drive faster than 90 mph (140 km/h).<br />
f With the basic carrier fitted and no load, do not<br />
exceed a maximum speed of 110 mph<br />
(180 km/h).<br />
f Driving, braking and steering behavior change<br />
due to the higher center of gravity and the greater<br />
wind-resistant area. You should adapt your<br />
driving style appropriately.<br />
f Since fuel consumption and noise are increased<br />
with the Roof Transport System fitted, it<br />
should not remain on the vehicle if not in use.<br />
Operation, Safety 105
1, 2, 3 - Programmable buttons<br />
A - Light-emitting diode for status identification<br />
HomeLink<br />
The programmable HomeLink replaces up to three<br />
original hand-held transmitters used to operate<br />
various devices (e.g. garage door, gate to the<br />
property, alarm system).<br />
You can program buttons 1 to 3 with a frequency<br />
of an original handheld transmitter.<br />
106 Operation, Safety<br />
Warning!<br />
Risk of accident when using the HomeLink if<br />
persons, animals or objects are within the<br />
range of movement of the equipment that is<br />
being operated.<br />
f When using the HomeLink, ensure that no<br />
persons, animals or objects are within the<br />
range of movement of the equipment that is<br />
being operated.<br />
f Observe the safety notes for the original<br />
hand-held transmitter.<br />
Preconditions for operating and<br />
programming the HomeLink:<br />
– Ignition is switched on.<br />
– Daytime driving lights/fog lights are switched<br />
off.<br />
To operate the respective device:<br />
f Press the appropriate button (1, 2 or 3).<br />
Light-emitting diode A lights up during signal<br />
transfer.<br />
Note on operation<br />
f Always use the HomeLink opener in the<br />
direction of travel.<br />
Otherwise, range restrictions cannot be ruled<br />
out.<br />
f Before selling the vehicle, delete the<br />
programmed signals of the HomeLink.<br />
f Please read the instructions for the original<br />
hand-held transmitter to find out whether the<br />
original transmitter is equipped with fixed or<br />
changeable code.<br />
f Always fit new batteries in your hand-held transmitter<br />
before programming the transmitter.
Allocating signals to the buttons<br />
f Please follow the operating instructions for the<br />
original hand-held transmitter.<br />
Prior to programming the HomeLink for the<br />
first time<br />
The following process deletes the standard codes<br />
set at the factory. Do not repeat the process if you<br />
program further buttons.<br />
f Keep the two outer buttons 1 and 3<br />
depressed for approx. 20 seconds until lightemitting<br />
diode A begins to flash quickly.<br />
All programmed signals of buttons 1 to 3 are<br />
deleted.<br />
Programming HomeLink with fixed code<br />
hand-held transmitters<br />
1. Press and hold the desired button until the<br />
light-emitting diode begins to flash slowly.<br />
You then have approx. 5 minutes to perform<br />
steps 2 and 3.<br />
2. Hold the original hand-held transmitter approx.<br />
0 to 12 in. (0 to 30 cm) in front of the marked<br />
position (figure) on the vehicle.<br />
3. Press the transmit button on the original handheld<br />
transmitter until the daytime driving lights<br />
flash three times (up to approx. 45 seconds).<br />
4. Repeat steps 1 to 3 to allocate other buttons.<br />
Programming HomeLink with changeable<br />
code hand-held transmitters<br />
1. Press and hold the desired button until the<br />
light-emitting diode begins to flash slowly.<br />
You then have approx. 5 minutes to perform<br />
steps 2 and 3.<br />
2. Hold the original hand-held transmitter approx.<br />
0 to 12 in. (0 to 30 cm) in front of the marked<br />
position (figure) on the vehicle.<br />
3. Press the transmit button on the original handheld<br />
transmitter until the daytime driving lights<br />
flash three times (up to approx. 45 seconds).<br />
4. To synchronize the system:<br />
Press the programming button on the receiver<br />
for the garage door actuator.<br />
Afterwards, you usually have approx.<br />
30 seconds to initiate step 5.<br />
5. Press the allocated HomeLink button twice.<br />
(With some devices, the button to be allocated<br />
must be pressed a third time in order to<br />
complete the setting process.)<br />
6. Repeat the programming steps to allocate<br />
other buttons.<br />
Note<br />
Several attempts with different distances between<br />
the vehicle and the original hand-held transmitter<br />
might be necessary.<br />
The daytime driving lights will flash once the 5<br />
minutes have been exceeded. Programming must<br />
be repeated from the beginning.<br />
f Please consult your authorized Porsche dealer<br />
if you have not been able to successfully<br />
allocate signals for the garage door opener to<br />
the buttons even though you have carefully<br />
followed the instructions in this chapter and<br />
the operating instructions for the original handheld<br />
transmitter.<br />
Deleting programmed signals of the<br />
HomeLink<br />
(e.g., when selling the vehicle)<br />
Keep the two outer buttons 1 and 3 depressed<br />
for approx. 20 seconds until light-emitting diode A<br />
begins to flash quickly.<br />
All programmed signals of buttons 1 to 3 are<br />
deleted.<br />
Operation, Safety 107
108 Operation, Safety
Automatic Air Conditioning System, Heated Rear Window/Door Mirror Heating<br />
Air Conditioning......................................... 110<br />
Automatic Air Conditioning System ............. 113<br />
Central and Side Vents .............................. 116<br />
Fresh-air Intake ......................................... 116<br />
Heated Rear Window/Door Mirror Heating... 117<br />
Automatic Air Conditioning System, Heated Rear Window/Door Mirror Heating 109
Air Conditioning<br />
Air quantity, air distribution, and temperature can<br />
be set on the control panel.<br />
The display panel shows the following<br />
– Temperature<br />
– Air-conditioning compressor on/off<br />
– Blower speed<br />
– AC max<br />
– Air distribution<br />
Setting temperature<br />
f Press button F upwards or downwards<br />
respectively.<br />
The selected temperature is shown on the display<br />
by a bar display.<br />
If a bar cannot be seen, the temperature is set<br />
to maximum cold.<br />
If all bars can be seen, the temperature is set to<br />
maximum warm.<br />
Note<br />
f For maximum cooling, activate AC max<br />
button G.<br />
110 Automatic air conditioning system, Heated rear window/Door mirror heating<br />
A - Defrosting the windshield<br />
B - Heated rear window<br />
C - Temperature sensor<br />
D - AC OFF button (air-conditioning compressor off/on)<br />
E - Recirculating-air button<br />
F - Temperature button<br />
G - AC max<br />
H - Air distribution to footwell<br />
I - Air distribution to central and side vents<br />
J - Air distribution to windshield<br />
K - Blower speed button<br />
Adjusting blower speed<br />
f Press button K upwards or downwards<br />
respectively.<br />
The preset blower speed is increased or decreased.<br />
The blower speed is shown on the display by a bar<br />
display.<br />
The compressor is switched off at low blower<br />
speeds.
Defrosting the windshield<br />
f Press button A (switch on or off).<br />
The light-emitting diode in the button lights up.<br />
The windshield is demisted or defrosted as<br />
quickly as possible.<br />
Air flows to the windshield only.<br />
Recirculating-air setting<br />
The outside-air supply is interrupted and only the<br />
inside air is circulated.<br />
Warning!<br />
Risk of accident due to impaired vision,<br />
resulting in serious personal injury or death.<br />
In recirculating-air setting, the windows may<br />
fog up.<br />
f Only select recirculating-air setting for short<br />
periods.<br />
f If the windows fog up, switch recirculating-air<br />
setting off immediately by pressing the<br />
recirculating-air button again and select the<br />
”Defrost windshield“ function.<br />
Switching recirculating-air mode on or off<br />
f Press recirculating-air button E.<br />
The light-emitting diode in the button lights up.<br />
AC OFF– switching the air-conditioning<br />
compressor on and off<br />
The air conditioning compressor switches off<br />
automatically at temperatures below approx.<br />
37 °F/3 °C and cannot be switched on, even<br />
manually.<br />
Whenever outside temperatures exceed approx.<br />
37 °F/3 °C, the air-conditioning compressor can<br />
be switched on or off manually.<br />
The compressor can be switched off manual to<br />
save fuel.<br />
f Press AC OFF button D.<br />
The light-emitting diode in the button lights up.<br />
The compressor is switched off.<br />
f If the interior temperature is too high, switch<br />
on the compressor again.<br />
To dry incoming air in damp weather, do not<br />
switch off the air-conditioning compressor.<br />
This prevents fogging of windows.<br />
AC max operation<br />
In AC max operation, the interior of your vehicle is<br />
cooled as quickly as possible.<br />
f Press AC max button H.<br />
The light-emitting diode in the button lights up.<br />
Air distribution<br />
The individual air distributions can be combined as<br />
desired.<br />
If an air distribution is not selected, no symbol<br />
appears in the display panel. Air flows then from<br />
all vents as well as to the windshield.<br />
Recommended setting in Summer –<br />
Air distribution to central and side vents<br />
Recommended setting in Winter –<br />
Air distribution to footwell and windshield<br />
Air distribution to footwell<br />
f Press button H.<br />
The selection appears on the display panel.<br />
The air flows to the footwell.<br />
Air distribution to center and side<br />
vents<br />
f Press button I.<br />
The selection appears on the display panel.<br />
The air flows from the central and side vents.<br />
Vents must be open.<br />
Air distribution to windshield<br />
f Press button J.<br />
The selection appears on the display panel.<br />
The air flows to the windshield.<br />
Automatic air conditioning system, Heated rear window/Door mirror heating 111
Information on air-conditioning<br />
compressor<br />
– May switch off briefly to ensure sufficient<br />
engine cooling if the engine is operating under<br />
extreme load.<br />
– The air-conditioning compressor switches off<br />
automatically at temperatures below approx.<br />
37 °F/3 °C and cannot be switched on, even<br />
manually.<br />
– Operates most effectively with the windows<br />
closed.<br />
If the vehicle has been in the sun for a long<br />
time, it is a good idea to ventilate the interior<br />
briefly with the windows open.<br />
– Depending on the outside temperature and humidity,<br />
condensation can drip from the evaporator<br />
and form a pool under the car.<br />
This is normal and not a sign of leakage.<br />
– If uncooled air flows out when the lowest<br />
temperature has been set, switch off the air<br />
conditioning compressor and have the fault<br />
remedied.<br />
Please contact your authorized Porsche dealer<br />
for further information.<br />
112 Automatic air conditioning system, Heated rear window/Door mirror heating
Automatic Air Conditioning System<br />
The automatic air-conditioning system controls<br />
the preselected interior temperature completely<br />
automatically.<br />
If necessary, the automatic system can be<br />
manually adjusted.<br />
Automatic mode<br />
f Press AUTO button G.<br />
AUTO will appear on the display panel.<br />
Air quantity and distribution are automatically<br />
controlled and variations are compensated.<br />
All automatic setting functions can be individually<br />
changed.<br />
This setting is retained until the appropriate<br />
function button is pressed again or the AUTO<br />
button is pressed.<br />
A - Defrosting the windshield<br />
B -Heated rear window<br />
C -Temperature sensor<br />
D - AC OFF button (air-conditioning compressor off/on)<br />
E - Recirculating-air button<br />
F -Temperature button<br />
G - AUTO button (automatic mode)<br />
H - Air distribution to footwell<br />
I - Air distribution to central and side vents<br />
J - Air distribution to windshield<br />
K -Blower speed button<br />
Automatic air conditioning system, Heated rear window/Door mirror heating 113
Setting temperature<br />
f Press button F upwards or downwards<br />
respectively.<br />
To suit personal comfort, the interior temperature<br />
can be adjusted between 61 °F and 85 °F/16 °C<br />
and 29.5 °C.<br />
Recommendation: 72 °F/22 °C.<br />
If “LO” or “HI” appears on the display, the system<br />
is operating at maximum cooling or heating power.<br />
Automatic control is no longer active.<br />
Note<br />
If the preselected temperature is changed, the<br />
blower speed can increase automatically in automatic<br />
mode.<br />
The desired temperature is reached more quickly<br />
this way.<br />
Sensors<br />
To avoid affecting the performance of the air-conditioning<br />
system:<br />
f Do not cover the sun sensor on the instrument<br />
panel or the temperature sensor C.<br />
f Press button A (switch on or off).<br />
The windshield is defogged or defrosted as<br />
quickly as possible.<br />
Air flows to the windshield only.<br />
The light-emitting diode in the button lights up.<br />
AC OFF – switching compressor for airconditioning<br />
system on and off<br />
The air-conditioning compressor switches off<br />
automatically at temperatures below approx.<br />
37 °F/3 °C and cannot be switched on, even<br />
manually.<br />
Whenever outside temperatures exceed approx.<br />
37 °F/3 °C, the air-conditioning compressor is<br />
always switched on in automatic mode.<br />
The compressor can be switched off to save fuel,<br />
but control comfort is then limited:<br />
f Press AC OFF button D.<br />
The compressor is switched off.<br />
The light-emitting diode in the button lights up.<br />
f If the interior temperature is too high, switch<br />
compressor back on or press AUTO button.<br />
To dry incoming air in damp weather, do not<br />
switch off the air-conditioning compressor.<br />
This prevents fogging of windows.<br />
114 Automatic air conditioning system, Heated rear window/Door mirror heating<br />
Defrosting the windshield Adjusting blower speed<br />
f Press button K upwards or downwards respectively.<br />
The preset blower speed is increased or<br />
decreased.<br />
The speed stages are indicated by a bar display.<br />
If the button is pressed downwards at the lowest<br />
blower stage, the blower and automatic control<br />
are switched off. “OFF” will appear on the display<br />
field.<br />
Pressing the button upwards or pressing the<br />
AUTO button switches the blower and automatic<br />
control back on again.<br />
Recirculating-air setting<br />
Warning!<br />
Risk of accident due to impaired vision,<br />
resulting in serious personal injury or death.<br />
In recirculating-air setting, the windows may<br />
fog up.<br />
f Only select recirculating-air setting for short<br />
periods.<br />
f If the windows fog up, switch recirculating-air<br />
setting off immediately by pressing the<br />
circulating-air button again and select the<br />
“Defrost windshield” function.
Switching recirculating-air setting on or off<br />
f Press button E.<br />
The outside-air supply is interrupted and only<br />
the inside air is circulated.<br />
The light-emitting diode in the button lights up.<br />
Over approx. 37 °F/3 °C<br />
If the air-conditioning compressor was off, it<br />
switches on automatically. The duration of recirculating-air<br />
setting is not limited.<br />
Below approx. 37 °F/3 °C<br />
The air-conditioning compressor is switched off.<br />
Recirculating-air setting is automatically ended<br />
after approx. 3 minutes.<br />
Air distribution<br />
The individual air distributions can be combined as<br />
desired.<br />
Recommended setting in Summer:<br />
Air distribution to central and side vents.<br />
Recommended setting in Winter:<br />
Air distribution to footwell and windshield.<br />
Air distribution to footwell<br />
f Press button H.<br />
The air flows to the footwell.<br />
The selection appears on the display panel.<br />
Air distribution to central and side<br />
vents<br />
f Press button I.<br />
The air flows from the central and side vents.<br />
Vents must be open.<br />
The selection appears on the display panel.<br />
Air distribution to windshield<br />
f Press button J.<br />
The air flows to the windshield.<br />
The selection appears on the display panel.<br />
Note on operation<br />
f On vehicles with the Sport Chrono Package<br />
Plus, individual air conditioning settings can be<br />
stored on your vehicle key.<br />
Please observe the chapter “Individual<br />
Memory” in the separate PCM operating<br />
instructions.<br />
General instructions for air-conditioning<br />
compressor<br />
– Can switch off briefly if engine is under an extreme<br />
load to ensure sufficient engine cooling.<br />
– Switches off automatically at temperatures below<br />
approx. 37 °F/3 °C and cannot be<br />
switched on, even manually.<br />
– Operates most effectively with windows<br />
closed.<br />
If the car has been in the sun for a long time, it<br />
is a good idea to ventilate the interior briefly<br />
with the windows open.<br />
– Depending on the outside temperature and humidity,<br />
condensation can drip from the evaporator<br />
and form a pool under the vehicle.<br />
This is normal and not a sign of leakage.<br />
– If uncooled air flows out when the lowest<br />
temperature has been set, switch off the airconditioning<br />
compressor and have the fault<br />
repaired at an authorized Porsche dealer.<br />
Automatic air conditioning system, Heated rear window/Door mirror heating 115
A - Continuous opening and closing<br />
B - Setting vent direction<br />
Central and Side Vents<br />
Opening vents<br />
f Rotate knurled wheel upward.<br />
Closing vents<br />
f Rotate knurled wheel downward.<br />
Changing air flow direction<br />
f Move the vanes to make the air flow in the<br />
desired direction.<br />
Outside air or conditioned air can be delivered<br />
from all vents, depending on the air-distribution<br />
setting on the operating panel.<br />
116 Automatic air conditioning system, Heated rear window/Door mirror heating<br />
Fresh-air Intake<br />
To ensure proper air intake:<br />
f Keep the fresh-air inlet between the luggage<br />
compartment lid and the windshield free from<br />
snow, ice and leaves.
Heated Rear Window/Door<br />
Mirror Heating<br />
The heated rear window/door mirror heating is<br />
ready for operation when the ignition is on.<br />
Switching on<br />
f Press button.<br />
The light-emitting diode in the button lights up.<br />
After approx. 15 minutes, the heating switches off<br />
automatically.<br />
The heater can be switched back on by pressing<br />
the button again.<br />
Switching off<br />
f Press button.<br />
The light-emitting diode in the button goes out.<br />
Automatic air conditioning system, Heated rear window/Door mirror heating 117
118 Automatic air conditioning system, Heated rear window/Door mirror heating
Instruments, On-Board Computer, Warnings<br />
Instrument Panel USA Models ..................... 120<br />
Instrument Panel Canada Models ................ 122<br />
Automatic Speed Control Indicator light ...... 124<br />
Instrument Illumination ............................... 124<br />
Trip Odometer .......................................... 125<br />
Speedometer ............................................ 126<br />
Changing over between Miles / Kilometers .. 126<br />
Tachometer .............................................. 127<br />
Turn Signal Indicator Light ......................... 127<br />
High Beam Indicator Light .......................... 127<br />
Gear Shift Indicator<br />
(in vehicles with manual transmission) ......... 127<br />
Cooling System ......................................... 128<br />
Porsche Doppelkupplung (PDK) .................. 129<br />
Fuel .......................................................... 130<br />
Clock ....................................................... 131<br />
Outside Temperature ................................. 131<br />
Check Engine (Emission Control) ................ 133<br />
On-Board Computer (BC) ............................ 134<br />
Warnings on the instrument panel and<br />
the on-board computer .............................. 166<br />
Instruments, On-Board Computer, Warnings 119
Instrument Panel USA Models<br />
Also refer to the corresponding chapters in<br />
the Owner’s Manual.<br />
1.Speedometer with analogue display<br />
2.Automatic speed control indicator light<br />
3.Tire pressure warning light<br />
4.Turn signal indicator light, left/right<br />
5.Tachometer<br />
6.High beam indicator light<br />
7.ABS warning light<br />
8.Cooling system<br />
Temperature gage, warning light<br />
9.Fuel<br />
Level gage, warning light<br />
10.Adjustment button for instrument illumination<br />
and trip counter<br />
11.Odometer and daily trip mileage display<br />
12.Light sensor for instrument illumination<br />
13.Airbag warning light<br />
120 Instruments, On-Board Computer, Warnings<br />
14.Check Engine warning light<br />
(Emission control warning light)<br />
15.Central warning light<br />
16.On-board computer display<br />
17.Porsche Stability Management<br />
PSM Multifunctional light<br />
18.Brake warning light<br />
19.Safety belt warning light<br />
20.Gear display<br />
21.PDK transmission, selector lever position<br />
22.Clock and outside temperature display<br />
23.Adjustment button for clock<br />
When the ignition is switched on, the warning<br />
lights light up for a lamp check.<br />
Note<br />
Warnings that have been given are stored in the<br />
appropriate control unit memory and can be read<br />
out at an authorized Porsche dealer.<br />
This information can help to warn you about situations<br />
which may be hazardous to you or your car.
Instruments, On-Board Computer, Warnings 121
Instrument Panel Canada Models<br />
Also refer to the corresponding chapters in<br />
the Owner’s Manual.<br />
1.Speedometer with analogue display<br />
2.Automatic speed control indicator light<br />
3.Tire pressure warning light<br />
4.Turn signal indicator light, left/right<br />
5.Tachometer<br />
6.High beam indicator light<br />
7.ABS warning light<br />
8.Cooling system<br />
Temperature gage, warning light<br />
9.Fuel<br />
Level gage, warning light<br />
10.Adjustment button for instrument illumination<br />
and trip counter<br />
11.Odometer and daily trip mileage display<br />
12.Light sensor for instrument illumination<br />
13.Airbag warning light<br />
122 Instruments, On-Board Computer, Warnings<br />
14.Check Engine warning light<br />
(Emission control warning light)<br />
15.Central warning light<br />
16.On-board computer display<br />
17.Porsche Stability Management<br />
PSM Multifunctional light<br />
18.Brake warning light<br />
19.Safety belt warning light<br />
20.Gear display<br />
21.PDK transmission, selector lever position<br />
22.Clock and outside temperature display<br />
23.Adjustment button for clock<br />
When the ignition is switched on, the warning<br />
lights light up for a lamp check.<br />
Note<br />
Warnings that have been given are stored in the<br />
appropriate control unit memory and can be read<br />
out at an authorized Porsche dealer.<br />
This information can help to warn you about situations<br />
which may be hazardous to you or your car.
Instruments, On-Board Computer, Warnings 123
A - Adjustment button for instrument illumination and<br />
trip counter<br />
Automatic Speed Control<br />
Indicator light<br />
Indicates automatic speed control readiness.<br />
124 Instruments, On-Board Computer, Warnings<br />
Instrument Illumination<br />
The illumination is automatically adjusted to the<br />
ambient brightness by the light sensor in the<br />
tachometer.<br />
In addition, when the car lights are switched on,<br />
the instrument and switch symbol brightness can<br />
be manually adjusted.<br />
Warning!<br />
Risk of loss of control or accident, resulting<br />
in serious personal injury or death.<br />
f Do not reach through the steering-wheel<br />
spokes while driving.<br />
Note<br />
When the car lights are switched on, the instrument<br />
lighting for light dials switches on and off<br />
automatically depending on the ambient brightness.<br />
Dimming instrument illumination<br />
f Turn adjustment button A in the appropriate direction<br />
and hold it until the desired brightness<br />
has been reached.<br />
The chosen level of brightness is indicated by a<br />
bar display in the display field of the on-board<br />
computer.
Trip Odometer<br />
Warning!<br />
Risk of loss of control or accident, resulting<br />
in serious personal injury or death.<br />
f Do not reach through the steering-wheel<br />
spokes while driving.<br />
Resetting to zero<br />
f Press adjustment button A for approximately<br />
one second or<br />
f Reset the distance in the “SET” menu of the onboard<br />
computer.<br />
Please see the chapter “SET BASIC SETTING<br />
ON ON-BOARD COMPUTER” on Page 163.<br />
After exceeding 6,213 miles or 9,999 kilometers,<br />
the counter returns to “0”.<br />
Instruments, On-Board Computer, Warnings 125
Speedometer<br />
The digital speedometer is integrated in the onboard<br />
computer.<br />
The indication changes from mph to km/h when<br />
the units are changed from miles to kilometers.<br />
126 Instruments, On-Board Computer, Warnings<br />
Changing over between<br />
Miles / Kilometers<br />
The units of the distance and speed displays can<br />
be changed in the “SET” menu of the on-board<br />
computer.<br />
f Please see the chapter “SET BASIC SETTING<br />
ON ON-BOARD COMPUTER” on Page 163.
Tachometer<br />
The tachometer shows the engine speed in revolutions<br />
per minute (rpm).<br />
The beginning of the red marks at the right end of<br />
the scale indicates the maximum permissible engine<br />
rpm.<br />
A speed limiter prevents the engine from being<br />
overrevved during acceleration. Before reaching<br />
this area, the next higher gear should be selected.<br />
Shift to the next lower gear when the engine rpm<br />
drops below 1,500 rpm.<br />
Caution!<br />
To avoid severe engine damage.<br />
f Always observe the engine rpm before downshifting<br />
to a lower gear, so you do not exceed<br />
the maximum engine rpm.<br />
Turn Signal Indicator Light<br />
Flashes in synchronism with the turn signals.<br />
Left arrow – left turn signals<br />
Right arrow – right turn signals<br />
f If the frequency of the display becomes noticeably<br />
faster, check the operation of the turn signals.<br />
High Beam Indicator Light<br />
Lights when high beam or headlight flasher is<br />
switched on.<br />
The indicator light goes out when the high beams<br />
are switched off.<br />
The indicator light flashes in the event of cornering<br />
light failure.<br />
Gear Shift Indicator<br />
(in vehicles with manual transmission)<br />
The consumption-orientated gear shift indicator A<br />
on the display panel of the on-board computer<br />
assists a fuel-saving driving style. The gear shift<br />
indicator lights up as a recommendation to shift<br />
up to the next-higher gear depending on the<br />
selected gear, engine rpm and accelerator pedal<br />
position.<br />
f When the gear shift indicator A lights up,<br />
change to the next higher gear to decrease<br />
fuel consumption.<br />
Instruments, On-Board Computer, Warnings 127
Cooling System<br />
Temperature gage (ignition on)<br />
USA: Display in °F<br />
Canada: Display in °C<br />
Pointer to the left – engine cold<br />
f Avoid high engine speeds and heavy engine<br />
loading.<br />
128 Instruments, On-Board Computer, Warnings<br />
Pointer in the middle – normal operating temperature<br />
The pointer may move up to the red area when engine<br />
is heavily loaded and outside temperature is<br />
high, but should return to “normal” when engine<br />
load is reduced.<br />
Warning light “A”<br />
If the coolant temperature is too high, the warning<br />
light comes on.<br />
Additionally, a warning is displayed in the on-board<br />
computer.<br />
f Pull off the road, turn off the engine and allow<br />
to cool.<br />
f Check radiator and air passages in front end of<br />
car for obstructions.<br />
f Check coolant level.<br />
If necessary, add coolant and have fault remedied<br />
at an authorized Porsche dealer.<br />
Please see the chapter “COOLANT LEVEL” on<br />
Page 187.<br />
Note<br />
To prevent excessive temperatures, the coolingair<br />
passages must not be restricted by coverings<br />
(e.g. films, “stone guards”).<br />
If the coolant level is too low, the warning light<br />
flashes.<br />
Additionally, a warning is displayed in the on-board<br />
computer.<br />
f Switch engine off and allow to cool.<br />
f Add coolant after the engine has cooled to the<br />
touch.<br />
f Have the cause of the fault remedied at an authorized<br />
Porsche dealer.<br />
Please see the chapter “COOLANT LEVEL” on<br />
Page 187.<br />
Caution!<br />
Risk of engine damage.<br />
f If the warning lights come on even though coolant<br />
level is correct, do not continue driving.<br />
f Have the fault remedied at the nearest<br />
authorized Porsche dealer.<br />
Engine compartment blower fan<br />
In addition, this warning light flashes to indicate a<br />
fault in the engine compartment blower fan.<br />
f Have the cause of the fault remedied at an<br />
authorized Porsche dealer.
Porsche Doppelkupplung (PDK)<br />
Indicator for PDK selector lever position<br />
and engaged gear<br />
When the engine is running, the selector lever<br />
position and the engaged forward gear are<br />
indicated in gates D or M.<br />
Warning messages<br />
If the selector lever is between two positions<br />
– Effects:<br />
The corresponding selector lever position<br />
flashes on the instrument cluster and the<br />
warning “Selector lever not engaged” appears<br />
on the on-board computer.<br />
Remedy:<br />
Operate the footbrake and engage the<br />
selector lever properly.<br />
If there is a fault in the transmission<br />
– Depending on priority, the warning “Transmission<br />
emergency run” in white or red lettering or<br />
the warning “Transmission temperature too<br />
high” is displayed on the on-board computer.<br />
Warning “Transmission emergency run” white<br />
f Effects:<br />
Restricted gearshift comfort,<br />
Failure of reverse gear.<br />
Remedy:<br />
Have the fault repaired immediately at an<br />
authorized Porsche dealer.<br />
Warning “Transmission emergency run” red<br />
– Effect:<br />
Vehicle can be driven only until it comes to a<br />
stop.<br />
Remedy:<br />
It is not possible to continue driving. Immediately<br />
stop the vehicle in a suitable place. Have<br />
the vehicle towed to an authorized Porsche<br />
dealer.<br />
Warning “Transmission temperature too high”<br />
– Effects:<br />
“Warning jerks” can be felt when driving off and<br />
the engine power may be restricted.<br />
Remedies:<br />
Do not hold the vehicle with the accelerator on<br />
a hill, for example. Hold the vehicle with the<br />
brake. Reduce engine load. If possible, stop<br />
the vehicle in a suitable place. Allow the engine<br />
to run in selector lever position P or N until the<br />
warning disappears.<br />
f Please see the chapter “REDUCED DRIVING<br />
PROGRAM” on Page 184.<br />
f Please see the chapter “PORSCHE DOPPEL-<br />
KUPPLUNG (PDK)” on Page 178.<br />
Instruments, On-Board Computer, Warnings 129
Fuel<br />
Level gage<br />
When the ignition is on the fuel level is displayed.<br />
f Please see the chapter “CAPACITIES” on<br />
Page 271.<br />
If the vehicle’s inclination changes (e.g. going up<br />
or downhill), minor deviations in the indication may<br />
occur.<br />
130 Instruments, On-Board Computer, Warnings<br />
Note<br />
If a small quantity of fuel is added to a nearly empty<br />
fuel tank, the fuel gage cannot measure the added<br />
fuel accurately. The „remaining range“ readout<br />
will also be incorrect.<br />
Warning light “A”<br />
When the engine is running, the warning light<br />
of the level gage lights up if less than approx.<br />
2.6 U.S. gallons (10 liters) of fuel remains in the<br />
tank.<br />
Additionally, a warning is displayed in the on-board<br />
computer.<br />
f Fill up at the next opportunity.<br />
Caution!<br />
To prevent damage to the emission control<br />
system and engine.<br />
f Never drive the tank completely out of fuel.<br />
f Avoid high cornering speeds after the warning<br />
lights have come on.<br />
f Please see the chapter “EMISSION CONTROL<br />
SYSTEM” on Page 198.<br />
If the level gage warning light flashes, there<br />
has been a system fault.<br />
Additionally, a warning is displayed in the on-board<br />
computer.<br />
There will then be no reserve warning.<br />
f To remedy the fault, go to an authorized<br />
Porsche dealer.
A - Adjustment button for clock<br />
B - Clock<br />
C - Outside temperature display<br />
Clock<br />
The clock is blanked out approximately four minutes<br />
after the ignition is switched off or when the<br />
car is locked.<br />
Setting the time<br />
Warning!<br />
Risk of loss of control or accident, resulting<br />
in serious personal injury or death.<br />
f Do not reach through the steering-wheel<br />
spokes while driving.<br />
f Switch ignition on.<br />
Setting hours<br />
f Press adjustment button A for about one second.<br />
Hour display flashes.<br />
f Turn button in the appropriate direction:<br />
to right – increase hours figure<br />
to left – decrease hours figure.<br />
Adjustment in hours – turn button briefly<br />
Fast adjustment (display cycles) –<br />
turn and hold button.<br />
Setting minutes<br />
f Press adjustment button again.<br />
Minutes display flashes.<br />
f Set by rotating as in hours mode.<br />
Leaving adjustment mode<br />
Automatically after one minute or:<br />
f Press adjustment button again.<br />
When adjustment mode is deliberately left by<br />
pressing the button, the time begins precisely to<br />
the second.<br />
Note<br />
The time mode can be changed between 12h and<br />
24h in the on-board computer.<br />
Outside Temperature<br />
The outside temperature display C does not indicate,<br />
if ice is on the road.<br />
Even if a temperature above 32 °F (0 °C) is displayed,<br />
ice may still form on the road, for instance<br />
on bridges or when the road passes through a<br />
heavily shaded area.<br />
Instruments, On-Board Computer, Warnings 131
Battery Central Warning Light Brake Warning Light USA<br />
Brake Warning Light Canada<br />
If the battery voltage drops abruptly, a warning<br />
message will be displayed by the on-board computer.<br />
If the warning is displayed by the on-board<br />
computer while the engine is running or while<br />
driving:<br />
f Stop the car in a safe place and stop the<br />
engine.<br />
Possible causes<br />
– Defect in the battery charging system.<br />
– Broken drive belt.<br />
Warning!<br />
Risk of engine damage with resultant loss of<br />
control and accident, leading to serious personal<br />
injury or death.<br />
A broken drive belt means there is no power<br />
assistance to the steering (more effort is required<br />
to steer) and coolant pump function<br />
will stop.<br />
f Do not continue driving.<br />
f Have the fault remedied at the nearest authorized<br />
Porsche dealer.<br />
132 Instruments, On-Board Computer, Warnings<br />
The central warning light on the instrument panel<br />
lights up if there are warning messages in the<br />
INFO menu.<br />
The messages can be called in the on-board<br />
computer INFO menu:<br />
f Please see the chapter “INFO WARNING MES-<br />
SAGES” on Page 140.<br />
The warning light on the instrument panel lights<br />
up:<br />
– if the handbrake is on,<br />
– if the brake fluid level is low,<br />
– if the brake pads have reached the wear limit,<br />
– if the brake circuit division is defective.<br />
Additionally, a warning is displayed by the onboard<br />
computer.<br />
f Please see the chapter “WARNINGS ON THE<br />
INSTRUMENT PANEL AND THE ON-BOARD<br />
COMPUTER” on Page 166.
Check Engine<br />
(Emission Control)<br />
Warning Light<br />
The emission control system detects malfunctions<br />
early that could, for example, cause increased<br />
pollutant emissions or consequential damage.<br />
Faults are indicated by a continuously lit or<br />
flashing instrument panel warning light.<br />
The faults are recorded in the control unit's fault<br />
memory.<br />
The warning light in the instrument panel lights up<br />
when the ignition is switched on as a bulb check<br />
and goes out approx. 4 seconds after the engine<br />
starts. If the warning light does not light up, have<br />
the bulb replaced promptly.<br />
The warning light in the instrument panel flashes to<br />
indicate operating states (e.g. engine misfiring)<br />
which might cause damage to certain parts of the<br />
emission control system.<br />
f In this case, immediately reduce the engine<br />
load by easing off the accelerator.<br />
f In order to avoid consequential damage to the<br />
engine or emission control system (e.g. catalytic<br />
converter), have the fault diagnosed and<br />
rectified immediately at the nearest authorized<br />
Porsche dealer.<br />
If the warning light in the instrument panel lights up<br />
permanently without flashing before and remains<br />
on while driving, it suggests:<br />
– a potential engine control problem and the<br />
need for system service or<br />
– an improperly fastened tank cap or<br />
– the vehicle was refueled while the engine was<br />
running.<br />
f Stop immediately at a suitable and secure<br />
place and check tank cap for proper fastening.<br />
If tank cap was fastened correctly, see your authorized<br />
Porsche dealer for service as soon as<br />
possible.<br />
Caution!<br />
If the check engine warning light in the instrument<br />
panel is flashing, serious catalytic<br />
converter damage and power loss will soon<br />
occur.<br />
Prolonged driving with the check engine warning<br />
light on could cause damage to the<br />
emission control system. It also could affect<br />
fuel economy and driveability.<br />
f Have the fault remedied at the nearest<br />
authorized Porsche dealer immediately.<br />
Instruments, On-Board Computer, Warnings 133
On-Board Computer (BC)<br />
Display field<br />
The display field is beneath the tachometer.<br />
Readiness for operation<br />
– With ignition switched on,<br />
– with engine running.<br />
134 Instruments, On-Board Computer, Warnings<br />
Operation, controls<br />
It is not possible to describe all details of the onboard<br />
computer functions in this Owner’s Manual.<br />
However, the examples will quickly familiarize you<br />
with the operational principle and help you to<br />
navigate through the menu structure.<br />
You can restore the factory default settings at any<br />
time by using the “SET” menu.<br />
Operating lever<br />
The on-board computer is operated with the lower<br />
left lever on the steering column.<br />
Selecting functions of the on-board<br />
computer<br />
f Push lever up 3 or down 4.<br />
Confirming selection (Enter)<br />
f Push the lever forward 1.<br />
Moving back one or several selection levels<br />
f Pull the lever back 2 once or several times or<br />
f Select the arrow on the on-board computer<br />
display with the operating lever and push<br />
the operating lever forward 1.<br />
Note<br />
You can always return to the basic menu by pulling<br />
the operating lever several times.<br />
5 - Button for voice control<br />
f Please refer to the separate operating<br />
instructions for Porsche Communication<br />
Management (PCM).
A - Digital speedometer<br />
B -Central display<br />
C - Bottom display<br />
Functions and display possibilities<br />
Note<br />
The available items and displays in the on-board<br />
computer depend on the equipment of your vehicle.<br />
For this reason it is possible that some of the<br />
items and displays shown here are not available in<br />
your on-board computer.<br />
Basic setting<br />
– Central display: .... Radio station<br />
The central line B of the on-board computer can<br />
be selected in the SET menu.<br />
Calling on-board computer functions in<br />
display “C”<br />
f Push operating lever up or down<br />
(selection field D must be switched off).<br />
The following displays can be called step by step:<br />
– Average speed (ø mph),<br />
– Average consumption (ø mpg),<br />
– Range on remaining fuel (mls ),<br />
– Tire pressure<br />
– Navigation information<br />
(if activated in the SET menu).<br />
Note<br />
The values “Average speed”, “Average consumption”<br />
and “Daily trip mileage” can be reset to zero<br />
in the SET menu.<br />
Instruments, On-Board Computer, Warnings 135
D - Switching selection field “D” on or off<br />
f Push operating lever forward or back.<br />
136 Instruments, On-Board Computer, Warnings<br />
E - Arrow symbol for continuation<br />
Arrow symbol:<br />
f Push operating lever down in order to page<br />
through the menu.<br />
Arrow symbol:<br />
f Push operating lever up in order to page<br />
through the menu.<br />
The following menus are available, depending on<br />
vehicle equipment:<br />
1. LIMIT<br />
2. INFO<br />
3. TEL<br />
4. CHRONO<br />
5. AUDIO<br />
6. NAVI<br />
7. OIL<br />
8. TPM<br />
9. SET
LIMIT<br />
Acoustic warning signal for speed limit<br />
The acoustic warning signal can be activated for<br />
speeds above 6 mph (10 km/h).<br />
The signal sounds when the preset speed is exceeded.<br />
For the signal to sound again, the driving speed<br />
must fall below the preset speed by at least<br />
3 mph (5 km/h).<br />
Switching on selection field “D”<br />
f Push operating lever forward.<br />
Setting the speed<br />
f Select LIMIT with the operating lever.<br />
f Push operating lever forward.<br />
Instruments, On-Board Computer, Warnings 137
Option 1:<br />
Accepting current speed<br />
f Push operating lever forward.<br />
The acoustic warning signal is activated for the<br />
current speed.<br />
Display:<br />
If the vehicle is stationary, the message “Cannot<br />
be accepted with car stopped” is displayed.<br />
138 Instruments, On-Board Computer, Warnings<br />
Option 2:<br />
Presetting speed<br />
f Select “LIMIT active” with the operating lever:<br />
not active<br />
active<br />
f If “not active”, push the operating lever forward.<br />
f Select “xx mph” with the operating lever.<br />
f Push operating lever forward.
f Push operating lever slightly up or down until<br />
the desired speed is reached.<br />
upwards: speed is increased<br />
downwards: speed is decreased<br />
Note<br />
Holding the lever up or down for a longer period<br />
will adjust the speed in steps of 6 mph (10 km/h).<br />
f Push operating lever forward.<br />
Switching the acoustic warning signal off<br />
f Select “LIMIT active” with the operating lever.<br />
f Push operating lever forward.<br />
Display:<br />
Instruments, On-Board Computer, Warnings 139
INFO<br />
Warning messages<br />
Switching on selection field “D”<br />
f Push operating lever forward.<br />
Calling warning messages<br />
f Select INFO with the operating lever.<br />
140 Instruments, On-Board Computer, Warnings<br />
f Push operating lever forward.<br />
f Select “Messages” with the operating lever.<br />
f Push operating lever forward.<br />
Any existing warning messages can be called using<br />
the operating lever.<br />
You also can call warning messages which were<br />
cancelled during the journey (but only until the next<br />
time the ignition is switched on).<br />
f Push operating lever forward.<br />
f Push operating lever forwards or pull backwards.<br />
The display returns to the Info menu.
Service<br />
Switching on selection field “D”<br />
f Push operating lever forward.<br />
Recalling service information<br />
f Select INFO with the operating lever.<br />
f Push operating lever forward.<br />
f Select “Service” with the operating lever.<br />
f Push operating lever forward.<br />
f The time until the next service is displayed in<br />
miles and days.<br />
TEL<br />
Telephone information<br />
Switching on selection field “D”<br />
f Push operating lever forward.<br />
Recalling telephone information<br />
f Select TEL with the operating lever.<br />
f Push operating lever forward.<br />
Instruments, On-Board Computer, Warnings 141
Note<br />
You can recall phone calls, e.g. calls that arrived<br />
during your absence, via the menu item “Missed<br />
calls”.<br />
142 Instruments, On-Board Computer, Warnings<br />
Example:<br />
Selecting from the telephone book and<br />
calling<br />
f Select “Phone book” with the operating lever.<br />
f Push operating lever forward.<br />
f Select a person to call and push the operating<br />
lever forward.<br />
The connection is established.
f Push the operating lever forward to end the<br />
call.<br />
Incoming call<br />
f Select “Accept” or “Refuse” and push the<br />
operating lever forward.<br />
Note<br />
Rejected phone calls can be recalled with the<br />
menu item “Missed calls”.<br />
Instruments, On-Board Computer, Warnings 143
CHRONO<br />
Stopwatch<br />
You can use the stopwatch to measure time intervals,<br />
e.g. on the race circuit or on work-related<br />
journeys. Measured lap times can be stored and<br />
evaluated if the vehicle is equipped with Porsche<br />
Communication Management (PCM).<br />
f Please observe the chapter “Sport display” in<br />
the separate PCM operating instructions.<br />
144 Instruments, On-Board Computer, Warnings<br />
Stopwatch on the instrument panel<br />
The stopwatch has an analogue and a digital display.<br />
The large pointer of the analogue display measures<br />
the seconds. The two small pointers measure<br />
hours and minutes. The display re-starts at zero after<br />
12 hours.<br />
Seconds and increments of 1/100th of a second<br />
can be read on the digital display.<br />
The digital display and the display in the on-board<br />
computer can indicate up to 99 hours and<br />
59 minutes.<br />
The stopwatch can be swivelled both to the left<br />
and to the right.<br />
Stopwatch displays:<br />
– on the stopwatch on the instrument panel,<br />
– in the on-board computer menu CHRONO,<br />
– on the performance display in the PCM.<br />
Starting/stopping stopwatch<br />
All stopwatch displays are started and stopped via<br />
the on-board computer menu CHRONO.<br />
Note on operation<br />
When you leave the CHRONO menu while the stopwatch<br />
is running, measurement will continue.<br />
The stopwatch stops after the ignition is switched<br />
off. If the ignition is switched on again within approx.<br />
4 minutes, the stopwatch will continue to<br />
run.<br />
The only way to reset the stopwatch to zero is by<br />
selecting “Reset” in the CHRONO menu.
Starting the timing<br />
f Push operating lever forward.<br />
The selection field is switched on.<br />
f Select CHRONO with the operating lever.<br />
f Push operating lever forward. f Push operating lever forward.<br />
The time runs on all stopwatch displays.<br />
The on-board computer display changes to the<br />
“Stop timing/Intermediate time” selection.<br />
Instruments, On-Board Computer, Warnings 145
Stopping the timing<br />
After time measurement is started, the on-board<br />
computer display changes to the “Stop timing/Intermediate<br />
time”.<br />
f Select “Stop timing” with the operating lever.<br />
146 Instruments, On-Board Computer, Warnings<br />
f Push lever forward.<br />
The time is stopped in all stopwatch displays,<br />
and the on-board computer display changes to<br />
the “Continue/Reset” selection.<br />
The timing can be continued or reset to zero.<br />
Continue timing<br />
After timing has been stopped, the on-board computer<br />
display changes to the “Continue/Reset” selection.
f Push operating lever forward.<br />
The stopwatch displays continue the timing.<br />
The on-board computer display returns to the<br />
“Stop timing/Intermediate time” selection. You<br />
can stop the stopwatch or measure an intermediate<br />
time.<br />
Resetting the time<br />
After timing has been stopped, the on-board computer<br />
display changes to the “Continue/Reset” selection.<br />
f Select “Reset” with the operating lever.<br />
f Push operating lever forward.<br />
The display returns to the “Start timing”<br />
selection.<br />
The stopwatch displays in the instrument panel<br />
and the on-board computer are reset to zero.<br />
Instruments, On-Board Computer, Warnings 147
A -Lap<br />
B - Intermediate time<br />
Displaying intermediate times<br />
Several intermediate times can be displayed for a<br />
route or for a lap on the race circuit. The intermediate<br />
times B are for your information.<br />
Measured lap times A can be stored and evaluated<br />
if the vehicle is equipped with Porsche Communication<br />
Management (PCM).<br />
148 Instruments, On-Board Computer, Warnings<br />
After timing has been started, the on-board computer<br />
display changes to the “Stop timing/Intermediate<br />
time” selection.<br />
f Select “Intermediate time” with the operating<br />
lever and push the operating lever forwards.<br />
The intermediate time will be displayed for<br />
approx. 5 seconds.
The on-board computer display then returns to the<br />
“Stop timing/Intermediate time” selection.<br />
f You can stop the stopwatch or measure another<br />
intermediate time.<br />
In order to start timing a new lap:<br />
The “New lap?” selection appears for 5 seconds<br />
after selection of “Intermediate time”.<br />
f Select “New lap?” with the operating lever and<br />
push the operating lever forwards.<br />
The new lap is displayed on the on-board computer<br />
and the PCM. Timing on the on-board computer<br />
and on the PCM begins from zero. The stopwatch<br />
in the instrument panel continues to show the total<br />
time.<br />
Instruments, On-Board Computer, Warnings 149
f The on-board computer display returns to the<br />
“Stop timing/Intermediate time” selection after<br />
a short period.<br />
f You can stop the stopwatch or measure another<br />
intermediate time or a new lap.<br />
150 Instruments, On-Board Computer, Warnings<br />
AUDIO<br />
Switching on selection field “D”<br />
f Push operating lever forward.<br />
Selecting a radio station<br />
f Select “AUDIO” with the operating lever.<br />
f Push operating lever forward.<br />
f Select the desired station.<br />
f Push the operating lever up or down.<br />
NAVI<br />
Switching on selection field “D”<br />
f Push operating lever forward.<br />
Select destination<br />
f Select “NAVI” with the operating lever.<br />
f Push operating lever forward.<br />
f Select the desired function with the operating<br />
lever:<br />
– Last destinations<br />
– Destination memory<br />
– Route guidance
TPM<br />
Tire Pressure Monitoring<br />
f Please see the chapter “TIRE PRESSURE FOR<br />
COLD TIRES (68 °F/ 20 °C)” on Page 267.<br />
The Tire Pressure Monitoring continuously<br />
monitors tire pressure and tire temperature on all<br />
four wheels and warns the driver when the tire<br />
pressure is too low.<br />
The display as well as the settings for the Tire<br />
Pressure Monitoring take place on the on-board<br />
computer.<br />
However, you must still adjust the tire pressure on<br />
the wheel.<br />
f The driver is responsible for filling the tires<br />
correctly and making the correct settings on<br />
the on-board computer.<br />
The Tire Pressure Monitoring offers the following<br />
functions:<br />
– Display of the actual tire pressure while the<br />
vehicle is in motion.<br />
– Display of the deviation from the required<br />
pressure (refilling pressure).<br />
– Display of currently set tire size and type.<br />
– Tire pressure warnings in two stages.<br />
Warning!<br />
f Despite the advantages offered by the Tire<br />
Pressure Monitoring, it is still the driver’s responsibility<br />
to update the corresponding settings<br />
in the on-board computer and maintain<br />
the pressure in the tires.<br />
Low tire pressure reduces the road safety of<br />
the vehicle and destroys the tire and wheel.<br />
f When a flat tire has been displayed, immediately<br />
stop in a suitable place and check the<br />
tires for damage. If necessary, remedy the<br />
damage with a tire sealant.<br />
f Do not by any means continue to drive with<br />
damaged tires.<br />
f Sealing the tire with tire sealant is only an<br />
emergency repair, so you can drive to the next<br />
authorized Porsche dealer. The maximum permitted<br />
speed is 50 mph (80 km/h).<br />
f Do not drive with tires whose tire pressure<br />
drops again in a short period of time. In cases<br />
of doubt, have tires checked by an authorized<br />
Porsche dealer.<br />
f Damaged tires must be immediately replaced<br />
by an authorized Porsche dealer.<br />
Tire repairs are not permissible under any<br />
circumstances.<br />
f If a fault occurs in the Tire Pressure Monitoring<br />
(e.g. defective wheel transmitter), contact an<br />
authorized Porsche dealer immediately and<br />
have the damage repaired.<br />
The tire pressure will not be monitored at all or<br />
will be monitored only partially by defective<br />
Tire Pressure Monitoring.<br />
f Tires lose air over time without a tire defect<br />
being present. A tire pressure warning will then<br />
appear in the on-board computer display.<br />
Correct the tire pressure at the next opportunity.<br />
f The Tire Pressure Monitoring gives a warning<br />
about tire damage due to natural pressure loss<br />
as well as about a gradual loss of pressure due<br />
to foreign objects.<br />
The Tire Pressure Mnitoring cannot warn you<br />
about tire damage that occurs suddenly (e.g.<br />
flat tire due to abrupt external effects).<br />
Instruments, On-Board Computer, Warnings 151
Tire pressure function of the on-board<br />
computer<br />
The tire pressure function of the on-board<br />
computer displays the tire pressures (actual<br />
pressure) dependent on temperature in the four<br />
wheels.<br />
You can watch the tire pressure rise as the<br />
temperature increases while driving.<br />
This display is only for information.<br />
f Under no circumstances should the tire<br />
pressures be changed based on this display.<br />
152 Instruments, On-Board Computer, Warnings<br />
Warning!<br />
This display is for informational purposes<br />
only. Under no circumstances should the tire<br />
pressures be changed based on this display.<br />
Changing the tire pressure to incorrect<br />
pressures could adversely affect the performance,<br />
driving characteristics, and safety of<br />
your vehicle.<br />
f Maintain tire pressures according to the units<br />
indicated on the tire pressure plate, located on<br />
the drivers side door of the vehicle.<br />
Displaying the tire pressure function of the<br />
on-board computer<br />
f Push operating lever up or down until the tire<br />
pressure function of the on-board computer<br />
appears.<br />
(The selection field must be switched off.)<br />
Pressure info in tire pressure menu<br />
In accordance with physical principles, the air<br />
pressure changes as the temperature changes.<br />
The tire pressure increases or decreases by<br />
around 1.5 psi (0.1 bar) for every 18 °F (10 °C)<br />
change in temperature.<br />
The Tire Pressure Monitoring takes this relationship<br />
between tire pressure and temperature into<br />
account.<br />
f Please see the chapter “PRESSURE INCREASE<br />
AS THE RESULT OF TEMPERATURE<br />
INCREASE” on Page 160.<br />
You can read the tire pressures to be<br />
corrected in this display.
The tire pressure to be corrected (refill pressure)<br />
is indicated on the displayed wheel.<br />
Example: If “ –1.5 psi (–0.1 bar)” is displayed,<br />
1.5 psi (0.1 bar) must be added to this tire.<br />
Note<br />
The tire pressure menu can only be called up when<br />
the vehicle is stationary.<br />
Calling up the “Info pressure” display<br />
f Push operating lever forward in order to switch<br />
on the selection field.<br />
f Select “TPM” with the operating lever.<br />
f Push operating lever forward.<br />
The display changes to the tire pressure menu.<br />
f Select “Info pressure” with the operating lever.<br />
f Push operating lever forward.<br />
Note<br />
After the ignition is switched on, it can take up to<br />
approx. 1 minute before all tire pressures are<br />
displayed. Dashes (“-.-”) appear instead of the tire<br />
pressures.<br />
Tire type info in Tire pressure menu<br />
Information about the currently set tires:<br />
– Tire type: Summer tires, winter tires<br />
– Tire size: 17, 18, 19 inch<br />
“Info tires” shows the current tire settings.<br />
Calling up the “Info tires” display<br />
f Push operating lever forward in order to switch<br />
on the selection field.<br />
f Select “TPM” with the operating lever.<br />
f Push operating lever forward.<br />
The display changes to the tire pressure menu.<br />
f Select “Info tires” with the operating lever.<br />
f Push operating lever forward.<br />
Tire selection in the “Set” menu<br />
f Push operating lever forward in order to switch<br />
on the selection field.<br />
f Select “TPM” with the operating lever.<br />
Instruments, On-Board Computer, Warnings 153
f Push operating lever forward.<br />
The display changes to the tire pressure menu.<br />
154 Instruments, On-Board Computer, Warnings<br />
f Select “Set” with the operating lever. f Push the operating lever forward.<br />
f Select desired tire type:<br />
summer or winter.<br />
f Push operating lever forward.<br />
A display for confirming the selected type of<br />
tire appears.
f Select “Continue” and push the operating lever<br />
forward.<br />
f Select the appropriate tire size (17, 18 or 19<br />
inch) and push operating lever forwards. A display<br />
for confirming the selected tire size appears.<br />
Note<br />
This menu is displayed only if the tire pressures<br />
are different for the approved tire sizes.<br />
f Select “Continue” and push the operating lever<br />
forward.<br />
Instruments, On-Board Computer, Warnings 155
The tire selection has only been successfully<br />
completed when the message “Process<br />
complete” is displayed by the on-board computer.<br />
f Select arrow (Back) and push the operating<br />
lever forward. The display returns to the tire<br />
pressure menu.<br />
The on-board computer additionally displays<br />
the message “System learning”.<br />
156 Instruments, On-Board Computer, Warnings<br />
Note<br />
The message “Process aborted” appears if the<br />
setting process is interrupted. All entries made up<br />
to this point are lost, and the original settings<br />
remain in effect.<br />
Only if the message “Process complete” appears<br />
after the settings have been made will the Tire<br />
Pressure Monitoring re-learn the wheels.<br />
f Please see the chapter “SYSTEM LEARNING”<br />
on Page 158.<br />
Before fitting tires with sizes which are not stored<br />
in the on-board computer, the missing information<br />
should be supplemented in the on-board<br />
computer.<br />
f Please consult your authorized Porsche<br />
dealer.<br />
f Use only tires approved by Porsche.<br />
The available items in the tire pressure menu<br />
depend on the equipment of your vehicle. For this<br />
reason it is possible that some of the items shown<br />
here are not available on your on-board<br />
computer’s display.<br />
f Make sure that tire pressures correspond to<br />
the on-board computer settings. Correct the<br />
tire pressure if necessary.<br />
f Please see the chapter “TIRE PRESSURE FOR<br />
COLD TIRES (68 °F/ 20 °C)” on Page 267.<br />
Tire pressure warnings<br />
The tire pressure warning light on the instrument<br />
panel and a corresponding message on the onboard<br />
computer warn about loss of pressure in<br />
two stages, depending on the amount of pressure<br />
loss.<br />
Driving with insufficient tire pressure reduces the<br />
road safety of the vehicle and destroys the tire and<br />
wheel.<br />
Stage 1 – Add air<br />
The pressure in the tire is too low by 4 to 7 psi (0.3<br />
to 0.5 bar).<br />
f The tire pressure warning contains the<br />
affected tire with the tire pressure to be added.<br />
Correct the tire pressure at the next<br />
opportunity.
This tire pressure warning appears<br />
– for approx. 10 seconds with vehicle stopped<br />
when switching off the ignition or<br />
– again when switching on the ignition.<br />
With ignition on, the warning can be deactivated.<br />
The tire pressure warning light in the instrument<br />
panel goes out only when the tire pressure has<br />
been corrected.<br />
Stage 2 – Flat tire<br />
At speeds below 100 mph (160 km/h):<br />
The pressure in the tire has dropped by more<br />
than 7 psi (0.5 bar). This significant pressure<br />
loss is a danger to road safety.<br />
At speeds above 100 mph (160 km/h):<br />
The pressure in the tire has dropped by more<br />
than 5 psi (0.4 bar). This significant pressure<br />
loss is a danger to road safety.<br />
f When the tire pressure warning appears, stop<br />
immediately at a suitable location. Check the<br />
indicated tire for signs of damage. If necessary,<br />
fill in tire sealant and set the correct tire<br />
pressure.<br />
This tire pressure warning also appears when<br />
driving and can be acknowledged.<br />
The tire pressure warning light on the instrument<br />
panel goes out only when the tire pressure has<br />
been corrected.<br />
Instruments, On-Board Computer, Warnings 157
System learning<br />
The Tire Pressure Monitoring begins to “learn” the<br />
wheels after a wheel change, wheel transmitter<br />
replacement or update of the tire settings. During<br />
this process, the Tire Pressure Monitoring recognizes<br />
the tires and their locations.<br />
The on-board computer displayes the message<br />
“TPM is learning, monitoring not act.”.<br />
158 Instruments, On-Board Computer, Warnings<br />
The Tire Pressure Monitoring requires a certain<br />
amount of time to learn the wheels. During this<br />
time, the current tire pressures are not available<br />
on the on-board-computer:<br />
– The tire pressure warning light remains lit until<br />
all wheels have been learned.<br />
– The display of the tire pressure function of the<br />
on-board computer shows lines.<br />
– The required pressures for cold tires at 68 °F<br />
(20 °C) are indicated in the Info pressure<br />
display in the tire pressure menu.<br />
Position and pressure information is displayed as<br />
soon as the Tire Pressure Monitoring has assigned<br />
the wheels identified as belonging to the<br />
vehicle to the correct wheel positions.<br />
The wheel learning process takes place<br />
exclusively when the vehicle is being driven<br />
(vehicle speed above 25 km/h (16 mph)).<br />
f Check the tire pressure for all wheels on the<br />
“Info pressure” display.<br />
f Correct the tire pressure to the required<br />
pressure if necessary.<br />
Changing a wheel and replacing tires<br />
f New wheels must be fitted with radio transmitters<br />
for the Tire Pressure Monitoring.<br />
Before tires are changed, the battery charge<br />
state of the wheel transmitters should be<br />
checked at an authorized Porsche dealer.<br />
f Switch the ignition off when changing a wheel.<br />
The tire settings on the on-board computer must<br />
be updated after changing a wheel.<br />
If the tire settings are not updated, the message<br />
“Wheel change? Input new TPM settings!” is<br />
displayed on the on-board computer.<br />
f Update the on-board computer settings when<br />
the vehicle is stationary the next time.
Warning light<br />
Warning!<br />
Your vehicle has also been equipped with a TPM<br />
malfunction indicator to indicate when the system<br />
is not operating properly.<br />
The TPM malfunction indicator is combined with<br />
the low tire pressure telltale.<br />
When the system detects a malfunction, the telltale<br />
will flash for approximately one minute and then<br />
remain continuously illuminated. This sequence<br />
will continue upon subsequent vehicle start-ups as<br />
long as the malfunction exists.<br />
When the malfunction indicator is illuminated, the<br />
system may not be able to detect or signal low tire<br />
pressure as intended.<br />
TPM malfuntions may occur for a variety of<br />
reasons, including the installation of replacement<br />
or alternate tires or wheels on the vehicle that<br />
prevent the TPM from functioning properly.<br />
Always check the TPM malfunction telltale after<br />
replacing one or more tires or wheels on your<br />
vehicle to ensure that the replacement or alternate<br />
tires and wheels allow the TPM to continue to<br />
function properly.<br />
The warning light in the speedometer lights up:<br />
– When a loss in pressure has been detected.<br />
– When learning newly mounted wheels/wheel<br />
sensors, as long as the vehicle’s own wheels<br />
have not yet been recognized.<br />
In the event of a defect in Tire Pressure Monitoring<br />
or a temporary fault, the warning light in the<br />
speedometer flashes for approx. one minute and<br />
then remains continuously illuminated.<br />
The tire pressure warning light in the instrument<br />
panel goes out only when the cause of the fault<br />
has been rectified.<br />
Partial monitoring<br />
Monitoring of the other wheels is continued if there<br />
is a fault in one or two wheel transmitters.<br />
– The tire pressure warning light lights up.<br />
– The message “TPM partial monitoring” is<br />
displayed on the on-board computer.<br />
– No tire pressures are displayed on the onboard<br />
computer for wheels with faulty wheel<br />
transmitters.<br />
No monitoring<br />
In the event of faults the Tire Pressure Monitoring<br />
cannot monitor the tire pressure.<br />
The warning light in the speedometer flashes for<br />
approx. one minute and then remains continuously<br />
illuminated and a corresponding message<br />
appears on the on-board computer.<br />
Monitoring is not active when:<br />
– the Tire Pressure Monitoring is faulty,<br />
– wheel transmitters for the Tire Pressure<br />
Monitoring are missing,<br />
– during the learning phase after the tire settings<br />
have been updated,<br />
– after a wheel change without updating the tire<br />
settings,<br />
– more than four wheel transmitters are<br />
detected,<br />
– there is external interference by other radio<br />
sources, e.g. wireless headphones,<br />
– tire temperatures are too high.<br />
f Please see the chapter “WARNINGS ON THE<br />
INSTRUMENT PANEL AND THE ON-BOARD<br />
COMPUTER” on Page 166.<br />
Instruments, On-Board Computer, Warnings 159
Pressure increase as the result of<br />
temperature increase<br />
In accordance with physical principles, the air<br />
pressure changes as the temperature changes.<br />
The tire pressure increases or decreases by<br />
around 1.5 psi (0.1 bar) for every 18 °F (10 °C)<br />
change in temperature.<br />
The Tire Pressure Monitoring takes this relationship<br />
between tire pressure and temperature into<br />
account.<br />
160 Instruments, On-Board Computer, Warnings<br />
Tire pressure specifications<br />
Information on tire pressure for public roads can<br />
be found in this Owner's Manual in the Technical<br />
Data chapter or on the tire-pressure plate in the<br />
left door aperture.<br />
These values apply to cold tires at 68 °F (20 °C)<br />
ambient temperature.
OIL<br />
Display and measurement of the engine<br />
oil level<br />
Caution!<br />
Risk of engine damage.<br />
f Regularly check the oil level each time before<br />
refueling.<br />
f Do not allow the oil level to fall below the<br />
minimum mark.<br />
Conditions for measuring the oil level<br />
1. Vehicle stationary.<br />
2. It is important to ensure that the vehicle is<br />
horizontal for correct oil level measurement<br />
to occur.<br />
3. Engine must be at operating temperature<br />
(at least 140 °F/60 °C).<br />
4. Engine must be idling.<br />
Initiating oil level measurement<br />
1. Push operating lever forward in order to switch<br />
on the selection field.<br />
2. Select “OIL” with the operating lever.<br />
3. Push operating lever forward. Measurement is<br />
started.<br />
4. Allow waiting time to elapse.<br />
5. Once the measurement has been completed,<br />
you can read off the engine oil level on the<br />
segment display.<br />
Instruments, On-Board Computer, Warnings 161
6. If the segments are filled in up to the top line,<br />
the oil level has reached the maximum mark.<br />
Under no circumstances add engine oil.<br />
162 Instruments, On-Board Computer, Warnings<br />
7. If the bottom segment is filled in, the oil level<br />
has reached the minimum mark.<br />
Add engine oil immediately.<br />
8. If the bottom segment flashes, the oil level has<br />
dropped to below the minimum mark.<br />
Add engine oil immediately.<br />
The difference between the minimum and<br />
maximum marks on the segment display is<br />
approx. 1.3 quarts (1.25 litres).<br />
One segment of the display corresponds to a<br />
top-up quantity of approx. 0.42 quarts (0.4 litre).<br />
f Add engine oil if necessary.<br />
Switch off ignition before adding engine oil.<br />
f Please see the chapter “ENGINE OIL LEVEL”<br />
on Page 189.<br />
f Never add more engine oil than required<br />
to reach the maximum mark.<br />
Failure<br />
A failure of the oil level display is indicated by a<br />
warning message on the on-board computer.<br />
“Check engine oil level” display<br />
The on-board computer display “Check engine oil<br />
level” is an additional measurement that takes<br />
place in the background while driving.<br />
The display depends on the distance travelled.<br />
This display appears if the oil level has reached the<br />
minimum mark or if the oil level is well above the<br />
maximum mark.<br />
This message must be acknowledged by measuring<br />
the engine oil level manually using the onboard<br />
computer.<br />
f Please see the chapter “INITIATING OIL LEVEL<br />
MEASUREMENT” on Page 161.<br />
If an oil level measurement was initiated manually<br />
on the on-board computer and no oil was topped<br />
up, the message “Check engine oil level” is<br />
displayed again when the vehicle is driven.
SET<br />
Basic setting on on-board computer<br />
Switching on selection field “D”<br />
f Push operating lever forward.<br />
Changing the basic setting of the on-board<br />
computer<br />
f Select “SET” with the operating lever.<br />
f Push operating lever forward.<br />
f Select the desired function with the operating<br />
lever:<br />
Reset<br />
– Reset all,<br />
Reset average consumption,<br />
Reset average speed,<br />
Reset trip counter<br />
Units<br />
– Speedometer: km - km/h, miles - mph<br />
– Consumption:<br />
l/100 km, mls/gal (USA), mpg (UK), km/l<br />
– Temperature: °Celsius, °Fahrenheit<br />
– Tire pressure: bar, psi<br />
Display<br />
(Select central line of the on-board<br />
computer)<br />
– Change display<br />
Audio information (set radio station)<br />
Range on remaining fuel<br />
Empty<br />
– Telephone Info<br />
When Telephone information is active, incoming<br />
telephone calls are displayed on the onboard<br />
computer.<br />
Instruments, On-Board Computer, Warnings 163
Navigation<br />
– Integrated in the BC<br />
(Navigation instructions can be recalled on the<br />
on-board computer display)<br />
– When turning off<br />
(Navigation instructions are only shown before<br />
changing direction)<br />
Basic setting<br />
– Restore the basic setting of the on-board computer<br />
Language<br />
– Select language version<br />
164 Instruments, On-Board Computer, Warnings<br />
12/24h mode<br />
Select time mode:<br />
– 12h (small squares on the right side of the time<br />
display for AM/PM),<br />
– 24h<br />
Light<br />
USA only:<br />
Switch daytime driving lights on and off.<br />
Daytime driving lights<br />
(daytime driving lights switched off)<br />
Daytime driving lights<br />
(daytime driving lights switched on)<br />
f Please see the chapter “DAYTIME DRIVING<br />
LIGHTS” on Page 78.<br />
f Please see the chapter “DAYTIME DRIVING<br />
LIGHTS” on Page 80.<br />
General information regarding the<br />
on-board computer functions<br />
Range on remaining fuel<br />
The range on remaining fuel is continuously recalculated<br />
during the journey based on the fuel level,<br />
current consumption and average consumption.<br />
The more the fuel level falls, the more spontaneously<br />
the display reacts. For this reason, the<br />
range on remaining fuel is not displayed if less<br />
than 9 miles (15 kilometers).<br />
If the vehicle's inclination changes while driving or<br />
refueling, incorrect range information may temporarily<br />
be given.<br />
Note<br />
If the tank is nearly empty and you top up with only<br />
a small quantity of fuel, an accurate range on remaining<br />
fuel is impossible.
Average consumption and average speed<br />
The values displayed are based on the distance<br />
travelled since the last reset to “zero”.<br />
You can set the starting time for a measurement<br />
before or during the trip.<br />
Switching the ignition off does not reset the measurements.<br />
It is therefore possible to collect values<br />
over long periods.<br />
Disconnecting the car battery will cause these<br />
memories to be erased.<br />
Tire pressure<br />
The Tire pressure function of the on-board<br />
computer displays the tire pressures dependent<br />
on temperature in the four wheels. You can watch<br />
the tire pressure rise and fall while driving.<br />
The display is only for information.<br />
f To correct the tire pressures, always use the<br />
displayed values from the “Info pressure”<br />
display in the tire pressure menu.<br />
Instruments, On-Board Computer, Warnings 165
Warnings on the instrument panel and the on-board computer<br />
If a warning message appears, always refer to the corresponding chapters in the Owner’s Manual.<br />
Warning messages are issued only if all measurement preconditions are met. Therefore, check all fluid levels regularly –<br />
in particular, always check the engine oil level before refueling.<br />
Instrument<br />
panel<br />
166 Warnings<br />
On-board<br />
computer<br />
Text display on on-board Meaning/measure<br />
computer<br />
Seat belt Driver and passengers must fasten their seat<br />
belts.<br />
Handbrake Handbrake is still on.<br />
Ignition key<br />
not removed<br />
Replace battery<br />
in ignition key<br />
Ignition lock faulty,<br />
please go to workshop<br />
Ignition lock faulty,<br />
visit workshop now<br />
Replace the remote-control battery.<br />
Have the fault remedied at an authorized<br />
Porsche dealer.<br />
Have the fault remedied at an authorized<br />
Porsche dealer.<br />
Relieve steering Relieve the steering lock by moving the steering<br />
wheel to the left or right.<br />
Steering locked The steering wheel lock remains engaged.<br />
Have the fault remedied at an authorized<br />
Porsche dealer.<br />
Lights on Low beam/side marker lamps on<br />
Parking light on Left/right parking light on
Instrument<br />
panel<br />
On-board<br />
computer<br />
Text display on on-board<br />
computer<br />
Check left/right dipped beam (low<br />
beam)<br />
also applies to:<br />
direction indicator, high beam, side indicator<br />
light, reversing light<br />
Daytime<br />
driving lights off<br />
Headlight beam<br />
adjustment faulty<br />
The reported light is faulty. Check bulb.<br />
Have the fault remedied at an authorized<br />
Porsche dealer.<br />
Daytime driving lights switch off when the engine<br />
is shut off. Switch on lights if necessary.<br />
Have the fault remedied at an authorized<br />
Porsche dealer.<br />
Front lid not closed Close front luggage compartment lid properly.<br />
Rear lid not closed Close rear luggage compartment lid properly.<br />
Rain sensor faulty Have the fault remedied at an authorized<br />
Porsche dealer.<br />
Steering wheel heating<br />
ON<br />
Steering wheel heating<br />
OFF<br />
Launch<br />
control<br />
active<br />
Drive Off Assistant<br />
failure<br />
Refill washer fluid<br />
LIMIT<br />
Cannot be accepted<br />
with vehicle stopped<br />
Meaning/measure<br />
Steering wheel heating was switched on.<br />
Steering wheel heating was switched off.<br />
Have the fault remedied at an authorized<br />
Porsche dealer.<br />
The current speed can only be accepted for the<br />
acoustic warning signal when the vehicle is in<br />
motion.<br />
Warnings 167
Instrument<br />
panel<br />
Fuel gage warning<br />
light<br />
Warning light<br />
Temperature gage<br />
Temperature gage<br />
warning light flashes<br />
Temperature gage<br />
warning light flashes<br />
168 Warnings<br />
On-board<br />
computer<br />
Text display on on-board<br />
computer<br />
LIMIT<br />
30<br />
Selected speed limit (e.g. 30 mph) for the<br />
acoustic warning signal has been exceeded.<br />
Adjust your speed if necessary.<br />
Consider remaining range Refuel at next opportunity.<br />
Check engine oil level Start engine oil level measurement in the<br />
on-board computer.<br />
Engine oil pressure too low Stop immediately at a suitable place, measure<br />
oil level with the on-board computer and, if necessary,<br />
add engine oil.<br />
Engine temperature too high Switch engine off and let it cool.<br />
Check coolant level and, if necessary,<br />
add coolant.<br />
Check coolant level Switch engine off and let it cool.<br />
Check coolant level and, if necessary, add coolant.<br />
Engine diagnostics – workshop Stop immediately at a suitale place and check<br />
tank cap for proper fastening. If the tank cap<br />
was fastened correctly, consult your authorized<br />
Porsche dealer.<br />
Reduced engine power Consult your authorized Porsche dealer.<br />
Failure of<br />
engine compartment blower<br />
Meaning/measure<br />
Consult your authorized Porsche dealer.<br />
Warning battery/generator Stop at a safe place and switch the engine off.<br />
Do not continue driving.<br />
Have the fault remedied at an authorized<br />
Porsche dealer.
Instrument<br />
panel<br />
On-board<br />
computer<br />
Text display on on-board<br />
computer<br />
Oil pressure gage faulty Have the fault remedied at an authorized<br />
Porsche dealer.<br />
Oil level display faulty Have the fault remedied at an authorized<br />
Porsche dealer.<br />
Oil temperature gage faulty Have the fault remedied at an authorized<br />
Porsche dealer.<br />
Oil temperature<br />
too high<br />
Meaning/measure<br />
Switch engine off and let it cool. Check oil level<br />
and, if necessary, add oil.<br />
Please observe the chapter “OIL DISPLAY AND<br />
MEASUREMENT OF THE ENGINE OIL LEVEL“.<br />
Indicator faulty Coolant indicator failed.<br />
Have the fault remedied at an authorized<br />
Porsche dealer.<br />
Brake pad wear Have the brake pads changed immediately at an<br />
authorized Porsche dealer.<br />
Warning – Brake fluid level Stop immediately in a suitable place.<br />
Do not continue driving. Have the fault remedied<br />
at an authorized Porsche dealer.<br />
Warning – Brake circuit division Stop immediately in a suitable place.<br />
Do not continue driving. Have the fault remedied<br />
at an authorized Porsche dealer.<br />
ABS failure Have the fault remedied at an authorized<br />
Porsche dealer.<br />
PSM off Porsche Stability Management has been<br />
switched off.<br />
Warnings 169
Instrument<br />
panel<br />
Display of<br />
selector lever position<br />
flashes<br />
170 Warnings<br />
On-board<br />
computer<br />
Text display on on-board<br />
computer<br />
PSM on Porsche Stability Management has been<br />
switched on.<br />
PSM failure Have the fault remedied at an authorized<br />
Porsche dealer.<br />
PSM<br />
initialisation<br />
Meaning/measure<br />
Please observe the chapter “PUTTING VEHICLE<br />
INTO OPERATION“.<br />
PASM Normal/Sport Indicator for selected PASM mode<br />
PASM failure Have the fault remedied at an authorized<br />
Porsche dealer.<br />
PASM indicator faulty Have the fault remedied at an authorized<br />
Porsche dealer.<br />
Sport mode failure Have the fault remedied at an authorized<br />
Porsche dealer.<br />
Airbag system fault Airbag is faulty.<br />
Have the fault remedied at an authorized<br />
Porsche dealer.<br />
Check passenger’s seat setting Weight sensing is impaired on the front<br />
passenger's seat (Advanced Airbag).<br />
Correct the seating position, set the backrest<br />
upright, do not support weight on the armrests,<br />
or lift on the handles.<br />
Failure spoiler control Driving stability is impaired.<br />
Adjust your driving style. Reduce speed.<br />
Have the fault remedied at an authorized<br />
Porsche dealer.<br />
Selector lever is not engaged Porsche Doppelkupplung:<br />
Selector lever can be between two positions.<br />
Engage the selector lever correctly.
Instrument<br />
panel<br />
On-board<br />
computer<br />
Text display on on-board<br />
computer<br />
Move selector lever to P Porsche Doppelkupplung:<br />
Move selector lever to position P before withdrawing<br />
key from ignition lock.<br />
Apply brake Porsche Doppelkupplung:<br />
Apply the brake when starting.<br />
Depress clutch pedal Manual transmission:<br />
Depress clutch pedal when starting.<br />
Move selector lever<br />
to position P or N<br />
Text display in white:<br />
Transmission<br />
emergency run<br />
Text display in red:<br />
Transmission<br />
emergency run<br />
Transmission<br />
temperature<br />
too high<br />
Meaning/measure<br />
Porsche Doppelkupplung:<br />
The vehicle can be started only in the selector<br />
lever position P or N.<br />
Restricted gearshift comfort,<br />
failure of reverse gear.<br />
Have the fault remedied at an authorized<br />
Porsche dealer.<br />
No selector lever position is displayed on the<br />
instrument cluster.<br />
Vehicle can be driven only until it comes to a<br />
stop.<br />
It is not possible to continue driving. Immediately<br />
stop the vehicle in a suitable place. Have<br />
the vehicle towed to an authorized Porsche<br />
dealer.<br />
Jerking can be felt when driving off, and the<br />
engine power may be restricted.<br />
Do not hold the vehicle with the accelerator on<br />
a hill, for example. Hold the vehicle with the<br />
brake. Reduce engine load. If possible, stop the<br />
vehicle in a suitable place. Allow the engine to<br />
run in selector lever position P or N until the<br />
warning disappears.<br />
Warnings 171
Instrument<br />
panel<br />
172 Warnings<br />
On-board<br />
computer<br />
Text display on on-board<br />
computer<br />
System fault<br />
Go to workshop<br />
Failure of fuel level indicator<br />
Workshop<br />
Several systems may have failed. Adjust your<br />
driving style. Reduce speed.<br />
Have the fault remedied at an authorized<br />
Porsche dealer.<br />
Have the fault remedied at an authorized<br />
Porsche dealer.<br />
Service in mls/days Service indicator<br />
Bring the vehicle in for service no later than after<br />
the distance/time shown has elapsed.<br />
Please observe the additional information in the<br />
“Maintenance” booklet.<br />
Service now Service indicator<br />
Have your vehicle serviced at an authorized<br />
Porsche dealer.<br />
Flat tyre! Tire Pressure Monitoring has detected a serious<br />
pressure loss.<br />
Stop at a suitable place and check tires for damage.<br />
Fill in tire sealant if necessary.<br />
Add air The Tire Pressure Monitoring has detected a<br />
gradual pressure loss. Correct tire pressure at<br />
the next opportunity.<br />
TPM is learning<br />
monitoring<br />
not act.<br />
Meaning/measure<br />
The Tire Pressure Monitoring is learning the<br />
wheels on the vehicle. The Tire Pressure Monitoring<br />
is searching for the tires and their position.<br />
During this period the current pressure<br />
specifications are not available on the on-board<br />
computer.<br />
TPM inactive The Tire Pressure Monitoring is faulty.<br />
Consult an authorized Porsche dealer.
Instrument<br />
panel<br />
On-board<br />
computer<br />
Acknowledging warning messages<br />
Text display on on-board<br />
computer<br />
Warning messages can be deleted from the on-board computer display.<br />
f Push the on-board computer operating lever forward.<br />
You can recall erased warning messages in the “INFO” menu.<br />
TPM partial monitoring 1 or 2 wheel transmitters are faulty. The tyre<br />
pressures of these wheels are not monitored.<br />
The other wheels are still monitored.<br />
Consult an authorized Porsche dealer.<br />
TPM inactive<br />
Brief disturbance<br />
TPM inactive<br />
Too many wheel transmitters<br />
Wheel change?<br />
Input new<br />
TPM settings!<br />
TPM<br />
Indicator faulty<br />
Meaning/measure<br />
The Tire Pressure Monitoring is temporarily deactivated<br />
by excessive tire temperatures (approx.<br />
248 °F (120 °C)) or external interference<br />
(e.g. from other wheel transmitters inside the<br />
car). Once the source of the interference is removed,<br />
the system is automatically reactivated.<br />
Update the settings in the TPM menu of the<br />
on-board computer at the next opportunity.<br />
Wrong entries will affect the correct pressure information<br />
in the menu. The safety of your vehicle<br />
is at risk.<br />
The display of the Tire Pressure Monitoring is<br />
faulty.<br />
Consult an authorized Porsche dealer.<br />
Warnings 173
174 Warnings
Shifting Gears<br />
Manual Transmission, Clutch ...................... 176<br />
Drive-Off Assistant...................................... 177<br />
Porsche Doppelkupplung (PDK) ................... 178<br />
Shifting Gears 175
Manual Transmission, Clutch<br />
The positions of the gears are shown on the shift<br />
diagram on the gearshift lever.<br />
Warning!<br />
Risk of accident, resulting in serious personal<br />
injury or death.<br />
f Do not obstruct the pedal travel with floor mats<br />
or other objects.<br />
Nonskid floor mats of the correct size are<br />
available at your authorized Porsche dealer.<br />
176 Shifting Gears<br />
To avoid damage to the clutch and transmission:<br />
f Always depress the clutch pedal fully when<br />
changing gears. Make sure that the gearshift<br />
lever is completely engaged.<br />
f Only shift into reverse when the car has come<br />
to a complete stop.<br />
f When shifting gears, always ensure that the<br />
clutch pedal is fully depressed and the gear<br />
has fully engaged.<br />
f Select reverse only when vehicle is stationary.<br />
Reverse gear can be engaged after shifting the<br />
gearshift lever as far as possible to the left.<br />
f Select an appropriately low gear on upward<br />
and downward slopes.<br />
This will ensure optimum use of engine power<br />
and engine braking.<br />
When reverse gear is selected and the ignition is<br />
on, the backup lights are illuminated.<br />
Permitted engine speed<br />
f You should change into a higher gear before<br />
the needle reaches the red mark on the<br />
tachometer, or ease off the accelerator.<br />
If the red zone is reached during acceleration, fuel<br />
feed is interrupted.<br />
Caution!<br />
Risk of engine damage (overrevving) when<br />
shifting down to a lower gear.<br />
f Take care not to exceed the maximum<br />
permitted engine speed when shifting down.
Drive-Off Assistant<br />
The Drive-Off Assistant assists the driver when<br />
moving off on hills.<br />
The vehicle must have sufficient road contact.<br />
The Drive-Off Assistant is available on gradients as<br />
from around 5%.<br />
Danger!<br />
Risk of accident.<br />
Assistance by the Drive-Off Assistant is not<br />
guaranteed when moving off on a slippery<br />
surface (e.g. on icy or loose surfaces). In this<br />
case, the vehicle could slip.<br />
The limits dictated by the laws of physics<br />
cannot be overcome, even with the Drive-Off<br />
Assistant. The responsibility for moving off<br />
on upward slopes is still the driver’s, despite<br />
the Drive-Off Assistant.<br />
f Always adjust your driving style to the driving<br />
conditions and vehicle load, use the brake<br />
pedal if necessary.<br />
Risk of accident.<br />
If the Drive-Off Assistant is not functioning,<br />
the driver cannot be assisted when moving<br />
off on hills.<br />
f Hold the vehicle with the brake pedal.<br />
Driving off with the Drive-Off Assistant<br />
(vehicles with manual transmission)<br />
1. Hold the vehicle securely on the slope with the<br />
brake pedal.<br />
The engine must be running.<br />
2. Fully depress the clutch pedal.<br />
3. Engage a gear corresponding to the direction<br />
of travel up the slope (1st gear or reverse<br />
gear).<br />
4. Fully release the parking brake.<br />
5. While keeping the clutch pedal depressed,<br />
release the brake pedal.<br />
The vehicle is held on the slope for a short time<br />
in order to allow driving off directly after the<br />
brake is released.<br />
6. Move off as usual.<br />
Note on operation<br />
The Drive-Off Assistant is not active:<br />
– If the clutch is not depressed.<br />
– If the vehicle is not stationary.<br />
– If the engine is not running.<br />
– On gradients of less than 5%.<br />
– If the pressure on the brake pedal is too low.<br />
Driving off with the Drive-Off Assistant<br />
(vehicles with PDK transmission)<br />
1. Hold the vehicle securely on the slope with the<br />
brake pedal.<br />
The engine must be running.<br />
2. Select a gear corresponding to the direction<br />
of travel up the slope (selector lever position<br />
D or R).<br />
3. Fully release the parking brake.<br />
4. Release the brake pedal.<br />
The vehicle is held on the slope for a short time<br />
in order to allow driving off directly after the<br />
brake is released.<br />
5. Move off as usual.<br />
Note on operation<br />
The Drive-Off Assistant is not active:<br />
– In the event of shift to neutral.<br />
– If the vehicle is not stationary.<br />
– If the engine is not running.<br />
– On gradients of less than 5%.<br />
– If the pressure on the brake pedal is too low.<br />
Shifting Gears 177
Porsche Doppelkupplung (PDK)<br />
The Porsche Doppelkupplung (PDK) is a sevenspeed<br />
transmission with an “automatic” and a<br />
“manual” selection mode.<br />
In automatic selection mode (selector lever<br />
position D), gear changing is automatic.<br />
You can change temporarily from automatic to<br />
manual mode using the shift buttons on the<br />
steering wheel.<br />
In manual selection mode (selector lever<br />
position M), you change gear using the shift<br />
buttons on the steering wheel or with the PDK<br />
selector lever.<br />
You can change between selector lever position D<br />
and M as you wish while driving.<br />
Note<br />
f Take care not to operate the shift buttons on<br />
the steering wheel inadvertently in either<br />
automatic or manual mode, thereby triggering<br />
undesired gear changes.<br />
178 Shifting Gears<br />
Changing the selector lever position<br />
The selector lever is locked when the ignition is<br />
switched off.<br />
When the ignition is switched on, the selector lever<br />
can be moved from position P and N only when<br />
the release button is pressed, and when the brake<br />
pedal is pressed.<br />
Release button<br />
The release button (arrow) in the selector lever<br />
prevents the gear from being changed unintentionally.<br />
The release button must be pressed when shifting<br />
to position R or P.<br />
Starting<br />
The engine can be started only if the brake<br />
pedal is depressed and the selector lever is in<br />
position P or N.<br />
Driving off<br />
f Only select the desired position for driving off<br />
(D, M or R) when the engine is idling and the<br />
brake pedal is depressed.<br />
f Since the vehicle creeps when in gear, do not<br />
release the brake until you want to move off.<br />
f After selecting a gear, do not accelerate until<br />
you can feel that the gear is engaged.<br />
Driving off on hills<br />
The Drive-Off Assistant assists the driver when<br />
moving off on hills. The vehicle is held on the slope<br />
for a short time during the change from the brake<br />
pedal to the accelerator in order to allow driving<br />
off directly after the brake is released.<br />
f Please see the chapter “DRIVE-OFF ASSIS-<br />
TANT” on Page 177.
Indicator for selector lever position and<br />
engaged gear<br />
When the engine is running, the selector lever<br />
position and engaged gear are indicated.<br />
If the selector lever is between two positions<br />
– Effects:<br />
The corresponding selector-lever position in<br />
the instrument panel flashes and the warning<br />
“Actuate brake” or “Selector lever not<br />
engaged” appears on the on-board computer.<br />
f Action required:<br />
Operate the footbrake and engage the<br />
selector lever properly.<br />
If the selector lever is inadvertently (due to<br />
a defect or incorrect operation) moved out of P or<br />
N into gear without pressing the brake, this gear<br />
will start to “flash” and no power transmission is<br />
built up. To drive off, press the brake and move<br />
the selector lever from P or N into the required<br />
gear again.<br />
Selector-lever position R or D is flashing<br />
in the instrument cluster<br />
f Effects:<br />
There is no power transmission.<br />
The selector lever was engaged without<br />
pressing the footbrake or only the restricted<br />
driving programme is available when the<br />
“Transmission emergency run” message<br />
is displayed.<br />
Action required:<br />
Press the footbrake and engage the required<br />
selector-lever position again by moving the<br />
selector lever from P or N.<br />
If reverse gear fails:<br />
Please see the chapter “REDUCED DRIVING<br />
PROGRAM” on Page 184.<br />
If there is a fault in the transmission:<br />
– The warning “Transmission emergency run” in<br />
white or red lettering or the warning “Transmission<br />
temperature too high” is displayed on the<br />
on-board computer.<br />
Please see the chapter “REDUCED DRIVING<br />
PROGRAM” on Page 184.<br />
f Have the fault repaired immediately at an<br />
authorized Porsche dealer.<br />
Shifting Gears 179
Selector lever positions<br />
P – Parking lock<br />
f Engage parking lock only when vehicle is<br />
stationary.<br />
If selector-lever position P is flashing in the<br />
instrument cluster, the parking brake is not<br />
engaged. The vehicle can roll away.<br />
Engage selector-lever position P again by<br />
moving the selector lever out of R.<br />
f Engage parking lock after applying the<br />
handbrake and release it before releasing the<br />
handbrake.<br />
The ignition key can be withdrawn only in<br />
selector lever position P.<br />
R – Reverse gear<br />
f Select only if car is stationary and the brake is<br />
applied.<br />
N – Neutral<br />
Selector lever position N must be selected for<br />
towing or in car washes, for example.<br />
f Only select the desired position for driving off<br />
(D, M or R) when the engine is idling and the<br />
brake pedal is depressed.<br />
180 Shifting Gears<br />
D - Automatic selection mode<br />
Select position D for “normal” driving. The gears<br />
are shifted automatically according to the accelerator<br />
position and speed.<br />
Depending on the way the vehicle is driven<br />
(economical, comfortable or sporty driving style)<br />
and on the resistance (e.g. uphill), the gearchanging<br />
points are shifted towards higher or<br />
lower engine-speed ranges.<br />
The accelerator position, driving speed, engine<br />
speed, longitudinal and lateral acceleration and<br />
the road profile all have an influence on the gearchanging<br />
characteristic.<br />
Unwanted upward shifts, e.g. before bends, are<br />
prevented by swiftly releasing the accelerator<br />
pedal.<br />
Depending on lateral acceleration, upward<br />
changes on bends are not made until the enginespeed<br />
limit is reached.<br />
Under braking, and depending on the amount of<br />
deceleration, the PDK transmission changes down<br />
earlier.<br />
For subsequent cornering, the right gear is<br />
engaged when pressure is applied to the brakes<br />
before the bend. The bend is taken in the right<br />
gear, and when you accelerate out of the bend you<br />
do not have to change down.<br />
With a sporty driving style, downshifts are already<br />
initiated when the brake pedal is touched lightly.<br />
This further enhances a dynamic driving style.<br />
The PDK transmission temporarily changes to the<br />
sportiest gear-changing map, i.e. to the highest<br />
possible gear-changing points, if the accelerator<br />
pedal is pressed quickly. The transmission accordingly<br />
shifts down immediately by one or two gears<br />
(temporary change-down).<br />
The transmission no longer selects 7th gear at<br />
high driving speeds.<br />
Sport mode<br />
(“Sport” and “Sport Plus” modes)<br />
“Sport” mode activated:<br />
The PDK transmission switches to a sporty gearchanging<br />
map and shortens the gear shifting<br />
times.<br />
A sporty driving style is recognised more quickly<br />
and the gear-changing speeds are adapted to<br />
driving performance.<br />
Deceleration downshifts are commenced earlier.<br />
Downshifts are already carried out in the case of<br />
slight decelerations, even at higher engine<br />
speeds.
“Sport Plus” mode activated:<br />
In “Sport Plus” mode, the PDK transmission<br />
changes to a shift program designed for driving<br />
on race circuits. 7th gear is not selected.<br />
The gear-changing performance is enhanced<br />
significantly again compared with “Sport” mode.<br />
f Please see the chapter “SPORT MODE” on<br />
Page 61.<br />
Driving with Launch Control<br />
Driving with Launch Control allows you to achieve<br />
maximum acceleration from a standing start. It is<br />
intended to provide you with a unique enjoyment of<br />
your vehicle under controlled circumstances and<br />
is not intended to be used in any location where it<br />
could be a nuisance to other persons.<br />
Warning!<br />
There is a risk of endangering other road<br />
users if you use this Control in an improper<br />
location or in a situation where other persons<br />
might need to take evasive action due to the<br />
rapid acceleration that this technology<br />
permits.<br />
f Launch Control is designed to be used in a<br />
controlled environment on closed circuit<br />
driving courses where no vehicle cross traffic<br />
or pedestrian traffic is present.<br />
f Use Launch Control only if conditions permit it<br />
to be applied in a safe manner.<br />
f Do not use Launch Control if there is a possibility<br />
it could endanger other persons. Such a<br />
possibility exists if you cannot see that you<br />
have a clear road with no possibility of cross<br />
traffic in your intended direction of driving.<br />
Caution!<br />
Stress on components increases dramatically<br />
when starting with maximum acceleration in<br />
comparison with normal driving off. Use of<br />
Launch Control will inevitably reduce the life<br />
of the engaged engine and transmission<br />
components.<br />
Preconditions:<br />
– Launch Control should only be used when the<br />
engine has reached operating temperature.<br />
– “Sport Plus” mode must be switched on (lightemitting<br />
diode in button is on and “SPORT<br />
PLUS” is displayed on the on-board computer).<br />
1. Press the brake with your left foot.<br />
2. Quickly press down the accelerator fully<br />
(kickdown activated) and hold.<br />
The engine speed will flatten out at around<br />
6500 rpm.<br />
“Launch Control active” is displayed on the<br />
on-board computer.<br />
3. Release the brake within a few seconds.<br />
Remaining stationary for a long time with<br />
“Launch Control active” can lead to overloading<br />
of the transmission.<br />
In order to protect the transmission, the engine<br />
power is then reduced and the “Launch Control<br />
active” process is cancelled.<br />
Shifting gears on the steering wheel<br />
With the shift buttons on the steering wheel, you<br />
can change temporarily from automatic selection<br />
mode D to manual mode M.<br />
For example:<br />
– Shifting down before bends and on entering<br />
built-up areas.<br />
– Shifting down on downward slopes<br />
(engine braking).<br />
– Shifting down for brief spurts of acceleration.<br />
Manual selection mode remains engaged:<br />
– for cornering (depending on the lateral acceleration)<br />
and overrunning,<br />
– when the vehicle is stationary (e.g. at a<br />
junction).<br />
The system leaves manual selection mode:<br />
– automatically after approx. 8 seconds (unless<br />
cornering or overrunning),<br />
– after driving off.<br />
Shifting Gears 181
Kickdown<br />
The kickdown function is active in selector lever<br />
positions D and M.<br />
f For optimum acceleration, e.g. when<br />
overtaking, depress the accelerator pedal<br />
beyond the full-throttle point (kickdown).<br />
The transmission shifts down depending on the<br />
speed of travel and engine speed.<br />
Upward shifts occur at the highest possible engine<br />
speeds.<br />
182 Shifting Gears<br />
M – Manual selection mode<br />
The currently selected gear is retained when you<br />
change from D to M.<br />
If you change from M to D, the gear-changing map<br />
suitable for your current driving style is selected<br />
and the appropriate gear is selected.<br />
The selector lever and the two shift buttons in the<br />
top steering wheel spokes allow you to comfortably<br />
and reliably select the seven forward gears.<br />
Shifting up +<br />
f Press the PDK selector lever or shift button on<br />
the steering wheel forward.<br />
Shifting down –<br />
f Pull the PDK selector lever or shift button on<br />
the steering wheel back.<br />
You can shift up or down by the corresponding<br />
number of gears by quickly pressing or pulling the<br />
shift buttons or selector lever several times in<br />
succession.<br />
The transmission can be shifted up or down by<br />
several gears in succession by continuously<br />
operating the selector lever or shift buttons.
Depending on driving speed and engine speed,<br />
you can shift up or down at any time.<br />
Gear changes which would exceed the upper or<br />
lower engine speed limit are not executed by the<br />
controller.<br />
There is no automatic upshift at the upper engine<br />
speed limit in selector lever position M. Upshift<br />
suppression can be cancelled by kickdown operation.<br />
If, for example, the engine speed limit is<br />
reached during overtaking and the automatic<br />
upshift does not occur, the transmission in this<br />
case shifts up as a result of kickdown operation.<br />
f Select an appropriately low gear on upward<br />
and downward slopes.<br />
This will ensure optimum use of engine power<br />
and engine braking.<br />
In order to shift up automatically at the upper<br />
engine speed limit:<br />
f Depress the accelerator pedal beyond the fullthrottle<br />
point (kickdown).<br />
Failure of the selector lever display on the<br />
instrument cluster<br />
The warning “Transmission emergency run” is<br />
displayed in red on the on-board computer.<br />
– Effect:<br />
No selector lever position is displayed on the<br />
instrument cluster.<br />
Vehicle can be driven only until it comes to a<br />
stop.<br />
Remedy:<br />
It is not possible to continue driving. Immediately<br />
stop the vehicle in a suitable place. Have<br />
the vehicle towed to an authorized Porsche<br />
dealer.<br />
Please see the chapter “TOWING” on<br />
Page 259.<br />
Stopping<br />
f For a brief stop (e.g. at a traffic light), leave the<br />
selector lever in drive position and hold the<br />
vehicle with the brake pedal.<br />
f Do not hold the car on a slope using the<br />
accelerator. Use the brake pedal or the<br />
handbrake instead.<br />
f Before leaving the vehicle, always apply the<br />
handbrake and move the selector lever to<br />
position P.<br />
Parking<br />
f Go easy on the accelerator!<br />
f When parking or manoeuvring in a small<br />
space, control the speed by careful use of the<br />
footbrake.<br />
Driving in winter<br />
In wintry road conditions it is advisable to take<br />
steep inclines in manual mode. This prevents gear<br />
changes occurring that could cause wheelspin.<br />
Tow-starting, towing<br />
f Please see the chapter “TOWING” on<br />
Page 259.<br />
Shifting Gears 183
Reduced driving program<br />
If there is a fault in the transmission<br />
– Depending on priority, the warning “Transmission<br />
emergency run” in white or red lettering or<br />
the warning “Transmission temperature too<br />
high” is displayed on the on-board computer.<br />
Warning “Transmission emergency run” white<br />
– Effects:<br />
Restricted gearshift comfort,<br />
Reverse gear may not function.<br />
Remedy:<br />
Have the fault repaired immediately at an<br />
authorized Porsche dealer.<br />
184 Shifting Gears<br />
Warning “Transmission emergency run” red<br />
– Effect:<br />
Vehicle can be driven only until it comes to a<br />
stop.<br />
Remedy:<br />
It is not possible to continue driving. Immediately<br />
stop the vehicle in a suitable place. Have<br />
the vehicle towed to an authorized Porsche<br />
dealer.<br />
Warning “Transmission temperature too high”<br />
– Effects:<br />
“Warning jerks” can be felt when driving off and<br />
the engine power may be restricted.<br />
Remedy:<br />
Do not hold the vehicle with the accelerator on<br />
a hill, for example. Hold the vehicle with the<br />
brake. Reduce engine load. If possible, stop<br />
the vehicle in a suitable place. Allow the engine<br />
to run in selector lever position P or N until the<br />
warning disappears.
Maintenance, Car Care<br />
Exercise Extreme Caution when Working<br />
on your Vehicle ......................................... 186<br />
Coolant Level ............................................ 187<br />
Engine Oil ................................................ 188<br />
Engine Oil Level ....................................... 189<br />
Engine Oil Recommendation ....................... 190<br />
Brake Fluid Level ....................................... 192<br />
Fuel Economy ........................................... 194<br />
Operating your Porsche in other Countries .. 194<br />
Fuel Recommendations .............................. 196<br />
Portable Fuel Containers ........................... 197<br />
Fuel Evaporation Control ........................... 197<br />
Emission Control System ........................... 198<br />
How Emission Control Works ..................... 199<br />
Washer Fluid ............................................. 200<br />
Power Steering .......................................... 201<br />
Air Filter ................................................... 201<br />
Combination Filter ..................................... 201<br />
Fluids/Oils for Manual Transmission<br />
and Porsche Doppelkupplung (PDK) ............ 201<br />
Wiper Blades ........................................... 202<br />
Car Care Instructions ................................ 203<br />
Maintenance, Car Care 185
Exercise Extreme Caution when<br />
Working on your Vehicle<br />
Danger!<br />
Ignoring the following instructions may<br />
cause serious personal injury or death.<br />
f The engine compartment of any motor vehicle<br />
is a potentially hazardous area. If you are not<br />
fully familiar with proper repair procedures, do<br />
not attempt the adjustments described on the<br />
following pages.<br />
This caution also applies to the entire vehicle.<br />
f Only work on your vehicle outdoors or in a well<br />
ventilated area.<br />
f Ensure that there are no open flames in the<br />
area of your vehicle at any time when fuel<br />
fumes might be present. Be especially cautious<br />
of such devices such as hot water heaters<br />
which ignite a flame intermittently.<br />
f Before working on any part in the engine compartment,<br />
turn the engine off and let it cool<br />
down sufficiently. Hot engine compartment<br />
components can burn skin on contact.<br />
f Be alert and cautious around engine at all<br />
times while the engine is running.<br />
If work has to be performed with the engine<br />
running, always set the parking brake, and<br />
make sure the shift lever is in neutral position<br />
or the PDK selector lever in position P or N.<br />
186 Maintenance, Car Care<br />
f In particular, be very careful to ensure that<br />
items of clothing (ties, shirt, sleeves etc.),<br />
jewelry, long hair, hand or fingers cannot get<br />
caught in the engine-compartment blower, fan,<br />
belts or other moving parts.<br />
The radiator and radiator fans are in the front<br />
of the car.<br />
The engine-compartment blower is mounted in<br />
the engine-compartment.<br />
The fans can start or continue running as a<br />
function of temperature, even with the engine<br />
switched off.<br />
Carry out work in these areas only with the engine<br />
off, the ignition switched off, and exercise<br />
extreme caution.<br />
f Your Porsche is equipped with an electronic ignition<br />
system. When the ignition is on, high<br />
voltage is present in all wires connected with<br />
the ignition system; therefore, exercise extreme<br />
caution when working on any part of the<br />
engine while the ignition is on or the engine is<br />
running.<br />
f Always support your car with safety stands if it<br />
is necessary to work under the car.<br />
f When working under the car without safety<br />
stands but with the wheels on the ground,<br />
make sure the car is on level ground, the<br />
wheels are blocked, and that the engine<br />
cannot be started.<br />
Remove the ignition key.<br />
f Do not smoke or allow an open flame around<br />
the battery or fuel.<br />
Keep a fire extinguisher in close reach.<br />
f Incomplete or improper servicing may cause<br />
problems in the operation of the car. If in doubt<br />
about any servicing, have it done by your<br />
authorized Porsche dealer.<br />
Improper maintenance during the warranty<br />
period may affect your Porsche warranty coverage.<br />
f Supplies of fluids, e.g. engine oil, brake fluid or<br />
coolant, are hazardous to your health.<br />
Keep these fluids out of children’s reach and<br />
dispose of them in accordance with the appropriate<br />
regulations.<br />
f Some countries require additional tools and<br />
special spare parts to be carried in your vehicle.<br />
Please make enquiries before driving abroad.
Coolant Level<br />
f Please see the chapter “EXERCISE EXTREME<br />
CAUTION WHEN WORKING ON YOUR VEHICLE”<br />
on Page 186.<br />
The cooling system is filled at the factory with a<br />
permanent coolant.<br />
It provides year-round protection from corrosion<br />
and freezing down to –31 °F/–35 °C.<br />
f Only use antifreeze authorized by Porsche.<br />
Checking coolant level<br />
The expansion tank with its filler orifice is located<br />
in the rear luggage compartment under the service<br />
flap.<br />
f Check the coolant level regularly.<br />
When the engine is cold and the car is level the<br />
fluid level must lie between the “MIN” and “MAX”<br />
markings.<br />
Topping off coolant<br />
Warning!<br />
Danger of serious personal injury or death<br />
from scalding. Coolant is hazardous to your<br />
health, and may be fatal if swallowed.<br />
f Do not open the cap of the expansion tank<br />
while the engine is hot.<br />
f Allow the engine to cool down before opening<br />
the cap and protect your hands, arms and face<br />
from any possible escape of hot coolant.<br />
f Keep coolant out of children’s reach.<br />
f Also, keep coolant away from your pets.<br />
They can be attracted to it should there be a<br />
spill, or to used coolant left in an open container.<br />
Coolant can be deadly to pets if consumed.<br />
Risk of damage from overflowing coolant.<br />
f Take care while topping off coolant not to soil<br />
the luggage compartment or items of luggage.<br />
1. Switch engine off and let it cool.<br />
Please see the chapter “COOLING SYSTEM” on<br />
Page 88.<br />
2. Press catch button on the service flap and<br />
open flap.<br />
3. Cover the expansion tank cap with a thick rag.<br />
Open cap slowly and carefully and allow overpressure<br />
to escape.<br />
Then unscrew cap completely.<br />
4. Only add a mixture of antifreeze and water in<br />
equal parts, and do not exceed the ”Max.“<br />
mark.<br />
Antifreeze in coolant:<br />
50% gives protection down to –31 °F/–35 °C<br />
60% gives protection down to –58 °F/–50 °C<br />
5. Screw cap firmly on.<br />
6. Close service flap.<br />
Maintenance, Car Care 187
If in an emergency pure water has been added, the<br />
mix ratio must be corrected at an authorized<br />
Porsche dealer.<br />
Marked loss of coolant indicates leakage in the<br />
cooling system.<br />
The cause should immediately be remedied at an<br />
authorized Porsche dealer.<br />
188 Maintenance, Car Care<br />
Engine-compartment blower,<br />
radiator fan<br />
The radiator and radiator fans are in the front of<br />
the car.<br />
The engine-compartment blower is mounted in the<br />
engine compartment.<br />
Warning!<br />
Risk of injury.<br />
After the engine is switched off, the enginecompartment<br />
temperature is monitored for<br />
approx. 30 minutes.<br />
During this period, and depending on temperature,<br />
the engine-compartment blower<br />
may continue to run or start to run.<br />
f Carry out work in these areas only with the engine<br />
off, the ignition off, and exercise extreme<br />
caution.<br />
Risk of injury. The radiator fans in the front<br />
end of the car may be operating or<br />
unexpectedly start operating when the<br />
engine is switched on.<br />
f Carry out work in these areas only with the engine<br />
switched off.<br />
Engine Oil<br />
It is important to perform oil changes regularly in<br />
accordance with the intervals specified in the<br />
“Maintenance” booklet.<br />
Engine oil consumption<br />
It is normal for your engine to consume oil.<br />
The rate of oil consumption depends on the quality<br />
and viscosity of oil, the speed at which the engine<br />
is operated, the climate, road conditions as well<br />
as the amount of dilution and oxidation of the<br />
lubricant.<br />
If the vehicle is used for repeated short trips, and<br />
consumes a normal amount of oil, the engine oil<br />
measurement may not show any drop in the oil<br />
level at all, even after 600 miles (1,000 km) or<br />
more. This is because the oil is gradually becoming<br />
diluted with fuel or moisture, making it appear<br />
that the oil level has not changed.<br />
The diluting ingredients evaporate out when the<br />
vehicle is driven at high speeds, as on an expressway,<br />
making it then appear that oil is excessively<br />
consumed after driving at high speeds.<br />
If the conditions you drive your vehicle in are<br />
dusty, humid, or hot, the frequency of the oil<br />
change intervals should be greater.
If the vehicle is driven at a high rate of speed,<br />
climatic conditions are warm, and the load is high,<br />
the oil should be checked more frequently, as<br />
driving conditions will determine the rate of oil<br />
consumption.<br />
– The engine in your vehicle depends on oil to<br />
lubricate and cool all of its moving parts.<br />
Therefore, the engine oil should be checked<br />
regularly and kept at the required level.<br />
– Make it a habit to have the engine oil level<br />
checked at every fuel filling.<br />
– The oil pressure warning light is not an oil level<br />
indicator.<br />
The oil pressure warning light indicates serious<br />
engine damage may be occuring when lit, if engine<br />
rpm is above idle speed.<br />
Engine Oil Level<br />
f Please see the chapter “EXERCISE EXTREME<br />
CAUTION WHEN WORKING ON YOUR VEHICLE”<br />
on Page 186.<br />
f Regularly check the oil level using the on-board<br />
computer after the vehicle is refuelled.<br />
Please see the chapter “OIL DISPLAY AND<br />
MEASUREMENT OF THE ENGINE OIL LEVEL”<br />
on Page 161.<br />
The difference between the minimum and maximum<br />
marks on the segment display is approx.<br />
1.3 quarts (1.25 liters).<br />
Each segment of the display corresponds to approx.<br />
0.42 quart (0.4 liter).<br />
Topping off engine oil<br />
Warning!<br />
Engine oil is hazardous to your health and<br />
may be fatal if swallowed.<br />
f Keep engine oil out of children’s reach.<br />
Used engine oil contains chemicals that have<br />
caused cancer in laboratory animals.<br />
f Always protect your skin by washing thoroughly<br />
with soap and water.<br />
Caution!<br />
Risk of damage from overflowing engine oil.<br />
f Take care while checking and topping up<br />
engine oil not to soil the luggage compartment<br />
or items of luggage.<br />
Note<br />
The Check Engine warning light may light up if the<br />
cap of the oil filler opening is opened while the<br />
engine is running.<br />
The oil inlet opening is located in the rear luggage<br />
compartment under the service flap.<br />
1. Measure the oil level and read off the required<br />
top-up quantity on the on-board computer.<br />
2. Switch off the engine.<br />
3. Press catch button on the service flap and<br />
open flap.<br />
4. Unscrew the oil filler cap.<br />
5. Add at most 0.5 quarts (0.5 liter) of engine oil<br />
at a time.<br />
Never add more engine oil than required<br />
to reach the max. mark.<br />
6. Close oil filler cap until you feel it reach its end<br />
position.<br />
7. Measure oil level again with the on-board<br />
computer. Switch off the engine.<br />
8. If necessary, repeat the process and add more<br />
engine oil as required.<br />
Maintenance, Car Care 189
Engine Oil Recommendation<br />
Porsche recommends .<br />
The right oil for your vehicle.<br />
Complies with<br />
approval 1)<br />
Viscosity class 2)<br />
Porsche A40 SAE 0W - 403) SAE 5W - 404) SAE 5W - 504) 1) Generally, you can find details of the<br />
manufacturer approvals on the oil containers or as<br />
a notice displayed by the retailer.<br />
The current approval status is also available from<br />
your Porsche partner.<br />
2)<br />
SAE viscosity class - Example: SAE 0W - 40<br />
Specification 0W = Viscosity specification for<br />
low temperatures (winter).<br />
Specification 40 = Viscosity specification for<br />
high temperatures.<br />
3)<br />
For all temperature ranges.<br />
4) For the temperature range over --13 °F (--25 °C).<br />
190 Maintenance, Car Care<br />
Always observe the following points:<br />
– Use engine oils approved by Porsche only. This<br />
is a precondition for optimum and problem-free<br />
operation of your vehicle.<br />
– Regular oil changes are part of servicing.<br />
It is important that the service intervals,<br />
particularly the oil change intervals, are<br />
observed in accordance with the specifications<br />
in the “Maintenance” booklet.<br />
– Oils approved by Porsche can be mixed with<br />
each other.<br />
– Porsche engines are designed so that no oil<br />
additives may be used.<br />
– A label is located in the engine compartment,<br />
which provides you with information on suitable<br />
oil for your engine.<br />
Your Porsche partner will be pleased to<br />
advise you.<br />
Oil change<br />
The engine oil has to be changed regularly at the<br />
intervals listed in your Maintenance Schedule.<br />
f Please see the chapter “CAPACITIES” on<br />
Page 271.<br />
We recommend that you have the engine oil<br />
changed at your Porsche dealer, who has the required<br />
oils and the necessary filling equipment.<br />
If you suspect an oil leak in the engine have your<br />
dealer check it out immediately.<br />
All current engine oils are compatible with each<br />
other, i.e. when making an oil change it is not necessary<br />
to flush the engine if you wish to use a different<br />
brand or grade of oil.<br />
Since, however, each brand of oil has a special<br />
composition, you should, if possible, use the<br />
same oil brand if it becomes necessary to top up<br />
between oil changes.<br />
Porsche engines have long intervals between oil<br />
changes. You can make best use of these long oil<br />
change intervals by using multigrade oils since<br />
these are largely independent of seasonal fluctuations<br />
in temperature.
If your vehicle is used frequently in stop-and-go<br />
traffic in cold weather, the engine will not always<br />
be properly warmed up.<br />
Condensation from products of combustion may<br />
accumulate in the oil. In this case, it is advisable<br />
to change the oil more frequently so that your engine<br />
once again has 100% efficient engine oil.<br />
Engine oil performance class<br />
Engine oil is not only a lubricant, but also serves<br />
to keep the engine clean, to neutralize the dirt<br />
which penetrates into the engine through combustion<br />
and to protect the engine against corrosion.<br />
To perform these functions, the oil is provided with<br />
additives which have been specially developed for<br />
these functions.<br />
The efficiency of an oil is expressed, for example,<br />
by the API, ILSAC or ACEA classifications.<br />
Viscosity<br />
Like all liquids, engine oil is viscous when cold,<br />
and thin-bodied when warm. The viscosity of an oil<br />
is expressed by its SAE class. For cold viscosity<br />
(measured at temperatures below 32 °F/0 °C) the<br />
SAE class is given as a number and the letter “W”<br />
(as in winter), for hot viscosity (measured at<br />
212 °F/100 °C) the SAE class is given only as a<br />
number.<br />
The viscosity of an oil is, therefore, always the<br />
same if it has the same number of an SAE class.<br />
Oils with two viscosities are called multigrade oils;<br />
oils with only one viscosity are termed singlegrade<br />
oils.<br />
Single-grade oils can not be used in your engine.<br />
The viscosity of the engine oil for your Porsche<br />
has to be chosen according to the ambient temperature<br />
given in the engine oil recommendation<br />
table.<br />
Maintenance, Car Care 191
Brake Fluid Level<br />
f Please see the chapter “EXERCISE EXTREME<br />
CAUTION WHEN WORKING ON YOUR VEHICLE”<br />
on Page 186.<br />
f Use only new (unused) Original Porsche<br />
brake fluid.<br />
Warning!<br />
Brake fluid is hazardous to your health, and<br />
may be fatal if swallowed.<br />
Brake fluid also attacks paintwork.<br />
f Keep brake fluid out of children’s reach.<br />
f Take care while topping off brake fluid not to<br />
soil the luggage compartment or items of luggage.<br />
192 Maintenance, Car Care<br />
Checking the brake fluid level<br />
The reservoir for the hydraulic braking and clutch<br />
systems is located in the luggage compartment.<br />
1. Open and remove cover flap A.<br />
2. Regularly check the brake-fluid level on the<br />
transparent expansion tank through the<br />
window B.<br />
The fluid level should always lie between the<br />
minimum and maximum marks.<br />
A slight decrease in the fluid level due to wear and<br />
automatic readjustment of the disc brakes is<br />
normal.<br />
If, however, the fluid level falls markedly or below<br />
the minimum mark, the braking system may have<br />
developed a leak.<br />
f Have the brake system checked without delay<br />
at an authorized Porsche dealer.
Changing the brake fluid<br />
Brake fluid absorbs moisture from the air over<br />
time. This accumulation of water lowers the boiling<br />
point and, under certain operating conditions,<br />
can affect the braking performance.<br />
Therefore have the brake fluid changed in accordance<br />
with the change intervals stated in the<br />
brochure “Maintenance”.<br />
Warning light USA<br />
Warning light Canada<br />
– The warning lights on the instrument panel and<br />
on the on-board computer indicate an insufficient<br />
brake fluid level.<br />
– If the warning light lights up on the instrument<br />
panel and the warning message appears on<br />
the on-board computer in combination with a<br />
larger pedal travel, a brake circuit may have<br />
failed.<br />
If the warning lights should light up when<br />
driving:<br />
f Stop immediately in a suitable place.<br />
f Do not continue driving.<br />
Consult an authorized Porsche dealer.<br />
Maintenance, Car Care 193
Fuel Economy<br />
Fuel economy will vary depending on where,<br />
when and how you drive, optional equipment<br />
installed, and the general condition of your<br />
car.<br />
A car tuned to specifications and correctly<br />
maintained, will help you to achieve optimal<br />
fuel economy.<br />
f Have your vehicle tuned to specifications.<br />
Air cleaner should be dirt free to allow proper<br />
engine “breathing”.<br />
Battery should be fully charged.<br />
Wheels should be properly aligned.<br />
Tires should be inflated at correct pressure.<br />
f Always monitor your fuel consumption.<br />
f Drive smoothly, avoid abrupt changes in speed<br />
as much as possible.<br />
f Avoid jack rabbit starts and sudden stops.<br />
f Do not drive longer than necessary in the lower<br />
gears. Shifting into a higher gear early without<br />
lugging the engine will help save fuel.<br />
f Prolonged “warm up” idling wastes gas. Start<br />
the vehicle just before you are ready to drive.<br />
Accelerate slowly and smoothly.<br />
f Switch off the engine if stationary for longer<br />
periods.<br />
194 Maintenance, Car Care<br />
f Any additional weight carried in the vehicle reduces<br />
fuel economy. Always keep cargo to a<br />
minimum and remove all unnecessary items.<br />
f Organize your trips to take in several errands<br />
in one trip.<br />
f All electrical accessories contribute to increased<br />
fuel consumption.<br />
f Only switch on the air conditioning when necessary.<br />
f Do not drive with the Roof Transport System<br />
mounted unless you need it.<br />
The EPA estimated mpg. is to be used for<br />
comparison purposes, actual mileage may<br />
be different from the estimated mpg.,<br />
depending on your driving speed, weather<br />
conditions and trip length. Your actual<br />
highway mileage will probably be less than<br />
the estimated mpg.<br />
f Please observe all local and national speed<br />
limits.<br />
Operating your Porsche in other<br />
Countries<br />
Government regulations in the United States and<br />
Canada require that automobiles meet specific<br />
emission regulations and safety standards. Therefore,<br />
cars built for the U.S. and Canada differ from<br />
vehicles sold in other countries.<br />
If you plan to take your Porsche outside the continental<br />
limits of the United States or Canada, there<br />
is the possibility that<br />
– unleaded fuel may not be available;<br />
– unleaded fuel may have a considerably lower<br />
octane rating. Excessive engine knock and serious<br />
damage to both engine and catalytic converters<br />
could result;<br />
– service may be inadequate due to lack of proper<br />
service facilities, tools or diagnostic equipment;<br />
– replacement parts may not be available or very<br />
difficult to get.<br />
Porsche cannot be responsible for the<br />
mechanical damage that could result<br />
because of inadequate fuel, service or parts<br />
availability.<br />
If you purchased your Porsche abroad and want to<br />
bring it back home, be sure to find out about shipping<br />
and forwarding requirements, as well as current<br />
import and customs regulations.
Fuel<br />
Warning!<br />
Fuel is highly flammable and harmful to<br />
health.<br />
f Fire, open flame and smoking are prohibited<br />
when handling fuel.<br />
f Avoid contact with skin or clothing.<br />
f Do not inhale fuel vapors.<br />
To prevent damage to the emission control<br />
system and engine:<br />
f Never drive the tank completely out of fuel.<br />
f Avoid high cornering speeds after the warning<br />
lights have come on.<br />
f Please see the chapter “FUEL ECONOMY” on<br />
Page 194.<br />
Please see the chapter “EMISSION CONTROL<br />
SYSTEM” on Page 198.<br />
Please see the chapter “LEVEL GAGE” on<br />
Page 130.<br />
Check engine warning light<br />
If the warning lights in the instrument panel and onboard<br />
computer come on and remain on while<br />
driving, it suggests:<br />
– a potential engine control problem and the<br />
need for system service or<br />
– an improperly fastened tank cap or<br />
– refueling with engine running.<br />
Opening the filler flap<br />
The filler opening is under the filler flap in the front<br />
right fender.<br />
f With the vehicle unlocked, press on the front<br />
part of the filler flap (arrow) to open the flap.<br />
The filler flap is centrally locked along with the other<br />
locks.<br />
If there is a defect in the automatic unlocking<br />
system:<br />
f Open the passenger door.<br />
f Pull the ring in the right-hand door aperture<br />
(arrow).<br />
Maintenance, Car Care 195
Refueling<br />
Fuel tank capacity is listed under “Capacities”.<br />
Porsche does not recommend the use of fuel additives.<br />
Fuel is highly flammable and harmful to<br />
health.<br />
f Please see the chapter “CAPACITIES” on<br />
Page 271.<br />
196 Maintenance, Car Care<br />
1. Important: Stop the engine and switch off the<br />
ignition.<br />
2. Slowly unscrew the tank cap.<br />
Hang the tank cap's plastic strap on the hook<br />
on the inside wall of the filler flap.<br />
3. Insert fuel-hose nozzle fully into the filler neck<br />
with the handle of the fuel-hose nozzle facing<br />
down.<br />
4. Do not add further fuel once the correctly operated<br />
automatic fuel-hose nozzle has<br />
switched off.<br />
Fuel could spray or could run over in warm<br />
temperatures.<br />
5. Replace the tank cap immediately after<br />
refueling and turn it until you hear it and feel it<br />
engage.<br />
If you lose the tank cap, you must replace it<br />
only with an original part to reduce the<br />
possibility of a fire in the event of a collision.<br />
Caution!<br />
Risk of damage. Decorative film may fade<br />
if it comes into contact with fuel.<br />
f Wipe off any emerging fuel immediately.<br />
Fuel Recommendations<br />
Your Porsche is equipped with catalytic converters<br />
and must use UNLEADED FUEL ONLY.<br />
Your engine is designed to provide optimum performance<br />
and fuel economy using unleaded premium<br />
fuel with an octane rating of 98 RON<br />
(93 CLC or AKI). Porsche therefore recommends<br />
the use of these fuels in your vehicle.<br />
Porsche also recognizes that these fuels may not<br />
always be available. Be assured that your vehicle<br />
will operate properly on unleaded premium fuels<br />
with octane numbers of at least 95 RON<br />
(90 CLC or AKI), since the engine’s “Electronic<br />
Oktane knock control” will adapt the ignition timing,<br />
if necessary.<br />
It is important to observe the regular service intervals,<br />
and particularly the oil change intervals,<br />
specified in the “Maintenance” booklet.<br />
The use of UNLEADED FUEL ONLY is critically<br />
important to the life of the catalytic<br />
converters. Deposits from leaded fuels will<br />
ruin the converters and make it ineffective<br />
as an emission control device.<br />
Cars with catalytic converters have a smaller fuel<br />
tank opening, and gas station pumps have smaller<br />
nozzles. This will prevent accidental pumping of<br />
leaded fuel into cars with catalytic converters.
Unleaded fuels may not be available outside the<br />
continental U.S. and Canada. Therefore, we recommend<br />
you do not take your car to areas or<br />
countries where unleaded fuel may not be available.<br />
Octane ratings<br />
Octane rating indicates a fuel’s ability to resist detonation.<br />
Therefore, buying the correct octane gas<br />
is important to prevent engine “damage”.<br />
The RON octane rating is based on the research<br />
method. The CLC (U.S. Cost of Living Council octane<br />
rating) or AKI (antiknock index) octane rating<br />
usually displayed on U.S. fuel pumps is calculated<br />
as research octane number plus motor octane<br />
number, divided by 2, that is written as:<br />
RON+MON<br />
2<br />
or<br />
R+M<br />
2<br />
The CLC or AKI octane rating is usually lower than<br />
the RON rating:<br />
For example: 95 RON equals 90 CLC or AKI<br />
Fuels containing ethanol<br />
Do not use any fuels containing more than 10 percent<br />
ethanol by volume.<br />
We recommend, however, to change to a different<br />
fuel or station if any of the following problems occur<br />
with your vehicle:<br />
– Deterioration of driveability and performance.<br />
– Substantially reduced fuel economy.<br />
– Vapor lock and non-start problems, especially<br />
at high altitude or at high temperature.<br />
– Engine malfunction or stalling.<br />
Portable Fuel Containers<br />
Danger!<br />
Portable fuel containers, full or partially<br />
empty, may leak causing an explosion, or result<br />
in fire in case of an accident.<br />
f Never carry additional fuel in portable containers<br />
in your vehicle.<br />
Fuel Evaporation Control<br />
Fuel tank venting<br />
The evaporation chamber and the carbon canister<br />
prevent fuel from escaping to the atmosphere at<br />
extreme high outside temperatures, when driving<br />
abruptly around curves and when the car is parked<br />
at an incline or in any other nonlevel position.<br />
Vapor control system and storage<br />
When the fuel tank is filled, vapors are collected in<br />
the evaporation chamber by a vent line leading the<br />
vapors to the carbon canister where they are<br />
stored as long as the engine does not run.<br />
Purge system<br />
When the engine is running, the fuel vapors from<br />
the canister will be mixed with fresh air from the<br />
ambient air of the canister. This mixture will be<br />
directed to the intake air housing by the tank vent<br />
line, mixed with the intake air and burned during<br />
normal combustion.<br />
Maintenance, Car Care 197
Emission Control System<br />
In the interest of clean air<br />
Pollution of our environment has become a problem<br />
that is of increasing concern to all of us. We<br />
urge you to join us in our efforts for cleaner air in<br />
controlling the pollutants emitted from the automobile.<br />
Porsche has developed an emission control system<br />
that controls or reduces those parts of the<br />
emission that can be harmful to our environment.<br />
Your Porsche is equipped with such a system.<br />
Porsche warrants the Emission Control System in<br />
your new car under the terms and conditions set<br />
forth in the Warranty Booklet.<br />
You, as the owner of the vehicle, have the<br />
responsibility to provide regular maintenance service<br />
for the vehicle and to keep a record of all maintenance<br />
work performed. To facilitate record<br />
keeping, have the service performed by authorized<br />
Porsche dealers. They have Porsche trained<br />
technicians and special tools to provide fast and<br />
efficient service.<br />
198 Maintenance, Car Care<br />
To assure efficient operation of the Emission<br />
Control System:<br />
f Have your vehicle maintained properly and in<br />
accordance with the recommendations described<br />
in your Maintenance Booklet.<br />
Lack of proper maintenance, as well as improper<br />
use of the vehicle, will impair the function<br />
of the emission control system and could<br />
lead to damage.<br />
f Do not alter or remove any component of the<br />
emission control system.<br />
f Do not alter or remove any device, such as<br />
heat shields, switches, ignition wires, valves,<br />
etc., which are designed to protect your vehicle’s<br />
emission control system.<br />
In addition to serious engine damage, this can<br />
result in a fire if excess raw fuel reaches the<br />
exhaust system.<br />
f Do not continue to operate your vehicle if you<br />
detect engine misfire or other unusual operating<br />
conditions.<br />
Parking<br />
Warning!<br />
Danger of fire resulting in serious personal<br />
injury or death.<br />
f Do not park or operate the vehicle in areas<br />
where the hot exhaust system may come in<br />
contact with dry grass, brush, fuel spill or other<br />
flammable material.<br />
f If your car catches on fire for any reason, call<br />
the fire department.<br />
Do not endanger your life by attempting to put<br />
out the fire.<br />
Undercoating<br />
Danger!<br />
Danger of fire resulting in serious personal<br />
injury or death.<br />
f Do not apply additional undercoating or rustproofing<br />
on or near the exhaust manifold,<br />
exhaust pipes, catalytic converters or heat<br />
shields. During driving the substance used for<br />
undercoating could overheat and ignite.
How Emission Control Works<br />
When an automobile engine is running, it uses energy<br />
generated through the combustion of a mixture<br />
of air and fuel. Depending on whether a car is<br />
driven fast or slowly or whether the engine is cold<br />
or hot, some of the fuel (hydrocarbons) may not<br />
be burned completely, but may be discharged into<br />
the engine crankcase or exhaust system. Additonal<br />
hydrocarbons may enter the atmosphere<br />
through evaporation of fuel from the fuel tank.<br />
These hydrocarbons (HC), when released into the<br />
air, contribute to undesirable pollution.<br />
In addition, carbon monoxide (CO) and oxides of<br />
nitrogen (NOx) contribute to engine emissions.<br />
They, too, are formed during the combustion process<br />
and discharged into the exhaust system.<br />
To reduce these pollutants, your Porsche is<br />
equipped with a precisely calibrated fuel injection<br />
system to assure a finely balanced air/fuel mixture<br />
under all operating conditions.<br />
Oxygen sensor<br />
The oxygen sensor, installed in the exhaust pipe<br />
continuously senses the oxygen content of the<br />
exhaust and signals the information to an electronic<br />
control unit. The control unit corrects the air/<br />
fuel ratio, so the engine always receives an accurately<br />
metered air/fuel mixture.<br />
Crankcase ventilation<br />
Through crankcase ventilation, undesirable emissions<br />
from the engine crankcase are not permitted<br />
to reach the outside atmosphere. These emissions<br />
are recirculated from the crankcase to the<br />
air intake system. From here the emissions mix<br />
with the intake air and are later burned in the engine.<br />
Catalytic converters<br />
The catalytic converters are efficient “clean-up”<br />
devices built into the exhaust system of the vehicle.<br />
The catalytic converters burn the undesirable<br />
pollutants in the exhaust gas before it is released<br />
into the atmosphere.<br />
The exclusive use of unleaded fuel is critically<br />
important for the life of the catalytic converters.<br />
Therefore, only unleaded fuel must<br />
be used.<br />
The catalytic converters will be damaged by:<br />
– push or tow starting the vehicle<br />
– misfiring of the engine<br />
– turning off the ignition while the vehicle is moving<br />
or<br />
– driving until the fuel tank is completely empty<br />
– by other unusual operating conditions.<br />
f Do not continue to operate your vehicle under<br />
these conditions, since raw fuel might reach<br />
the catalytic converters. This could result in<br />
overheating of the converters. Federal law prohibits<br />
use of leaded fuel in this car.<br />
Maintenance, Car Care 199
Washer Fluid<br />
Capacity<br />
– Without headlight cleaning system:<br />
approximately 2.6 quarts (2.5 liters).<br />
– With headlight cleaning system:<br />
approximately 6.3 quarts (6 liters).<br />
Washer fluid<br />
The reservoir, with a blue screw cap, is in the front<br />
luggage compartment, to the rear left.<br />
200 Maintenance, Car Care<br />
Clean water is generally not enough to clean the<br />
windshield and headlights. Depending on the<br />
season, mix the water with the appropriate<br />
additives. Follow the instructions for the mixture<br />
ratio.<br />
Only use window cleaner concentrate which meets<br />
the following requirements.<br />
– Dilutability 1:100<br />
– Phosphate-free<br />
– Suitable for plastic headlight lenses.<br />
We recommend window cleaner concentrates<br />
approved by Porsche. Your authorized Porsche<br />
dealer will be pleased to advise you.<br />
Summer filling<br />
Water + window cleaner concentrate at the mixing<br />
ratio indicated on the container.<br />
Winter filling<br />
Water + antifreeze protection + window cleaner<br />
concentrate at the mixing ratio indicated on the<br />
container.<br />
f Please note all the information on the containers<br />
of the window cleaner concentrate or the<br />
antifreeze protection.<br />
Topping off washer fluid<br />
1. Please note all the information on the refill container<br />
of the cleaning agent.<br />
2. Open cap of the washer-fluid reservoir (arrow).<br />
3. Top up washer fluid and close cap properly.<br />
f Do not use engine coolant anti-freeze or any<br />
other solution that can damage the car’s paint,<br />
in the washer reservoir.<br />
Warning light<br />
If less than 0.53 quarts (0.5 liter) remains, a<br />
warning message appears on the on-board<br />
computer.<br />
f Add washer fluid.
Power Steering<br />
Warning!<br />
Risk of accident resulting in serious personal<br />
injury or death.<br />
When the engine is stopped (e.g. when being<br />
towed) or the hydraulic system fails, there is<br />
no assistance for steering.<br />
Therefore, substantially more force will have<br />
to be exerted in order to steer.<br />
f Exercise great care when being towed.<br />
f Have the fault remedied at your nearest authorized<br />
Porsche dealer.<br />
Note<br />
The flow noise heard at full steering lock is system<br />
related and does not indicate a defect in the<br />
steering system.<br />
Checking hydraulic fluid<br />
f Please see the chapter “EXERCISE EXTREME<br />
CAUTION WHEN WORKING ON YOUR VEHICLE”<br />
on Page 186.<br />
The hydraulic fluid reservoir is located in the engine<br />
compartment.<br />
Regular checking of hydraulic fluid is part of<br />
servicing.<br />
Air Filter<br />
A dirty air filter not only reduces engine performance,<br />
but can lead to premature engine wear.<br />
Regular filter replacement is part of the routine<br />
maintenance service.<br />
f In dusty conditions, check the filter element<br />
more frequently and replace if necessary.<br />
Combination Filter<br />
The fresh air passing through the combination filter<br />
into the passenger compartment is virtually<br />
free of dust, pollen, and unpleasant odors.<br />
f If the outside air is polluted by exhaust fumes,<br />
press the circulating-air button.<br />
A dirty filter can be the cause of reduced air flow:<br />
f Have filter replaced by your authorized<br />
Porsche dealer.<br />
Regular filter replacement is part of the routine<br />
maintenance service.<br />
Fluids/Oils for Manual<br />
Transmission and Porsche<br />
Doppelkupplung (PDK)<br />
The transmission fluids/oils have to be checked<br />
and changed at the intervals listed in your Maintenance<br />
Schedule.<br />
f Please see the chapter “CAPACITIES” on<br />
Page 271.<br />
Do not tow the car or run the engine without fluid/<br />
oil in the transmission. The transmission may be<br />
damaged by even a tiny speck of dirt, only a clean<br />
funnel or spout must be used when adding fluid/<br />
oil.<br />
We recommend that you have the fluids/oils<br />
changed at your Porsche dealer, who has the required<br />
lubricants and the necessary filling equipment.<br />
f If you suspect an oil leak in the transmission,<br />
have your authorized Porsche dealer check it<br />
out immediately.<br />
Maintenance, Car Care 201
Wiper Blades<br />
Wiper blades that are in perfect condition are vital<br />
for a clear view.<br />
f Replace the wiper blades twice per year (before<br />
and after the cold season) or whenever<br />
wiper performance deteriorates.<br />
Caution!<br />
Risk of damage if the wiper arm accidentally<br />
falls back on to the window.<br />
f Always hold the wiper arm securely when replacing<br />
the wiper blade.<br />
Risk of damage if wiper blades that are frozen<br />
in place are loosened improperly.<br />
f Thaw the wiper blades before loosening them.<br />
Maintenance note<br />
f Periodically clean the wiper blades with window<br />
cleaner, especially after the vehicle has<br />
been washed in a car wash.<br />
We recommend the Porsche window cleaner. If<br />
they are very dirty (e.g. with insect remains),<br />
they can be cleaned with a sponge or cloth.<br />
202 Maintenance, Car Care<br />
If the wiper blades rub or squeak, this can be as a<br />
result of the following:<br />
– If the vehicle is washed in an automatic car<br />
wash, wax residues may adhere to the windshield.<br />
These wax residues can be removed<br />
only by using window cleaner concentrate.<br />
– The wiper blades may be damaged or worn.<br />
– Replace damaged or worn wiper blades as<br />
soon as possible.<br />
– Please see the chapter “WASHER FLUID” on<br />
Page 200.<br />
f Please contact your authorized Porsche dealer<br />
for further information.<br />
Changing wiper blades<br />
f Please read the separate instructions for fitting<br />
wiper blades as supplied by the manufacturer.<br />
f We recommend that you get your authorized<br />
Porsche dealer to replace the wiper blades.<br />
Caution!<br />
Risk of damage.<br />
If the wiper blades are not changed properly,<br />
they can come loose when the car is moving.<br />
f Check that the wiper blades are seated<br />
securely. The wiper blades must engage<br />
properly in the wiper arm.
Car Care Instructions<br />
f Please see the chapter “EXERCISE EXTREME<br />
CAUTION WHEN WORKING ON YOUR VEHICLE”<br />
on Page 186.<br />
Regular and correct care helps to maintain<br />
the value of your car and is also a<br />
precondition for the New Vehicle Warranty<br />
and the Anti Corrosion Warranty.<br />
Your authorized Porsche dealer has specially<br />
developed car-care products from the<br />
Porsche program available either singly or<br />
as complete car-care sets. They will be<br />
pleased to help you select suitable products.<br />
Whether you use Porsche products or other<br />
commercially available cleaning agents first<br />
make sure of their correct application.<br />
A Porsche that is well-cared for can look like new<br />
for years. It all depends on the amount of care the<br />
owner is willing to give the car.<br />
Warning!<br />
Risk of serious personal injury or damage to<br />
the vehicle or property.<br />
Cleaning agents may be hazardous to your<br />
health.<br />
Most chemical cleaners are concentrates<br />
which require dilution. High concentrations<br />
might cause problems ranging from irritation<br />
to serious injury as well as damage to your<br />
vehicle.<br />
f Keep cleaning agents out of reach from children.<br />
f Observe all caution labels.<br />
f Always read directions on the container before<br />
using any product. These directions may contain<br />
information necessary to avoid personal<br />
injury.<br />
f Do not use fuel, kerosene, naphtha, nail polish<br />
remover or other volatile cleaning fluids. They<br />
may be toxic, flammable or hazardous in other<br />
ways. Only use spot removing fluids in a well<br />
vented area.<br />
f Do not clean the underside of chassis, fenders,<br />
wheel covers, etc., without protecting<br />
your hands and arms as you may cut yourself<br />
on sharp-edged metal parts.<br />
Moisture and road salt on brakes may affect braking<br />
efficiency.<br />
f Test the brakes after each vehicle washing.<br />
Decorative film<br />
Caution!<br />
Risk of damage due to separation of the<br />
decorative film when cleaning your vehicle<br />
with high-pressure cleaning equipment or<br />
steam cleaners.<br />
f Do not use high-pressure cleaning equipment<br />
or steam cleaners for cleaning decorative film.<br />
High-pressure cleaning units, steam<br />
cleaners<br />
Warning!<br />
High-pressure cleaning units or steam cleaners<br />
can damage the following components:<br />
– tires,<br />
– logos, emblems,<br />
– painted surfaces,<br />
– alternator,<br />
– ParkAssist sensors.<br />
f Please observe the operating instructions from<br />
the unit manufacturer.<br />
f When cleaning with a flat-jet nozzle or the like,<br />
maintain a minimum distance of 20 inches (50<br />
cm).<br />
f Never use high-pressure cleaning units or<br />
steam cleaners with a round-jet nozzle. A highpressure<br />
cleaning unit or steam cleaners with<br />
round nozzle will damage your vehicle.<br />
f The tires are particularly susceptible to damage.<br />
f Do not point the cleaning jet directly at any of<br />
the aforementioned components.<br />
Maintenance, Car Care 203
Washing<br />
The best method of protecting your car from the<br />
damaging effects of the environment is frequent<br />
washing and the application of a preservative. The<br />
underside of your vehicle should also be thoroughly<br />
washed for cinders, salt or sanding at winter’s<br />
end.<br />
The longer salt, road dust and industrial dust,<br />
dead insects, bird droppings or substances from<br />
trees (resin, pollen) are allowed to remain on the<br />
bodywork, the more serious is their harmful effect.<br />
New cars should be washed carefully with plenty<br />
of clear water to protect the new paint work. Dark<br />
paint finishes show up the smallest of surface<br />
damage (e.g., scratches) more readily than lighter<br />
colors.<br />
Dark colors are also more susceptible to scratching<br />
because of the composition of their pigments<br />
and require particularly careful paint care.<br />
f Do not wash your car in bright sunlight or while<br />
the bodywork is still hot.<br />
f When washing by hand, use abundant water, a<br />
soft sponge or wash brush, and Porsche car<br />
shampoo.<br />
f Begin by spraying the body thoroughly with water<br />
to rinse away loose dirt.<br />
204 Maintenance, Car Care<br />
f After washing, rinse the car with plenty of water<br />
and then dry with a chamois leather.<br />
Do not use the same chamois leather for drying<br />
as you use for cleaning the windshield and<br />
windows.<br />
Warning!<br />
Moisture which gets on to the brakes during<br />
a car wash can reduce braking efficiency or<br />
make the brakes pull unevenly which could<br />
increase the danger of an accident, causing<br />
serious personal injuries or death.<br />
f After washing the car, test the brakes and<br />
steering and briefly brake the discs dry.<br />
When doing this, take care not to hamper other<br />
road users behind you (traffic conditions<br />
permitting).<br />
Automatic car washes<br />
f Please see the chapter “WIPER BLADES” on<br />
Page 202.<br />
Optional add-on parts or parts which project<br />
beyond the contours of the vehicle may be<br />
damaged by design features (e.g. brushes) of automatic<br />
car washes.<br />
The following parts are particularly<br />
susceptible to damage:<br />
– Windshield wipers (always switch them off to<br />
prevent them wiping unintentionally in intermittent<br />
or sensor operation)<br />
– External antennas (always unscrew)<br />
– Rear spoiler<br />
– Wheels (the wider the rim and the lower the tire<br />
height, the greater the risk of damage)<br />
– High-gloss wheels (to prevent these from getting<br />
scratched, do not clean with the wheelcleaning<br />
brushes of the car wash).<br />
f Please consult the operator before using automatic<br />
car washes.<br />
f Wash and dry by hand all points not reached by<br />
a car wash, such as door and lid seams or<br />
door sills.<br />
Note<br />
Automatic car washes spray water at odd angles<br />
and high pressures, which are not seen in normal<br />
driving. Therefore, water can sometimes find its<br />
way into the passengers compartment during or<br />
shortly after the car wash.
Door lock<br />
f To prevent the door lock from freezing during<br />
the cold season, the lock cylinder should be<br />
covered during a wash.<br />
f Should the lock freeze, use an ordinary de-icer.<br />
In many cases, a well warmed key can help.<br />
Never use excessive force.<br />
Paint<br />
To protect the paint on your vehicle in the best<br />
possible way against mechanical and chemical<br />
damage, you should<br />
– preserve it regularly,<br />
– polish it if necessary,<br />
– remove spots and stains, and<br />
– repair damaged paintwork.<br />
f Do not apply care products containing silicone<br />
to the convertible top and windows.<br />
General information<br />
f Never rub a dusty vehicle with a dry cloth,<br />
because the grains of dirt will damage the<br />
paintwork.<br />
f Do not treat matt-painted components with<br />
preservatives or polishes, otherwise the matt<br />
effect will be lost.<br />
Preservation<br />
The paint surface becomes dull over time due<br />
to weathering.<br />
f Preserve paint regularly.<br />
f Apply paint preservative after washing the<br />
vehicle and polish it smooth to preserve the<br />
paintwork.<br />
This keeps the paint shiny and elastic. Dirt is<br />
prevented from adhering to the paint surface and<br />
industrial dust is prevented from penetrating<br />
the paint.<br />
Polishing<br />
Do not resort to using Porsche polish until it becomes<br />
evident that the normal preservatives no<br />
longer produce the desired finish.<br />
Spots and stains<br />
f Remove tar stains, grease, oil spots and dead<br />
insects as soon as possible with Insect Remover.<br />
They can cause discoloration if allowed to<br />
remain on the paintwork.<br />
f Wash the affected area immediately after treating<br />
it.<br />
Minor paint damage<br />
f Have minor paint damage, such as scratches,<br />
scores or chips caused by flying stones, repaired<br />
immediately by your authorized<br />
Porsche dealer before corrosion sets in.<br />
However, if there are already traces of corrosion,<br />
they must first be removed carefully and thoroughly.<br />
Coat the area with a rust-proofing primer and<br />
finish off with a top coat. The paint code and color<br />
number are found on the data bank in the Maintenance<br />
booklet.<br />
f Please see the chapter “VEHICLE DATA BANK”<br />
on Page 264.<br />
Engine compartment<br />
The engine compartment and the surface of the<br />
engine are treated with a corrosion-inhibitor at the<br />
factory.<br />
If degreasing solvents are used to clean the engine<br />
compartment or the engine is washed down,<br />
the process almost invariably removes the corrosion-inhibiting<br />
coating. It is then absolutely necessary<br />
to have a durable preservative applied to all<br />
surfaces, body seams, joints and assemblies in<br />
the engine compartment. This also applies when<br />
corrosion-inhibitor parts are replaced.<br />
Maintenance, Car Care 205
Caution!<br />
Risk of damage to the alternator.<br />
f Do not point the cleaning jet directly at the alternator,<br />
or cover the alternator.<br />
Effective rust-proofing is particularly important<br />
during the cold weather season. If the vehicle is<br />
driven frequently in areas where salt has been<br />
spread on the roads, the engine compartment<br />
should be cleaned thoroughly and subsequently<br />
sealed after the cold weather season to prevent<br />
salt from causing any lasting damage.<br />
Windows<br />
The road dust which settles on the windshield and<br />
windows contains particles of tire rubber and oil<br />
residue. The interior trim and upholstery release<br />
particles, particularly in strong sunlight, which collect<br />
on the insides of the windows. These deposits<br />
are augmented by impurities in the air which enters<br />
the car through the fresh air vents.<br />
f Clean all windows regularly, inside and outside,<br />
with Porsche window cleaner.<br />
f If you use a chamois leather for the windows,<br />
do not use it for paintwork as it will otherwise<br />
pick up a certain amount of preservative or<br />
polish and could smear the windows and thus<br />
impair vision.<br />
f Remove dead insects with Porsche insect remover.<br />
206 Maintenance, Car Care<br />
Note<br />
Door windows feature a water-repellent (hydrophobic)<br />
coating which prevents soiling of the<br />
windows.<br />
This coating is subject to natural wear and can be<br />
renewed.<br />
f Consult an authorized Porsche dealer.<br />
Wiper blades<br />
Wiper blades that are in perfect condition are vital<br />
for a clear view.<br />
f Please see the chapter “WIPER BLADES” on<br />
Page 202.<br />
f Replace the wiper blades twice per year (before<br />
and after the cold season) or whenever<br />
wiper performance deteriorates or the blades<br />
are damaged.<br />
f Periodically clean the wiper blades with<br />
Porsche window cleaner, especially after the<br />
vehicle has been washed in a car wash.<br />
If they are very dirty (e.g. with insect remains),<br />
they can be cleaned with a sponge or cloth.<br />
If the wiper blades rub or squeak, this can be as a<br />
result of the following:<br />
– If the vehicle is washed in an automatic car<br />
wash, residues may adhere to the windshield.<br />
These wax residues can be removed only by<br />
using window cleaner concentrate.<br />
– The wiper blades may be damaged or worn.<br />
– Replace damaged or worn wiper blades immediately.<br />
f Please see the chapter “WASHER FLUID” on<br />
Page 200.<br />
f Please contact your authorized Porsche dealer<br />
for further information.<br />
The wiper blades may be damaged:<br />
f Replace damaged wiper blades as soon as<br />
possible.<br />
Undercoating<br />
As it is not possible to exclude the risk of damage<br />
to this protective coating in day to day driving, it<br />
is advisable to have the underside of the car inspected<br />
at certain intervals – preferably before<br />
the start of winter and again in spring – and the undercoating<br />
restored as necessary.<br />
Your authorized Porsche dealer is familiar with the<br />
bodyseal treatment procedures and has the necessary<br />
equipment for applying factory approved<br />
materials. We recommend that you entrust them<br />
with such work and inspections.<br />
Unlike conventional spray oils, undercoating and<br />
rust-proofing compounds based on bitumen or<br />
wax do not attack the sound-proofing materials applied<br />
at the factory.
Warning!<br />
Danger of fire resulting in serious personal<br />
injury or death.<br />
f Do not apply additional undercoating or rustproofing<br />
on or near the exhaust manifold, exhaust<br />
pipes, catalytic converters or heat<br />
shields. During driving the substance used for<br />
undercoating could overheat and ignite.<br />
f Before applying fresh underseal, carefully<br />
remove any deposits of dirt and grease. Once<br />
it has dried, the new undercoating compound<br />
forms a tough protective coating which<br />
provides efficient rust-proofing of the floor<br />
panels and components.<br />
f Always apply a fresh coating of suitable preservative<br />
to unprotected areas after cleaning<br />
the underside of the body, the transmission,<br />
the engine or carrying out repairs to underbody,<br />
engine or transmission components.<br />
Effective rust-proofing is particularly important<br />
during the cold weather season. If your car is driven<br />
frequently in areas where salt has been spread<br />
on the roads, the whole engine compartment<br />
should be cleaned thoroughly after the winter to<br />
prevent salt from causing any lasting damage. A<br />
full under-body wash should also be performed at<br />
the same time.<br />
Stainless steel exhaust tailpipes<br />
Stainless steel exhaust tailpipes can discolor due<br />
to soiling, strong heat, and combustion residues.<br />
The original polish can be achieved again using<br />
commercially available metal polishing paste or<br />
metal polish.<br />
Light alloy wheels<br />
f Please see the chapter “WASHING” on<br />
Page 204.<br />
Warning!<br />
Danger of accident resulting in serious personal<br />
injury or death if cleaning agents (e.g.<br />
wheel cleaning agents) come into contact<br />
with the brake discs.<br />
The resulting film on the brake discs can impair<br />
braking performance.<br />
f Make sure that no cleaning agent comes into<br />
contact with the brake discs.<br />
f If cleaning agent has come into contact with<br />
the brake discs, thoroughly clean the brake<br />
discs with a strong jet of water.<br />
f Paying attention to any road users behind you,<br />
dry the brake discs by applying the brakes at<br />
short intervals.<br />
Metal particles (such as brass or copper in brake<br />
dust) must not remain too long on alloy wheels.<br />
Contact corrosion can cause pitting.<br />
Cleaners with an oxide-removing effect or the<br />
wrong pH value, as are commonly used for other<br />
metals, as well as mechanical tools and products,<br />
will damage the oxide layer and are therefore<br />
unsuitable.<br />
f Use only cleaners for alloy wheels<br />
(pH value 9.5). Products with the wrong<br />
pH value can destroy the protective layer<br />
on the wheels.<br />
We recommend Porsche cleaner for alloy rims.<br />
f If possible, wash the wheels every two weeks<br />
with a sponge or washing brush. If the wheels<br />
are exposed to road salt, grit or industrial dust,<br />
weekly cleaning is necessary.<br />
Maintenance, Car Care 207
Door, lid and window seals<br />
Caution!<br />
The lubricant coating on the inner door<br />
seals, convertible top and hardtop seals<br />
may be damaged by unsuitable cleaning and<br />
care agents.<br />
f Do not use any chemical cleaning agents<br />
or solvents.<br />
f Do not use any preservative agents.<br />
f Wash dirt (e.g. abrasion, dust, road salt and<br />
grit) from all seals regularly using warm<br />
soapy water.<br />
f If there is a risk of frost, protect the outer door<br />
seals and lid seals against freezing into place<br />
with a suitable care product.<br />
Headlights, lights, interior and exterior<br />
plastic parts, adhesive films<br />
Use only clean water and a little dishwashing<br />
detergent to clean light lenses, plastic headlight<br />
lenses, plastic parts, adhesive films and surfaces.<br />
Do not clean when dry.<br />
Use a soft sponge or a soft, lint-free cloth. Gently<br />
wipe the surface without applying too much<br />
pressure.<br />
An interior window cleaner can also be used to<br />
clean plastic surfaces (always read the cleaning<br />
instructions on the container). We recommend<br />
Porsche interior window cleaner.<br />
208 Maintenance, Car Care<br />
f Gently wipe the surface without applying too<br />
much pressure.<br />
f Do not clean when dry.<br />
f Never use other chemical cleaners or<br />
solvents.<br />
f Rinse cleaned surfaces with clear water.<br />
Leather<br />
Characteristics and special features<br />
The natural surface markings of leather, e.g.<br />
creases, healed scars, insect sting marks, structural<br />
differences and slight variations in shade and<br />
grain add to the attractiveness of the natural leather<br />
product.<br />
Observe the following care instructions:<br />
Caution!<br />
The leather will be damaged by the use of<br />
unsuitable cleaning and care agents and by<br />
incorrect treatment.<br />
f Do not use caustic cleaners or hard<br />
cleaning aids.<br />
f Perforated leather must under no<br />
circumstances get wet on its reverse side.<br />
f Clean all types of leather regularly to remove<br />
fine dust using a soft, damp, white woollen<br />
cloth or a commercially available<br />
microfibre cloth.<br />
f Remove heavy contamination with a leather<br />
cleaner.<br />
Always read the instructions for use given on<br />
the containers.<br />
We recommend Porsche leather cleaner.<br />
f Treat cleaned leather only with a leather<br />
care product.<br />
We recommend the Porsche leather<br />
care product.<br />
Cleaning airbags covers<br />
Danger!<br />
There is a danger of serious personal injury<br />
or death if the airbag system is impaired by<br />
improper cleaning work.<br />
f Do not make any modifications whatsoever on<br />
individual components such as the padded<br />
covers of the steering wheel, passenger side<br />
instrument panel, the front seats and the door<br />
linings.<br />
f Let your authorized Porsche dealer clean<br />
these components.
Fabric, upholstery, carpets and<br />
floor-mats<br />
f Use only a vacuum cleaner or a medium stiff<br />
brush.<br />
f Remove stains and spots with Porsche stain<br />
remover.<br />
To protect carpets, the Porsche range of accessories<br />
includes mats of the correct size and with the<br />
appropriate fastening.<br />
Warning!<br />
Risk of an accident resulting in serious personal<br />
injury or death.<br />
f Always check the movement of the pedals before<br />
driving and make sure that they are not obstructed<br />
by a floor-mat or any other object.<br />
f Secure the floor-mat to prevent it from sliding<br />
into positions that could interfere with the safe<br />
operation of your vehicle - do not install them<br />
loosely in the vehicle.<br />
Your Porsche dealer will be glad to offer you<br />
nonskid floor-mats of the correct size.<br />
Cleaning fabric linings<br />
f Fabric linings on pillars, convertible top liner<br />
and sun blinds, etc. must be cleaned only<br />
using suitable cleaning agents or a suitable dry<br />
foam and a soft brush.<br />
Alcantara<br />
f Do not use a leather care product to clean<br />
Alcantara.<br />
For regular care it is sufficient to clean the cover<br />
with a soft brush.<br />
Heavy abrasion or rubbing when cleaning causes<br />
a lasting change in the surface.<br />
Cleaning when lightly soiled<br />
f Wet a soft cloth with water or a neutral soap<br />
solution and wipe off the dirt.<br />
Cleaning when heavily soiled<br />
f Wet a soft cloth with lukewarm water or<br />
thinned white spirit and dab the dirt from the<br />
outside in.<br />
Cleaning safety belts<br />
f Use mild detergent to clean soiled belts.<br />
f When drying, avoid direct sunlight.<br />
f Only use suitable cleaning agents.<br />
f Do not tint or bleach the belts.<br />
The belt fabric could be weakened, thus affecting<br />
safety.<br />
Maintenance, Car Care 209
Storing your Porsche<br />
If you intend to store your Porsche for a prolonged<br />
period, please consult your authorized Porsche<br />
dealer. The staff will be glad to advise you on the<br />
most suitable and necessary methods.<br />
f Clean your vehicle thoroughly inside and outside.<br />
Clean the engine compartment.<br />
The under carriage and chassis components<br />
should be free of dirt and salt deposits.<br />
f Fill up the fuel tank.<br />
f Change the oil and oil filter, and run the engine<br />
for several minutes.<br />
f Increase the tire pressure to 50 psi (3.5 bar).<br />
It is not recommended to lift the vehicle, due to<br />
the possibility of corrosion on shock absorber<br />
piston shafts.<br />
The vehicle should be moved slightly, approximately<br />
every four weeks, to prevent flat spot<br />
on the tires.<br />
210 Maintenance, Car Care<br />
Climate control<br />
The air conditioning system should be in good<br />
working condition and fully charged.<br />
Windshield/Headlight washer<br />
f Check and correct antifreeze/cleaning solution<br />
level as necessary.<br />
Electrical system<br />
f Remove the battery from the vehicle and store<br />
it in a cool dry place, not on a cement floor.<br />
When the battery is disconnected, the<br />
alarm system is deactivated.<br />
f Recharge the battery every 3 months. If the<br />
battery remains in the vehicle with the cables<br />
connected, it is necessary to check, remove<br />
and recharge the battery every 2-3 weeks.<br />
Do not fast charge the battery.<br />
f Please see the chapter “BATTERY” on<br />
Page 239.<br />
Vehicle interior<br />
The interior must be dry, especially in the area of<br />
the floor carpets. The use of drying agents (Silica-<br />
Gel) is recommended in vehicles with leather interior<br />
and in areas with high humidity. The recommended<br />
amount is 3 fabric bags of 1.1 lbs.<br />
(500 grams) each placed on the floor carpets.<br />
Windows, doors and lids must be closed. The air<br />
vents should be opened.
Practical Tips, Emergency Service<br />
Exercise Extreme Caution when Working<br />
on your Vehicle ........................................ 212<br />
Tires/Wheels ........................................... 213<br />
Loading Information ................................... 224<br />
Wheel Bolts ............................................. 226<br />
Changing a wheel ...................................... 227<br />
Flat Tire .................................................... 229<br />
Lifting the Vehicle with a Lifting Platform<br />
or Garage Lift ........................................... 232<br />
Spacers ................................................... 233<br />
Electrical System ..................................... 235<br />
Battery .................................................... 239<br />
Replacing the remote-control battery ......... 244<br />
Emergency Starting with Jumper Cables ..... 245<br />
Bulb chart ................................................. 247<br />
Lights, Replacing Bulbs ............................. 247<br />
Headlights ................................................ 248<br />
Number Plate Light .................................... 256<br />
Changing Light-Emitting Diodes and<br />
Long-Life Bulbs ......................................... 256<br />
Adjusting Headlights .................................. 257<br />
Towing ..................................................... 259<br />
Practical Tips, Emergency Service 211
Exercise Extreme Caution when<br />
Working on your Vehicle<br />
Danger!<br />
Ignoring the following instructions may<br />
cause serious personal injury or death.<br />
f The engine compartment of any motor vehicle<br />
is a potentially hazardous area. If you are not<br />
fully familiar with proper repair procedures, do<br />
not attempt the adjustments described on the<br />
following pages.<br />
This caution also applies to the entire vehicle.<br />
f Only work on your vehicle outdoors or in a well<br />
ventilated area.<br />
f Ensure that there are no open flames in the<br />
area of your vehicle at any time when fuel<br />
fumes might be present. Be especially cautious<br />
of such devices such as hot water heaters<br />
which ignite a flame intermittently.<br />
f Before working on any part in the engine compartment,<br />
turn the engine off and let it cool<br />
down sufficiently. Hot engine compartment<br />
components can burn skin on contact.<br />
f Be alert and cautious around engine at all<br />
times while the engine is running.<br />
If work has to be performed with the engine<br />
running, always set the parking brake, and<br />
make sure the shift lever is in neutral position<br />
or the PDK selector lever in position P or N.<br />
212 Practical Tips, Emergency Service<br />
f In particular, be very careful to ensure that<br />
items of clothing (ties, shirt, sleeves etc.),<br />
jewelry, long hair, hand or fingers cannot get<br />
caught in the engine-compartment blower, fan,<br />
belts or other moving parts.<br />
The radiator and radiator fans are in the front<br />
of the car.<br />
The engine-compartment blower is mounted in<br />
the engine-compartment.<br />
The fans can start or continue running as a<br />
function of temperature, even with the engine<br />
switched off.<br />
Carry out work in these areas only with the engine<br />
off, the ignition switched off, and exercise<br />
extreme caution.<br />
f Your Porsche is equipped with an electronic ignition<br />
system. When the ignition is on, high voltage<br />
is present in all wires connected with the<br />
ignition system; therefore, exercise extreme<br />
caution when working on any part of the engine<br />
while the ignition is on or the engine is running.<br />
f Always support your car with safety stands if it<br />
is necessary to work under the car.<br />
Jacks are not suitable for this kind of work.<br />
f When working under the car without safety<br />
stands but with the wheels on the ground,<br />
make sure the car is on level ground, the<br />
wheels are blocked, and that the engine<br />
cannot be started.<br />
Remove the ignition key.<br />
f Do not smoke or allow an open flame around<br />
the battery or fuel.<br />
Keep a fire extinguisher in close reach.<br />
f Incomplete or improper servicing may cause<br />
problems in the operation of the car. If in doubt<br />
about any servicing, have it done by your authorized<br />
Porsche dealer.<br />
Improper maintenance during the warranty period<br />
may affect your Porsche warranty coverage.<br />
f Supplies of fluids, e.g. engine oil, brake fluid or<br />
coolant, are hazardous to your health.<br />
Keep these fluids out of children’s reach and<br />
dispose of them in accordance with the appropriate<br />
regulations.<br />
f Some countries require additional tools and<br />
special spare parts to be carried.<br />
Please make enquiries before driving abroad.
Tires/Wheels<br />
The original equipment tires and wheel rims on<br />
your Porsche comply with all applicable Federal<br />
Motor Vehicle Safety Standards.<br />
For your safety remember the following:<br />
– Wheel rims and wheel bolts are matched to fit<br />
your Porsche.<br />
– If you intend to use other than original equipment<br />
wheels, be sure that they conform to<br />
Porsche specifications for your model.<br />
Only tires with the same make and with the<br />
same specification code (e.g. “N0”, “N1”...)<br />
can be mounted.<br />
– The use of wheel rims and wheel bolts that do<br />
not meet specifications of the original factory<br />
installed equipment will affect the safe operation<br />
of your vehicle.<br />
– Before you plan on exchanging wheels, or<br />
snow tires already mounted on the wheel rims,<br />
consult your authorized Porsche dealer. Your<br />
dealer has the technical information necessary<br />
to advise you which wheel rims and wheel bolts<br />
are compatible with the original factory installations.<br />
Danger!<br />
Risk of loss of control and serious personal<br />
injury or death.<br />
f If while driving, your vehicle experiences a sudden<br />
vibration or ride disturbance, and/or you<br />
suspect that possible damage to your tires or<br />
vehicle has occurred, you should immediately<br />
reduce your speed without excessive use of<br />
the brakes.<br />
f Stop the vehicle as soon as possible, and inspect<br />
the tires.<br />
If you cannot determine the cause for the disturbance,<br />
have your vehicle towed to the nearest<br />
Porsche or tire dealer to have your vehicle<br />
or tire(s) inspected.<br />
f Continuing to operate the vehicle without correction<br />
could result in a loss of control and<br />
serious personal injury.<br />
Example<br />
Uniform Tire Quality Grading<br />
Quality grades can be found where applicable on<br />
the tire sidewall between tread shoulder and maximum<br />
section width.<br />
All passenger car tires must conform to Federal<br />
Safety Requirements in addition to these grades.<br />
Treadwear<br />
The treadwear grade is a comparative rating<br />
based on the wear rate of the tire when tested<br />
under controlled conditions on a specific government<br />
test course.<br />
For example, a tire graded 150 would wear one<br />
Practical Tips, Emergency Service 213
and a half (1-1/2) times as well on the government<br />
course as a tire graded 100.<br />
The relative performance of tires depends upon<br />
the actual conditions of their use, however, and<br />
may depart significantly from the norm due to variations<br />
in driving habits, service practices and differences<br />
in road characteristics and climate.<br />
Traction AA, A, B, C<br />
The traction grades, from highest to lowest, are<br />
AA, A, B, and C and they represent the tire’s ability<br />
to stop on wet pavement as measured under controlled<br />
conditions on specified government test<br />
surfaces of asphalt and concrete.<br />
A tire marked C may have poor traction performance.<br />
Warning!<br />
The traction grade assigned to this is based on<br />
braking (straight-ahead) traction tests and does<br />
not include cornering (turned) traction, acceleration,<br />
hydroplaning or peak traction characteristics.<br />
Temperature A, B, C<br />
The temperature grades are A (the highest), B and<br />
C, representing the tire’s resistance to the generation<br />
of heat and its ability to dissipate heat when<br />
tested under controlled conditions on a specified<br />
indoor laboratory test wheel.<br />
Sustained high temperatures can cause the material<br />
of the tire to degenerate and reduce tire life,<br />
and excessive temperature can lead to sudden<br />
214 Practical Tips, Emergency Service<br />
tire failure.<br />
The grade C corresponds to a level of performance<br />
which all passenger car tires must meet under<br />
the Federal Motor Vehicle Safety Standard No.<br />
109.<br />
Grades B and A represent higher levels of performance<br />
on the laboratory test wheel than the<br />
minimum required by law.<br />
Warning!<br />
The temperature grade for this tire is established<br />
for a tire that is properly inflated and not overloaded.<br />
Excessive speed, underinflation, or excessive<br />
loading, either separately or in combination, can<br />
cause heat buildup and possible tire failure, resulting<br />
in serious personal injury or death.<br />
Tire pressures<br />
Warning!<br />
Incorrect tire pressure causes increased tire<br />
wear and adversely affects road handling.<br />
This could lead to tire failure, resulting in loss<br />
of control, leading to serious personal injury<br />
or death.<br />
f Always use an accurate tire pressure gage<br />
when checking inflation pressures.<br />
f Do not exceed the maximum tire pressure listed<br />
on the tire sidewall.<br />
Please see the chapter “TIRE PRESSURE PLA-<br />
TE” on Page 265.<br />
f Cold tire inflation pressure means: all tires<br />
must be cold, ambient temperature maximum<br />
(68 °F/20 °C), when adjusting the inflation<br />
pressure.<br />
Avoid sunlight striking the tires before measuring<br />
cold pressures, since the pressures would<br />
rise from temperature influence.<br />
f Valve caps protect the valve from dust and dirt,<br />
and thus from leakage.<br />
Always screw caps tightly down.<br />
Replace missing caps immediately.<br />
f Use only plastic valve caps.<br />
f Do not use commercially available sealant or<br />
tire inflating bottles. Only use Porsche<br />
approved tire sealant.<br />
f Please see the chapter “TIRE PRESSURE FOR<br />
COLD TIRES (68 °F/ 20 °C)” on Page 267.
Each tire, including the spare (if provided) should<br />
be checked monthly when cold and inflated to the<br />
inflation pressure recommended by the vehicle<br />
manufacturer on the vehicle placard or tire inflation<br />
pressure label. (If your vehicle has tires of a<br />
different size than the size indicated on the vehicle<br />
placard or tire inflation pressure label, you should<br />
determine the proper tire inflation pressure for<br />
those tires.)<br />
As an added safety feature, your vehicle has been<br />
equipped with a tire pressure monitoring (TPM)<br />
that illuminates a low tire pressure telltale when<br />
one or more of your tires is significantly under-inflated.<br />
Accordingly, when the low tire pressure telltale<br />
illuminates, you should stop and check your<br />
tires as soon as possible, and inflate them to the<br />
proper pressure. Driving on a significantly underinflated<br />
tire causes the tire to overheat and can<br />
lead to tire failure. Under-inflation also reduces<br />
fuel efficiency and tire tread life, and may affect<br />
the vehicle’s handling and stopping ability.<br />
Please note that the TPM is not a substitute for<br />
proper tire maintenance, and it is the driver’s responsibility<br />
to maintain correct tire pressure, even<br />
if under-inflation has not reached the level to trigger<br />
illumination of the TPM low tire pressure telltale.<br />
f On vehicles with tire pressure monitoring:<br />
Please see the chapter “TPM TIRE PRESSURE<br />
MONITORING” on Page 151.<br />
When tires are warm, the tire pressure is<br />
increased.<br />
f Never let air out of hot tires.<br />
This could cause the tire pressure to fall below<br />
the prescribed value.<br />
Insufficient tire filling pressure can cause tires to<br />
overheat and thus be damaged – even invisibly.<br />
Hidden tire damage is not eliminated by subsequently<br />
correcting the tire pressure.<br />
Overloading<br />
Danger!<br />
Risk of damage to vehicle parts, loss of control<br />
and serious personal injury or death.<br />
f Do not overload your vehicle. Be careful about<br />
the roof load.<br />
f If loading the vehicle also correct the tire pressure.<br />
Tire pressure for loaded vehicle can be<br />
found on the tire pressure plate and in the<br />
chapter technical data.<br />
f Never exceed the specified axle load.<br />
Overloading can shorten the service life of the<br />
tires and car, as well as lead to dangerous vehicle<br />
reactions and long braking distances.<br />
Damage due to overloading is not covered by<br />
the vehicle warranty.<br />
f Please see the chapter “LOADING INFORMA-<br />
TION” on Page 224.<br />
f Please see the chapter “TIRE PRESSURE FOR<br />
COLD TIRES (68 °F/ 20 °C)” on Page 267.<br />
Example of a tire pressure plate<br />
Tire pressure plate<br />
Information on the tire pressure plate<br />
A Seating capacity<br />
Maximum number of vehicle occupants, including<br />
the driver.<br />
Practical Tips, Emergency Service 215
B Vehicle load limit<br />
Is the maximum total weight limit specified of<br />
the load (passengers and cargo) for the vehicle.<br />
This is the maximum weight of passengers<br />
and cargo that can be loaded into the vehicle.<br />
Please see the chapter “LOADING INFORMA-<br />
TION” on Page 224.<br />
C Tire size for the front axle<br />
Check with your authorized Porsche dealer<br />
about the current release status.<br />
D Recommended tire pressure for the front axle<br />
These values are for cold tires (68 °F/20 °C).<br />
E Tire size for the rear axle<br />
Check with your authorized Porsche dealer<br />
about the current release status.<br />
F Recommended tire pressure for the rear axle.<br />
These values are for cold tires (68 °F/20 °C).<br />
G In vehicles with collapsible spare wheel:<br />
Size and tire pressure of the spare wheel.<br />
216 Practical Tips, Emergency Service<br />
Tire traction<br />
Warning!<br />
When driving on wet or slushy roads, a<br />
wedge of water may build up between the<br />
tires and the road. This phenomenon is<br />
known as “hydroplane” and may cause partial<br />
or complete loss of traction, vehicle<br />
control or stopping ability.<br />
f Reduce speed on wet surface to prevent this.<br />
Tire life<br />
Tire life depends on various factors, i. e., road<br />
surfaces, traffic and weather conditions, driving<br />
habits, type of tires and tire care.<br />
f Inspect your tires for wear and damage before<br />
driving off. If you notice uneven or substantial<br />
wear, wheels might need alignment or tires<br />
should be balanced or replaced.<br />
Tire wear<br />
The original equipment tires on your Porsche have<br />
built-in tire wear indicators. They are molded into<br />
the bottom of the tread grooves and will appear as<br />
approximately 1/2 in. (12 mm) bands when the<br />
tire tread depth is down to 1/16 of an in.<br />
(1.6 mm).<br />
When the indicators appear in two or more adjacent<br />
grooves, it is time to replace the tires. We<br />
recommend, however, that you do not let the tires<br />
wear down to this extent.<br />
Worn tires cannot grip the road surface properly<br />
and are even less effective on wet roads.<br />
Snow tires lose their traction capability when their<br />
tread depth falls below 5/32 in. (4 mm).<br />
In the United States, state laws may govern the<br />
minimum tread depth permissible. Follow all such<br />
laws.
Danger!<br />
Driving on worn tires can result in loss of control<br />
of the vehicle and could cause serious<br />
personal injuries or death.<br />
f Do not drive with worn tires or tires showing<br />
cuts or bruises as they may lead to sudden<br />
deflation and loss of control which could cause<br />
severe personal injury.<br />
f Specialized high performance tires on high<br />
performance sports cars exhibit more wear<br />
than those on a family sedan, or even a high<br />
performance sedan.<br />
Therefore, it is important to check your tire<br />
pressure and condition at least every two<br />
weeks.<br />
If you notice that tires are wearing unevenly, consult<br />
your Porsche dealer.<br />
Uneven wear may not always be due to improper<br />
wheel alignment. It can be the result of individual<br />
driving habits such as cornering at high speeds. If<br />
the tire pressure is not checked and adjusted<br />
regularly, abnormal tire wear can also occur.<br />
Tire care<br />
f Avoid damaging tires and wheel rims.<br />
f If you must drive over a curb or other obstacle,<br />
drive slowly and at an obtuse angle.<br />
f Check tires for uneven wear and damage<br />
before driving off.<br />
f Remove imbedded material.<br />
f Replace worn or damaged tires immediately.<br />
f Keep oil, fuel, brake fluid, etc. away from tires.<br />
f Replace missing valve stem caps.<br />
f Keep tires inflated correctly.<br />
f Wash tires when washing the vehicle. Also<br />
clean inner side of wheels.<br />
f Do not use abrasive cleaners when washing<br />
the wheels.<br />
f Check wheel rims for corrosion.<br />
f Remove road salt, if driving in winter.<br />
Tire damage, puncture<br />
High-pressure cleaning units can damage the<br />
tires.<br />
f Please see the chapter “HIGH-PRESSURE<br />
CLEANING UNITS, STEAM CLEANERS” on<br />
Page 203.<br />
f Check tires for imbedded material, cuts, punctures,<br />
cracks and bulges (side wall) before driving<br />
off.<br />
In case of tire damage, where it is uncertain whether<br />
there is a break in the ply with all its consequences<br />
or tire damage caused by thermal or mechanical<br />
overloading due to loss of pressure or<br />
any other prior damage, we recommend that the<br />
tire be replaced for safety reasons.<br />
If one faulty tire is replaced it should be noted that<br />
the difference in tread depth on one axle must not<br />
exceed 30%.<br />
Handling inconsistencies may result.<br />
f Perform a visual inspection if necessary.<br />
Practical Tips, Emergency Service 217
Danger!<br />
Risk of serious personal injury or death.<br />
Driving the vehicle with low tire pressure<br />
increases risk of a tire failure and resulting<br />
loss of control. Furthermore, low tire pressure<br />
increases rate of wear of the affected<br />
tires.<br />
f Check tires – including sidewalls – regularly for<br />
foreign bodies, nicks, cuts, cracks and bulges.<br />
f After driving off road, examine tires for signs<br />
of damage such as cuts, tears, bulges or foreign<br />
objects stuck in the tread. Replace a damaged<br />
tire if necessary.<br />
f Cross curb edges slowly and at right angles if<br />
possible.<br />
Avoid driving over steep or sharp curbs.<br />
f In cases of doubt, have the wheel (particularly<br />
the inner side) checked by an authorized<br />
Porsche dealer.<br />
218 Practical Tips, Emergency Service<br />
Tire replacements<br />
If in doubt, contact your Porsche dealer.<br />
Use only tire makes and types approved by<br />
Porsche.<br />
If you do not use a Porsche recommended<br />
replacement tire, make sure that you<br />
purchase your new tires from a reputable tire<br />
dealer and that the dealer complies with all<br />
manufacturers warnings for those tires.<br />
Only tires with the same make and with the<br />
same specification code (e.g. “N0”, “N1”...)<br />
can be mounted.<br />
Before mounting new tires, check with your<br />
Porsche dealer about the current release<br />
status.<br />
Use tires with “ZR” quality standards. There<br />
are currently no standards concerning tire<br />
strength at speeds above 150 mph (240 km/h).<br />
Tires should be replaced no less than on one axle<br />
at the time.<br />
Only tires of the same make and type must be<br />
used. Mixed tires are not permissible.<br />
Initially, new tires do not have their full traction.<br />
You should therefore drive at moderate speeds<br />
during the first 60 - 120 miles (100 - 200 km).<br />
If new tires are installed only on one axle, a noticeable<br />
change in handling occurs due to the different<br />
tread depth of the other tires.<br />
This happens especially if only rear tires are replaced.<br />
However, this condition disappears as the<br />
new tires are broken in.<br />
f Please adjust your driving style accordingly.<br />
Installation of new tires should only be done by a<br />
qualified tire technician.<br />
Valves<br />
Rubber valve stems must be replaced every time<br />
a tire is replaced.<br />
For metal valves, the installation and replacement<br />
instructions must be observed.<br />
f Use only genuine Porsche metal valves.<br />
f Protect the valve inserts against soiling with<br />
valve caps.<br />
Soiled valve inserts can cause a gradual loss<br />
of air.<br />
f Use only plastic valve caps.
Parking at the curb<br />
Warning!<br />
Hard impacts against curbs (or traffic<br />
islands) are dangerous and may cause hidden<br />
tire damage which is not noticeable until<br />
later. Such damage can result in accidents at<br />
high speeds causing serious personal injury<br />
or death.<br />
Depending on the force of impact, the edge<br />
of the rim can also be damaged.<br />
f If you are in doubt, have the wheel checked by<br />
an expert, particularly if you suspect damage<br />
on the inside.<br />
f If you must drive over a curb or other obstacle,<br />
drive slowly and at an obtuse angle. Exercise<br />
care when parking along curbs.<br />
Wheel alignment, wheel balancing<br />
As a precaution, have wheels with summer tires<br />
balanced in the spring, and those with mud and<br />
snow tires before winter.<br />
Unbalanced wheels may affect car handling and<br />
tire life.<br />
Only the specified weights may be used for wheel<br />
balancing.<br />
Self-adhesive weights must not come into contact<br />
with cleaning agents, since they could drop off.<br />
Uneven tread wear indicates wheel imbalance. In<br />
this event, the vehicle should be checked at an authorized<br />
Porsche dealer.<br />
Warning!<br />
If, during a trip, uneven running or vibrations<br />
occur that could be caused by damage to<br />
tires or the car, the speed must be reduced<br />
immediately, but without braking sharply.<br />
If you continue your trip without having the<br />
cause of the fault remedied, you might lose<br />
control of your vehicle which could cause serious<br />
personal injury or death.<br />
f Stop the vehicle and check the tires.<br />
f If no cause for the fault can be found, drive<br />
carefully to the nearest authorized Porsche<br />
dealer.<br />
Wheels with Tire Pressure Monitoring<br />
(TPM) sensors<br />
Before changing wheels, make sure that the<br />
wheels are compatible with your vehicle's TPM.<br />
f Check this with your authorized Porsche<br />
dealer.<br />
Removing and storing tires<br />
f After changing, adjust tire pressure and torque<br />
wheel bolts diagonally to 94 ftlb (130 Nm).<br />
Tires must always remain on the same side of<br />
the vehicle.<br />
When wheels are removed, the direction of<br />
rotation and position of each wheel should be<br />
marked.<br />
Example<br />
FR (front right), FL, RR and RL.<br />
Wheels must always be fitted in accordance with<br />
their marking.<br />
The perception that tire durability and performance<br />
are immune to the effects of storage and<br />
age is unfounded.<br />
Chemical additives, which make the rubber elastic,<br />
lose their effectiveness in the course of time<br />
and the rubber becomes brittle and cracks.<br />
Therefore, the tires should be inspected from<br />
time to time.<br />
Practical Tips, Emergency Service 219
Note<br />
Under no circumstances should tires older than 6<br />
years be used on your Porsche.<br />
The age of the tire can be obtained from the “DOT”<br />
code number. If, for example, the last four numbers<br />
read 1208, then the tire was produced in the<br />
12th week of 2008.<br />
f Store tires in a cool and dry place.<br />
Snow tires<br />
For a better grip on snow and ice, use radial M+S<br />
tires with studs.<br />
Check with your local Motor Vehicle Bureau for<br />
possible restrictions.<br />
Danger!<br />
Risk of loss of control and damage to the<br />
vehicle as well as serious personal injury or<br />
death.<br />
The standard tires profile and rubber mixture<br />
are optimized for wet and dry driving conditions,<br />
and may not prove favorable for snow<br />
conditions.<br />
f Therefore install M+S tires before driving in<br />
such conditions.<br />
220 Practical Tips, Emergency Service<br />
Before mounting snow tires, consult with<br />
your Porsche dealer. He has the technical<br />
information necessary to advise you on<br />
wheel and tire compatibility.<br />
Snow tires should have the same load capacity as<br />
original equipment tires and should be mounted on<br />
all four wheels.<br />
Snow tires with studs should be run at moderate<br />
speeds when new in order to give the studs time<br />
to settle.<br />
Danger!<br />
Tires with badly worn treads and studs are<br />
very dangerous and could cause accidents<br />
resulting in serious personal injuries or<br />
death.<br />
f Make sure they are replaced immediately.<br />
f Do not drive a vehicle equipped with snow tires<br />
at prolonged high speed.<br />
Snow tires do not have the same degree of<br />
traction on dry, wet or snowfree roads as a<br />
normal tire.<br />
Furthermore, snow tires wear rapidly under<br />
these conditions.<br />
Comply with all state and local laws<br />
governing snow tire and tread depth<br />
requirements.<br />
Danger!<br />
Risk of accident and serious personal injury<br />
or death due to excessive speed.<br />
f Always check the maximum speed rating on<br />
the tire sidewall on any tire on the vehicle.<br />
f Never exceed the maximum speed rating of<br />
the tires.<br />
f Fit winter tires to both axles well before the<br />
cold season begins.<br />
Your authorized Porsche dealer will be pleased<br />
to advise you.<br />
Maintenance note<br />
We recommend fitting snow tires on the vehicle at<br />
temperatures below 45 °F (7 °C) since the driving<br />
performance of summer tires is reduced at low<br />
temperatures. Summer tires may be permanently<br />
damaged at extremely low temperatures.<br />
Winter tires lose their traction capability when their<br />
tread depth falls below 5/32 in. (4 mm).
Snow chains<br />
Caution!<br />
Risk of damage to body, axle or brake components.<br />
f Fit snow chains only to the rear wheels, and<br />
only with the tire/rim combination listed in the<br />
Technical Data.<br />
To ensure adequate clearance between chain<br />
and body, Porsche recommends only the use<br />
of fine-link chains such as those approved by<br />
Porsche.<br />
f Follow instructions issued by the supplier of<br />
the chains.<br />
Different states and countries have varying statutory<br />
requirements regarding maximum speed.<br />
Check with local authorities for possible restrictions.<br />
f Remove chains as soon as the roads are free<br />
of ice and snow.<br />
Fitting snow chains<br />
The use of snow chains is not permitted when<br />
5 mm spacers are mounted.<br />
Caution!<br />
Risk of damage to the wheel housings if the<br />
5 mm spacers are not removed before fitting<br />
snow chains.<br />
f To permit the fitting of snow chains, have the<br />
5 mm spacers removed on all 4 wheels.<br />
f To fit/remove the spacers:<br />
Please consult an authorized Porsche dealer.<br />
f Please see the chapter “SPACERS” on<br />
Page 233.<br />
Tire designations<br />
Due to new speed and load ratings for radial tires,<br />
new designations have come into force for snow<br />
tires for your Porsche.<br />
The designation to be used for ZR tires is e.g.,<br />
265/40 ZR 18 (Z = code letter for radial tires for<br />
speeds above 150 mph / 240 km/h).<br />
Practical Tips, Emergency Service 221
Example of Inscription<br />
Inscription on radial tire<br />
A Tire size<br />
Example: P 295/30 ZR 19 100 Y<br />
– P - The tire is designed for Passenger vehicle.<br />
This information is not included on all tires.<br />
– 295 - Indication of tire width in mm<br />
– 30 - Indication of tire height to tire width ratio<br />
in percent<br />
222 Practical Tips, Emergency Service<br />
– ZR - code letter for radial tires for speeds<br />
above 150 mph / 240 km/h<br />
There are currently no standards concerning<br />
tire strength at speeds above 150 mph<br />
(240 km/h).<br />
– R - Belt type code letter for radial<br />
– 19 - Indication of rim diameter in inches<br />
– 100 - Load capacity coefficient<br />
– Y - Speed code letter<br />
– XL (Extra Load) - Tire with increased load rating<br />
B TIN (Tire Identification Number)<br />
Example: DOT xx xx xxxx xxxx<br />
– DOT<br />
The DOT symbol indicates that the tires comply<br />
with the requirements of the US Department<br />
of Transportation and provides information<br />
about:<br />
– first two-digit code means manufacturer’s identification<br />
mark.<br />
– second two-digit code means tire size.<br />
– third four-digit code means tire type code.<br />
– fourth four-digit code means date of manufacture.<br />
If, for example, the last four numbers read<br />
0208, the tire was produced in the 2nd week<br />
of 2008.<br />
C Tire ply composition and material<br />
The number of layers in the tread and sidewalls<br />
and their material composition.<br />
D Maximum permissible inflation pressure<br />
The maximum permissible cold inflation pressure<br />
to which a tire can be inflated.<br />
f Do not exceed the permissible inflation<br />
pressure.
E Maximum Load rating<br />
The maximum load in kilograms and pounds can<br />
be carried by the tire. If you replace tires always<br />
use a tire that has the same maximum load rating<br />
as the factory installed tire.<br />
F Radial<br />
The identification indicates if the tire has radial<br />
structure.<br />
G Term of tubeless or tube tire<br />
Identification for tubeless tires.<br />
Speed code letter<br />
The speed code letter indicates the maximum permissible<br />
speed for the tire.<br />
This code letter is shown on the tire sidewall.<br />
T = up to 118 mph (190 km/h)<br />
H = up to 131 mph (210 km/h)<br />
V = up to 150 mph (240 km/h)<br />
W = up to 167 mph (270 km/h)<br />
Y = up to 186 mph (300 km/h)<br />
(Y) = up to 186 mph (300 km/h) as for<br />
Y tires. Speeds of more than<br />
300 km/h (186 mph) are also<br />
possible at a maximum tire load<br />
capacity of 85 % (confirmation from<br />
tire manufacturer required for<br />
speeds of more than 186 mph (300<br />
km/h)).<br />
Tip on driving<br />
Tires with a maximum speed rating that is lower<br />
than the specified maximum vehicle speed may be<br />
mounted only if they bear an M+S identification on<br />
the tire sidewall.<br />
f Please note that in addition to the winter tires,<br />
all-season and all-terrain tires are also subject<br />
to speed limits and bear this identification.<br />
Inscription on light alloy wheels<br />
Maintenance note<br />
f Protect the valve inserts against soiling with<br />
valve caps.<br />
Use only plastic valve caps.<br />
Soiled valve inserts can cause a gradual loss<br />
of air.<br />
Note on operation<br />
f The rim width in inches A and the rim offset F<br />
are visible from the outside.<br />
The information is inscribed on the back of the<br />
spokes near the tire valve.<br />
A - Rim width in inches<br />
B - Rim-flange contour code letter<br />
C - Symbol for drop-center rim<br />
D - Rim diameter in inches<br />
E -Double hump<br />
F - Rim offset in mm<br />
Practical Tips, Emergency Service 223
Loading Information<br />
Definitions<br />
The Curb weight - actual weight of your vehicle -<br />
vehicle weight including standard and optional<br />
equipment, fluids and emergency tools. This<br />
weight does not include passengers and cargo.<br />
The Gross Vehicle Weight is sum of the curb<br />
weight and the weight of passengers and cargo<br />
combined.<br />
The Gross Vehicle Weight Rating is the maximum<br />
total weight of vehicle, passengers, luggage<br />
and optional equipment.<br />
The Gross Axle Weight Rating is the maximum<br />
load limit for the front or the rear axle. This information<br />
is located on the safety compliance sticker<br />
located in the driver’s side door jamb.<br />
For determining the compatibility of the tire and<br />
vehicle load capabilities:<br />
f Please see the chapter “TECHNICAL DATA” on<br />
Page 266.<br />
The load capacity coefficient (e.g. “100”) is a minimum<br />
requirement.<br />
224 Practical Tips, Emergency Service<br />
The Gross Combined Weight Rating is the<br />
maximum total weight rating of vehicle, passengers<br />
and cargo.<br />
The Vehicle Capacity Weight - Load Limit - is<br />
the maximum total weight limit specified of the<br />
load (passengers and cargo) for the vehicle. This<br />
is the maximum weight of passengers and cargo<br />
that can be loaded into the vehicle. This information<br />
can be found on the tire pressure plate.<br />
The maximum loaded vehicle weight is the<br />
sum of curb weight, accessory weight, vehicle capacity<br />
weight and production options weight.<br />
The load rating is the maximum load that a tire<br />
is rated to carry for a given inflation pressure.<br />
The maximum load rating is the load rating for<br />
a tire at the maximum permissble inflation pressure.<br />
The cargo capacity is the permissible weight of<br />
cargo, the substracted weight of passengers from<br />
the load limit.<br />
f Never exceed the permissible limits.<br />
Danger!<br />
Risk of loss of control, damage to the vehicle<br />
and serious personal injury or death.<br />
f Never exceed the specified axle loads.<br />
Overloading can shorten the service life of the<br />
tires and car, as well as lead to dangerous<br />
vehicle reactions and long braking distances.<br />
Damage due to overloading is not covered by<br />
the vehicle warranty.
Example for determining the combined weight of<br />
occupants and cargo<br />
Vehicle Load Capacity<br />
f The combined weight of occupants and cargo<br />
should never exceed the weight shown on the<br />
tire plate in the vehicle.<br />
Please see the chapter “TIRE PRESSURE PLA-<br />
TE” on Page 265.<br />
f Never exceed the number of passengers<br />
shown on the tire pressure plate in the vehicle.<br />
Determining the combined weight of<br />
occupants and cargo:<br />
f Add the weight of all occupants and then add<br />
the total luggage weight (figure).<br />
Steps for determining correct load limit<br />
1. Locate the statement "The combined weight of<br />
occupants and cargo should never exceed XXX<br />
pounds" on your vehicle’s placard (depending<br />
on the date of manufacture).<br />
2. Determine the combined weight of the driver<br />
and passengers that will be riding in your vehicle.<br />
3. Subtract the combined weight of the driver and<br />
passengers from XXX kilograms or XXX<br />
pounds.<br />
4. The resulting figure equals the available<br />
amount of cargo and luggage load capacity.<br />
For example, if the ”XXX“ amount equals<br />
400 lbs. and there will be two - 150 lb passengers<br />
in your vehicle, the amount of available<br />
cargo and luggage load capacity is 100 lbs.<br />
(400 - 300 (2 x 150) = 100 lbs.).<br />
5. Determine the combined weight of luggage<br />
and cargo being loaded on the vehicle. That<br />
weight may not safely exceed the available cargo<br />
and luggage load capacity calculated in<br />
Step 4.<br />
Practical Tips, Emergency Service 225
Wheel Bolts<br />
Danger!<br />
Risk of wheel bolt breakage and wheel separation,<br />
resulting in serious personal injury or<br />
death.<br />
f Follow all instructions concerning wheel bolts.<br />
226 Practical Tips, Emergency Service<br />
f Always clean the wheel bolts before fitting.<br />
f Apply a thin coat of Optimoly TA (aluminum<br />
paste) on the thread and between the bolt head<br />
and movable spherical cap ring (arrows).<br />
The bearing surface of the spherical cap<br />
facing the wheel must not be greased.<br />
f Replace damaged wheel bolts.<br />
Only use the Original Porsche wheel bolts specially<br />
designed for this vehicle type.<br />
Tightening torque<br />
Tightening torque of wheel bolts:<br />
96 ftlb./130 Nm<br />
Wheel Securing Bolts<br />
If the wheels have to be removed at the workshop,<br />
please do not forget to hand over the wrench<br />
socket for the wheel securing bolts along with the<br />
car key.<br />
The wrench socket for the wheel securing bolts is<br />
in the tool box.<br />
To loosen or tighten the wheel bolt with anti-theft<br />
protection, a wrench socket with the appropriate<br />
coding must be used between the wheel bolt and<br />
the wheel-bolt spanner.<br />
f When positioning the wrench socket, ensure<br />
that it engages fully in the teeth of the wheel<br />
bolt.
Changing a wheel<br />
Warning!<br />
Risk of serious personal injury or death. The<br />
car may slip off the jack.<br />
f Make sure that no one is in the vehicle when<br />
jacking up and changing a wheel.<br />
f Always place the car on stable supports if work<br />
has to be carried out under the car.<br />
Risk of damage to the brake discs of the<br />
Porsche Ceramic Composite Brake (PCCB).<br />
f Always screw in both assembly aids when<br />
changing a wheel.<br />
Note<br />
The tools required for changing a wheel (e.g. jack,<br />
wheel bolt wrench, assembly aids) are not supplied<br />
with the car.<br />
Your authorized Porsche dealer will be pleased to<br />
advise you.<br />
1. Apply the handbrake fully and engage 1st gear<br />
or PDK selector-lever position P and remove<br />
the ignition key.<br />
2. Switch on the hazard warning lights if necessary.<br />
3. Secure the car against rolling away, e.g. by<br />
means of wedges under the wheels on the opposite<br />
side.<br />
This is particularly important on slopes.<br />
4. Slightly slacken the wheel bolts of the wheel to<br />
be changed.<br />
5. Lift the car only at the specified jacking points.<br />
6. Raise the car until the wheel lifts off the<br />
ground.<br />
Please see the chapter “LIFTING THE VEHICLE<br />
WITH A LIFTING PLATFORM OR GARAGE LIFT”<br />
on Page 232.<br />
7. Remove 1 or 2 wheel bolts (see respective<br />
illustration).<br />
8. Screw in assembly aids instead of the wheel<br />
bolts.<br />
Screw in assembly aid for cars without Porsche Ceramic<br />
Composite Brake<br />
9. Remove the remaining wheel bolts.<br />
Note on operation<br />
f To remove or mount the spacers:<br />
Please see the chapter “SPACERS” on<br />
Page 233.<br />
Practical Tips, Emergency Service 227
Screw in two assembly aids for cars with Porsche<br />
Ceramic Composite Brake<br />
10.Take the wheel off and put a new wheel on.<br />
Please see the chapter “WHEEL BOLTS” on<br />
Page 226.<br />
11.Insert wheel bolts and tighten by hand.<br />
12.Remove assembly aids, screw in remaining<br />
wheel bolts.<br />
Initially tighten bolts only slightly in diagonally<br />
opposite sequence so that the wheel<br />
is centred.<br />
13.Inflate the tire if necessary.<br />
228 Practical Tips, Emergency Service<br />
Please see the chapter “TIRE PRESSURE FOR<br />
COLD TIRES (68 °F/ 20 °C)” on Page 267.<br />
14.Lower the car fully and remove the jack.<br />
15.Tighten wheel bolts in diagonally opposite<br />
sequence.<br />
f Immediately after changing a wheel, use<br />
a torque wrench to check the prescribed<br />
tightening torque (96 ftlb./130 Nm).<br />
Note on operation for vehicles with<br />
Tire Pressure Monitoring<br />
f On vehicles with Tire Pressure Monitoring, the<br />
settings on the on-board computer must be<br />
updated after the wheel change.<br />
f Please see the chapter “TIRE PRESSURE FOR<br />
COLD TIRES (68 °F/ 20 °C)” on Page 267.<br />
Checking tire pressure with a<br />
pressure gage<br />
1. Remove the valve stem cap from the tire.<br />
2. Press the pressure gage onto the valve stem.<br />
Note on operation<br />
f Do not press too hard or force the valve stem<br />
sideways, or air will escape.<br />
If the sound of air escaping from the tire is<br />
heard, reposition the pressure gage.<br />
3. Read the tire pressure on the gage stem and<br />
compare it to the permissble tire pressure.<br />
This information can be found on the tire pressure<br />
plate or in the chapter Technical Data.<br />
Please see the chapter “TIRE PRESSURE FOR<br />
COLD TIRES (68 °F/ 20 °C)” on Page 267.<br />
4. Remove the pressure gage.<br />
f Please see the chapter “TPM TIRE PRESSURE<br />
MONITORING” on Page 151.
Flat Tire<br />
Warning!<br />
Failure to follow these instructions may result<br />
in serious personal injury to you or to bystanders.<br />
f If you have a flat tire, move a safe distance off<br />
the road. Turn the emergency flasher on and<br />
use other warning devices to alert other motorists.<br />
Set the parking brake.<br />
f Do not park your vehicle where it may contact<br />
dry grass, brush or other flammable materials.<br />
The hot parts of the exhaust system could set<br />
such materials on fire, thereby causing both<br />
property damage and serious personal injury<br />
or death.<br />
A tire sealant and compressor with pressure<br />
tester are located in the luggage compartment.<br />
f Please observe the safety and operating instructions<br />
on the special sealant bottle with a<br />
special Porsche part number and on the compressor<br />
– these are essential.<br />
Important note<br />
Sealing the tire with the tire repair kit is only<br />
an emergency repair. Even with the tire airtight,<br />
it may be used only for short journeys<br />
in an emergency.<br />
The maximum permitted speed is 50 mph<br />
(80 km/h).<br />
f Do not use commercially available sealant or<br />
tire inflating bottles.<br />
Use only the tire sealant located in the luggage<br />
compartment.<br />
Warning!<br />
Risk of accident, resulting in serious<br />
personal injury or death.<br />
f Have tires replaced by a specialist workshop<br />
as soon as possible.<br />
f Avoid hard acceleration and high cornering<br />
speeds.<br />
Practical Tips, Emergency Service 229
A - Filler bottle<br />
B - Filler hose<br />
Tire sealant<br />
The tire sealant can be used to seal small cuts,<br />
especially in the tire tread.<br />
Sealing the tire with the tire sealant is only an<br />
emergency repair, so you can drive to the next<br />
workshop. Even with the tire air-tight, it may be<br />
used only for short journeys in an emergency.<br />
230 Practical Tips, Emergency Service<br />
The tire sealant and a compressor with pressure<br />
tester can be found in the luggage compartment.<br />
The tire sealant comprises:<br />
– A filler bottle<br />
– A sticker denoting the maximum permissible<br />
speed for the driver’s field of vision<br />
– A filler hose<br />
– A valve turner and<br />
– A spare valve insert.<br />
Danger!<br />
Risk of accident, resulting in serious personal<br />
injury or death.<br />
f Use the tire sealant only in the case of cuts or<br />
punctures no larger than 0.15 in. (4 mm).<br />
f Never use the tire sealant if the rim is damaged.<br />
Warning!<br />
The sealant is highly flammable and harmful<br />
to health.<br />
f Fire, naked flame and smoking are prohibited<br />
when handling tire sealant.<br />
f Avoid contact with skin, eyes or clothing due to<br />
caustic chemical properties of the tire sealant.<br />
f Keep tire sealant away from children.<br />
f Do not inhale vapors, due to consequent harm<br />
to personal health resulting in serious personal<br />
injury or death.<br />
In case of contact with the sealant:<br />
f If sealant gets on the skin or in the eyes,<br />
thoroughly rinse the affected part of the body<br />
off immediately.<br />
f Change soiled clothing immediately.<br />
f Get medical attention immediately in the event<br />
of an allergic reaction.<br />
f If sealant was swallowed, thoroughly rinse out<br />
the mouth without delay and drink plenty of<br />
water.<br />
Do not induce vomiting.<br />
Get medical attention immediately.
A - Filler bottle<br />
B - Filler hose<br />
C - Plug of the filler hose<br />
D -Valve turner<br />
E -Valve insert<br />
F - Tire valve<br />
Inserting sealant<br />
1.Leave the object that caused the puncture in<br />
the tire.<br />
2.Remove compressor, sealant and the<br />
enclosed sticker from the luggage compartment.<br />
3.Adhere the sticker in the driver's field of vision.<br />
4.Shake filler bottle A.<br />
5.Screw filler hose B onto the filler bottle.<br />
The filler bottle is now open.<br />
6.Unscrew valve cap from tire valve F.<br />
7.Remove valve insert E from the tire valve with<br />
valve turner D.<br />
Keep the valve insert in a clean and dry place.<br />
8.Remove plug C of the filler hose B.<br />
9.Push filler hose onto the tire valve.<br />
10.Hold filler bottle higher than the level of the tire<br />
valve and press it together forcefully until the<br />
bottle is completely emptied into the tire.<br />
11.Pull filler hose off the tire valve.<br />
12.Twist the valve insert firmly into the tire valve<br />
using the valve turner.<br />
13.Connect the compressor to the cigarette lighter<br />
and inflate the tire to the prescribed tire<br />
pressure.<br />
Please see the chapter “TIRE PRESSURE FOR<br />
COLD TIRES (68 °F/ 20 °C)” on Page 267.<br />
14.Screw valve cap onto the tire valve.<br />
15.Check the tire pressure after driving for around<br />
10 minutes.<br />
If the tire pressure is less than 22 psi (1.5 bar),<br />
do not continue driving.<br />
If a value of more than 22 psi (1.5 bar) is indicated,<br />
correct the pressure to the prescribed<br />
value.<br />
16.Please consult your authorized Porsche<br />
dealer.<br />
Note on operation for vehicles with<br />
Tire Pressure Monitoring<br />
17.On vehicles with Tire Pressure Monitoring, the<br />
settings on the on-board computer must be<br />
updated after the wheel change.<br />
Please see the chapter “TPM TIRE PRESSURE<br />
MONITORING” on Page 151.<br />
Care Instructions<br />
After drying, any sealant that emerges can be<br />
peeled off like a film.<br />
Warning!<br />
Risk of accident, resulting in serious personal<br />
injury or death.<br />
f Have the tire replaced by an authorized<br />
Porsche dealer immediately.<br />
f Avoid hard acceleration and high cornering<br />
speeds.<br />
f Do not exceed maximum speed of 50 mph<br />
(80 km/h).<br />
f Please always observe the safety and operating<br />
instructions, which can be found in the<br />
separate operating instructions for the sealant<br />
and on the compressor.<br />
Practical Tips, Emergency Service 231
Lifting the Vehicle with a Lifting<br />
Platform or Garage Lift<br />
The car must be raised only at the illustrated jacking<br />
points.<br />
232 Practical Tips, Emergency Service<br />
Caution!<br />
Serious personal injury or death and/or serious<br />
damage to the engine or the vehicle may<br />
occur, if you lift the vehicle improperly.<br />
f Never lift the vehicle at any other place than<br />
the jacking points.<br />
f Never lift the vehicle by the engine, transmission<br />
or axles.<br />
f Do not damage any sensitive components in<br />
the vicinity of the jacking points.<br />
Platform lift<br />
Before the car is driven on to a lifting platform, it<br />
must be ensured that there is enough space between<br />
the lifting platform and the vehicle.<br />
Garage lift<br />
A garage lift must be used only at the illustrated<br />
jacking points.
Spacers<br />
f Use the spacers only together with wheels and<br />
fastening parts approved by Porsche.<br />
Before having spacers fitted, find out about the<br />
current approval status.<br />
Mounting an emergency spare wheel<br />
If 5 mm spacers are mounted, these must not be<br />
removed to mount an emergency spare wheel.<br />
Fitting snow chains<br />
The use of snow chains is not permitted when<br />
5 mm spacers are mounted.<br />
Caution!<br />
Risk of damage to the wheel housings if the<br />
5 mm spacers are not removed before fitting<br />
snow chains.<br />
f To permit the fitting of snow chains, have the<br />
5 mm spacers removed on all 4 wheels.<br />
Note on operation<br />
f To fit/remove the spacers:<br />
Please consult an authorized Porsche dealer.<br />
f Please see the chapter “CHANGING A WHEEL”<br />
on Page 227.<br />
Removing the spacers<br />
1. Unscrew both countersunk screws (M6x16) on<br />
the wheel hub.<br />
2. Remove the spacer.<br />
3. Fasten the brake disc with the short M6x12<br />
countersunk screws, part No.:<br />
900.269.047.09.<br />
Tightening torque 7.5 ftlb. (10 Nm).<br />
4. For wheel mounting without a spacer, 5 mm<br />
shorter wheel bolts (part No.:<br />
997.361.203.01) must be used.<br />
Tightening torque: 96 ftlb. (130 Nm).<br />
Practical Tips, Emergency Service 233
f Please see the chapter “CHANGING A WHEEL”<br />
on Page 227.<br />
Mounting the spacers<br />
1. Remove wheel.<br />
2. Unscrew both countersunk screws (M6x12) on<br />
the break disc.<br />
3. Fasten the spacer with the long M6x16<br />
countersunk screws.<br />
Tightening torque 7.5 ftlb. (10 Nm).<br />
4. Fit wheel. To do this use the longer wheel<br />
bolts for fastening the wheels.<br />
Tightening torque: 96 ftlb. (130 Nm).<br />
f Please see the chapter “CHANGING A WHEEL”<br />
on Page 227.<br />
Required scope of parts if the spacers are<br />
removed<br />
Short countersunk screws (M6x12)<br />
Part No: 900.269.047.09<br />
1 set short wheel bolts<br />
Part No: 997.361.203.01<br />
Short anti-theft protection<br />
Part No: 996.361.057.01<br />
f For information on the spacers: Please see the<br />
chapter “SPACERS” on Page 233.<br />
234 Practical Tips, Emergency Service<br />
Long wheel bolt<br />
- X: Bolt length approx. 49 mm<br />
- Arrows: spherical cap ring<br />
Wheel bolt identifying features<br />
For identification purposes, the movable spherical<br />
cap ring is galvanised in red on the long wheel<br />
bolts.<br />
The long wheel bolts must only be used together<br />
with 5 mm spacers fitted.<br />
The short wheel bolts are not marked in colour.<br />
The short wheel bolts must only be used without<br />
5 mm spacers fitted.<br />
f Tightening torque for both wheel bolts:<br />
96 ftlb. (130 Nm).
Electrical System<br />
In order to avoid damage and faults in electrical or<br />
electronic systems, electrical accessories should<br />
be installed at your authorized Porsche dealer.<br />
f Only use accessories authorized by Porsche.<br />
Warning!<br />
Risk of short circuit and fire, resulting in<br />
serious personal injury or death.<br />
Replacing fuses or relays with the engine<br />
running or the ignition on could cause electrical<br />
shock.<br />
f Disconnect the negative terminal on the<br />
battery during all work on the electrical<br />
system.<br />
Please see the chapter “BATTERY” on<br />
Page 239.<br />
Relays<br />
Defective relays should be changed only by an<br />
authorized workshop.<br />
In storage tray between the front seats<br />
(not on vehicles with iPod, USB, AUX interfaces)<br />
Sockets<br />
Electrical accessories should preferably be<br />
connected to the 12 V sockets.<br />
f Please observe the maximum power<br />
consumption.<br />
Note on operation<br />
The tire filling compressor must be connected to<br />
the cigarette lighter.<br />
In the passenger’s footwell<br />
Note on operation<br />
The sockets and thus the connected electrical<br />
accessories function even if the ignition is<br />
switched off or the ignition key is withdrawn.<br />
If the engine is not running and the accessories<br />
are switched on, the vehicle battery will be discharged.<br />
Do not operate additional accessories for more<br />
than 5 minutes when engine is off. Continuing to<br />
do so may drain the battery such that it may go<br />
completely dead.<br />
Maximum power consumption for both sockets<br />
together: 70 W.<br />
Practical Tips, Emergency Service 235
Alarm system, central locking<br />
The status of the central locking and alarm system<br />
is not changed by disconnecting the battery.<br />
When the battery is disconnected, the alarm<br />
system ceases to function.<br />
Central locking overload protection<br />
If the central locking system is operated more<br />
than ten times within a minute, further operation is<br />
blocked for 30 seconds.<br />
236 Practical Tips, Emergency Service<br />
Load switch-off after 2 hours or 7 days<br />
If the ignition key is removed, loads which are<br />
switched on or are in standby mode (such as the<br />
luggage compartment light and interior light) are<br />
automatically switched off after approx. 2hours. The Radio/PCM is automatically switched off after<br />
approx. 10 minutes.<br />
If the vehicle is not started or unlocked with the<br />
remote control within 7days, the remote control<br />
standby function is switched off (to save the<br />
vehicle battery).<br />
1. In this case, unlock the driver’s door with the<br />
key at the door lock.<br />
Leave the door closed in order to prevent the<br />
alarm system from being triggered.<br />
2. Press button 1 on the remote control.<br />
The remote control is now activated again.
Replacing fuses<br />
In order to prevent damage to the electrical system<br />
due to short circuits and overloads, the individual<br />
circuits are protected by fuses.<br />
The fuse box is located in the driver’s footwell.<br />
A - Plastic gripper<br />
B - Spare fuses<br />
1. Switch off the load with the defective fuse.<br />
2. Pull off plastic cover at the finger hole (arrow).<br />
The fuse plan and instructions for<br />
emergency unlocking of the luggage<br />
compartment lid can be found on the inner<br />
side of the cover.<br />
3. Remove the corresponding fuse from its slot<br />
using the plastic gripper A in order to check it.<br />
A blown fuse can be identified by the melted<br />
metal strip.<br />
4. Replace only with fuses of the same rating.<br />
We recommend using genuine Porsche fuses<br />
for replacement.<br />
Note<br />
f If a fuse blows repeatedly consult an authorized<br />
Porsche dealer.<br />
f Never try to “repair” fuses: you may cause serious<br />
damage to other parts of the electrical<br />
system.<br />
Practical Tips, Emergency Service 237
Emergency unlocking of the front luggage<br />
compartment lid<br />
If the battery is discharged, the front luggage<br />
compartment lid can be opened only with the aid<br />
of a donor battery.<br />
Note<br />
The engine cannot be started with this method.<br />
f Please see the chapter “EMERGENCY<br />
STARTING WITH JUMPER CABLES” on<br />
Page 245.<br />
Unlocking lid<br />
1. Use the key to unlock the vehicle at the door<br />
lock.<br />
2. Remove the plastic cover from the fuse box.<br />
3. Pull out positive terminal C (red) in the fuse box<br />
using the plastic gripper A (yellow).<br />
238 Practical Tips, Emergency Service<br />
A - Plastic gripper (yellow)<br />
C - Positive terminal (red)<br />
4. Use a jumper cable to connect the positive<br />
terminal of the donor battery to the positive<br />
terminal C in the fuse box.<br />
Note<br />
If the vehicle was locked, the alarm horn will sound<br />
when the negative cable is connected.<br />
5. Use the black jumper cable to connect the<br />
negative terminal of the donor battery to the<br />
door arrester D.<br />
6. Press button 2 on the remote control for<br />
approx. 2 seconds to unlock the luggage<br />
compartment lid.<br />
The alarm system is switched off.<br />
7. Disconnect the negative cable first, then the<br />
positive cable.<br />
8. Push positive terminal C into the fuse box and<br />
push on the plastic fuse box cover.
Battery<br />
The battery is located in the front luggage<br />
compartment under a black plastic cover.<br />
f Please see the chapter “EMERGENCY OPERA-<br />
TION – PULLING OUT THE IGNITION KEY” on<br />
Page 74.<br />
f Please see the chapter “EMERGENCY UNLO-<br />
CKING OF THE FRONT LUGGAGE COMPART-<br />
MENT LID” on Page 238.<br />
Warning!<br />
Risk of short circuit, fire and damage to alternator<br />
and electronic control units, resulting<br />
in serious personal injury or death.<br />
f Observe all warning notes on the battery.<br />
f Disconnect the negative terminal on the battery<br />
during all work on the electrical system.<br />
f Do not lay tools or other metal objects on the<br />
battery as they could cause a short circuit<br />
across the battery terminal.<br />
Hydrogen gas generated by the battery<br />
could cause an explosion, resulting in<br />
serious personal injury or death.<br />
f Do not expose the battery to an open flame,<br />
electrical spark or a lit cigarette.<br />
f Do not wipe battery with a dry cloth.<br />
Risk of serious personal injury or death and<br />
damage to the fabric, metal or paint.<br />
f Wear eye protection.<br />
f Do not allow battery acid to come in contact<br />
with your skin, eyes, fabric or painted<br />
surfaces.<br />
f If you get electrolyte, which is an acid, in your<br />
eyes or on your skin, immediately rinse with<br />
cold water for several minutes and call a doctor.<br />
f Spilled electrolyte must be rinsed off at once<br />
with a solution of baking soda and water to<br />
neutralize the acid.<br />
Battery posts, terminals and related accessories<br />
contain lead and lead compounds,<br />
chemicals known to the State of California to<br />
cause cancer and reproductive harm.<br />
f Always protect your skin by washing thoroughly<br />
with soap and water.<br />
Risk of explosion as a result of static charge,<br />
resulting in serious personal injury or death.<br />
f Do not wipe the battery with a dry cloth.<br />
f Eliminate potential electrostatic charge by<br />
touching the vehicle before touching the battery.<br />
Charge state<br />
A well-charged battery prevents starting problems<br />
and has a longer service life.<br />
Traffic density, requirements regarding noise, exhaust<br />
gas and fuel consumption reduce the engine<br />
speed and, hence, the alternator output.<br />
However, the large number of electrical loads has<br />
markedly increased the demand for electrical<br />
power.<br />
In order to avoid discharging the battery<br />
unintentionally:<br />
f Switch off unnecessary electrical loads in city<br />
traffic, on short trips or in a line or traffic.<br />
f Always remove the ignition key from the ignition<br />
switch when leaving the car.<br />
f Avoid frequent operation of the Porsche Communication<br />
Management system and audio<br />
system when the engine is not running.<br />
f In the cold season in particular or if the vehicle<br />
is used primarily for short journeys, it may be<br />
necessary to recharge the battery from time to<br />
time.<br />
Practical Tips, Emergency Service 239
Battery care<br />
f Ensure that battery is securely mounted.<br />
f Keep terminals and connections clean and<br />
properly tightened.<br />
Corrosion can be prevented by coating the terminals<br />
and connections with petroleum jelly or<br />
silicone spray.<br />
f Ensure that vent caps are securely tightened to<br />
prevent spillage.<br />
Checking the electrolyte fluid level<br />
f The acid level should be checked more frequently<br />
by a qualified specialist workshop during<br />
the summer months and in predominantly<br />
warm countries.<br />
240 Practical Tips, Emergency Service<br />
Battery charging<br />
Automotive batteries loose their efficiency when<br />
not in use.<br />
The charge available in your battery can be measured<br />
with a battery hydrometer.<br />
We recommend that the battery voltage be tested<br />
by your authorized Porsche dealer who has the appropriate<br />
equipment.<br />
If the car is not driven for prolonged periods, the<br />
battery must be charged at least every 6 weeks.<br />
A discharged battery allows rapid formation of sulfates,<br />
leading to premature deterioration of the<br />
plates.<br />
Warning!<br />
Hydrogen gas generated by the battery<br />
could cause an explosion, resulting in<br />
serious personal injury or death.<br />
f Charge battery in a well ventilated area.<br />
f Never charge a frozen battery. It may explode<br />
because of gas trapped in the ice. Allow a frozen<br />
battery to thaw out first.<br />
f If you get electrolyte, which is an acid, in your<br />
eyes or on your skin, immediately rinse with<br />
cold water for several minutes and call a doctor.<br />
Slow battery charging<br />
Your authorized Porsche dealer will be pleased to<br />
advise you about a suitable charger.<br />
1. Always observe the instructions of the charger<br />
manufacturer.<br />
Depending on the type of charger, the battery<br />
may have to be disconnected.<br />
In this case, always disconnect the negative<br />
lead first, and then the positive lead – risk of<br />
short circuit!.<br />
Reconnect the leads in reverse order.<br />
2. Before charging, cold batteries must be<br />
warmed up indoors.<br />
3. Frozen batteries must be thawed out first<br />
before being charged.<br />
4. When charging, ensure that there is adequate<br />
ventilation.<br />
5. Connect the charger to the battery.<br />
Only plug into the mains and switch the<br />
charger on when it is connected up correctly.<br />
6. Switch on the charger.<br />
7. After charging, switch off the charger first and<br />
then disconnect it.<br />
8. Please see the chapter “PUTTING VEHICLE<br />
INTO OPERATION” on Page 241.
Winter operation<br />
The capacity and ability of the battery to store<br />
power decreases at low outside temperatures.<br />
Moreover, the battery is more heavily loaded in<br />
winter months, e.g. by the heated rear window,<br />
more frequent use of additional lights, the fans<br />
and the windshield wipers, etc.<br />
f Have the battery checked before the start<br />
of winter.<br />
Maintenance note<br />
Keep the battery well charged to prevent it<br />
from freezing.<br />
A discharged battery can freeze at 23 °F (--5 °C),<br />
but a fully charged battery only freezes at -- 40 °F<br />
(--40 °C).<br />
A frozen battery must always be thawed before<br />
connecting jump leads.<br />
Replacing battery<br />
The service life of the battery is subject to normal<br />
wear; it depends greatly on care, climatic conditions,<br />
and driving conditions (distances, loads).<br />
f Only use an original Porsche battery, with the<br />
correct part number, as a replacement.<br />
f Please observe the disposal instructions for<br />
batteries.<br />
Putting vehicle into operation<br />
After the battery is connected or after an exhaustively<br />
discharged battery is charged, the multifunctional<br />
PSM light lights up on the instrument<br />
panel and a message appears on the on-board<br />
computer to indicate a fault.<br />
This fault can be remedied with a few simple<br />
steps:<br />
1. Start the engine.<br />
2. With the vehicle stationary, perform a few<br />
steering movements to the left and right and<br />
then drive a short distance in a straight line<br />
until the multifunctinal PSM light goes out and<br />
the message on the on-board computer<br />
disappears.<br />
3. If the warnings do not disappear, then:<br />
Drive carefully to the nearest authorized<br />
Porsche dealer.<br />
Have the fault remedied.<br />
4. After the warnings disappear:<br />
Stop the vehicle in a suitable place.<br />
f Perform adaptation of the power windows:<br />
Please see the chapter “STORING END<br />
POSITION OF THE WINDOWS” on Page 28.<br />
Practical Tips, Emergency Service 241
Removing the battery<br />
The required tool is in the tool kit.<br />
The battery is located in the front luggage compartment<br />
under a black plastic lid.<br />
Warning!<br />
Risk of damage to alternator and electronic<br />
control units.<br />
f Do not disconnect the battery while the engine<br />
is running.<br />
This also applies to cars equipped with a battery<br />
main switch.<br />
f Never drive the car with a disconnected battery.<br />
Risk of caustic burns from escaping acid.<br />
f Keep vent caps on to avoid spillage.<br />
f Do not tilt the battery when removing and installing<br />
it.<br />
242 Practical Tips, Emergency Service<br />
1. Switch off engine and all electrical loads.<br />
2. Open turn-locks A.<br />
Remove plastic lid.<br />
3. Pull off central vent hose C.<br />
Danger!<br />
Risk of short circuit and explosion, resulting<br />
in serious personal injury or death.<br />
f Important: disconnect the negative (–) ground<br />
wire first, and then the positive (+) cable.<br />
4. Important: disconnect the negative (–) ground<br />
wire first, and then the positive (+) cable -<br />
danger of short circuit!<br />
5. Unscrew fastening screw B.<br />
6. Remove battery.
Installing the battery<br />
1. Put battery in and push it all the way to the<br />
stop.<br />
2. Screw in fastening screw B.<br />
Danger!<br />
Risk of short circuit and explosion, resulting<br />
in serious personal injury or death.<br />
f Important: connect the positive (+) cable first,<br />
and then the negative (–) ground wire.<br />
3. Important: connect the positive (+) cable first,<br />
and then the negative (–) ground wire -<br />
danger of short circuit!<br />
4. Push on central vent hose C.<br />
Fitting the plastic lid<br />
1. Insert the two outer hooks of the plastic lid into<br />
the eye mounts of the lid opening.<br />
2. Lower the lid.<br />
3. Using both hands, push the lid into the eye<br />
mounts without using force (if too much force<br />
is used, the hooks may jam and the panel will<br />
warp).<br />
Make sure that the lid is correctly seated.<br />
4. Turn the turn-locks so that they point in<br />
longitudinal direction.<br />
5. Press the turn-locks down until they audibly<br />
engage.<br />
Practical Tips, Emergency Service 243
Replacing the remote-control<br />
battery<br />
The battery should be changed when the range of<br />
the radio remote control becomes smaller or<br />
when the light-emitting diode no longer flashes<br />
when the remote control is operated.<br />
1. Using your finger nail or a small screwdriver,<br />
carefully lift off the cover of the key grip<br />
(arrow).<br />
2. Replace the battery (paying attention to the<br />
polarity).<br />
Replacement battery – Lithium CR 2032,<br />
3volts.<br />
244 Practical Tips, Emergency Service<br />
3. Replace the cover and press together firmly.<br />
Please observe the disposal instructions for<br />
batteries.<br />
Note<br />
f Please dispose batteries in compliance with<br />
any and all government regulations.
Emergency Starting with Jumper<br />
Cables<br />
If the battery is discharged, e.g. in winter or after<br />
the car has been parked for a long time, the battery<br />
of another car can be used for starting with<br />
the help of jumper cables.<br />
Make sure the voltage of both batteries is the<br />
same. Both batteries must be 12 volt types.<br />
The capacity (Ampere hours, Ah) of the booster<br />
battery must not be substantially less than that of<br />
the discharged battery.<br />
The discharged battery must be correctly connected<br />
to the vehicle’s electrical system.<br />
f Please see the chapter “BATTERY” on<br />
Page 239.<br />
f Please see the chapter “EMERGENCY UNLO-<br />
CKING OF THE FRONT LUGGAGE COMPART-<br />
MENT LID” on Page 238.<br />
Note<br />
f Do not try to start the car by pushing or towing.<br />
Damage to the catalytic converters and<br />
other components of the car may result.<br />
Warning!<br />
Risk of short circuit, damage and explosion,<br />
resulting in serious personal injury or death.<br />
f Use only jumper cables of adequate diameter<br />
cross-section and fitted with completely insulated<br />
alligator clips.<br />
f Follow all warnings and instructions of the<br />
jumper cable manufacturer.<br />
f When connecting jumper cables, make sure<br />
that they cannot get caught in any moving<br />
parts in the engine compartment.<br />
The jumper cables must be long enough so<br />
that neither vehicles nor cables touch another.<br />
f The vehicles must not be in contact, otherwise<br />
current might flow as soon as the positive terminals<br />
are connected.<br />
f The cable clamps must not be allowed to contact<br />
each other when one end of the jumper cables<br />
are connected to a battery.<br />
f Ensure that tools or conductive jewelery (rings,<br />
chains, watch straps) do not come into contact<br />
with the positive jumper cable or the positive<br />
battery post.<br />
f Improper hook-up of jumper cables can ruin<br />
the alternator.<br />
Danger of caustic burns from escaping acid.<br />
f Do not lean over the battery.<br />
Danger of gas explosion.<br />
f Improper use of booster battery to start a<br />
vehicle may cause an explosion, resulting in<br />
serious personal injury or death.<br />
f Keep sources of ignition away from the battery,<br />
e.g. open flame, burning cigarettes or<br />
sparking due to cable contact or welding work.<br />
f A discharged battery can freeze even at 23 °F/<br />
–5 °C.<br />
Before connecting jumper cables, a frozen<br />
battery must be thawed out.<br />
Practical Tips, Emergency Service 245
Connect jumper cables in the following<br />
sequence:<br />
Always observe the sequence below:<br />
1. Connect the positive lead (red) to the<br />
positive terminal of the discharged battery<br />
first, then connect it to the positive terminal of<br />
the donor battery.<br />
2. First connect the negative cable (black) to<br />
the negative terminal of the donor battery, then<br />
connect it to a suitable grounding point on the<br />
vehicle with the discharged battery.<br />
This grounding point must lie as far as possible<br />
from the battery.<br />
For example, a solid metal part or the engine<br />
block are suitable grounding points.<br />
If no suitable grounding points are to be found<br />
on either vehicle, the negative cable must<br />
carefully be connected directly to the negative<br />
terminal of the battery.<br />
If a suitable grounding point is to be found only<br />
on the donor vehicle, the negative cable must<br />
first be connected to the terminal of the<br />
discharged battery, then to the grounding point<br />
of the donor vehicle.<br />
3. Run the engine of the donor car at a higher<br />
speed.<br />
246 Practical Tips, Emergency Service<br />
4. Start the engine.<br />
An attempted start using jumper cables should<br />
not last more than 15 seconds. Then allow a<br />
waiting period of at least one minute.<br />
f Note<br />
Before disconnecting the jumper cables, electrical<br />
loads such as the heated rear window<br />
and the heating fan blower should be switched<br />
on (the vehicle’s lights must not be switched<br />
on). This reduces voltage peaks which may occur<br />
when disconnecting the jumper cables.<br />
With the engine running, remove both jumper<br />
cables in reverse order.
Bulb chart<br />
Type, rating<br />
Halogen low beam H7, 55W<br />
Halogen high beam H9, 65W<br />
Low beam/high beam with Bi-Xenon headlights Philips, D2S 35W<br />
Additional high beam with Bi-Xenon headlights H7, 55 W<br />
Turn signal light, front Philips HY21W<br />
Turn signal light, side WY5W<br />
Fog light H8, 35W<br />
License plate light C5W<br />
Lights, Replacing Bulbs<br />
Warning!<br />
Risk of short circuit.<br />
f Always switch off the relevant consumer when<br />
changing bulbs.<br />
Risk of serious personal injury or death.<br />
The Bi-Xenon headlights are under high<br />
voltage when installed.<br />
f Be careful during all work in the area of the Bi-<br />
Xenon headlights.<br />
Risk of damage. Bulbs of a higher wattage<br />
can damage the lamp housing.<br />
f Only the bulbs shown in the chart may be used.<br />
f New bulbs must be clean and free from oil,<br />
grease and fingerprints. Therefore, never<br />
touch bulbs with your bare hands.<br />
Use a cloth or soft paper while replacing bulbs.<br />
Practical Tips, Emergency Service 247
Headlights<br />
Caution!<br />
Risk of damage to headlights due to excessive<br />
temperatures and abrasion.<br />
f To ensure optimum ventilation, do not cover<br />
the gap between headlight and body<br />
(e.g. “stone guards” or films).<br />
f Use soapy water only to clean light lenses and<br />
plastic headlight lenses.<br />
In no case may chemical cleaners or other volatile<br />
cleaning fluids be used.<br />
f To prevent scratches, do not rub with a dry or<br />
merely moist cloth, tissue or insect sponges.<br />
248 Practical Tips, Emergency Service<br />
Removing headlights<br />
1. Unscrew plastic nut A.<br />
Detach the side carpeting.<br />
2. Remove rubber plug B from the unlocking<br />
opening.
3. Place socket wrench (tool kit) on the unlocking<br />
spindle.<br />
The handle of the wrench should point horizontally<br />
to the rear.<br />
4. Turn socket wrench approx. 180° A. The<br />
headlight is unlocked and pushed forward<br />
slightly during this process.<br />
5. Turn socket wrench back until it is pointing<br />
vertically downward B and leave in position.<br />
6. The headlight is now unlocked and can be<br />
pulled forward out of the fender.<br />
Installing<br />
1. Insert headlight into the guide rails and push<br />
fully into the fender.<br />
2. Push headlight to the rear and at the same<br />
time turn the socket wrench until it points<br />
horizontally to the rear C.<br />
The headlight locking device must perceptibly<br />
and audibly engage.<br />
3. Insert the rubber plug into the unlocking<br />
opening and secure the carpet.<br />
Check the function of all lights.<br />
Low beam/high beam<br />
Halogen/Bi-Xenon headlight<br />
Opening the lid of the headlight housing<br />
1. Unscrew the 4 screws A.<br />
2. First lift release tab B, then push both release<br />
tabs C upwards and take off lid.<br />
Practical Tips, Emergency Service 249
Changing bulb for low beam<br />
Halogen headlights<br />
1. Pull off plug A.<br />
2. Disengage fixing clip B.<br />
3. Replace defective bulb.<br />
When doing so, ensure bulb is seated properly.<br />
4. Reassemble in reverse order.<br />
Closing the cover of the headlight housing<br />
1. Push on cover until it is felt to engage.<br />
2. Fasten cover with the 4 screws.<br />
250 Practical Tips, Emergency Service<br />
Changing bulb for high beam<br />
Halogen headlights<br />
1. Turn housing cover counter-clockwise and take<br />
it off.<br />
2. Turn bulb holder clockwise and remove it<br />
(bayonet lock).<br />
3. Pull both plug release tabs apart and pull plug<br />
out.<br />
4. Replace the defective bulb with bulb holder.<br />
5. Insert bulb holder and turn it as far as it will go<br />
to the left.<br />
6. Close the housing cover.
Changing bulb for low beam/high beam<br />
Bi-Xenon headlights<br />
1. Unscrew the 3 screws A on the control unit and<br />
remove the control unit.<br />
2. Turn the plug counter-clockwise and pull it off. 3. Disengage both fixing clips.<br />
4. Replace defective bulb.<br />
When doing so, ensure bulb is seated properly.<br />
5. Engage both fixing clips, push on plug and turn<br />
right as far as the stop.<br />
6. Fit control unit and screw tight.<br />
Closing the cover of the headlight housing<br />
1. Push on cover until it is felt to engage.<br />
2. Fasten cover with the 4 screws.<br />
Practical Tips, Emergency Service 251
Changing bulb for additional high beam<br />
Bi-Xenon headlights<br />
1. Turn housing cover counter-clockwise and take<br />
it off.<br />
252 Practical Tips, Emergency Service<br />
2. Pull off plug. 3. Disengage fixing clip.<br />
4. Replace defective bulb.<br />
5. Engage fixing clip, insert plug and close<br />
housing cover.
Changing bulb for turn signal light<br />
Halogen/Bi-Xenon headlights<br />
1. Turn housing cover counter-clockwise and take<br />
it off.<br />
2. Turn bulb holder counter-clockwise and<br />
remove it (bayonet lock).<br />
3. Replace the defective bulb (bayonet lock).<br />
4. Insert the bulb holder and turn it clockwise.<br />
5. Close the housing cover.<br />
Practical Tips, Emergency Service 253
A - Fog light height adjustment<br />
Changing bulb for fog lights<br />
1. Pull cover forward in direction of arrow.<br />
254 Practical Tips, Emergency Service<br />
2. Loosen the two screws on the bulb housing,<br />
swivel the housing out to the side and<br />
remove it.<br />
3. Pull both plug release tabs apart and pull<br />
plug out.<br />
4. Turn bulb holder in direction of arrow and<br />
remove it.<br />
5. Replace the defective bulb with bulb holder.<br />
6. Insert bulb holder and turn it as far as it will go<br />
to the right. Then insert plug. Make sure that<br />
the two tabs engage correctly.
7. Fit the lamp housing by first inserting the tab<br />
into the rear opening and then swivel the<br />
housing into installation position.<br />
8. Screw in both screws.<br />
9. Insert the cover with the two tabs into the<br />
openings and then carefully press in the cover<br />
in direction of arrow.<br />
Make sure that the cover is seated correctly.<br />
10.Check operation of the headlight.<br />
Changing bulb for side marker light<br />
1. Remove the cap in the wheel housing liner with<br />
a screwdriver.<br />
2. Insert the screwdriver into the opening in the<br />
wheel housing liner parallel to the side marker<br />
housing (in direction of travel).<br />
By pressing with the screwdriver, disengage<br />
the securing spring of the side marker<br />
housing.<br />
Practical Tips, Emergency Service 255
3. Remove side marker and undo bulb holder<br />
(bayonet lock).<br />
4. Remove the bulb from the holder and replace<br />
it. Insert holder.<br />
Check operation of the light.<br />
5. Insert the side marker’s retaining lugs A into<br />
the side section at the front.<br />
Push in side marker until the securing spring B<br />
is felt to engage.<br />
6. Press the cap into the wheel housing liner.<br />
256 Practical Tips, Emergency Service<br />
Number Plate Light<br />
Changing bulb<br />
1. Unscrew both screws A and take off the light<br />
lens.<br />
2. Remove defective bulb from between the<br />
contact springs and replace.<br />
3. Reassemble in reverse order.<br />
Check operation of the light.<br />
Changing Light-Emitting Diodes<br />
and Long-Life Bulbs<br />
The following lights are equipped with lightemitting<br />
diodes (LEDs) or long-life bulbs and<br />
cannot be replaced individually. Replacement also<br />
involves a greater amount of installation work.<br />
– Side light, front,<br />
– Daytime driving lights on vehicles with<br />
Bi-Xenon headlights,<br />
– Tail lights and<br />
– Additional brake lights<br />
f Have the defective light replaced at an authorized<br />
Porsche dealer.
Adjusting Headlights<br />
f Please see the chapter “LIGHTS, REPLACING<br />
BULBS” on Page 247.<br />
Adjustment<br />
The adjustment is made with the vehicle ready to<br />
drive and the fuel tank completely filled.<br />
The driver’s seat must be loaded by a person or a<br />
165 lbs. (75 kg) weight and the tire pressures<br />
must meet the prescribed values.<br />
After being loaded, the car must be rolled a few<br />
meters so that the suspension can settle.<br />
For checking the headlight adjustment, the vertical<br />
position of the cutoff of the lowbeam (see fig.)<br />
has to be projected on a vertical screen (wall) in<br />
distance of 24.6 ft. (7.5 m) from the front lens of<br />
the headlamp.<br />
The correct position of the cutoff is 2.0 in. (5 cm)<br />
at 24.6 ft. or 7.5 m (0.4°) below a horizontal line,<br />
x cm from ground to the center of the headlamp<br />
lens.<br />
Lateral adjustment of the headlights should be<br />
carried out at a specialist workshop with an optical<br />
adjustment unit.<br />
Distance<br />
Visual aim shall be performed at not less than<br />
24.6 ft./7.5 m (this value is a rounded down conversion<br />
from the 25-foot distance typical of field<br />
aim using a screen). The 24.6 ft./7.5 m distance<br />
is measured from the headlamp lens to the viewing<br />
screen.<br />
Practical Tips, Emergency Service 257
Floor<br />
The surface upon which the vehicle rests is flat<br />
and approximately level.<br />
Screen<br />
The screen upon which headlamp beams are projected<br />
is perpendicular to the floor and the vehicle’s<br />
longitudinal axis, flat, uniformly light in color,<br />
unobstructed, and wide and high enough to accommodate<br />
the vehicle beam patterns to be<br />
aimed.<br />
The screen should be wide enough to provide at<br />
least 3.3 ft. (1 m) of space outboard of the vehicle’s<br />
headlamp spacing.<br />
258 Practical Tips, Emergency Service<br />
Adjustment screws<br />
f Detach side carpeting in luggage compartment.<br />
Unscrew plastic nut A.<br />
Open the cover of the appropriate adjustment<br />
screw.<br />
The setting is adjusted by turning the hexagon<br />
socket screws right or left, as appropriate.<br />
B - Headlight vertical adjustment<br />
Vertical adjustment (screw B)<br />
f turn clockwise = beam moves down<br />
turn counter-clockwise = beam moves up<br />
Note<br />
f Do not alter the lateral adjustment.
Towing<br />
Certain state statutes and local ordinances prohibit<br />
towing with a chain, rope or even a tow bar.<br />
In addition, damage to your vehicle may result<br />
from improper procedures.<br />
Consult your authorized Porsche dealer for details.<br />
Vehicle towing<br />
Flat bed towing is the preferred type of towing to<br />
be used on Porsche vehicles.<br />
Under certain circumstances, wheel lifts may be<br />
used when the vehicle will not roll.<br />
The vehicle must be towed with all four<br />
wheels off the ground, otherwise damage to<br />
the vehicle may result.<br />
PDK selector lever emergency release<br />
In the event of an electronics failure, the selector<br />
lever must be released for towing.<br />
1. Lift up the rubber mat in the oddments tray.<br />
2. Insert a screwdriver in the opening and press<br />
down until you feel it reach the limit position.<br />
The selector lever can now be moved to<br />
position N.<br />
Towing hook<br />
The towing hook A is contained in the tool box in<br />
the luggage compartment.<br />
Caution!<br />
Risk of damage to the vehicle.<br />
f Use the towing hook only for an emergency to<br />
remove the vehicle off the road. The towing<br />
hook is to be used only to pull the vehicle onto<br />
the flat bed, tractor or towing aparatus if the<br />
vehicle will roll freely. Under no circumstances<br />
is the vehicle to be secured using the towing<br />
hook.<br />
f Never use the towing hook to tow this or any<br />
other vehicle.<br />
f Bear in mind the limited ground clearance of<br />
your car on uneven surfaces.<br />
Practical Tips, Emergency Service 259
Fitting towing hook<br />
When fitting on the rear of the vehicle, the license<br />
plate must be removed.<br />
1. Press the lower edge of the appropriate<br />
plastic cover into the bumper until the cover<br />
disengages.<br />
2. Pull cover out of the bumper and let it hang by<br />
its thread.<br />
3. Completely screw in the towing hook A.<br />
260 Practical Tips, Emergency Service<br />
Removing towing hook<br />
1. Unscrew the towing hook A.<br />
2. Insert plastic cover at the lower edge of the<br />
opening.<br />
3. Fold the cover up and press on its upper edge<br />
to engage it in the bumper.<br />
When removing on the rear of the vehicle, the<br />
license plate must be mouted.
Pulling vehicle onto flat bed<br />
1. Position wooden ramps at the base of the flat<br />
bed to reduce the angle of the pull.<br />
2. Reel in the hoist cable and check the underside<br />
of the vehicle for any interference.<br />
Tieing down vehicle on flat bed<br />
1. Carefully feed towing straps through the opening<br />
in the rear wheels.<br />
Make sure metal parts of straps do not damage<br />
rim.<br />
Make sure the strap is flat over the rim bead.<br />
Make sure brake backing plate is not damaged.<br />
2. Secure straps to rear of flat bed.<br />
3. Reel in hoist cable only far enough to tension<br />
tie-down straps.<br />
4. Carefully feed towing straps through the opening<br />
in the front wheels.<br />
Make sure metal parts of straps do not damage<br />
rim.<br />
Make sure the strap is flat over the rim bead.<br />
Make sure brake backing plate is not damaged.<br />
5. Secure straps to front of flat bed.<br />
6. Release tension on hoist cable, but do not disconnect.<br />
Use hoist cable as a safety cable.<br />
Practical Tips, Emergency Service 261
262 Practical Tips, Emergency Service
Vehicle Identification, Technical Data<br />
Vehicle Identification .................................. 264<br />
Technical Data .......................................... 266<br />
Tire Pressure for Cold Tires ...................... 267<br />
Tires, Rims, Tracks .................................. 268<br />
Driving Performance .................................. 270<br />
Capacities ................................................ 271<br />
Weights ................................................... 272<br />
Dimensions .............................................. 272<br />
Diagrams ................................................. 273<br />
Vehicle Identification, Technical Data 263
Vehicle Identification<br />
When ordering spare parts or making inquiries,<br />
please always quote the vehicle identification<br />
number.<br />
Vehicle data bank<br />
The vehicle data bank is attached to the inside of<br />
the “Maintenance” booklet.<br />
It contains all important data about your vehicle.<br />
Note<br />
This data bank cannot be re-ordered if it is lost or<br />
damaged.<br />
This label contains the following information:<br />
1. Vehicle Identification No.<br />
2. Type/Type description<br />
3. Engine code/Transmission code<br />
4. Paint No./Interior<br />
5. Optional equipment<br />
264 Vehicle Identification, Technical Data<br />
Vehicle identification number<br />
In accordance with Federal Safety Regulations,<br />
the vehicle identification number of your car is located<br />
at the bottom left of the windshield frame<br />
and can be seen from the outside.<br />
The vehicle identification number is in the luggage<br />
compartment under the battery cover and at the<br />
bottom left behind the windshield.<br />
Removing the battery cover<br />
f Please see the chapter “BATTERY” on<br />
Page 239.<br />
Safety compliance sticker<br />
The safety compliance sticker is your assurance<br />
that your new Porsche complies with all applicable<br />
Federal Motor Vehicle Safety Standards which<br />
were in effect at the time the vehicle was manufactured.<br />
f The sticker also shows the month and year of<br />
production and the vehicle identification<br />
number of your car (perforations) as well as<br />
the Gross Vehicle Weight Rating and the Gross<br />
Axle Weight Rating.
Tire pressure plate<br />
The tire pressure plate is attached to the left-hand<br />
door aperture.<br />
Engine number<br />
The engine number is stamped on the underside<br />
of the crankcase.<br />
Vehicle Identification, Technical Data 265
Technical Data<br />
Engine data<br />
<strong>Cayman</strong> <strong>Cayman</strong> S<br />
Type MA120C MA121C<br />
Horizontally opposed engine, liquid cooled Horizontally opposed engine, liquid cooled<br />
Number of cylinders 6 6<br />
Bore 3.5 in./89 mm 3.8 in./97 mm<br />
Stroke 3.1 in./77.5 mm 3.1 in./77.5 mm<br />
Cubic capacity 176.5 cu. in./2893 cm 3 209.7 cu. in./3436 cm 3<br />
Net-horsepower 265 hp/195 kW 320 hp/235 kW<br />
at crankshaft speed 7200 rpm 7200 rpm<br />
Net torque 221 ft. lb./300 Nm 273 ft. lb./370 Nm<br />
at crankshaft speed 4400 - 6000 rpm 4750 rpm<br />
Engine oil consumption up to 1.6 quarts/622 miles (1.5 liters/1000 km) up to 1.6 quarts/622 miles (1.5 liters/1000 km)<br />
266 Technical Data
Tire Pressure for Cold Tires (68 °F/ 20 °C)<br />
Summer and snow tires <strong>Cayman</strong>, <strong>Cayman</strong> S<br />
17 inch wheels front 30 psi (2.0 bar)<br />
rear 31 psi (2.1 bar)<br />
18 inch wheels front 30 psi (2.0 bar)<br />
rear 31 psi (2.1 bar)<br />
19 inch wheels front 32 psi (2.2 bar)<br />
rear 34 psi (2.3 bar)<br />
f These tire pressures apply only to the tire makes and types approved by Porsche.<br />
Please see the chapter “WHEEL BOLTS” on Page 226.<br />
f Please see the chapter “TPM TIRE PRESSURE MONITORING” on Page 151.<br />
Technical Data 267
Tires, Rims, Tracks<br />
<strong>Cayman</strong> Tires Rim Rim offset Track<br />
Summer tires front 205/55 ZR 17 91Y 7 J x 17 H2 55 mm 58.7 in./1490 mm<br />
rear 235/50 ZR 17 96Y 8.5 J x 17 H2 40 mm 60.4 in./1534 mm<br />
268 Technical Data<br />
or front 235/40 ZR 18 91Y 8 J x 18 H2 57 mm 58.5 in./1486 mm<br />
rear 265/40 ZR 18 101Y XL 9 J x 18 H2 43 mm 60.2 in./1528 mm<br />
or front 235/35 ZR 19 87Y 8 J x 19 H2 57 mm 58.5 in./1486 mm<br />
rear 265/35 ZR 19 94Y 9.5 J x 19 H2 46 mm 59.9 in./1522 mm<br />
or front 235/35 ZR 19 87Y 8.5 J x 19 H2 55 mm 58.7 in./1490 mm<br />
rear 265/35 ZR 19 94Y 10 J x 19 H2 42 mm 60.2 in./1530 mm<br />
Snow tires front 205/55 R 17 91V M+S 7 J x 17 H2 55 mm 58.7 in./1490 mm<br />
rear * 235/50 R 17 96V M+S 8.5 J x 17 H2 40 mm 60.4 in./1534 mm<br />
or front 235/40 R 18 91V M+S 8 J x 18 H2 57 mm 58.5 in./1486 mm<br />
rear * 255/40 R 18 95V M+S 9 J x 18 H2 43 mm 60.2 in./1528 mm<br />
The load capacity coefficient (e.g. ”91“) and maximum speed code letter (e.g. ”V“) are minimum requirements.
<strong>Cayman</strong> S Tires Rim Rim offset Track<br />
Summer tires front 235/40 ZR 18 91Y 8 J x 18 H2 57 mm 58.5 in./1486 mm<br />
rear 265/40 ZR 18 101Y XL 9 J x 18 H2 43 mm 60.2 in./1528 mm<br />
f When changing tires or fitting new ones: Please see the chapter “WHEEL BOLTS” on Page 226.<br />
Danger!<br />
or front 235/35 ZR 19 87Y 8 J x 19 H2 57 mm 58.5 in./1486 mm<br />
rear 265/35 ZR 19 94Y 9.5 J x 19 H2 46 mm 59.9 in./1522 mm<br />
or front 235/35 ZR 19 87Y 8.5 J x 19 H2 55 mm 58.7 in./1490 mm<br />
rear 265/35 ZR 19 94Y 10 J x 19 H2 42 mm 60.2 in./1530 mm<br />
Snow tires front 235/40 R 18 91V M+S 8 J x 18 H2 57 mm 58.5 in./1486 mm<br />
rear * 255/40 R 18 95V M+S 9 J x 18 H2 43 mm 60.2 in./1528 mm<br />
The load capacity coefficient (e.g. ”91“) and maximum speed code letter (e.g. ”Y“) are minimum requirements.<br />
Installation of sizes not authorized by<br />
Porsche may have a dangerous effect on<br />
the driving stability and could result in<br />
serious personal injury or death.<br />
f Before mounting new tires, check with your<br />
Porsche dealer about the current release status.<br />
Tire and rim sizes Extensive tests are performed before specific tires and wheels are approved by Porsche. Your Porsche dealer has information<br />
about approved tires and wheels and is happy to assist you. If aftermarket tires and/or wheels are installed which are not<br />
approved by Porsche, the vehicle’s roadability and handling characteristics might be impaired. Since Porsche has no data on<br />
such combinations, Porsche cannot stand behind the safety or durability of these aftermarket combinations.<br />
Snow chains Can be mounted only on the rear wheels; maximum speed 30 mph/50 km/h. Use only Porsche authorized fine-link<br />
cross-type or edge chains. Snow chain clearance can be guaranteed only with the tire + rim combination marked*<br />
without spacers. Please see the chapter “SPACERS” on Page 233.<br />
Technical Data 269
Driving Performance*<br />
<strong>Cayman</strong> Manual transmission Porsche Doppelkupplung<br />
Top track speed<br />
6-speed transmission 165 mph/265 km/h 163 mph/263 km/h<br />
Acceleration 0 – 60 mph 5.5 seconds 5.4 seconds<br />
Acceleration 0 – 60 mph with Sport+ 5.2 seconds<br />
Acceleration 0 – 100 km/h (62 mph) 5.8 seconds 5.7 seconds<br />
Acceleration 0 – 100 km/h (62 mph) with Sport+ 5.5 seconds<br />
<strong>Cayman</strong> S Manual transmission Porsche Doppelkupplung<br />
Top track speed 172 mph/277 km/h 171 mph/275 km/h<br />
Acceleration 0 – 60 mph 4.9 seconds 4.8 seconds<br />
Acceleration 0 – 60 mph with Sport+ 4.6 seconds<br />
Acceleration 0 – 100 km/h (62 mph) 5.2 seconds 5.1 seconds<br />
Acceleration 0 – 100 km/h (62 mph) with Sport+ 4.9 seconds<br />
* At DIN empty weight and half load, without performance-inhibiting extra equipment.<br />
270 Technical Data
Capacities<br />
Use only fluids and fuels authorized by Porsche. Your authorized Porsche dealer will gladly advise you.<br />
Your Porsche has been designed so that it is not necessary to mix any additives with oils or fuels.<br />
Engine Oil change quantity with oil filter approx. 1.98 U.S.gallons/7.5 liters<br />
Please see the chapter “ENGINE OIL RECOMMENDATION” on Page 190.<br />
Coolant <strong>Cayman</strong>: approx. 6.05 - 6.18 U.S. gallons/22.9 - 23.4 liters<br />
<strong>Cayman</strong> S: approx. 6.13 - 6.61 U.S. gallons/23.3 - 25 liters<br />
Manual transmission and differential <strong>Cayman</strong>: approx. 0.79 U.S. gallons/3 liters<br />
<strong>Cayman</strong> S: approx. 0.85 U.S. gallons/3.2 liters<br />
Porsche Doppelkupplung<br />
Gear set<br />
Porsche Doppelkupplung<br />
Clutch/Hydraulic fluid<br />
approx. 0.78 U.S. gallons/2.95 liters<br />
approx. 1.37 U.S. gallons/5.2 liters<br />
Power steering approx. 1.1 quarts/1 liter hydraulic fluid Pentosin CHF 11 S ® or CHF 202 S ®<br />
Brake fluid approx. 0.4 quarts/0.39 liters; use only Original Porsche brake fluid<br />
Windshield washer approx. 0.66 U.S. gallons/2.5 liters without headlight washer<br />
approx. 1.58 U.S. gallons/6 liters with headlight washer<br />
Fuel tank Refill volume approx. 16.9 U.S. gallons/64 liters, including approx. 2.6 U.S.gallons/10 liters reserve.<br />
Fuel quality Your engine is designed to provide optimum performance and fuel economy using unleaded premium fuel with<br />
an octane rating of 98 RON (93 CLC or AKI).<br />
Porsche therefore recommends the use of these fuels in your vehicle.<br />
Porsche also recognizes that these fuels may not always be available. Be assured that your vehicle will operate<br />
properly on unleaded premium fuels with octane numbers of at least 95 RON (90 CLC or AKI), since the engine’s<br />
”Electronic Octane knock control“ will adapt the ignition timing, if necessary.<br />
Technical Data 271
Weights<br />
<strong>Cayman</strong> Manual transmission Porsche Doppelkupplung<br />
Empty weight (depending on equipment) 2932 lbs. to 3153 lbs. 2998 lbs. to 3230 lbs.<br />
1330 kg to 1430 kg 1360 kg to 1465 kg<br />
Maximum gross weight 3605 lbs./1635 kg 3682 lbs./1670 kg<br />
Maximum axle load, front* 1731 lbs./785 kg 1731 lbs./785 kg<br />
Maximum axle load, rear* 2017 lbs./915 kg 2017 lbs./915 kg<br />
Maximum useful load, Roof Transport System** 132 lbs./60 kg 132 lbs./60 kg<br />
<strong>Cayman</strong> S Manual transmission Porsche Doppelkupplung<br />
Empty weight (depending on equipment) 2976 lbs. to 3175 lbs. 3031 lbs. to 3241 lbs.<br />
1350 kg to 1440 kg 1375 kg to 1470 kg<br />
Maximum gross weight 3627 lbs./1645 kg 3693 lbs./1675 kg<br />
Maximum axle load, front* 1731 lbs./785 kg 1731 lbs./785 kg<br />
Maximum axle load, rear* 2072 lbs./940 kg 2072 lbs./940 kg<br />
Maximum useful load, Roof Transport System** 132 lbs./60 kg 132 lbs./60 kg<br />
*The maximum gross weight must not be exceeded.<br />
Note: If additional accessories are installed, the useful load will be correspondingly less.<br />
**Use only Original PorscheRoof Transport System<br />
Dimensions<br />
272 Technical Data<br />
<strong>Cayman</strong> <strong>Cayman</strong> S<br />
Length 171.1 in./4347 mm 171.1 in./4347 mm<br />
Width 70.9 in./1801 mm 70.9 in./1801 mm<br />
Width with door mirrors 76.9 in./1952 mm 76.9 in./1952 mm<br />
Height 51.3 in./1304 mm, with PASM 50.9 in./1294 mm 51.4 in./1306 mm, with PASM 51.0 in./1296 mm<br />
Wheelbase 95.1 in./2415 mm 95.1 in./2415 mm<br />
Ground clearance 4.5 in./115 mm, with PASM 4.2 in./107 mm 4.4 in./112 mm, with PASM 4.1 in./104 mm<br />
Turning circle 36.4 ft./11.1 m 36.4 ft./11.1 m
Diagrams<br />
Engine diagram at full power, <strong>Cayman</strong><br />
Technical Data 273
Engine diagram at full power, <strong>Cayman</strong> S<br />
274 Technical Data
A<br />
ABS (antilock brake system) ..........................59<br />
Warning light ........................................60<br />
Adaptive sports seat .....................................33<br />
Adjusting Headlights....................................257<br />
Advanced Airbag...........................................45<br />
Air conditioning...........................................110<br />
Air conditioning compressor ................113, 115<br />
Air conditioning system ...............................113<br />
Air distribution ............................110, 113, 115<br />
Air filter......................................................201<br />
Air intake....................................................116<br />
Airbag..........................................................44<br />
Cleaning covers ..................................208<br />
Function ...............................................45<br />
Warning light ........................................48<br />
Air-conditioning compressor ........................112<br />
Alarm system .......................................25, 103<br />
Deactivating passenger compartment<br />
monitoring............................................26<br />
Fault indication......................................26<br />
Function indication ................................25<br />
Not active ..........................................236<br />
Alcantara, cleaning .....................................209<br />
Antenna .....................................103, 104, 204<br />
Antifreeze ..................................................187<br />
Antilock brake system (ABS) ..........................59<br />
Warning light ........................................60<br />
Ashtray ........................................................89<br />
Assembly aids for wheel changes.................227<br />
Audio operation ..................................101, 102<br />
Auto-button, air conditioning ........................113<br />
Automatic<br />
Air conditioning system .......................113<br />
Anti-glare mirrors ..................................30<br />
Car washes ........................................204<br />
Door locking ...................................18, 24<br />
Garage door .........................................76<br />
Headlight adjustment.............................79<br />
Speed control .........................86, 87, 124<br />
Transmission ......................................178<br />
Automatic speed control..............................124<br />
Indicator light......................................124<br />
Average consumption..........................135, 165<br />
Average speed ...................................135, 165<br />
B<br />
Backrest<br />
Adjustment ...........................................32<br />
Release ................................................32<br />
Battery.......................................................239<br />
Care...................................................240<br />
Charge state.......................................239<br />
Charging ............................................240<br />
Putting vehicle into operation ...............241<br />
Remote control ...................................244<br />
Removing ...........................................242<br />
Replacing ...........................................241<br />
Warning light.......................................132<br />
Winter operation..................................241<br />
Before driving off ........................................8, 9<br />
Belts ............................................................42<br />
Cleaning .............................................209<br />
Tensioner .............................................42<br />
Warning light.........................................43<br />
Blower adjustment ..............................110, 116<br />
Blower speed adjustment ............................114<br />
Brake<br />
Break in............................................... 10<br />
Pads ................................................... 58<br />
Pedal................................................... 57<br />
Wear ................................................... 58<br />
Brake fluid<br />
Changing ........................................... 193<br />
Checking level.................................... 192<br />
Level ................................................. 192<br />
Warning light...................................... 193<br />
Brake light................................................. 256<br />
Brake light, additional ................................. 256<br />
Brakes ...................................................... 192<br />
Brake circuit division warning light ....... 193<br />
Brake warning light............................. 132<br />
Fluid .......................................... 192, 271<br />
Fluid warning light............................... 193<br />
Function .............................................. 56<br />
New brake pads or linings..................... 58<br />
Pads ................................................... 10<br />
Parking brake....................................... 55<br />
Porsche Ceramic Composite Brake<br />
(PCCB) .................................................. 4<br />
Test stand ........................................... 65<br />
Break in brakes............................................ 10<br />
Break in hints............................................... 10<br />
Bulbs<br />
Chart................................................. 247<br />
Replacing .......................................... 247<br />
Index 275
C<br />
Capacities, overview ...................................271<br />
Car care ....................................................203<br />
Car telephone.............................................103<br />
Car washes ................................................204<br />
Cargo partition .............................................97<br />
Carpet .......................................................209<br />
Catalytic converters....................................199<br />
Cautions ............................................186, 212<br />
Central locking ...........................................236<br />
Emergency operation ......................19, 22<br />
In cars with alarm system ......................21<br />
In cars without alarm system .................19<br />
Overload protection ............................236<br />
Central vents..............................................116<br />
Central warning light ...................................132<br />
Changing light-emitting diodes (LEDs) ...........256<br />
Changing wheels ........................................227<br />
Check engine<br />
Warning light ......................................132<br />
Check engine warning light ..........................133<br />
Opening the oil filler cap ......................189<br />
Checking pressure......................................228<br />
Child restraint anchorage ..............................54<br />
Child restraint systems..................................50<br />
Chime....................................................78, 80<br />
CHRONO Stopwatch....................................144<br />
Cigarette lighter............................................90<br />
Circulating-air button ...........................110, 114<br />
Clock.................................................131, 164<br />
Clutch..................................................60, 176<br />
Clutch pedal .................................................60<br />
Combination filter .......................................201<br />
Comfort seat................................................33<br />
276 Index<br />
Coming home mode................................79, 80<br />
Communication management.......................101<br />
Compact disc<br />
Player ................................................102<br />
Storage................................................92<br />
Compartment monitoring...............................25<br />
Coolant ......................................128, 187, 271<br />
Checking ............................................187<br />
Level..................................................187<br />
Temperature gage ..............................128<br />
Topping off.........................................187<br />
Warning light.......................................128<br />
Cooling system...................................128, 187<br />
Warning light.......................................128<br />
Cornering light..............................................78<br />
Indicator light......................................127<br />
Crankcase ventilation ..................................199<br />
Cruise control.................................86, 87, 132<br />
Cupholder ....................................................88<br />
D<br />
Data bank...................................................264<br />
Daytime driving lights ....................................78<br />
Changing bulbs ...................................256<br />
On-board computer .............................164<br />
Defrosting windows.......................31, 110, 114<br />
Diagnostic socket .........................................11<br />
Dimensions ................................................272<br />
Direction indicator light, front.......................256<br />
Door ............................................................18<br />
Handles................................................18<br />
Locks...........................................18, 205<br />
Mirror...................................................30<br />
Mirror heating .......................................31<br />
Mirrors .................................................29<br />
Windows.................................18, 27, 206<br />
Drive-Off Assistant.......................................177<br />
Driving<br />
Hints ......................................................8<br />
Winter ................................................183<br />
Driving off<br />
Drive-Off Assistant ...............................177<br />
Launch Control....................................181<br />
Driving performance....................................270<br />
Drop-center rim...........................................223<br />
E<br />
Electrical system.........................................235<br />
Emergency flasher switch ..............................77<br />
Emergency operation ....................................22<br />
Central locking................................19, 22<br />
Ignition key ...........................................74<br />
Lids....................................................238<br />
Tank flap ............................................195<br />
Emergency service .....................................212<br />
Emergency starting with jumper cables.245, 246<br />
Emission control system..............133, 198, 199<br />
Engine<br />
Checking the oil level...........................161<br />
Diagram .............................................273<br />
Exhaust ..................................................5<br />
Number ..............................................265<br />
Oil consumption ............................10, 188<br />
Oil level ..............................................189<br />
Oil level indicator.................................161<br />
Oils ............................................188, 271<br />
Speeds.................................................10<br />
Starting ................................................75
Stopping ..............................................76<br />
Engine compartment<br />
Blower .........................................76, 128<br />
Blower fan..........................................128<br />
Care ..................................................205<br />
Engine oil<br />
Change ..............................................190<br />
Consumption ........................................10<br />
Performance class ..............................191<br />
Recommendation ................................190<br />
Topping off.........................................189<br />
Viscosity ............................................191<br />
Exhaust<br />
Pipes .....................................................5<br />
System ................................................55<br />
Tailpipes, stainless steel......................207<br />
External antenna.........................................104<br />
F<br />
Filler flap ....................................................195<br />
Fire extinguisher ...........................................85<br />
Flat tire ......................................................229<br />
Floor mats..................................................209<br />
Fluids.........................................................201<br />
FM reception ..............................................101<br />
Fog light ......................................................80<br />
Fog light, rear.........................................78, 80<br />
Fog lights<br />
Changing bulb.....................................254<br />
Footbrake ....................................................56<br />
Footwell lights ..............................................69<br />
Fresh air intake...........................................116<br />
Front lid ...............................................94, 100<br />
Front luggage compartment ..........................94<br />
Fuel ...................................................130, 195<br />
Containers......................................4, 197<br />
Economy ............................................194<br />
Evaporation control .............................197<br />
Fuels containing ethanol.......................197<br />
Level gage .........................................130<br />
Level warning light ..............................130<br />
Recommendation ........................196, 197<br />
Recommendations ..............................196<br />
Tank ..................................................196<br />
Function keys ...............................................40<br />
Fuses, replacing .........................................237<br />
G<br />
Garage<br />
Door ....................................................76<br />
Door opener .......................................106<br />
Lift.....................................................232<br />
Gear display .......................................120, 122<br />
Gear shift indicator......................................127<br />
Glove compartment.......................................92<br />
Gong..................................14, 73, 78, 80, 137<br />
Ground clearance............................................4<br />
H<br />
Handbrake....................................................55<br />
Hands-free microphone ...............................104<br />
Head restraints.............................................32<br />
Headlights ..................................................248<br />
Adjusting ....................................257, 258<br />
Beam adjustment ..................................79<br />
Changing bulbs ...........................249, 251<br />
Cleaning system ...................82, 200, 271<br />
Flasher ................................................ 81<br />
Removing .......................................... 248<br />
Heated rear window ..................................... 31<br />
Heated rear window/Door mirror heating ..... 117<br />
Heater....................................................... 113<br />
Heating ..................................................... 110<br />
High beam<br />
Indicator light ..................................... 127<br />
Lever............................................. 78, 80<br />
High beam, additional<br />
Changing bulb .................................... 251<br />
High-pressure cleaning units........................ 203<br />
Home mode........................................... 79, 80<br />
HomeLink .................................................. 106<br />
Hoods ................................................. 94, 100<br />
Horn ..................................................... 12, 21<br />
Hot exhaust pipes .......................................... 5<br />
I<br />
Ignition key .................................................. 72<br />
Emergency operation ........................... 74<br />
Ignition lock ................................................. 72<br />
Withdrawing ignition key,<br />
PDK transmission ............................... 180<br />
Immobilizer.................................................. 15<br />
Indicator lights ................................... 120, 122<br />
INFO Warning messages............................. 140<br />
Instrument<br />
Illumination......................................... 124<br />
Lights............................................ 78, 80<br />
Panel................................. 120, 122, 166<br />
Interior ........................................................ 69<br />
Interior lights ............................................... 69<br />
Interior mirror .............................................. 30<br />
Index 277
J<br />
Jumper cables............................................245<br />
K<br />
Key codes....................................................15<br />
Keys......................................................15, 16<br />
L<br />
LATCH System .............................................53<br />
Launch Control ...........................................181<br />
Leather care ..............................................208<br />
License plate light...................................78, 80<br />
Lids ...............................................93, 94, 100<br />
Emergency unlocking ..........................238<br />
Lifting vehicle .............................................232<br />
Light<br />
Daytime driving.....................................78<br />
Flasher.............................78, 80, 81, 127<br />
Low beam ................................78, 80, 81<br />
Sensor for instrument illumination 120, 122<br />
Switch......................................78, 80, 81<br />
Light alloy wheels<br />
Inscription ..........................................223<br />
Light functions, individual...............................81<br />
Lights ..........................................................69<br />
Care ..................................................208<br />
Headlight beam adjustment ...................79<br />
LIMIT Acoustic warning signal for speed limit 137<br />
Load switch-off ...........................................236<br />
Loading information ....................................224<br />
Locking..................................................20, 23<br />
Low beam ....................................................81<br />
Luggage compartment............................94, 96<br />
278 Index<br />
Lid warning light..............................93, 95<br />
Lids .....................................................93<br />
Unlocking lid .........................................16<br />
Luggage compartment, warning lights............93<br />
Luggage cover .............................................99<br />
Luggage net.................................................96<br />
M<br />
Maintenance ...............................................186<br />
Make-up mirror .............................................41<br />
Maximum permitted engine speeds ................10<br />
Manual transmission............................176<br />
Microphone ................................................104<br />
Mirror<br />
Folding in..............................................30<br />
Heating ........................................31, 117<br />
Inside ...................................................29<br />
Mirrors...................................................29, 71<br />
Anti-glare..............................................30<br />
Multi-functional steering wheel........................40<br />
N<br />
Navigation ..................................................101<br />
Selection field, on-board computer .......150<br />
Notes on<br />
Car care.............................................203<br />
Maintenance .......................................186<br />
Number plate light ..................................78, 80<br />
Changing bulb.....................................256<br />
O<br />
Octane rating......................................196, 197<br />
Odometer...................................................125<br />
Off delay ................................................79, 80<br />
Oil......................................................188, 271<br />
Change...............................................190<br />
Checking level.....................................161<br />
Consumption.........................................10<br />
Level checks.......................................189<br />
Level indicator ....................................161<br />
Recommendation ................................190<br />
Topping off engine oil ..........................189<br />
OIL Display and measurement<br />
of the engine oil level...................................161<br />
On-board computer .....................................134<br />
Basic settings .............................135, 163<br />
Calling on-board computer functions .....135<br />
Functions and display possibilities ........135<br />
General information .............................164<br />
Language versions ..............................163<br />
Operation, controls..............................134<br />
Selecting a radio station ......................150<br />
Setting the clock .................................164<br />
Switching daytime driving lights on/off..164<br />
Switching on navigation .......................150<br />
Tire pressure warnings ........................156<br />
Warnings and messages ......................166<br />
On-board literature ..........................................2<br />
Operating voice control ...............................134<br />
Operating your Porsche in other Countries ....194<br />
Orientation light ............................................69<br />
Outside temperatur indicator........................131<br />
Oxygen sensor............................................199
P<br />
Paint<br />
Care ..........................................203, 205<br />
Data...................................................265<br />
ParkAssistant ...............................................70<br />
Parking<br />
PDK transmission................................183<br />
Parking aids ...........................................70, 71<br />
Parking brake ...............................................55<br />
Warning light ........................................56<br />
Parking light .....................................78, 80, 81<br />
Particle filter...............................................201<br />
Passenger compartment monitoring...............25<br />
PDK transmission .......................................178<br />
Drive-Off Assistant...............................177<br />
Driving in winter ..................................183<br />
Faults.................................................179<br />
Kickdown ...........................................181<br />
Launch Control ...................................181<br />
Manual selection mode........................182<br />
Reduced driving program ....................184<br />
Selector lever emergency release ........259<br />
Selector lever positions .......................180<br />
Shifting gears on the steering wheel.....181<br />
Sport mode ........................................180<br />
Transmission fluid ...............................201<br />
Warning messages..............................184<br />
Pen holder....................................................92<br />
Plastic parts ...............................................208<br />
Care ..................................................208<br />
Platform lift ................................................232<br />
Porsche Active Suspension Management<br />
(PASM).........................................................66<br />
Sport mode ..........................................66<br />
Porsche Ceramic Composite Brake (PCCB) .......4<br />
Porsche Communication Management (PCM).101<br />
Porsche Doppelkupplung (PDK) ....................178<br />
Drive-Off Assistant...............................177<br />
Driving in winter ..................................183<br />
Faults.................................................179<br />
Kickdown............................................182<br />
Launch Control....................................178<br />
Manual selection mode ........................182<br />
Reduced driving program.....................184<br />
Selector lever emergency release ........259<br />
Selector lever position.................178, 180<br />
Shifting gears on the steering wheel .....181<br />
Sport mode ........................................180<br />
Transmission fluid ...............................201<br />
Porsche Stability Management (PSM)..............63<br />
Information light ....................................65<br />
Power steering fluid level.....................201, 271<br />
Power windows.............................................18<br />
Practical tips ..............................................212<br />
Putting vehicle into operation .......................241<br />
R<br />
Radiator fan..........................................76, 188<br />
Radio reception ..........................................101<br />
Rain sensor ..................................................82<br />
Range on remaining fuel ......................135, 164<br />
Rear fender<br />
Retractable...........................................67<br />
Rear lid ..................................................94, 95<br />
Unlocking .............................................16<br />
Rear luggage compartment ...........................96<br />
Rear spoiler............................................67, 68<br />
Rear view mirrors....................................29, 30<br />
Rear window defogger.......................... 31, 117<br />
Rear window heating .................................. 117<br />
Recirculating-air button ............................... 114<br />
Refuelling .................................................. 196<br />
Relays ....................................................... 235<br />
Remote control ............................................ 16<br />
Readiness............................................ 17<br />
Replacing battery ............................... 244<br />
Standby funktion .................................. 17<br />
Synchronization.................................... 17<br />
Replacement key.......................................... 15<br />
Replacing bulbs.......................................... 247<br />
Replacing wiper blades............................... 202<br />
Retractable spoiler ....................................... 67<br />
Rims<br />
Diameter ........................................... 223<br />
Rim width........................................... 223<br />
TPM sensors...................................... 219<br />
Roof transport system................................ 105<br />
Running in.................................................... 10<br />
S<br />
Safety belts ................................................. 42<br />
Cleaning ............................................ 209<br />
Tensioner ............................................ 42<br />
Warning light........................................ 43<br />
Safety compliance sticker........................... 264<br />
Sealing set ................................................ 230<br />
Seals ........................................................ 208<br />
Care.................................................. 208<br />
Seat<br />
Adaptive sports seat............................. 33<br />
Adjustment .......................................... 32<br />
Comfort seat ....................................... 33<br />
Index 279
Heating ................................................37<br />
Memory ...............................................35<br />
Position................................................32<br />
Sports bucket seat ...............................34<br />
Sports seat ..........................................33<br />
Standard seat.......................................33<br />
Ventilation ............................................38<br />
Seat memory<br />
Operating with the remote control ..........36<br />
Operation with person buttons ...............35<br />
Selector lever position ........................120, 122<br />
Selector lever position indicator,<br />
PDK transmission .......................................179<br />
Service ......................................................141<br />
SET Basic setting on on-board computer ......163<br />
Shift indicator.............................................127<br />
Shifting gears<br />
Drive-Off Assistant...............................177<br />
Manual transmission............................176<br />
Porsche Doppelkupplung (PDK) ............178<br />
Side light, front...........................................256<br />
Side marker light ....................................78, 80<br />
Changing bulb.....................................255<br />
Side storage compartment............................92<br />
Side vents..................................................116<br />
Snow chains...............................221, 267, 269<br />
Snow tires..........................................220, 268<br />
Socket.......................................................235<br />
Spacers.....................................................233<br />
Spare key ....................................................15<br />
Spare wheel ...............................................267<br />
Speed code letter.......................................222<br />
Speed control.......................................87, 110<br />
Automatic.............................................86<br />
280 Index<br />
Indicator light......................................124<br />
Speed limit .........................................137, 222<br />
Speedometer .............................................126<br />
Spoiler .........................................................67<br />
Fixed....................................................68<br />
Retractable...........................................67<br />
Sport Chrono Plus package<br />
CHRONO stopwatch ............................144<br />
Sport mode ..........................................61<br />
Sport mode ..................................................65<br />
PDK transmission................................180<br />
Switching on/off....................................61<br />
Switching PASM on/off ..........................66<br />
Sport plus mode ...........................................61<br />
Sports bucket seat .......................................34<br />
Sports exhaust system..................................55<br />
Sports seat ..................................................33<br />
Stability management system ........................63<br />
Standard seat...............................................33<br />
Starter switch...............................................72<br />
Starting........................................................73<br />
Starting engine .............................................75<br />
Steering column<br />
Locking ................................................73<br />
Steering lock ................................................72<br />
Steering wheel<br />
Adjustment ...........................................38<br />
Function keys........................................40<br />
Heating ................................................39<br />
Lock ....................................................73<br />
Multi functional......................................40<br />
PDK shift buttons ................................178<br />
Stopping engine............................................76<br />
Stopwatch..................................................144<br />
Storage options ............................................91<br />
Storage possibilities......................................91<br />
Storing your Porsche...................................210<br />
Sun visors ....................................................41<br />
Suspension management...............................66<br />
T<br />
Tachometer................................................127<br />
Tail light .....................................................256<br />
Tank ..................................................195, 196<br />
Ventilation system ...............................197<br />
Technical data ............................................266<br />
TEL Telephone information...........................141<br />
Telephone ..................................................103<br />
Microphone.........................................104<br />
Temperature setting....................110, 113, 114<br />
Temperature, outside indicator.....................131<br />
Test stand, measurements ............................65<br />
Theft protection ............................................14<br />
Tie-down rings ..............................................96<br />
Tire<br />
Care...................................................217<br />
Damage .............................................217<br />
Designations.......................................221<br />
Pressure plate ....................................215<br />
Replacements .....................................218<br />
Traction..............................................216<br />
Wear ..................................................216<br />
Tire pressure monitoring<br />
Warning light.......................................159<br />
Wheels ...............................................219<br />
Tire pressure monitoring (TPM) ....................151<br />
Tires ....................................10, 213, 268, 269<br />
Care...................................................213
Checking pressure ..............................228<br />
Inscription ..........................................222<br />
Loading information ............................224<br />
New tires .............................................10<br />
Pressure ....................................214, 270<br />
Pressure monitoring............................151<br />
Pressure plate ....................................265<br />
Removing and storing..........................219<br />
Sealant ......................................229, 230<br />
Sidewall .............................................222<br />
Size ...................................................222<br />
Snow tires..........................................220<br />
Tools ...........................................................94<br />
Towing...............................................259, 261<br />
Towing hook...............................................259<br />
TPM Tire pressure monitoring......................151<br />
Track.........................................................268<br />
Transmission<br />
Drive-Off Assistant...............................176<br />
Fluid...........................................201, 271<br />
Manual transmission............................176<br />
Porsche Doppelkupplung (PDK) ....176, 178<br />
Trip Odometer............................................125<br />
Trunk entrapment .......................................100<br />
Turn signal<br />
Indicator light......................................127<br />
Turn signal light, front<br />
Changing bulb.....................................253<br />
Turn signals .........................................81, 127<br />
U<br />
Undercoating......................................198, 206<br />
V<br />
Valves ........................................................218<br />
Vanity mirror.................................................41<br />
Vehicle<br />
Care...................................................203<br />
Engine number....................................265<br />
Identification .......................................264<br />
Identification label ...............................264<br />
Identification number ...........................264<br />
Lifting.................................................232<br />
Load capacity .....................................225<br />
Putting into operation ..........................241<br />
Safety compliance sticker....................264<br />
Washing .............................................204<br />
Vehicle identification number........................264<br />
Ventilation ..................................................113<br />
Vents .........................................110, 113, 116<br />
Viscosity, engine oil.....................................191<br />
Voice control, button ...................................134<br />
Voice control, PCM .....................................134<br />
W<br />
Warning lights and messages...................... 166<br />
Washer<br />
Fluid .................................................. 200<br />
Fluid warning light............................... 200<br />
Washer fluid............................................... 271<br />
Washer lever................................................ 82<br />
Washing .................................................... 204<br />
Weights..................................................... 272<br />
Welcome Home Function ........................ 79, 80<br />
Wheel.................................. 10, 213, 268, 269<br />
Alignment .......................................... 219<br />
Balancing........................................... 219<br />
Bolts ................................................. 226<br />
Care.................................................. 213<br />
Changing ........................................... 229<br />
Checking pressure ............................. 228<br />
Inscription.......................................... 222<br />
Loading information............................ 224<br />
Securing bolts.................................... 226<br />
Security wheel bolts ............................. 15<br />
Sidewall............................................. 222<br />
Size .................................................. 222<br />
Tire pressure ..................................... 214<br />
Tire pressure plate ............................. 265<br />
Tire sealant................................ 229, 230<br />
Wheels<br />
Assembly aids for wheel changes ........ 227<br />
Care.................................................. 207<br />
TPM sensors...................................... 219<br />
Windows.................................................... 206<br />
Anti-crushing protection ........................ 28<br />
Care.................................................. 206<br />
Opening/Closing .................................. 27<br />
Index 281
Washer nozzles ....................................82<br />
Washer system...........................200, 271<br />
Windshield<br />
Wiper blades, changing .......................202<br />
Windshield wipers .................................82, 202<br />
Replacing ...........................................202<br />
Winter operation<br />
Battery...............................................241<br />
Coolant ..............................................187<br />
Engine oil ...........................................188<br />
Jumper cables............................245, 246<br />
Locks ................................................205<br />
Seals .................................................208<br />
Snow chains .......................................221<br />
Tires ..................................................220<br />
Washer fluid .......................................200<br />
Wiper blades ......................................202<br />
Wiper<br />
Blades ...............................................202<br />
Wiper blades<br />
Care ..................................................206<br />
Changing............................................202<br />
282 Index