
You also want an ePaper? Increase the reach of your titles
YUMPU automatically turns print PDFs into web optimized ePapers that Google loves.
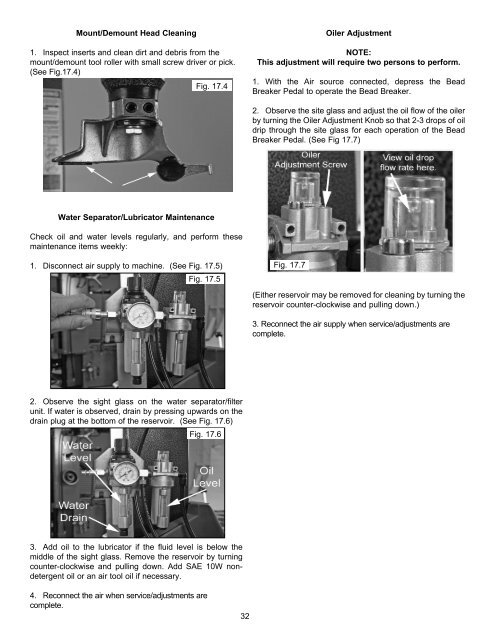
Mount/Demount Head Cleaning<br />
1. Inspect inserts and clean dirt and debris from the<br />
mount/demount tool roller with small screw driver or pick.<br />
(See Fig.17.4)<br />
Water Separator/Lubricator Maintenance<br />
Check oil and water levels regularly, and perform these<br />
maintenance items weekly:<br />
1. Disconnect air supply to machine. (See Fig. 17.5)<br />
Fig. 17.5<br />
2. Observe the sight glass on the water separator/filter<br />
unit. If water is observed, drain by pressing upwards on the<br />
drain plug at the bottom of the reservoir. (See Fig. 17.6)<br />
Fig. 17.6<br />
3. Add oil to the lubricator if the fluid level is below the<br />
middle of the sight glass. Remove the reservoir by turning<br />
counter-clockwise and pulling down. Add SAE <strong>10</strong>W nondetergent<br />
oil or an air tool oil if necessary.<br />
4. Reconnect the air when service/adjustments are<br />
complete.<br />
Fig. 17.4<br />
32<br />
Oiler Adjustment<br />
NOTE:<br />
This adjustment will require two persons to perform.<br />
1. With the Air source connected, depress the Bead<br />
Breaker Pedal to operate the Bead Breaker.<br />
2. Observe the site glass and adjust the oil flow of the oiler<br />
by turning the Oiler Adjustment Knob so that 2-3 drops of oil<br />
drip through the site glass for each operation of the Bead<br />
Breaker Pedal. (See Fig 17.7)<br />
Fig. 17.7<br />
(Either reservoir may be removed for cleaning by turning the<br />
reservoir counter-clockwise and pulling down.)<br />
3. Reconnect the air supply when service/adjustments are<br />
complete.