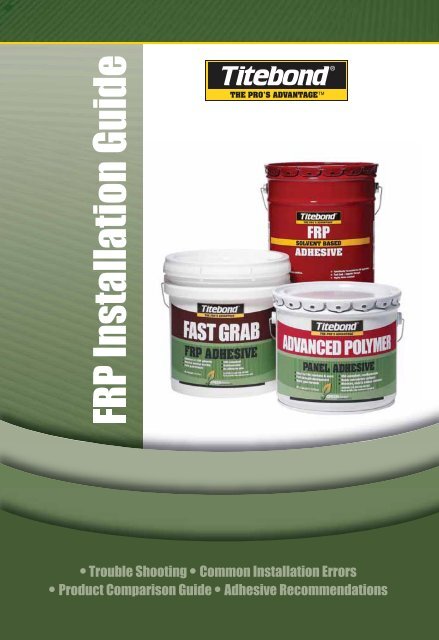
RP Installation Guide - Crane Composites
RP Installation Guide - Crane Composites
RP Installation Guide - Crane Composites
- No tags were found...

You also want an ePaper? Increase the reach of your titles
YUMPU automatically turns print PDFs into web optimized ePapers that Google loves.
Trouble ShootingIf you are experiencing bubbles or other weak bonding pointson the F<strong>RP</strong> panels, reinstallation may be required. To helpdetermine the cause of these problems and to prevent futurerecurrences, please review the following information below. Ifyou cannot identify the cause of the problem, circle theaffected area with a permanent marker and take photos beforetaking down the panel. Send samples of the affected area tothe manufacturer along with samples of the adhesive and a lotnumber to have the issue analyzed by an expert.Incorrect Trowel Ridges•Check trowel ridges and spacing to determine if correcttrowel size was used and if trowel marks are on the panel. Ifthere are bare spots or drag spots on the panel, then theadhesive was applied to the wall, not the panel as indicatedin the instructions.Vertical & Horizontal Bubbles• If there are long vertical bubbles down the middle, checkright and left moldings for proper expansion space.• Look for skips in the adhesive trowel pattern. Low trowelridges (less than full depth) where the adhesive nevermade contact with the wall substrate could cause a failedinstallation.• If there are long horizontal bubbles, check the top andbottom moldings for proper expansion space.F<strong>RP</strong> <strong>Installation</strong> Tips• Trowel adhesive to the back of the panel - not the wall substrate.• Check wall surface for irregularities that might deter adhesion:high/low spots, dirt, dust, oil, paint, excessive joint compound, etc.• Acclimate panels to room temperature and lay panels flat for 24hours before installation.• Check to make sure the climate of the room, adhesive, panel andwall substrate are all above 50˚F at least 24 hours before, during,and after installation. Avoid large temperature swings during thefirst 24 hours after installation.• Use correct trowel size as recommended by the manufacturer.• If there are long horizontal bubbles, check the top and bottommoldings for proper expansion space.
Application of Adhesive•DO NOT apply adhesive directly to the wall surface. Applyit to the F<strong>RP</strong> panel.• DO NOT wait longer than the manufacturer’s recommendedopen-time. Doing so could allow the adhesive to dry or cureand create weak bonding to the substrate.•Be sure to spread the adhesive over the entire back of thepanel using the recommended trowel.• Keep trowel notches clean and free of adhesive build-upto insure proper application.•After the adhesive is applied to the F<strong>RP</strong> panel, adhere thepanel to the wall surface. Failure to adhere the panel tothe wall surface within the recommended open-time willresult in weak bonding or bubbles.• Please refer to the open-time recommendations under thecomparison guide.Restricting Free Expansion of the PanelsRecognize the need for oversized holes where pipes orconduits penetrate the wall. Failure to oversize any necessaryholes through the panel could force the F<strong>RP</strong> panel to buckleor bubble.• Avoid post installation additions, such as ceramic tile basedirectly over the F<strong>RP</strong> panel. Such additions restrictexpansion space of the panel.Example of properly troweled adhesive applicationAllowing for Expansion Space Around PanelsF<strong>RP</strong> changes dimension with temperature and grows astemperature increases.Properly Rolling or Pressing Entire Panelas it is PositionedUse linoleum roller, J-roller or diligent hand pressure toadhere entire surface of the panel, ensuring good contactover the entire panel.• Place panel against surface and press firmly over entiresurface, working from the edge of the panel wheremolding is installed outward to the open edge.• Adhesive needs to come in contact over the entire wallsubstrate. If not, the adhesive may not bond, creatingbubbles.CorrectIncorrectF<strong>RP</strong> panels expand and contract due to fluctuatingtemperatures and humidity. Always allow for adequatespace between and around the panel, allowing for properexpansion and contraction. Always refer to the panelmanufacturer’s spacing guidelines before the installation.• Apply Titebond WeatherMaster® Sealant or Titebond 100%Silicone Sealant around panels where edges are exposed,around oversized holes for pipes or conduits and alongbaseboard moldings where moisture can penetrate.• Use grommetted heads and Titebond WeatherMasterSealant or Titebond 100% Silicone Sealant where fastenerspenetrate panel.
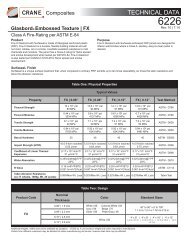
Product Comparison <strong>Guide</strong>ApplicationRecommendationsTitebond ® Titebond ®Advanced Polymer Fast Grab F<strong>RP</strong> AdhesivePanel Adhesive• Porous and most non-poroussubstrates• Interior and exterior applications• Fiberglass faced and moldresistant drywall, fire rated andpressure treated plywood, drywall,steel, foamboard, vinyl, PVC, F<strong>RP</strong>,ceramic tile, laminate, sealed andunsealed concrete• Porous substratesInterior drywall applications••Non-treated plywood, greenboard,non-painted or unsealed concreteTitebond ® Solvent-BasedF<strong>RP</strong> Adhesive• Porous substratesInterior and exterior applications••Fire rated and pressure treatedplywood, drywall, greenboardand unsealed cementCure ProcessCures as moisture penetrates theadhesive (reactive)Dries as water leaves adhesiveDries as solvents leave adhesiveOpen Time20 minutes20 minutes20 minutesApplicationTemperature50 - 90˚F50 - 90˚F50 - 90˚FBenefits• Easy to trowel• Quick grab• VOC-compliant• Nonflammable• Mold & mildew resistant• Fast strength development• Quick grab formula - requiresminimal bracing• VOC-compliant• Nonflammable• No offensive odor• Environmentally safe• Easy to trowel• Unaffected by moisture andhigh humidity• Easy to trowel• Will not become hard or brittle• Excellent wet outCoverage3/16” W x 1/4” D x 11/16” c-c V-notchApproximately 60 sq. ft. per gallon3/16” W x 1/4” D x 1/2” c-c V-notchApproximately 50 sq. ft. per gallon3/16” W x 1/4” D x 1/2” c-c V-notchApproximately 50 sq. ft. per gallon3/16” W x 1/4” D x 1/2” c-c V-notchApproximately 50 sq. ft. per gallonCleanupIt is important to clean-up adhesiveimmediately while still wet. To cleanadhesive from panel, tools andhands while wet, use mineral spiritsand a rag. Once adhesive has cured,it can be extremely difficult toremove. Follow solvent vendor’sprecautions. NOTE: Test solvent in anout-of-the-way area to make sure itwill not mar or attack the surface.Tools and excess adhesive may becleaned with water while wet. Ifadhesive has dried, use mineralspirits. Follow solvent vendor'sprecautions when using solvents.NOTE: Test solvent in anout-of-the-way area to make sure itwill not mar or attack the surface.Scrape off dried excess with a puttyknife. Remove residue with mineralspirits or equivalent solvent while theadhesive is still wet. Follow solventvendor’s precautions when usingsolvents. NOTE: Test solvent on anout-of-the-way area to make sure it willnot affect the surface being cleaned.SpecificationsMeets GreenSeal GS-36, LEED,SCAQMD, CARB and NAHB GreenBuilding specifications.Meets GreenSeal GS-36, LEED,SCAQMD, CARB and NAHB GreenBuilding specifications. FDA andCanadian Food Inspection Agency(CFIA) approved for indirect foodcontact.N/AProject Help LineTechnical Support 1.800.347.4583Customer Service 1.800.669.4583www.titebond.comwww.TitebondGreenChoice.com
F<strong>RP</strong> to Various Substrates with Adhesive RecommendationF<strong>RP</strong> TO:Titebond ® Titebond ®Advanced Polymer Fast Grab F<strong>RP</strong> AdhesivePanel AdhesiveTitebond ® Solvent-BasedF<strong>RP</strong> AdhesiveStandard unpainted drywall YesYes YesStandard unpainted plywood YesYes YesTreated plywood YesNo YesFire rated plywood YesNo YesCement boardYesYes (will have longer drying timeand F<strong>RP</strong> may have to be braced)YesFiberglass faced moldresistant Gypsum wallboardYesNoYesDensGlass YesNo NoF<strong>RP</strong> YesNo NoGreenboard moistureresistant drywallYesYes (will have longer drying timeand F<strong>RP</strong> may have to be braced)YesCeramic tile YesNo NoStainless steel YesNo NoMetal YesNo NoAluminum YesNo NoGalvanized metalYesNoNoCement block(above grade or inside wall)YesYes (will have longer drying timeand F<strong>RP</strong> may have to be braced)YesCement block(below grade or outside wall)YesNoYesPainted walls(if paint is well anchored)YesNoYes (will have longer drying timeand F<strong>RP</strong> may have to be braced)Polystyrene foamYesNoNoPolyurethane foam YesNo NoFoil-faced insulation YesNo NoNote: This list should not be considered fully exhaustive. It represents Franklin International's adhesiverecommendations for specific materials and substrates. For questions regarding adhesive application for specificsubstrates, please call Franklin International's Technical Service at (800) 347-4583.Telephone 800.877.4583 • 614.443.0241© 2010 FF821