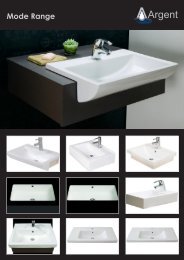
Zeta Range
Zeta Range
Zeta Range

Create successful ePaper yourself
Turn your PDF publications into a flip-book with our unique Google optimized e-Paper software.
INSTALLATION TIPS<br />
CARE + MAINTENANCE<br />
Care must be taken to dry any spillage or leakage of water which may<br />
gain access to furniture. It is recommended that vanities are installed<br />
to avoid splashes from wet areas such as baths, spas and showers.<br />
All wood composite veneers and polyurethane lacquer are water<br />
resistant only. To ensure the quality of finish is maintained, wipe up<br />
all spills with a clean lightly moistened cloth as soon as they occur.<br />
Use only a soft cloth, or a weak solution of non-abrasive detergent.<br />
Do not expose to excessive heat e.g. from hot hair styling equipment<br />
or naked flames.<br />
To restore accidental scratches, burns etc. on two pack polyurethane<br />
parts or acrylic tops, rub gently with car cutting compound, car polish<br />
or household brass/silver cleaner.<br />
WARRANTY INFORMATION<br />
The Argent furniture warranty applies to Argent furniture only.<br />
The Argent Warranty is 5 years against manufacturing fault.<br />
Finishes<br />
All finishes are warranted against chipping and flaking, excluding<br />
normal wear and tear for five (5) years from date of purchase. Fading<br />
of colour due to excessive exposure to sunlight is excluded from the<br />
warranty.<br />
Exclusions<br />
This warranty is for normal domestic limited use only and excludes<br />
any defect or injury caused by or resulting from misuse, abuse or<br />
neglect, accidental damage, improper installation or other alterations<br />
or modifications which affect the reliability or performance of the unit<br />
that are not attributable to faulty manufacture.<br />
For full Warranty information visit www.argentaust.com.au<br />
Brisbane<br />
Level 3 / 18 Wandoo Street<br />
Fortitude Valley QLD 4006<br />
Sydney<br />
80 Abercrombie Street<br />
Chippendale NSW 2008<br />
Melbourne<br />
198 Coventry Street<br />
South Melbourne VIC 3205<br />
Perth<br />
Unit 1 / 40 Collingwood Street<br />
Osborne Park WA 6017<br />
Technical Advice<br />
1800 356 717<br />
Fax<br />
1300 656 057<br />
www.argentaust.com.au<br />
S T O R E T H I S<br />
DOCUMENT<br />
F O R Y O U R<br />
WARRANTY<br />
RECORDS<br />
ARG-ZETA11-0512<br />
Z20SF0901SB<br />
ZETA semi recessed<br />
900mm Floor<br />
ZU20SF0901SB<br />
ZETA under counter<br />
900mm Floor<br />
<strong>Zeta</strong> <strong>Range</strong><br />
Z20SW0901SB<br />
ZETA semi recessed<br />
900mm Wall<br />
ZU20SW0901SB<br />
ZETA under counter<br />
900mm Wall<br />
Z20SW1201SB<br />
ZETA semi recessed<br />
1200mm Wall<br />
ZU20SW1201SB<br />
ZETA under counter<br />
1200mm Wall
PLEASE INSPECT THE CABINET, STONE TOP<br />
AND BASIN TO ENSURE NO DAMAGE HAS<br />
OCCURED DURING TRANSIT. IF DAMAGE HAS<br />
OCCURRED, OR VISIBLE DEFECTS EXIST,<br />
DO NOT PROCEED WITH INSTALLATION AND<br />
ADVISE ARGENT IMMEDIATELY ON<br />
1300 364 748<br />
IMPORTANT:<br />
IT IS NECESSARY TO SECURE THE CABINET<br />
THROUGH THE BACK BOARD INTO A SOLID<br />
SUBSTRATE.<br />
FOR CAVITY WALLS, CABINET MUST BE SECURED<br />
THROUGH THE WALL INTO EITHER WALL STUDS<br />
OR NOGGINS.<br />
FOR SOLID WALLS, SUITABLE WALL PLUGS/<br />
FIXINGS WILL NEED TO BE USED.<br />
UNDERCOUNTER BASINS NEED TO BE INSTALLED<br />
ONTO STONE TOP 24 HOURS PRIOR TO THE STONE<br />
TOP BEING INSTALLED ONTO THE CABINET.<br />
PRIOR TO INSTALLATION<br />
Argent recommends a qualified trade person fit your<br />
vanity. Ensure your furniture is installed to relevant<br />
building codes and Australian Standards.<br />
Please note, Argent will not be liable for the cost of<br />
installation or removal of the furniture and the warranty<br />
will be voided if damage occurred during or after<br />
installation.<br />
MEASURE & MARK<br />
Locate wall studs to secure cabinet. Measure and mark<br />
fixing positions for drilling. Make allowance for the height<br />
of the stone top and basin style being used ie. Counter<br />
top basins will invite a lower cabinet height than other<br />
basin styles. Fix through multiple studs/noggins to<br />
ensure secure fixing, a minimum of 6 fixing positions is<br />
required. for solid walls, use fixings appropriate to your<br />
wall substrate. Mark and cut holes in the cabinet for hot<br />
and cold water inlets and waste exit pipes as required.<br />
INSTALLATION<br />
Fit the cabinet at the required height and/or location to studs and/or solid substrate, ensure the cabinet is level.<br />
STONE TOP INSTALLATION<br />
UNDER COUNTER BASIN INSTALLATION<br />
Where an undercounter basin is being installed, it must be siliconed onto the stone top a minimum of 24 hours prior<br />
to the stone top being installed onto the cabinet.<br />
PROCESS<br />
Set up a secure area where the stone top can be laid out upside down and left for 24 hours, a void needs be left<br />
underneath the basin cut out area to allow for a visual inspection of the basin alignment with the stone top cut out.<br />
With the stone top laid out upside down, place the undercounter basin into position over the basin cut out.<br />
Please inspect the alignment of the undercounter basin to the basin cut<br />
out in the stone top from underneath and ensure the alignment is even<br />
all the way around. (Villeroy & Boch Undercounter basins should be<br />
positioned with the logo closest to the rear of the stone top)<br />
Mark around the outer perimeter of the basin onto the underside of the<br />
stone top, this will form a reference line for adhering the basin to the<br />
stone top.<br />
Remove the basin and ensure both the basin and the stone top are clean<br />
and free of any dirt where the silicon is to be applied.<br />
Apply healthy beads of white bathroom grade silicon adhesive to the<br />
stone top and the undercounter basin<br />
Place the siliconed basin onto the stone top using the reference line for<br />
alignment, run an additional bead of silicon around the basin where it<br />
joins the stone top.<br />
Double check with a visual inspection from below of the basin alignment<br />
on the stone top. Remove any excess silicon on the inside of the basin<br />
& leave the basin and stone top to cure for a minimum of 24 hours.<br />
DROP IN & SEMI RECESSED BASIN INSTALLATION<br />
Drop in & counter top basins can be installed after the stone top is<br />
installed onto the cabinet.<br />
INSTALLING STONE TOP<br />
Prior to installing the stone top, tapware and waste can be fitted to the<br />
basin/ stone top to facilitate simpler access installation.<br />
Ensure the edge of the cabinet and stone top are clean and free of<br />
detritus.<br />
Test fit the stone top onto the cabinet to check alignment.<br />
Remove the stone top and apply a bead of bathroom grade silicon on<br />
all four edges of the cabinet.<br />
Install the stone top onto the cabinet confirming correct alignment.<br />
Install tapware and waste into drop in & or counter top basin.<br />
Install basin onto cabinet with a bead of bathroom grade silicon<br />
sealant.<br />
Leave cabinet & basin to cure for 24 hours.<br />
FITTING TAPWARE & WASTE<br />
If tapware and waste are still to be fitted, the drawer of cabinet can be<br />
removed by pulling the clasps on the underside front towards the outer<br />
edge of the drawer. Set the drawer aside carefully. Fit tapware and<br />
waste to the basin.<br />
Test to ensure there are no leaks.<br />
Replace the drawer.<br />
FIT OFF, ADJUST & FINISH<br />
Replace drawer and adjust to ensure all square with the installed<br />
vanity.<br />
Put a bead of bathroom grade silicon around the rear edge of the<br />
stone top & or basin where they touch the wall & or the stone top for<br />
waterproofing .<br />
Drawer Removal<br />
Feel under the drawer for<br />
release catches. Squeeze<br />
catches, pull out towards you<br />
to release the drawer from the<br />
runners.<br />
Basin Sealing<br />
IMPORTANT:<br />
USE ONLY bathroom<br />
grade silicon sealant<br />
Epoxy type glues<br />
MUST NOT BE USED.<br />
Put a bead of bathroom grade<br />
silicon around the back edge of<br />
the stone top where it touches<br />
the wall.<br />
IMPORTANT:<br />
INSPECT THE CABINET,<br />
STONE TOP AND BASIN<br />
TO ENSURE NO DAMAGE<br />
HAS OCCURRED DURING<br />
TRANSIT.<br />
IF DAMAGE HAS<br />
OCCURRED, OR VISIBLE<br />
DEFECTS EXIST, DO<br />
NOT PROCEED WITH<br />
INSTALLATION AND ADVISE<br />
ARGENT IMMEDIATELY.