PDF Instructions - Soft Expressions
PDF Instructions - Soft Expressions
PDF Instructions - Soft Expressions
- No tags were found...

Create successful ePaper yourself
Turn your PDF publications into a flip-book with our unique Google optimized e-Paper software.
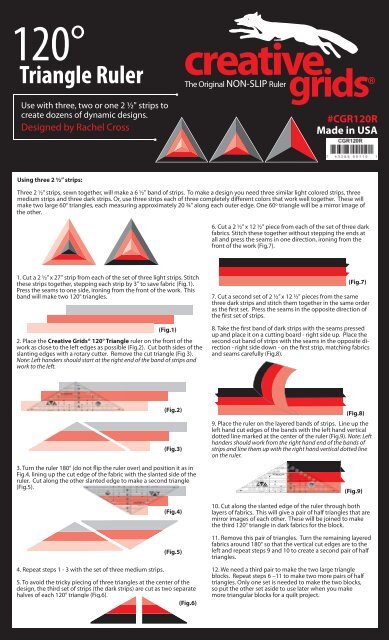
120°Triangle RulerUse with three, two or one 2 ½" strips tocreate dozens of dynamic designs.Designed by Rachel CrosscreativegridsThe Original NON-SLIP Ruler®#CGR120RMade in USAUsing three 2 ½” strips:Three 2 ½” strips, sewn together, will make a 6 ½" band of strips. To make a design you need three similar light colored strips, threemedium strips and three dark strips. Or, use three strips each of three completely different colors that work well together. These willmake two large 60° triangles, each measuring approximately 20 ¾" along each outer edge. One 60º triangle will be a mirror image ofthe other.6. Cut a 2 ½” x 12 ½" piece from each of the set of three darkfabrics. Stitch these together without stepping the ends atall and press the seams in one direction, ironing from thefront of the work (Fig.7).1. Cut a 2 ½” x 27" strip from each of the set of three light strips. Stitchthese strips together, stepping each strip by 3" to save fabric (Fig.1).Press the seams to one side, ironing from the front of the work. Thisband will make two 120° triangles.(Fig.1)2. Place the Creative Grids® 120° Triangle ruler on the front of thework as close to the left edges as possible (Fig.2). Cut both sides of theslanting edges with a rotary cutter. Remove the cut triangle (Fig 3).Note: Left handers should start at the right end of the band of strips andwork to the left.(Fig.7)7. Cut a second set of 2 ½” x 12 ½" pieces from the samethree dark strips and stitch them together in the same orderas the first set. Press the seams in the opposite direction ofthe first set of strips.8. Take the first band of dark strips with the seams pressedup and place it on a cutting board - right side up. Place thesecond cut band of strips with the seams in the opposite direction- right side down - on the first strip, matching fabricsand seams carefully (Fig.8).(Fig.2)(Fig.3)3. Turn the ruler 180° (do not flip the ruler over) and position it as inFig.4, lining up the cut edge of the fabric with the slanted side of theruler. Cut along the other slanted edge to make a second triangle(Fig.5).(Fig.4)(Fig.5)4. Repeat steps 1 - 3 with the set of three medium strips.5. To avoid the tricky piecing of three triangles at the center of thedesign, the third set of strips (the dark strips) are as two separatehalves cutof each 120° triangle (Fig.6).(Fig.6)(Fig.8)9. Place the ruler on thelayered bands of strips. Line up theleft hand cut edges of the bands with the left hand verticaldotted line marked at the center of the ruler (Fig.9). Note: Lefthanders should work from the right hand end of the bands ofstrips and line them up with the right hand vertical dotted lineon the ruler.(Fig.9)10. Cut along the slanted edge of the ruler through bothlayers of fabrics. This will give a pair of half triangles that aremirror images of each other. These will be joined to makethe third 120° triangle in dark fabrics for the block.11. Remove this pair of triangles. Turn the remaining layeredfabrics around 180° so that the vertical cut edges are to theleft and repeat steps 9 and 10 to create a second pair of halftriangles.12. We need a third pair to make the two large triangleblocks. Repeat steps 6 –11 to make two more pairs of halftriangles. Only one set is needed to make the two blocks,so put the other set aside to use later when you makemore triangular blocks for a quilt project.
13. Arrange two large triangles and two half triangles as in Fig.10.Pin and stitch a half triangle to each of the large triangles, matchingseams carefully (Fig.11). Press the two seams in opposite directions.5. Follow steps 13 – 14 in ‘Using the three 2 ½” strips’ to completethe large triangular blocks.Using one 2 ½” strip:(Fig.10)(Fig.11)120° triangles cut from one 2 ½” strip will make triangularblocks measuring approximately 7” along each outer edge.Use three strips that contrast well with each other or a light,medium and dark in each block.14. Pin and stitch the two halves together, matching seams carefully,to make the large triangle block. Repeat this with the remaining120° triangles and half triangles to make the second block.Using two 2 ½” strips:Two 2 ½" wide strips, sewn together, will make a 4 ½" band of strips.To make the two triangular blocks you need two sets of contrastingfabrics. Three 2 ½” strips from each set will make two large triangles,each measuring approximately 14” along each outer edge.One 60º triangle will be a mirror image of the other.1. Take one of the chosen 2 ½” strips – several may be layeredand cut at the same time if preferred – and place the 120° triangleruler on it. The top edge of the ruler should line up withthe top of the fabric strip and the bottom edge of the fabricshould match the line marked line 2 (Fig.13).(Fig.13)2. Repeat step 1 with the medium strips.1. Take the one 2 ½” strip from set one of fabrics and one strip fromthe contrasting set two. Stitch these two strips together, steppingeach strip by 3” to save fabric. Press the seam to one side, ironingfrom the front of the work. This band will make four 120° triangles.Just two triangles are needed to make the two large triangularblocks shown above.2. Place the Creative Grids® 120° Triangle ruler on the front ofthe work as close to the left edges as possible. The top edge ofthe ruler should line up with the top of the band of strips and thebottom edge of fabric should match the line marked 4 (Fig.12). Followthe cutting instructions for the three-strip block above to cuttwo 120° triangles for the two blocks shown, or you may prefer tocontinue cutting all four.3. The dark strips need to be cut into half triangles to makethe piecing easier. Take a dark 2 ½” strip and do not unfold it– leave it as a double layer with right sides outside as it comesoff the roll. Place it on the cutting board and cut a series of5" pieces from the doubled strip. Follow steps 6 -12 in ‘Usingthree 2 ½” strips’ above to make three pairs of half triangles.The method is exactly the same, just the length of the stripswill be 5” and because there is only one 2 ½” strip. The ruler isplaced on the fabric with the marked 1-strip line matching thebottom edge of the fabric as before.5. Follow steps 13 – 14 in ‘Using the three 2 ½” strips’ to completetwo large triangular blocks.Completing the design:Most of the designs made with the 120° ruler comprise a seriesof equilateral triangles, which may need filling in with extrashapes at the outer edges of the design to make a square orrectangular quilt. These ‘squaring-off’ corners can be madewith the ruler by combining a whole 120° triangle with a halftriangle as shown in Fig.14.(Fig.12)3. Take another pair of contrasting strips and repeat steps 1 and 2.4. The third band of two strips needs to be cut into half triangles tomake the piecing easier. Cut a 9" length from each of the third pairof contrasting strips. Follow steps 6 -12 in ‘Using three 2 ½” stripsabove to make three pairs of half triangles from these two fabrics:the method is exactly the same, just the length of the strips will be9” and because the band has only two strips, the ruler is placed onthe fabric with the marked 2-strip line matching the bottom edgeof the fabric as before.(Fig.14)Possibilities: