IMSolo-IV Forensic LinkMASSter-NET Quick Start Guide - ICS-IQ.com
IMSolo-IV Forensic LinkMASSter-NET Quick Start Guide - ICS-IQ.com
IMSolo-IV Forensic LinkMASSter-NET Quick Start Guide - ICS-IQ.com
- No tags were found...

Create successful ePaper yourself
Turn your PDF publications into a flip-book with our unique Google optimized e-Paper software.
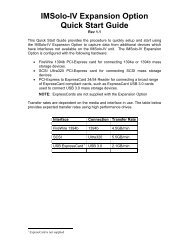
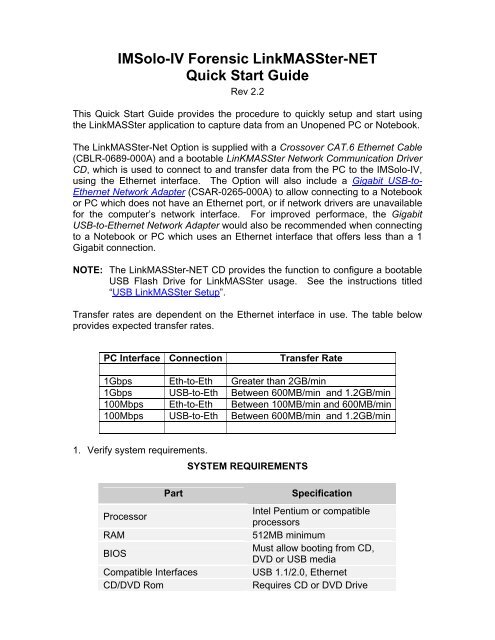
<strong>IMSolo</strong>-<strong>IV</strong> <strong>Forensic</strong> <strong>LinkMASSter</strong>-<strong>NET</strong><strong>Quick</strong> <strong>Start</strong> <strong>Guide</strong>Rev 2.2This <strong>Quick</strong> <strong>Start</strong> <strong>Guide</strong> provides the procedure to quickly setup and start usingthe <strong>LinkMASSter</strong> application to capture data from an Unopened PC or Notebook.The <strong>LinkMASSter</strong>-Net Option is supplied with a Crossover CAT.6 Ethernet Cable(CBLR-0689-000A) and a bootable LinKMASSter Network Communication DriverCD, which is used to connect to and transfer data from the PC to the <strong>IMSolo</strong>-<strong>IV</strong>,using the Ethernet interface. The Option will also include a Gigabit USB-to-Ethernet Network Adapter (CSAR-0265-000A) to allow connecting to a Notebookor PC which does not have an Ethernet port, or if network drivers are unavailablefor the <strong>com</strong>puter’s network interface. For improved performace, the GigabitUSB-to-Ethernet Network Adapter would also be re<strong>com</strong>mended when connectingto a Notebook or PC which uses an Ethernet interface that offers less than a 1Gigabit connection.NOTE:The <strong>LinkMASSter</strong>-<strong>NET</strong> CD provides the function to configure a bootableUSB Flash Drive for <strong>LinkMASSter</strong> usage. See the instructions titled“USB <strong>LinkMASSter</strong> Setup”.Transfer rates are dependent on the Ethernet interface inprovides expected transfer rates.use. The table belowPC Interface Connection Transfer Rate1Gbps Eth-to-Eth Greater than 2GB/min1Gbps USB-to-Eth Between 600MB/min and 1.2GB/min100Mbps Eth-to-Eth Between 100MB/min and 600MB/min100Mbps USB-to-Eth Between 600MB/min and 1.2GB/min1. Verify system requirements.SYSTEM REQUIREMENTSPartProcessorRAMBIOSCompatible InterfacesCD/DVD RomSpecificationIntel Pentium or <strong>com</strong>patibleprocessors512MB minimumMust allow booting from CD,DVD or USB mediaUSB 1.1/2.0, EthernetRequires CD or DVD Drive
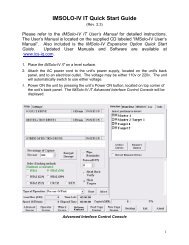
2.Power ON the <strong>IMSolo</strong>-<strong>IV</strong> by pressing the unit’s Power ON button, located ontop corner of the unit’s back panel. The <strong>IMSolo</strong>-<strong>IV</strong> <strong>Forensic</strong>s AdvancedInterface Control Console will be displayed.Drive SelectionPanelOperational Modes3.NOTE:<strong>Forensic</strong>s Application to properly activate the4. Attach the Evidence drive(s) to the <strong>IMSolo</strong>-<strong>IV</strong> unit’ s Evidence ports using the<strong>ICS</strong> supplied SATA/SAS drive data/power cables.6.If the <strong>LinkMASSter</strong> Option was purchased separately, enter the <strong>ICS</strong> suppliedLInkMASSter Option Code using the unit’s ADD/REMOVE OPTION function.Exit and restart the<strong>LinkMASSter</strong> Option.5. Select the Mode of Operation from the Operations pull down menu.Select DETECT REMOTE DR<strong>IV</strong>ES from the Drive Selection Panel.NOTE: Do not select any Suspect position from the Drive Selection Panel.7. Select the Evidence Drive(s)to be used for the selected operation from theDrive Selection Panel.
8.Verify all remaining applicable settings and optionally enter Case Informationusing the CASE INFO screen functions (See Table 1 and 2). It isre<strong>com</strong>mended to enable the Hash Targets function. Selecting Hash Targetswill result in the Capture operation generating the Hash value for the dataread from the Suspect drive and the data written to the Evidence drive. Afterall the data is written to the Evidence drive, the Capture operation willgenerate the Hash value for the data read from the Evidence drive.9.Hash values generated during the capture operation are generatedfor the data read from the Suspect’s drive not from the data read fromthe Evidence (target) drive, unless the unit is instructed to hash theEvidence drive(s) by enabling the Hash Targets function. As analternative, the Evidence Drives can also be hashed after the captureoperation using the Hash mode of operation.Connect the <strong>ICS</strong> supplied Crossover Ethernet Cable to the <strong>IMSolo</strong>-<strong>IV</strong> unit’sEthernet port and to the Notebook/PC Ethernet port. Alternately, connect theGigabit USB-to-Ethernet Network Adapter to the Notebook/PC USB port andthe Ethernet Cable connector end to the <strong>IMSolo</strong>-<strong>IV</strong> unit’s Ethernet port. Seethe inst ructions below titled “USB-to-Ethernet Connection”, for additionaldetails.10. Configure the Suspect’s PC or Notebook BIOS to boot from its CD-ROM orDVD drive. Most BIOS have a section titled “Boot Order” to perform thisfunction.NOTE:Various PC or Notebook BIOS require deferent key <strong>com</strong>binations atboot up to change the default Boot Order. It is the user’sresponsibility to correctly setup the Suspect’s PC or Notebook BIOS.11. Insert the <strong>LinkMASSter</strong> Bootable CD and allow the Suspect’s PC or Notebookto boot from the <strong>LinkMASSter</strong> CD.12. After “Initializing the Environment”, the <strong>LinkMASSter</strong> application will display aprompt indicating “Do you want to prepare a USB Flash?” Select “NO” tocontinue.13. The <strong>LinkMASSter</strong> Network Capture Agent Screen is display with the<strong>com</strong>puter’s detected drive information.14. Select Detect Drives from the <strong>IMSolo</strong>-<strong>IV</strong> <strong>Forensic</strong>s Advanced InterfaceControl Console screen. The Suspect drive, located in the Suspect’s<strong>com</strong>puter, will be listed in the Source Drive panel list and the Evidence drivewill be listed in the Destination Drives panel list.15. Select START to begin the operation.Operational status information will bedisplayed during an operation.
16. After the operation <strong>com</strong>pletes, the Evidence drive will be powered OFF andthe can be safely removed. Remove the <strong>LinkMASSter</strong> CD from the Suspect’s<strong>com</strong>puter prior to powering OFF the <strong>com</strong>puter. The simulated drive statusLEDs will be set to GREEN if the operation passes or RED if the operationfails. Log files will automatically be stored internally and can be transferred toexternal media using the unit’s USB ports, located on the back of the unit.NOTE:Prior to saving logs to external media, disable the DETECT REMOTEDR<strong>IV</strong>ES function from the Drive Selection Panel.Menu ItemCOMMON SETTINGSSingle Capture SettingsTable 1SettingOperational ModesSingle CaptureBad Sector HandlingLog and SkipWrite-VerifyDisable (Optional)Readback-HashEnable (Optional)Transfer Buffer Size (64KB)10– Located under ProgramSettingsHashing Methods CRC32: OFFMD5: OFFSHA1: OFFSHA2: ONMenu ItemLinuxDD Capture SettingsTable 2SettingOperational ModesLinuxDD CaptureBad Sector HandlingLog and SkipWrite-VerifyDisable (Optional)Readback-HashEnable (Optional)Transfer Buffer Size (64KB)10– Located under ProgramSettingsHashing Methods CRC32: OFFMD5: OFFSHA1: OFFSHA2: ONFile Size 4000
The <strong>IMSolo</strong>-<strong>IV</strong> <strong>LinkMASSter</strong> Option will also include a Gigabit USB-to-EthernetNetwork Adapter (CSAR-0265-000A) to allow connecting to a Notebook or PCwhich does not have an Ethernet port, or if drivers are unavailable for the<strong>com</strong>puter’s network interface. For improved performace, the Gigabit USB-to-Ethernet Network Adapter would also be re<strong>com</strong>mended when connecting to aNotebook or PC which uses an Ethernet interface that offers less than a1 Gigabit connection.NOTE:USB-to-Ethernet ConnectionWhen using the Gigabit USB-to-Ethernet Network Adapter, connect theEthernet connector to the <strong>IMSolo</strong>-<strong>IV</strong> unit and connect the USB connectorto the <strong>com</strong>puter.1. Connect the <strong>ICS</strong> supplied Crossover Ethernet Cable to the <strong>IMSolo</strong>-<strong>IV</strong> unit’sEthernet port.2. Connect the Crossover Ethernet Cable to the Gigabit USB-to-EthernetNetwork Adapter.3. Connect the <strong>ICS</strong> supplied USB 8” Cable to the Gigabit USB-to-EthernetNetwork Adapter.4. Connect the USB 8” Cable to the Notebook/PC USB port.Connect to<strong>IMSolo</strong>-<strong>IV</strong>Connect toPC
USB <strong>LinkMASSter</strong> SetupThe <strong>LinkMASSter</strong>-<strong>NET</strong> CD provides the function to configure a bootable USBFlash device for <strong>LinkMASSter</strong> usage. Use of a USB Flash device may benecessary if the <strong>com</strong>puter does not have a CD or DVD drive.1. Connect a spare USB Flash Drive 1 to your PC or Notebook.2. Insert the <strong>LinkMASSter</strong> Bootable CD and allow the PC or Notebook to bootfrom the <strong>LinkMASSter</strong> CD.3.4.5.After “Initializing the Environment”, the <strong>LinkMASSter</strong> application will display aprompt indicating “Do you want to prepare a USB Flash?” Select ‘Y’ tocontinue.The USB Flash Drive will be detected and its information will be displayed.Verify that the correct device is listed and select ‘YES’ to the promptindicating “Format this Disk?”The USB Flash Disk will be formatted and the <strong>LinkMASSter</strong> image will betransferred from the CD to the USB Flash Disk. The USB Flash Disk hasbeen prepared for <strong>LinkMASSter</strong> usage. Press a key to power-OFF the<strong>com</strong>puter.USB <strong>LinkMASSter</strong> Usage1. Follow the <strong>LinkMASSter</strong> <strong>Quick</strong> <strong>Start</strong> Steps 1-9, previously outlined.2. Connect the <strong>LinkMASSter</strong> USB Flash Drive to the Suspect’s PC or Notebook.3. Configure the Suspect’s PC or Notebook BIOS to boot from the USB FlashDrive.NOTE: Various PC or Notebook BIOS require deferent key <strong>com</strong>binations atboot up to change the default Boot Order. It is the user’sresponsibility to correctly setup the Suspect’s PC or Notebook BIOS.4. Allow the Suspect’s PC or Notebook to boot from the <strong>LinkMASSter</strong> USBFlash Drive.5. Follow the <strong>LinkMASSter</strong> <strong>Quick</strong> <strong>Start</strong> Steps 13-16, previously outlined.1 The USB Flash Drive is not supplied with the <strong>LinkMASSter</strong> Option