TRU9488 - at Uniden
TRU9488 - at Uniden
TRU9488 - at Uniden
- No tags were found...

You also want an ePaper? Increase the reach of your titles
YUMPU automatically turns print PDFs into web optimized ePapers that Google loves.
DENSS<strong>TRU9488</strong>
ContentsWelcome....................................................................... 4Accessibility.............................................................. 4Terminology used in this Manual.............................. 5Product Overview........................................................ 6<strong>TRU9488</strong> Fe<strong>at</strong>ures:.................................................. 6Answering Machine Fe<strong>at</strong>ures:.................................. 6<strong>TRU9488</strong> - Parts of the Phone................................. 7Using the Interface....................................................... 9Reading the Handset Display................................... 9Reading the Base Display...................................... 10Using the Four-way Function Key.......................... 12Using the Handset and Base Menus...................... 12Entering Text from your Phone............................... 13Installing the Phone................................................... 14Choosing the Best Loc<strong>at</strong>ion................................... 14Installing the Rechargeable B<strong>at</strong>tery....................... 14Charge the Cordless Handset................................ 15Connecting the Base.............................................. 16Installing the Belt Clip............................................. 17Connecting to the Phone Line ............................... 17Testing the connection............................................ 17Changing the Dial Mode......................................... 18Basic Setup................................................................ 19Selecting a Language............................................. 19Setting the D<strong>at</strong>e and Time...................................... 19Activ<strong>at</strong>ing Caller ID on Call Waiting and .Call Waiting Deluxe................................................ 20Activ<strong>at</strong>ing Personal Ring (Handset only)................ 20Activ<strong>at</strong>ing the Key Touch Tone............................... 21Adjusting the Display (LCD Contrast)..................... 21Adding Accessory Handsets.................................... 22Comp<strong>at</strong>ible Handsets............................................. 22Registering TCX905 Accessory Handsets, or .Other Comp<strong>at</strong>ible Handsets................................... 23Resetting the Handsets............................................. 24Base Unavailable (Handset Only).......................... 24Setting up the Phonebook ........................................ 25Cre<strong>at</strong>ing Phonebook Entries.................................. 25Finding a Phonebook Entry.................................... 27Editing Phonebook Entries..................................... 27Storing Caller ID or Redial Numbers in the .Phonebook............................................................. 27Erasing Phonebook Entries.................................... 28Deleting All Phonebook Entries ............................. 28Copying Phonebook Entries to another St<strong>at</strong>ion..... 29Customizing Your Phone........................................... 30Changing the Handset Banner............................... 30
Selecting a Ring Tone (Handset only).................... 31Activ<strong>at</strong>ing AutoTalk (Handset only)......................... 32Activ<strong>at</strong>ing Any Key Answer (Handset only)............ 32Using your Phone...................................................... 33Power Failure Oper<strong>at</strong>ion........................................ 33Making a call from the Phonebook......................... 35Chain Dialing from the Phonebook......................... 35Making a Call with Speed Dial................................ 35Switching to the Handset Speakerphone .during a Call........................................................... 36Using Caller ID, Call Waiting and Redial Lists........ 36Using the Caller ID List .......................................... 36Making a call from a Caller ID Record.................... 37Deleting Caller ID Numbers ................................... 37Using Call Waiting and Call Waiting Deluxe........... 38Redialing a Number................................................ 39Deleting a Redial Record....................................... 39Adjusting the Ringer, Earpiece and .Speaker Volume......................................................... 40Adjusting the Ringer Volume ................................. 40Adjusting the Speaker Volume .............................. 40T-coil (Handset only).............................................. 40Finding a Lost Handset............................................. 41Using Hold, Conference and Transfer...................... 41Placing a Call on Hold............................................ 41Conferencing.......................................................... 41Transferring a Call.................................................. 42Answering a Transferred Call ................................ 42Using Special Fe<strong>at</strong>ures............................................. 43Do Not Disturb (All Calls)....................................... 43Muting the Ringer (One Call Only)......................... 43Muting the Microphone........................................... 43Privacy Mode.......................................................... 43Using the DirectLink Fe<strong>at</strong>ure.................................. 44Intercom................................................................. 45Room/Baby Monitor................................................ 46Tone Dialing Switch Over....................................... 47Installing the Optional Headset.............................. 48Seven-Digit Dialing................................................. 48Inuse Line Setup (Base only)................................. 48Setting Up the Answering Machine.......................... 49Fe<strong>at</strong>ures................................................................. 49Using the Answering Machine Interface................. 50Selecting the Language.......................................... 50Your Greeting......................................................... 51Setting the Number of Rings.................................. 53Setting the Record Time (or Announce Only)......... 53
Activ<strong>at</strong>ing the Message Alert ................................. 54Activ<strong>at</strong>ing Call Screening ...................................... 54Setting a Security Code or .Personal Identific<strong>at</strong>ion Number (PIN)..................... 54Using the Answering Machine.................................. 55Turning your Answering Machine On and Off......... 55Reviewing Messages............................................. 56Screening Calls...................................................... 58Recording a Convers<strong>at</strong>ion...................................... 59Recording a Voice Memo....................................... 60Message Alert......................................................... 61Remotely Oper<strong>at</strong>ing Your Answering Machine....... 62Maintenance............................................................... 64Specific<strong>at</strong>ions......................................................... 64Power Failures....................................................... 64B<strong>at</strong>tery Replacement and Handling ....................... 65Cleaning the B<strong>at</strong>tery Contacts................................ 65Low B<strong>at</strong>tery Alert ................................................... 66Talk and Standby Times......................................... 66Troubleshooting......................................................... 67Resetting the Handset............................................ 67Resetting the Handset without the Base................ 68Changing the Digital Security Code....................... 68Traveling Out of Range.......................................... 68Common Issues..................................................... 69Liquid Damage .......................................................... 72Precautions! .............................................................. 73Rechargeable Nickel-Metal-Hydride .B<strong>at</strong>tery Warning ..................................................... 73The FCC Wants You To Know ............................... 75I.C. Notice............................................................... 76One Year Limited Warranty....................................... 77Index............................................................................ 78Remote Oper<strong>at</strong>ion Card......................................... 80
WelcomeThank you for purchasing a <strong>Uniden</strong> Multi-Handset phone.Note: Illustr<strong>at</strong>ions in this manual are used for explan<strong>at</strong>ion purposes. Some illustr<strong>at</strong>ions in this manual may differ fromthe actual unit.<strong>Uniden</strong>; is a registered trademark of <strong>Uniden</strong> America Corpor<strong>at</strong>ion. AutoStandby, DirectLink, IntegriSound and RandomCode are trademarks of <strong>Uniden</strong> America.Accessibility<strong>Uniden</strong> provides a customer service hotline for accessibility questions. If you have a disability and need customerservice assistance or if you have any questions about how <strong>Uniden</strong>’s products can accommod<strong>at</strong>e persons with disabilities,please call the accessibility voice/TTY line: 1-800-874-9314.A represent<strong>at</strong>ive is available to talk to you M-F, 8:00 am to 5:00 pm, CST. After hours, you can leave us a message,and we will call you back. Inform<strong>at</strong>ion is also available on our website, www.uniden.com, under the “Accessibility”link.
Product Overview<strong>TRU9488</strong> Fe<strong>at</strong>ures:•••••••5.8GHz DSS Expandable SystemExpands up to 10 HandsetsIntegr<strong>at</strong>ed Digital Answering MachineCaller ID/Call Waiting DeluxeBase Corded Handset with Base KeypadCordless Handset and ChargerAdvanced Phonebook Fe<strong>at</strong>ures:•••••Store Up to 100 Names for each st<strong>at</strong>ionStore Up to 2 Numbers per Name (200 #’sTotal)Alphabetical SearchPersonalized Ring by PartyTransfer Single Listing or Entire PhonebookAnswering Machine Fe<strong>at</strong>ures:•••••Digital Tapeless RecordingUp to 12 Minutes of Recording TimeCall ScreeningPersonal or Pre-recorded Outgoing MessagesTrilingual Voice Prompts for Menu Setup (English,Spanish and French)•••••••••••••••••DirectLinkRoom/Baby MonitoringSpeakerphones on Base & Handset20 Ringer Options on Handset (10 Tones/10Melodies)10 Speed Dial NumbersLast 3 Number RedialTrilingual Menu Displays (English, Spanish andFrench)Call TransferConferencingIntercomDay and Time AnnouncementRemote Message RetrievalToll SaverConvers<strong>at</strong>ion RecordingVoice MemoMessage AlertRecords Up to 59 messages
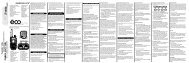
<strong>TRU9488</strong> - Parts of the PhoneThe following illustr<strong>at</strong>ions show you all of the different parts of your phone.Handset12345678910111213147 82 abc35 6ghi jkl mno09defpqrs tuv wxyztoneoperint , comredialspeaker hold pause141516171819202122.2.3.4.5.6.7.8.9.0..2.3.4.5.6.7.8.9.20.2.22.Handset AntennaHeadset Jack CoverBeltclip HoleSpeakerphone Speaker and RingerHandset B<strong>at</strong>tery CompartmentNew Message lightHandset EarpieceHandset DisplaySoft keys[ /flash] (talk/flash) key[ ] (phonebook) key[ tone] key[ ] (speaker) key[ ] (up) key[ ] (end call) key[ ] (caller ID) key[ ] (down) key[#] key[redial/pause] key[int’com/hold] (intercom/hold) keyHandset MicrophoneHandset Charging Contacts
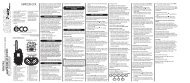
Parts of the Answering Machine Base26 27 28 2940 412330312432333435Answering Machine Keysrepe<strong>at</strong> skip answer on/off23.24.25.26.27.28.29.30.3.32.2539 38Base Corded HandsetBase SpeakerCurl CordBase DisplaySoft Keys[ ] (phonebook) key[ ] (up) key[ ] (caller ID) key[ ] (down) key[dnd] (do not disturb) key and light37 3633.34.35.36.37.38.39.40.4.exit/play stopdelete[int'com/hold] (intercom/hold) key[flash/find handset] key[ ] (speaker) key and speaker lightBase Microphone[#] key[ tone] keyin use lightDC IN 9V JackTEL LINE Jack
Using the Four-way Function KeyYour handset and the base have a four-way function key th<strong>at</strong> allowsyou to move the cursor (or highlighted area) on the display and accessthe most commonly used fe<strong>at</strong>ures <strong>at</strong> the touch of a button. Bymoving this key to the left, you open the Phonebook. Move the keyto the right to access Caller ID inform<strong>at</strong>ion. To use this four-way key,place your thumb over the key on the st<strong>at</strong>ion and move to the fourpositions to get the feel of how it moves and oper<strong>at</strong>es.Using the Handset and Base MenusTo open the menu, press the MENU soft key. Highlight the option youwant by pressing the four-way function key. This will move the cursor;the option currently highlighted appears in reversed out text. SelectView thephonebookFour-wayFunction Key1 2 abc3the highlighted option by pressing the OK soft key. To exit the menuDownand return to standby, press [ ] on the handset and [ /exit] on thebase.If you do not press a key within 30 seconds, the phone will time out and exit the menu. When setting D<strong>at</strong>e and Time,the time-out period is extended to two minutes.Note: For GLOBAL SETUP and DEREGISTRATION menu options, make sure the line is not in use and the handsetsare within range of the base.UpdefView theCaller ID12
Installing the PhoneChoosing the Best Loc<strong>at</strong>ionWhen choosing a loc<strong>at</strong>ion for your new phone, here are some important guidelines you should consider:•••••••••The loc<strong>at</strong>ion should be close to both a phone jack and a continuous power outlet (one whichis not connected to a switch).The base and handset should be kept away from sources of electrical noise such as motors,microwave ovens, and fluorescent lighting.For better reception, place the base as high as possible.The base should be placed in an open area for optimum range and reception.If your home has wired alarm equipment connected to a phone line, be sure th<strong>at</strong> installingthe system does not disable your alarm equipment. If you have questions about wh<strong>at</strong> willdisable alarm equipment, contact your telephone company or a qualified installer.Note: For maximum range:Keep the antenna free of obstruction.When the handset is not in use, place the handset in an upright position.Do not hold the handset where you would block the signal.Metal and reinforced concrete may affect cordless telephone performance.Installing the Rechargeable B<strong>at</strong>teryUse only the <strong>Uniden</strong> BT-446 or BT-1005 rechargeable b<strong>at</strong>tery pack supplied with your cordless telephone.Follow the steps below to install a b<strong>at</strong>tery:)2)3)Press in on the handset b<strong>at</strong>tery case cover (use the finger indention for a better grip) and slide the coverdownward to remove.Plug the b<strong>at</strong>tery cable into the b<strong>at</strong>tery jack. Be sure to m<strong>at</strong>ch the red and black wires to the label near thejack. The cable should snap into place. Gently pull on the b<strong>at</strong>tery cable. If the b<strong>at</strong>tery connector comes lose,try connecting again until the b<strong>at</strong>tery snaps into place.Place the b<strong>at</strong>tery case cover back on the handset and slide it upwards until it clicks into place.14CorrectIncorrect
Charge the Cordless HandsetThe cordless handset is powered by a rechargeable b<strong>at</strong>tery pack. The b<strong>at</strong>tery recharges autom<strong>at</strong>ically when thehandset is placed in the charger.)2)3)Connect the AC adapter to the DC IN 9V jack and to a standard120V AC wall outlet.Set the charger on a desk or tabletop, and place the handset inthe charger with the keypad facing forward.Make sure th<strong>at</strong> the charge light illumin<strong>at</strong>es. If the light doesnot illumin<strong>at</strong>e, check to see th<strong>at</strong> the AC adapter is plugged inand the handset makes good contact with the base chargingcontacts.4)Charge the handset b<strong>at</strong>tery pack for <strong>at</strong> least 15-20 hours beforeusing your new cordless telephone for the first time.15
Connecting the Base)2)3)4)Connect the handset curly cord to the left side of the phoneand the base corded handset.Note: Your phone has a slot to route the curly cord in the bottomof the base.Connect the AC adapter to the DC IN 9V jack.Connect the AC adapter to a continuous power supply (i.e.,an outlet th<strong>at</strong> is not controlled by a switch).Set the base on a desk or tabletop. Place the base cordedhandset on the base.16
Installing the Belt Clip)2)Line up the holes on each side of the handset. To <strong>at</strong>tach the belt clip, insert into the holes oneach side of the handset. Press down until it clicks.To remove the belt clip, pull either side of the belt clip to release the tabs from the holes.Connecting to the Phone LineOnce the handset b<strong>at</strong>tery pack is fully charged, connect thelong telephone line cord to the TEL LINE jack and to a telephoneoutlet.Testing the connectionTo test your connection, try making a call. If your call connects, the settings are fine. If your call does not connect,check the following:)2)3)Check the AC adapter cord. Make sure it is securely connected to the DC IN connector and to a standard ACpower outlet.Check to make sure the b<strong>at</strong>tery is fully charged. (If you don’t see the “b<strong>at</strong>tery full” icon, check to make surethe b<strong>at</strong>tery is properly connected.)Change dial mode (instructions on page 18).17
Changing the Dial ModeYour phone can communic<strong>at</strong>e with the telephone network in two different ways: tone dialingor pulse dialing. These days, most phone networks use a method called tone dialing,so your phone comes programmed for tone dialing. If your phone company uses pulse dialing,you will need to change your phone’s dial mode. If you cannot connect to the telephonenetwork, please follow the steps below to modify your phone’s settings:)2)3)Dial ModeTonePulseBACK DELETE OKPress the MENU soft key. Select the GLOBAL SETUP menu, and then the DIAL MODE submenu.Press [ ] on the four-way function key to select PULSE. (The initial setting is Tone).Press the OK soft key. You will hear a confirm<strong>at</strong>ion tone.If you ever need to change the dial mode back to Tone, follow the same procedure, but select TONE in step 2.18
Basic SetupSelecting a LanguageYour phone supports three languages: English, French and Spanish. Once you select alanguage, the menus on the phone will display in th<strong>at</strong> language. The default language isEnglish.)2)3)Press the MENU soft key. Select the HANDSET SETUP or BASE SETUP menu,and then the HANDSET LANGUAGE or BASE LANGUAGE submenu.Move the cursor to choose ENGLISH, FRANÇAIS (French), or ESPAÑOL (Spanish).Press the OK soft key. You will hear a confirm<strong>at</strong>ion tone.Setting the D<strong>at</strong>e and TimeTo change the day and time shown in the display, follow the steps listed below.Note: If you don’t press any keys for two minutes when setting the d<strong>at</strong>e and time, thephone will exit the menu.)2)3)Handset LanguageEnglishFranユaisBACKOKBase LanguageEnglishFranユaisBACKOKD<strong>at</strong>e & Time01/01/200612:00AM[*=AM/PM]BACKSAVEPress the MENU soft key. Select the GLOBAL SETUP menu, and then the DATE & TIME submenu.Use the four-way key to move the cursor to highlight the month, day, year, hours, and minutes. .To change, press the number keypad.To select AM or PM, press [ tone] , then press the SAVE soft key. You will hear a confirm<strong>at</strong>ion tone.19
Activ<strong>at</strong>ing Caller ID on Call Waiting and Call Waiting DeluxeYour phone supports Caller ID on Call Waiting (CIDCW), so you can see the name andnumber of someone who calls when you’re already on the line. Your phone also supportsCall Waiting Deluxe (CWDX), which gives you a choice of how you want to handle a waitingcall. You’ll need to subscribe to these fe<strong>at</strong>ures with your phone company before youcan use them. To let your phone support these fe<strong>at</strong>ures, follow the steps below:See page 38 for instructions on using Call Waiting Deluxe.)2)3)4)Press the MENU soft key. Select the GLOBAL SETUP menu, and then the CALL WAITING submenu.Move the cursor to select ON or OFF.If you select ON, CALL WAIT DELUXE submenu appears. Move the cursor to select ON or OFF.Press the OK soft key. You will hear a confirm<strong>at</strong>ion tone.Activ<strong>at</strong>ing Personal Ring (Handset only)You can assign special ring tones to anyone in your phonebook. When your phone gets a call, it looks up the CallerID inform<strong>at</strong>ion in your phonebook. If you’ve assigned a personal ring to th<strong>at</strong> number, the phone uses it so you knowwho is calling. To turn on personal ring, follow these steps:)2)3)Call WaitingOnOffBACK DELETE OKPress the MENU soft key. Select the HANDSET SETUP menu, and then the PERSONAL RING submenu.Move the cursor to select ON or OFF.Press the OK soft key. You will hear a confirm<strong>at</strong>ion tone.20
Activ<strong>at</strong>ing the Key Touch ToneKey Touch Tone is the tone your keypad makes when keys are pressed. You can turn thistone on or off.)2)3)Press the MENU soft key. Select the HANDSET SETUP or BASE SETUP menu,and then the KEY TOUCH TONE submenu.Move the cursor to select ON or OFF.Press the OK soft key. You will hear a confirm<strong>at</strong>ion tone.Adjusting the Display (LCD Contrast)Contrast adjusts the handset and base display brightness. Choose from one of the 10levels for optimum viewing.)2)3)Press the MENU soft key. Select the HANDSET SETUP or BASE SETUP menu,and then the LCD CONTRAST submenu.Press [ / ] on the four-way function key to adjust the contrast of the display.Press the OK soft key. You will hear a confirm<strong>at</strong>ion tone.Key Touch ToneOnOffBACK DELETE OKLCD Contrast‐ +BACKOK21
Adding Accessory HandsetsYour phone supports up to ten (10) handsets, including any handsets supplied with your phone. Accessory handsetsdo not need to be connected to a phone jack. You can now place a fully-fe<strong>at</strong>ured cordless handset anywhere ACpower is available to connect the handset charger.Comp<strong>at</strong>ible HandsetsYour phone is comp<strong>at</strong>ible with the following <strong>Uniden</strong> 5.8 GHz Digital Accessory Handsets: TCX805, TCX905,TCX400, TCX440, TWX977 and ELX500. Please visit our website <strong>at</strong> www.uniden.com for the most up-to-d<strong>at</strong>e list ofcomp<strong>at</strong>ible handsets. If you purchase an accessory or extra handset, you must register the handset to the original ormain base before use. Accessory handsets will not oper<strong>at</strong>e until they are registered.22
Registering TCX905 Accessory Handsets, or Other Comp<strong>at</strong>ible HandsetsIf you purchase an accessory handset, you need to register the handset before use. Only one handset can be registered<strong>at</strong> a time. Handsets supplied with the phone are registered to the base by the factory. When charged, preregisteredhandsets display a handset ID number. Handsets th<strong>at</strong> have not been registered display MODELS VARY!PLACE HANDSET ON THE BASE FOR REGISTRATION OR REFER TO OWNER’S MANUAL. (If an accessoryhandset has ever been registered to a base, you must reset the handset before you can register it to a new base.See Resetting the Handsets on page 24.)When you register an extra handset to the base, the handset ID will be assigned.Models vary!Place Handseton the base forregistr<strong>at</strong>ion↔ or refer toOwner's Manual)2)3)4)5)Before registering the TCX905 or other extra handset, the b<strong>at</strong>tery pack MUST be charged for 15-20 hours.With the base in standby, press the MENU soft key.Move the cursor to select REGISTER HANDSET. Press the OK soft key.On handset,press & hold "#"On the handset, press and hold [#] until you hear a beep.key for 2secCANCELWhile the handset is registering, HANDSET REGISTERING will appear in the display..When REGISTRATION COMPLETE. is displayed; the handset has been registered to the base. .If REGISTRATION FAILED. appears, please try these steps again.23
Resetting the HandsetsIf you want to register a handset to a different base or replace a handset with another one, you must first clear theexisting registr<strong>at</strong>ion d<strong>at</strong>a. To clear, please follow these steps:)2)Press the MENU soft key. Select the DEREGISTERATION menu.ARE YOU SURE? appears. Move the cursor to select YES. Press the OK softkey.Are You Sure?YesNoBACK DELETE OKTo clear other handset inform<strong>at</strong>ion, please follow these steps:) From the handset, press and hold [ ] and [#] for more than 5 seconds. Select the DEREGISTER HS submenu.2) Move the cursor to select the handset ID to be de-registered from the list, andDeregister HSYesthen press the OK soft key.No3) DEREGISTER HS appears. Move the cursor to select YES. Press the OK softkey.BACK DELETE OK4) ARE YOU SURE? appears. Move the cursor to select YES, and then press the OK soft key. You will hear aconfirm<strong>at</strong>ion tone.Base Unavailable (Handset Only)To clear the base registr<strong>at</strong>ion d<strong>at</strong>a in the handset, please follow these steps:)2)3)Press and hold [ ] and [#] for more than 5 seconds. Select .the BASE UNAVAILABLE submenu.BASE UNAVAILABLE appears. Move the cursor to select YES, and then press theOK soft key.ARE YOU SURE? appears. Move the cursor to select YES. Press the OK soft key.Base UnavailableYesNoBACK DELETE OK24
Setting up the PhonebookYour phone allows you to store up to 2 numbers per name and up to 100 names in your handset and base phonebook.Your phone shares memory between your phonebook and CID with a total of 100 entries which are not usedup by the 2 phone numbers th<strong>at</strong> can be stored per 1 name entry. Once you store 100 phonebook entries, CID inform<strong>at</strong>ionwill not be stored and will only display <strong>at</strong> time of new incoming calls. When Phonebook entries are full, youwill hear a beep and MEMORY FULL appears. You cannot store any additional names and numbers unless you deletesome of the existing ones.You can also use the phonebook or speed dial loc<strong>at</strong>ions to store a group of numbers (up to 32 digits) th<strong>at</strong> you mayneed to enter once your call connects. This is referred to as Chain Dialing. (See page 35 for instructions.)Cre<strong>at</strong>ing Phonebook EntriesTo store names and numbers in your Phonebook, please follow these steps:)2)3)When the phone is in standby mode, press [ ] (on the left side of the four-way key).To cre<strong>at</strong>e a new phonebook entry, press the NEW soft key. Edit Name appears.Enter the name for this entry (Edit Name)..Use the keypad to enter a name for this entry; the name can contain up to 16characters. (See page 13 for instructions on entering text.) If you do not want toenter a name for this entry, your phone will store this entry as No Name. Press theOK soft key when you are finished.Total: 0Search[A‐Z/ / ]BACK OPTIONS NEW。BACKEdit NameOK25
4) Enter the number for this entry (Edit Number 1)..Once you have stored a name, EDIT NUMBER1 appears next. Use the numberEdit Number1keypad, [right] or [left] on the four-way function key, or the DELETE soft key to。enter the phone number 1; the phone number can contain up to 32 digits. If youneed the phone to pause between digits when it’s dialing (for example, to enter anBACKOKextension or an access code), press [redial/pause] on the handset or the PAUSE soft key on the base toinsert a two-second pause. You will see a P in the display. You can also use more than one pause together iftwo seconds is not long enough. Each pause counts as one digit. Press the OK soft key when you arefinished. .EDIT NUMBER2 appears next. Use the same procedure when entering the phone number 1 to enter thephone number 2. Press the OK soft key when you are finished.5) Assign a personal ring tone for this entry (Personal Ring) (Handset only)..You can <strong>at</strong>tach a personalized ring tone to each phonebook entry; the phone willuse this ring tone when this person calls. Move the cursor to highlight one of thePersonal RingNo SelectionFlicker20 different ring tone options. As you highlight each ring tone, you will hear aBACK DELETE OKsample of th<strong>at</strong> tone. When you hear the ring tone you want to use, press the OKsoft key. If you do not want to use a personal ring tone for this phonebook entry, select the NO SELECTIONoption, and the phone will use your standard ring tone setting.6) Assign this entry to a Speed Dial number (Speed Dial)..Speed DialYour phone has 10 speed dial numbers, 0 to 9. Move the cursor to select theNo Selectionspeed dial number you want to assign to this phonebook entry, and press the OKSPD1:Emptysoft key. Select NO SELECTION if you do not want to assign this entry to a speeddial number.BACK DELETE OK7) You will hear a tone confirming th<strong>at</strong> the new phonebook entry has been stored, and DONE! appears in thedisplay.Note: When the shared memory is full, the oldest Caller ID message is overwritten.26
Finding a Phonebook EntryPhonebook entries are stored in alphabetical order. To scroll through the phonebook, press [ ] and then press .[ ] or [ ] on the four-way function key. Press and hold [ ] or [ ] on the four-way function key to scroll through thedisplay quickly. When viewing the phonebook entry, use the [→] soft key or [right] on the four-way function key todisplay the DIAL NUMBER 2. To show the personal ring and speed dial, press the [→] soft key or [right] on the fourwayfunction key.You can also use the letters on the number keys to jump to a name th<strong>at</strong> starts with th<strong>at</strong> letter. Press [ ] and a numberkey (0, 2-9) once for the first letter, twice for the second letter, and so on. The phonebook jumps to the first entryth<strong>at</strong> begins with the letter you entered; you can then use [ ] or [ ] on the four-way function key to scroll to other entries.For example, to search for an entry beginning with the letter M, press 6 once.To close the phonebook, press [ ] on the handset or [ /exit] on the base. If you are looking up a phonebook entryduring a call and want to close the phonebook, press the BACK soft key instead of [ ].Editing Phonebook Entries)2)3)4)Press [ ] to open.Use [ ] or [ ] on the four-way function key to scroll through the phonebook entries. When you come to theentry you want to edit, press the OPTIONS soft key.Move the cursor to select EDIT SELECTION submenu. Press the OK soft key.Follow the steps for Cre<strong>at</strong>ing Phonebook Entries on page 25. If you do not wish to change the inform<strong>at</strong>ion <strong>at</strong>any step, simply press the OK soft key to go to the next step.Storing Caller ID or Redial Numbers in the PhonebookYou can store Caller ID or redial numbers in the phonebook so you can use them l<strong>at</strong>er. Go to the Caller ID or rediallist and select the number you want to store. (If the Caller ID inform<strong>at</strong>ion did not include the number, then you will notbe able to store it.))When the phone is in standby, press [ ] (on the right side of the four-way key) to open the Caller ID list, orthe REDIAL soft key on the handset or the base or [redial/pause] on the handset to open the redial list.27
2) Use [ ] or [ ] on the four-way function key to scroll through the Caller ID records or redial numbers. Whenyou come to the inform<strong>at</strong>ion you want to store, press the STORE soft key. < ADD TO PHONEBK > appears.3) Move the cursor to select NEW ENTRY or STORE & EDIT to add to an existing phonebook loc<strong>at</strong>ion. Pressthe OK soft key. For the additional phone number, if the phone loc<strong>at</strong>ion is already full, THIS PERSON’SPHONE NUMBER MEMORY IS FULL. appears in the display. The number will not be stored.Follow the steps for Cre<strong>at</strong>ing Phonebook Entries on page 25.Note: If the Caller ID message was received as a priv<strong>at</strong>e or unknown number, or the message does not have thenumber, you cannot store the message in the phonebook. If it was received as priv<strong>at</strong>e or unknown name, themessage will be stored as .Erasing Phonebook EntriesYou can erase individual phonebook entries or erase all the phonebook entries <strong>at</strong> once.)2)3)4)5)When the phone is in standby, press [ ].Edit SelectionUse [ ] or [ ] on the four-way function key or the number keypad to select theDelete Selectiondesired phonebook entry, then press the OPTIONS soft key.Move the cursor to select DELETE SELECTION. Press the OK soft key.BACK DELETE OKARE YOU SURE? appears in the display. Select YES, and then press the OK soft key.You will hear a confirm<strong>at</strong>ion tone, and DELETED! appears in the display.Deleting All Phonebook Entries)2)3)When the phone is in standby, press [ ]. Press the OPTIONS soft key.Move the cursor to select DELETE ALL, and press the OK soft key.ARE YOU SURE? appears in the display. Select YES and then press the OK soft key. You will hear a confirm<strong>at</strong>iontone, and DELETED! appears in the display.28
Copying Phonebook Entries to another St<strong>at</strong>ionYou can transfer stored phonebook entries from one handset to another or handset to the base without having to reenternames and numbers. You can transfer one phonebook entry <strong>at</strong> a time or all phonebook entries <strong>at</strong> once.) When the phone is in standby, press [ ].2) Use [ ] or [ ] on the four-way function key or the number keypad to selectCopy Selection3)desired phonebook entry, then press the OPTIONS soft key.Move the cursor to select COPY SELECTION. Press the OK soft key. TO WHICHUNIT? will appear.Edit SelectionBACK DELETE OK4) Scroll through the list until the st<strong>at</strong>ion you wish to copy listings to is highlighted. Press the OK soft key.The phonebook entries will be transferred to the design<strong>at</strong>ed handset or the base. During the copy process, the receivinghandset shows RECEIVING and the Banner name of the sending handset or base. When the transfer iscompleted, DONE! appears.Copying all the phonebook entries <strong>at</strong> once:)2)3)4)When the phone is in standby, press [ ]. Press the OPTIONS soft key.Move the cursor to select COPY ALL. Press the OK soft key. TO WHICH UNIT? will appear.Scroll through the list until the st<strong>at</strong>ion you wish to copy listings to is highlighted. Press the OK soft key.ARE YOU SURE? appears. Select YES or NO. Press the OK soft key.The phonebook entries will be transferred to the design<strong>at</strong>ed handset or the base. During the copy process,the receiving handset shows RECEIVING and the Banner name of the sending handset or base. When thetransfer is completed, DONE! appears.Note:• If your Phonebook contains 100 entries, you cannot store any new phonebook entries. You will hear abeep, and NOT ENOUGH MEMORY IN RECEIVING UNIT appears on the display.• If the selected handset is out of range or d<strong>at</strong>a transfer is canceled, UNAVAILABLE appears in the display.Phonebook listings will not be transferred.29
Customizing Your PhoneChanging the Handset BannerEach handset will display a banner name once it is registered to the base.The default banner is Handset #1, Handset #2, etc. You can change the name yourphone displays by changing the banner display. If you have more than one handset, youcan use the banner name to identify your handset during handset-to-handset functionslike intercom and DirectLink. The banner lets you customize the name your handset displays.The name will be displayed on the screen during Standby, Intercom, Intercom Hold, Room/Baby Monitor, andCopy Phonebook oper<strong>at</strong>ions. The banner name will be displayed on the receiving handset as well.)2)3)4)Banner DisplayMoms'phone #1BACK DELETEOKPress the MENU soft key.Select the HANDSET SETUP menu, and then the BANNER DISPLAY submenu.Use the keypad or the DELETE soft key to enter or edit the banner name. (See page 13 for detailed instructionson entering text.)Press the OK soft key. You will hear a confirm<strong>at</strong>ion tone.30
Selecting a Ring Tone (Handset only)You may choose from 10 melodies or 10 tones for your phone’s primary ring tone. Each st<strong>at</strong>ion can use a differentring tone or melody. The available ring tones are listed below:MelodiesBeethoven’s Symphony #9 [Beethoven9]For Elise [Elise]We Wish You A Merry Christmas [Merry- Xmas]Home Sweet Home [Hm Swt Hm]Lorri Song #6 [Lorri Song]When the Irish Eyes Are Smiling [Irish Eyes]Aura LeeLet Me Call You Sweet Heart [Sweetheart]Star Spangled Banner [Star Spngl]Old MacDonald [Old MacDld]RingersFlickerCl<strong>at</strong>terSoft AlertWake UpLighting BugBebop (Beep Boop)Tone BoardChirpParty ClapReminder)2)3)Press the MENU soft key. Select the HANDSET SETUP menu, and then the RINGER TONES submenu.Move the cursor to highlight a ring tone. As each ring tone is highlighted, you willRinger Toneshear a sample of the ring tone.FlickerWhen you hear the tone you want to use, press the OK soft key. You will hear aCl<strong>at</strong>terBACK DELETE OKconfirm<strong>at</strong>ion tone.31
Activ<strong>at</strong>ing AutoTalk (Handset only)AutoTalk allows you to answer the phone simply by removing the handset from the cradle.You do not have to press any keys to answer the call.)2)3)Press the MENU soft keySelect the HANDSET SETUP menu, and then the AUTOTALK submenu.Select ON or OFF, and press the OK soft key. You will hear a confirm<strong>at</strong>ion tone.Activ<strong>at</strong>ing Any Key Answer (Handset only)Any Key Answer allows you to answer the phone by pressing any key in the number keypad.)2)3)Press the MENU soft key.Select the HANDSET SETUP menu, and then the ANY KEY ANSWER submenu.Select ON or OFF, and then press the OK soft key. You will hear a confirm<strong>at</strong>ion tone.OnOffAutoTalkBACK DELETE OKAny Key AnswerOnOffBACK DELETE OK32
Using your PhonePower Failure Oper<strong>at</strong>ionBecause the <strong>TRU9488</strong> is a corded/cordless combin<strong>at</strong>ion phone, it can still perform several of its functions during apower failure. The following fe<strong>at</strong>ures will function even during a power failure;• Making and receiving calls with the base corded handset• Adjusting the volume on the main base• DirectLink fe<strong>at</strong>ureAll other fe<strong>at</strong>ures are disabled during a power failure.From the basespeakerphoneFrom the base .corded handsetFrom a cordlesshandsetFrom a handsetspeakerphoneMaking acall)2)3))2)Press [ ].Listen for the dialtone.Dial the number.ORDial the Number.Press [ ].)2)3)Pick up the basecorded handsetfrom the base.Listen for the dialtone.Dial the number.)2)3)4))2)3)Remove thehandset from thecharging cradle.Press [ /flash].Listen for the dialtone.Dial the number.ORRemove thehandset from thecharging cradle.Dial the number.Press [ /flash].)2)3)4))2)3)Remove thehandset from thecharging cradle.Press [ ].Listen for the dialtone.Dial the number.ORRemove thehandset from thecharging cradle.Dial the number.Press [ ].33
From the basespeakerphoneFrom the base .corded handsetFrom a cordlesshandsetFrom a handsetspeakerphoneAnswering acallHanging up) Press [ ].) Pick up the base ) Pick up the handset.) Pick up the hand-corded handset(If AutoTalkset.from the base.is on, the phonewill answer whenyou remove thehandset from thecharging cradle.)2) Press [ ].2) Press [ /flash]..(If Any Key Answeris on, youcan also pressany number keypad.)) Press [ ].) Return the base ) Press [ ].) Press [ ].corded handset tothe base cradle.34
Making a call from the Phonebook)2)3)Or)2)3)4)When the phone is in standby, press [ ] to open the phonebook.Scroll through the list with the [ ] or [ ] on the four-way function keys until you find the phonebook entry youwant to call. (See Finding a Phonebook Entry on page 27).Press [ /flash] or [ ] on the handset or pick up the base corded handset or [ ] on the base to dial the number.Press [ /flash] or [ ] on the handset or pick up the base corded handset or [ ] on the base.Press [ ] to open the phonebook.Scroll through the list with the [ ] or [ ] on the four-way function keys until you find the phonebook entry youwant to call. (See Finding a Phonebook Entry on page 27).Press the DIAL soft key to dial the number.To insert a 1 in front of a phonebook number to enable long distance dialing, press [ tone]. To remove area code,press [#].Chain Dialing from the PhonebookYou can use the phonebook entries to store a group of numbers (up to 32 digits) th<strong>at</strong> you may need to enter onceyour call connects. Once the call has connected you will then do the following.)2)3)Press [ ].Use [ ] and [ ] to select the phonebook entry you want to dial.Press the DIAL soft key.Making a Call with Speed Dial)2)When the phone is in standby, press and hold the number key [0]-[9] until the assigned phonebook entry appearsin the display.Press [ /flash] or [ ] on the handset or pick up the base corded handset or [ ] on the base to dial the number.35
Switching to the Handset Speakerphone during a Call] on the handset. To switch from a speakerphone call to a nor-To switch a normal call to the speakerphone, press [mal call, press [ ].Using Caller ID, Call Waiting and Redial ListsIf you subscribe to Caller ID from your phone company, your phone will show you the caller’s phone number andname (if available) whenever a call comes in. If you subscribe to both Call Waiting and Caller ID, the phone alsoshows you the name and the number of any call th<strong>at</strong> comes in while you are on the line.Note:• If you answer a call before the Caller ID message is received (for example, before the second ring), the CallerID message may not appear.• When the call is received via a Telephone Company th<strong>at</strong> does not offer Caller ID service, the caller’s phonenumber and name will not appear. (This includes some intern<strong>at</strong>ional calls.)• When the Call is from a PBX (Priv<strong>at</strong>e Branch Exchange), the caller’s phone number and name may not appear,but you may see a main company phone number for th<strong>at</strong> PBX appear.Using the Caller ID ListYou can store up to 100 Caller ID numbers in each handset or the base. Your phone shares up to 100 memory entriesbetween your Phonebook and Caller ID. Once you reach your maximum phonebook entries of 100, Caller ID inform<strong>at</strong>ionwill not be stored (but it will still display when the call comes in).To open the Caller ID list, press [ ] (on the right side of the four-way key). The phone will show the total number ofstored Caller ID records. Use [ ] or [ ] to scroll through the list, or enter a letter on the keypad to jump to the firstcaller ID name th<strong>at</strong> starts with th<strong>at</strong> letter. To scroll quickly through the list, press and hold [ ] or [ ] on the four-wayfunction key.Note: The number of calls from the same Caller ID will appear next to the time to indic<strong>at</strong>e th<strong>at</strong> this is an unread message.Once you view the new message, the number will disappear.36
Making a call from a Caller ID Record)2)3)4)Or)2)3)4)5)When the phone is in standby, press [ ] (on the right side of the four-way key) to open the Caller ID list.Use [ ] or [ ] to find the Caller ID record you want to dial.To add (or delete) a “1” <strong>at</strong> the beginning of the displayed phone number, press [ tone]. To add (or remove) thestored area code, press [#].Press [ /flash] or [ ] on the handset or pick up the base corded handset or [ ] on the base to dial the number.Press [ /flash] on the handset or pick up the base corded handset or [ ] on the handset or [ ] on the base.Press [ ] to open the Caller ID list.Use [ ] or [ ] to find the Caller ID you want to dial.To add (or delete) a “1” <strong>at</strong> the beginning of the displayed phone number, press [ tone]. To add (or remove) thestored area code, press [#].Press the DIAL soft key to dial the number.Deleting Caller ID NumbersTo delete only one Caller ID number, go to the Caller ID list and select the number you want to delete. Press the DE-LETE soft key. When the phone asks you to confirm, select YES.To delete all the Caller ID numbers, go to the Caller ID list and press the DELETE soft key. Select YES when askedif you want to DELETE ALL.Note: When you delete a Caller ID number, you delete it permanently.37
Using Call Waiting and Call Waiting DeluxeIf you have Call Waiting service and a second call comes in when you are on the phone, a call waiting tone willsound. Press [ /flash] on the handset or [flash/find handset] on the base to accept the waiting call. There is a shortpause, and then you will hear the new caller. To return to the original caller, press [ /flash] on the handset or [flash/find handset] on the base.Note: You must subscribe through your telephone provider to receive Call Waiting services.Your phone gives you new options for Call Waiting Deluxe. At the touch of a button, you can place the caller on hold,send them to your voice mail service, or conference them into your current call. You must subscribe to Call Waitingand Call Waiting Deluxe to use these fe<strong>at</strong>ures. Not all fe<strong>at</strong>ures are available in all areas. Check with your telephoneprovider for details.Note:)2)•••To activ<strong>at</strong>e fe<strong>at</strong>ures, select the CALL WAITING submenu and the CALL WAIT DELUXE submenu to ON. Seepage 20.If you don’t choose a CWDX option within 30 seconds, the phone returns to the call.To return to the call, press the BACK soft key.When you receive a Call Waiting call, press the MENU soft key.Move the cursor to CALLWAITDELUXE, and then press the OK soft key.Move the cursor or use the number keypad [1-7] to select an option.3)Ask to Hold — A prerecorded message st<strong>at</strong>es th<strong>at</strong> the user will be available shortly, andthe call is placed on hold.Tell Busy — A prerecorded message tells the caller you are busy, and the waiting call isdisconnected.Forward — The caller is sent to your voice mail box, if available.Answer/Drop — Disconnects the first call, and connects to the new caller.Conference — Starts a conference call with your first and second callers.Drop First/Drop Last — During a conference call, allows you to choose to drop the first or last caller.4) Press the OK soft key. A confirm<strong>at</strong>ion screen will appear, and the phone returns to the call.381:Ask to Hold2:Tell Busy3:ForwardBACK DELETE OK
Redialing a NumberYou can quickly redial the last 3 numbers dialed on each handset and the base.)2)3))2)3)4)Note:With the phone in standby, press the REDIAL soft key on the handset or base or [redial/pause] on the handsetto open the redial list.Use [ / ] to scroll through the redial list.When you find the number you want to dial, press [ /flash] or [ ] on the handset or pick up the base cordedhandset or press [ ] on the base to dial the number.OrPress [ /flash] or [ ] on the handset or pick up the base corded handset or press [ ] on the base to dial thenumber.Press [redial/pause] on the handset or REDIAL soft key on the base to open the redial list.Use [ / ] to scroll through the redial list.Press the DIAL soft key to dial the number.If the number exceeds 32 digits, only the first 32 digits are retained in redial memory.If the redial memory is empty, you will hear a beep.Deleting a Redial RecordIf you want to delete a phone number from the redial list, follow the steps below:)2)3)4)••With the phone in standby, press the REDIAL soft key on the base or handset or [redial/pause] on the handset.Use [ / ] to scroll through the redial list.When you find the redial number you want to delete, press the DELETE soft key.Select YES, and press the OK soft key. The redialed number is deleted.39
Adjusting the Ringer, Earpiece and Speaker VolumeAdjusting the Ringer VolumeYou can choose from three ringer volume settings on the handset and base (off, low,and high). With the phone in standby, use [ / ] on the four-way function keys to adjustthe ringer volume.Adjusting the Speaker VolumeEar speaker: You can choose from six volume levels for the earpiece speaker. To adjustthe earpiece volume while on a call, press [ ] (to make it louder) or [ ] (to makeit softer).Speaker: You can choose from six volume levels for the handset speakerphone andten volume levels for the base speakerphone. To adjust the speaker volume while on acall, press [ ] (to make it louder) or [ ] (to make it softer).12 abc34 5 6defghi jkl mnoT-coil (Handset only)Digital spread spectrum cordless phones gener<strong>at</strong>e magnetic signals th<strong>at</strong> could cause noise to be heard by userswearing hearing aids set to “T” mode. (The “T” mode is only found on hearing aids equipped with a telecoil (“T” coil)fe<strong>at</strong>ure). This phone includes a special “T-coil” mode th<strong>at</strong>, when activ<strong>at</strong>ed, reduces the magnetic noise gener<strong>at</strong>ed bythe handset. To activ<strong>at</strong>e the “T-coil” mode perform the following steps on your handset:)2)3)4)Press the MENU soft key.Select the HANDSET SETUP menu, and then the T-COIL submenu.Move the cursor to select ON or OFF.Press the OK soft key. You will hear a confirm<strong>at</strong>ion tone.Note: Using the T-coil fe<strong>at</strong>ure may shorten your b<strong>at</strong>tery’s talk time, please set to off when not using this fe<strong>at</strong>ure.40
Finding a Lost HandsetTo loc<strong>at</strong>e a misplaced handset, press [flash/find handset] key on the base when the phone is in standby. All registeredhandsets will beep for 60 seconds, and PAGING appears on the handset display. To cancel paging, press anykey on the found handset or press [flash/find handset] key on the base.Note: If the b<strong>at</strong>tery pack is completely drained, the handset will not beep when paging.Using Hold, Conference and TransferPlacing a Call on Hold) During a call, press [int’com/hold] to place the caller on hold. If you leave a caller on hold for more than ten2)seconds, the display will read, HOLD.To return to the party on hold, press [ /flash] or [ ] on a handset or pick up the base corded handset orpress [ ] on the base. The phone will return to the holding party.Note:• You can only place a caller on hold for 5 minutes. Once 5 minutes has passed, th<strong>at</strong> party’s line will be disconnectedand the phone will return to standby.• While a call is on hold, Caller ID and Call Waiting cannot be received.ConferencingIf you have more than one handset, up to four people can particip<strong>at</strong>e in a conference call. A four-way conference callconsists of an outside line, two handsets, and the base speakerphone. You can easily join a call already in progress.) Press [ /flash] or [ ] on the handset or [ ] on the base to join the call.2) To hang up, return the handset to the cradle or press [ ] on the handset or, return the base corded handset tothe base or press [ ] on the base. The other party will still be connected to the call.41
Transferring a CallYou can transfer a call from one st<strong>at</strong>ion to another.)2)3)Hold/TransferAllDuring a call, press [int’com/hold] on the handset or [int'com/hold] on the base.Handset #2BACK DELETE OKUse [ ] or [ ] to select the st<strong>at</strong>ion you want to transfer the call to, then pressthe OK soft key. The call will autom<strong>at</strong>ically be placed on hold, and a paging tonesounds. To cancel the transfer, press [ /flash] or [ ] the handset or [ ] on the base.When another st<strong>at</strong>ion accepts the transferred call, your call will be disconnected. If you want to rejoin the call,pick up the base corded handset, or press [ /flash] or [ ] on the handset or [ ] on the base again.Answering a Transferred CallWhen a st<strong>at</strong>ion receives a call transfer, it sounds a paging tone and shows the ID of the st<strong>at</strong>ion th<strong>at</strong> is paging. To acceptthe call transfer:) Press [ /flash], [int’com/hold], or the ANSWER soft key from the handset (or pick up the base corded handsetfrom the base, or press [int'com/hold], [ ], or the ANSWER soft key on the base).2) To speak to the caller, press [ /flash] on the receiving handset or [ ] on the base.If you have multiple handsets, only the first handset to answer the transfer page will be connected to the call. If thetransfer page is not picked up within one minute, the oper<strong>at</strong>ion will be canceled.42
Using Special Fe<strong>at</strong>uresDo Not Disturb (All Calls)DND allows you to mute the ringer of all registered handsets and the base. With the phone in standby, press andhold [dnd] on the base. You will hear a confirm<strong>at</strong>ion tone and the [dnd] light illumin<strong>at</strong>es. To cancel, press [dnd]again. You can also mute the ringer tone while the phone is ringing by pressing [dnd] on the base.Note: If the answering system is off, it will autom<strong>at</strong>ically turn on when you activ<strong>at</strong>e DND. If you turn the answeringmachine off while DND is on, DND autom<strong>at</strong>ically turns off along with the answering machine.Muting the Ringer (One Call Only)While a handset is ringing, press the MUTE soft key on the handset or base, [ ] on the handset, or [ /exit] on thebase to mute the ringer for this call. The phone will ring again normally on the next call. (The handset must be off thecradle to mute the ringer.)Muting the MicrophoneMute turns off the microphone so the caller can not hear you. The display shows the MUTE ON icon while the microphoneis muted.)2)3)While you are on a call, press the MUTE soft key.MUTE ON will appear in the display for 2 seconds, but the に icon will appear and remain in the display untilthe fe<strong>at</strong>ure is turned off.To cancel muting, press the MUTE soft key. MUTE OFF appears.Privacy ModeIf you don’t want another st<strong>at</strong>ion to interrupt you while on a call, you can turn on privacy mode. As long as your st<strong>at</strong>ionis in privacy mode, other st<strong>at</strong>ions won’t be able to join your call or make any calls of their own.From the Handset)While on a call, press the PRIVACY soft key.43
2) PRIVACY MODE ON will appear in the display for 2 seconds, but the icon will appear and remain in the displayuntil the fe<strong>at</strong>ure is turned off. Other st<strong>at</strong>ions will not be able to make a call and their display will list .UNAVAILABLE.To turn Privacy off, press the PRIVACY soft key again. PRIVACY MODE OFF appears.From the Base:)2)While on a call, press the MENU soft key.Move the cursor to CALL PRIVACY, and then press the OK soft key. PRIVACY MODE ON will appear in thedisplay for 2 seconds, but the icon will appear and remain in the display until the fe<strong>at</strong>ure is turned off. Otherst<strong>at</strong>ions will not be able to make a call and their display will list UNAVAILABLE.To turn Privacy off, repe<strong>at</strong> the procedures listed above. PRIVACY MODE OFF appears.Using the DirectLink Fe<strong>at</strong>ureA pair of handsets (or two pairs of handsets <strong>at</strong> one time) can function as two-way radios. This fe<strong>at</strong>ureis called DirectLink and will not interfere with the base’s ability to make or receive telephonecalls while in use. To activ<strong>at</strong>e, you must set both handsets to the DirectLink fe<strong>at</strong>ure. While usingthis fe<strong>at</strong>ure, these two handsets will not be able to make or receive normal phone calls until thisoper<strong>at</strong>ion is canceled; however, other handsets will function normally.Note: If the party is out of range, NO SIGNAL appears in the display and the oper<strong>at</strong>ion will becanceled.)2)3)Press the MENU soft key. Select DIRECTLINK MODE menu.Press the OK soft key. The display shows TO ENTER DIRECTLINK MODE PRESS .[ENTER].Press the ENTER soft key. You will hear a confirm<strong>at</strong>ion tone, and DIRECTLINK MODECOMPLETE appears in the display.To enterDirectLink modepress [ENTER]BACK DELETE ENTER44
Making a DirectLink Call)2)3)To call another handset with DirectLink, press the DirectLink soft key.Move the pointer to select the handset you want to call, and press the OK soft key. If the handset is out ofrange or not in DirectLink oper<strong>at</strong>ion, the display shows OUT OF RANGE.On the receiving handset, press the ANSWER soft key or [ /flash].Exiting a DirectLink CallTo exit the DirectLink fe<strong>at</strong>ure and return to standby, press the CANCEL soft key and then press the OK soft key. .DIRECTLINK MODE CANCEL appears in the display.IntercomMaking an Intercom PageYou can use the intercom to talk to another st<strong>at</strong>ion without using the phone line.)2)With the phone in standby, press [int’com/hold].Use [ ] or [ ] to select the handset or base you want to talk with, and then press the OK soft key. If you selectALL, all other registered handsets and base will be paged. An intercom tone sounds. To cancel intercom,press [ ] on either handset (or [int'com/hold] or [ ] on the base).45
Answering an Intercom PageWhen the intercom page tone sounds, the display will show the ID of the st<strong>at</strong>ion th<strong>at</strong> isIntercom「「 Handset #1paging.) Press [ /flash], [int’com/hold], or the ANSWER soft key (or pick up the basecorded handset. To answer with the base speakerphone press [int'com/hold],ANSWER[ ] or the ANSWER soft key on the base). Or press a number key, [ tone], or [#] (when Any Key Answer is enabled),or pick up the handset from the cradle (when AutoTalk is on).2) To hang up an intercom page, press the END soft key or [ ] on either handset (or return the base cordedhandset to the base, or press [int'com/hold] on the base).Note:••••If the party is busy, the handset returns to standby. If the party is out of range, UNAVAILABLE appears in thedisplay and the oper<strong>at</strong>ion will be canceled.If you receive an outside or intercom call or page while selecting the other handset, the oper<strong>at</strong>ion is canceled.If you do not select a handset within 30 seconds, the oper<strong>at</strong>ion will be canceled.If the party does not answer within one minute, the oper<strong>at</strong>ion is canceled.Room/Baby MonitorThis fe<strong>at</strong>ure allows you to monitor sounds in another room. Place ahandset (or the base) in the room you wish to monitor; it will function asa microphone. Another handset (or the base) can be set to function as aremote speaker, allowing you to monitor sounds in the room.)2)Press the MENU soft key and enter the Room Monitor menu. .TO WHICH UNIT? appears.Select the handset or base you want to monitor by using [ ] or .[ ].46
3) Press the OK soft key. MONITOR appears on the handset or the base, and .MONITORING appears on the base or the handset, and you will hear sounds inthe room where the handset or base is installed.4) To turn off the Room Monitor, press the END soft key or [ ] on either handset orreturn the handset to the cradle.If you want to prevent other handsets or the base from monitoring the st<strong>at</strong>ion, press theMENU soft key on the handset or base. Select the HANDSET SETUP menu or the .BASE SETUP menu, and then the ROOM MONITOR submenu. Select OFF and pressthe OK soft key.Note:•••To which unit?Handset #2Handset #3BACK DELETE OKMonitoring」」 Handset #2This fe<strong>at</strong>ure only works when both handsets are within range of the base.If the party is out of range, UNAVAILABLE appears in the display and the oper<strong>at</strong>ion will be canceled.While a pair of handsets is in Room/Baby Monitoring mode, only the Handsets in monitoring mode can receiveincoming calls. To resume normal telephone oper<strong>at</strong>ion, you should termin<strong>at</strong>e the monitoring session bypressing the END soft key on either handset.Tone Dialing Switch OverIf your telephone company requires pulse dialing, you can switch to tone dialing after the call connects. This fe<strong>at</strong>ureis useful when you need tone dialing to use autom<strong>at</strong>ed menu systems, such as telephone bank tellers, telephoneprescription refills, customer support menus, etc. If your phone is set to pulse dialing, make your call normally. Onceyour call connects, press [ tone] on the handset or base. Any digits you enter from then on will be sent as tone dialing.When this call ends, the phone autom<strong>at</strong>ically returns to pulse dialing.END47
Installing the Optional HeadsetYour phone may be used with an optional headset. To use this fe<strong>at</strong>ure, insert the headsetplug into the headset jack. Your phone is ready for hands-free convers<strong>at</strong>ions. .Headsets may be purchased by calling the <strong>Uniden</strong> Parts Department. See back coverpage for contact inform<strong>at</strong>ion.Seven-Digit DialingIf you can make a local call by dialing only 7 digits (instead of 10), you can programyour local area code into your phone. If you get a call from within your area code, you’llonly see the 7-digit phone number. If you get a call from outside your area code, you’llsee all 10 digits. To enter an area code, follow the steps below:)2)3)Press the MENU soft key. Select the GLOBAL SETUP menu, and then the AREA CODE submenu.Use the number keypad (0-9) to enter a 3-digit area code. If an area code has already been stored, it will appearin the display. Press the DELETE soft key to delete the stored code, and then enter a new one.Press the OK soft key. You will hear a confirm<strong>at</strong>ion tone.Inuse Line Setup (Base only)Change this option only when instructed to by customer service. You can choose from TYPE-A, TYPE-B, or OFF.Default is Type-A.)2)3)4)Press the MENU soft key. Select the GLOBAL SETUP menu, and then the INUSE LINE SETUP submenu.CHANGE ONLY IF INSTRUCTED BY CUSTOMER SERVICE appears. Press the OK soft key.Move the cursor to select TYPE – A, TYPE – B, or OFF.Press the OK soft key. You will hear a confirm<strong>at</strong>ion tone.48
Setting Up the Answering MachineYour phone has a built-in answering machine th<strong>at</strong> answers and records incoming calls. You can also use youranswering machine to record a convers<strong>at</strong>ion or leave a voice memo.Fe<strong>at</strong>ures••••••Digital Tapeless RecordingUp to 12 Minutes of Recording TimeCall ScreeningPersonal or Pre-recorded OutgoingMessagesVoice Prompts for Menu Setup (English,Spanish, or French)Day and Time AnnouncementRemote Message RetrievalToll SaverConvers<strong>at</strong>ion RecordingVoice MemoMessage AlertHands Free Speakerphone <strong>at</strong> BaseRecords Up to 59 messagesDigital Tapeless Recording allows you to quickly review, save, or delete the messages you choose. You willnever have to worry about a tape wearing out, jamming, or resetting improperly.•••••••49
Using the Answering Machine InterfaceUsing Handset and Base MenusYou can set up your answering machine's primary fe<strong>at</strong>ures from the base or handset. The menu options of the basehave voice prompt.When the phone is in standby, press the MENU soft key and then scroll down and select ANSW. SETUP. Press theOK soft key. Use [ ] or [ ] to scroll through the answering machine setup menu options. Select the option by pressingthe OK soft key.To exit the menu and return to standby, press [ ] on the handset and [ /exit] on the base.Handset oper<strong>at</strong>ionYou can use your handset to oper<strong>at</strong>e your answering machine from anywhere in your home. When the phone is instandby, press the soft key on the handset to access the answering machine. REMOTE ANSWERING MACHINEOPERATION appears on the handset display, and the answering machine announces the number of new and oldmessages. Keep the following things in mind when you use your handset to access your answering machine:••••You can enter a command <strong>at</strong> any time during the announcements.After the first announcement, you have 30 seconds to enter your first command before the answering machinereturns to standby.If you receive a call, the remote oper<strong>at</strong>ion is cancelled.During the remote oper<strong>at</strong>ion HANDSET REMOTE MODE appears on the base.Selecting the LanguageYou can select the language (English, French, and Spanish) of your answering machine announcements. The defaultanswering machine language is English.From the base or handset:) Press the MENU soft key. Select the ANSW. SETUP menu option, then the ANSW LANGUAGE.2) Move the cursor to choose ENGLISH, FRANÇAIS (French), or ESPAÑOL (Spanish).3) Press the OK soft key. You will hear a confirm<strong>at</strong>ion tone.50
Your GreetingYour answering machine comes with a pre-recorded outgoing message or greeting th<strong>at</strong> plays when you receive acall:"Hello, no one is available to take your call. Please leave a message after the tone."Or you can record your own personal outgoing greeting. Your recorded greeting must be between 2 seconds and 30seconds long. Once you have recorded a personal greeting, you can switch back and forth between the pre-recordedgreeting and your own greeting.To Record a PersonalGreeting)2)3)4)5)From the basePress the MENU soft key. Select theANSW. SETUP menu option, then theRECORD GREETING submenu.Press the START soft key.The answering machine announces,"Record Greeting", begin recordingafter the announcement.The message counter on the basedisplays "30", and then begins tocount down.When you finish recording, press theSTOP soft key or you will hear a beep,and the answering machine playsback your greeting for confirm<strong>at</strong>ion.)2)3)4)From the handsetWith the phone in standby, press the .soft key. REMOTEANSWERINGMACHINE OPERATIONappears on the display, and theanswering machine announces thetime, and the number of new and oldmessages.Press [8].The answering machine announces,"Record Greeting", begin recordingafter the announcement.When you finish recording, pressthe STOP soft key, [5], or [8]. Youwill hear a beep, and the answeringmachine plays back your greeting forconfirm<strong>at</strong>ion.51
From the baseWith the phone in standby, pressthe MENU soft key. Select ANSW.SETUP menu option, then theGREETINGOPTIONS submenu. Theanswering machine plays the currentgreeting.To keep this greeting, do nothing.To switch to the other greeting, pressthe CHANGE soft key while theanswering machine is playing thecurrent greeting.Each time you press the CHANGEsoft key, the answering machineswitches between the pre-recordedand the personal greeting. The lastgreeting you hear is used as thecurrent greeting.From the handsetWith the phone in standby, press the .soft key. REMOTEANSWERINGMACHINE OPERATIONappears on the display, and theanswering machine announces thetime, and the number of new and oldmessages.To switch to the other greeting, press[6].Each time you press [6], theanswering machine switches betweenthe pre-recorded and the personalgreeting. The last greeting you hear isused as the current greeting.To Select apre-recordedGreeting)2)3)4))2)3)Deleting your Personal Greeting (Base Only)You can delete your personal greeting from the base. You cannot delete the pre-recorded greeting.)2)3)When the phone is in standby, press the MENU soft key. Select ANSW. SETUP menu option, then theGREETINGOPTIONS submenu. The answering machine plays the current greeting.While the personal greeting is playing, press the DELETE soft key.The answering machine announces "Greeting has been deleted" and autom<strong>at</strong>ically switches back to the prerecordedgreeting.52
Setting the Number of RingsThe ring time setting allows you to set the number of rings the caller hears before your answering machine plays theoutgoing message. You can set the ring time to answer after two, four, or six rings. If you enable the Toll Saver (TSsetting), the answering machine picks up after two rings if you have new messages, and after four rings if there arenone. This way, if you make a long distance call to check your messages, you can hang up after the second ring toavoid long distance billing charges.From the base or handset:)2)3)Press the MENU soft key. Select the ANSW. SETUP menu, and then the RING TIME submenu.Move the cursor to select a Ring Time (2 TIMES, 4 TIMES, 6 TIMES or TOLL SAVER).Press the OK soft key. You will hear a confirm<strong>at</strong>ion tone.Setting the Record Time (or Announce Only)You can choose how long callers have to record a message. Set the record time to 1 MINUTE or 4 MINUTES to limitthe record time for incoming messages. If you set the record time to ANNOUNCE ONLY, the answering machine answersthe call but prevents callers from leaving a message.From the base or handset:)2)3)Press the MENU soft key. Select the ANSW. SETUP menu, and then the RECORD TIME submenu.Move the cursor to select Record Time (1 MINUTE, 4 MINUTES, or ANNOUNCE ONLY).Press the OK soft key. You will hear a confirm<strong>at</strong>ion tone.While your answering system is set to ANNOUNCE ONLY, the base screen will display ANNOUNCE ONLY. If youare using the prerecorded greeting, the answering machine autom<strong>at</strong>ically switches to the following message: "Hello,no one is available to take your call. Please call again." If you are using a personal greeting, the answering machinecontinues to use th<strong>at</strong> greeting.53
Activ<strong>at</strong>ing the Message AlertThe Message Alert fe<strong>at</strong>ure sounds a short alert tone every 15 seconds whenever you have a new message. To turnon the message alert:From the base or handset:)2)3)Press the MENU soft key. Select the ANSW. SETUP menu, and then the MESSAGE ALERT submenu.Move the cursor to select ON or OFF.Press the OK soft key. You will hear a confirm<strong>at</strong>ion tone.Activ<strong>at</strong>ing Call ScreeningYour phone allows you to listen to callers leaving you a message. This, Call Screen, fe<strong>at</strong>ure can be turned on or off.From the base or handset:)2)3)Press the MENU soft key. Select the ANSW. SETUP menu and then the CALL SCREEN submenu.Move the cursor to select ON or OFF.Press the OK soft. You will hear a confirm<strong>at</strong>ion tone.Setting a Security Code or Personal Identific<strong>at</strong>ion Number (PIN)To play your messages from a remote loc<strong>at</strong>ion, you will need to enter a two-digit Personal Identific<strong>at</strong>ion Number(PIN) or PIN Code.From the base or handset:)2)3)Press the MENU soft key. Select the ANSW. SETUP menu, and then the SECURITY CODE submenu.Enter a two-digit security code (01-99) using the number keypad [0-9].Press the OK soft. You will hear a confirm<strong>at</strong>ion tone.54
TurningOff)2)3)From the baseWith the phone in standby, press [ ].The phone announces "Answering Systemis off."appears.)2)From the handsetWith the phone in standby, press the .soft key on the handset. REMOTE .ANSWERING MACHINE OPERATION appearson the handset display, and the answeringsystem announces the time, andthe number of new and old messages.Press [9] <strong>at</strong> any time during the announcement.The system announces ."Answering System is off."Reviewing MessagesWhen you have a new message, the new message light on the handset blinks. The light stops blinking when you listento all of your new messages. The answering machine will play your new messages first. After you play all of yournew messages, you can then play your old messages.You can review your messages from the base or from the handset:From the basePlaying your messagesannounces the number of new and old mes-Press [ /exit]. The answering machinesages. It announces the message number,plays the message, and then announces thetime and d<strong>at</strong>e th<strong>at</strong> message was received.From the handsetPress . REMOTE ANSWERING MACHINEOPERATION appears on the handsetdisplay, and the answering machine announcesthe time, and the number of newand old messages. Press [ /2] to play yourmessages. After playing the message, theanswering machine announces the time andd<strong>at</strong>e th<strong>at</strong> message was received.56
Screening CallsYour phone allows you to listen to callers leaving a message without answering the phone. You can always hear callersfrom the base speaker. To screen an incoming call from the handset and base:)2)3)4)From the basePress the SCREEN soft key or the MUTE softkey when the answering machine is answering.If another st<strong>at</strong>ion is screening a call, you willhear a beep and you will not be able to screenthe call.To answer the call, pick up the base cordedhandset, or press [ ].To mute the call screen, press the MUTE softkey, or [ /exit]. To cancel muting, press theSCREEN soft key.To cancel the call screen, press the MUTE softkey.)2)3)4)From the handsetPress the SCREEN soft key when the answeringmachine is answering. If another st<strong>at</strong>ion isscreening a call, you will hear a beep and youwill not be able to screen the call.To answer the call, press [ /flash].To mute the call screen, press the MUTE softkey.To cancel the call screen, press [ ].58
Recording a Convers<strong>at</strong>ionYou can record a convers<strong>at</strong>ion between 2 seconds and 10 minutes long from the handset or the base. These recordedconvers<strong>at</strong>ions are tre<strong>at</strong>ed just like regular messages. When the answering machine is full, FULL will appear onthe base display and recording will be termin<strong>at</strong>ed. You can not record 3-way calls or intercom convers<strong>at</strong>ions with thisfe<strong>at</strong>ure.From the baseFrom the handsetStarting a Recording) During a convers<strong>at</strong>ion, press the ) During a convers<strong>at</strong>ion, press the .MENU soft key then select .CALL RECORD. Press the OK softRECORD soft key. (If the CWDX is setto on, press the MENU soft key, andkey.then [ ] or [ ] key to select CALL2) RECORDING CALL will appear on the RECORD. Press the OK soft key.)display. A confirm<strong>at</strong>ion tone th<strong>at</strong> can 2) RECORDING CALL will appear on thebe heard by both parties sounds duringrecording. Press the OK soft key.display. A confirm<strong>at</strong>ion tone th<strong>at</strong> canbe heard by both parties sounds duringrecording.Stopping a recording) Press the MENU soft key then select ) Press the RECORD soft key. (If theCALL RECORD.CWDX is set to on, press the MENU2) STOP RECORDING appears on thesoft key, and then [ ] or [ ] key todisplay, and you will hear a confirm<strong>at</strong>iontone.soft key.)select CALL RECORD. Press the OK2) STOP RECORDING appears on thedisplay, and you will hear a confirm<strong>at</strong>iontone.Note:• Every st<strong>at</strong>e has different regul<strong>at</strong>ions governing the recording of convers<strong>at</strong>ions over the telephone. Make sureto check your local, st<strong>at</strong>e and federal laws before using this product to record any telephone convers<strong>at</strong>ion inorder to determine th<strong>at</strong> your use is in compliance with such laws or guidelines.59
• If the recording memory is full, UNAVAILABLE appears in the display. You cannot record a convers<strong>at</strong>ion untilyou clear some messages from the memory.• You cannot record intercom convers<strong>at</strong>ions.Recording a Voice MemoThe voice memo fe<strong>at</strong>ure allows you to record messages th<strong>at</strong> are between 2 seconds and 4 minutes long. You mightwant to use this fe<strong>at</strong>ure to leave messages for other members of your household instead of written notes.Starting a memoStopping a memo)2))2)From the baseWith the phone in standby, pressthe RECORD soft key, and then theSTART soft key.The answering machine announces"Record memo message." Beginyour message after this announcementand a beep.Press the STOP soft key.You hear a confirm<strong>at</strong>ion tone, andthe system returns to standby.)2)3))2)3)From the handsetWith the phone in standby, pressthe soft key.REMOTE ANSWERING .MACHINE OPERATION appearson the display, and the answeringmachine announces the time, andthe number of new and old messages.Press [7]. The answering machineannounces "Record memo message."Begin your message afterthis announcement.Press [7].You hear a confirm<strong>at</strong>ion tone, andthe answering machine waits foryour next command.Press [ /2] to hear the messageyou just recorded or [ ] to exit andreturn to standby.60
Message AlertThe Message Alert fe<strong>at</strong>ure sounds a short alert tone whenever you have a new message. When a new message isreceived and Message Alert is on, the alert tone will sound every 15 seconds. Set the Message Alert to on or off byusing MENU. To active the message alert, see page 54 for details.When all new messages are played back (see page 56), the Message Alert tone will autom<strong>at</strong>ically deactiv<strong>at</strong>e. Thetone will not deactiv<strong>at</strong>e until all new messages are played back. To quickly turn off the Message Alert tone, press anykey on the base.61
Remotely Oper<strong>at</strong>ing Your Answering MachineYou can access your answering machine while you are away from home to check, play, delete messages, or evenrecord a new greeting message or to turn your answering machine on and off.Note:• The system will only playback messages for four minutes and then it returns to the command-waiting mode.To continue playing your messages, press [0] then [2] again within 15 seconds.• If you enter an incorrect security code three times, you will hear a beep and the answering machine will returnto standby.To oper<strong>at</strong>e from a remote loc<strong>at</strong>ion, use any touch-tone telephone and follow these steps:) Call your telephone number and wait for the answering machine to answer. If the answering machine is off, itwill answer after about 10 rings and series of beeping sounds.2) During the greeting message (or a series of beeps when the answering machine is off), press [0] and enteryour PIN code within 2 seconds (see "Setting a Security Code or Personal Identific<strong>at</strong>ion Number (PIN)" onpage 54).3) The answering machine announces the current time and the number of messages stored in memory. Youhear "To play incoming messages, press zero-two. For help, press one-zero." You will hear a beep.4) Enter a remote command within 15 seconds, each command there after must be entered within 2 seconds.You may select a command from the following chart:62
Remote CommandsCommand Function Command Function0 then 1 Repe<strong>at</strong> a Message* 0 then 6 Answering System On0 then 2 Playback Messages 0 then 7 Memo Record/Stop**0 then 3 Skipping a Message 0 then 8 Greeting Record/Stop**0 then 4 Deleting a Message 0 then 9 Answer System Off0 then 5 Stop Oper<strong>at</strong>ion 1 then 0 Help Guidance* To Repe<strong>at</strong> a Message, press [0] then [1] within four seconds to repe<strong>at</strong> the previous message, or press [0] then [1]after four seconds to repe<strong>at</strong> the current message.** For the Memo Record and Greeting Record/Stop, the first time you enter the corresponding command, it starts theRecording. If you want to stop the recording, press [0] then [7], [8], or [5].5) When you finish, you will hear intermittent beeps indic<strong>at</strong>ing th<strong>at</strong> the answering machine is in the commandwaiting mode. You can enter another command from the chart, or you can hang up to exit the answering machine.6) When you hang up, the answering machine autom<strong>at</strong>ically returns to its normal standby setting.63
MaintenanceSpecific<strong>at</strong>ionsOper<strong>at</strong>ing Temper<strong>at</strong>ure 0° C to 50° C (32° F to 122° F)AC Adapter Part NumberInput VoltageOutput VoltageBase: AD-800Charging Cradle: AD-0005Base: 120V AC, 60 HzCharging Cradle: 120V AC, 60 HzBase: 9V DC @ 350mACharging Cradle: 9V DC @ 210mAB<strong>at</strong>tery Part NumberCapacityBT-4463.6V DC @ 800mAhorBT-10053.6V DC @ 750mAhNotes:•••Use only the supplied AD-800 and AD-0005 AC adapters.Do not use any other AC adapter.Do not place the power cord where it cre<strong>at</strong>es a trip hazard or where it could become chafed and cre<strong>at</strong>e afire or electrical hazard.Do not place the base in direct sunlight or subject it to high temper<strong>at</strong>ures.•Power FailuresDuring the period th<strong>at</strong> the power is off, you can make or receive calls with the base. You can not use the base speakerphoneor the cordless handset.64
B<strong>at</strong>tery Replacement and HandlingWith average use, your phone’s b<strong>at</strong>tery should last approxim<strong>at</strong>ely one year. To order replacement b<strong>at</strong>teries, pleasecontact <strong>Uniden</strong>’s Parts Department. The contact inform<strong>at</strong>ion is listed on the back cover page.Cleaning the B<strong>at</strong>tery ContactsTo maintain a good charge, clean the charging contacts on the handsetonce a month. Dampen a cloth with plain w<strong>at</strong>er. Gently rub the damp clothover the charging contacts until all visible dirt is removed. Dry the contactsthoroughly before returning the handset to the charging cradle.Caution: Do not use paint thinner, alcohol, or other chemical products. Doingso may discolor the surface of the telephone and damage the finish.WarningTo avoid the risk of personal injury or property damage from fire or electrical shock, use only <strong>Uniden</strong> AD-800 (9V350mA) and AD-0005 AC adapters and <strong>Uniden</strong> BT-446 or BT-1005 b<strong>at</strong>tery pack with your phone.Caution:•••••Use only the specified <strong>Uniden</strong> b<strong>at</strong>tery pack BT-446 or BT-1005.Do not remove the b<strong>at</strong>teries from the handset to charge them.Never throw the b<strong>at</strong>tery into a fire, disassemble, or he<strong>at</strong> them.Do not remove or damage the b<strong>at</strong>tery casing.A replacement <strong>Uniden</strong> adapter or b<strong>at</strong>tery may be purchased by calling <strong>Uniden</strong>’s Parts department. See backcover page for contact inform<strong>at</strong>ion.65
Low B<strong>at</strong>tery AlertWhen the b<strong>at</strong>tery pack is very low, the phone is programmed to elimin<strong>at</strong>e functions in orderto save power. When Low B<strong>at</strong>tery appears in the display and the phone is in standby,none of the keys will oper<strong>at</strong>e. If you are on a call, complete your convers<strong>at</strong>ion as quicklyas possible, and return the handset to the charging cradle.The b<strong>at</strong>tery pack needs to be charged when the empty b<strong>at</strong>tery icon appears.Low B<strong>at</strong>teryTalk and Standby TimesWith average use, your handset b<strong>at</strong>tery provides approxim<strong>at</strong>ely 5 hours of talk time and approxim<strong>at</strong>ely 7 days ofstandby time. When your handsets are not being used and are left off of their charging cradles, the b<strong>at</strong>tery will graduallydischarge. You can achieve optimum b<strong>at</strong>tery life and performance by returning the handset to the chargingcradle after each use. If the handset is left off of the charging cradle, the actual talk time dur<strong>at</strong>ion will be reduced respectiveto the amount of time the handset is off of the charging cradle.66
TroubleshootingResetting the HandsetYou may need to reset your handset in the following instances:You lose a handset and purchase a new one. When you try and register to your existing base you get registr<strong>at</strong>ionfailure.You are unable to register any handsets to the base.You had a base which needed to be exchanged by the manufacturer. When you register your existing handsetsto the base, the handsets say #3 and #4, but you only have 2 handsets.When you are instructed to by the one of the manufacturer’s call center represent<strong>at</strong>ives.To reset, do the following:)2)3)4)••••Press and hold [ ] and [#] for more than 5 seconds. Select DEREGISTER HS.WHICH HANDSET? appears. Select the handset th<strong>at</strong> you want to de-register, and press the OK soft key.DEREGISTER HS appears. Select YES, and press the OK soft key.ARE YOU SURE? appears. Select YES, and press the OK soft key. You will hear a confirm<strong>at</strong>ion tone. Thehandset will clear its registr<strong>at</strong>ion inform<strong>at</strong>ion from the base, and then delete its own base inform<strong>at</strong>ion.MODELS VARY! PLACE HANDSET ON THE BASE FOR REGISTRATION OR REFER TO OWNER’S MANUAL. Tore-register the handset to the base (see page 23).If the handset cannot contact the base, it will display OUT OF RANGE. Make sure the handset is in range of thebase and the base is connected to power.Note: It is also possible to reset the handset back to its original factory settings. All changes including Caller ID inform<strong>at</strong>ionwill be erased. For more inform<strong>at</strong>ion on resetting the handset back to factory settings and when you need todo this, see www.uniden.com or call our Customer Service Hotline. See back cover page for contact inform<strong>at</strong>ion.67
Resetting the Handset without the BaseIf your original base is not available for some reason (for example, it is lost or somehow incapacit<strong>at</strong>ed), you can stillreset the handset and use it with another base.)2)3)4)Press and hold [ ] and [#] for more than 5 seconds.Move the cursor to select BASE UNAVAILABLE and then press the OK soft key.Base UnavailableBASE UNAVAILABLE appears.YesMove the cursor to select YES, and then press the OK soft key. ARE YOU SURE?NoBACK DELETE OKappears.Move the cursor to select YES, and then press the OK soft key. You will hear a confirm<strong>at</strong>ion tone. The handsetwill delete its own base inform<strong>at</strong>ion without trying to contact the base. When the base inform<strong>at</strong>ion is deleted,the handset displays MODELS VARY! PLACE HANDSET ON THE BASE FOR REGISTRATION OR RE-FER TO OWNER’S MANUAL. Register the handset to the new base (see page 23).Changing the Digital Security CodeThe digital security code is an identific<strong>at</strong>ion code used to connect the handset and the base. Your unit ships from themanufacturer with a preset security code. Resetting this code is not normally necessary. In the rare situ<strong>at</strong>ion th<strong>at</strong> yoususpect another cordless telephone is using the same security code or if you are instructed to change this code by amanufacturer’s Call Center Represent<strong>at</strong>ive, you can change the code by:.2.Perform “Resetting the Handset” for all of your handsets.Re-register each handset by following the steps on page 23.Traveling Out of RangeDuring a call, if you move your handset too far away from your base, noise may increase. If you pass the range limitsof the base, you will hear a beep and see OUT OF RANGE on the display, and then the handset returns to standby.68
Common IssuesIf your phone is not performing to your expect<strong>at</strong>ions, please try these simple steps first. If these steps do not solveyour problem, please call our Customer Hotline. See back cover page for contact inform<strong>at</strong>ion.SymptomSuggestionThe charge light won’tillumin<strong>at</strong>e when the handset isplaced in the cradle.The audio sounds weak.Can’t make or receive calls.The handset doesn’t ring orreceive a page.During power failure, can'tmake or receive a call.•••Make sure the AC adapter is plugged into the charger and wall outlet.Make sure the handset is properly se<strong>at</strong>ed in the cradle.Make sure the charging contacts on the handset are clean.• Move the handset and/or base away from metal objects or appliances andtry again.• Make sure th<strong>at</strong> you are not too far from the base.•••••••••••Make sure th<strong>at</strong> you are not too far from the base.Make sure the line is not in use. If an outside call is already using a line,you cannot use th<strong>at</strong> line to make another outside call.Check both ends of the base telephone line cord.Make sure the AC adapter is plugged into the base and a wall outlet.Disconnect the AC adapter and reconnect.Change the Digital Security Code (see page 68).Make sure th<strong>at</strong> you are not too far from the base.Charge the b<strong>at</strong>tery in the handset for <strong>at</strong> least 15-20 hours by placing thehandset on the base or charging cradle.Change the Digital Security Code (see page 68).Make sure to use the base corded handset to make or receive a call.Make sure th<strong>at</strong> TEL line cord is connected firmly.69
SymptomSevere noise interference.The Caller ID does notdisplay.You cannot register thehandset <strong>at</strong> the base.The handset doesn’t communic<strong>at</strong>ewith other handsets.An extra handset can’t join theconvers<strong>at</strong>ion.The Room Monitor fe<strong>at</strong>uredoes not work.The answering machine doesnot work.Messages are incomplete.Suggestion• Keep the handset away from microwave ovens, computers, remote controltoys, wireless microphones, alarm systems, intercoms, room monitors,fluorescent lights, and electrical appliances.• Move to another loc<strong>at</strong>ion or turn off the source of interference.••••••••••••••The call was placed through a switchboard.Call your telephone provider to verify your Caller ID service is current.There may be a problem with your Caller ID service.Charge the b<strong>at</strong>tery pack in the handset for 15-20 hours.Change the Digital Security Code (see page 68).Make sure you have not stored 10 handsets already.Change the Digital Security Code (see page 68).Make sure th<strong>at</strong> you have registered all handsets.Make sure there are not 2 handsets already using the conference fe<strong>at</strong>ure.Make sure th<strong>at</strong> another st<strong>at</strong>ion is not in privacy mode.Make sure to place the handset(s) within the range of the base.Make sure th<strong>at</strong> the Room Monitor fe<strong>at</strong>ure is turned on.Make sure the base is plugged in.Make sure th<strong>at</strong> the answering machine is turned on.Make sure th<strong>at</strong> the message record time is not set to Announce only (seepage 53).• The incoming messages may be too long. Remind callers to leave a briefmessage.·• The memory may be full. Delete some or all of the saved messages.70
Liquid DamageMoisture and liquid can damage your cordless phone. Follow the suggestions below if your phone gets wet.ExteriorIf the handset or base is exposed to moisture or liquid, but only the exterior plastic housing is affected, wipe off theliquid, and use as normal.InteriorIf moisture or liquid has entered the plastic housing (i.e. liquid can be heard in the phone or liquid has entered thehandset b<strong>at</strong>tery compartment or vent openings on the base):Handset:.2.3.4.Remove the b<strong>at</strong>tery cover and leave it off for ventil<strong>at</strong>ion.Disconnect the b<strong>at</strong>tery pack. Leave the b<strong>at</strong>tery cover off and the b<strong>at</strong>tery pack disconnected for <strong>at</strong> least 3days.Once the handset is completely dry, reconnect the b<strong>at</strong>tery pack and the b<strong>at</strong>tery cover.Recharge the handset's b<strong>at</strong>tery pack for 15 to 20 hours before using.IMPORTANT: You must unplug the telephone line while recharging the b<strong>at</strong>tery packs to avoid charge interruption.Base:. Disconnect the AC adapter from the base, cutting off electrical power.2. Disconnect the telephone cord from the base.3. Let dry for <strong>at</strong> least 3 days.CAUTION: DO NOT use a microwave oven to speed up the drying process. This will cause permanent damage tothe handset, base and the microwave oven. After following these steps, if your cordless telephone does not work,please call our Customer Service Hotline. See back cover page for contact inform<strong>at</strong>ion.72
Precautions!Before you read anything else, please observe the following:Warning!<strong>Uniden</strong> America Corpor<strong>at</strong>ion DOES NOT represent this unit to be w<strong>at</strong>erproof. To reduce the risk of fire, electricalshock, or damage to the unit, DO NOT expose this unit to rain or moisture.Rechargeable Nickel-Metal-Hydride B<strong>at</strong>tery Warning•••••This equipment contains a rechargeable Nickel-Metal-Hydride b<strong>at</strong>tery.The rechargeable b<strong>at</strong>teries contained in this equipment may explode if disposed of in a fire.Nickel is a chemical known to St<strong>at</strong>e of California to cause cancer.Do not short-circuit the b<strong>at</strong>tery.Do not charge the rechargeable b<strong>at</strong>tery used in this equipment in any charger other than the one specified inthe owner’s manual. Using another charger may damage the b<strong>at</strong>tery or cause the b<strong>at</strong>tery to explode.Rechargeable B<strong>at</strong>teries Must Be Recycled or Disposed of Properly.!The exclam<strong>at</strong>ion point within an equil<strong>at</strong>eraltriangle is intended to alert the user to thepresence of important oper<strong>at</strong>ing and maintenance(servicing) instructions in the liter<strong>at</strong>ureaccompanying the appliance.73
Radio InterferenceRadio interference may occasionally cause buzzing and humming inyour cordless handset, or clicking noises in the base. This interferenceis caused by external sources such as TV, refriger<strong>at</strong>or, vacuum cleaner,fluorescent lighting, or electrical storm. Your unit is NOT DEFECTIVE. Ifthese noises continue and are too distracting, please check around yourhome to see wh<strong>at</strong> appliances may be causing the problem. In addition,we recommend th<strong>at</strong> the base not be plugged into a circuit th<strong>at</strong> alsopowers a major appliance because of the potential for interference. Becertain th<strong>at</strong> the antenna on the unit is fully extended when needed. Inthe unlikely event th<strong>at</strong> you consistently hear other voices or distractingtransmissions on your phone, you may be receiving radio signals fromanother cordless telephone or other source of interference. If you cannotelimin<strong>at</strong>e this type of interference, you need to change to a differentchannel.Finally, it should be noted th<strong>at</strong> some cordless telephones oper<strong>at</strong>e <strong>at</strong>frequencies th<strong>at</strong> may cause interference to nearby TVs and VCRs.To minimize or prevent such interference, the base of the cordlesstelephone should not be placed near or on top of a TV or VCR. Ifinterference is experienced, moving the cordless telephone farther awayfrom the TV or VCR will often reduce or elimin<strong>at</strong>e the interference.Cordless Telephone PrivacyCordless telephones are radio devices. Communic<strong>at</strong>ions betweenthe handset and base of your cordless telephone are accomplishedby means of radio waves which are broadcast over the open airways.Because of the inherent physical properties of radio waves, yourcommunic<strong>at</strong>ions can be received by radio receiving devices other thanyour own cordless telephone unit. Consequently, any communic<strong>at</strong>ionsusing your cordless telephone may not be priv<strong>at</strong>e.I.C. NoticeTerminal EquipmentNOTICE: This equipment meets the applicable Industry Canada TerminalEquipment Technical Specific<strong>at</strong>ions. This is confirmed by the registr<strong>at</strong>ionnumber. The abbrevi<strong>at</strong>ion, IC, before the registr<strong>at</strong>ion number signifiesth<strong>at</strong> registr<strong>at</strong>ion was performed based on a Declar<strong>at</strong>ion of Conformityindic<strong>at</strong>ing th<strong>at</strong> Industry Canada technical specific<strong>at</strong>ions were met. It doesnot imply th<strong>at</strong> Industry Canada approved the equipment.NOTICE: The Ringer Equivalence Number (REN) for this terminalequipment is marked on the equipment itself. The REN assigned toeach terminal equipment provides an indic<strong>at</strong>ion of the maximum numberof terminals allowed to be connected to a telephone interface. Thetermin<strong>at</strong>ion on an interface may consist of any combin<strong>at</strong>ion of devicessubject only to the requirement th<strong>at</strong> the sum of the Ringer EquivalenceNumbers of all the devices does not exceed five.RADIO EQUIPMENTThe term “IC:” before the radio certific<strong>at</strong>ion number only signifies th<strong>at</strong>Industry Canada technical specific<strong>at</strong>ions were met.Oper<strong>at</strong>ion is subject to the following two conditions: (1) this device maynot cause interference, and (2) this device must accept any interference,including interference th<strong>at</strong> may cause undesired oper<strong>at</strong>ion of the device.“Privacy of communic<strong>at</strong>ions may not be ensured when using this telephone.”76
One Year Limited WarrantyImportant: Evidence of original purchase is required forwarranty service. WARRANTOR: UNIDEN AMERICACORPORATION (“<strong>Uniden</strong>”) ELEMENTS OF WARRANTY:<strong>Uniden</strong> warrants, for one year, to the original retail owner,this <strong>Uniden</strong> Product to be free from defects in m<strong>at</strong>erials andcraftsmanship with only the limit<strong>at</strong>ions or exclusions set outbelow. WARRANTY DURATION: This warranty to the originaluser shall termin<strong>at</strong>e and be of no further effect 12 monthsafter the d<strong>at</strong>e of original retail sale. The warranty is invalid ifthe Product is (A) damaged or not maintained as reasonableor necessary, (B) modified, altered, or used as part of anyconversion kits, subassemblies, or any configur<strong>at</strong>ions not soldby <strong>Uniden</strong>, (C) improperly installed, (D) serviced or repaired bysomeone other than an authorized <strong>Uniden</strong> service center for adefect or malfunction covered by this warranty, (E) used in anyconjunction with equipment or parts or as part of any systemnot manufactured by <strong>Uniden</strong>, or (F) installed or programmedby anyone other than as detailed by the owner’s manual forthis product. STATEMENT OF REMEDY: In the event th<strong>at</strong> theproduct does not conform to this warranty <strong>at</strong> any time while thiswarranty is in effect, warrantor will either, <strong>at</strong> its option, repair orreplace the defective unit and return it to you without charge forparts, service, or any other cost (except shipping and handling)incurred by warrantor or its represent<strong>at</strong>ives in connection withthe performance of this warranty. Warrantor, <strong>at</strong> its option, mayreplace the unit with a new or refurbished unit. THE LIMITEDWARRANTY SET FORTH ABOVE IS THE SOLE AND ENTIREWARRANTY PERTAINING TO THE PRODUCT AND IS INLIEU OF AND EXCLUDES ALL OTHER WARRANTIES OFANY NATURE WHATSOEVER, WHETHER EXPRESS,IMPLIED OR ARISING BY OPERATION OF LAW,INCLUDING, BUT NOT LIMITED TO ANY IMPLIEDWARRANTIES OF MERCHANTABILITY OR FITNESS FORA PARTICULAR PURPOSE. THIS WARRANTY DOESNOT COVER OR PROVIDE FOR THE REIMBURSEMENTOR PAYMENT OF INCIDENTAL OR CONSEQUENTIALDAMAGES. Some st<strong>at</strong>es do not allow this exclusion orlimit<strong>at</strong>ion of incidental or consequential damages so the abovelimit<strong>at</strong>ion or exclusion may not apply to you.LEGAL REMEDIES: This warranty gives you specific legalrights, and you may also have other rights which vary fromst<strong>at</strong>e to st<strong>at</strong>e. This warranty is void outside the United St<strong>at</strong>esof America and Canada. PROCEDURE FOR OBTAININGPERFORMANCE OF WARRANTY: If, after following theinstructions in the owner’s manual you are certain th<strong>at</strong> theProduct is defective, pack the Product carefully (preferably inits original packaging). Disconnect the b<strong>at</strong>tery from the Productand separ<strong>at</strong>ely secure the b<strong>at</strong>tery in its own separ<strong>at</strong>e packagingwithin the shipping carton. The Product should include all partsand accessories originally packaged with the Product. Includeevidence of original purchase and a note describing the defectth<strong>at</strong> has caused you to return it. The Product should be shippedfreight prepaid, by traceable means, to warrantor <strong>at</strong>:<strong>Uniden</strong> America Service4700 Amon Carter Blvd.Fort Worth, TX 7615577
AIndexAnswering a Call......................... 34Answering MachineHandset oper<strong>at</strong>ion................. 50Using the handset & .base menu....................... 50When away from home......... 62Any Key Answer.......................... 32Area Code................................... 48AutoTalk...................................... 32BBase Unavailable........................ 68B<strong>at</strong>tery Contacts Maintence........ 65B<strong>at</strong>tery Replacement and .Handling........................... 65CCaller ID on Call Waiting............. 20Call screen............................ 54, 58Call Waiting Deluxe............... 20, 38Chain Dialing............................... 35Conferencing............................... 41Controls Parts of the Phone.......... 7DD<strong>at</strong>e and Time............................. 19Deleting a Redial Record............ 39Deleting Caller ID Numbers........ 37Deregistr<strong>at</strong>ion.............................. 24Dial Mode.................................... 18Digital Security Code.................. 68DirectLink.................................... 44Do Not Disturb............................ 43EEarpiece Volume......................... 40Entering Text from the Phone...... 13GGreetingsDeleting................................. 52Recording.............................. 51Selecting................................ 52HHandset Banner.......................... 30Hanging up.................................. 34IImportant Safety Instructions...... 74Installing the Belt Clip................. 1778Installing the Phone.................... 14Installing the Rechargeable .B<strong>at</strong>tery............................. 14KKey Touch Tone........................... 21LLanguage.................................... 19LCD contrast............................... 21Liquid Damage............................ 72Low B<strong>at</strong>tery Alert......................... 66MMaintenance............................... 64Making a call............................... 33Making a call from a Caller ID .Record............................. 37Making a call with Speed Dial..... 35Muting the Microphone............... 43Muting the Ringer........................ 43OOptional Headset........................ 48Out of Range............................... 68
PPersonal identifi c<strong>at</strong>ion number(PIN)................................. 54Personal Ring............................. 20Phonebook.................................. 25Placing a Call on Hold................. 41Privacy Mode.............................. 43Product Overview.......................... 6RRecording a call.......................... 59Redialing a Number.................... 39Register Handset........................ 23Resetting the Handset................ 67Ringer Tones............................... 31Ringer Volume............................ 40Room/Baby Monitor.................... 46SScreening calls...................... 54, 58Securiy codeAnswering system................. 54Seven-Digit Dialing..................... 48Speaker Volume.......................... 40Speed Dial.................................. 35TT-coil........................................... 40Talk and Standby Times.............. 66The FCC Wants You To Know..... 75VVoice Memo................................ 6079
At <strong>Uniden</strong>, we’ll take care of you!Thank you for purchasing a <strong>Uniden</strong> product. if you have any questions or problems,.please do not return this product to the place of purchase.Having Trouble?Need A Part?Help For Our.Customers with.Special NeedsOur customer care specialists are here to help you! Visit our website <strong>at</strong> www.uniden.com or call our Customer Service Hotline <strong>at</strong> 1-800-297-1023,Monday through Friday, 7 AM to 7 PM or S<strong>at</strong>urday/Sunday, 9 AM to 5 PM,CST. The Customer Service Hotline is closed on holidays.To order headsets, additional handsets, replacement b<strong>at</strong>teries, or otheraccessories, visit our website <strong>at</strong> www.uniden.com or call 1-800-554-3988,Monday through Friday, 8 AM to 5 PM, CST.If you need special assistance due to a disability, or have questions on theaccessibility fe<strong>at</strong>ures of this product, please call 1-800-874-9314 (voice orTTY).May be covered under one or more of the following U.S. p<strong>at</strong>ents:4,797,916 5,426,690 5,434,905 5,491,745 5,493,605 5,533,0105,574,727 5,581,598 5,650,790 5,660,269 5,661,780 5,663,9815,671,248 5,696,471 5,717,312 5,732,355 5,754,407 5,758,2895,768,345 5,787,356 5,794,152 5,801,466 5,825,161 5,864,6195,893,034 5,912,968 5,915,227 5,929,598 5,930,720 5,960,3585,987,330 6,044,281 6,070,082 6,125,277 6,253,088 6,314,2786,418,209 6,618,015 6,671,315 6,714,630 6,782,098 6,788,9206,788,953 6,839,550 6,889,184 6,901,271 6,907,094 6,914,9406,953,118 7,023,176Other p<strong>at</strong>ents pending.82
VISIT©UPZZ01764BA(0)