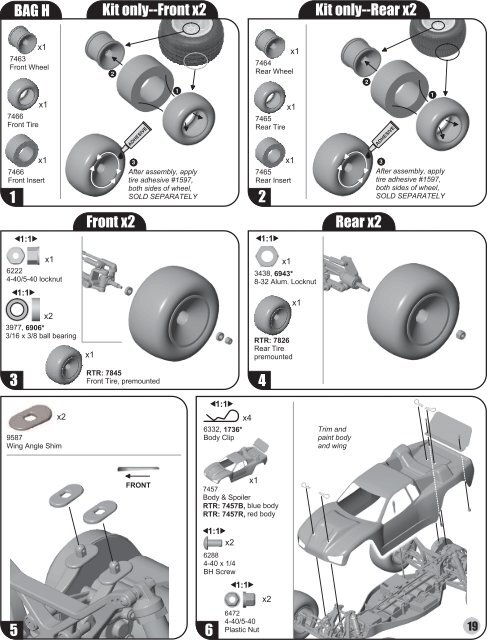
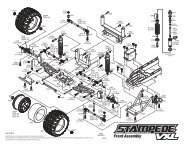
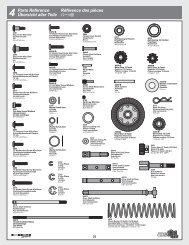
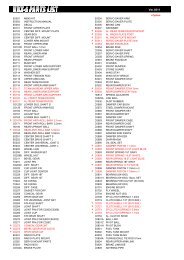
* ) / 0 EJ O H JN EJ O 4 A = HNN % " $ ! H J9 D A A N % " $ "4 A = H9 D A A % " $ $ H J6 EHAN ) , 0 - 5 18 -% " $ #4 A = H6 EHAN ) , 0 - 5 18 -% " $ $ H J1 I A HJN ) BJA H= I I A > O = F F OJEHA = @ D A I EL A # ' % > JD I E@ A I BM D A A 5 , 5 - 2 ) 4 ) 6 - ;N % " $ #4 A = H1 I A HJ) BJA H= I I A > O = F F OJEHA = @ D A I EL A # ' % > JD I E@ A I BM D A A 5 , 5 - 2 ) 4 ) 6 - ; H JN4 A = HNN $" " # " ? K JN ! " ! & $ ' " ! & ! ) K ? K JN N! ' % % $ ' $ ! $ N ! & > = > A = HE CN 4 6 4 % & $4 A = H6 EHAF HA K JA @4 6 4 % & " #! H J6 EHA F HA K JA @"' # & %9 E C ) C A 5 D EN$ ! ! % ! $ * @ O + EFN "6 HE = @ F = E J> @ O = @ M E C 4 6N % " # %* @ O 5 F EA H4 6 4 % " # % * > K A > @ O4 6 4 % " # % 4 HA @ > @ ON$ & &" " N "* 0 5 ? HA MN#$$ " %" " # " 2 = I JE? K J '
FINAL ADJUSTMENTSRADIO ADJUSTMENTSUse the following steps to make the final adjustmentson your car.1. Turn the transmitter on.2. Make sure the motor is disconnected.3. Connect your battery pack and turn thepower switch on.4. Move the steering control on the transmitterto the right and left. Do the wheels move in thecorrect direction? If not, you must reverse thesteering servo direction on your transmitter (seeradio manual.)5. Adjust your steering trim (see radio manual)until the #9659 steering rack is centered underthe top plate. Then, using the two steeringMake these adjustments before you drive the truckturnbuckles, adjust the front wheels so theyare pointing straight ahead.6. Adjust the ESC (electronic speed control)according to the speed control manufacturer’sinstructions. Some manufacturers have themotor connected during adjustment and somedo not. Now turn the power switch off.7. Connect the motor. Place your car on a blockor car stand so that all four wheels are elevated.Turn the power switch on again. Check the ESCand steering settings you have made and thenturn the power switch back off.8. Remember this! The transmitter is alwaysthe FIRST TO BE TURNED ON and <strong>THE</strong>LAST TURNED OFF.ASSEMBLE BATTERY PACKIf you are not using a stick battery pack, here ishow to assemble your battery pack. Solder individualcell connections as shown.Team racers prefer battery bars for sturdierconnections. Insulated wire will not allowthe pack to fit in the battery slot.MOTOR GEARINGTo get the most from your motor, proper gearingis important. The gear ratios listed in thechart are recommended starting gear ratios.Ratios can vary from track to track, but youshould not change the pinion size more thanone tooth from the recommended ratio.Solder connections with battery bars(#651)CAUTION! Increasing thepinion size by more than one toothcan damage your motor from excessheat.Aim negative lead toward the frontFINALMOTOR PINION SPUR DRIVE RATIO24° stock (torque-based) 20 87 11.31:124° stock (RPM-based) 19 87 11.91:119 turn 19 87 11.91:114 turn modified motor 22 87 10.28:113 turn modified motor 21 87 10.77:112 turn modified motor 20 87 11.31:111 turn modified motor 19 87 11.91:110 turn modified motor 18 87 12.57:1MAINTENANCE Follow these steps to keep your truck in shape for racingCHECK <strong>FOR</strong> FITYou should periodically check all the movingparts: front and rear end, suspension arms,steering blocks, steering linkage, shocks, andso on. If any of these should get dirty or bindthen your car’s performance will suffer.MOTOR MAINTENANCEBetween runs, inspect the brushes to ensurethey are moving freely in the brush holder. Thisis done by carefully removing the spring andsliding the brush in and out of the holder. If thereis any resistance or rough spots, remove thebrush and carefully wipe the brush clean. Thiswill clean off any buildup so the brush slidessmoothly in the brush holder.After every 3 to 5 runs, remove the brushesfrom the holders and inspect the tips for wearand/or burning. If there is a noticeable amountof wear, replace the brush with a new pair. Ifthe tip is a burnt blue color, then the lubricantin the brush has been burned away and newbrushes should be installed.After every other battery charge you shouldcarefully clean the motor. One recommendedmethod is to spray motor cleaner directly onthe brush and commutator area. Run the motorfor approximately 15 seconds. Disconnectthe motor and spray it again, making sure therunoff is clear and clean. If the runoff is still dirty,repeat the spraying action until clean. After completingthe cleaning, apply a small amount oflightweight oil to each bushing or bearing forlubrication. Be careful not to apply too muchoil, for this will pick up dirt and contaminate thecommutator and brushes.DIFFERENTIALAdjust the differential (“diff”) as noted on page6. Adjusting the diff is not meant to be a tuningoption. If you can hear the diff making a “barking”or “chirping” sound on jump landings, eitheryour diff is set too loose or your slipperclutch is set too tight. First check your slippersetting, then re-set the diff according to the instructionson step C-9.20SLIPPER CLUTCHThe assembly instructions give you a basesetting for your clutch. Turn the nut on theshaft so that the end of the top shaft is evenwith the outside of the nut. Tighten the nut 3more turns. At the track, tighten or loosen thenut in 1/8 turn increments until you hear afaint slipping sound for 1-2 feet on takeoffs.Another popular way to set the clutch isto hold both rear tires firmly in place andapply short bursts of throttle. If the clutch isproperly set, the front tires should lift slightlyup off the surface.