- Page 2 and 3: !FULLY CHARGE BATTERIES BEFORE FIRS
- Page 4 and 5: Personal Care from Currie Technolog
- Page 6 and 7: Please Retain your Sales Receipt as
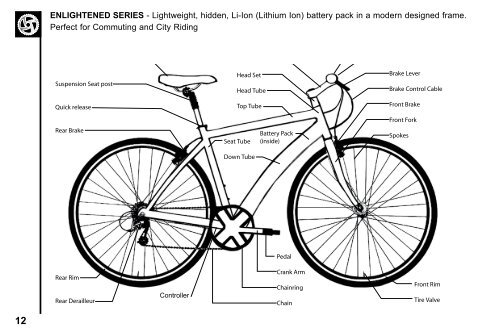
- Page 8 and 9: 1. PARTS IDENTIFICATION ...........
- Page 10 and 11: BMX Bicycles - BMX style bicycles a
- Page 15: CORRECT FRAME SIZEWhen selecting a
- Page 19 and 20: 5. Bearings• Ensure all bearings
- Page 21 and 22: ReflectorsYour bicycle is supplied
- Page 23 and 24: RIDING SAFELYGeneral RulesWhen ridi
- Page 25 and 26: Hill Technique• Gear down before
- Page 27 and 28: 6 5 4 3 2 16 5 4 3 2 132 1High Midd
- Page 29 and 30: BICYCLE CAREBasic MaintenanceThe fo
- Page 31 and 32: ELECTRONIC COMPONENTSBattery GaugeW
- Page 33 and 34: ThrottlesThrottles are equipped on
- Page 35 and 36: Battery FAQ'sQ: Do I need to charge
- Page 37 and 38: ChargerThe hybrid electric bicycle
- Page 39 and 40: How to use the Li-Ion ChargersBefor
- Page 41 and 42: Main Power SwitchesSTANDARD POWER S
- Page 43 and 44: FULLHALFLOWLENWiring Diagram - Via
- Page 45 and 46: 231Wiring Diagram - TAG/PAS w/ RMB
- Page 47 and 48: Blank page for this manual revision
- Page 49 and 50: DERAILLEUR GEARED BICYCLESIncludes
- Page 51 and 52: Standard Stem Bolt System1. Remove
- Page 53 and 54: CrownSteering TubeBrake BossDrop-ou
- Page 55 and 56: Note: In addition to normal assembl
- Page 57 and 58: 5. The wheel is tightly secured whe
- Page 59 and 60: V - Brake1. If fitted with V-Brakes
- Page 61 and 62: Check your BrakesPress each brake l
- Page 63 and 64:
Disc MountingBoltsHubFork LegCenter
- Page 65 and 66:
Cable Anchor BoltDerailleur CageLow
- Page 67 and 68:
12113231.2.3.Attaching BoltBushingS
- Page 69 and 70:
figure 1FendersFront FenderThe fron
- Page 71 and 72:
Final Check• After all adjustment
- Page 73 and 74:
SeatLoosen nut on the seat clamp an
- Page 75 and 76:
Side PullBrakesBrakeArmFixing Nutin
- Page 77 and 78:
3. While holding the shoe against5.
- Page 79 and 80:
!Failure to adjust correctly may re
- Page 81 and 82:
Training WheelsThere are two option
- Page 83 and 84:
Training Wheel Stabilizer BracketYo
- Page 85 and 86:
Correct routine maintenance of your
- Page 87 and 88:
Frequency Task Page ReferenceCheck
- Page 89 and 90:
Tire InspectionTires must be mainta
- Page 91 and 92:
Remove tire bead from the rim.Pull
- Page 93 and 94:
GripWhen re-fitting the stem, make
- Page 95 and 96:
Cables and Cable HousingCables and
- Page 97 and 98:
SADDLE AND SEAT POSTSeat Fixing Bol
- Page 99 and 100:
BRAKESThe correct adjustment and op
- Page 101 and 102:
Some brakes have a special mechanis
- Page 103 and 104:
DRIVETRAINThe drivetrain of a bicyc
- Page 105 and 106:
Standard Crank SetCrank BoltDust Ca
- Page 107 and 108:
Bottom BracketShellFixed CupAxleBot
- Page 109 and 110:
Rear SprocketFront ChainwheelCHAINS
- Page 111 and 112:
Motor Drive Chain Adjustment• Too
- Page 113 and 114:
FREEWHEELInspectionLike the chain,
- Page 115 and 116:
FreewheelTop GearPulley AdjustmentS
- Page 117 and 118:
REFLECTORSYour bicycle is supplied
- Page 119 and 120:
ProblemPossible CauseRemedyGear shi
- Page 121 and 122:
ProblemSteering not accuratePossibl
- Page 123 and 124:
Problem Possible Cause RemedyBicycl
- Page 125 and 126:
2. Front Wheel Secondary Retention
- Page 127 and 128:
4. Removing and Installing Bolt-On
- Page 129 and 130:
The braking action of a bicycle is
- Page 131 and 132:
The number of possible gear combina
- Page 133 and 134:
confidence. Once you’ve learned t
- Page 135 and 136:
Some special high-performance tires
- Page 137 and 138:
Serial Number:__________________###
- Page 139:
All warranty claims must be made di