English Mortise Chisels:Details Make a DifferenceMany tools labeled “mortising chisels”are misnamed, missing features, poorlymanufactured and difficult to use. But nowRay Iles, an English toolmaker with familyroots in Sheffield, makes mortising chiselsusing a traditional English pattern that isn’tcommon in the North America. The toolsplunge into hardwoods like an Olympic diverthrough water, and they lever out waste likean electric crowbar. They work because Ilespaid attention to the details on the old Englishmortising chisels, and he took no shortcuts.This particular pattern of mortising chiselhasn’t been manufactured for many years. Itlooks primitive at first. But on close examination,it’s a tool of subtlety.First, a bit of terminology. Many of thechisels you see in tool catalogs that are calledmortising chisels would be called “sash mortisingchisels” by a 19th-century woodworker,and they are best for chopping mortises insoftwoods. Some other so-called mortisechisels are actually “firmer chisels,” which aretools for all-around woodwork that don’t havebeveled edges.The Ray Iles mortisers are more massive andheavy than any of these chisels. The six toolsIles offers are more than 12" long – abouthalf the tool is the blade; the other half is thebeech handle. Both halves are equally importantto the function of the whole.The blades (offered in widths from 3 ⁄ 16" to1 ⁄ 2") are thick at the tool’s bolster (almost 3 ⁄ 4")and this thickness tapers as you approach theshallow 20° primary bevel. The cutting edgeof the tool is ground at a stout and appropriate35° secondary bevel. One nice aspect ofall this blade geometry is that you can use the20° bevel as a depth indicator. When all ofThe Ray Iles mortising chisels revive a pattern of tool that has been lost for decades. They workremarkably well, outcutting other chisels in our shop.the bevel is buried in the mortise, your mortiseis a shade more than 1 1 ⁄ 4" deep, which is a typicalmortise depth. As you sharpen the primarybevel back, this will change slightly, but I don’tsuspect you’ll be sharpening these much.That’s because Iles used D2 steel for the blade.This exotic steel is tough and as durable as anyI’ve worked with. There are advantages and onedisadvantage to the D2. First let’s look at D2’sdemerit: It’s no fun to sharpen. Setting up thesetools took longer than I expected because of theD2’s stout personality. The backs (sometimescalled the “faces”) of the chisels were groundat the factory quite well. But even though theywere close to perfect from the factory, takingthem that last step took a little longer. Sharpeningup the secondary bevel also took longer thanusual because of the D2’s pigheadedness.After sharpening, I can report that the D2seems worth it. Even after a cabinet’s worth ofmortises, the edge of the 1 ⁄ 4" chisel looked andfelt like it was still freshly sharpened. My Sorbysash mortisers (which I have since given away)would not have survived half that much work.The final detail worth noting is that theblade is not rectangular in cross-section. Theflanks are tapered (I measured the taper asvarying between 1° and 2°). This taper is presenton quality older tools and missing on latertools and every modern chisel I’ve encountered.The taper helps the chisel release whenyou pull it out of a deep cut. It also makes iteasier to lever the waste. And the taper has nodisadvantages that I can discern. The chiseldoes not twist in the cut at all.A Better HandleThe handles to these tools are a complexshape that gives the user feedback to keep thetool true in the cut. The handles are ellipticalin cross-section and are tapered both front toback and side to side. This elliptical shape tellsyou instantly whether or not the tool’s bevelis straight on your work. And the tapers allowthe tool to fit your hand gracefully.The handles are made from air-dried beechwith a traditional linseed oil finish. And theytake a heck of a beating. After a year of use(and a little abuse thrown in for good measure),I feel no trepidation about whalingon these. They and their tough nature haveearned a permanent place in my shop. — CSAs you can see from the thin line of lightbetween the square and the chisel’s flanks, thesides of the Ray Iles chisels are tapered, allowingthe tool to release easily from a deep cut.The beech handles come in two sizes. Both sizesare elliptical in shape and tapered in two directions.This complex shape allows you to steer thechisel to make straight cuts.SuppliesThe Ray Iles mortising chisels areavailable from:■ Tools for Working Wood800-426-4613or toolsforworkingwood.comwoodworking-magazine.com ■ 17
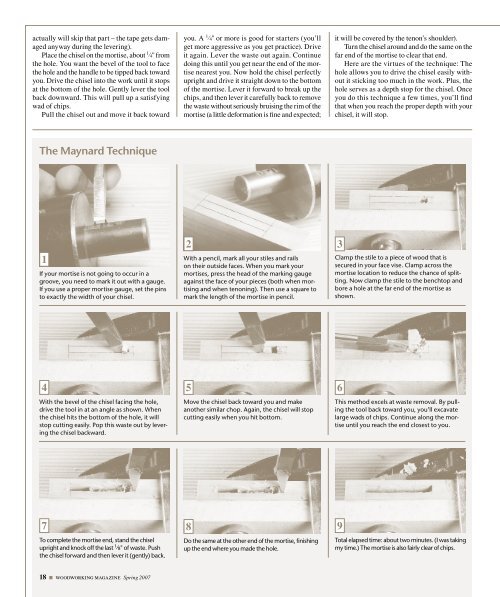
actually will skip that part – the tape gets damagedanyway during the levering).Place the chisel on the mortise, about 1 ⁄ 4" fromthe hole. You want the bevel of the tool to facethe hole and the handle to be tipped back towardyou. Drive the chisel into the work until it stopsat the bottom of the hole. Gently lever the toolback downward. This will pull up a satisfyingwad of chips.Pull the chisel out and move it back towardyou. A 1 ⁄ 4" or more is good for starters (you’llget more aggressive as you get practice). Driveit again. Lever the waste out again. Continuedoing this until you get near the end of the mortisenearest you. Now hold the chisel perfectlyupright and drive it straight down to the bottomof the mortise. Lever it forward to break up thechips, and then lever it carefully back to removethe waste without seriously bruising the rim of themortise (a little deformation is fine and expected;it will be covered by the tenon’s shoulder).Turn the chisel around and do the same on thefar end of the mortise to clear that end.Here are the virtues of the technique: Thehole allows you to drive the chisel easily withoutit sticking too much in the work. Plus, thehole serves as a depth stop for the chisel. Onceyou do this technique a few times, you’ll findthat when you reach the proper depth with yourchisel, it will stop.The Maynard Technique1If your mortise is not going to occur in agroove, you need to mark it out with a gauge.If you use a proper mortise gauge, set the pinsto exactly the width of your chisel.2 3With a pencil, mark all your stiles and railson their outside faces. When you mark yourmortises, press the head of the marking gaugeagainst the face of your pieces (both when mortisingand when tenoning). Then use a square tomark the length of the mortise in pencil.Clamp the stile to a piece of wood that issecured in your face vise. Clamp across themortise location to reduce the chance of splitting.Now clamp the stile to the benchtop andbore a hole at the far end of the mortise asshown.4 5 6With the bevel of the chisel facing the hole,drive the tool in at an angle as shown. Whenthe chisel hits the bottom of the hole, it willstop cutting easily. Pop this waste out by leveringthe chisel backward.Move the chisel back toward you and makeanother similar chop. Again, the chisel will stopcutting easily when you hit bottom.This method excels at waste removal. By pullingthe tool back toward you, you’ll excavatelarge wads of chips. Continue along the mortiseuntil you reach the end closest to you.7 8 9To complete the mortise end, stand the chiselupright and knock off the last 1 ⁄ 8" of waste. Pushthe chisel forward and then lever it (gently) back.Do the same at the other end of the mortise, finishingup the end where you made the hole.Total elapsed time: about two minutes. (I was takingmy time.) The mortise is also fairly clear of chips.18 ■ woodworking magazine Spring 2007