


You also want an ePaper? Increase the reach of your titles
YUMPU automatically turns print PDFs into web optimized ePapers that Google loves.
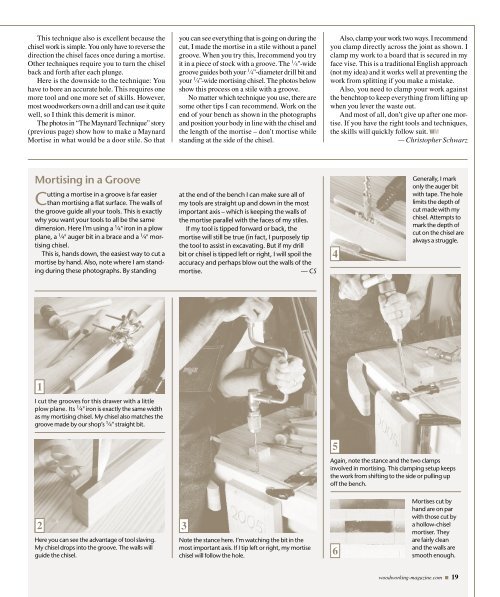
This technique also is excellent because thechisel work is simple. You only have to reverse thedirection the chisel faces once during a mortise.Other techniques require you to turn the chiselback and forth after each plunge.Here is the downside to the technique: Youhave to bore an accurate hole. This requires onemore tool and one more set of skills. However,most woodworkers own a drill and can use it quitewell, so I think this demerit is minor.The photos in “The Maynard Technique” story(previous page) show how to make a MaynardMortise in what would be a door stile. So thatyou can see everything that is going on during thecut, I made the mortise in a stile without a panelgroove. When you try this, Irecommend you tryit in a piece of stock with a groove. The 1 ⁄ 4"-widegroove guides both your 1 ⁄ 4"-diameter drill bit andyour 1 ⁄ 4"-wide mortising chisel. The photos belowshow this process on a stile with a groove.No matter which technique you use, there aresome other tips I can recommend. Work on theend of your bench as shown in the photographsand position your body in line with the chisel andthe length of the mortise – don’t mortise whilestanding at the side of the chisel.Also, clamp your work two ways. I recommendyou clamp directly across the joint as shown. Iclamp my work to a board that is secured in myface vise. This is a traditional English approach(not my idea) and it works well at preventing thework from splitting if you make a mistake.Also, you need to clamp your work againstthe benchtop to keep everything from lifting upwhen you lever the waste out.And most of all, don’t give up after one mortise.If you have the right tools and techniques,the skills will quickly follow suit. WM— Christopher SchwarzMortising in a GrooveCutting a mortise in a groove is far easierthan mortising a flat surface. The walls ofthe groove guide all your tools. This is exactlywhy you want your tools to all be the samedimension. Here I’m using a 1 ⁄ 4" iron in a plowplane, a 1 ⁄ 4" auger bit in a brace and a 1 ⁄ 4" mortisingchisel.This is, hands down, the easiest way to cut amortise by hand. Also, note where I am standingduring these photographs. By standingat the end of the bench I can make sure all ofmy tools are straight up and down in the mostimportant axis – which is keeping the walls ofthe mortise parallel with the faces of my stiles.If my tool is tipped forward or back, themortise will still be true (in fact, I purposely tipthe tool to assist in excavating. But if my drillbit or chisel is tipped left or right, I will spoil theaccuracy and perhaps blow out the walls of themortise. — CS4Generally, I markonly the auger bitwith tape. The holelimits the depth ofcut made with mychisel. Attempts tomark the depth ofcut on the chisel arealways a struggle.1I cut the grooves for this drawer with a littleplow plane. Its 1 ⁄ 4" iron is exactly the same widthas my mortising chisel. My chisel also matches thegroove made by our shop’s 1 ⁄ 4" straight bit.5Again, note the stance and the two clampsinvolved in mortising. This clamping setup keepsthe work from shifting to the side or pulling upoff the bench.2 3Here you can see the advantage of tool slaving.My chisel drops into the groove. The walls willguide the chisel.Note the stance here. I’m watching the bit in themost important axis. If I tip left or right, my mortisechisel will follow the hole.6Mortises cut byhand are on parwith those cut bya hollow-chiselmortiser. Theyare fairly cleanand the walls aresmooth enough.woodworking-magazine.com ■ 19


