
Create successful ePaper yourself
Turn your PDF publications into a flip-book with our unique Google optimized e-Paper software.
<strong>ECO</strong> <strong>Pro</strong> Operation <strong>Manual</strong>Table of ContentsMachine Description:Contents of package 3Description of parts 4Daily Checklist 5Before Repairing Discs:Attaching compound and water bottle 6Key card operation 8Turning the power on 8Priming the water and compound PumpsRunning the water pump 10Running the polish pump 10Installing the Pads 11Repairing Discs<strong>Pro</strong>per placement of disc into machine 12Repairing a disc 12How to stop a repair session 13Increasing the repair time 14Tracking the time on a Key Card 14Cleaning the pads 14Optional Settings<strong>Manual</strong> versus Automatic Start 15Changing the Default Disc Repair Time 15Daily Cleaning 16Alert messages 18Checking the Total Repair Time 19
1. Contents of Package: <strong>ECO</strong> <strong>Pro</strong> Machine Bottle Holder AC Adaptor andPower CableWater Bottle Compound Bottle Pads(2 pieces)KEY CARD (1 piece)
2. Description and function of each partOperation PanelLED indicates status of the machine,Push buttons operate the machineKEY CARD slot for time card.LidMain Power SwitchWater nozzlesCompound NozzlesPad HoldersPlace Pads here.Platen TablePlace a disc here.AC InletConnect the cable tothe AC Adapter.Polish TrayWater Supply TubeCompound Supply TubeWater Bottle CapAttaches the Water Bottle.Compound Bottle CapAttaches the Compound Bottle.
Confirm that the Water Supply Tube reaches the bottom of the bottle.3. Before you repair a Disc…3.1 Attach the Compound Bottle and the Water BottleIMPORTANT! Shake the Compound Bottle well before uncapping.1. Uncap the Compound Bottle and attach the bottle to the Compound Bottle Cap. Insert the tube so the black sleeve is partially inside the bottle. This position is correct.This position is INCORRECT. Thecompound pump will not prime properlywith the tube in this position. 2. Pour 300 ml of water into the Water Bottle.300 ml3. Attach the Water Bottle to the Water Bottle Cap and tighten the lid.
74. Loosen and temporarily remove the Bottle Holder Thumb Screw at the back of the machine. Bottle HolderThumb Screw5. Hook up the Bottle Holder to the back of the Main Unit.Looking at the rear of the machine, insert the hooks of the Bottle Holder into theslits in the back and then slide the holder to the left to lock it in place.6. Secure the Bottle Holder by re-installing and tightening the Bottle Holder Thumb Screw.7. Attach the Compound Bottle and the Water Bottle to the Bottle Holder as shown
2. Connect the other cable of the AC Adaptor securely to the AC Inlet at the back of the Main Unit.3.2 KEY CARD OperationCaution! Be sure to turn OFF the Main Power Switch before inserting/removing the KEYCARD.Be sure to insert the KEY CARD so that the label side faces to the right when viewing from the front of themachine).The KEY CARD should be insertedwith arrow pointing down.To Remove the Key CardBe sure the KEY CARD is fully inserted intothe KEY CARD slot by pushing it down andforward to lock it in place.WARNING: Wait until the KEY CARDhas nooperating time remaining before removing itfrom the machine. You will lose any remainingtime if the card is removed.Pull the tab forward to release the card.3.3 Power ON1. Connect the Power Cable to the AC Adaptor.3. Connect the plug on the power cable to a grounded (3 prong) wall receptacle.Caution! Use a correct power receptacle that meets the adaptor’s rated electric capacity.Electric capacity: 100 - 240 VAC, 50/60Hz, 120W (Max)8
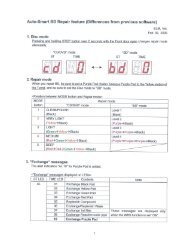
4. Turn ON the Main Power Switch.5. The LED displays “--“while the lid opens, and will change to either “cd“or “bd“ depending on the lastrepair setting. If the LED displays “NC” (“No KEY CARD” message), turn OFF the Main Power Switch, make surethat the KEY CARD is installed properly (see 3.2) and then turn ON the main power switch.IMPORTANT: Before repairing a disc the lines must be filled with water andpolish compound. Failure to do so may cause damage to disc and pads!3.4 Priming the Compound and Water PumpBefore you prime the pumps, remove the blackpolish compound nozzle caps and set themaside. DO NOT DISCARD THEM.Note: Use a small container or a piece of paper towel to catch water and compound from the nozzlesduring the following procedures 1 and 2 on next page.
1. How to Operate the Water Pump1. Press and hold “START” button, and then press “FUNC” button. The LED displays “P1”, and the WaterPump begins running. You will hear a rhythmic clunking sound each time the water pump operates.It may take several minutes for water to come out of the nozzles. If you do not see water after that time,try gently squeezing the sides of the water bottle to push water into the tubing and clear the air.If the water still does not come out, press Stop. Remove the tubing from the water bottle and use a canof compressed air to blow some air through the tubing until you feel air coming out of the nozzles.Repeat step 1.The water will not come out in a steady stream, but a few drops should come out each time the pumpengages.2. Press any button on the Operation Panel to stop the pump after confirming that water is coming out ofboth Water Nozzles. The display on the LED returns to “cd” or “bd”.2. How to Operate the Compound Pump1. Press and hold “STOP” button, and then press “FUNC” button.The LED displays “P2”. The Platen Table will begin rotating clockwise, which also starts the CompoundPump.It may take several minutes for the compound to fill the lines and drip out of the nozzles.2. Press any button on the Operation Panel to stop the Platen Table after confirming that compoundcomes out from both Compound Nozzles. The display on the LED returns to “cd” or “bd”.IMPORTANT: On a daily basis, run these tests to confirm that water andcompound are coming out from each nozzle before using the machine.WARNING: Put the nozzle caps back on the compound nozzles if the machineis going to sit for more than 24 hours between repair sessions, or thecompound will clog the lines. The 2 polish nozzles are the top left nozzle, andthe lower right nozzle.
3. 5 How to Install the PadsThe pads have a polishing side, and a Velcro side that attaches to the pad holder.1. Place each pad to be sure it is centered within each pad holder.Bend the Pad slightly with fingertips, and fitthe hole in the middle of the pad over thecenter pin of the Pad HolderMake sure the side of the pad with the center hole is attached to the pad holder.2. Push the center of the Pad lightly after placing it into the Pad Holder to attach the Velcro.Pad installed CORRECTLYPad installed INCORRECTLYIf the pads have been used before, make sure they are clean and dry before reusing them.See How to Clean the Pads on page 13.Helpful Hint: Buy another set of pads for quicker changeovers. That way you have a cleanset of pads ready to be used.11
3.6 Place The Disc In The MachinePlace a disc on the white Platen Table, with the label side down.IMPORTANT Place the disc so that theside to be repaired faces upwards.4. Repairing a Disc1. Select the Disc mode depending on the kind of disc to be repaired by pressing the “FUNC” button.Select “CD/DVD” mode for repairing CD and DVDs, or “BD” mode for repairing BD (Blu-rayDisc) and Hard-Coat Discs.When the machine is in the standby mode, the LED displays “cd” for “CD/DVD” mode,or “bd” for Blu-ray mode.2. When the lid is closed, the disc repair process begins automatically.Caution! Closing the Lid without a disc on thePlaten Table may cause pad damage.
3. The LED display shows the remaining time during the repair process.4. The LED displays “0” and blinks when the disc drying process begins.5. After finishing the disc drying process, the Lid opens automatically, and then the Platen Table stops.Caution! Take out the disc only after the PlatenTable has stopped completely.If there is compound residue left on the disc, wipe it gently with a soft cloth.All Blu-ray discs will need to be wiped after repairto remove compound residue.5. Stop the Repair SessionPressing the “STOP” button during the disc repair terminates the process.The lid will open and the Platen will stop spinning.
6. Increase the Disc Repair Time (for more heavily scratched discs)Press “START” button after the disc repair starts to extend the repair time.The repair time doubles every time the START button is pushed during a repair.When the repair is 1 minute or less the unit of the remaining time on the LED display is in seconds.When the time is longer than 1 minute (In that case, the LED displays the minutes remaining with the“.” after, and the “.” blinks).(Before extending repair time) (After pressing START button once) (After pressing START buttontwice)7. Track the Time Used on the Key CardThe key card keeps track of the number of repair minutes that have been used. To check this, openthe lid and press the START button. It will display the minutes of disc repairs to date on this KEYcard.When the key card disc repair time reaches its time limit, The machine will stop and a new Key cardand supplies are needed.8. Cleaning the PadsAfter a repair session, remove the pads and rinse them with warm water.Squeeze the pads several times to help remove any polish.Once no more polish comes out of the pads, squeeze the pads again to remove extra water and air dryovernight.
9. Optional Settings<strong>Manual</strong> versus Automatic StartThe <strong>ECO</strong> <strong>Pro</strong> default setting will automatically start repairing discs as soon as the lid is closed.This setting can be changed so the repair will start when the Start button is pressed, not when the lid isclosed.To change this setting, press and hold the FUNCTION button, then press and hold the STOP button.Continue holding both buttons until the screen shows a flashing “1.1” or a “1.0” on the screen. “1.1” isthe Automatic setting, and “1.0” is the <strong>Manual</strong> setting.Change this setting from Automatic to <strong>Manual</strong> by pressing the STOP button once. The screen willswitch from “1.1” to “1.0”To save this setting, press and hold the FUNCTION and the STOP buttons at the same time until theLCD display changes back to either “cd” or “bd”.Continue repairing discs.Changing the Default Disc Repair TimeThe default time for a disc repair session is 60 seconds.This setting can be changed so the default time is 30 seconds.To change this setting, press and hold the FUNCTION button, then press the STOP button. The screenwill show a flashing “1.1” or a “1.0” on the screen.Release the FUNCTION and STOP buttons, and press the START button. The LCD will change firstto a flashing “2.0”, and then to a flashing “3.0” or “3.1”.“3.0” is the 60 second repair time, and “3.1” is the 30 second repair time setting. If you pass thisoption, continue to press the START button and it will cycle around to these settings again.Change the setting from “3.0” to “3.1” by pressing the STOP button.To save this setting, press and hold the FUNCTION button and the STOP button at the same time untilthe LCD display changes back to “cd” or “bd”.Note: If the default disc repair time is set to 30 seconds, the time can still be increasedmanually by following the steps in Section 6 on page 13.
10. Daily Cleaning1. Put the polish nozzle covers on the machine when not in use.The polish nozzles are the upper left nozzle,and the lower right nozzle.2. Hold onto the platen table assembly and lift it straight up to remove it from the machine.3. Take the polish tray out of the machine and wipe it with a damp cloth. You can also wash it in the sink ifneeded.4. Spray the whole inside of the machine with Windex, including the lid and front panel.
5. Wipe out the machine with a soft cloth to remove any polish build up.6. Spray the platen table assembly with Windex and scrub with a toothbrush to clean it.7. Put the polish tray back in the machine.8. When you put the platen table assembly back into the machine, align the groove in the base withthe pin on the motor spindle.IMPORTANT: Once the platen table assembly is in the machine, rotate the platengently until you feel it drop slightly, then push down firmly in the middle to makesure it is securely connected to the motor.
11. Alert messagesThe LED display shows an alert code and blinks.In that case, perform each “Action” described below.Characters on theLED Screen(NC)(CP)(W)(CC)MeaningNo KEY CARDClean Pads(The message appearsevery 20-minutes ofdisc repair)Add waterInsert NEW KEY CARD,Add water, and Replacethe Compound BottleActionTurn OFF the Main Power Switch, insert the KEYCARD properly, and then turn ON the Main PowerSwitch again. Please call Tech Support if alert does notgo away after this step is done.Exchange Pads, and then press any button on theOperation Panel to clear the alert indication.Be sure to wash the detached Pads for additional use.Each Pad is reusable for a total of 300 minutes of discrepair.Add water to the Water Bottle, press any button on theOperation Panel to clear the alert. Refill water lines ifneccessary. See page 9.Turn OFF the Main Power Switch, exchange the KEYCARD, add water to the Water Bottle, and exchangethe Compound Bottle.12. Error MessagesIf an error occurs, the LED displays an error code “EX” (“E” means “error” and X is the error number) andblinks, each pump stops, the lid opens, and the Platen Table stops. For errors E4 to E9, call Tech Support.Characters onthe LED ScreenError NameContentsE2 No Pad Pads aren’t set to Pad Holders.Set Pads properly in that case.E4 Platen Motor The Platen Table doesn’t rotate properly.The Platen motor or the main circuit board may requireservice, and/or replacement.E7 Invalid KEY CARD “Reading data from” or “writing data to” the KEY CARD isimpossible.The KEY CARD may be out of order.The KEY CARD may have poor electrical contact to thesocket inside the KEY CARD slot.E8 EEPROM Load Reading of data is impossible from the EEPROM device.It is possible that the EEPROM memory is out of order.E9 EEPROM Write Data writing is impossible to the EEPROM device.It is possible that the EEPROM memory is out of order.
13. Checking the Total Repair Time for the <strong>ECO</strong> <strong>Pro</strong>You can check the accumulated repair time of the machine by following the procedure below.Press and hold “FUNC” button, and then turn ON the Main Power Switch.The LED displays the accumulated repair time (The maximum value is “999,999” minutes).The 6 digits are indicated in 3 groups of 2 digits.(Example) The accumulated repair time of the machine is “12,345” minutes“ ” (Blank) -> ”01” -> ”23” -> ”45”Once you have checked your repair time, Turn OFF the Main Power Switch,and turn ON again to resume repairs.
Service or repair of the <strong>ECO</strong> <strong>Pro</strong> disc repair machinePlease have the following information available:• Approximate date you received the machine• Model name of product• Serial Number• Description of <strong>Pro</strong>blem (as much detail as possible)Important:For factory service of your machine, go to www.rtico.com (<strong>RTI</strong> website), Click on TechnicalSupport on the left hand side. Fill out the Return a Machine or Part to <strong>RTI</strong> USA for ServiceForm found under the “<strong>RTI</strong> Group” listing of the web page.<strong>RTI</strong> Group4700 Chase Ave. - Lincolnwood , IL - USA - 60712Phone: 1-800-323-7520Fax: 1-847-677-1311E-mail: service@rtico.com