Christie Serie I Coolant Flush Instruction Sheet - Christie Digital ...
Christie Serie I Coolant Flush Instruction Sheet - Christie Digital ...
Christie Serie I Coolant Flush Instruction Sheet - Christie Digital ...

You also want an ePaper? Increase the reach of your titles
YUMPU automatically turns print PDFs into web optimized ePapers that Google loves.
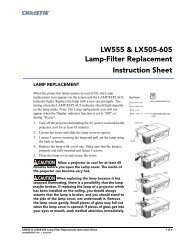
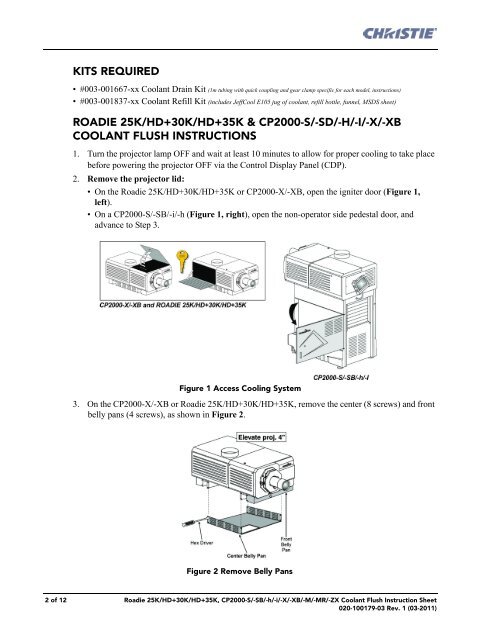
KITS REQUIRED• #003-001667-xx <strong>Coolant</strong> Drain Kit (1m tubing with quick coupling and gear clamp specific for each model, instructions)• #003-001837-xx <strong>Coolant</strong> Refill Kit (includes JeffCool E105 jug of coolant, refill bottle, funnel, MSDS sheet)ROADIE 25K/HD+30K/HD+35K & CP2000-S/-SD/-H/-I/-X/-XBCOOLANT FLUSH INSTRUCTIONS1. Turn the projector lamp OFF and wait at least 10 minutes to allow for proper cooling to take placebefore powering the projector OFF via the Control Display Panel (CDP).2. Remove the projector lid:• On the Roadie 25K/HD+30K/HD+35K or CP2000-X/-XB, open the igniter door (Figure 1,left).• On a CP2000-S/-SB/-i/-h (Figure 1, right), open the non-operator side pedestal door, andadvance to Step 3.Figure 1 Access Cooling System3. On the CP2000-X/-XB or Roadie 25K/HD+30K/HD+35K, remove the center (8 screws) and frontbelly pans (4 screws), as shown in Figure 2.Figure 2 Remove Belly Pans2 of 12 Roadie 25K/HD+30K/HD+35K, CP2000-S/-SB/-h/-i/-X/-XB/-M/-MR/-ZX <strong>Coolant</strong> <strong>Flush</strong> <strong>Instruction</strong> <strong>Sheet</strong>020-100179-03 Rev. 1 (03-2011)