The cambered Junk Sail - The Junk Rig Association
The cambered Junk Sail - The Junk Rig Association
The cambered Junk Sail - The Junk Rig Association
- No tags were found...

Create successful ePaper yourself
Turn your PDF publications into a flip-book with our unique Google optimized e-Paper software.
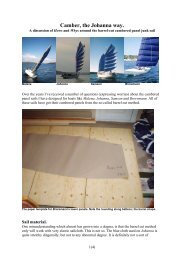
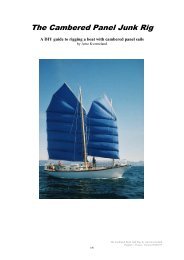
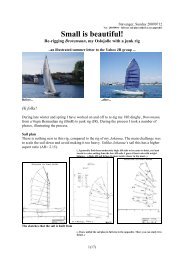
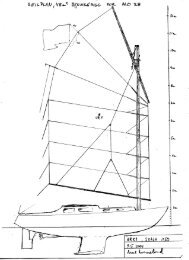
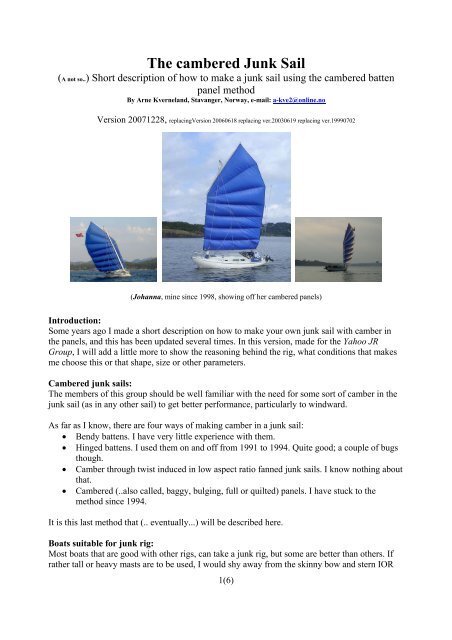
<strong>The</strong> <strong>cambered</strong> <strong>Junk</strong> <strong>Sail</strong>(A not so..) Short description of how to make a junk sail using the <strong>cambered</strong> battenpanel methodBy Arne Kverneland, Stavanger, Norway, e-mail: a-kve2@online.noVersion 20071228, replacingVersion 20060618 replacing ver.20030619 replacing ver.19990702(Johanna, mine since 1998, showing off her <strong>cambered</strong> panels)Introduction:Some years ago I made a short description on how to make your own junk sail with camber inthe panels, and this has been updated several times. In this version, made for the Yahoo JRGroup, I will add a little more to show the reasoning behind the rig, what conditions that makesme choose this or that shape, size or other parameters.Cambered junk sails:<strong>The</strong> members of this group should be well familiar with the need for some sort of camber in thejunk sail (as in any other sail) to get better performance, particularly to windward.As far as I know, there are four ways of making camber in a junk sail: Bendy battens. I have very little experience with them. Hinged battens. I used them on and off from 1991 to 1994. Quite good; a couple of bugsthough. Camber through twist induced in low aspect ratio fanned junk sails. I know nothing aboutthat. Cambered (..also called, baggy, bulging, full or quilted) panels. I have stuck to themethod since 1994.It is this last method that (.. eventually...) will be described here.Boats suitable for junk rig:Most boats that are good with other rigs, can take a junk rig, but some are better than others. Ifrather tall or heavy masts are to be used, I would shy away from the skinny bow and stern IOR1(6)
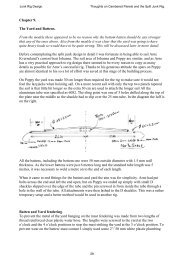
<strong>The</strong> HML sail has a vertical or next to vertical leech. This reduces trouble with sheetspansbeing caught by boom or battens when tacking or jibing. With the Reddish sail Ihad to throw the sheet over every time I tacked.<strong>The</strong> HML sail gives a very long luff for a given mast length (..when counting with the70deg yard...). Fine for upwind work.However, if you don’t like the look of the HML sail, you may well make a <strong>cambered</strong> sail with afanned planform. In fact, this may be a good idea for two reasons (.. I haven’t tested thismyself...): <strong>The</strong> reported problems with reefing the fanned sails (..sail moving aft as they reef...), maywell be eased or cured by cutting each panel with camber. <strong>The</strong> <strong>cambered</strong> panels will haveMuch reduced diagonal stiffness, so will move much less aft as you reef (..read laterabout Hong Kong parrels...). If you are to use double sheets, port and starboard, I guess the sheet spans will be lesslikely to catch battens than with a HML sail.Deciding the centre of effort and lead:Generally I design the sail with the max camber point well forward of the middle; between 35and 45% from the luff. Experience has told me that the effective CE of the sail is far forward insuch a sail (more than in the flat sail). For this reason; you may well move the geometrical CE ofthe junk sail at least 5% (of the DWL) aft from where it was with a Bermuda rig. In fact; if youare forced to put your mast and rig so far forward in the boat that you fear for lee helm, you cancut the sail with the max camber point as far aft as 40, 45 or even 50% aft of the luff. This shouldcompensate for up to 5% too much lead, I guess.I have fiddled a lot with different rigs in my first junk rigged boat, Malena, so I actually know a bitabout this.Making the sail:This short description is for people who have some basic knowledge about the junk sail. Istrongly recommend that you read one of these books before starting rigging a boat with a <strong>Junk</strong><strong>Rig</strong> for the first time: "Practical <strong>Junk</strong> <strong>Rig</strong>" by Hasler and McLeod. (ISBN 0-229-11798 8), "<strong>The</strong> Chinese <strong>Sail</strong>ing <strong>Rig</strong>" by Derek van Loan. <strong>The</strong>re is also useful information on the www.1. Draw up the sail-plan (.. yes, draw - pen and paper...). Have several copies of the boat plansready, so you can make 2-3 versions of the sailplan, until you get the right sail area andcorrect centre of effort (CE) in the sail-(plan). Be generous with sail area, but avoid fittingtoo tall and heavy masts. I use hollow (dug out) spruce.2. Decide how much camber you want in each panel, and calculate the necessary rounding ineach panel to achieve that camber. <strong>The</strong> result may end up like the enclosed sail-plan forJohanna (sheet 3). <strong>The</strong> ‘Arne’s chain calculator’ and ”chain calculator sketch” is a useful aidin this process.3. Alternative 2. If you already have a drawing of a junk sail that you like in your hands, withlengths written on, you can scale it up or down to the area you want and see how it looks onyour boat. Just remember that linear scale factor is the square root of the area factor. E.G. ifyou want your sail to be 30sqm instead of 40, the area is reduced to 75%. <strong>The</strong> lengths ofbattens etc should then be reduced to square root of 0.75=0.87, or 87% of original lengths.4(6)
4. I use to make a pattern in cardboard or plywood to show the rounding in the lowest panels (..by now you understand why I use 4-5 identical panels on Malena and Johanna…). Use abendy wooden batten to scribe the curves on the pattern. By the way, choose a slightlystretchy, soft canvas for sailcloth, not the firm, heat-treated and doped Dacron sailcloth. <strong>The</strong>softer cloth will more easily take up the compound curves in the bulging batten-panelswithout showing creases. Hopefully your sailcloth /canvas is wide enough to cover a wholepanel, at least in the lower ones. If not, you will have to build them up from smaller panelsfirst. Don’t forget to add cloth-width for hems and along battens (see step 4-5 andAfterthought #1).5. Before assembling the sail, panel for panel, make the hem on all the outer edges of the sail,2-4 cm wide, 2 seams. Sew in a 3mm thick inner bolt-rope in the hem, cheap polypropyleneor something. ( See also Afterthought #3)6. Sew the panels together (se enclosed sewing sketch). Staple the panels together first to makesewing easier. You may want to make gaps in the batten-pockets where batten-parrels andHong Kong parrels are to be. On Malena’s sail, I just burned holes with a solder-ironafterwards. <strong>The</strong> strong, doped nylon has never ripped. (See Afterhought #2)7. Now, with the sail almost completed, it is time for the outer bolt-rope, a most important item.This is a continous rope around the whole sail. I start somewhere on the foot of the sail andhand-stitch it to the inner bolt-rope (remember?) with about 3-4 locking stitches, then 15cmpause, then 3more locking stitches etc. Close to the battens or corners I may add extra sets of"3-stitch". This outer bolt-rope is to carry all the accumulated stresses in the sail, so it shouldbe fairly strong, and not elastic. On Malena I use a 7mm pre-stretched 3-strand polyesterline.Make sure that the roping is taut enough, i.e. that the weight comes on the rope and notthe sail. <strong>The</strong> reason for the inner bolt-rope should now be obvious: To give a good grip forthose 3-stitch groups. This is the Chinese way of doing it; remember their ‘sailcloth’ wasvery thin and fragile. (See also Afterthought #3)8. Fit a telltale made of nylon-ribbon at the leech of ach panel. <strong>The</strong>se will keep you from oversheeting(stalling) the sail. If you over-sheet, the telltales will fall behind the sail. Veryuseful, don’t skip this!9. <strong>The</strong> sail is now ready for the boat. <strong>The</strong> openings in the boltrope come now in handy whenyou are to lace the sail to the yard and boom. <strong>The</strong> batten-ends (with hole in) are also lacedwith thin line to the bolt-rope. Note!! I spliced a hoop of line to the outer bolt-rope at eachbatten-station prior to sewing the bolt-rope on. It is done so that the protruding batten willrest in this hoop. In other words, that hoop will take up all the vertical forces from thebattens. This is necessary because I fix sheetlets/sheetspans and luff hauling parrels directlyto the battens. This works well, but it means a lot of splicing! (still, I roped Malena’s sail thisway in 8hour’s sharp)10. Hoist sail on a dead calm day, and fix batten parrels, Hong Kong parrels one by one as youhoist the sail. After some sailing, you may need to make adjustments on the batten parrels,and also on those diagonal Hong Kong parrels - whose job, by the way, is to avoid diagonalwrinkles in each batten panel. <strong>The</strong> bulging panels do not have much diagonal stiffnessthemselves.5(6)
Afterthoughts:1. On bigger sails (over 35sqm) I may fit patches at each batten-end, prior to fitting the outerbolt-rope. Remember, that diagonal Hong Kong parrel should act on the batten, not on thecloth in the batten pockets (only on rope type boltrope...)2. Now (2003) on Johanna’s sail I have a 20cm gap between the fore and the aft batten pocket.<strong>The</strong>y have been sewed on from separate strips of canvas. <strong>The</strong> fore batten pocket by the mastis made from heavy pvc-like canvas to avoid shafing.3. On Johanna’s sail I have ”roped” the sail with webbing (saves a lot of time with a sewingmachine). <strong>The</strong> hoops through which the battens are run (at luff/leech), are also made from thesame webbing. Smaller webbing hoops are fixed to the head and foot of the sail to fix themto yard and boom. Such small hoops are also fitted to the luff/leech at the battens. Time willshow if it works. (Comment 20060618: It does, but I wonder if the webbing I have used is alittle too elastic. This winter I might fit a boltrope all round the sail, Malena-style. It takesjust about 6 hours. ). (Comment 20071228: Maybe some day...).4. (20060618) <strong>The</strong> way of assembling panel to panel along the battens seems terribly crude onmy sketch. Still, Malena’s sail has been in use for over 10 years now, and we have not hadto replace a single stitch yet. Remember, it is the boltrope which carries the loads. <strong>The</strong> loadper metre or ft along the battens is very low indeed.******************That’s all folks – for now.Hopefully I may write up a section on problems and their solutions, small tricks etc. Some fileswith sketches will also pop up in this folder as I get them ready.Stavanger, Dec. 28 th 2007.Arne KvernelandPS. No doubt I have forgotten things. Still I hope, with some sensible feedback from you, maybeI can fill the worst holes – and straighten up my Stavanger-English too.6(6)
Sewing sketch 1.Three ways of assembling the batten panels. <strong>The</strong> two first let you do it without passing a big roll of sail inside thesewing machine. Looks crude, but it works.
Sewing sketch 2Shows how much easier it is to join two panels with camber cut in, if you use the amateur method. No need forpassing big rolls of sail inside the sewing machine.
Sewing sketch 3Shows a good way of joining straight canvas panels. Lets you make the first seam without needing to pass anycanvas inside the sewing machine. You hardly need double sided (basting) tape.