Visual Touchpad: A Two-handed Gestural Input Device
Visual Touchpad: A Two-handed Gestural Input Device
Visual Touchpad: A Two-handed Gestural Input Device

Create successful ePaper yourself
Turn your PDF publications into a flip-book with our unique Google optimized e-Paper software.
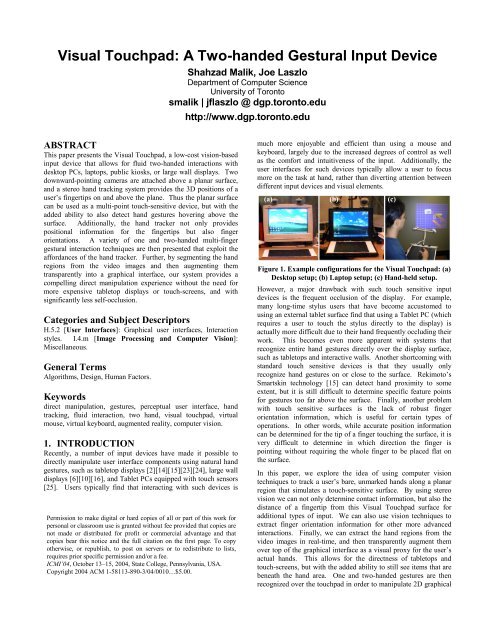
With the exception of the latter, these works use overlaid livevideo primarily for remote awareness in applications such asteleconferencing, and do not make use of the video proxy as anactive user input. In contrast, we make use of the self-image bothto provide visual feedback without occlusion, and as a direct userinput mechanism in a similar spirit to that of [19].3. SYSTEM OVERVIEW3.1 HardwareSimilar to the <strong>Visual</strong> Panel [26], the <strong>Visual</strong> <strong>Touchpad</strong> is a simplequadrangle panel such as a piece of paper with a rigid backing,over which hand gestures can be recognized for interactionpurposes. In our system, we use a piece of paper with a largeblack rectangle in the centre, surrounded by a thin white border.This black region defines the active “touchpad”, while the whiteborder facilitates the vision algorithms described later. The sizeof the paper can be any size as long as we can place both handscomfortably over the touchpad. Additionally, the touchpadshould ideally have the same aspect ratio as the display that willbe used for visualization. Section 3.4 discusses this in moredetail.<strong>Two</strong> off-the-shelf web cameras are then placed in a convenientlocation such that the black rectangular region of the touchpad isfully visible to both cameras, and the cameras are placed with asufficiently wide baseline for accurate depth estimation. Thecameras can capture 320x240 images at 30 frames per second on astandard Pentium 4 PC. For desktops, laptops, and kioskconfigurations, it is sufficient to fix the location of the touchpadin front of the display, and then place the cameras on top of thedisplay facing downward (Figure 1a and Figure 1b). Forinteracting with large wall displays from afar, we proposeattaching the cameras directly to the panel (Figure 1c) and usingthe panel as a handheld input device, instead of hanging thecameras from the ceiling as in the original <strong>Visual</strong> Panel work.The advantage with our fixed panel approach is that the system iseasier to set up, and the pattern will always be visible to thecameras. The disadvantage is that we lose the ability to extractthe panel orientation, but we make up for these lost degrees offreedom with a more sophisticated hand gesture recognitionsystem.3.2 Homography ComputationTo simulate a touch-sensitive surface, we assume that the cornersof the touchpad map to the corners of the display (Figure 2). Inorder to determine this mapping, we use a homography [4], whichdefines a plane-projective mapping between two planes. In orderto compute a homography we require the positions of at least fourpoints on one plane and the corresponding four points on theother plane.Figure 2. <strong>Touchpad</strong> to screen mapping.Therefore, for each of our cameras, we detect the four corners ofthe touchpad in a captured video frame and then computeH i є {1,2} , which represents the homography that maps camera i’sview of the touchpad into display coordinates.To find the corners of the touchpad in a frame of video, we usesimple binary image processing operations. First we threshold agrayscale version of the video frame into a binary image in orderto segment out the high contrast black rectangle that is surroundedby the thin white border (Figures 3a and 3b). We currently use afixed value of 128 for our 8-bit grayscale image threshold, whichworks well in most situations. A flood-fill technique is then usedto extract the largest black connected component in the videoframe, and for this black blob we extract the four strongest cornerfeatures (Figure 3c). A homography is then computed using thesefour touchpad corners and the corresponding corners of thedisplay. The assumption here is that the <strong>Visual</strong> <strong>Touchpad</strong> fillsmost of the image such that the largest black blob region willcorrespond to the black rectangular region of the touchpad.(a) (b) (c)Figure 3. <strong>Touchpad</strong> detection: (a) Original frame; (b)Thresholded binary image; (c) Corners detected.3.3 Hand TrackingIn this section we describe the details of the hand tracker, whichapplies low-level image processing operations to each frame ofvideo in order to detect the locations of the fingertips. While amodel-based approach that uses temporal information couldprovide more robustness to situations such as complexbackgrounds or overlapping hands, the image processingapproach is straightforward to implement and can run in real-timewith low cost PCs and cameras.3.3.1 Image RectificationUsing H i defining the mapping from the touchpad in camera i toscreen space, our hand tracker first warps each frame of live videoso that the panel (and any hand over top of it) is in screen space.Let p j represent a pixel in screen space, and q j represent thecorresponding pixel from touchpad space. Therefore we have −1q = H p(1)jiFigure 4a and 4b show the result of creating a warped (screenspace) image of the touchpad with a hand over top of it3.3.2 Background SubtractionSince we assume a black rectangular region for our panel, it iseasy to segment out the hand from the warped image by using asimple background subtraction operation, where our backgroundis simply a black rectangle covering the whole screen (Figure 4c).By using a black region as our known background, the system isquite robust to shadows cast onto the touchpad by foregroundobjects such as hands. Additionally, the system can reliablydetect foreground objects in a wide variety of lighting conditionsas long as they are different from the black background.j
3.3.3 Hand Blob DetectionA flood-fill technique is then applied to the foreground objects,and the two largest connected blobs above some threshold size areassumed to be the hand blobs. Assuming that hands will not crossover during interaction, we simply label the left-most blob as theleft hand, and the right-most blob as the right hand. In the case ofonly a single blob, we consider it to be either the left or right handdepending on a software setting that defines a user’s dominanthand preference.3.3.4 Fingertip DetectionThe contours of each blob are then detected in a clockwise orderand potential fingertips are found by finding strong peaks alongthe blob perimeters. We first use an approach similar to [18],where the vectors from a contour point k to k+n and k-n arecomputed (for some fixed n). If the angle between these vectors isbelow some threshold (we currently use 30 degrees) then we markthat contour point as a potential fingertip. To avoid detectingvalleys (such as between fingers) we verify that the determinant ofthe 2x2 matrix consisting of the two vectors is negative. Nonmaximalsuppression is then used to avoid detecting strongfingertips too close to one another. Finally, orientation isdetermined by computing a line from the midpoint betweencontour points k+n and k-n to the fingertip point k. Figure 4dshows the result of fingertip position and orientation detection.since the homography only provides a planar mapping (Figure 5).This disparity of corresponding points can thus be used todetermine the distance of feature points above the touchpadsurface [21]. To determine a binary touch state, we define adisparity threshold below which we consider a point to be incontact with the touchpad. For a given camera configuration, athreshold can be easily determined by holding the finger at aheight above the touchpad which should be considered “off” thesurface. The disparity of the fingertip position can then be used asthe disparity threshold. In our experiments we have found thatholding the finger approximately 1cm above the surface workswell. The final output from our hand tracker is a set of (x,y,z,Θ)values for each detected fingertip, where z is a boolean valuerepresenting whether the finger is touching the surface. Note thatwe set one of our cameras to be the reference camera, and thus the(x,y) values for each fingertip are extracted from the hand contourassociated with that camera. Additionally, the tracker can alsoprovide temporal information, resulting in five parameters foreach fingertip. The advantage of using disparity instead of 3Dtriangulation is that we do not need to perform camera calibrationof any sort, which makes the system extremely simple to set up.(a)(c)Figure 4. Hand detection in the warped image: (a) Originalimage; (b) Warped image; (c) After background subtraction;(d) Finger tip positions and orientations detected.3.3.5 Fingertip LabelingIf a single fingertip is detected in the contour, it is always labeledas the index finger. If two fingers are detected, the systemassumes they are the thumb and index finger, using the distancebetween each fingertip along the contour to differentiate betweenthe two. For example, for the right hand, the distance from theindex finger to the thumb is larger in the clockwise contourdirection than the distance from the thumb to index finger. Forthree, four, and five finger arrangements we use a similar contourdistanceheuristic for the labeling, with label priority in thefollowing order: index finger, thumb, middle finger, ring finger,little finger.3.3.6 Detecting Contact with the <strong>Visual</strong> <strong>Touchpad</strong>For each camera, the hand detector gives us the (x,y) position offingertips in screen space, as well as the orientation angle Θ of thefinger. For fingertips directly on the surface of the touchpad, thepositions will be the same regardless of whether we use the poseinformation from the warped image from camera 1 or the warpedimage from camera 2. However, for fingertips above the touchpadsurface the positions of corresponding points will be different(b)(d)Figure 5. Using disparity for sensing height of raised fingers:(left) Rectified camera 1 view; (middle) Rectified camera 2view; (right) Images overlaid together show correspondingpoints for raised fingers are not in same position.3.3.7 Postures and GesturesGiven the output of the hand tracker, it is extremely simple todetect the four static postures depicted in Figure 6. The pointingposture is simply the index finger held straight out in somedirection. The pinching posture involves setting the thumb andindex finger as if something is being held between them, with thethumb and index finger pointing in relatively the same direction.The L-posture is a variation of the pinching posture, where thethumb and index finger are pointing in approximately orthogonaldirections. For both the pinch posture and L-posture we canoverload the recognition system with variations such as bothfingers touching the touchpad surface, both fingers not touchingthe surface, or one finger on the surface and one finger off thesurface. Finally the five-finger posture is simply holding out allfingers so that the hand detector can clearly identify all fingertips.(a)(c)Figure 6. Posture set: (a) Pointing; (b) Pinching; (c) L-posture;(d) Five-finger posture.(b)(d)
Along with the static postures, our system can also detect gesturesusing temporal information. To demonstrate this capability, wecurrently detect a holding gesture (for all postures), a double-tapgesture (for the pointing posture), and an X shape gesture (alsofor the pointing posture). While these gestures are fairly simplethere is nothing preventing our system from recognizing morecomplicated gestures, since all of the required information isavailable.3.4 Hand AugmentationThe ability to use your hand for direct manipulations is one of themain advantages of devices such as tabletop displays or touchscreens.Roussel’s VideoPointer system [17] proposed using alive video stream of a user’s hand as a better telepointer for realtimegroupware. Building on this idea, we propose augmentingthe user’s hand directly into the graphical interface, using the livevideo of the segmented hand region from the reference camera asa visual proxy for direct manipulations. The advantage of thisapproach is that a user feels more connected to the interface in amanner similar to tabletops or touch-screens, but while using anexternal display such as a monitor. The other advantage is that byrendering the hand as an image, we can apply other special effectssuch as transparency to help overcome the occlusion problem, aswell as visual annotations onto the hand such as mode or stateinformation. Figure 7 shows an example of a hand beingaugmented onto a graphical interface.4.1 One-<strong>handed</strong> Techniques4.1.1 Object Selection/Translating/Rotating/QueryTo select an image on the canvas, a single hand in a pointingposture can be positioned so that the fingertip is within thebounds of the object, with the fingertip touching the surface of the<strong>Visual</strong> <strong>Touchpad</strong>. When the finger makes contact with thetouchpad a yellow glow appears around the fingertip.Additionally, the borders of the selected image become green tosignify that it has been selected. To deselect the object, the usersimply raises the fingertip up from the touchpad surface until theyellow glow disappears.Once an object has been selected, it can be simultaneouslytranslated and rotated. Translation is controlled by simplymoving the finger in the appropriate direction. The image thenremains attached to the fingertip. Similarly, the orientation of thefinger controls the rotation of the object, with the centre ofrotation being the fingertip position. Figure 8 shows an imagebeing translated and rotated using the pointing gesture.To query an object for information (such as file name, imagedimensions, etc) we use an approach similar to tooltips found ingraphical interfaces such as Windows. By simply holding apointing posture for one second inside the boundaries of animage, but without touching the touchpad surface, a small querybox is activated. Moving the finger out of the image dismisses thequery box.(a) (b) (c)Figure 7. Hand augmentation: (a) No fingers; (b) Fingerabove surface; (c) Finger contacting touchpad.Note that the size of the hand on the screen is dependent upon thesize of the touchpad, due to the touchpad-screen homography; thelarger the touchpad, the smaller the hand appears on the screen,and vice-versa. Thus the size of the panel should be proportionalto the size of the display. As mentioned earlier, it is also best tohave similar aspect ratios for the display and the touchpad so thatthe hand is rendered realistically.When no fingers are detected by the hand tracker, any hand blobsare rendered with 50% opacity (Figure 7a). As soon as anyfingers are detected, each fingertip is drawn at 85% opacity withgradual falloff to 50% opacity using a fixed falloff radius (Figure7b). This allows the hand to come into focus when the user isperforming some action. Additionally, when a fingertip isdetermined to be in contact with the touchpad, a yellow highlightis rendered beneath it for visual touch feedback (Figure 7c).4. INTERACTION TECHNIQUESTo demonstrate the capabilities of the <strong>Visual</strong> <strong>Touchpad</strong>, a simplepicture manipulation application has been implemented. Anumber of images are scattered around a canvas, and using handgestures the user is able to move/rotate/scale the images, queryobject properties, pan/rotate/zoom the view, etc. Using some ofthe postures and gestures described earlier we show that the<strong>Visual</strong> <strong>Touchpad</strong> can be used to perform a variety of commonGUI operations in a fluid manner.Figure 8. Image translation and rotation.4.1.2 Group Selection/Copy/Paste/DeleteTo select a group of images for operations such as copying ordeleting we can make use of the double-tap gesture. By doubletappingon an image a yellow highlight appears around itsignifying that it has been added to the current group. To removea selected image from the group we simply double-tap it again. Asingle tap in any empty canvas location causes the entire group ofobjects to be deselected.The selected group is always the set of objects in the clipboard sothere is no need to explicitly perform a copy operation. To pastethe selected group of images we use the L-posture with bothfingers above the touchpad surface. The index finger positiondefines the centre of the selected group, and translation or rotationof the L-posture can be used to place the group in the desiredlocation. To finalize the positioning the user simply places boththe index finger and thumb onto the touchpad surface. After thepaste operation, the new set of images becomes the active groupselection. Note that the second hand can be used to navigate thecanvas viewpoint simultaneously (as described in the nextsection). To cancel the paste operation the user can touch thethumb and index finger together without touching the touchpadsurface. To delete a selected group of images a user draws an Xin an empty part of the canvas.
4.1.3 Canvas Panning/Rotating/ZoomingTo control the canvas viewpoint we use an approach similar to theSmartSkin map viewer [15]. Using a pinching posture, where thethumb and index finger are in contact with the surface of thetouchpad, the user can simultaneously control the position,orientation, and zoom level of the window into the canvas. Theidea is that as soon as two fingers make contact with the touchpad,they become “attached” to the corresponding positions within thecanvas. Moving the hand around the canvas while maintainingthe pinch posture causes the window into the canvas to move in asimilar direction. To rotate the entire canvas, the hand can berotated while the pinch posture is maintained. The centre ofrotation is thus defined as the midpoint between the tips of thethumb and index finger. Finally, bringing the fingers closertogether while still touching the surface causes the view to bezoomed out, while moving the fingers further apart causes theview to be zoomed in. The centre of zoom is defined as themidpoint between the thumb and index finger. In all cases, whentranslation, rotation or zooming becomes difficult due to the handending up in an awkward pose, the operation can be continued bysimply raising the fingers off the touchpad surface, adjusting thehand to a comfortable position again, and then continuing theviewpoint control. Figure 9 shows an example of a pinch posturecontrolling the zoom level.Zooming inFigure 9. Canvas zoom control.Zooming out4.1.4 Navigation WidgetWhile the canvas viewpoint control described above works wellfor small adjustments of the canvas, it is inefficient when largescaleviewpoint changes are required. Since we are able torecognize postures and gestures above the touchpad surface, wepropose a navigation widget that can be used for continuousscrolling of the viewpoint. To activate the widget the user holds apinch posture steady for one whole second above the surface ofthe touchpad. Once activated, the system captures the midpointbetween the thumb and index finger as the “centre” position. Anavigation arrow then appears between the thumb and indexfinger, with a line connecting the current midpoint between thethumb and index finger to the “centre” position (Figure 10).The widget then acts much like a joystick, where translation inany direction away from the “centre” causes the viewpoint totranslate in that direction, with scrolling speed dependent uponthe distance of the widget from the “centre”. Canvas zooming canalso be performed, by treating the navigation widget as a dial,where the “zero” rotation is the finger orientation at the “centre”pose. Therefore, rotation of the fingers in a clockwise directioncauses the view to be zoomed in, while a counter-clockwiserotation causes the view to be zoomed out. The amount ofrotation from the “zero” defines the speed of the zoom. Todeactivate the widget, the user can simply pinch the fingerstogether completely.TranslationFigure 10. Navigation widget.Zooming4.2 <strong>Two</strong>-<strong>handed</strong> Techniques4.2.1 Pie MenuAsymmetric-dependent tasks, as proposed by Guiard [5], are thosein which the dominant (D) hand moves within a frame ofreference that has been set by the non-dominant (ND) hand.Therefore, the ND hand will engage in coarse and less frequentactions, while the D hand will be used for faster, more frequentactions that require more precision. Kabbash [8] showed thatsuch asymmetric-dependent interaction techniques, where theaction of the D hand depends on that of the ND hand, give rise tothe best performance since they most closely resemble thebimanual tasks that we perform in everyday life.We follow such an asymmetric-dependent approach for our piemenu system that is used to select various options. To activate thepie menu the user performs a double-tap gesture using the NDhand. The pie menu (with a small hollow centre) is thendisplayed, centered at the ND hand’s index finger. If the usermaintains contact with the touchpad surface, the pie menu willremain centered at the index finger. If the index finger is raisedfrom the surface, the pie menu will remain at the previousposition, thereby allowing the user to select menu options with asingle-tap. Another double-tap in the hollow centre is used todeactivate the pie menu. To illustrate the functionality of the piemenu, we implemented a simple drawing tool that allows the userto “finger-paint” onto the canvas. The pie menu consists of thefollowing options: drawing mode, draw color, draw size, drawshape.The drawing mode option acts as a toggle switch. When selected,the D hand’s fingertip becomes a paintbrush, with an appropriatecursor drawn at its tip. The user can then paint strokes with the Dfinger when it is in contact with the touchpad surface.By selecting the draw color option, a color palette is presented tothe user. Moving the ND fingertip within the palette (whilemaking contact with the touchpad surface) sets the color of the Dhand’s fingertip. To deactivate the color palette the user simplymoves the ND fingertip out of the palette area.The draw size menu option allows the size of the paintbrush tip tobe modified. A slider appears when the option is selected, which
can be modified by “dragging” the slider handle using the NDfinger much like many 2D GUIs. The slider is deactivated bymoving the ND finger outside of the slider’s rectangular border.Finally, the draw shape menu option allows the user to change theshape of the paintbrush tip. Four simple shapes are currentlyimplemented as shown in Figure 11. Unlike traditional paintingtools, ours allows for simultaneous control of not only the brushtip’s position but also the tip orientation, thereby allowing forinteresting calligraphic effects.Figure 11. Pie menu for finger-painting.4.2.2 Image StretchiesKurtenbach et al [11] introduced an interaction technique called“two <strong>handed</strong> stretchies” that allow primitive shapes to besimultaneously translated, rotated and scaled using two rotationsensitivepucks on a tablet surface. The <strong>Visual</strong> <strong>Touchpad</strong> is alsocapable of such techniques using two-<strong>handed</strong> postures instead ofpucks.One hand with a pointing posture selects an object as usual. Theposition of the fingertip is then “locked” onto the selected image.The second hand then selects another position within the sameimage, and that position becomes “locked”. Translating bothfingers at the same rate and in the same direction allows for theimage to be moved. However, translating the fingers in differentdirections or at different speeds will cause rotation and scalechanges. The idea is that the two “locked” finger positions willalways represent the same pixel in the image. While we currentlydo not use the finger orientations for this stretch operation, weplan to integrate it into the system in the future to allow for asimultaneous image warp as well.4.2.3 <strong>Two</strong>-<strong>handed</strong> Virtual KeyboardMany applications such as presentation tools, drawing tools, orweb browsers require frequent switching between text entry(keyboard) and navigation (mouse). Virtual keyboards [9] are oneapproach to making text entry and navigation more fluid. Byrendering a graphical layout of a keyboard on the screen, a userdoes not have to switch between input devices and can insteadfocus more on the desired task. Additionally, virtual keyboardscan be reconfigured to different layouts based on a user’s personalpreferences. The downfall with most virtual keyboards is thatthey rely on single mouse clicks to simulate key presses, resultingin slow text entry.Motivated by the familiarity and reconfigurability of virtualkeyboards, we have implemented an onscreen QWERTY keyboardfor the <strong>Visual</strong> <strong>Touchpad</strong> that can be used to make textualannotations on our image canvas. To activate the virtualkeyboard, a user makes a five-finger gesture with both hands overthe touchpad (Figure 12). This gesture simulates putting thehands onto “home-row” on a real keyboard. The virtual keyboardis then rendered transparently on the screen, with the handsrendered over top. By default, the text entry cursor is placed atthe canvas location corresponding to the middle of the screen,above the virtual keyboard. Letters can then be entered by simplytouching the appropriate virtual keys with the fingertips. Thevirtual keyboard is deactivated by pressing the virtual “Escape”key. Note that the mapping between the touchpad and the virtualkeyboard is not dependent on the canvas window settings.Instead, the size and position of the virtual keyboard is fixed tosome predetermined absolute region of the touchpad and acorresponding region of the screen so that the spatial layout of thekeys remains constant.By rendering the hands and keyboard together on the display,users do not have to divert their visual attention away from theonscreen task. Additionally, by using the same input surface forboth text-entry and GUI navigation, the experience is much morefluid compared to traditional keyboard-mouse configurations. Itis worth mentioning, however, that the current implementationdoes not allow for extremely fast text entry, largely due to thelimited speed of our camera capture and image processingoperations.Figure 12. Virtual keyboard.5. DISCUSSIONWhile detailed user experiments have not yet been performed,informal user feedback from students in our research lab has beenvery positive. Each user was given a brief introduction to theposture and gesture set, and then they were free to explore thesystem on their own for 10 to 15 minutes.All users found the posture and gesture based manipulations to beextremely intuitive, with descriptions such as “cool”, “neat”, and“fun” to describe the overall system. One of the first things manypeople were impressed with was the ability to see their own handson the screen, and as a result they found the direct manipulationtechniques to be very compelling.The asymmetric two-<strong>handed</strong> pie menu required a quickintroduction in most cases, but afterwards all users found the piemenu to be easy to use. Although our pie menu only has fouroptions on it, we tried a quick experiment to see if handtransparency makes any difference when portions of the menu endup beneath the hand. Some users were given a version with afully opaque hand, while others were given a transparent hand. Itwas observed that a few of the opaque hand users wouldfrequently move their hand off to the side of the pie menu if anoption’s title was occluded by the hand, while we did not see thiswith the transparent hand users. A more extensive study isrequired to accurately determine how effective our transparenthands are against occlusion, but these preliminary observationsare encouraging.