
You also want an ePaper? Increase the reach of your titles
YUMPU automatically turns print PDFs into web optimized ePapers that Google loves.
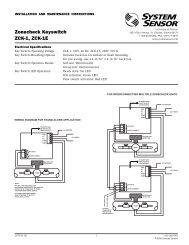
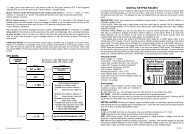
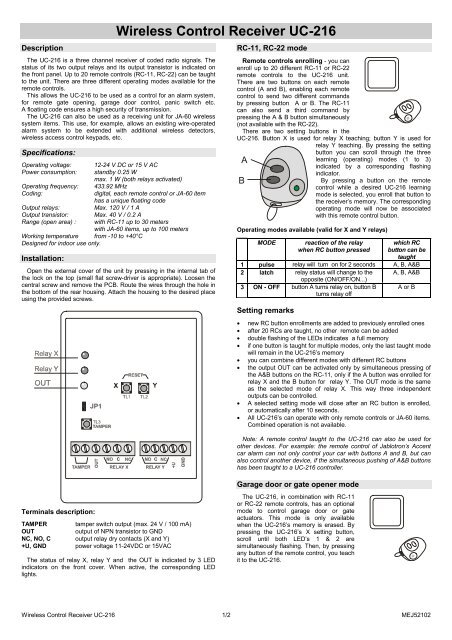
Description<strong>Wireless</strong> <strong>Control</strong> <strong>Receiver</strong> <strong>UC</strong>-<strong>216</strong>The <strong>UC</strong>-<strong>216</strong> is a three channel receiver of coded radio signals. Thestatus of its two output relays and its output transistor is indicated onthe front panel. Up to 20 remote controls (RC-11, RC-22) can be taughtto the unit. There are three different operating modes available for theremote controls.This allows the <strong>UC</strong>-<strong>216</strong> to be used as a control for an alarm system,for remote gate opening, garage door control, panic switch etc.A floating code ensures a high security of transmission.The <strong>UC</strong>-<strong>216</strong> can also be used as a receiving unit for JA-60 wirelesssystem items. This use, for example, allows an existing wire-operatedalarm system to be extended with additional wireless detectors,wireless access control keypads, etc.Specifications:Operating voltage: 12-24 V DC or 15 V ACPower consumption: standby 0.25 Wmax. 1 W (both relays activated)Operating frequency: 433.92 MHzCoding:digital, each remote control or JA-60 itemhas a unique floating codeOutput relays:Max. 120 V / 1 AOutput transistor: Max. 40 V / 0.2 ARange (open area) : with RC-11 up to 30 meterswith JA-60 items, up to 100 metersWorking temperature from -10 to +40°CDesigned for indoor use only.Installation:Open the external cover of the unit by pressing in the internal tab ofthe lock on the top (small flat screw-driver is appropriate). Loosen thecentral screw and remove the PCB. Route the wires through the hole inthe bottom of the rear housing. Attach the housing to the desired placeusing the provided screws.RC-11, RC-22 modeRemote controls enrolling - you canenroll up to 20 different RC-11 or RC-22remote controls to the <strong>UC</strong>-<strong>216</strong> unit.There are two buttons on each remotecontrol (A and B), enabling each remotecontrol to send two different commandsby pressing button A or B. The RC-11can also send a third command bypressing the A & B button simultaneously(not available with the RC-22).There are two setting buttons in the<strong>UC</strong>-<strong>216</strong>. Button X is used for relay X teaching; button Y is used forrelay Y teaching. By pressing the settingbutton you can scroll through the threeAlearning (operating) modes (1 to 3)indicated by a corresponding flashingindicator.BBy pressing a button on the remotecontrol while a desired <strong>UC</strong>-<strong>216</strong> learningmode is selected, you enroll that button tothe receiver’s memory. The correspondingoperating mode will now be associatedwith this remote control button.Operating modes available (valid for X and Y relays)MODE reaction of the relaywhen RC button pressedwhich RCbutton can betaught1 pulse relay will turn on for 2 seconds A, B, A&B2 latch relay status will change to the A, B, A&Bopposite (ON/OFF/ON...)3 ON - OFF button A turns relay on, button Bturns relay offA or BSetting remarks• new RC button enrollments are added to previously enrolled ones• after 20 RCs are taught, no other remote can be added• double flashing of the LEDs indicates a full memory• if one button is taught for multiple modes, only the last taught modewill remain in the <strong>UC</strong>-<strong>216</strong>’s memory• you can combine different modes with different RC buttons• the output OUT can be activated only by simultaneous pressing ofthe A&B buttons on the RC-11, only if the A button was enrolled forrelay X and the B button for relay Y. The OUT mode is the sameas the selected mode of relay X. This way three independentoutputs can be controlled.• A selected setting mode will close after an RC button is enrolled,or automatically after 10 seconds.• All <strong>UC</strong>-<strong>216</strong>’s can operate with only remote controls or JA-60 items.Combined operation is not available.Note: A remote control taught to the <strong>UC</strong>-<strong>216</strong> can also be used forother devices. For example: the remote control of Jablotron’s Accentcar alarm can not only control your car with buttons A and B, but canalso control another device, if the simultaneous pushing of A&B buttonshas been taught to a <strong>UC</strong>-<strong>216</strong> controller.Garage door or gate opener modeTerminals description:TAMPER tamper switch output (max. 24 V / 100 mA)OUToutput of NPN transistor to GNDNC, NO, C output relay dry contacts (X and Y)+U, GND power voltage 11-24VDC or 15VACThe status of relay X, relay Y and the OUT is indicated by 3 LEDindicators on the front cover. When active, the corresponding LEDlights.The <strong>UC</strong>-<strong>216</strong>, in combination with RC-11or RC-22 remote controls, has an optionalmode to control garage door or gateactuators. This mode is only availablewhen the <strong>UC</strong>-<strong>216</strong>’s memory is erased. Bypressing the <strong>UC</strong>-<strong>216</strong>’s X setting button,scroll until both LED’s 1 & 2 aresimultaneously flashing. Then, by pressingany button of the remote control, you teachit to the <strong>UC</strong>-<strong>216</strong>.<strong>Wireless</strong> <strong>Control</strong> <strong>Receiver</strong> <strong>UC</strong>-<strong>216</strong> 1/2 MEJ52102
Operating of the remote control in this mode is as follows:• pressing button A while both <strong>UC</strong>-<strong>216</strong> relays are off, the relay X willbe activated for 2 minutes• pressing button B while both <strong>UC</strong>-<strong>216</strong> relays are off, the relay Y willbe activated for 2 minutes• pressing any remote control button while any <strong>UC</strong>-<strong>216</strong> relay is on,will switch off this relay.Up to 20 remote controls can be enrolled to this mode, using themethod above. After the first remote control is enrolled to this specialmode, no other <strong>UC</strong>-<strong>216</strong> learning mode will be available.Use of the <strong>UC</strong>-<strong>216</strong> with JA-60 detectorsAll wireless JA-60 detectors can beused with the <strong>UC</strong>-<strong>216</strong>. In such a case the<strong>UC</strong>-<strong>216</strong>’s outputs have the followingfunctions:relay Xrelay Yalarm trigger (detector output)tamper output (tampering of adetector or the signal thata detector was lost) - alldetectors are supervisedOUT low battery signal froma detectorA maximum of eight JA-60 detectors can be enrolled into a single<strong>UC</strong>-<strong>216</strong>’s memory. The <strong>UC</strong>-<strong>216</strong>’s outputs will react to all enrolleddetectors. For example if any enrolled detector has an opened cover,the <strong>UC</strong>-<strong>216</strong>’s Y relay will be activated.The X relay reacts to all types of signals from a JA-60 detector (INST,DELAY, FIRE, PANIC). For example, the selection of INST or DELAYreaction in a JA-60P makes no difference to the function of the<strong>UC</strong>-<strong>216</strong>’s output ( the relay will be activated instantly when anymovement is detected).Enrolling of JA-60 detectorsDetectors can be enrolled to a <strong>UC</strong>-<strong>216</strong> only if all other items (remotecontrols) have been erased from the <strong>UC</strong>-<strong>216</strong>’s memory. The detectorscan be enrolled the following way:• remove the batteries from the JA-60 detector• select learning mode no. 1 for relay X in the <strong>UC</strong>-<strong>216</strong>• install batteries into the detector• the <strong>UC</strong>-<strong>216</strong> will automatically store the detector’s code into its memory• close the cover of the JA-60 detectorBy repeating this procedure you can teach up to eight JA-60detectors to each <strong>UC</strong>-<strong>216</strong>.After the first JA-60 detector is enrolled, no other item will be possibleto enroll other than additional JA-60 detectors.Use of the <strong>UC</strong>-<strong>216</strong> with a JA-60D keypadJA-60D keypads can be used with the<strong>UC</strong>-<strong>216</strong>. In such a case the <strong>UC</strong>-<strong>216</strong>’soutputs have the following functions:relay X will change its status after avalid access code is enteredon the keypad (on - off - on...). The relay can also beswitched on by entering F1 onthe keypad (a quick armfunction).relay Y is a tamper output (tampering of a keypad, more than 5unsuccessful attempts to enter a valid access code or thesignal that the keypad was lost) - all keypads aresupervisedOUT low battery signal from a keypadA maximum of eight JA-60D keypads can be enrolled into a single<strong>UC</strong>-<strong>216</strong>’s memory. The <strong>UC</strong>-<strong>216</strong>’s outputs will react to all enrolledkeypads. For example if any enrolled keypad has an open cover, the<strong>UC</strong>-<strong>216</strong>’s Y relay will activate.Enrolling of the JA-60D keypadThe JA-60D keypads can be enrolled to a <strong>UC</strong>-<strong>216</strong> only if all otheritems (remote controls, detectors) have been erased from the <strong>UC</strong>-<strong>216</strong>’smemory. The keypad can be enrolled the following way:• remove the battery from the JA-60D• select learning mode no. 1 for relay X in the <strong>UC</strong>-<strong>216</strong>• install the battery into the keypad• The <strong>UC</strong>-<strong>216</strong> will automatically store the keypad’s code into itsmemory• close the cover of the JA-60D keypadBy repeating this procedure you can teach up to eight JA-60Dkeypads to each <strong>UC</strong>-<strong>216</strong>.After the first JA-60D keypad is enrolled, no other item will be able tobe enrolled other than additional JA-60D keypads.Supervising Detectors and KeypadsAll enrolled JA-60 detectors (or keypads) transmit regular testingsignals. If the <strong>UC</strong>-<strong>216</strong> does not receive this testing signal from anyenrolled detector (keypad) for a period longer than 1 hour, relay Y willbe triggered (tamper output).This supervising function can be disabled by disconnecting the JP1jumper in the <strong>UC</strong>-<strong>216</strong>.Note: If the JP1 link is open, supervising is disabled and all of the<strong>UC</strong>-<strong>216</strong>’s outputs (X, Y and OUT), will have a 2 second pulse reaction tosignals from detectors or keypads. In the contrary, when the JP1 isclosed, all of the <strong>UC</strong>-<strong>216</strong>’s outputs are copying the status of the detector(for example, the Y relay is activated for the entire period in which adetector or a keypad is open, etc.) and entering of the access code on thekeypad will change the condition of the relay X (on - off - on...).Use of the <strong>UC</strong>-<strong>216</strong> with the JA-60K control panel.The <strong>UC</strong>-<strong>216</strong> can also be used as awireless output module for the JA-60Kcontrol panel. The <strong>UC</strong>-<strong>216</strong>'s X and Youtput relays will have the samefunctions as the PgX and PgYprogrammable outputs of the controlpanel (see JA-60 installation manual formore details). The OUT output willindicate if the JA-60 system has anyproblem with power (low battery in items,failure of AC etc.).To use the <strong>UC</strong>-<strong>216</strong> with the control panel, all other items have to beerased from the <strong>UC</strong>-<strong>216</strong>’s memory. The control panel can be enrolledthe following way:• enter the programming mode on the JA-60K• select learning mode no. 1 for relay X in the <strong>UC</strong>-<strong>216</strong>• enter the code 299 on the JA-60K keypad• The <strong>UC</strong>-<strong>216</strong> will automatically store the control panel’s code in itsmemory• exit the JA-60K’s programming modeUp to eight JA-60K control panels can be enrolled to each <strong>UC</strong>-<strong>216</strong>.After the first JA-60K is enrolled, no other item will be able to beenrolled other than additional JA-60K control panels.Erasing items from the <strong>UC</strong>-<strong>216</strong>’s memoryAll enrolled remote controls (or JA-60 items) can be erased from the<strong>UC</strong>-<strong>216</strong>’s memory. Open the cover and press both setting buttons andhold them pressed until all indicators flash for a moment. The <strong>UC</strong>-<strong>216</strong>‘smemory will now be erased.Pod Skalkou 33466 01 Jablonec nad NisouCzech Republictel.: 420-428-346911fax: 420-428-313183export@jablotron.czwww.jablotron.cz<strong>Wireless</strong> <strong>Control</strong> <strong>Receiver</strong> <strong>UC</strong>-<strong>216</strong> 2/2 MEJ52102