User Manual Drill Stopper Kit - Mis Implants
User Manual Drill Stopper Kit - Mis Implants
User Manual Drill Stopper Kit - Mis Implants

You also want an ePaper? Increase the reach of your titles
YUMPU automatically turns print PDFs into web optimized ePapers that Google loves.
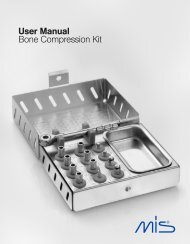
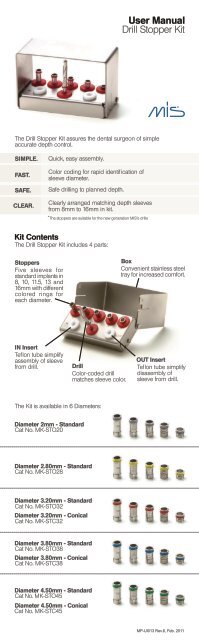
<strong>User</strong> <strong>Manual</strong><strong>Drill</strong> <strong>Stopper</strong> <strong>Kit</strong>The <strong>Drill</strong> <strong>Stopper</strong> <strong>Kit</strong> assures the dental surgeon of simpleaccurate depth control.SIMPLE.FAST.SAFE.CLEAR.Quick, easy assembly.Color coding for rapid identification ofsleeve diameter.Safe drilling to planned depth.Clearly arranged matching depth sleevesfrom 8mm to 16mm in kit.* The stoppers are suitable for the new generation MIS's drills<strong>Kit</strong> ContentsThe <strong>Drill</strong> <strong>Stopper</strong> <strong>Kit</strong> includes 4 parts:<strong>Stopper</strong>sFive sleeves forstandard implants in8, 10, 11.5, 13 and16mm with differentcolored rings foreach diameter.BoxConvenient stainless steeltray for increased comfort.IN InsertTeflon tube simplifyassembly of sleevefrom drill.<strong>Drill</strong>Color-coded drillmatches sleeve color.OUT InsertTeflon tube simplifydisasembly ofsleeve from drill.The <strong>Kit</strong> is available in 6 Diameters:Diameter 2mm - StandardCat No. MK-STO20Diameter 2.80mm - StandardCat No. MK-STO28Diameter 3.20mm - StandardCat No. MK-STO32Diameter 3.20mm - ConicalCat No. MK-STC32Diameter 3.80mm - StandardCat No. MK-STO38Diameter 3.80mm - ConicalCat No. MK-STC38Diameter 4.50mm - StandardCat No. MK-STO45Diameter 4.50mm - ConicalCat No. MK-STC45MP-UI013 Rev.6, Feb. 2011
ECREPIN/OUT InsertIn 3 steps<strong>Stopper</strong> SleeveColor-coded drill1.Choose sleeve according todesired drilling depth.Insert the drill into the stopper.2.Assemble - using IN Insert toend of drill stop. Verify thatsleeve is clamped.IN Proceeding3.To disassemble - place drillon OUT Insert and disconnectsleeve from drill while pushingthe sleeve down.OUT ProceedingInstrument MaintenanceDisinfection- Immerse instrumentsimmediately after use.- Use approved agents only.- Observe manufacturer'srecommendations regardingconcentration/time/materialcompatibility.Cleaning- Remove all residue.- Use Ultrasound.- Use anticorrosive cleaning agent.- Thoroughly rinse cleaning anddisinfecting agents underrunning water.- Use distilled water to preventwater spots.DryingDry only with:- Compressed air.- Hot air.- Absorbent paper tissue.Examination- Perform visual inspection.- Dispose of damaged instruments.Check for:- Breakouts in blades.- Bent instruments.- Corrosion.Sterilization- The device is not sterile.- The device must be sterilized beforeuse by autoclave, at a temperatureof 134 0 C (273 0 F) at a pressure of 315Kpa during 6 minutes.- Do not exceed 134 0 C duringsterilization.Storage- Store in dry, dust-proof area.- Keep instruments separated fromchemicals.Key to codes used:REFBatch CodeCatalogue NumberAttention, seeinstructions for useManufacturer© MIS Corporation. all rights reserved.MIS <strong>Implants</strong> Technologies Ltd.P.O.Box 7 Bar Lev Industrial Park 20156, ISRAELWebsite: www.mis-implants.com0483MIS <strong>Implants</strong> Technologies GmbHPaulinenstr. 12A, 32427 Minden, GermanyTel: +49 571-972-7690Email: service@mis-implants.de