Quick Reference Guide - School Health
Quick Reference Guide - School Health
Quick Reference Guide - School Health
You also want an ePaper? Increase the reach of your titles
YUMPU automatically turns print PDFs into web optimized ePapers that Google loves.
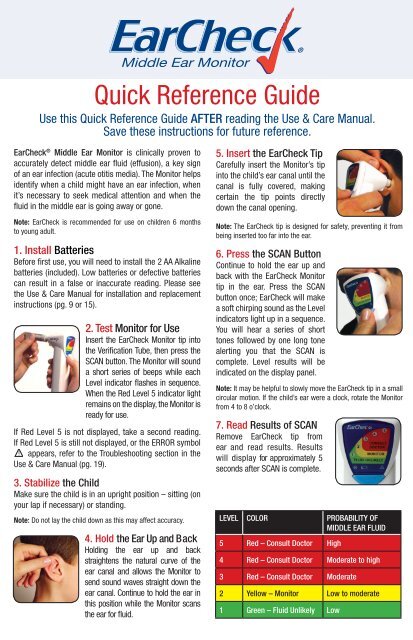
<strong>Quick</strong> <strong>Reference</strong> <strong>Guide</strong>Use this <strong>Quick</strong> <strong>Reference</strong> <strong>Guide</strong> AFTER reading the Use & Care Manual.Save these instructions for future reference.EarCheck ® Middle Ear Monitor is clinically proven toaccurately detect middle ear fluid (effusion), a key signof an ear infection (acute otitis media). The Monitor helpsidentify when a child might have an ear infection, whenit’s necessary to seek medical attention and when thefluid in the middle ear is going away or gone.Note: EarCheck is recommended for use on children 6 monthsto young adult.1. Install BatteriesBefore first use, you will need to install the 2 AA Alkalinebatteries (included). Low batteries or defective batteriescan result in a false or inaccurate reading. Please seethe Use & Care Manual for installation and replacementinstructions (pg. 9 or 15).2. Test Monitor for UseInsert the EarCheck Monitor tip intothe Verification Tube, then press theSCAN button. The Monitor will sounda short series of beeps while eachLevel indicator flashes in sequence.When the Red Level 5 indicator lightremains on the display, the Monitor isready for use.If Red Level 5 is not displayed, take a second reading.If Red Level 5 is still not displayed, or the ERROR symbolappears, refer to the Troubleshooting section in theUse & Care Manual (pg. 19).3. Stabilize the ChildMake sure the child is in an upright position – sitting (onyour lap if necessary) or standing.Note: Do not lay the child down as this may affect accuracy.4. Hold the Ear Up and BackHolding the ear up and backstraightens the natural curve of theear canal and allows the Monitor tosend sound waves straight down theear canal. Continue to hold the ear inthis position while the Monitor scansthe ear for fluid.5. Insert the EarCheck TipCarefully insert the Monitor’s tipinto the child’s ear canal until thecanal is fully covered, makingcertain the tip points directlydown the canal opening.Note: The EarCheck tip is designed for safety, preventing it frombeing inserted too far into the ear.6. Press the SCAN ButtonContinue to hold the ear up andback with the EarCheck Monitortip in the ear. Press the SCANbutton once; EarCheck will makea soft chirping sound as the Levelindicators light up in a sequence.You will hear a series of shorttones followed by one long tonealerting you that the SCAN iscomplete. Level results will beindicated on the display panel.Note: It may be helpful to slowly move the EarCheck tip in a smallcircular motion. If the child’s ear were a clock, rotate the Monitorfrom 4 to 8 o’clock.7. Read Results of SCANRemove EarCheck tip fromear and read results. Resultswill display for approximately 5seconds after SCAN is complete.LEVEL COLOR PROBABILITY OFMIDDLE EAR FLUID5 Red – Consult Doctor High4 Red – Consult Doctor Moderate to high3 Red – Consult Doctor Moderate2 Yellow – Monitor Low to moderate1 Green – Fluid Unlikely Low
Level Indication Course of ActionRED (Levels 3-5)This result may appear with:YELLOW (Level 2)A sick child (a child with pain, fever or othersigns of illness) with an untreated ear infection.ORA sick child who has been treated for an earinfection, but is not responding to antibioticswithin a reasonable amount of time.A sick child who appears to be getting better.This result may appear with:A sick child whose signs of illness may warrantmedical attention.Consult doctor.Consult doctor.Continue monitoring daily.If reading Level does not continue todecrease within a reasonable amountof time, consult doctor.Monitor.Consult doctor if Level does notdecrease within a reasonable amountof time.GREEN (Level 1)A sick child who appears to be getting better.ORA well child.(Note: Some well children will always have Level 2 as anormal reading.)This result may appear with:A well child.A sick child who does not have middle ear fluid.Continue monitoring daily.If reading Level does not continue todecrease within a reasonable amountof time, consult doctor.No action required.Consult doctor if signs of illnesswarrant a medical opinion.Note:Fluid may remain in the middle ear for several weeks after an ear infection has cleared. If it does, consultyour doctor.Important:Make sure to inform your doctor of any other signs and/or symptoms of illness the child may have, such as fever,pain, pulling or rubbing the ear, etc. Your doctor is the best source of information about your child’s health. At anytime if you have a question or concern about your child’s health, contact your doctor.Helpful Hints••••While monitoring with EarCheck Middle Ear Monitor, you may occasionally receive an ERROR symbol .If an ERROR symbol persists, refer to the Troubleshooting section of the Use & Care Manual (pg. 19). If youcontinue to experience difficulty with EarCheck, please do not return the Monitor to the store wherepurchased; instead, please call 1-888-EAR-CHEK (327-2435) for product usage assistance and support.To familiarize yourself with proper technique, practice using EarCheck on a well and cooperative child.Be sure to hold the child’s ear straight up and back. If you still do not receive a reading, try holding the earstraight back or straight back and down.Use EarCheck in a quiet area, eliminating all background noise, such as TVs and radios. If the child iscrying, try to calm him or her down before taking a reading.For product assistance or more information, call 1-888-EAR-CHEK (327-2435) or visitwww.earcheck.com© 2007 Innovia Medical, LLC. All rights reserved. 12/07 Printed in USA


