Manual for Starch Gel Electrophoresis: A Method ... - Index of - NOAA
Manual for Starch Gel Electrophoresis: A Method ... - Index of - NOAA
Manual for Starch Gel Electrophoresis: A Method ... - Index of - NOAA

Create successful ePaper yourself
Turn your PDF publications into a flip-book with our unique Google optimized e-Paper software.
<strong>NOAA</strong> Technical Report NMFS 61 December 1987<br />
<strong>Manual</strong> <strong>for</strong> <strong>Starch</strong> <strong>Gel</strong><br />
<strong>Electrophoresis</strong>: A <strong>Method</strong> <strong>for</strong><br />
the Detection <strong>of</strong> Genetic Variation<br />
Paul B. Aebersold, Gary A. Winans, David J. Teel, George B. Milner,<br />
and Fred M. Utter<br />
U.S. DEPARTMENT OF COMMERCE<br />
National Oceanic and Atmospheric Administration<br />
National Marine Fisheries Service
<strong>NOAA</strong> TECHNICAL REPORT NMFS<br />
The major responsibilities <strong>of</strong> the National Marine Fisheries Service (NMFS) are to monitor and assess the abundance and geographic distribution <strong>of</strong> fishery resources, to<br />
understand and predict fluctuations in the quantity and distribution <strong>of</strong> these resources, and to establish levels <strong>for</strong> their optimum use. NMFS is also charged with the development<br />
and implementation <strong>of</strong> policies <strong>for</strong> managing national fishing grounds, development and en<strong>for</strong>cement <strong>of</strong> domestic fisheries regulations, surveillance <strong>of</strong> <strong>for</strong>eign fishing <strong>of</strong>f United<br />
States coastal waters, and the develop,ment and en<strong>for</strong>cement <strong>of</strong> international fishery agreements and policies. NMFS also assists the fishing industry through marketing service<br />
and economic analysis programs, and mortgage insurance and vessel construction subsidies. It collects, analyzes, and publishes statistics on various phases <strong>of</strong> the industry.<br />
The <strong>NOAA</strong> Technical Report NMFS series was established in 1983 to replace two subcategories <strong>of</strong> the Technical Reports series: "Special Scientific Report-Fisheries" and<br />
"Circular." The series contains the following types <strong>of</strong> reports: Scientific investigations that document long-term continuing programs <strong>of</strong> NMFS; intensive scientific reports on<br />
studies <strong>of</strong> restricted scope; papers on applied fishery problems; technical reports <strong>of</strong> general interest intended to aid conservation and management; reports that review in considerable<br />
detail and at a high technical level certain broad areas <strong>of</strong> research; and technical papers originating in economics studies and from management investigations.. Since<br />
this is a <strong>for</strong>mal series, all submitted papers receive peer review and those accepted receive pr<strong>of</strong>essional editing be<strong>for</strong>e publication.<br />
Copies <strong>of</strong> <strong>NOAA</strong> Technical Reports NMFS are available free in limited numbers to governmental agencies, both Federal and State. They are also available in exchange <strong>for</strong><br />
other scientific and technical publications in the marine sciences. Individual copies may be obtained from: U.S. Department <strong>of</strong> Commerce, National Technical In<strong>for</strong>mation Service,<br />
5285 Port Royal Road, Springfield, VA 22161. Although the contents have not been copyrighted and may be reprinted entirely, reference to source is appreciated.<br />
13. Guidelines <strong>for</strong> reducing porpoise mortality in tuna purse seining, by James M.<br />
Coe, David B. Holts, and Richard W. Butler. September 1984, 16 p.<br />
14. Synopsis <strong>of</strong> biological data on shortnose sturgeon, Acipenser breviroslrum<br />
LeSueur 1818, by Michael J. Dadswell, Bruce D. Taubert, Thomas S. Squiers, Donald<br />
Marchelle, and Jack Buckley. October 1984, 45 p.<br />
15. Chaetognatha <strong>of</strong> the Caribbean sea and adjacent areas, by Harding B. Michel.<br />
October 1984, 33 p.<br />
16. Proceedings <strong>of</strong> the Ninth and Tenth U.S.-Japan Meetings on Aquaculture, by<br />
Carl J. Sindermann (editor). November 1984, 92 p.<br />
17. Identification and estimation <strong>of</strong> size from the beaks <strong>of</strong> 18 species <strong>of</strong> cephalopods<br />
from the Pacific Ocean, by Gary A. Wolff. November 1984,50 p.<br />
18. A temporal and spatial study <strong>of</strong> invertebrate communities associated with hardbottom<br />
habitats in the South Atlantic Bight, by E. L. Wenner, P. Hinde, D. M. KnOll,<br />
and R. F. Van Dolah. November 1984, 104 p.<br />
19. Synopsis <strong>of</strong> biological data on spottail pinfish, Diplodus holbrooki (Pisces:<br />
Sparidae), by George H. Darcy. January 1985, II p.<br />
20. Ichthyoplankton <strong>of</strong> the Continental Shelf near Kodiak Island, Alaska, by Arthur<br />
W. Kendall, Jr., and Jean R. Dunn. January 1985,89 p.<br />
21. Annotated bibliography on hypoxia and its effects on marine life, with emphasis<br />
on the Gulf <strong>of</strong> Mexico, by Maurice L. Renaud. February 1985, 9 p.<br />
22. Congrid eels <strong>of</strong> the eastern Pacific and key to their Leptocephali, by Solomon<br />
N. Raju. February 1985, 19 p.<br />
23. Synopsis <strong>of</strong> biological data on the pinfish, Lagodon rhomboides (pisces:Sparidae),<br />
by George H. Darcy. February 1985, 32 p.<br />
24. Temperature conditions in the cold pool 1977-81: A comparison between southern<br />
New England and New York transects, by Steven K. Cook. February 1985,22 p.<br />
25. Parasitology and pathology <strong>of</strong> marine organisms <strong>of</strong> the world ocean, by William<br />
J. Hargis, Jr. (editor). March 1985, 135 p.<br />
26. Synopsis <strong>of</strong> biological data on the sand perch, Dipleclrum <strong>for</strong>mosum (Pisces:<br />
Serranidae), by George H. Darcy. March 1985, 21 p.<br />
27. Proceedings <strong>of</strong> the Eleventh U.S.-Japan Meeting on Aquaculture, Salmon<br />
Enhancement, Tokyo, Japan, October 19-20, 1982, by Carl J. Sindermann (editor).<br />
March 1985, 102 p.<br />
28. Review <strong>of</strong>geographical stocks uf tropical dolphins (Slenella spp. and Delphinus<br />
delphis) in the eastern Pacific, by William F. Perrin, Michael D. Scott, G. Jay Walker,<br />
and Virginia L. Casso March 1985, 28 p.<br />
29. Prevalence, intensity, longevity, and persistence <strong>of</strong> Anisakis sp. larvae and Lacislorhynchus<br />
lelluis metacestodes in San Francisco striped bass, by Mike Moser, Judy<br />
A. Sakanari, Carol A. Reilly, and Jeannelle Whipple. April 1985,4 p.<br />
30. Synopsis <strong>of</strong> biological data on the pink shrimp, Pandalus borealis Krllyer, 1838,<br />
by Sandra E. Shumway, Herbert C. Perkins. Daniel F. Schick, and AJden P. Stickney.<br />
May 1985, 57 p.<br />
31. Shark catches from selected fisheries <strong>of</strong>f the U.S. east coast, by Emory D. Anderson,<br />
John G. Casey, John J. Hoey, and W. N. WitzelI. July 1985, 22 p.<br />
32. Nutrient Distributions <strong>for</strong> Georges Bank and adjacent waters in 1979, by A. F.<br />
J. Draxler, A. Malle, R. Waldhauer, and J. E. O'Reilly. July 1985,34 p.<br />
33. Marine flora and fauna <strong>of</strong> the Northeastern United States. Echinodermata:<br />
Echinoidea, by D. Keith Serafy and F. Julian Fell. September 1985,27 p.<br />
34. Additions to a revision <strong>of</strong> the shark genus Carcharhinus: Synonymy <strong>of</strong> Aprionodon<br />
and Hypoprion, and description <strong>of</strong>a new species <strong>of</strong> Carcharhinus (Carcharhinidae),<br />
by J. A. F. Garrick. November 1985, 26 p.<br />
35. Synoptic review <strong>of</strong> the literature on the Southern oyster drill Thais haemasloma<br />
j1oridana, by Philip A. Butler. November 1985, 9 p.<br />
36. An egg production method <strong>for</strong> estimating spawning biomass <strong>of</strong> pelagic fish:<br />
Application to the northern anchovy, Engraulis mordax, by Reuben Lasker (editor).<br />
December 1985, 99 p.<br />
37. A histopathologic evaluation <strong>of</strong> gross lesions excised from commercially important<br />
North Atlantic marine fishes, by Robert A. Murchelano, Linda Despres-Patanjo,<br />
and John Ziskowski. March 1986, 14 p.<br />
38. Fishery atlas <strong>of</strong> the northwestern Hawaiian Islands, by Richard N. Uchida and<br />
James H. Uchiyama (editors). September 1986, 142 p.<br />
39. Survey <strong>of</strong> fish protective facilities at water withdrawal sites on the Snake and<br />
Columbia Rivers, by George A. Swan, Tommy G. Withrow, and Donn L. Park. April<br />
1986, 34 p.<br />
40. Potential impact <strong>of</strong> ocean thermal energy conversion (OTEC) on fisheries, by<br />
Edward P. Myers, Donald E. Hoss, Walter M. Matsumoto, David S. Peters, Michael<br />
P. Seki, Richard N. Uchida, John D. Ditmars, and Robert A. Paddock. June 1986,<br />
33 p.<br />
41. A stationary visual census technique <strong>for</strong> quantitatively assessing community structure<br />
<strong>of</strong> coral reef fishes, by James A. Bohnsack and Scott P. Bannerol. July 1986, 15 p.<br />
42. Effects <strong>of</strong> temperature on the biology <strong>of</strong> the northern shrimp, Pandalus borealis,<br />
in the Gulf<strong>of</strong>Maine, by Spencer Apollonio, David K. Stevenson, and Earl E. Dunton,<br />
Jr. September 1986, 22 p.<br />
43. Environment and resources <strong>of</strong> seamounts in the North Pacific, by Richard N.<br />
Uchida, Sigeiti Hayasi, and George W. Boehlert (editors). September 1986, 105 p.<br />
44. Synopsis <strong>of</strong> biological data on the porgies, Calamus arclifrons and C. proridens<br />
(Pisces: Sparidae), by George H. Darcy. September 1986, 19 p.<br />
45. Meristic variation in Sebasles (Scorpaenidae), with an analysis <strong>of</strong>character association<br />
and bilateral pallern and their significance in species separation, by Lo-chai Chen.<br />
September 1986, 17 p.<br />
46. Distribution and relative abundance <strong>of</strong> pelagic nonsalmonid nekton <strong>of</strong>f Oregon<br />
and Washington 1979-84, by Richard D. Brodeur and William G. Pearcy. December<br />
1986, 85 p.
<strong>NOAA</strong> Technical Report NMFS 61<br />
<strong>Manual</strong> <strong>for</strong> <strong>Starch</strong> <strong>Gel</strong><br />
<strong>Electrophoresis</strong>:<br />
A <strong>Method</strong> <strong>for</strong> the Detection<br />
<strong>of</strong> Genetic Variation<br />
Paul B. Aebersold, Gary A. Winans, David J. Teel,<br />
George B. Milner, and Fred M. Utter<br />
December 1987<br />
u.s. DEPARTMENT OF COMMERCE<br />
C. William Verity, Jr., Secretary<br />
National Oceanic and Atmospheric Administration<br />
Anthony J. Calia, Administrator<br />
National Marine Fisheries Service<br />
William E. Evans, Assistant Administrator <strong>for</strong> Fisheries
The National Marine Fisheries Service (NMFS) does not approve, recommend<br />
or endorse any proprietary product or proprietary material mentioned in this<br />
publication. No reference shall be made to NMFS, or to this publication furnished<br />
by NMFS, in any advertising or sales promotion which would indicate or imply<br />
that NMFS approves, recommends or endorses any proprietary product or proprietary<br />
material mentioned herein, or which has as its purpose an intent to cause<br />
directly or indirectly the advertised product to be used or purchased because <strong>of</strong><br />
this NMFS publication.<br />
11
CONTENTS<br />
Introduction<br />
Collection and storage <strong>of</strong> specimens<br />
Preparation <strong>of</strong> tissues 3<br />
Preparation <strong>of</strong> a starch gel 4<br />
Application <strong>of</strong> enzyme extracts to a gel 6<br />
Setting up a gel <strong>for</strong> electrophoresis 7<br />
Slicing a gel 8<br />
Staining a gel 9<br />
Acknowledgments 10<br />
Citations 10<br />
Appendices<br />
I Staining recipes 11<br />
2 <strong>Electrophoresis</strong> buffers 20<br />
iii
<strong>Manual</strong> <strong>for</strong> <strong>Starch</strong> <strong>Gel</strong><br />
<strong>Electrophoresis</strong>:<br />
a <strong>Method</strong> <strong>for</strong> the Detection<br />
<strong>of</strong> Genetic Variation<br />
PAUL B. AEBERSOLD<br />
GARY A. WINANS<br />
DAVID J. TEEL<br />
GEORGE B. MILNER<br />
FRED M. UTTER<br />
Coastal Zone and Estuarine Studies Division<br />
Northwest and Alaska Fisheries Center<br />
National Marine Fisheries Service, <strong>NOAA</strong><br />
2725 Montlake Boulevard East<br />
Seattle. Washington 98112<br />
ABSTRACT<br />
The procedure to conduct horizontal starch gel electrophoresis on enzymes is<br />
described in detail. Areas covered are (I) collection and storage <strong>of</strong>specimens, (2)<br />
preparation <strong>of</strong> tissues, (3) preparation <strong>of</strong> a starch gel, (4) application <strong>of</strong> enzyme<br />
extracts to a gel, (5) setting up a gel <strong>for</strong> electrophoresis, (6) slicing a gel, and (7)<br />
staining a gel. Recipes are also included <strong>for</strong> 47 enzyme stains and 3 selected gel<br />
buffers.<br />
Introduction _<br />
<strong>Electrophoresis</strong> is the most useful technique yet devised <strong>for</strong> studying<br />
genetic variability within and among populations <strong>of</strong> plants and<br />
animals (Avise 1974; Ayala 1976; Hartl 1980). In fact, over 1,200<br />
species have been studied electrophoretically in basic and applied<br />
research (see references in Nevo et al. 1984). Since 1966, geneticists<br />
at the Northwest and Alaska Fisheries Center, National<br />
Marine Fisheries Service, <strong>NOAA</strong>, Seattle, Washington, have been<br />
using starch gel electrophoresis <strong>of</strong> proteins (or, more specifically,<br />
enzymes) to investigate population genetics <strong>of</strong> numerous aquatic<br />
organisms, particularly fishes.<br />
<strong>Electrophoresis</strong> is the separation <strong>of</strong> a mixture <strong>of</strong> electrically<br />
charged molecules in an electric field. When a molecular mixture<br />
is placed in an electric field, the molecules with a net electrical<br />
charge will be attracted to the opposite side <strong>of</strong> the electric field<br />
(positive molecules to the negative side and negative molecules to<br />
the positive side) at a rate dependent on the amount <strong>of</strong> their charge<br />
(and to some extent on their size). There<strong>for</strong>e, all like-charged<br />
molecules will migrate a characteristic distance through the electric<br />
field in a given time. When a mixture is applied in the field, the<br />
result is an isolation <strong>of</strong> each molecular charge-type at varying<br />
distances from their point <strong>of</strong> application.<br />
The purpose <strong>of</strong> this report is to thoroughly describe procedures<br />
currently used in our laboratory <strong>for</strong> horizontal starch gel electrophoresis.<br />
It is intended as a complement to other descriptions<br />
that may be outdated or abbreviated (Smith 1968; Brewer and Sing<br />
1970; Utter et al. 1974; Harris and Hopkinson 1976; Siciliano and<br />
Shaw 1976; May et al. 1979; Shaklee and Keenan 1986). The<br />
procedures we describe have been adopted more from personal<br />
experience and convenience than from necessity. Thus, other laboratories<br />
may effectively employ procedures that differ from ours.<br />
The general areas and procedures we cover, however, are common<br />
to all users. Despite specific procedural differences, they yield the<br />
same result. The areas we discuss in detail are (1) collection and<br />
storage <strong>of</strong> specimens, (2) preparation <strong>of</strong> tissues, (3) preparation <strong>of</strong><br />
a starch gel, (4) application <strong>of</strong> enzyme extracts to a gel, (5) setting<br />
up a gel <strong>for</strong> electrophoresis, (6) slicing a gel, and (7) staining a gel<br />
(Fig. I). Recipes <strong>for</strong> 47 enzyme stains (Appendix 1) and 3 gel<br />
buffers (Appendix 2) are included. We believe that this in<strong>for</strong>mation<br />
will be generally useful as a working manual because electrophoretic<br />
investigations <strong>of</strong> all classes <strong>of</strong> organisms are related by<br />
similar biological constraints (e.g., heat-labile enzymes) and mechanical<br />
processes involved in separating proteins in a gel matrix.<br />
In addition, the thoroughness with which we have covered these<br />
procedures will be particularly useful <strong>for</strong> people attempting starch<br />
gel electrophoresis <strong>for</strong> the first time.<br />
Collection and storage <strong>of</strong> specimens _<br />
Procedures <strong>for</strong> the collection and storage <strong>of</strong> specimens <strong>for</strong> electrophoresis<br />
are extremely important because <strong>of</strong> the lability <strong>of</strong> enzymes<br />
in vitro. Proper cryogenic storage will preserve enzyme<br />
activity and minimize breakdown. Conversely, improper collection<br />
and preservation commonly result in a reduction or loss <strong>of</strong><br />
enzyme activity or in uninterpretable electrophoretic patterns due<br />
to enzyme breakdown. Thus, the ultimate success <strong>of</strong> an electrophoretic<br />
project rests initially on the proper collection and<br />
preservation <strong>of</strong> specimens. Although the procedures described here<br />
are <strong>for</strong> fish specimens, the processes are generally applicable to<br />
other organisms.
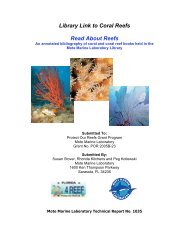
1 Collection and storage <strong>of</strong> specimens<br />
2 Preparation <strong>of</strong> tissues<br />
4 Application <strong>of</strong> enzyme extracts to a gel<br />
•<br />
tfr----__<br />
/ .<br />
5 Setting up a gel <strong>for</strong> electrophoresIs .<br />
6 Slicing a gel<br />
7 Staining a gel<br />
Figure 1<br />
Diagram <strong>of</strong> the seven steps involved in the electrophoretic method.<br />
2
When fish are sacrificed <strong>for</strong> analysis, enzyme degradation begins<br />
almost immediately. The rate <strong>of</strong> degradation is enzymespecific.<br />
Packing the specimens in ice will slow the degradation<br />
process only slightly. Freezing the samples at normal freezer temperatures<br />
(-lO°C to -20°C) will reduce degradation considerably.<br />
However, even at these temperatures, if electrophoresis is not<br />
conducted within a few weeks, enzyme degradation will become<br />
apparent. At the temperature <strong>of</strong> dry ice (-76°C) or colder, the<br />
stability <strong>of</strong> the enzymes is greatly improved. Enzyme activity in<br />
tissues immediately frozen with dry ice and stored <strong>for</strong> up to 6 mo<br />
at -85°C in an ultracold freezer is comparable to enzyme activity<br />
in tissues from freshly sacrificed specimens. In fact, we have<br />
achieved satisfactory results with specimens collected on dry ice<br />
and stored at -85°C <strong>for</strong> greater than 2 yr. Thus, <strong>for</strong> the best<br />
electrophoretic results, we recommend that specimens or tissues <strong>of</strong><br />
specimens be (l) frozen with dry ice immediately after collection,<br />
(2) transported with dry ice to an electrophoresis laboratory, and<br />
(3) stored at -85°C until used.<br />
The quantity <strong>of</strong> dry ice needed while collecting in the field<br />
depends upon many factors. These include the quality and size <strong>of</strong><br />
the cooler in which the samples are held, volume <strong>of</strong> specimens<br />
being collected, number <strong>of</strong> times the cooler will be opened prior to<br />
returning to the laboratory, length <strong>of</strong> time spent in the field and in<br />
transport, and ambient air temperature. For example, we would use<br />
a minimum <strong>of</strong> 2.3 kg (5 Ib) <strong>of</strong> dry ice in a 7.6-L (8 qt) cooler to<br />
collect 100 juvenile fish on a 24°C (80°F) day, with a total time <strong>of</strong><br />
8 h spent going to the sample location, collecting the specimens,<br />
and returning to the laboratory. To collect tissues from 100 adults<br />
under the same circumstances would require a 38-L (40 qt) cooler<br />
and a minimum <strong>of</strong> 9.0 kg (20 Ib) <strong>of</strong> dry ice. Reducing the air space<br />
in the cooler makes dry ice more effective and longer lasting. Also,<br />
when sufficient dry ice is available, it is placed above and below<br />
the specimens; otherwise, the dry ice is placed above the specimens<br />
in the cooler. Specimens are kept in a cooler with sufficient<br />
quantities <strong>of</strong> dry ice until they can be stored in a - 85°C freezer.<br />
Whole specimens or tissue samples are prepared <strong>for</strong> cryogenic<br />
storage in a way that minimizes the amount <strong>of</strong> time necessary to<br />
prepare them <strong>for</strong> electrophoresis. For example, it is undesirable to<br />
freeze fish in a ball with water. Fish prepared in this fashion require<br />
considerable thawing time to separate them <strong>for</strong> dissection, and,<br />
there<strong>for</strong>e, they are more prone to enzyme degradation.<br />
We recommend that whole fish be prepared <strong>for</strong> freezing in the<br />
following manner which allows <strong>for</strong> easy separation prior to dissection.<br />
Fish with a <strong>for</strong>k length <strong>of</strong> 20 cm or less (five or more fish per<br />
pound) are collected and frozen whole. Of these fish, those that are<br />
6-20 cm long (between 5 and 160 fish per pound) are rolled up dry<br />
in bundles <strong>of</strong> 10 to 20 specimens using sheets <strong>of</strong> polyethylene film<br />
or "plastic wrap." To do this, specimens are briefly blotted to<br />
remove excess moisture. Two or three specimens are spread out<br />
near one end <strong>of</strong> the plastic wrap, which is then folded over the<br />
specimens. Then, several more specimens are laid down, rolled<br />
into the bundle, and so on. This method keeps the fish separated<br />
by plastic film and facilitates separating them later <strong>for</strong> dissection.<br />
Fish smaller than 6 cm <strong>for</strong>k length (160 or more fish per pound) are<br />
loosely placed in a single layer into a sealable or "zip-lock" bag<br />
(lOx 10 em) without water.<br />
For specimens greater than 20 em <strong>for</strong>k length (five or fewer fish<br />
per pound), we usually dissect out the desired tissues at the time<br />
<strong>of</strong> collection and freeze the set <strong>of</strong> tissues from each specimen in<br />
one zip-lock bag (lOx 10 cm). We routinely analyze enzymes from<br />
four sources: skeletal muscle, heart, liver, and retinal tissue and<br />
vitreous fluid from the eye. For the first three tissues, a cube <strong>of</strong><br />
3<br />
tissue measuring approximately 3 cm 3 or weighing 20 g is taken<br />
from the fish when possible. For the retinal tissue and vitreous<br />
fluid, both eyes are removed and stored whole. Care is taken to<br />
avoid prolonged exposure <strong>of</strong> the tissue to direct sunlight. Each bag<br />
<strong>of</strong> specimens from a location is labeled with in<strong>for</strong>mation regarding<br />
species name, date <strong>of</strong> collection, sample location, and number <strong>of</strong><br />
specimens. Labels are written in large bold print on water-resistant<br />
paper and inserted in each bag so that they are visible from the<br />
outside <strong>of</strong> the plastic bag. Alternatively, a tag on a piece <strong>of</strong> wire<br />
can be used <strong>for</strong> this in<strong>for</strong>mation as well as to secure the bag.<br />
Preparation <strong>of</strong> tissues _<br />
Once specimens or tissue samples have been obtained and stored<br />
properly, an enzyme extract <strong>of</strong> each tissue is prepared <strong>for</strong> each<br />
specimen. To do this, specimens are removed from the freezer and<br />
allowed to thaw <strong>for</strong> about 10 to 20 min, just until the tissues can<br />
be cut. When preparing subsamples <strong>of</strong> extracted tissues from adult<br />
fish, approximately 0.75 g or 7 mm 3 are cut from each tissue. To<br />
subsample frozen eyes, one-fourth to one-third <strong>of</strong> the eyeball is cut<br />
away and the frozen vitreous fluid with the surrounding black<br />
retinal tissue is collected. Each <strong>of</strong> these subsamples is placed into<br />
a culture tube (I2x75 mm, disposable) containing a tissue dilution<br />
buffer. This is done <strong>for</strong> each tissue <strong>of</strong> each fish, being careful to<br />
ensure the subsamples are not contaminated with other tissues. Our<br />
tissue dilution buffer (abbreviated PIP buffer) I consists <strong>of</strong> PIPES<br />
[Piperazine-N,N'-bis(2-ethanesulfonic acid)], Triton X-IOO, and<br />
pyridoxal-5-phosphate. The volume <strong>of</strong> buffer added to each tube<br />
depends upon the number <strong>of</strong> gels required <strong>for</strong> each specimen as<br />
well as the amount and type <strong>of</strong> tissue being diluted. Usually about<br />
0.2 to 0.4 ml <strong>of</strong> PIP buffer is added per culture tube. Muscle<br />
tissues are usually given 0.05 mL more dilution buffer per sample<br />
than liver or heart tissues because muscle tissues tend to absorb the<br />
buffer. Because <strong>of</strong> their initial liquid state, eye fluid samples from<br />
salmonids arc usually given one-half the volume <strong>of</strong> the liver or<br />
heart tissues. We have observed that the vitreous fluid from marine<br />
fish, however, is much more viscous than that <strong>of</strong> salmonids and<br />
requires more dilution, 0.1 mL less than liver or heart tissues.<br />
We routinely prepare tissues from 5 to 10 frozen specimens at<br />
a time. The culture tubes are kept in a tube rack which is in an<br />
icewater bath to keep the samples as cold as possible during the<br />
preparation process. When the group <strong>of</strong> 5 to 10 specimens is<br />
completed, the tubes are transferred into other tube racks, one<br />
appropriately labeled rack <strong>for</strong> each tissue, and put into a freezer.<br />
A specimen number, corresponding with the subsample position in<br />
the culture tube rack, is added to each specimen bag in the event<br />
resampling might be necessary. Upon completion <strong>of</strong> subsampling,<br />
the racks <strong>of</strong> culture tubes are individually enclosed in plastic bags,<br />
secured with rubber bands, and moved to a -85°C freezer until the<br />
tissues are analyzed. We do not routinely homogenize tissues prior<br />
to electrophoresis. Instead, we rely on a freeze-thaw process during<br />
subsample preparation and application to the starch gel <strong>for</strong> cell<br />
disruption and enzyme extraction (see Aebersold et al. 1986).<br />
However, tissues which will be used fresh or without extended<br />
freezing should be homogenized in some fashion.<br />
'The PTP buffer consists <strong>of</strong> 0.05M PIPES. 0.05% Triton X-lOO, and 0.2 mM<br />
pyridoxal-5-phosphate adjusted to a final pH <strong>of</strong> 6.8 with 1.0 M NaOH. PIPES will<br />
not go into solution at the initial acidic pH until an approximate pH <strong>of</strong> 5.5 is<br />
approached with the NaOH. After that, the Triton X-IOO and pyridoxal-5-phosphate<br />
are added be<strong>for</strong>e the final pH adjustment is made (Aebersold et al. 1986).
The preparation <strong>of</strong> whole juvenile fish <strong>for</strong> electrophoresis is<br />
similar to the preparation <strong>of</strong> extracted adult tissues. How::ver,<br />
dissection and extraction <strong>of</strong> the tissues involve a more delicate<br />
procedure. Quite <strong>of</strong>ten the entire liver, heart, and one or both<br />
eyeballs are taken from juvenile fish. In such cases, the heart<br />
should be chopped up with a scalpel (to open the tough membrane<br />
surrounding the heart) be<strong>for</strong>e insertion into the culture tube, and<br />
eyeballs should be broken open in the tube by smashing them with<br />
a glass rod. Also, the amount <strong>of</strong> dilution buffer should be reduced<br />
in proportion to the reduction in tissue volume.<br />
Preparation <strong>of</strong> a starch gel _<br />
In the electrophoretic procedures described here, enzymes are separated<br />
in an electric field relative to their electrical charge to reveal<br />
possible genetic differences. The medium we use <strong>for</strong> the electric<br />
field to separate the enzymes is a starch gel. A gel is made in a<br />
Plexiglas/glass mold into which hot starch solution is poured and<br />
allowed to gel upon cooling.<br />
The gel mold consists <strong>of</strong> a glass plate on the bottom and four<br />
Plexiglas strips clamped around the edges (Fig. 2). We use laminated<br />
glass to eliminate stress fracturing that may occur when the<br />
hot gel solution is poured into the mold. Dimensions <strong>of</strong>glass plates<br />
and Plexiglas strips are given in Table I. The thickness <strong>of</strong> the strips<br />
can be varied to make thicker or thinner gels as needed. The strips<br />
are held in position on the glass plate with paper clamps. The mold<br />
is elevated above the lab counter to leave clearance <strong>for</strong> the clamps<br />
and accelerate cooling. To save time and counter space, a number<br />
<strong>of</strong> gel molds can be set up together by butting the gel molds up to<br />
one another be<strong>for</strong>e clamping, as in Figure 2. <strong>Gel</strong> molds should be<br />
set up on a level surface. The type <strong>of</strong> buffer used to make the gel<br />
is written with wax pencil on one <strong>of</strong> the short plastic strips <strong>for</strong> each<br />
mold.<br />
The gels are made by mixing a heated buffer with hydrolyzed<br />
potato starch (Sigma Chemical Co., St. Louis, MO). In this proce-<br />
dure, the first step is to weigh the starch and put into a wide-mouth<br />
Erlenmeyer flask. For one to two gels, a I-L flask works well; up<br />
to four gels can be poured from a 2-L flask. We usually make a<br />
12% starch gel, with a 6-mm thick gel mold holding 300 mL <strong>of</strong><br />
starch solution. There<strong>for</strong>e, to make one gel, 36 g <strong>of</strong> starch are<br />
weighed and added to the flask.<br />
The buffer used to prepare the gel can vary considerably in<br />
composition, concentration, and pH, each having an effect on the<br />
mobility, resolution, and activity <strong>of</strong> each enzyme. Many buffer<br />
recipes are available <strong>for</strong> these purposes. A number <strong>of</strong> these recipes<br />
can be found in the references previously cited in the Introduction.<br />
We use three buffers (or slight variations <strong>of</strong> these) in resolving a<br />
majority <strong>of</strong> the enzymes in our studies. These buffers are given in<br />
Appendix 2.<br />
Each buffer is made as a concentrated stock solution and diluted<br />
as stated to make the gel. After dilution, one-third <strong>of</strong> the volume<br />
(100 mL <strong>of</strong> the 300 mL used <strong>for</strong> one gel) goes in the flask with the<br />
starch, and the flask is immediately swirled to fully suspend all the<br />
starch. (If a wet flask is used <strong>for</strong> the starch, the buffer should be<br />
added immediately after adding the starch to reduce the chance <strong>of</strong><br />
creating lumps.) The remainder <strong>of</strong> the buffer is put into an<br />
appropriate-sized volumetric or narrow-mouth Erlenmeyer<br />
flask.<br />
The flask containing only the buffer is heated. When the buffer<br />
begins to boil, the flask is first swirled to settle the boiling action,<br />
which could cause the buffer to splatter out when dispensing. Then<br />
the buffer is rapidly poured into the flask with the starch-buffer<br />
mixture, with simultaneous swirling <strong>of</strong> both flasks. It is important<br />
to swirl the flask with the starch just prior to addition <strong>of</strong> the hot<br />
buffer to ensure that the starch is fully suspended to achieve a<br />
smooth lump-free gel. At this point, the starch mixture is a thick<br />
paste. Additional heating is needed to raise the temperature <strong>of</strong> the<br />
solution to the boiling point. This is necessary to achieve the<br />
proper viscosity <strong>for</strong> aspiration and pouring. Proper viscosity is<br />
indicated when the size <strong>of</strong> the bubbles changes from large to small<br />
and the bubbles rise up to the surface <strong>of</strong> the starch solution. The<br />
Figure 2<br />
<strong>Gel</strong> molds. Four Plexiglas strips (1) are held with clamps (2) around each glass plate (3) to <strong>for</strong>m a gel mold.<br />
Hot liquid starch (4) is then poured into the mold as illustrated. The glass plates are elevated <strong>of</strong>f the counter<br />
on polystyrene cups (5) to leave room <strong>for</strong> the clamps.<br />
4
efrigerator can speed cooling. <strong>Gel</strong>s can usually be made I day in<br />
advance with no noticeable effect. 2 To prevent desiccation, gels<br />
are covered with plastic wrap after cooling and stored at room<br />
temperature (storage in a refrigerator can alter physical properties<br />
<strong>of</strong> the gel, making them unsuitable <strong>for</strong> subsequent electrophoresis).<br />
Application <strong>of</strong> enzyme extracts to a gel _<br />
Be<strong>for</strong>e the enzyme extracts <strong>of</strong> the tissue subsamples are applied to<br />
a gel, the gel must undergo some initial preparation. A scalpel is<br />
drawn vertically around the inside edge <strong>of</strong> the gel mold and the<br />
long strips are removed. Using a sharp, clean scalpel, the gel is cut<br />
from side to side, with the aid <strong>of</strong> a ruler, about 3 cm from the edge<br />
<strong>of</strong> one <strong>of</strong> the long sides <strong>of</strong> the gel. The exact location <strong>of</strong> this<br />
incision can vary under special circumstances, depending upon the<br />
relative mobility <strong>of</strong> the enzyme being studied. Care must be taken<br />
to ensure a smooth, vertical cut. This cut is referred to as the<br />
origin-the location on the gel where enzyme extracts are applied.<br />
The narrow strip <strong>of</strong> gel is called the cathodal strip, and the remaining<br />
portion is the anodal piece. The cathodal strip is gently pulled<br />
away from the anodal piece using the fingertips until an approximately<br />
I-cm gap is obtained at the origin. The gel, still on the glass<br />
plate, is placed on a repackaged, frozen Blue Ice package [(DIVA<br />
SEX, Tustin, CA) Table II and is now ready <strong>for</strong> extract application<br />
(Fig. 4).<br />
The frozen tissue subsamples in the test tubes are centrifuged at<br />
2000 x g at room temperature (22°C) <strong>for</strong> 15 to 20 min. We use a<br />
Sorvall RT6000 centrifuge with the H-lOOOB swinging bucket<br />
rotor (DuPont Co., Wilmington, DE). This process thaws the<br />
lThe loss <strong>of</strong> visible electrophoretic varialion was observed <strong>for</strong> pelagic arrnorhead<br />
(Pen/aceros richardsoni) when the gel had been prepared more than 12 h be<strong>for</strong>ehand.<br />
This unusual phenomenon occurred only <strong>for</strong> the dimeric EST-D locus using<br />
liver tissue and the TBCL gel buffer.<br />
tissue and provides a fairly clear enzyme extract. The tubes are<br />
transferred from their storage rack into the centrifuge racks <strong>for</strong> the<br />
centrifuge process. After centrifugation, the centrifuge racks with<br />
the tubes are placed in an icewater bath or on a frozen Blue Ice<br />
package to keep the samples cold during the application process.<br />
The enzyme extract from each test tube is applied to the gel<br />
using paper wicks. We make wicks 3-4X 13 mm from heavy-duty<br />
filter paper (Schleicher and SchueII No. 470). A wick is picked up<br />
with <strong>for</strong>ceps and dipped into a tube (Fig. 5). The wick draws up<br />
the extract and is removed from the tube when the wick is soaked<br />
to about three-fourths <strong>of</strong> its length. The reason <strong>for</strong> not soaking the<br />
wick its full length is that a completely saturated wick will lose<br />
some extraction fluid when touched to the gel and glass plate. This<br />
excess fluid will "run together" with adjacent wicks and adversely<br />
affect their electrophoretic patterns. However, it is desirable to<br />
introduce as much <strong>of</strong> the enzyme extraction fluid to the gel as<br />
possible. There<strong>for</strong>e, close attention is needed to ensure proper<br />
soaking <strong>of</strong> the wicks.<br />
One way to ensure proper soaking <strong>of</strong> wicks is to observe the<br />
reflection <strong>of</strong> light on the surface <strong>of</strong> each wick. Just after a wick is<br />
removed from a tube, extraction fluid will be present on the surface<br />
<strong>of</strong> the wick, as indicated by the reflection <strong>of</strong> light on the surface<br />
<strong>of</strong> the wick. As the fluid spreads to the remaining quarter <strong>of</strong> the<br />
wick, the surface fluid is drawn into the wick and light reflection<br />
disappears. If this reflection does not disappear, then the wick is<br />
oversoaked and some fluid is removed by touching the wick to a<br />
paper towel. If the reflection disappears be<strong>for</strong>e the full length <strong>of</strong><br />
the wick is soaked, then additional fluid is drawn up the wick to<br />
maximize the amount <strong>of</strong> sample applied to the gel.<br />
Wicks are placed vertically in the origin on the anodal portion<br />
<strong>of</strong> the gel from left to right (Fig. 4). The wicks will adhere to the<br />
gel surface which will aid in their application. The first wick is<br />
placed about 5 mm from the left inside edge <strong>of</strong> the gel. Subsequent<br />
wicks are placed in the origin with a separation <strong>of</strong> about I mm. It<br />
is important to make sure that each wick is vertical, that it touches<br />
Figure 4<br />
Preparing the gel <strong>for</strong> application <strong>of</strong> enzyme extracts and applying wicks to a gel. The gel (la and lb) resting<br />
on a frozen Blue lee package (2) is separated at the origin (3). Wicks (4) are placed about 1 mm apart; wicks<br />
with marker dyes are placed every 10 specimens. The wide portion <strong>of</strong> the gel is the anodal piece (1a); the<br />
narrow portion is the cathodal strip (lb).<br />
6
Figure 5<br />
Drawing up the extract onto the wick. Samples are held in an icewater bath (I) or on a Blue Ice package<br />
during the wick application process. For each sample, a wick (2) is dipped into a tube (3), allowing tbe extract<br />
to be soaked up, which then is applied to a gel (Fig. 4).<br />
the glass plate, and that adjacent wicks do not touch each other.<br />
After each set <strong>of</strong> 10 wicks, a wick dipped in a red tracking dye is<br />
applied. 3 Dye markers provide a standardized perspective <strong>of</strong> how<br />
far enzymes have migrated in a gel and aid in recording data.<br />
Initially, it may be helpful to apply the dye markers first be<strong>for</strong>e<br />
applying enzyme extracts to aid in proper spacing <strong>of</strong> wicks. We<br />
routinely apply 40 to 50 extracts plus dye markers to a gel. Since<br />
the dye can interfere with migration <strong>of</strong> some enzymes, we use<br />
narrower wicks <strong>for</strong> dye markers (I - 2 x 13 mm) and increase the<br />
space on either side <strong>of</strong> each marker.<br />
When all the wicks have been applied to the origin, the cathodal<br />
gel strip is pushed up close to, but not touching, the wicks and<br />
carefully aligned with the anodal piece. This alignment is important<br />
because the cathodal strip will stretch when it is moved. If the<br />
cathodal strip were in contact with the wicks with this tension, it<br />
could cause the wicks to twist out <strong>of</strong> position as the strip shifted to<br />
relieve the tension. After alignment, the cathol strip to pushed up<br />
to make firm contract with the wicks and anodal piece. The inward<br />
pressure should be enough to cause the wicks to move with the<br />
pressure. The wicks viewed through the gel should have a uni<strong>for</strong>m<br />
color. A circular spot <strong>of</strong> a different shade is evidence <strong>of</strong> an air<br />
pocket. Air pockets disrupt electric current and should be removed<br />
by applying localized pressure on the cathodal strip. To prevent<br />
desiccation, a piece <strong>of</strong> plastic wrap, slightly larger than the gel, is<br />
placed on the gel surface. A portion <strong>of</strong> the plastic wrap is folded<br />
back exposing approximately 10 mm <strong>of</strong> the gel surface along the<br />
length <strong>of</strong> both sides <strong>of</strong> the gel.<br />
3We use a dye solution containing both cathodal and anodal migrating components.<br />
The dye consists <strong>of</strong> one part red food coloring, containing FD and C Red Nos. 3 and<br />
40 (Cresent Mfg. Co., SeaRle. WA), and two parts <strong>of</strong> a histological dye called<br />
Fuschin Red (Pararosaniline. Sigma Chemical Co., SI. Louis, MO) made up in a<br />
1.0% solution and adjusted to pH 7.0 with 1.0 M NaOH. The two red components<br />
in the food coloring migrate anodally. One <strong>of</strong> these components migrates faster than<br />
all enzymes normally detected, and there<strong>for</strong>e is used to detect the end point <strong>of</strong><br />
electrophoresis. The other red component migrdtes approximately one-half as far<br />
anodally and is useful in recording data. The Fuschin Red migrates cathodally and<br />
there<strong>for</strong>e is useful as a visual marker <strong>for</strong> cathodally migrating enzymes.<br />
7<br />
Setting up a gel <strong>for</strong> electrophoresis _<br />
When the gel is ready <strong>for</strong> electrophoresis, the gel and glass plate<br />
are taken <strong>of</strong>f the Blue Ice package and placed on a cO'oling plate.<br />
A cooling plate is part <strong>of</strong> a self-contained chilled water-circulation<br />
system (Fig. 6). The purpose <strong>of</strong> the system is to remove heat<br />
generated during electrophoresis and keep the gel cold, minimizing<br />
enzyme degradation. Alternatively, the gel may be cooled on a<br />
Blue Ice package or in a refrigerator. An electrode buffer tray is<br />
placed on either side <strong>of</strong> the cooling plate. We use "organizer trays"<br />
(Rubber Maid Inc., Wooster, OH), 23x7 cm, cut down to a height<br />
<strong>of</strong> 3 cm. Approximately 250 mL <strong>of</strong> electrode buffer (Appendix 2)<br />
is used <strong>for</strong> each tray. The connection between the electrode buffer<br />
and the gel is made using absorbent sponge cloths [(e.g., Everywhere<br />
Wiper, Lola Products Corp., Hackensack, NJ) Table 1].<br />
The cloths are allowed to absorb the electrode buffer in the buffer<br />
tray, then they are placed on the surface <strong>of</strong> the exposed portions <strong>of</strong><br />
both sides <strong>of</strong> the gel and tucked in along both venical edges <strong>of</strong> the<br />
gel. Moderate pressure is applied to the cloths to ensure good<br />
contact (Fig. 7). The gel is connected to a DC power supply<br />
(capable <strong>of</strong> an output <strong>of</strong> 400 V) using two electrodes. 4 The electrode<br />
connected to the positive terminal is placed in the electrode<br />
buffer adjacent to the anodal piece. The electrode connected to<br />
the negative terminal is placed in the electrode buffer adjacent to<br />
the cathodal strip. Electrodes are held in place with wooden clips<br />
(Fig. 7).5<br />
4The electrodes are made from a patch cord having a banana plug at each end. The<br />
cord is cut in half and a portion <strong>of</strong> the exposed wire is wrapped around a 3-cm piece<br />
<strong>of</strong> 20-gauge platinum wire. Platinum wire is necessary because <strong>of</strong> its resistance to<br />
corrosion during electrophoresis. A short piece <strong>of</strong> flexible tubing, which fits snugly<br />
around the patch cord, is pushed over the wire covering the connection. Epoxy is<br />
used to fill the open end <strong>of</strong> the tubing which seals the connection from possible<br />
corrosion during electrophoresis but leaves at least 2 cm <strong>of</strong> exposed platinum wire.<br />
5With this electrophoresis setup there is the possibility <strong>of</strong> electrical shock. There<strong>for</strong>e,<br />
it is necessary to exercise caution when working with or near gels during electrophoresis.
Figure 6<br />
Cooling system <strong>for</strong> gels with five cooling plates (J). A cooling plate is a watertight box with internal channels causing water to circulate into and out <strong>of</strong> the plate (see<br />
Table I <strong>for</strong> dimensions). The top surface <strong>of</strong> the plate is aluminum to facilitate heat transfer. A thin sheet <strong>of</strong> plastic covers the aluminum surface to insulate it from the<br />
electrical current. Each plate is connected to a 2"C water circulating chiller (2) via a system <strong>of</strong> PVC pipe and insulated tubing (3) which pumps water through the system.<br />
A valve (4) at the end <strong>of</strong> the PVC pipe system controls the amount <strong>of</strong> water flow through the plates. Arrows indicate direction <strong>of</strong> flow.<br />
Current is now applied to the gel. The voltage and milliamp<br />
settings will vary depending upon the buffer. For the three buffers<br />
we commonly use (see Appendix 2), AC and TBCL gels run at<br />
250 V, whereas a TBE gel runs at 350 V. Current is never allowed<br />
to go higher than 70 mA to prevent the buildup <strong>of</strong> excess heat,<br />
which would result in suboptimal electrophoretic separation. The<br />
current is applied <strong>for</strong> 15 min with the wicks in place. After this<br />
time, the power is turned <strong>of</strong>f and the wicks are removed (it is<br />
necessary to remove the wicks because in time the wicks begin to<br />
dry out, which will hinder current flow across the gel).<br />
Removing the wicks and reassembling the gel to continue electrophoresis<br />
are critical steps. Proper attention and care are necessary<br />
to ensure straight, consistent migration <strong>of</strong> enzymes in the gel<br />
matrix. The power is turned <strong>of</strong>f and the electrode buffer cloth on<br />
the cathodal side is folded back into the buffer tray. The plastic<br />
wrap is folded back to expose the origin and wicks. The cathodal<br />
strip is pulled ftway from the wicks. Using <strong>for</strong>ceps, the wicks are<br />
carefully removed and discarded. Bits <strong>of</strong> the wick paper will <strong>of</strong>ten<br />
stick to the gel. The origin must be very clean <strong>for</strong> current to flow<br />
evenly across the gel. To ensure a clean origin, tips <strong>of</strong> the <strong>for</strong>ceps<br />
are dipped into the electrode buffer and then carefully run along<br />
both sides <strong>of</strong> the origin, picking up bits <strong>of</strong> filter paper along the<br />
way. It may be necessary to repeat this step several times to get the<br />
origin clean. The cathodal strip is then pushed back up firmly<br />
against the anodal strip, taking care not to trap air between the two<br />
sides <strong>of</strong> the gel at the origin. To minimize the occurrence <strong>of</strong> air<br />
pockets, start at one end <strong>of</strong> the cathodal strip, or in the middle, and<br />
push it up to the anodal piece at a wide angle to the origin (as<br />
opposed to no angle when you push the cathodal strip up to the<br />
anodal piece when the wicks are still in place). As be<strong>for</strong>e, trapped<br />
air pockets can be seen as a change in color at the origin. These<br />
pockets can easily be removed by gently pulling the surface <strong>of</strong> the<br />
gel away from the origin. After contact is made, the cathodal strip<br />
can be moved from side to side to line it up properly with the<br />
anodal piece (as opposed to prealigning the cathodal strip when the<br />
wicks are still in place). The plastic wrap and cloth are then<br />
replaced and the current reapplied to the gel.<br />
The amount <strong>of</strong> time <strong>for</strong> an electrophoretic run depends upon the<br />
buffer type and the amount <strong>of</strong> separation that is needed <strong>for</strong> the<br />
enzymes <strong>of</strong> interest. Typically, we run AC and TBE gels until the<br />
fast red dye migrates to the far edge <strong>of</strong> the anodal piece (approximately<br />
10 cm from the origin). This takes about 4 h <strong>for</strong> an AC gel<br />
8<br />
and about 5 h <strong>for</strong> a TBE gel. A TBCL gel has a visible "boundary"<br />
which migrates through the gel; the fast red dye migrates with this<br />
boundary zone. We usually run the fast red dye in a TBCL gel until<br />
it has moved 6 to 7 cm, about 3.5 to 4 h.<br />
Slicing a gel _<br />
Following completion <strong>of</strong> electrophoresis, the gel is sliced horizontally<br />
into a number <strong>of</strong> thin slabs. Each slab can be individually<br />
stained <strong>for</strong> a different enzyme. Prior to slicing, the gel and glass<br />
plate are removed from the cooling system and placed on a firm<br />
foundation. The plastic wrap and short plastic strips are removed.<br />
The comers <strong>of</strong> the gel on the end where the first wick was applied<br />
are cut <strong>of</strong>f at an angle. This is done to keep track <strong>of</strong> the direction<br />
<strong>of</strong> extract application on the gel. A narrow sliver is cut <strong>of</strong>f the<br />
entire side <strong>of</strong> the other end <strong>of</strong> the gel so that the leading edge <strong>for</strong><br />
slicing will have a consistent, moist texture. Also, a cm or more<br />
<strong>of</strong> gel may be cut <strong>of</strong>f the entire length <strong>of</strong> the outside <strong>of</strong> the anodal<br />
edge to facilitate accurate slicing when it is known that no enzymes<br />
<strong>of</strong> interest have migrated that far.<br />
Be<strong>for</strong>e slicing the gel, it is necessary to determine if the gel is<br />
adhering to the glass plate. <strong>Gel</strong>s can collect moisture between the<br />
glass plate and the gel, causing them to slide <strong>of</strong>f the plate during<br />
slicing. To obviate this problem, both the cathodal strip and anodal<br />
piece are carefully removed, placed briefly on paper towels, and<br />
then repositioned on a dry glass plate. After repositioning, any air<br />
bubbles beneath the gel are gently pressed out.<br />
The gel and glass plate are then returned to their foundation <strong>for</strong><br />
slicing and positioned as illustrated in Figure 8. Two plastic<br />
"slicing" strips (see Table I) are placed on the glass plate along<br />
both long sides <strong>of</strong> the gel. To keep the slicing strips from sliding<br />
<strong>of</strong>f during slicing, they may be placed so that they rest against the<br />
technician, or they may be clamped to the glass plate. The gel is<br />
sliced by pulling a piece <strong>of</strong> nylon thread or 2-lb test mon<strong>of</strong>ilament<br />
fishing line (approximately 90 cm long) through the gel, using the<br />
slicing strips <strong>for</strong> adjusting the height <strong>of</strong> the slice through the gel.<br />
The ends <strong>of</strong> the thread are wrapped securely around both index<br />
fingers with enough thread between fingers to span the width <strong>of</strong> the<br />
gel. With both index fingers pointed toward the technician, the<br />
thumbs are placed on the thread and pressed onto the two slicing<br />
strips above the top edge <strong>of</strong> the gel as shown in Figure 8. The
Figure 7<br />
A gel setup <strong>for</strong> electrophoresis. Electrode bulTer trays (I) are on each<br />
side <strong>of</strong> the gel (2) which is on a cooling plate (3). Electrodes (4) are held<br />
in the electrode bulTer with wooden clips. Absorbent cloths (5) connect<br />
the electrode bulTer to the gel. The cathodal (-) and anodal (+) portions<br />
<strong>of</strong> the gel are determined by their connection to the power supply (6).<br />
thread is entered at a slight angle to the leading edge <strong>of</strong> the gel and<br />
drawn through at a slow but constant rate. Constant tautness on the<br />
thread and slight downward pressure on the slicing strips are maintained.<br />
The amount <strong>of</strong> tautness and pressure needed to ensure<br />
accurate slicing can be learned only by experience. Only a slight<br />
arc in the thread should be present as it passes through the gel. If<br />
too little tension is applied, the thread will fluctuate down to a<br />
lower slice in the gel, affecting the smooth slicing <strong>of</strong> both slabs.<br />
If too much tension is applied, the thread will break; if this happens,<br />
the slice is simply done again with another piece <strong>of</strong> thread.<br />
After making the slice, another slicing strip is placed on top <strong>of</strong> each<br />
<strong>of</strong> the previous slicing strips and the process repeated until the top<br />
<strong>of</strong> the gel is reached. The first and final slices are <strong>of</strong>ten the most<br />
difficult. so the thread is drawn through extra slowly to achieve<br />
smooth slices. Up to seven or eight usable slabs can be cut from<br />
a single 300-mL gel in this manner. Plastic slicing strips up to 2<br />
mm thick are sometimes used when fewer slabs are needed, or<br />
when a thicker slab gi ves greater levels <strong>of</strong> enzyme activity.<br />
Staining a gel _<br />
The slabs <strong>of</strong> a sliced gel are now prepared <strong>for</strong> staining. The top slab<br />
has a rubbery upper surface due to its exposure to the air and<br />
always gives very poor enzyme resolution. There<strong>for</strong>e, this slab is<br />
peeled <strong>of</strong>f and set aside (it is possible to slice and remove the top<br />
9<br />
slab prior to electrophoresis which can help migration and resolution<br />
<strong>of</strong> the enzymes as well as decrease the time <strong>of</strong> electrophoresis).<br />
Subsequent slabs are peeled <strong>of</strong>f and individually placed on<br />
glass plates (Table 1). The cathodal strip may be placed and<br />
aligned with the anodal piece depending upon location <strong>of</strong> the<br />
enzyme <strong>of</strong> interest. The thin slabs are sometimes difficult to handle<br />
at first because they are easily torn and slightly tacky. One method<br />
<strong>for</strong> handling them is to get the fingertips <strong>of</strong>one hand under one end<br />
<strong>of</strong> the gel near the edge, gently lift the slab all the way <strong>of</strong>f, and then<br />
get the fingertips <strong>of</strong> the other hand under the end <strong>of</strong> the slab that<br />
is hanging. Others use a method by which both hands hold one end<br />
<strong>of</strong> the gel while the other end is left to hang down. A spatula can<br />
help in separating the slabs. Some find it useful to wet their fingers<br />
and the glass plate to aid in the handling <strong>of</strong> the slabs. Slabs torn<br />
during handling can usually be pieced back together and stained.<br />
The upper slabs <strong>of</strong> the gel provide poorer enzyme resolution than<br />
lower slabs <strong>of</strong> the gel due to the top rubbery slab. Thus, the first<br />
two usable slabs next to the rubbery top slab are inverted, when<br />
laid out on the glass plate. to expose the lower surface <strong>of</strong> the gel<br />
<strong>for</strong> staining. When laying out the slabs, it is best to avoid trapping<br />
air bubbles under the gel slab as they can affect the even distribution<br />
<strong>of</strong> the stain. Each slab is appropriately labeled with population<br />
name. sample numbers, buffer type, and enzyme abbreviation<br />
using transparent tape applied to the glass plate.<br />
To stain each gel slab, a mixture <strong>of</strong> a hot agar solution and a<br />
staining reagent is poured over the gel slab. We use a 2% agar<br />
solution <strong>for</strong> staining, i.e., 2 g agar dissolved by heating in 100 mL<br />
<strong>of</strong> distilled water. The desired amount <strong>of</strong> agar is sifted into heated,<br />
distilled water which is just about to boil. The solution is swirled<br />
frequently as the agar is added, to minimize the possibility <strong>of</strong><br />
creating lumps. The solution is kept on "low" heat with intermittent<br />
swirling until no granules are visible in the solution. Once it<br />
is melted, the agar solution is held as a liquid at 65°C in a hot water<br />
bath. Hardened agar is reused by remelting the agar in a boiling<br />
water bath. A microwave oven works well in dissolving agar as<br />
well as in remelting hardened agar. We use granular agar (Bacto<br />
Agar, Difco Laboratories, Detroit, MI), as opposed to a powdered<br />
agar, because it melts faster and produces a clear solution.<br />
A staining reagent, in general, consists <strong>of</strong> a buffer <strong>of</strong> an appropriate<br />
pH containing the substrate <strong>for</strong> a particular enzyme, any<br />
c<strong>of</strong>actors or enhancers that are required <strong>for</strong> that particular enzyme,<br />
and a dye. 6 Typically, the dye precipitates or changes color in the<br />
presence <strong>of</strong> one <strong>of</strong> the products <strong>of</strong> the enzyme reaction. In some<br />
cases, the site <strong>of</strong> enzyme activity can be detected by the lack or<br />
presence <strong>of</strong> fluorescence under an ultraviolet light. In either case,<br />
the results <strong>of</strong> staining are visible bands where the enzyme is present<br />
in the gel slab. Interpretation <strong>of</strong> these banding patterns is thoroughly<br />
covered in Utter et al. (1987).<br />
To cover one gel slab, 25 mL <strong>of</strong> the staining mixture (three parts<br />
staining reagent and two parts liquid agar) are needed. When<br />
pouring this mixture over the gel surface, a spatula is sometimes<br />
used to help spread the staining mixture evenly over the gel and to<br />
hold back or remove bubbles. After a minute or less. the agar will<br />
set up or gel. and the stained gel slab on the glass plate can be put<br />
into an incubator. Incubation at 37°C is used <strong>for</strong> most enzymes to<br />
speed up enzyme reaction and limit exposure to light (some <strong>of</strong> the<br />
dyes that are used are reactive to light). Incubation time varies<br />
depending upon the enzyme: some enzymes produce bands almost<br />
6A number <strong>of</strong> chemicals used in the stains. particularly the dyes, are hazardous and<br />
should be handled with cau'ion. It is advisable to (I) measure out the hazardous<br />
chenlicals in a hood to minimize the breathing <strong>of</strong> dust and (2) wear disposable gloves<br />
when preparing or pouring stains and in handling the stained gel plates. Hazardous<br />
chemicals are usually readily identified with warning labels on the container.
APPENDIX 1: Staining recipes _<br />
Following is a list <strong>of</strong> staining recipes <strong>for</strong> enzymes which we use in<br />
our electrophoretic studies <strong>of</strong>fishes. They are adapted from recipes<br />
given in Harris and Hopkinson (1976) and Siciliano and Shaw<br />
(1976) using the agar overlay method. They are divided into four<br />
categories to facilitate stain preparation: stains involving NAD+<br />
dependent enzymes, stains involving NADP+ dependent enzymes,<br />
enzymes detected with ultraviolet light, and miscellaneous stains.<br />
For each enzyme stain, the full enzyme name is given as well as<br />
an abbreviation, the presumed or observed subunit structure <strong>of</strong> the<br />
enzyme when known, and the number assigned to the enzyme by<br />
the Enzyme Commission (E.C.) <strong>of</strong> the International Union <strong>of</strong><br />
Biochemistry (1984). When preparing the stains, items can be<br />
premixed on the day to be used except <strong>for</strong> those preceded by an<br />
asterisk, which should be added just prior to staining. Items are<br />
listed in order <strong>of</strong> most common use. Stain buffers, which are<br />
ADP<br />
ATP<br />
DMSO<br />
E.C.<br />
EVU<br />
FAD<br />
GAPDH<br />
G6PDH<br />
GDH<br />
HCI<br />
LDH<br />
MgCl 2<br />
MIT<br />
NAD+<br />
NADH<br />
NADP+<br />
NADPH<br />
NaOH<br />
PMS<br />
XO<br />
List <strong>of</strong> abbreviations<br />
usually the first item, are made at a given concentration and adjusted<br />
to the desired pH with the item following the slash (I). For<br />
HCI, we use a 12.1-M concentrated solution, and <strong>for</strong> citric acid a<br />
1.0-M solution. All phosphate buffers are made by mixing appropriate<br />
quantities <strong>of</strong> monobasic, dibasic, or tribasic sodium phosphate<br />
0.1 M solutions to achieve the desired pH. Items which are<br />
listed as percent solutions (g per 100 mL) are dissolved in distilled<br />
water unless indicated otherwise. To expedite the preparation <strong>of</strong><br />
stains, it is useful to rely on an "estimated volumetic unit" (EVU)<br />
as opposed to weighing out each chemical, and to use drops <strong>of</strong><br />
coupling enzymes from a pipet by calculating the number <strong>of</strong> units<br />
in a drop. EVU equivalents are given next to milligram quantities<br />
and relate to the approximate volume these quantities yield when<br />
measured by eye on the tip <strong>of</strong> a spatula.<br />
Adenosine diphosphate<br />
Adenosine triphosphate<br />
Dimethyl sulfoxide<br />
Enzyme Commission, IntI. Union Biochem.<br />
Estimated volumetric unit<br />
Flavine adenine dinucleotide<br />
Glycerilldehyde-3-phosphate dehydrogenase<br />
Glucose-6-phosphate dehydrogenase<br />
Glutamate dehydrogenase<br />
Hydrochloric acid<br />
Lactate dehydrogenase<br />
Magnesium chloride<br />
3-(4,5-Dimethyl-2-thiazolyl)-2,5-diphenyl-2H-tetrazolium<br />
bromide<br />
f3-Nicotinamide adenine dinucleotide<br />
f3-Nicotinamide adenine dinucleotide (reduced)<br />
f3-Nicotinamide adenine dinucleotide phosphate<br />
f3-Nicotinamide adenine dinucleotide phosphate<br />
(reduced)<br />
Sodium hydroxide<br />
Phenazine methosulfate<br />
Xanthine oxidase<br />
I1
Alanine aminotransferase<br />
dimer<br />
0.1 M Phosphate, 0.1 % 0.-<br />
Ketoglutaric acid, pH 8.5<br />
NAD+ 0.5%<br />
ADP<br />
Pyridoxal-5-phosphate<br />
L-Alanine<br />
*GDH (suspended in 50% glycerol<br />
with negligible ammonium ions)<br />
*MTT 0.5%<br />
*PMS 0.5%<br />
*Agar 2.0%<br />
Incubate at 37°C in the dark until sufficient activity is present.<br />
Alcohol dehydrogenase<br />
dimer<br />
0.2 M TfI5/HCl, pH 8.0<br />
NAD+ 0.5%<br />
Ethyl alcohol 100%<br />
*MTT 0.5%<br />
*PMS 0.5%<br />
*Agar 2.0%<br />
Incubate at 37°C in the dark until sufficient activity is present.<br />
Fructose-biphosphate aldolase<br />
tetramer<br />
0.2 M Tris/HCl, pH 8.0<br />
NAD+ 0.5%<br />
Arsenic ac!d (sodium salt)<br />
Fructose-I, 6-diphosphate<br />
*GAPDH<br />
*MTT 0.5%<br />
*PMS 0.5%<br />
*Agar 2.0%<br />
Incubate at 37°C in the dark until sufficient activity is present.<br />
Fumarate hydratase<br />
tetramer<br />
0.2 M Tris/HCl, pH 8.0<br />
NAD+ 0.5%<br />
Pyruvic acid (sodium salt)<br />
Fumaric acid (sodium salt)<br />
*Malate dehydrogenase<br />
*MTT 0.5%<br />
*PMS 0.5%<br />
*Agar 2.0%<br />
Stains Involving NAD+ Dependent Enzymes<br />
ALAT<br />
E.C.2.6.12<br />
15 mL<br />
0.5 mL<br />
7 mg (1/2 EVU)<br />
0.5 mg (1/50 EVU)<br />
20 mg (112 EVU)<br />
100 units<br />
0.5 mL<br />
0.5 mL<br />
10 mL<br />
15 mL<br />
0.5 mL<br />
0.08 mL<br />
0.5 mL<br />
0.5 mL<br />
IOmL<br />
ADH<br />
E.C. 1.I.l.I<br />
FBALD<br />
E.C.4.1.I.l3<br />
15 mL<br />
0.5 mL<br />
50 mg (1 EVU)<br />
28 mg (1 EVU)<br />
200 units<br />
0.5 mL<br />
0.5 mL<br />
10 mL<br />
FH<br />
E.C. 4.2.1.2<br />
15 mL<br />
0.5 mL<br />
5 mg (1/4 EVU)<br />
50 mg (I EVU)<br />
300 units<br />
0.5 mL<br />
0.5 rnL<br />
IOmL<br />
Incubate at 37°C in the dark until sufficient activity is present.<br />
12<br />
Glutamate dehydrogenase<br />
hexamer<br />
0.1 M Phosphate, pH 8.5<br />
NAD+ 0.5%<br />
ADP<br />
L-Glutamic acid (sodium salt)<br />
*Pyridoxal-5-phosphate<br />
*MTT 0.5%<br />
*PMS 0.5%<br />
*Agar 2.0%<br />
Incubate at 37°C in the dark until sufficient activity is present.<br />
Glyceraldehyde-3-phosphate dehydrogenase GAPDH<br />
tetramer E.C. 1.2.1.12<br />
0.2 M Tris/HCI, pH 8.0<br />
NAD+ 0.5%<br />
Arsenic acid (sodium salt)<br />
Aldolase<br />
Fructose-I, 6-diphosphate<br />
*MTT 0.5%<br />
*PMS 0.5%<br />
*Agar 2.0%<br />
Incubate at 37°C in the dark until sufficient activity is present.<br />
Glycerol-3-phosphate dehydrogenase<br />
dimer<br />
0.2 M Tris/HCl, pH 8.5<br />
NAD+ 0.5%<br />
a-Glycerophosphate<br />
*MTT 0.5%<br />
*PMS 0.5%<br />
*Agar 2.0%<br />
Incubate at 37°C in the dark until sufficient activity is present.<br />
Hydroxyacylglutathione hydrolase<br />
dimer<br />
0.2 M TrisIHCI, pH 8.0<br />
Methyl glyoxal<br />
Glutathione (reduced)<br />
Lactoyl-glutathione lyase (GLOI)<br />
*NAD+ 0.5%<br />
*Pyruvic acid (sodium salt)<br />
*1.0 M Zinc chloride<br />
*LDH<br />
*MTT 0.5%<br />
*PMS 0.5%<br />
*Agar 2.0%<br />
GDH<br />
E.C. 1.4.1.2<br />
15 mL<br />
0.5 mL<br />
7 mg (1/2 EVU)<br />
45 mg (I EVU)<br />
0.5 mg (1150 EVU)<br />
0.5 mL<br />
0.5 mL<br />
10 mL<br />
15 mL<br />
0.5 mL<br />
50 mg (1 EVU)<br />
20 unils<br />
28 mg (1 EVU)<br />
0.5 mL<br />
0.5 mL<br />
10 mL<br />
G3PDH<br />
E.C. 1.1.1.8<br />
15 mL<br />
0.5 mL<br />
35 mg (I EVU)<br />
0.5 mL<br />
0.5 mL<br />
10 mL<br />
HAGH<br />
E.C.3.1.2.6<br />
15 mL<br />
0.24 mL<br />
25 mg (I EVU)<br />
150 units<br />
3 mL<br />
5 mg (114 EVU)<br />
0.08 mL<br />
400 units<br />
0.5 mL<br />
0.5 mL<br />
10 mL<br />
Rinse all glassware used in stain with distilled water prior to<br />
use.<br />
Mix first four items at least 30 min prior to staining.<br />
Incubate at 37°C in the dark until sufficient activity is present.
L-iditol dehydrogenase<br />
tetramer<br />
0.2 M Tris/HCI, pH 8.5<br />
NAO+ 0.5%<br />
Sorbital50.0%<br />
*MTT 0.5%<br />
*PMS 0.5%<br />
*Agar 2.0%<br />
IDDH<br />
E.C. 1.1.1.14<br />
Incubate at 37°C in the dark until sufficient activity is present.<br />
Lactate dehydrogenase<br />
tetramer<br />
0.2 M Tris/HCI. pH 8.0<br />
NAO+ 0.5%<br />
0.5 M Lactic acid/NaOH (-0.5 M),<br />
pH 8.0<br />
*MTT 0.5%<br />
*PMS 0.5%<br />
*Agar 2.0%<br />
Incubate at 37°C in the dark until sufficient activity is present.<br />
Malate dehydrogenase<br />
dimer<br />
0.2 M Tris/HCI, pH 8.0<br />
NAO+ 0.5%<br />
0.5 M Malic acid/NaOH (-1.0 M),<br />
pH 7.0<br />
*MTT 0.5%<br />
*PMS 0.5%<br />
*Agar 2.0%<br />
13 mL<br />
0.5 mL<br />
2 mL<br />
0.5 mL<br />
0.5 mL<br />
IOmL<br />
13 mL<br />
0.5 mL<br />
2 mL<br />
0.5 mL<br />
0.5 mL<br />
10 mL<br />
13 mL<br />
0.5 mL<br />
2 mL<br />
0.5 mL<br />
0.5 mL<br />
10 mL<br />
LDH<br />
E.C. 1.1.1.27<br />
MDH<br />
E.C. 1.1.1.37<br />
Incubate at 37°C in the dark until sufficient activity is present.<br />
Aconitate hydratase<br />
monomer<br />
1.0 M Tris/HCl, pH 8.0<br />
NAOP+ 0.25%<br />
1.0 M MgCI 2<br />
Aconitic acid<br />
*Isocitrate dehydrogenase<br />
*MTT 0.5%<br />
*PMS 0.5%<br />
*Agar 2.0%<br />
Triosephosphate isomerase<br />
dimer<br />
0.03 M Tris, 0.005 M Citric acid,<br />
0.6 mM Lithium hydroxide,<br />
3.0 mM Boric Acid (TBCL gel buffer<br />
diluted 1 in 10, see Appendix I),<br />
pH 8.7<br />
NAO+ 0.5%<br />
Arsenic acid (sodium salt)<br />
Oihydroxyacetone phosphate<br />
(lithium salt)<br />
*GAPOH<br />
*MTT 0.5%<br />
*PMS 0.5%<br />
*Agar 2.0%<br />
TPI<br />
E.C. 5.3.1.1<br />
15 mL<br />
0.5 mL<br />
25 mg (1/2 EVU)<br />
10 mg (112 EVU)<br />
200 units<br />
0.5 mL<br />
0.5 mL<br />
IOmL<br />
Incubate at 37°C in the dark until sufficient activity is present.<br />
Tyrosine aminotransferase<br />
subunit structure uncertain<br />
0.2 M Tris/HCI, pH 8.5<br />
NAD+ 0.5%<br />
ADP<br />
ex-Ketpglutaric acid<br />
L-Tyrosine/HCI 5.0% in 1.0 M HCI<br />
*Pyridoxal-5-phosphate<br />
*GOH (suspended in 50% glycerol<br />
with negligible ammonium ions)<br />
*MTT 0.5%<br />
*PMS 0.5%<br />
*Agar 2.0%<br />
Stains Involving NADP+ Dependent Enzymes<br />
AH<br />
E.C. 4.2.1.2<br />
15 mL<br />
0.5 mL<br />
I mL<br />
12 mg (1/2 EVU)<br />
5 units<br />
0.5 mL<br />
0.5 mL<br />
10 mL<br />
Incubate at 37°C in the dark until sufficient activity is present.<br />
13<br />
TAT<br />
E.C. 2.6.1.5<br />
15 mL<br />
0.5 mL<br />
7 mg (112 EVU)<br />
8 mg (114 EVU)<br />
0.2 mL<br />
0.5 mg (1150 EVU)<br />
100 units<br />
0.5 mL<br />
0.5 mL<br />
10 mL<br />
Incubate at 37°C in the dark until sufficient activity is present.<br />
Adenylate kinase<br />
monomer<br />
0.2 M Tris/HCl, pH 8.0<br />
NAOP+ 0.25%<br />
1.0 M MgCI 2<br />
G6PDH<br />
Glucose<br />
ADP<br />
*Hexokinase<br />
*MTT 0.5%<br />
*PMS 0.5%<br />
*Agar 2.0%<br />
AK<br />
E.C. 2.7.4.3<br />
15 mL<br />
0.5 mL<br />
0.25 mL<br />
12 units<br />
100 mg (2 EVU)<br />
14 mg (I EVU)<br />
1.5 mg (1/4 EVU)<br />
0.5 mL<br />
0.5 mL<br />
IOmL<br />
Incubate a 37°C in the dark until sufficient activity is present.
Creatine kinase<br />
dimer 1<br />
0.2 M Tris/HCI, pH 8.0<br />
NADP+ 0.25%<br />
1.0 M MgCl 2<br />
G6PDH<br />
Glucose<br />
ADP<br />
Phosphocreatine<br />
*Hexokinase<br />
*MTT 0.5%<br />
*PMS 0.5%<br />
*Agar 2.0%<br />
Incubate at 37°C in the dark until sufficient activity is present.<br />
lIn fish, the skeletal muscle CK isozymes act as monomers.<br />
Glucose-6-phosphate dehydrogenase<br />
dimer<br />
0.2 M Tris/HCI, pH 8.0<br />
NADP+ 0.25%<br />
1.0 M MgCI 2<br />
Glucose-6-phosphate<br />
*MTT 0.5%<br />
"PMS 0.5%<br />
*Agar 2.0%<br />
Incubate at 37°C in the dark until sufficient activity is present.<br />
Glucose-6-phosphate isomerase<br />
dimer<br />
0.2 M Tris/HCl, pH 8.0<br />
NADP+ 0.25%<br />
1.0 M MgCI 2<br />
G6PDH<br />
Fructose-6-phosphate<br />
*MTT 0.5%<br />
*PMS 0.5%<br />
*Agar 2.0%<br />
Incubate at 37°C in the dark until sufficient activity is present.<br />
Hexokinase<br />
monomer<br />
0.2 M Tris/HCl, pH 8.0<br />
NADpr 0.25%<br />
1.0 M MgCI 2<br />
G6PDH<br />
Glucose<br />
ATP<br />
*MTT 0.5%<br />
*PMS 0.5%<br />
*Agar 2.0%<br />
CK<br />
E.C. 2.7.3.2<br />
IS mL<br />
0.5 mL<br />
0.25 mL<br />
12 units<br />
100 mg (2 EVU)<br />
14 mg (I EVU)<br />
18 mg (I EVU)<br />
1.5 mg (1/4 EVU)<br />
0.5 mL<br />
0.5 mL<br />
IOmL<br />
G6PDH<br />
E.C. 1.1.1.49<br />
15 mL<br />
0.5 mL<br />
0.25 mL<br />
50 mg (2 EVU)<br />
0.5 mL<br />
0.5 mL<br />
IOmL<br />
GPI<br />
E.C. 5.3.1.9<br />
IS mL<br />
0.5 mL<br />
0.25 mL<br />
12 units<br />
5 mg (1/4 EVU)<br />
0.5 mL<br />
0.5 mL<br />
10 mL<br />
HK<br />
E.C.2.7.1.1<br />
15 mL<br />
0.5 mL<br />
0.25 mL<br />
12 units<br />
100 mg (2 EVU)<br />
14 mg (J EVU)<br />
0.5 mL<br />
0.5 mL<br />
10 mL<br />
Incubate at 37°C in the dark until sufficient activity is present.<br />
14<br />
Isocitrate dehydrogenase<br />
dimer<br />
0.2 M Tris/HCI, pH 8.0<br />
NADP+ 0.25%<br />
1.0 M MgCl 2<br />
Isocitric acid (sodium salt)<br />
*MTT 0.5%<br />
*PMS 0.5%<br />
*Agar 2.0%<br />
Incubate at 37°C in the dark until sufficient activity is present.<br />
Malate dehydrogenase (NADP+)<br />
tetramer<br />
0.2 M Tris/HCI, pH 8.0<br />
NADP+ 0.25%<br />
1.0 M MgCI 2<br />
Oxaloacetic acid<br />
0.5 M Malic acidiNaOH (-1.0 M),<br />
pH 7.0<br />
*MTT 0.5%<br />
*PMS 0.5%<br />
"Agar 2.0%<br />
Incubate at 3rC in the dark until sufficient activity is present.<br />
Mannose-6-phosphate isomerase<br />
monomer<br />
0.03 M Tris, 0.005 M Citric acid,<br />
0.6 mM Lithium hydroxide,<br />
3.0 mM Boric acid (TBCL gel buffer<br />
diluted I in 10, see Appendix I.),<br />
pH 8.7<br />
NADP+ 0.25%<br />
1.0 M MgCI 2<br />
G6PDH<br />
Mannose-6-phosphate<br />
*Glucose-6-phosphate isomerase<br />
*MTT 0.5 %<br />
*PMS 0.5%<br />
*Agar 2.0%<br />
Incubate at 37°C in the dark until sufficient activity is present.<br />
Phosphoglucomutase<br />
monomer<br />
0.2 M Tris/HCl, pH 8.0<br />
NADP+ 0.25%<br />
1.0 M MgCI 2<br />
G6PDH<br />
Glucose-I-phosphate (with<br />
I% glucose-I, 6-diphosphate)<br />
*MTT 0.5%<br />
*PMS 0.5%<br />
*Agar 2.0%<br />
IDH<br />
E.C. 1.1.1.42<br />
IS mL<br />
0.5 mL<br />
0.25 mL<br />
36 mg (I EVU)<br />
0.5 mL<br />
0.5 mL<br />
10 mL<br />
MDHp<br />
E.C. 1.1.1.40<br />
13 mL<br />
0.5 mL<br />
05 mL<br />
9 mg (1/4 EVU)<br />
2 mL<br />
0.5 mL<br />
0.5 mL<br />
IOmL<br />
MPI<br />
E.C. 5.3.1.8<br />
IS mL<br />
0.5 mL<br />
0.25 mL<br />
12 units<br />
7 mg (I EVU)<br />
10 units<br />
0.5 mL<br />
0.5 mL<br />
10 mL<br />
15 mL<br />
0.5 mL<br />
0.1 mL<br />
6 units<br />
PGM<br />
E.C. 5.4.2.2<br />
13 mg (1/2 EVU)<br />
0.5 mL<br />
0.5 mL<br />
10 mL<br />
Incubate at 37°C in the dark until sufficient activity is present.
a-Glucosidase<br />
tetramer<br />
0.1 M phosphate/Citric acid. pH 8.0<br />
*4-Methylumbelliferyl-a-D-glucoside<br />
*Agar 2.0%<br />
Incubate at 37°C, until sufficient activity is visible under longwave<br />
(365 nm) UV light.<br />
a-Mannosidase<br />
subunit structure uncertain<br />
0.1 M Phosphate/Citric acid, pH 9.5<br />
*4-Methylumbelliferyl-a-D-mannopyranoside<br />
(dissolve first in 0.25 mL<br />
DMSO)<br />
*Agar 2.0%<br />
aGLU<br />
E.C. 3.2.1.20<br />
15 mL<br />
3 mg (1/4 EVU)<br />
10 mL<br />
aMAN<br />
E.c. 3.2.1.24<br />
15 mL<br />
6.5 mg (1/4 EVU)<br />
IOmL<br />
Incubate at 37°C, until sufficient activity is visible under longwave<br />
(365 nm) UV light.<br />
Adenosine deaminase<br />
monomer<br />
0.1 M Phosphate, pH 8.5<br />
Arsenic acid (sodium salt)<br />
Adenosine<br />
*XO<br />
*Purine-nucleoside phosphorylase<br />
*MTT 0.5%<br />
*PMS 0.5%<br />
*Agar 2.0%<br />
Miscellaneous Stains<br />
ADA<br />
E.C. 3.5.4.4<br />
15 mL<br />
50 mg (I EVU)<br />
3 mg (1/4 EVU)<br />
3 units<br />
5 units<br />
0.5 mL<br />
0.5 mL<br />
IOmL<br />
Incubate at 37°C in the dark until sufficient activity is present.<br />
16<br />
Phosphoglycerate kinase<br />
monomer<br />
0.2 M Tris/HCl, pH 8.0<br />
1.0 M MgCI 2<br />
ATP<br />
3-Phosphoglyceric acid (sodium salt)<br />
*NADH<br />
*GAPDH<br />
*Triosephosphate isomerase<br />
*Glycerol-3-phosphate dehydrogenase<br />
*Agar 2.0%<br />
Incubate at 37°C, until sufficient activity is visible under longwave<br />
(365 nm) UV light.<br />
Pyruvate kinase<br />
tetramer<br />
u.2 M Tris/HCI, pH 8.0<br />
ADP<br />
Fmdose-I, 6-diphosphate<br />
1.0 M MgCI 2<br />
Potassium chloride<br />
Phospho(enol)pyruvate<br />
*NADH<br />
*LDH<br />
*Agar 2.0%<br />
PGK<br />
E.C. 2.7.2.3<br />
15 ml<br />
I mL<br />
14 mg (I EVU)<br />
55 mg (I EVU)<br />
30 mg (3 EVU)<br />
375 units<br />
300 units<br />
75 units<br />
10 mL<br />
PK<br />
E.C. 2.7.1.40<br />
15 mL<br />
14 mg (1 EVU)<br />
7 mg (1/4 EVlJ)<br />
0.5 mL<br />
165 mg (3 EVU)<br />
12 mg (1 EVU)<br />
30 mg (3 EVU)<br />
400 units<br />
IOmL<br />
Incubate at 37°C, until sufficient activity is visible under longwave<br />
(365 nm) UV light.<br />
Aspartate aminotransferase<br />
dimer<br />
0.12 M Tris, 0.02 M Citric acid,<br />
2.4 mM Lithium hydroxide,<br />
12.0 mM Boric acid (TBCL<br />
gel buffer diluted 1 in 5,<br />
see Appendix 1),<br />
0.22% a-Ketoglutaric acid.<br />
0.5% L-Aspartic acid, pH 7.5<br />
(adjust pH with 3.0 M Potassium<br />
hydroxide)<br />
"'Fast blue BB salt<br />
"Agar 2.0%<br />
AAT<br />
E.C. 2.6.1.1<br />
15 mL<br />
17 mg (1/2 EVU)<br />
10 mL<br />
Incubate at 37°C in the dark until sufficient activity is present.
Carboxylesterase<br />
subunit structure variableI<br />
0.1 M Phosphate, pH 7.0<br />
*(X-Napthyl propionate (dissolve<br />
first in 4.0 mL acetone)<br />
*Fast blue BB salt<br />
75 mL<br />
EST<br />
E.C. 3.1.1.1<br />
12.5 mg (1/2 EVU)<br />
34 mg (I EVU)<br />
Place gel slab in a staining tray, pour staining solution into tray,<br />
then agitate tray to loosen gel slab from the bottom <strong>of</strong> tray.<br />
Incubate at 22°C until sufficient activity is present, pour <strong>of</strong>f the<br />
staining solution, and rinse the gel slab in water.<br />
Other possible substrates are (X-Naphthyl acetate and<br />
(X-Naphthyl butyrate.<br />
IThis stain detects a class <strong>of</strong> enzymes which does not represent<br />
a single ancestral lineage; there<strong>for</strong>e subunit structure may vary<br />
among loci.<br />
Catalase<br />
tetramer<br />
Hydrogen peroxide 0.06%<br />
Apply to filter paper overlay as<br />
needed to keep moist and incubate<br />
at 22°C <strong>for</strong> 5 min; remove<br />
filter paper, soak up excess<br />
H 20 2 solution, and add the following:<br />
*Potassium ferricyanide 2.0%<br />
(make the same day as used)<br />
*Ferric chloride 2.0% (make the<br />
same day as used)<br />
*Agar<br />
Appears immediately as yellow zones on blue-green background.<br />
Diaphorase<br />
subunit structure uncertain<br />
0.2 M Tris/HCl, pH 8.0<br />
2, 6-Dichlorophenol-indophenol 0.02%<br />
in 0.2 M Tris/HCl, pH 8.0<br />
*FAD<br />
*NADH or NADPH<br />
*MTT 0.5%<br />
*Agar 2.0%<br />
10 mL<br />
7 mL<br />
7 mL<br />
IOmL<br />
13 mL<br />
CAT<br />
E.C. 1.11.1.6<br />
DIA<br />
E.C.*.*.*.*.I<br />
2 mL<br />
2 mg (1/8 EVU)<br />
7.5 mg (1/2 EVU)<br />
2 mL<br />
10 mL<br />
Incubate at 37°C in the dark until sufficient activity is present.<br />
IThis stain may detect Xanthine oxidase or a variety <strong>of</strong> other<br />
enzymes.<br />
17<br />
General protein stain<br />
Glacial acetic acid<br />
Ethyl alcohol 100%<br />
Distilled water<br />
Naphthol Blue Black 1%<br />
Nigrosin 1%<br />
I part<br />
5 parts<br />
4 parts<br />
GP<br />
Place gel slab in a staining tray, pour enough staining solution<br />
into the tray to cover the gel (approximately 75 mL), and then<br />
agitate the tray to loosen the gel slab from bottom <strong>of</strong> the tray.<br />
Incubate at 22°C <strong>for</strong> approximately 15 min, then pour the staining<br />
solution <strong>of</strong>f (save <strong>for</strong> repeated use), rinse gel slab with<br />
water, and then cover with destain solution (first three items).<br />
Change the destain periodically, as it turns blue, until all excess<br />
stain has been removed.<br />
13-Glucuronidase<br />
tetramer<br />
0.2 M sodium acetate/HCI, pH 5.0<br />
*Naphthol-AS-BI-(3-D-glucuronide<br />
*Fast garnet GBC salt<br />
*Agar 2.0%<br />
13GUS<br />
E.C. 3.2.1.31<br />
Incubate at 37°C in the dark until sufficient activity is present.<br />
Glutathione reductase<br />
dimer<br />
0.2 M Tris/HCI, pH 8.0<br />
2, 6-Dichlorophenol-indophenol 0.02%<br />
in 0.2 M Tris/HCI, pH 8.0<br />
Glutathione (oxidized)<br />
*FAD<br />
*NADH<br />
*MTT 0.5%<br />
*Agar 2.0%<br />
Incubate at 37°C in the dark until sufficient activity is present.<br />
Guanine deaminase<br />
dimer<br />
0.2 M Tris/HCI, pH 8.0<br />
Guanine 2.0% in 1.0 M NaOH<br />
*XO<br />
*MTT 0.5%<br />
*PMS 0.5%<br />
*Agar 2.0%<br />
15 mL<br />
10 mg (1/2 EVU)<br />
10 mg (1/2 EVU)<br />
10 mL<br />
13 mL<br />
GR<br />
E.C. 1.6.4.2<br />
2mL<br />
18 mg (I EVU)<br />
2 mg (1/8 EVU)<br />
7.5 mg (1/2 EVU)<br />
2mL<br />
10 mL<br />
15 mL<br />
0.1 mL<br />
3 units<br />
0.5 mL<br />
0.5 mL<br />
IOmL<br />
GDA<br />
E.C. 3.5.4.3<br />
Incubate at 37°C in the dark until sufficient activity is present.
APPENDIX 2: <strong>Electrophoresis</strong> butTers _<br />
Following are recipes <strong>for</strong> our three most commonly used gel<br />
buffers. The first two are continuous buffer systems (where components<br />
<strong>of</strong> the gel buffer are the same as components <strong>of</strong> the electrode<br />
buffer), and the third is a discontinuous buffer system (where<br />
components <strong>of</strong> the gel buffer are different than components <strong>of</strong> the<br />
AC : Amine, Citric acid butTer (Clayton and Tretiak 1972)<br />
Electrode, pH 7.0*:<br />
Citric acid 0.04 M<br />
N-(3-aminopropyl)-morpholine: add until pH is reached<br />
EDTAI (optional) 0.01 M<br />
<strong>Gel</strong>: use 1 in 20 dilution <strong>of</strong> the electrode buffer.<br />
*For certain circumstances where it is desirable to have the<br />
locus <strong>of</strong> interest migrate more toward the cathode, a pH <strong>of</strong> 6.0<br />
or 6.5 is sometimes used.<br />
lEthylenediarninetetraacetic acid (sodium salt).<br />
TBE : Tris, Boric acid, EDTA butTer (Boyer et al. 1963)<br />
Electrode, pH 8.7:<br />
Tris 0.18 M<br />
Boric acid 0.1 M<br />
EDTA 0.004 M<br />
<strong>Gel</strong>: use 1 in 4 dilution <strong>of</strong> the electrode buffer.<br />
19<br />
electrode buffer). Recipes <strong>for</strong> the buffers are presented in units <strong>of</strong><br />
molarity (M) or moles per liter. To calculate the number <strong>of</strong> grams<br />
<strong>of</strong> a chemical required in a specific volume <strong>of</strong> buffer, multiply the<br />
molarity (miL) times the <strong>for</strong>mula or molecular weight (g/m) <strong>of</strong> the<br />
chemical times the desired volume (L).<br />
TBCL: Tris, Citric acid gel butTerlLithium hydroxide,<br />
Boric acid electrode butTer (Ridgway et al. 1970)<br />
Electrode, pH 8.0:<br />
Lithium hydroxide 0.06 M<br />
Boric acid 0.3 M<br />
EDTA (optional) 0.01 M<br />
<strong>Gel</strong>, pH 8.7:<br />
Tris 0.3 M<br />
Citric acid 0.05 M<br />
Add 10% <strong>of</strong> the electrode buffer.<br />
Use 1 in 10 dilution <strong>of</strong> the gel buffer.