Installation & Instruction Manual - Reverse Osmosis, RO Water ...
Installation & Instruction Manual - Reverse Osmosis, RO Water ...
Installation & Instruction Manual - Reverse Osmosis, RO Water ...

Create successful ePaper yourself
Turn your PDF publications into a flip-book with our unique Google optimized e-Paper software.
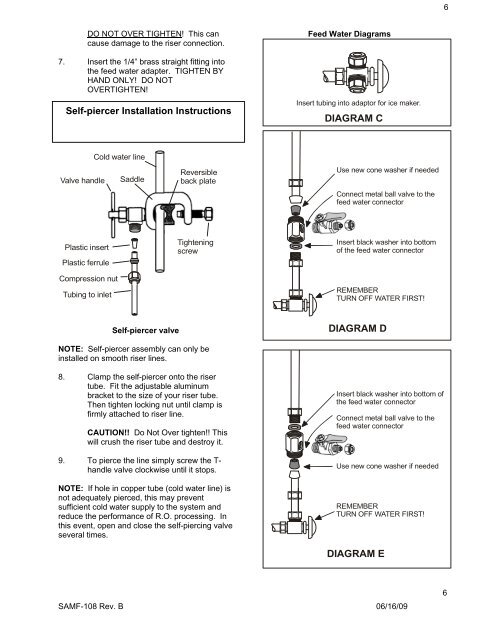
6DO NOT OVER TIGHTEN! This cancause damage to the riser connection.7. Insert the 1/4” brass straight fitting intothe feed water adapter. TIGHTEN BYHAND ONLY! DO NOTOVERTIGHTEN!Self-piercer <strong>Installation</strong> <strong>Instruction</strong>sFeed <strong>Water</strong> DiagramsInsert tubing into adaptor for ice maker.DIAGRAM CValve handleCold water lineSaddleReversibleback plateUse new cone washer if neededConnect metal ball valve to thefeed water connectorPlastic insertPlastic ferruleCompression nutTubing to inletTighteningscrewInsert black washer into bottomof the feed water connectorREMEMBERTURN OFF WATER FIRST!Self-piercer valveDIAGRAM DNOTE: Self-piercer assembly can only beinstalled on smooth riser lines.8. Clamp the self-piercer onto the risertube. Fit the adjustable aluminumbracket to the size of your riser tube.Then tighten locking nut until clamp isfirmly attached to riser line.CAUTION!! Do Not Over tighten!! Thiswill crush the riser tube and destroy it.9. To pierce the line simply screw the T-handle valve clockwise until it stops.NOTE: If hole in copper tube (cold water line) isnot adequately pierced, this may preventsufficient cold water supply to the system andreduce the performance of R.O. processing. Inthis event, open and close the self-piercing valveseveral times.Insert black washer into bottom ofthe feed water connectorConnect metal ball valve to thefeed water connectorUse new cone washer if neededREMEMBERTURN OFF WATER FIRST!DIAGRAM ESAMF-108 Rev. B 06/16/096