UZDK 30P6103/S14 - amirada GmbH
UZDK 30P6103/S14 - amirada GmbH
UZDK 30P6103/S14 - amirada GmbH

You also want an ePaper? Increase the reach of your titles
YUMPU automatically turns print PDFs into web optimized ePapers that Google loves.
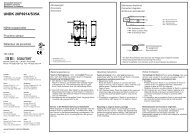
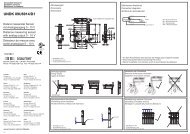
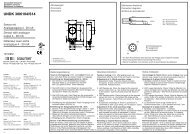
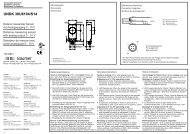
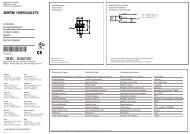
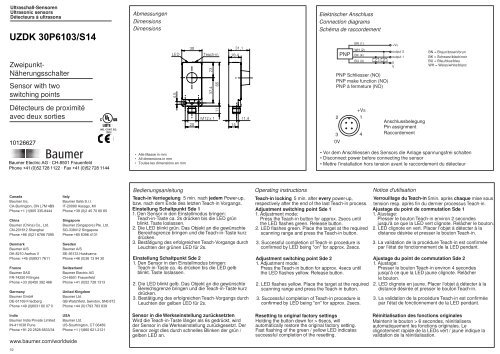
Ultraschall-SensorenUltrasonic sensorsDétecteurs à ultrasons<strong>UZDK</strong> <strong>30P6103</strong>/<strong>S14</strong>Zweipunkt-NäherungsschalterSensor with twoswitching pointsAbmessungenDimensionsDimensionsLED4,530Teach-in37,4 236531,118,4Elektrischer AnschlussConnection diagramsSchéma de raccordementBN (1)WH (2)PNP BK (4)BU (3)PNP Schliesser (NO)PNP make function (NO)PNP à fermeture (NO)ZZ+VSoutput 2output 10VBN = Braun/brown/brunBK = Schwarz/black/noirBU = Blau/blue/bleuWH = Weiss/white/blancDétecteurs de proximitéavec deux sorties10126627IND. CONT. EQ.1DD220M12 x 1111411,4230V+V<strong>S14</strong>AnschlussbelegungPin assignmentRaccordementBaumer Electric AG · CH-8501 FrauenfeldPhone +41 (0)52 728 1122 · Fax +41 (0)52 728 1144• Alle Masse in mm• All dimensions in mm• Toutes les dimensions en mm• Vor dem Anschliessen des Sensors die Anlage spannungsfrei schalten• Disconnect power before connecting the sensor• Mettre l’installation hors tension avant le raccordement du détecteurCanadaBaumer Inc.CA-Burlington, ON L7M 4B9Phone +1 (1)905 335-8444ChinaBaumer (China) Co., Ltd.CN-201612 ShanghaiPhone +86 (0)21 6768 7095DenmarkBaumer A/SDK-8210 Aarhus VPhone: +45 (0)8931 7611FranceBaumer SASFR-74250 FillingesPhone +33 (0)450 392 466GermanyBaumer <strong>GmbH</strong>DE-61169 FriedbergPhone +49 (0)6031 60 07 0ItalyBaumer Italia S.r.l.IT-20090 Assago, MIPhone +39 (0)2 45 70 60 65SingaporeBaumer (Singapore) Pte. Ltd.SG-339412 SingaporePhone +65 6396 4131SwedenBaumer A/SSE-56133 HuskvarnaPhone +46 (0)36 13 94 30SwitzerlandBaumer Electric AGCH-8501 FrauenfeldPhone +41 (0)52 728 1313United KingdomBaumer Ltd.GB-Watchfield, Swindon, SN6 8TZPhone +44 (0)1793 783 839Bedienungsanleitung Operating instructions Notice d'utilisationTeach-in Verriegelung 5 min. nach jedem Power-up, Teach-in locking 5 min. after every power-up, Verrouillage du Teach-in 5min. après chaque mise sousbzw. nach dem Ende des letzten Teach-in Vorgangs. respectively after the end of the last Teach-in process. tension resp. après fin du dernier processus Teach-in.Einstellung Schaltpunkt Sde 1Adjustment switching point Sde 1Ajustage du point de commutation Sde 11. Den Sensor in den Einstellmodus bringen:1. Adjustment mode:1. Ajustage:Teach-in-Taste ca. 2s drücken bis die LED grün Press the Teach-in button for approx. 2secs until Presser le bouton Teach-in environ 2 secondesblinkt. Taste loslassen.the LED flashes green. Release button.jusqu'à ce que la LED vert clignote. Relâcher le bouton.2. Die LED blinkt grün. Das Objekt an die gewünschte 2. LED flashes green. Place the target at the required 2. LED clignote en vert. Placer I'objet à détecter à laBereichsgrenze bringen und die Teach-in-Taste kurz scanning range and press the Teach-in button. distance désirée et presser le bouton Teach-in.drücken.3. Bestätigung des erfolgreichen Teach-Vorgangs durchLeuchten der grünen LED für 2s.Einstellung Schaltpunkt Sde 21. Den Sensor in den Einstellmodus bringen:Teach-in-Taste ca. 4s drücken bis die LED gelbblinkt. Taste loslassen.2. Die LED blinkt gelb. Das Objekt an die gewünschteBereichsgrenze bringen und die Teach-in-Taste kurzdrücken.3. Bestätigung des erfolgreichen Teach-Vorgangs durchLeuchten der gelben LED für 2s.3. Successful completion of Teach-in procedure isconfirmed by LED being "on" for approx. 2secs.Adjustment switching point Sde 21. Adjustment mode:Press the Teach-in button for approx. 4secs untilthe LED flashes yellow. Release button.2. LED flashes yellow. Place the target at the requiredscanning range and press the Teach-in button.3. Successful completion of Teach-in procedure isconfirmed by LED being "on" for approx. 2secs.3. La validation de la procédure Teach-in est confirméepar I'état de fonctionnement de la LED pendant.Ajustage du point de commutation Sde 21. Ajustage:Presser le bouton Teach-in environ 4 secondesjusqu'à ce que la LED jaune clignote. Relâcherle bouton.2. LED clignote en jaune. Placer I'objet à détecter à ladistance désirée et presser le bouton Teach-in.3. La validation de la procédure Teach-in est confirméepar I'état de fonctionnement de la LED pendant.IndiaBaumer India Private LimitedIN-411038 PunePhone +91 20 2528 6833/34www.baumer.com/worldwideUSABaumer Ltd.US-Southington, CT 06489Phone +1 (1)860 621-2121Sensor in die Werkseinstellung zurücksetztenWird die Teach-in-Taste länger als 6s gedrückt, wirdder Sensor in die Werkseinstellung zurückgesetzt. DerSensor zeigt dies durch schnelles Blinken der grün /gelben LED an.Resetting to original factory settingsHolding the button down for > 6secs, willautomatically restore the original factory setting.Fast flashing of the green / yellow LED indicatessuccessful completion of the resetting.Réinitialisation des fonctions originalesMaintenir le bouton > 6 secondes, réinitialiseraautomatiquement les fonctions originales. Leclignotement rapide de la LEDs vert / jaune indique lavalidation de la réinitialisation.1/2
Technische DatenTechnical dataDonnées techniques<strong>UZDK</strong> <strong>30P6103</strong>/<strong>S14</strong>Betriebsspannungsbereich VsVoltage supply range VsPlage de tension VsStromaufnahme max. (ohne Last) current consumption max. (no load) Consommation max. (sans charge)Max. Laststrom Max. load current Courant de charge max.Kurzschlussfest Short circuit protection Protégé contre courts circuitsVerpolungsfestAusgangsanzeigeReverse polarity protectionOutput state indicationProtégé contre inversion de polaritéIndication de l’état de sortieTemperaturbereichTemperature rangeTempérature de fonctionnementSchutzklasse Protection class Classe de protection12-30VDC (UL-Class 2)