View / Download By The Sea - Panel
View / Download By The Sea - Panel
View / Download By The Sea - Panel

You also want an ePaper? Increase the reach of your titles
YUMPU automatically turns print PDFs into web optimized ePapers that Google loves.
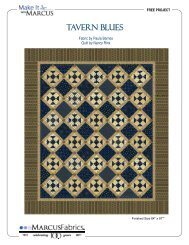
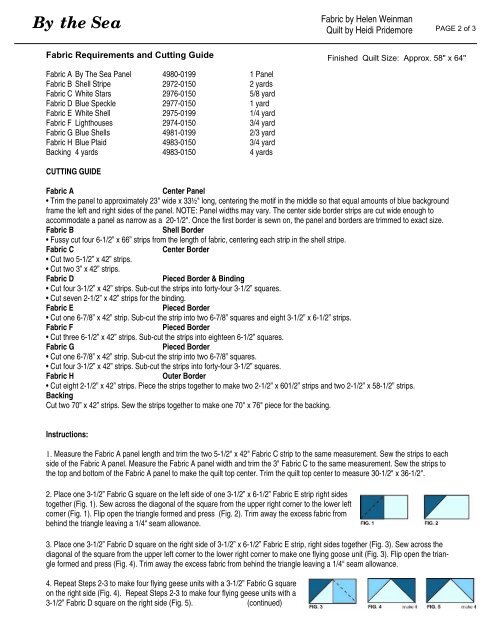
<strong>By</strong> the <strong>Sea</strong>Fabric by Helen WeinmanQuilt by Heidi PridemorePAGE 2 of 3Fabric Requirements and Cutting GuideFinished Quilt Size: Approx. 58" x 64"Fabric A <strong>By</strong> <strong>The</strong> <strong>Sea</strong> <strong>Panel</strong> 4980-0199 1 <strong>Panel</strong>Fabric B Shell Stripe 2972-0150 2 yardsFabric C White Stars 2976-0150 5/8 yardFabric D Blue Speckle 2977-0150 1 yardFabric E White Shell 2975-0199 1/4 yardFabric F Lighthouses 2974-0150 3/4 yardFabric G Blue Shells 4981-0199 2/3 yardFabric H Blue Plaid 4983-0150 3/4 yardBacking 4 yards 4983-0150 4 yardsCUTTING GUIDEFabric ACenter <strong>Panel</strong>• Trim the panel to approximately 23" wide x 33½" long, centering the motif in the middle so that equal amounts of blue backgroundframe the left and right sides of the panel. NOTE: <strong>Panel</strong> widths may vary. <strong>The</strong> center side border strips are cut wide enough toaccommodate a panel as narrow as a 20-1/2". Once the first border is sewn on, the panel and borders are trimmed to exact size.Fabric BShell Border• Fussy cut four 6-1/2” x 66” strips from the length of fabric, centering each strip in the shell stripe.Fabric CCenter Border• Cut two 5-1/2” x 42” strips.• Cut two 3” x 42” strips.Fabric DPieced Border & Binding• Cut four 3-1/2” x 42” strips. Sub-cut the strips into forty-four 3-1/2” squares.• Cut seven 2-1/2” x 42” strips for the binding.Fabric EPieced Border• Cut one 6-7/8” x 42” strip. Sub-cut the strip into two 6-7/8” squares and eight 3-1/2” x 6-1/2” strips.Fabric FPieced Border• Cut three 6-1/2” x 42” strips. Sub-cut the strips into eighteen 6-1/2” squares.Fabric GPieced Border• Cut one 6-7/8” x 42” strip. Sub-cut the strip into two 6-7/8” squares.• Cut four 3-1/2” x 42” strips. Sub-cut the strips into forty-four 3-1/2” squares.Fabric HOuter Border• Cut eight 2-1/2” x 42” strips. Piece the strips together to make two 2-1/2” x 601/2” strips and two 2-1/2” x 58-1/2” strips.BackingCut two 70” x 42” strips. Sew the strips together to make one 70" x 76" piece for the backing.Instructions:1. Measure the Fabric A panel length and trim the two 5-1/2" x 42" Fabric C strip to the same measurement. Sew the strips to eachside of the Fabric A panel. Measure the Fabric A panel width and trim the 3" Fabric C to the same measurement. Sew the strips tothe top and bottom of the Fabric A panel to make the quilt top center. Trim the quilt top center to measure 30-1/2" x 36-1/2".2. Place one 3-1/2” Fabric G square on the left side of one 3-1/2” x 6-1/2” Fabric E strip right sidestogether (Fig. 1). Sew across the diagonal of the square from the upper right corner to the lower leftcorner (Fig. 1). Flip open the triangle formed and press (Fig. 2). Trim away the excess fabric frombehind the triangle leaving a 1/4“ seam allowance.3. Place one 3-1/2” Fabric D square on the right side of 3-1/2” x 6-1/2” Fabric E strip, right sides together (Fig. 3). Sew across thediagonal of the square from the upper left corner to the lower right corner to make one flying goose unit (Fig. 3). Flip open the triangleformed and press (Fig. 4). Trim away the excess fabric from behind the triangle leaving a 1/4“ seam allowance.4. Repeat Steps 2-3 to make four flying geese units with a 3-1/2” Fabric G squareon the right side (Fig. 4). Repeat Steps 2-3 to make four flying geese units with a3-1/2” Fabric D square on the right side (Fig. 5). (continued)