User Instructions for 50 BMG Case Trimmers - Forster Products
User Instructions for 50 BMG Case Trimmers - Forster Products
User Instructions for 50 BMG Case Trimmers - Forster Products

Create successful ePaper yourself
Turn your PDF publications into a flip-book with our unique Google optimized e-Paper software.
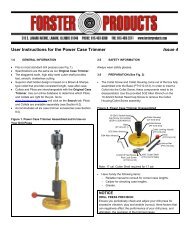
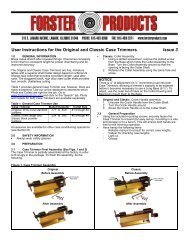
Figure 2. <strong>50</strong> <strong>BMG</strong> <strong>Case</strong> Trimmer NomenclatureCollet Screw Handle(CT1010-011)Collet Screw(CT1010-012)<strong>50</strong><strong>BMG</strong> Housing(<strong>50</strong><strong>BMG</strong>CT-013)Pilot (available separately)O-Ring(<strong>50</strong><strong>BMG</strong>CT-014)8-32X1/8" Set Screw: Pilot Lock Screw(CT1010-015)Bearing(<strong>50</strong><strong>BMG</strong>CT-019)Cutter Shaft(<strong>50</strong><strong>BMG</strong>CT-CTC400)Base Screw <strong>for</strong> HousingSide(CT1010-025)Stop Collar(<strong>50</strong><strong>BMG</strong>CT-020)8-32X3/8" Set Screw: Stop Collar Fine Adjustment Self-Locking Screw(<strong>50</strong><strong>BMG</strong>T-8-32X3/8")BaseExtra Long: (<strong>50</strong><strong>BMG</strong>CT-CTB103)Crank Handle(CT1010-023)Washer(CT1010-026)Knob(CT1010-021)#10 Hi Collar Lock Washer(<strong>50</strong><strong>BMG</strong>CT-024A)Base Screw <strong>for</strong> Bearing Side(<strong>50</strong><strong>BMG</strong>CT-024)8-32X1/8" Set Screw: Stop Collar Coarse Adjustment Lock Screw(CT1010-015)Knob Screw(CT1010-022)Knob Plastic Cover(CT1010-003)4.0 PROCEDURE4.1 Assemble Pilot in <strong>Case</strong> Trimmer1. Insert the Pilot into the Cutter Shaft.2. Press the Pilot firmly against the cutter teeth and lock it inplace by tightening the Pilot Lock Screw with the provided5/64” allen wrench.4.2 Insert <strong>Case</strong> and Adjust <strong>for</strong> Length1. With tension released, insert the base of the case to betrimmed into the rim-holding device of the <strong>50</strong>MBGHousing.2. Move the Pilot into the neck of the case. With one hand onthe Crank Handle, push the base of the case against thebottom of the <strong>50</strong>MBG Housing. Ensure the base of thecase is held firmly against the bottom of the <strong>50</strong>MBGHousing and the Pilot is supporting the inside case neck,then tighten the Collet Screw with the other hand (see Fig.3).3. Ensure the cutter teeth are in contact with the case neck,then tighten the Stop Collar Coarse Adjustment LockScrew.Figure 3. <strong>Case</strong> Trimmer with <strong>Case</strong> Inserted4.3 Make Trial Cut to Check <strong>Case</strong> Length1. Turn the Crank handle to make a trial cut.2. Remove the case and use a caliper to check its length.3. Consult a reliable manual <strong>for</strong> correct case length.4.4 Make Adjustments <strong>for</strong> <strong>Case</strong> Length and Set StopCollar1. Coarse adjustments: Move the Stop Collar along theCutter Shaft to the desired location and tighten in placeusing the Stop Collar Coarse Adjustment Lock Screw.2. Fine adjustments: Turn the Stop Collar Fine AdjustmentSelf-Locking Screw the desired amount (one completeturn equals .032” in case length):• A clockwise turn increases case length.• A counterclockwise turn decreases case length.3. Make a final trial cut and check case length. Re-adjust, ifnecessary.4.5 Trim Batch of <strong>Case</strong>s1. The <strong>Case</strong> Trimmer is now set up to trim a batch of casesto the exact same length.2. Occasionally lubricate the Cutter Shaft to Bearing surfacewith a drop of light oil when trimming.3. Label and save a master setup case that is trimmed to thecorrect length. This will save setup time in future trimmingoperations.