- Page 1 and 2: Operation Manual
- Page 3 and 4: D Table of Contents
- Page 5: 123 Using Reason as a ReWire Slave1
- Page 9 and 10: 1D Common Operations and Concepts
- Page 11 and 12: Multi Mode SelectorsSome parameters
- Page 13 and 14: About Multiple UndosThe concept of
- Page 15 and 16: D You can also click and drag with
- Page 17 and 18: 2D Audio basics
- Page 19 and 20: About Sample Rates and ResolutionsS
- Page 21 and 22: What is acceptable?Normally, hardwa
- Page 23 and 24: 3D Sounds, Devices and Patches
- Page 25 and 26: Selecting devicesSome operations (e
- Page 27 and 28: Naming devicesEach device has a “
- Page 29 and 30: Routing an Insert Effect between th
- Page 31 and 32: Hiding and Showing CablesYou can ch
- Page 33 and 34: Saving device settings as patches o
- Page 35 and 36: | File type | Extension | Descripti
- Page 37 and 38: Show pop-up menuLocations listThis
- Page 39 and 40: About hierarchic and flat listsIn c
- Page 41 and 42: Create Instrument/Create EffectThis
- Page 43 and 44: Using Favorites - a practical examp
- Page 45 and 46: D For the files you have found (sta
- Page 47 and 48: 4D Routing Audio and CV
- Page 49 and 50: Color CodingCables are color coded
- Page 51 and 52: Using pop-up menus1. Click (or righ
- Page 53 and 54: 5D The Sequencer
- Page 55 and 56: Track typesThere are three basic tr
- Page 57 and 58:
D To solo a track, click the corres
- Page 59 and 60:
Rack vs. Sequencer scroll focusReas
- Page 61 and 62:
Transport controls - overviewThe tr
- Page 63 and 64:
RecordingSetting up for recordingBe
- Page 65 and 66:
Basic note lane handlingAdding note
- Page 67 and 68:
Recording performance controller au
- Page 69 and 70:
D If the device that you wish to au
- Page 71 and 72:
Recording pattern changesIf your so
- Page 73 and 74:
To select multiple clips in Arrange
- Page 75 and 76:
Deleting clipsD To delete a clip, s
- Page 77 and 78:
D If you select a clip, two value f
- Page 79 and 80:
Inserting and Removing BarsWhen edi
- Page 81 and 82:
The Edit mode elementsIn Edit mode,
- Page 83 and 84:
Drawing NotesNotes are drawn and ed
- Page 85 and 86:
Editing velocityThe velocity values
- Page 87 and 88:
D You can also remove automation la
- Page 89 and 90:
Editing performance controller auto
- Page 91 and 92:
Tool window - Tools pagenote editin
- Page 93 and 94:
Legato AdjustmentsThis function can
- Page 95 and 96:
Redrum notesWhen you use this funct
- Page 97 and 98:
Automating time signature1. Set the
- Page 99 and 100:
6D The ReGroove Mixer
- Page 101 and 102:
Anchor PointNormally, all groove pa
- Page 103 and 104:
Groove AmountUse this fader to adju
- Page 105 and 106:
Velocity ImpactThis determines the
- Page 107 and 108:
7. Turn the Slide knob back to its
- Page 109 and 110:
The ReGroove patches in theFactory
- Page 111 and 112:
7D Remote - Playing and controlling
- Page 113 and 114:
6. An image of the selected control
- Page 115 and 116:
The “Control Surface Details” d
- Page 117 and 118:
Remote OverrideRemote Override allo
- Page 119 and 120:
Additional RemoteOverrides...D Patc
- Page 121 and 122:
Saving Remote SetupsThere’s no ne
- Page 123 and 124:
8D Advanced MIDI - the External Con
- Page 125 and 126:
9D Using Reason as a ReWire Slave
- Page 127 and 128:
Launching and QuittingWhen using Re
- Page 129 and 130:
Converting ReWireChannels to Audio
- Page 131 and 132:
10D Synchronization
- Page 133 and 134:
Slaving Reason to AnotherProgram on
- Page 135 and 136:
11D Song File Handling
- Page 137 and 138:
Song InformationSelecting the Song
- Page 139 and 140:
1. Select New from the File menu to
- Page 141 and 142:
12D Optimizing Performance
- Page 143 and 144:
General procedureThe basic procedur
- Page 145 and 146:
RedrumD Do not use the Tone feature
- Page 147 and 148:
13D Transport Panel
- Page 149 and 150:
Tempo and Time SignatureTo round of
- Page 151 and 152:
14D Reason Hardware Interface
- Page 153 and 154:
15D The Combinator
- Page 155 and 156:
Combinator elementsIn the picture b
- Page 157 and 158:
Adding devices to a CombiAbout the
- Page 159 and 160:
Deleting devices in a CombiThis wor
- Page 161 and 162:
1. Make sure the Combinator track h
- Page 163 and 164:
2. Click in the Target column for t
- Page 165 and 166:
16D The Mixer
- Page 167 and 168:
Channel Strip Controls:| Item | Des
- Page 169 and 170:
ConnectionsAuxiliary (AUX) ReturnsA
- Page 171 and 172:
17D The Line Mixer 6:2
- Page 173 and 174:
ConnectionsAll input and output con
- Page 175 and 176:
18D Redrum
- Page 177 and 178:
Using PatchesWhen you create a new
- Page 179 and 180:
D To select a pattern in the curren
- Page 181 and 182:
D Applying flam to several consecut
- Page 183 and 184:
D If the Vel knob is set to zero (m
- Page 185 and 186:
Using Redrum as a SoundModuleConnec
- Page 187 and 188:
19D Subtractor Synthesizer
- Page 189 and 190:
Here follows a brief description of
- Page 191 and 192:
Phase Offset ModulationA unique fea
- Page 193 and 194:
The Filter SectionD 12 dB Lowpass (
- Page 195 and 196:
Filter 1 FrequencyThe Filter Freque
- Page 197 and 198:
Filter Envelope AmountThis paramete
- Page 199 and 200:
Play ParametersThis section deals w
- Page 201 and 202:
About the Low Bandwidth buttonThis
- Page 203 and 204:
20D Thor Polysonic Synthesizer
- Page 205 and 206:
The Controller panelThe Controller
- Page 207 and 208:
D There are three open Oscillator s
- Page 209 and 210:
D The Arrow button in the top left
- Page 211 and 212:
Multi oscillatorNoise oscillatorThi
- Page 213 and 214:
Filter slotsD The “VEL” paramet
- Page 215 and 216:
D The ENV-VEL-KBD knobs affect the
- Page 217 and 218:
Global sectionThe Global section co
- Page 219 and 220:
The upper half of the menu contains
- Page 221 and 222:
Modulation Sources - GlobalThe foll
- Page 223 and 224:
| Parameter | DescriptionStep Seque
- Page 225 and 226:
Setting the number of stepsD You ca
- Page 227 and 228:
21D Malström Synthesizer
- Page 229 and 230:
The Oscillator sectionD To select a
- Page 231 and 232:
The Modulator sectionThe Malström
- Page 233 and 234:
D To activate/deactivate a filter,
- Page 235 and 236:
The ShaperD NoiseThis is actually n
- Page 237 and 238:
Both oscillators with one filter ea
- Page 239 and 240:
LegatoThe Velocity controlsBy click
- Page 241 and 242:
Sequencer ControlThe Sequencer Cont
- Page 243 and 244:
22D NN-19 Sampler
- Page 245 and 246:
About Audio File FormatsThe NN-19 c
- Page 247 and 248:
Creating Key ZonesA “key zone”
- Page 249 and 250:
Looping SamplesAutomap SamplesIf yo
- Page 251 and 252:
The Filter Section! Note that the F
- Page 253 and 254:
SyncBy clicking this button you act
- Page 255 and 256:
Voice SpreadThis parameter can be u
- Page 257 and 258:
23D NN-XT Sampler
- Page 259 and 260:
Loading Complete Patchesand REX Fil
- Page 261 and 262:
All of these knobs change the value
- Page 263 and 264:
Selections and Edit FocusAlmost all
- Page 265 and 266:
Adjusting ParametersAdjusting Synth
- Page 267 and 268:
Replacing a SampleTo replace the sa
- Page 269 and 270:
Working with Key RangesAbout Key Ra
- Page 271 and 272:
Moving Zones by Dragging the Zone B
- Page 273 and 274:
Tuning Samples ManuallyIn addition
- Page 275 and 276:
• Zones with any other velocity r
- Page 277 and 278:
Sample Parameters• The NN-XT then
- Page 279 and 280:
Legato and RetrigLegatoLegato works
- Page 281 and 282:
The Pitch sectionThe Filter Section
- Page 283 and 284:
D SustainThe Sustain parameter dete
- Page 285 and 286:
Mode (LFO 1 only)This lets you set
- Page 287 and 288:
24D Dr. Rex Loop Player
- Page 289 and 290:
Adding a LoopTo add a loop into the
- Page 291 and 292:
Slice HandlingEditing in the Wavefo
- Page 293 and 294:
Filter FrequencyThe Filter Frequenc
- Page 295 and 296:
Pitch Bend and Modulation WheelsSet
- Page 297 and 298:
25D Matrix Pattern Sequencer
- Page 299 and 300:
Programming PatternsPattern BasicsM
- Page 301 and 302:
4. Click inside the upper grid sect
- Page 303 and 304:
Setting Pattern LengthPattern Shuff
- Page 305 and 306:
Example UsageAs mentioned previousl
- Page 307 and 308:
26D RPG-8 Arpeggiator
- Page 309 and 310:
4. With MIDI input directed to the
- Page 311 and 312:
Rendering arpeggio notes to trackTh
- Page 313 and 314:
Single Note RepeatSingle Note repea
- Page 315 and 316:
CV connectionsOn the back of the RP
- Page 317 and 318:
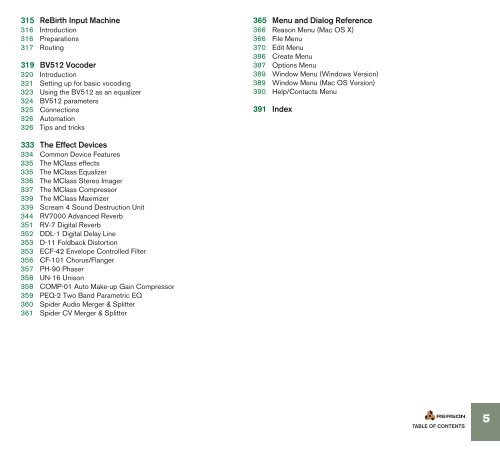
27D ReBirth Input Machine
- Page 319 and 320:
RoutingWhen the two programs are sy
- Page 321 and 322:
28D BV512 Vocoder
- Page 323 and 324:
Setting up for basicvocodingThis tu
- Page 325 and 326:
Using the BV512 as anequalizerThe B
- Page 327 and 328:
ConnectionsThe back panel of the BV
- Page 329 and 330:
D For a more distinct and precise s
- Page 331 and 332:
D Connect the gate outputs on a Red
- Page 333 and 334:
Creating a stereo reverbWhat you’
- Page 335 and 336:
29D The Effect Devices
- Page 337 and 338:
The MClass effectsThe MClass packag
- Page 339 and 340:
The MClass CompressorThis is a sing
- Page 341 and 342:
The MClass MaximizerScream 4 Sound
- Page 343 and 344:
FeedbackModulateWarpDigitalScreamTh
- Page 345 and 346:
Tips and tricksDon’t restrict you
- Page 347 and 348:
The main panelReverb algorithms and
- Page 349 and 350:
PlateA classic plate reverb, excell
- Page 351 and 352:
The EQ sectionThe Gate sectionThe e
- Page 353 and 354:
RV-7 Digital ReverbReverb adds ambi
- Page 355 and 356:
D-11 Foldback DistortionECF-42 Enve
- Page 357 and 358:
Pattern Controlled Filter - An Exam
- Page 359 and 360:
PH-90 PhaserThe PH-90 Phaser is a c
- Page 361 and 362:
PEQ-2 Two Band ParametricEQCV Input
- Page 363 and 364:
Spider CV Merger & SplitterFor inst
- Page 365 and 366:
Splitting CVTwo CV Split Inputs (A
- Page 367 and 368:
30D Menu and Dialog Reference
- Page 369 and 370:
Song Information...To add a splash
- Page 371 and 372:
D All controller data in the MIDI f
- Page 373 and 374:
D If you copy and paste several dev
- Page 375 and 376:
1. Select all samples that belong t
- Page 377 and 378:
Automap ZonesThis menu item is used
- Page 379 and 380:
Combine/UncombineD By selecting sev
- Page 381 and 382:
Crop Events to ClipsNotes or automa
- Page 383 and 384:
1. Select New from the File menu to
- Page 385 and 386:
Output Latency & Buffer SizeThe Out
- Page 387 and 388:
If your control surface model isn
- Page 389 and 390:
Options MenuInternal Sync/MIDI Cloc
- Page 391 and 392:
Window Menu (WindowsVersion)Window
- Page 393 and 394:
D Index
- Page 395 and 396:
CombinatorAdding devices 155Bypass
- Page 397 and 398:
KKey CommandsSyntax in Manual 8Tran
- Page 399 and 400:
Pre-Align (ReGroove Mixer) 101Pre-c
- Page 401 and 402:
SongsCreating Default 136Creating N