XFINITY Connection Manager - Comcast Business
XFINITY Connection Manager - Comcast Business
XFINITY Connection Manager - Comcast Business
- No tags were found...

You also want an ePaper? Increase the reach of your titles
YUMPU automatically turns print PDFs into web optimized ePapers that Google loves.
<strong>XFINITY</strong> ®<strong>Connection</strong><strong>Manager</strong>Version 1.06User Guidehttp://customer.comcast.com/2go1-800-COMCASTTake Fast With You
Copyright 2011, Smith Micro Software, Inc. All rights reserved.This document is the property of Smith Micro Software, Inc. and contains confidential and proprietary informationowned by Smith Micro Software, Inc. Any unauthorized copying, use or disclosure of it without the prior writtenpermission of Smith Micro Software, Inc. is strictly prohibited.
Table of ContentsChapter 1 — Getting StartedSystem Requirements. . . . . . . . . . . . . . . . . . . . . . . . . . . . . . . . . . . . . . . . . . . . . . . . . . .5Installing the <strong>XFINITY</strong> <strong>Connection</strong> <strong>Manager</strong> Software . . . . . . . . . . . . . . . . . . . . . . . . . .6Launching the <strong>XFINITY</strong> <strong>Connection</strong> <strong>Manager</strong> . . . . . . . . . . . . . . . . . . . . . . . . . . . . . . . .6Chapter 2 — The <strong>XFINITY</strong> <strong>Connection</strong> <strong>Manager</strong> InterfaceGetting Connected . . . . . . . . . . . . . . . . . . . . . . . . . . . . . . . . . . . . . . . . . . . . . . . . . . . . .8Supported Networks List: In Detail . . . . . . . . . . . . . . . . . . . . . . . . . . . . . . . . . . . . . . . . .9The Main Window . . . . . . . . . . . . . . . . . . . . . . . . . . . . . . . . . . . . . . . . . . . . . . . . . . . . .11Minimizing the Main Window. . . . . . . . . . . . . . . . . . . . . . . . . . . . . . . . . . . . . . . . . . . . .14Using the System Tray Icon . . . . . . . . . . . . . . . . . . . . . . . . . . . . . . . . . . . . . . . . . . . . .15Chapter 3 — Establishing Mobile <strong>Connection</strong>sManually Connecting to a Mobile Network . . . . . . . . . . . . . . . . . . . . . . . . . . . . . . . . . .17Chapter 4 — Establishing WiFi <strong>Connection</strong>sManually Connecting to a WiFi Network . . . . . . . . . . . . . . . . . . . . . . . . . . . . . . . . . . . .20Options for Connecting to a New Network . . . . . . . . . . . . . . . . . . . . . . . . . . . . . . . . . .21The List of WiFi Networks . . . . . . . . . . . . . . . . . . . . . . . . . . . . . . . . . . . . . . . . . . . . . . .22WiFi Info . . . . . . . . . . . . . . . . . . . . . . . . . . . . . . . . . . . . . . . . . . . . . . . . . . . . . . . . . . . .23What is a Closed Network?. . . . . . . . . . . . . . . . . . . . . . . . . . . . . . . . . . . . . . . . . . . . . .23How to Access a Closed Network . . . . . . . . . . . . . . . . . . . . . . . . . . . . . . . . . . . . . . . . .23Introduction to WiFi Encryption . . . . . . . . . . . . . . . . . . . . . . . . . . . . . . . . . . . . . . . . . . .24Connecting to an Encrypted Network . . . . . . . . . . . . . . . . . . . . . . . . . . . . . . . . . . . . . .26Chapter 5 — Network ProfilesWhat is a Network Profile? . . . . . . . . . . . . . . . . . . . . . . . . . . . . . . . . . . . . . . . . . . . . . .27The Network Profiles Window . . . . . . . . . . . . . . . . . . . . . . . . . . . . . . . . . . . . . . . . . . . .27Creating a Profile for a WiFi Network . . . . . . . . . . . . . . . . . . . . . . . . . . . . . . . . . . . . . .29Configuring WiFi Data Encryption . . . . . . . . . . . . . . . . . . . . . . . . . . . . . . . . . . . . . . . . .31Automatic Profile Creation Settings . . . . . . . . . . . . . . . . . . . . . . . . . . . . . . . . . . . . . . .32Editing a Network Profile. . . . . . . . . . . . . . . . . . . . . . . . . . . . . . . . . . . . . . . . . . . . . . . .32Deleting a Network Profile. . . . . . . . . . . . . . . . . . . . . . . . . . . . . . . . . . . . . . . . . . . . . . .33Profile Properties: WiFi . . . . . . . . . . . . . . . . . . . . . . . . . . . . . . . . . . . . . . . . . . . . . . . . .33Profile Properties: General . . . . . . . . . . . . . . . . . . . . . . . . . . . . . . . . . . . . . . . . . . . . . .34– 3 –
Chapter 6 — Virtual Private Networks (VPNs)What is a Virtual Private Network? . . . . . . . . . . . . . . . . . . . . . . . . . . . . . . . . . . . . . . . .37Supported Clients . . . . . . . . . . . . . . . . . . . . . . . . . . . . . . . . . . . . . . . . . . . . . . . . . . . . .37Configuring a VPN <strong>Connection</strong> . . . . . . . . . . . . . . . . . . . . . . . . . . . . . . . . . . . . . . . . . . .37Automatically Launching a VPN <strong>Connection</strong>. . . . . . . . . . . . . . . . . . . . . . . . . . . . . . . . .38Using the Checkpoint VPN Client . . . . . . . . . . . . . . . . . . . . . . . . . . . . . . . . . . . . . . . . .39Using the NetMotion VPN Client . . . . . . . . . . . . . . . . . . . . . . . . . . . . . . . . . . . . . . . . . .40Chapter 7 — <strong>XFINITY</strong> <strong>Connection</strong> <strong>Manager</strong> SettingsIntroduction . . . . . . . . . . . . . . . . . . . . . . . . . . . . . . . . . . . . . . . . . . . . . . . . . . . . . . . . . .41Settings: General. . . . . . . . . . . . . . . . . . . . . . . . . . . . . . . . . . . . . . . . . . . . . . . . . . . . . .41Settings: Updates . . . . . . . . . . . . . . . . . . . . . . . . . . . . . . . . . . . . . . . . . . . . . . . . . . . . .42Settings: Hardware . . . . . . . . . . . . . . . . . . . . . . . . . . . . . . . . . . . . . . . . . . . . . . . . . . . .44Settings: <strong>Connection</strong> Timeout . . . . . . . . . . . . . . . . . . . . . . . . . . . . . . . . . . . . . . . . . . . .49Settings: VPN . . . . . . . . . . . . . . . . . . . . . . . . . . . . . . . . . . . . . . . . . . . . . . . . . . . . . . . .50Chapter 8 — Troubleshooting ToolsEvent History <strong>Manager</strong> . . . . . . . . . . . . . . . . . . . . . . . . . . . . . . . . . . . . . . . . . . . . . . . . .52WiFi Network Information . . . . . . . . . . . . . . . . . . . . . . . . . . . . . . . . . . . . . . . . . . . . . . .53Mobile 3G Info Window . . . . . . . . . . . . . . . . . . . . . . . . . . . . . . . . . . . . . . . . . . . . . . . . .56Mobile 4G Info Window . . . . . . . . . . . . . . . . . . . . . . . . . . . . . . . . . . . . . . . . . . . . . . . . .61About <strong>XFINITY</strong> <strong>Connection</strong> <strong>Manager</strong> . . . . . . . . . . . . . . . . . . . . . . . . . . . . . . . . . . . . . .65Chapter 9 — Troubleshooting ProceduresNumbered Errors. . . . . . . . . . . . . . . . . . . . . . . . . . . . . . . . . . . . . . . . . . . . . . . . . . . . . .66Application Launch Issues. . . . . . . . . . . . . . . . . . . . . . . . . . . . . . . . . . . . . . . . . . . . . . .71Device Issues . . . . . . . . . . . . . . . . . . . . . . . . . . . . . . . . . . . . . . . . . . . . . . . . . . . . . . . .72Chapter 10 — SupportSupport Information. . . . . . . . . . . . . . . . . . . . . . . . . . . . . . . . . . . . . . . . . . . . . . . . . . . .73Chapter 11 — FAQsFrequently Asked Questions . . . . . . . . . . . . . . . . . . . . . . . . . . . . . . . . . . . . . . . . . . . . .74. . . . . . . . . . . . . . . . . . . . . . . . . . . . . . . . . . . . . . . . . . . . . . . . . . . . . . . . . . . . . . . . . . .79– 4 –
Getting Started1System RequirementsThe minimum system requirements to install and operate the <strong>XFINITY</strong> <strong>Connection</strong> <strong>Manager</strong>are shown in the table that follows:Windows XP Windows VIsta Windows 7Processor 300 MHz 1 GHz(1.25 GHz recommended)RAM 256 MB 1 GB(2 GB recommended)1 GHz(1.25 GHz recommended)1 GB(2 GB recommended)Hard Drive Space 60 MB 75 MB 75 MBInternet Explorer IE 5.5 (or higher) IE 7 (or higher) IE 7 (or higher)Windows ServicePackService Pack 3 (or higher) Service Pack 2 (or higher) Any32-Bit or 64-Bit 32-Bit 32-Bit or 64-Bit 32-Bit or 64-BitAdditional Requirements• Windows Vista and Windows 7 operation requires a DirectX 9.0 (or better) graphicsaccelerator• Internet connection (if downloading the software from the Internet)• CD-ROM drive (if installing from CD)• Compatible <strong>XFINITY</strong> Mobile 3G or Mobile 4G Internet Device for Mobile connections• Compatible WiFi enabled device for WiFi connectionsNew Devices SupportedThis version of the <strong>XFINITY</strong> <strong>Connection</strong> <strong>Manager</strong> supports the following Mobile InternetDevices:• Novatel MC760– 5 –
• Franklin Wireless CMU-300• Franklin Wireless CMU-301• Franklin Wireless CMU-600• ZTE TU25• Ubee PXU1903Installing the <strong>XFINITY</strong> <strong>Connection</strong> <strong>Manager</strong> SoftwareInstalling the <strong>XFINITY</strong> <strong>Connection</strong> <strong>Manager</strong> is easy. Complete the following steps to install the<strong>XFINITY</strong> <strong>Connection</strong> <strong>Manager</strong> software:1. Insert the CD into your computer’s CD ROM drive.2. If your computer automatically starts the installation program from the CD, follow the onscreeninstructions for installation and configuration.If your computer does not automatically install the software from the CD:a. Open the My Computer folder (on Windows Vista and Windows 7, this folder is simplycalled Computer.)b. Browse to the CD drive in My Computer (or Computer), and double-click on the CDdrive icon.c. Double click the “Setup” icon to begin installation.d. Follow the on-screen instructions to install and configure the <strong>XFINITY</strong> <strong>Connection</strong><strong>Manager</strong>.Note: Once the <strong>XFINITY</strong> <strong>Connection</strong> <strong>Manager</strong> software is installed, supported wirelessdevices will be detected automatically by the <strong>XFINITY</strong> <strong>Connection</strong> <strong>Manager</strong> whenever youattach them..DO NOT plug the <strong>XFINITY</strong> Mobile Internet Device into your computer until you have completedthe <strong>XFINITY</strong> <strong>Connection</strong> <strong>Manager</strong> Installation. Inserting the device prior to installing the<strong>XFINITY</strong> <strong>Connection</strong> <strong>Manager</strong> could result in the device drivers being configured incorrectly.Launching the <strong>XFINITY</strong> <strong>Connection</strong> <strong>Manager</strong>Once your hardware is installed and ready to connect, you may go ahead and launch the<strong>XFINITY</strong> <strong>Connection</strong> <strong>Manager</strong> by doing one of the following:– 6 –
• Double-click the <strong>XFINITY</strong> <strong>Connection</strong> <strong>Manager</strong> icon on your computer’s desktop• In the Start menu, select Programs or All Programs > <strong>XFINITY</strong> > <strong>XFINITY</strong> <strong>Connection</strong><strong>Manager</strong> > <strong>XFINITY</strong> <strong>Connection</strong> <strong>Manager</strong>.– 7 –
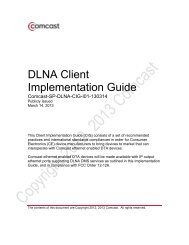
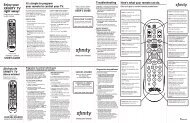
The <strong>XFINITY</strong> <strong>Connection</strong><strong>Manager</strong> Interface2Getting ConnectedBy default, the <strong>XFINITY</strong> <strong>Connection</strong> <strong>Manager</strong> automatically connects to an available Mobile 4Gor Mobile 3G network. It will seek to connect to WiFi, Mobile 4G and Mobile 3G networks (inthat order). You can also manually connect to a network, by first turning off the auto-connectionfeature. WiFi connections may require additional configuration first, but the basics ofestablishing a connection are simple:1. If you are already connected to a network whose connections are not managed by the<strong>XFINITY</strong> <strong>Connection</strong> <strong>Manager</strong>, you must shut that connection down before establishing aconnection with the <strong>XFINITY</strong> <strong>Connection</strong> <strong>Manager</strong> (only one connection is allowed at atime).DisconnectSupportedNetworksListClick to OpenWi-Fi Networks ListConnect/DisconnectButtonNote: Manually disconnecting switches off the auto-connect feature until you restart the<strong>XFINITY</strong> <strong>Connection</strong> <strong>Manager</strong> application.2. Select the network to which you want to establish the connection by clicking one of thelines of the Supported Networks List.– 8 –
Note: If more than one available WiFi network is detected, the <strong>XFINITY</strong> <strong>Connection</strong><strong>Manager</strong> selects one for you. To choose a different network, click View All WiFi, whichdisplays the complete list of WiFi networks detected (see page 22).3. Click the Connect button to establish a connection to the currently selected network.Note: Because only one connection is allowed at a time, any other connection will beshut down when you click Connect.See Chapter 3, “Establishing Mobile <strong>Connection</strong>s” for more information on establishing Mobile3G and Mobile 4G connections. See Chapter 4, “Establishing WiFi <strong>Connection</strong>s” for moreinformation on establishing WiFi connections.Supported Networks List: In DetailThe main window of the <strong>XFINITY</strong> <strong>Connection</strong> <strong>Manager</strong> interface features a list of the supportednetworks. The networks for which you have a supported device installed are displayed in black.Those for which you do not have a supported device installed are in gray.Note: Networks are displayed in GRAY if the corresponding device has been disabled by theWindows operating system.The columns in this list include the following:<strong>Connection</strong> IndicatorsIf you are currently connected to a particular network, the corresponding connection indicator islit GREEN in <strong>XFINITY</strong>. Other networks (to which you are not connected) remain GRAY.– 9 –
Network NameNetworks supported by the <strong>XFINITY</strong> <strong>Connection</strong> <strong>Manager</strong> are listed in this column. If theMobile 3G network displayed is not <strong>XFINITY</strong>'s network, the symbol appears next to thenetwork's name to indicate that this is a roaming network.StatusThis column provides a brief textual description of the connection status for the currentlyselectednetwork (for example, “Ready to Connect” or “Connected”).If the <strong>XFINITY</strong> Mobile Internet Device you are currently using is a 4G-only device, this columncontains a “What's 3G?” link. Click this link to view information on upgrading to 3G/4G dualmode service.Network TypeThis column indicates whether each supported network is Mobile (3G or 4G) or WiFi.Additionally, an icon appears in this column, if the network to which you are currentlyconnected has been secured using encryption technologies.SignalThis column indicates the current strength of signals being received from this network.Stronger signals tend to produce more reliable connections.– 10 –
The Main WindowThe main window displays information about your current connection and other wirelessnetworks that are available for connection.<strong>Connection</strong>IndicatorsRefreshButtonDisconnect<strong>XFINITY</strong>.comButtonNote: If more than one WiFi network is currently available, the <strong>XFINITY</strong> <strong>Connection</strong> <strong>Manager</strong>chooses the network to be displayed in the following manner:1. The last network you connected to (if available) is given the highest preference.2. Any "preferred" network (networks for which you have a profile) are chosen next, startingwith the highest priority profile.3. If no WiFi networks for which you have a profile are available, the network with thestrongest signal strength is displayed.<strong>Connection</strong> IndicatorsThese indicators are similar to the connection indicators on the leftmost column of theSupported Networks List. However, the Mobile indicator indicates a connection to either aMobile 3G network or a Mobile 4G network.Refresh ButtonClick this button to refresh the information in the window.– 11 –
<strong>XFINITY</strong>.com ButtonWhen connected to one of the networks listed above, clicking this button opens your browserto the <strong>XFINITY</strong> home page.The main window has the following menus:• File menu• Tools menu• Help menuThe File MenuClick File in the menu bar of the <strong>XFINITY</strong> <strong>Connection</strong> <strong>Manager</strong>'s main window to produce amenu with the following options:Enable/Disable WiFiSelect this option to enable and disable WiFi. Use the disable option when you want to preventyour WiFi adapter from establishing connections or consuming your laptop's power.Enable/Disable Mobile 3GSelect this option to enable and disable <strong>XFINITY</strong> Mobile 3G connections. Use the disableoption when you want to prevent your <strong>XFINITY</strong> Mobile 3G Internet Device from establishingconnections or consuming your laptop's power.Enable/Disable Mobile 4GSelect this option to enable and disable <strong>XFINITY</strong> Mobile 4G connections. Use the disableoption when you want to prevent your <strong>XFINITY</strong> Mobile 4G Internet Device from establishingconnections or consuming your laptop's power.ExitExit the <strong>XFINITY</strong> <strong>Connection</strong> <strong>Manager</strong> application and close any wireless connections.The Tools MenuClick Tools in the menu bar of the <strong>XFINITY</strong> <strong>Connection</strong> <strong>Manager</strong>'s main window to produce amenu with the following options:– 12 –
ProfilesSelect this option to display the Network Profiles window (see page 27). This window is used tocreate, edit and prioritize network profiles.My UsageSelect this item to open your default browser to the Customer Central Website, where you canview your current 3G/4G data usage. You will need your account holder login information (thelogin information you use to pay your bill). An informational dialog box displays to notify you ofyour action. This dialog box displays each time you click My Usage, until you check the Do NotShow Again box. This item is grayed out when no Internet access is available.Note: If you have not yet registered for online access, you must click the Click Here toRegister link, in the dialog box, to sign up for online access. You can also visit the sign up pageat https://customer.comcast.com.Upon successful login, with correct credentials, the Users & Settings web page with your 3G/4G data usage displays.Diagnostics > WiFi InfoSelect this item to open the WiFi Info window. This window displays technical information aboutthe WiFi network to which you are currently connected (if any) and the associated WiFienabled device.Diagnostics > Mobile 3G InfoSelect this item to open the Mobile 3G Info window. This window displays technical informationabout the Mobile network to which you are currently connected (if any) and your <strong>XFINITY</strong>Mobile 3G Internet Device.Diagnostics > Mobile 4G InfoSelect this item to open the Mobile 4G Info window. This window displays technical informationabout the Mobile 4G Internet network to which you are currently connected (if any) and your<strong>XFINITY</strong> Mobile 4G Internet Device.Diagnostics > Event HistorySelect this item to display a list of the most recent events (for example, network connections,network disconnection, errors, etc.).Diagnostics > Generate DiagnosticsSelect this item to generate a file containing diagnostic information; <strong>XFINITY</strong> technical supportmay ask you to generate and email the file to aid in diagnosing connection problems.– 13 –
Check for UpdatesSelect this item to check for updates to the <strong>XFINITY</strong> <strong>Connection</strong> <strong>Manager</strong> software and itsdatabases.SettingsSelect this item to open the Settings window, which allows you to configure a number offeatures to your personal preference.The Help MenuClick Help in the menu bar of the <strong>XFINITY</strong> <strong>Connection</strong> <strong>Manager</strong>'s main window to produce amenu with the following options:HelpSelect this item to open the <strong>XFINITY</strong> <strong>Connection</strong> <strong>Manager</strong>’s help system.About the <strong>XFINITY</strong> <strong>Connection</strong> <strong>Manager</strong>Select this item to display version information for the <strong>XFINITY</strong> <strong>Connection</strong> <strong>Manager</strong> software.Minimizing the Main WindowThe buttons in the upper-right corner of the main window control the appearance and locationof the window.Minimize ButtonCloseButtonMinimize ButtonSimilar to the minimize button in most Windows applications, this reduces the <strong>XFINITY</strong><strong>Connection</strong> <strong>Manager</strong> to a panel on the task bar.– 14 –
Click this panel to return the <strong>XFINITY</strong> <strong>Connection</strong> <strong>Manager</strong> to full size.Close ButtonClick this button to close the main window but leave the <strong>XFINITY</strong> <strong>Connection</strong> <strong>Manager</strong> runningin the background. The smaller version of the main window (shown below) appears in thecorner of your screen.After a few seconds, this window closes automatically and only the system tray icon remainson the screen (see page 15).Available NetworksClick the Available Networks link to return to the main window.Using the System Tray IconWhenever the <strong>XFINITY</strong> <strong>Connection</strong> <strong>Manager</strong> software is running, the icon shown belowappears in the system tray (the row of icons next to the clock on the taskbar).The icon remains in the system tray as long as the <strong>XFINITY</strong> <strong>Connection</strong> <strong>Manager</strong> is running,even if the main window has been closed. Click once on this icon to open a small window with– 15 –
the ability to connect and disconnect. Note that this smaller version of the main window onlyremains on screen for a few seconds (just long enough to establish a new connection).Double-click the system tray icon to open the main window (if it is closed) and to move it infront of other open applications.The Right-Click MenuRight-click the system tray icon to produce a menu with two options:• Select Settings to open the Settings window (see Chapter 7, “<strong>XFINITY</strong> <strong>Connection</strong><strong>Manager</strong> Settings”).• Select Exit to close the <strong>XFINITY</strong> <strong>Connection</strong> <strong>Manager</strong> application.– 16 –
Establishing Mobile<strong>Connection</strong>s3Manually Connecting to a Mobile NetworkBy default, the<strong>XFINITY</strong> <strong>Connection</strong> <strong>Manager</strong> automatically selects an available wirelessnetwork and establish a connection. But, you can choose a different network if you like. Tomanually connect to a mobile network, follow these steps:1. Connect your <strong>XFINITY</strong> Mobile Internet Device.2. Select either Mobile 4G or Mobile 3G in the main window.3. Click the Connect button to connect.Note: Manually choosing a network to connect to stops the <strong>XFINITY</strong> <strong>Connection</strong> <strong>Manager</strong>from automatically connecting to networks for the duration of the session. If you want to returnto automatic connection mode, you must restart the <strong>XFINITY</strong> <strong>Connection</strong> <strong>Manager</strong>.– 17 –
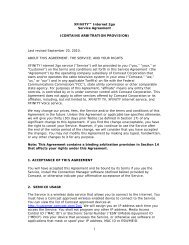
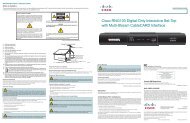
Mobile 3G Info WindowTo view information about your <strong>XFINITY</strong> Mobile 3G Internet Device and/or your Mobile 3Gconnection, select Diagnostics > Mobile 3G Info from the Tools menu. The Mobile 3G Infowindow appears.Note: Your mobile number (phone number) is listed on this window as well.The window includes two tabs:• Network (See page 59 for more information)• Device (See page 56 for more information)– 18 –
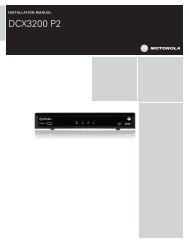
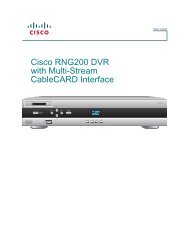
Mobile 4G Info WindowTo view information about your <strong>XFINITY</strong> Mobile 4G Internet Device and/or your Mobile 4Gconnection, select Diagnostics > Mobile 4G Info from the Tools menu. The Mobile 4G Infowindow appears.The window includes two tabs:• Network (See page 63 for more information)• Device (See page 61 for more information)– 19 –
Establishing WiFi<strong>Connection</strong>s4Manually Connecting to a WiFi NetworkIf you have a WiFi enabled laptop, or a computer with an external WiFi device attached, the<strong>XFINITY</strong> <strong>Connection</strong> <strong>Manager</strong> enables you to connect to nearby WiFi networks. When thereare nearby WiFi networks available, the <strong>XFINITY</strong> <strong>Connection</strong> <strong>Manager</strong> selects a network toconnect to and display its name.By default, the <strong>XFINITY</strong> <strong>Connection</strong> <strong>Manager</strong> will automatically establish a connection to anavailable wireless network. But, you can choose a different network if you like. Follow thesesteps to connect:1. Select WiFi in the <strong>XFINITY</strong> <strong>Connection</strong> <strong>Manager</strong>’s main window.2. To connect to the network whose name is displayed, click Connect.To connect to a different network, click the View All WiFi link. The drop-down menu thatappears lists all available networks (see page 22). Select the network you want to connectto and then click the Connect button.Note: A *closed* item under Network Name indicates the presence of one or more closednetworks. See “WiFi Info” on page 23 for more information.Note: Manually choosing a network to connect to stops the <strong>XFINITY</strong> <strong>Connection</strong> <strong>Manager</strong>from automatically connecting to networks for the duration of the session. If you want toreturn to automatic connection mode, you must restart the <strong>XFINITY</strong> <strong>Connection</strong> <strong>Manager</strong>.PromptsOnce the <strong>XFINITY</strong> <strong>Connection</strong> <strong>Manager</strong> has connected to the selected network, you may seethe following prompts:• If the network is encrypted, you will be prompted to enter an encryption key. Enter it andclick OK or click Cancel and select a different network. See “Introduction to WiFiEncryption” on page 24 for more information on connecting to encrypted networks.• When connecting to a WiFi network for the first time, the <strong>XFINITY</strong> <strong>Connection</strong> <strong>Manager</strong>may display the New Network Options prompt (see page 21). You can use this dialog boxto configure the <strong>XFINITY</strong> <strong>Connection</strong> <strong>Manager</strong> to automatically connect to the network inthe future or to prompt you when that network is available.– 20 –
Options for Connecting to a New NetworkIf Prompt me before saving network settings is selected in the Automatic Profile CreationSettings window (see “Automatic Profile Creation Settings” on page 32), you will see the dialogpictured below when you connect to a new WiFi Network for the first time. The option selectedspecifies the type of profile that the <strong>XFINITY</strong> <strong>Connection</strong> <strong>Manager</strong> will create for this network.By creating a profile automatically, the <strong>XFINITY</strong> <strong>Connection</strong> <strong>Manager</strong> makes it easier for you toconnect to the same network in the future.You must choose one the following options:Automatically connect to network in futureIf this option is selected, the <strong>XFINITY</strong> <strong>Connection</strong> <strong>Manager</strong> will automatically connect to thisnetwork whenever it is detected.Note: When multiple networks that have been configured for auto-connection are detected, the<strong>XFINITY</strong> <strong>Connection</strong> <strong>Manager</strong> connects to the network whose profile is ranked highest in theNetwork Profiles window. See “Network Profile Priority” on page 28 for more information onprofile rank and how to change it.Prompt me before connecting to this networkIf this option is selected, the <strong>XFINITY</strong> <strong>Connection</strong> <strong>Manager</strong> will notify you when this network isdetected and offer to establish a connection to it. However, it won’t actually establish theconnection unless you give your “OK.”Save settings for manual connectionsIf this option is selected, the <strong>XFINITY</strong> <strong>Connection</strong> <strong>Manager</strong> will save the connection settingsyou used to connect to this network so that you do not have to enter them again, but it won’tconnect to this network automatically. To manually connect to this network, select it in the WiFiNetworks List and then click the Connect button.– 21 –
Do not save settingsChoosing this option will allow you to connect to the network this time, but will not saveparameters for future connections (No profile will be created.)The List of WiFi NetworksClicking View All WiFi link in the <strong>XFINITY</strong> <strong>Connection</strong> <strong>Manager</strong>’s main window produces a listof all available networks.Select a network and click the Connect button to connect.The information displayed for each network includes the items listed below:Network NameThe Signal Set IDentifier (SSID) is the name that is broadcast by a WiFi Access Point toidentify the network.A *closed* item in this column indicates the presence of one or more closed networks.Connecting to such a network requires the creation of a profile for that network. See “WiFi Info”on page 23 for more information.SecuredEncrypted networks display the icon in this column. See “Introduction to WiFi Encryption”on page 24 for instructions on connecting to encrypted networks.PreferredA check ( ) is displayed for any WiFi network that is listed in the Network Profiles window.This includes WiFi networks for which you have created profiles and Wi-Fi networks for which aprofile has been created automatically (see “Options for Connecting to a New Network” onpage 21 for more about automatic profile creation).Signal StrengthA gauge showing the strength of the signal detected from each network. Stronger signals tendto produce more reliable connections.– 22 –
WiFi InfoTo view information about a WiFi network you are currently connected to or the WiFi device youare using to connect to that network, select Diagnostics > WiFi Info from the Tools menu. Thisproduces a window with two tabs.• The Network tab contains information about the IP Settings for and the amount of Activityon your current WiFi connection (if any).• The Device tab contains information about your current WiFi device (if any).What is a Closed Network?Closed networks are private networks that do not choose to broadcast their existence. The<strong>XFINITY</strong> <strong>Connection</strong> <strong>Manager</strong> can detect when there are closed networks present simplybecause it "sees" unidentified broadcasts in the WiFi frequency band. When this happens, theword *closed* appears in the WiFi networks list.However, the <strong>XFINITY</strong> <strong>Connection</strong> <strong>Manager</strong> cannot detect the actual name of or establish aconnection to a closed network unless you create a profile for that network. For moreinformation, see the following:• How to access a closed network (see below)• How to create a WiFi Network Profile (see “Creating a Profile for a WiFi Network” onpage 29)How to Access a Closed NetworkTo access a closed network with the <strong>XFINITY</strong> <strong>Connection</strong> <strong>Manager</strong>, you must set up a networkprofile for that network. Follow these steps:1. Select Profiles from the Tools menu to display the Network Profiles window.2. Select Add New Profile from the Settings menu. A list of network profile types appears.3. Select WiFi.4. Click Add. The first page of properties for the new profile appears.5. Enter the name of the network you want to add in the SSID field exactly as provided by thenetwork administrator.6. Check This is a non-broadcasted network (Closed) to identify this as a closed network.7. Fill out the remaining fields on this page as instructed by the network administrator.– 23 –
8. Click Next to continue to the General page.9. Configure the fields on the General page as desired.10. Click Finish to exit.Introduction to WiFi EncryptionMobile 4G networks and Mobile 3G networks are encrypted and connection to them securedusing special software in your <strong>XFINITY</strong> Mobile Internet Devices. Similarly, WiFi networks oftenuse encryption technologies to protect data travelling over the network. Unlike Mobile 4Gnetworks and Mobile 3G networks, however, connecting to an encrypted WiFi network requiresthat you enter an encryption key.What is an Encryption Key?An encryption key is a code used to encrypt data exchanged between an encrypted networkand the <strong>XFINITY</strong> <strong>Connection</strong> <strong>Manager</strong>. You must obtain the appropriate encryption key fromthe administrator of an encrypted network in order to connect to that network.How to Change an Encryption KeyWhen a network is added to the Network Profile list, all encryption information is saved with it.Therefore, you will not be asked for encryption information again when connecting. For securitypurposes, the network administrator may find it necessary to change the encryption key for thenetwork. When this happens, you will need to update the encryption keys in the appropriatenetwork profile to match the new keys specified by the network administrator. Follow thesesteps:1. Select Profiles from the Tools menu. The Network Profiles window appears.2. Select the network for which you wish to edit the encryption keys.3. Click Edit.4. Switch to the WiFi tab.5. Enter the new encryption key in both the Network Key box and the Confirm Network Keybox.6. Click the OK button.– 24 –
What Does “PSK” Stand For?PSK stands for “Pre-Shared Key,” which means that your encryption key has to be enteredmanually rather than using a protocol like 802.1x to obtain it from the network as part of theconnection process. Because of its simplicity, PSK is the typical choice for home and smalloffice environments.Wired Equivalent Privacy (WEP)WEP is a standard encryption technology that has been used since the early days of WiFinetworks. Although even more secure methods such as WPA have since emerged, WEPremains an extremely popular choice for encrypted networks. There are two variants of WEP:• WEP Open: This is by far the most commonly-used version of WEP. Networks that useWEP Open do not verify that you have the correct encryption key before allowing you toconnect. However, if you don't have the correct encryption key, you will not be able tocommunicate with the network.• WEP Shared: The network sends out sample text for the <strong>XFINITY</strong> <strong>Connection</strong> <strong>Manager</strong> toencrypt. If the result that the network gets back is what it expected, it allows theconnection. Ironically, this is somewhat less secure than WEP Open because theverification process gives potential intruders a large hint about the contents of theencryption key.WiFi Protected Access (WPA and WPA2)Developed by an industry trade group known as the WiFi Alliance, WPA is an interim standardmeant to address the shortcomings of WEP. WPA2 is a newer standard that succeeded WPA,but both versions remain in common use.To use WPA, you need a WPA-compliant WiFi device.What are TKIP and AES?Temporal Key Integrity Protocol (TKIP) and Advanced Encryption Standard (AES) are differentencryption protocols that can be used with WPA. TKIP is the method that was called for in theoriginal WPA Specification. AES, which is even more secure, was added as an alternatemethod to later versions of the specification. If network uses WPA, but does not specify whichone, TKIP is the most likely to be supported by the network.– 25 –
Connecting to an Encrypted NetworkWhen you choose to connect to an encrypted network, the software will prompt you to enter anetwork encryption key. To proceed, enter a network encryption key obtained from the networkadministrator and then click the Connect button on the prompt dialog.Tip: You can create a profile containing the appropriate encryption information to avoid havingto manually enter an encryption key each time you connect. See “Creating a Profile for a WiFiNetwork” on page 29 for more information.– 26 –
Network Profiles5What is a Network Profile?A network profile contains the configuration information needed to connect to a particularnetwork. Mobile Internet profiles are predefined by <strong>Comcast</strong> (though some configurationoptions are available). WiFi profiles can be created in the Network Profiles window or createdautomatically when you connect to a new WiFi network.Among other things, network profiles allow you to:• Configure the <strong>XFINITY</strong> <strong>Connection</strong> <strong>Manager</strong> to automatically connect using the profile’ssettings whenever the associated network is available.• Prioritize networks to help the <strong>XFINITY</strong> <strong>Connection</strong> <strong>Manager</strong> choose which network toconnect to.• Save settings, such as encryption keys for WiFi security or VPN configuration, to enableone-click connection.The Network Profiles WindowNetwork profiles can be added and configured in the Network Profiles window. To access theNetwork Profiles window, click the Tools > Profiles tab in the main window.– 27 –
The left pane of this window lists all the Network Profiles you have defined so far. Also listedare any Network Profiles that have been pre-configured by <strong>XFINITY</strong> and any profilesautomatically added when you first connected to a new network.A profile's position in the list indicates its priority. See “Network Profile Priority” on page 28 formore information.Profile IconsEach profile listed in the Network Profiles window has an icon next to the name. This iconindicates the technology that this profile uses to establish connections.Mobile 4GMobile 3GWiFiUnmanaged <strong>Connection</strong>s - this is a placeholder for types of networks not managedby the <strong>XFINITY</strong> <strong>Connection</strong> <strong>Manager</strong>. See “Network Profile Priority” on page 28 formore information.Network Profile PriorityIn the Network Profiles window, profiles are listed in order of priority. When selecting a networkto connect to, the <strong>XFINITY</strong> <strong>Connection</strong> <strong>Manager</strong> will choose the topmost profile for which all ofthe following are true:• The network described by the profile is available• You have a device capable of connecting to the network connected to your computer• The <strong>Connection</strong> Options field on the General tab in the profile's configuration is set toeither “Automatic” or “Prompt”• The profile is not “Unmanaged <strong>Connection</strong>s” (see Unmanaged <strong>Connection</strong>s that follows).Profile priority also determines when the <strong>XFINITY</strong> <strong>Connection</strong> <strong>Manager</strong> automatically switchesfrom one network to another. If you are connected to one network and a higher priority networkbecomes available, the <strong>XFINITY</strong> <strong>Connection</strong> <strong>Manager</strong> will switch to the higher priority network.Note: Automatic connection switching only occurs when in automatic connection mode. The<strong>XFINITY</strong> <strong>Connection</strong> <strong>Manager</strong> starts out in this mode each time it is launched, but switches tomanual mode if you manually choose a network and click Connect. To return to automaticmode, restart the <strong>XFINITY</strong> <strong>Connection</strong> <strong>Manager</strong> application.– 28 –
Changing Profile PriorityTo change the priority of a specific profile, select the profile whose priority you would like tochange. Then, click the Up button or the Down button to move the profile up or down the list.Unmanaged <strong>Connection</strong>s“Unmanaged <strong>Connection</strong>s” is not a network profile. It is a placeholder for all networkconnections that are not managed by the <strong>XFINITY</strong> <strong>Connection</strong> <strong>Manager</strong> software. Since“Unmanaged <strong>Connection</strong>s” is always at the top of the list, connections of this type always takeprecedence over the wireless connections managed by the <strong>XFINITY</strong> <strong>Connection</strong> <strong>Manager</strong>.Ethernet LAN connections are an example of connections not managed by the <strong>XFINITY</strong><strong>Connection</strong> <strong>Manager</strong>. Since LAN connections take precedence over managed wirelessconnections, your managed wireless connections will be shut down when you connect to yourLAN.Note: You can specify which devices are included in the “Unmanaged <strong>Connection</strong>s” group inthe Hardware tab of the Settings window.Creating a Profile for a WiFi NetworkPerform these steps to create a WiFi network profile.1. Click the Tools > Profiles button in the main window. The Network Profiles Windowdisplays.2. Select Add New Profile from the Settings menu. A list of network profile types nowappears.3. Select WiFi.– 29 –
4. Click the Add button to bring up the first page of the wizard used to create WiFi networkprofiles5. In the SSID Field, enter the broadcast name of the network to which you will beconnecting. Note that the name entered here must match the SSID (Service SetIDentifier) used by the network exactly.6. If the network is a Closed network, check the This is a non-broadcast network box.7. If the network whose profile you are configuring does not use WEP or WPA encryption,leave the Enable data encryption box unchecked.—or—If the network uses WEP or WPA encryption, check the Enable data encryption box andconfigure the WiFi Data Encryption Settings as explained in “Configuring WiFi DataEncryption” on page 31.– 30 –
8. Click Next. The General page appears (see page 34).9. Configure the settings in the General page as desired and then click Finish.Configuring WiFi Data EncryptionFollow these steps to configure WEP or WPA data encryption:1. Contact the administrator of the network to obtain information needed for access, such asthe security method used, encryption keys required, etc.2. Check the Enable data encryption box.3. Select the appropriate Authentication method for this network. Supported authenticationmethods include the following:• None: For an unencrypted network.• WEP-Open (Normal Method): This is the standard WEP encryption method.• WEP-Shared: Similar to WEP-Open, but the base station asks the client to prove thatit has the right key before the connection is established.• WPA-PSK (TKIP or AES): This is the pre-shared key version of the WPA protocol.• WPA2-PSK (TKIP or AES): This is the pre-shared key version of the WPA2 protocol.– 31 –
Note: The WPA methods listed above will only be displayed if your WiFi adapter supportsWPA security.4. Enter the encryption key for this network in Network Key and Confirm Network Key fields.Note: Normally, the display of the encryption key is obscured for privacy reasons. If youprefer to actually see the key’s text, check the Show network key in clear text box.Automatic Profile Creation SettingsThe <strong>XFINITY</strong> <strong>Connection</strong> <strong>Manager</strong> can automatically create network profiles for each new WiFinetwork you successfully connect to. The setting that controls this can be found by selectingAutomatic Profile Creation from the Settings menu in the Network Profiles window. Choosefrom the following options:• Automatically save all networks that I connect to — The <strong>XFINITY</strong> <strong>Connection</strong> <strong>Manager</strong>will create a new profile for every new WiFi Network you successfully connect to.• Prompt me before saving network settings — The <strong>XFINITY</strong> <strong>Connection</strong> <strong>Manager</strong> will askyou if you want to create a new profile each time you successfully connect to a newnetwork.• Allow manual input of network settings only — The <strong>XFINITY</strong> <strong>Connection</strong> <strong>Manager</strong> will notautomatically create network profiles.Editing a Network ProfileYou can edit all of the settings contained in WiFi network profiles. A reduced set of parameterswill be available for modification in profiles that were created for you by <strong>XFINITY</strong>.1. Click the Tools > Profiles button in the main window. The Network Profiles windowappears.2. Select the profile you wish to edit in the left pane of the window.3. Click the Edit button. A tabbed interface showing all the user-editable settings of theselected profile appears. Depending on the type of profile you are editing, the followingtabs may be displayed:• WiFi (see page 33)• General (see page 34)4. Make the desired changes.– 32 –
5. Click the OK button when you are finished.Deleting a Network ProfileFollow these steps to delete a profile from the Network Profiles window:1. Click the Profiles button in the main window. The Network Profiles window will now bedisplayed.2. Select the profile that you want to delete from the list in the left pane of the window.3. Click Remove. A prompt that asks if you are sure you want to delete this profile appears.4. Click Yes to confirm that you want to delete the profile.Note: You cannot delete network profiles that were created for you by <strong>XFINITY</strong>.Profile Properties: WiFiThe WiFi page contains the security settings for WiFi network profiles.• The version of this window pictured on the left below appears when creating a new profile.• The tabbed version on the right appears when editing an existing profile.– 33 –
Although the window controls vary, the actual parameters included are identical for bothversions.Follow these steps to configure WiFi network security:1. In the SSID field, enter the name broadcast by the network for which you are creating aprofile. The name entered here must match the SSID (Service Set IDentifier) used by thenetwork exactly.2. If this is a closed network, check This is a non-broadcast network (closed).3. If the network does not use WEP or WPA encryption, leave Enable data encryptionunchecked and no further configuration is necessary on this page.If the network does use WEP or WPA encryption, check Enable data encryption andconfigure the WiFi data encryption settings. (See “Configuring WiFi Data Encryption” onpage 31).Profile Properties: GeneralThe General page contains settings that apply to all types of network profiles.• The version of this window pictured on the left below appears when creating a new profile.• The tab version on the right appears when editing an existing profile.– 34 –
Although the window controls vary, the actual parameters included are identical for bothversions.Note: Some of the options pictured on this page may not be available if you are editing a profilecreated for you by <strong>XFINITY</strong>.Profile NameThe name entered here will be displayed in the Network Profiles window and the <strong>XFINITY</strong><strong>Connection</strong> <strong>Manager</strong>’s main window.<strong>Connection</strong> OptionsThis setting controls what the <strong>XFINITY</strong> <strong>Connection</strong> <strong>Manager</strong> will do when it detects the networkto which this profile applies. Select one of the following options:• Automatic — The <strong>XFINITY</strong> <strong>Connection</strong> <strong>Manager</strong> will automatically connect to this networkwhenever it is detected.• Prompt me — The <strong>XFINITY</strong> <strong>Connection</strong> <strong>Manager</strong> will ask you whether to connect to thisnetwork each time the network is detected.• Manual — <strong>Connection</strong>s to this network may be established using the controls in the mainwindow or by selecting it in the Network Profiles window and then clicking Connect, butthe <strong>XFINITY</strong> <strong>Connection</strong> <strong>Manager</strong> will not connect to this network automatically.– 35 –
VPN Auto LaunchCheck this box if you would like to automatically launch your VPN client software when youestablish a connection to this network. Click the accompanying Settings button to open theVPN tab of the Settings window.Disable IE’s manual proxy settings on connectIf you normally connect to the Internet through a proxy server (common on corporate LANs),you may experience difficulty connecting to the Internet with Internet Explorer when you aretraveling. This is because Internet Explorer is trying to connect through a proxy server that ison your home network rather than on the network to which you are connected.If this is the case, you can check this box to disable proxy server settings while you areconnected using this profile.Launch browser window on connectCheck this box to automatically launch your browser each time you connect to this network. Ifyou want the browser to start at a particular Web page each time you connect to this network,enter its web address in the Start URL box.– 36 –
Virtual Private Networks(VPNs)6What is a Virtual Private Network?A Virtual Private Network (VPN) is a private network that can be accessed over a publicbackbone network (like the Internet) without compromising the privacy of the VPN. Typically,VPNs maintain their privacy by forming secure (encrypted) “tunnels” directly to users whoaccess them. For example, a company might set up a VPN for its employees to access theircorporate network securely when they are away from the office.The software responsible for forming the tunnel with the private network is called a VPN Client.Because the VPN Client and the private network exchange data in an encrypted format, no oneon the public network over which this information passes can access it.Supported ClientsAlthough the <strong>XFINITY</strong> <strong>Connection</strong> <strong>Manager</strong> is not a VPN Client itself, it can automate thelaunching of your VPN Client software when needed. The <strong>XFINITY</strong> <strong>Connection</strong> <strong>Manager</strong> hasbeen tested with the following VPN Clients and even automates certain tasks for these clients:• Microsoft• Cisco• Nortel• Checkpoint (please see “Using the Checkpoint VPN Client” on page 39 for importantcaveats)• NetMotion (please see “Using the NetMotion VPN Client” on page 40 for importantcaveats)The <strong>XFINITY</strong> <strong>Connection</strong> <strong>Manager</strong> can also launch other VPN Clients, but may require moremanual configuration to do so.Configuring a VPN <strong>Connection</strong>As with any other secure network, accessing a VPN requires some security-relatedconfiguration. Perform these steps:– 37 –
1. Consult the administrator of the VPN you wish to access. The administrator will provideyou with VPN Client software and instructions for establishing VPN connections.2. If the VPN Client software is not already installed on your system, install it now.(Microsoft's VPN Client is preinstalled on most versions of Windows).3. Follow your administrator’s instructions for setting up a VPN Login Profile.4. Access the VPN tab by selecting the Settings option in the Tools menu and then clickingthe VPN tab.5. If the VPN client software you are using is supported by the <strong>XFINITY</strong> <strong>Connection</strong><strong>Manager</strong>, select Use existing VPN profile. Then, specify the client software and the loginprofile that you want to use.If the VPN Client software you are using is NOT supported by the <strong>XFINITY</strong> <strong>Connection</strong><strong>Manager</strong>, select Use Third Party VPN Client. Then, click the Browse button to specify thelocation of the client software that you are using.6. Click the OK button to exit the Settings window.Once your VPN Settings have been configured, you can configure network profiles toautomatically start your VPN Session upon connection. See “Automatically Launching a VPN<strong>Connection</strong>” on page 38.Automatically Launching a VPN <strong>Connection</strong>You can configure a network profile to automatically launch your VPN Client and log into a VPNonce the connection to a wireless network has been established. Follow these steps:1. If you have not already done so, configure the connection settings for the VPN you wish toconnect to. (See “Configuring a VPN <strong>Connection</strong>” on page 37).2. Open the Network Profiles window by clicking the Tools > Profiles button in the mainwindow.3. In the left pane, select the profile for which you want to automate VPN connections.– 38 –
4. Click the Edit button. The Edit Profile window for the selected profile appears.5. If the General tab is not already selected, select it now.6. Check the Auto Launch box.7. Click OK to exit.Tip: If you want your VPN Client to be launched automatically with all (or most) of the newprofiles you create, consider checking the Set VPN Auto Launch for newly created connectionprofiles box on the VPN tab of the Settings window. This configures the default behavior of allnewly created profiles.Using the Checkpoint VPN ClientAlthough CheckPoint's VPN client provides a command line interface that applications such asthe <strong>XFINITY</strong> <strong>Connection</strong> <strong>Manager</strong> can use to establish connections, the user cannot accessother modes of the CheckPoint VPN client while the client is in command line mode.What does this mean for CheckPoint VPN users? Essentially, you should keep the <strong>XFINITY</strong><strong>Connection</strong> <strong>Manager</strong> open only when you have an active connection managed by the <strong>XFINITY</strong><strong>Connection</strong> <strong>Manager</strong> open. If you want to establish another type of connection with the– 39 –
CheckPoint VPN client, you MUST shut down the <strong>XFINITY</strong> <strong>Connection</strong> <strong>Manager</strong> first. Whenthe <strong>XFINITY</strong> <strong>Connection</strong> <strong>Manager</strong> shuts down, it will put the VPN client back into a mode thatusers can access.Using the NetMotion VPN ClientNetMotion's VPN client takes complete control of all data communication to and from yourcomputer. This forces all data communication applications to go through the “tunnel” it creates.However, the <strong>XFINITY</strong> <strong>Connection</strong> <strong>Manager</strong> needs to bypass this tunnel in order to establishconnections. The <strong>XFINITY</strong> <strong>Connection</strong> <strong>Manager</strong> will accomplish this in one of the followingways:• The NetMotion VPN client maintains a list of applications that are allowed to bypass itsVPN tunnel. If your VPN administrator has added the <strong>XFINITY</strong> <strong>Connection</strong> <strong>Manager</strong> tothis list, the <strong>XFINITY</strong> <strong>Connection</strong> <strong>Manager</strong> can establish connections without interruptingthe operation of the NetMotion client.• If the <strong>XFINITY</strong> <strong>Connection</strong> <strong>Manager</strong> has not been added to NetMotion's bypass list, the<strong>XFINITY</strong> <strong>Connection</strong> <strong>Manager</strong> will detect that the NetMotion client is interfering with itsoperations when it attempts to establish a connection. When this happens, it will instructthe NetMotion client to enter bypass mode (which allows all applications to bypass itstunnel) while the connection is being established. Once the connection has beensuccessfully established, the <strong>XFINITY</strong> <strong>Connection</strong> <strong>Manager</strong> will return the NetMotionclient to its normal operating mode.– 40 –
<strong>XFINITY</strong> <strong>Connection</strong><strong>Manager</strong> Settings7IntroductionThe Settings window allows you to configure the behavior of the <strong>XFINITY</strong> <strong>Connection</strong> <strong>Manager</strong>software. Among other things, these settings control how the client connects to networks, whenit retrieves updates and if its connections should time out.To access the Settings window, select Tools > Settings on the main menu.Settings: GeneralThe General tab contains general settings for the <strong>XFINITY</strong> <strong>Connection</strong> <strong>Manager</strong> software.– 41 –
Automatically run this application on machine startupWhen this box is checked, the <strong>XFINITY</strong> <strong>Connection</strong> <strong>Manager</strong> is launched automatically eachtime you start your computer.Use this as my default WiFi management utilityIf this box is checked, the <strong>XFINITY</strong> <strong>Connection</strong> <strong>Manager</strong> manages all WiFi connections on yourcomputer when it is running. If you wish to return control of WiFi connections to the operatingsystem (or to another application), you must exit the <strong>XFINITY</strong> <strong>Connection</strong> <strong>Manager</strong> software.When this box is NOT checked, the <strong>XFINITY</strong> <strong>Connection</strong> <strong>Manager</strong>'s WiFi functionality isdisabled.Settings: UpdatesThe Updates tab allows you to specify when updates to the <strong>XFINITY</strong> <strong>Connection</strong> <strong>Manager</strong>software and device firmware are made.The following items can be found on this tab:– 42 –
Automatically download and installSelect this option to have the <strong>XFINITY</strong> <strong>Connection</strong> <strong>Manager</strong> automatically download and installproduct updates at regular intervals (once a week).Note: These updates are silent (occur in the background). You do not see the update wizardwhen updates are downloaded silently.Prompt me to download and installSelect this option to have the <strong>XFINITY</strong> <strong>Connection</strong> <strong>Manager</strong> periodically prompts you todownload and install product updates.Manually download and installSelect this option if you want product updates to be downloaded only when you click theUpdate Now button.Update NowClick Update Now to have the <strong>XFINITY</strong> <strong>Connection</strong> <strong>Manager</strong> immediately check for anddownload available updates.Update ServicesClicking on the Update Services button triggers an update to the service profile and parameterson the device. Note that Update Services is only applicable to a Dual Mode or 3G-Only device.A Dual Mode device can function as a Dual Mode or Single Mode device. You can callCustomer Care to change your service plan at any time.A warning prompt is displayed to inform you that Update Services will interrupt any activeMobile (3G or 4G) connection.– 43 –
Settings: HardwareThe Hardware tab is used to configure hardware-related settings for connection establishment.The following items can be found on this tab:The Device ListThis table lists all the devices connected to your computer that may be used to establishnetwork connections. Among other things, this table allows you to:• Enable and disable individual devices.• Choose between multiple devices of the same type.• Configure additional properties for <strong>XFINITY</strong> Mobile 3G Internet Devices.For more information, see “The Device List” on page 45.– 44 –
Prompt before switching connectionsWhen in automatic connection mode, the <strong>XFINITY</strong> <strong>Connection</strong> <strong>Manager</strong> software automaticallyswitches to a higher priority network if one becomes available. This has the potential to disruptany activity that was relying on the original connection.Checking this box will cause the <strong>XFINITY</strong> <strong>Connection</strong> <strong>Manager</strong> to prompt you for permissionbefore establishing the connection to the new network.The Profiles ButtonClick this button to open the Network Profiles window.The Device ListThe device list is a table that appears on the Hardware tab of the Settings window. It isprimarily used to select and configure connected devices.Devices ColumnThis column lists all the network access devices installed on your computer, grouped by theconnection technologies they use. Each technology type heading is followed by the devicenames of the specific devices of that type that are installed on your computer. The technologytypes are:• WiFi Devices• Mobile 3G Devices• Mobile 4G Devices• Unmanaged DevicesNote: The network devices listed under Unmanaged Devices are not managed by the <strong>XFINITY</strong><strong>Connection</strong> <strong>Manager</strong> application. So, the configuration in this window works a bit differently forthem. See “Unmanaged Devices” on page 46 for more information.Selection ColumnThis column allows you to specify which devices should be used to connect. The choices forthis column are:• Automatic: The <strong>XFINITY</strong> <strong>Connection</strong> <strong>Manager</strong> automatically chooses the best device forthis technology type.• Manual: Allows you to manually select the device to be used. After selecting this option,check the box next to the device you wish to use.– 45 –
• Disabled: This option is useful when you are using a multifunction wireless device that canonly use one wireless mode at a time. For example, you may have a WiFi/Mobile InternetDevice that can not access both types of network at the same time. When using suchdevices, you may have to temporarily shut down the <strong>XFINITY</strong> <strong>Connection</strong> <strong>Manager</strong>'s useof one of these functions when you want to use the other technology.Status ColumnThis column identifies the operational status of the device. It indicates whether the device is Onor Off.Property ColumnAdditional properties (such as roaming) may be configured for devices if a Modify button isdisplayed in this column. Click Modify to open a pop-up window that provides additionalconfiguration options for the device. Currently, only <strong>XFINITY</strong> Mobile 3G Internet Devices havesuch a window. (For more information, see“Device Properties” on page 47)Unmanaged DevicesUnlike other categories in the device list, “Unmanaged Devices” are NOT supported by the<strong>XFINITY</strong> <strong>Connection</strong> <strong>Manager</strong>. Although the <strong>XFINITY</strong> <strong>Connection</strong> <strong>Manager</strong> cannot use thesedevices to establish connections, it can detect when a device in this category has established aconnection and (if you desire) shut down its own connections when this occurs.To monitor the connection status of a device in this group, check the box in the Selectedcolumn. <strong>Connection</strong>s for all checked devices will be included in the Unmanaged <strong>Connection</strong>sgroup in the Network Profiles window. For more information, see “Network Profile Priority” onpage 28.Note: The Automatic/Manual Disabled drop-down menu at the top of the Unmanaged Devicesgroup must be set to Manual to change which devices are checked. This menu alsodetermines the default state of the checkbox for newly-detected devices:• If the drop-down menu is set to Automatic, new devices added to the other group will bechecked by default.• If the drop-down menu is set to Manual, new devices will be unchecked by default.– 46 –
Device PropertiesThe Device Properties window contains three sections used to configure the behavior ofMobile 3G devices connected to your computer.Roaming SelectionConfigure permission for the <strong>XFINITY</strong> <strong>Connection</strong> <strong>Manager</strong> to connect to roaming networks.Consult your service agreement for more information about roaming service and any chargesthat such service might incur. You can choose one of these options:• Auto — connects to <strong>XFINITY</strong>’s network when available, using roaming networks onlywhen a connection to <strong>XFINITY</strong>’s network is not available.• Home Only — connects only to <strong>XFINITY</strong>’s network. Never connects to other networks.– 47 –
Roam GuardUse the Roam Guard pull-down menu to specify whether you would like the <strong>XFINITY</strong><strong>Connection</strong> <strong>Manager</strong> to display a warning message when you are about to connect to aroaming network for which there may be additional roaming charges.• Always Ask: always prompt before connecting to a roaming network.• Never Ask: never ask before connecting to a roaming network.• Default: display the prompt when the Extended Roaming Indicators (ERI) file on yourmobile device says it is necessary to do so.Device ConfigurationThis group allows you to update the configuration files that actually reside on your mobiledevice.Note: This group of settings is only available for some Mobile Broadand devices.The options here include the following:• Check Disable Service Updates if you want to disable all updates to your device'sconfiguration. This item disables all the other items in the Device Configuration group anddisables network-initiated updates of the same information.’• Click Activate Device if the selected device has not yet been activated. This will initiate thedevice activation process. Note that this button will not be available if the selected devicehas already been activated.• Click Update PRL to download the latest Preferred Roaming List. The Preferred RoamingList informs your device who <strong>XFINITY</strong>’s current roaming partners are. Keeping the listcurrent ensures that your device will select networks with the most reasonable roamingfees.• Click Update Profile to update the profile your device uses to establish connections.• Click Update Firmware to download the latest version of your device's firmware (itsonboard operating software).– 48 –
Settings: <strong>Connection</strong> TimeoutThe <strong>Connection</strong> Timeout tab allows you to specify if and when the <strong>XFINITY</strong> <strong>Connection</strong><strong>Manager</strong> automatically shuts down a connection.Configuring Duration TimeoutsA duration timeout is a maximum time allowed for any connection. So, a duration timeout of 30minutes shuts down any connection that lasts longer than 30 minutes.To configure a duration timeout, check the Enable Duration Timeout box. Then, specify thenumber of minutes after which the timeout should occur.If you want the <strong>XFINITY</strong> <strong>Connection</strong> <strong>Manager</strong> to warn you before it disconnects for a durationtimeout, check the Display warning before timeout box.Configuring Inactivity TimeoutsConfiguring an inactivity timeout instructs the <strong>XFINITY</strong> <strong>Connection</strong> <strong>Manager</strong> to disconnect ifthere has been little or no data exchanged on a connection for a specified number of minutes.To configure an inactivity timeout, check the Enable Inactivity Timeout box. Then, specify thenumber of minutes of inactivity that will trigger the timeout.– 49 –
Settings: VPNThe VPN tab specifies how the <strong>XFINITY</strong> <strong>Connection</strong> <strong>Manager</strong> accesses Virtual PrivateNetworks.The top item, Do Not Use VPN, disables the <strong>XFINITY</strong> <strong>Connection</strong> <strong>Manager</strong>'s capacity to loginto VPNs. Select this option if you do not wish to establish connections to Virtual PrivateNetworks.You must choose one of the other two options and fill in the corresponding fields if you wish toautomatically log into a VPN when you connect to a specific network (see “AutomaticallyLaunching a VPN <strong>Connection</strong>” on page 38).Use existing VPN profileSelect this item if the VPN client software you will be using is supported by the <strong>XFINITY</strong><strong>Connection</strong> <strong>Manager</strong>. Then, specify the supported client software and the login profile that youwant to use. See “Supported Clients” on page 37 for more information on supported VPN clientsoftware.– 50 –
Use third party VPN clientSelect this item if the VPN client software you will be using is NOT supported by the <strong>XFINITY</strong><strong>Connection</strong> <strong>Manager</strong>. Follow these steps to configure the <strong>XFINITY</strong> <strong>Connection</strong> <strong>Manager</strong> tolaunch the unsupported software:1. Click the Browse button.2. Select the program file to be launched.3. Click Open. The path of the selected file appears in the Command Line box.4. If your VPN client software requires that additional parameters be included after theprogram filename on the command line, these may be entered in the Parameters box.Consult the documentation for your VPN client to determine if such parameters areneeded.See “Supported Clients” on page 37 for more information on which VPN client software issupported.Set VPN autolaunch for newly created connection profilesIf this box is checked, all new network profiles created will be configured to automaticallylaunch your VPN upon successful connection. If this box not checked, new profiles will notconnect to your VPN until you follow the instructions in Automatically Launching a VPN.Note: This setting specifies the initial state of the VPN Autolaunch box on the General page ofsettings for each new profile (see page 36). You can easily change this setting for an individualprofile after the profile is created.– 51 –
Troubleshooting Tools8Event History <strong>Manager</strong>Select Diagnostics > Event History from the Tools menu to see a log of events (for example,connections, disconnections, errors). The window shown below appears.• You can do the following in this window:• Double-click any item in the list to see more information about that event.• Use the options in the Filter by section to limit the events displayed to a particular daterange, connection technology or event type.• Click on the Reset Event History <strong>Manager</strong> button to delete all the currently logged events.• Click on the Export Log button to save the currently logged events information to a text file.• Check your total usage data by viewing the statistics listed under Mobile Usage Since LastReset.Note: Byte Totals displayed are approximate and do not include any currently in-progresssession. More information about data usage is available at <strong>XFINITY</strong> Customer Central(https:// customer.comcast.com/Secure/Users.aspx).– 52 –
WiFi Network InformationTo view information about a WiFi network you are currently connected to or about your currentWiFi device, select Diagnostics > WiFi Info from the Tools main menu. This produces thewindow shown below:Network TabIP AddressThe Internet address your computer is using for the current WiFi network connection.Ordinarily, the address displayed here is assigned only for the duration of the currentconnection. It is most likely NOT permanently assigned to your computer.GatewayThe address of the device that is responsible for routing all the network traffic you send overthe WiFi connection.– 53 –
DNS ServerThe address of the server your computer is using to translate textual Internet addresses (like<strong>XFINITY</strong>.com) into the numerical addresses used natively by the Internet Protocol.DHCP ServerThe address of the server that assigned your computer's network configuration for the currentwireless connection.WINS ServerThe address of the server (if any) that your computer is using to find the names of computerson a Windows network.ActivityThe number of packets of data that your computer has sent and received over the WiFiconnection since it was established.– 54 –
Device TabVendor DescriptionThe name of your WiFi device, as reported by its on-board operating software.MAC AddressThe Hardware Address of the device. MAC (Media Access Control) addresses arepre-configured by the device's manufacturer and usually cannot be altered. These addressesare used for transferring data by hardware-level protocols such as Ethernet and 802.11 (WiFi).Higher level protocols such as the TCP/IP Protocol Suite used by the Internet have their ownaddressing schemes, but still rely on the hardware-level protocol for the transfer of databetween individual nodes on a network.Driver VersionThe version of the driver for the device that is currently installed on your computer.Firmware VersionThe version of the device's on-board operating software.– 55 –
Mobile 3G Info WindowTo view information about your Mobile 3G Internet Device and/or your Mobile 3G connection (ifany), select Diagnostics > Mobile 3G Info from the Tools menu. The window shown below willappear.Note: The information displayed in this window is provided by your <strong>XFINITY</strong> Mobile 3G InternetDevice and its drivers. If the device does not provide this information or the informationprovided is incorrect, this will be reflected in the displayed data.Device TabDevice NameThe name used internally by software applications to uniquely identify your Mobile 3G InternetDevice.– 56 –
Device DescriptionThe commercial name of your <strong>XFINITY</strong> Mobile 3G Internet Device.ManufacturerThe name of the manufacturer of your <strong>XFINITY</strong> Mobile 3G Internet Device.Modem ModelThe model name of your <strong>XFINITY</strong> Mobile 3G Internet Device.RevisionThe revision field contains manufacturer-specific information about the version of your device.It may, for example, contain additional information about your device's model number or itsfirmware version.ESNYour <strong>XFINITY</strong> Mobile 3G Internet Device's Electronic Serial Number.TechnologyThe type of <strong>XFINITY</strong> Mobile 3G Internet Device you are using.Firmware VersionThe version of your <strong>XFINITY</strong> Mobile 3G Internet Device's on-board operating software.Hardware VersionThe version of your device's hardware.Modem PortThe communications (COM) port that your <strong>XFINITY</strong> Mobile 3G Internet Device is currentlyattached to.User NameYour Network Access Identity (NAI), usually in the form of username@companyabc.com.Phone Number (MDN)The telephone number of your <strong>XFINITY</strong> Mobile 3G Internet Device.– 57 –
Home Carrier NameThe name of the wireless service provider that your <strong>XFINITY</strong> Mobile 3G Internet Deviceconsiders to be its “home” network.Home Carrier IDThe ID of the wireless service provider that your device considers to be its “home” network.PRL VersionThe version of the file on your device that contains the Preferred Roaming List.MSID (IMSI_S)Your <strong>XFINITY</strong> Mobile 3G Internet Device's IMSI (International Mobile Subscriber Identity) code.The IMSI allows any mobile network to know the home country and network of the subscriber.– 58 –
Network TabNetwork NameThe name of the Mobile 3G carrier to which you are currently connected.System IDThe ID of the network to which your <strong>XFINITY</strong> Mobile 3G Internet Device is currently connected.ConnectedIndicates whether you are currently connected to a Mobile 3G network.RoamingIndicates whether you are currently connected to a Mobile 3G network other than a Homenetwork.– 59 –
MIP ErrorThe last Mobile IP Error Code reported by your <strong>XFINITY</strong> Mobile 3G Internet Device.Signal Strength (dBm)The strength of the signal being received from this network, expressed in dBm.Data SentThe amount of data sent over this connection since it was established (in bytes).Data ReceivedThe amount of data received over this connection since it was established (in bytes).IP AddressThe IP Address you are using for the current <strong>XFINITY</strong>Mobile 3G Internet connection.Ordinarily, the address displayed here is assigned only for the duration of the currentconnection. It is most likely NOT permanently assigned to your computer.Gateway AddressThe address of the default gateway that has been assigned to your device.– 60 –
Mobile 4G Info WindowTo view information about your <strong>XFINITY</strong> Mobile 4G Internet Device and/or your Mobile 4Gconnection (if any), select Diagnostics > Mobile 4G Info from the Tools menu. The windowshown below appears:Note: The information displayed in this window is provided by your <strong>XFINITY</strong> Mobile 4G InternetDevice and its drivers. If the device does not provide this information or the informationprovided is incorrect, this will be reflected in the displayed data.Device TabThis page displays various information about the <strong>XFINITY</strong> Mobile 4G Internet Device currentlyattached to your computer.MAC AddressThe Hardware Address of the device. MAC (Media Access Control) addresses arepreconfigured by the device's manufacturer and usually cannot be altered. These addressesare used for transferring data by hardware-level protocols such as Ethernet or WiMAX. Higherlevel protocols such as the TCP/IP Protocol Suite used by the Internet have their ownaddressing schemes, but still rely on the hardware-level protocol for the transfer of databetween individual nodes on a network.Library VersionThe version of the software interface of the device’s Mobile 4G chipset.– 61 –
Firmware VersionThe version of your <strong>XFINITY</strong> Mobile 4G Internet Device's onboard operating software.Driver VersionThe version of the driver for the device that is currently installed on your computer.BaseBand ChipThe version of the chip in your <strong>XFINITY</strong> Mobile 4G Internet Device that formulates thebaseband Mobile 4G signal.RF Chip VersionThe version of the chip in your <strong>XFINITY</strong> Mobile 4G Internet Device that modulates andmultiplexes the baseband Mobile 4G signal for RF transmission.Calibration StatusThis indicates whether your <strong>XFINITY</strong> Mobile 4G Internet Device has been calibrated.Antenna CalibThis item is not currently reported by the <strong>XFINITY</strong> <strong>Connection</strong> <strong>Manager</strong> software.Antenna Gain DiffThis item is not currently reported by the <strong>XFINITY</strong> <strong>Connection</strong> <strong>Manager</strong> software.Tx Power OffsetThis item is not currently reported by the <strong>XFINITY</strong> <strong>Connection</strong> <strong>Manager</strong> software.MAC VersionThis item is not currently reported by the <strong>XFINITY</strong> <strong>Connection</strong> <strong>Manager</strong> software.The Advanced ButtonClick this button to open the Advanced Mobile 4G Info window.– 62 –
Network TabThis page displays various information about the Mobile 4G network you are currentlyconnected to (if any).IP AddressThe Internet address your computer is using for the current Mobile 4G network connection.Ordinarily, the address displayed here is assigned only for the duration of the currentconnection. It is most likely NOT permanently assigned to your computer.GatewayThe address of the device that is responsible for routing all the network traffic you send viaMobile 4G.DNS ServerThe address of the server your computer is using to translate textual Internet addresses (like<strong>XFINITY</strong>.com) into numerical addresses used natively by the Internet Protocol.DHCP ServerThe address of the server that assigned your computer's network configuration for the currentMobile 4G connection.WINS ServerThe address of the server (if any) that your computer is using to find the names used bycomputers in a Windows workgroup.– 63 –
ActivityThe number of packets of data that your computer has sent and received over the WiMAXconnection since it was established.Advanced Mobile 4G InformationClicking the Advanced button on the Device page of the Mobile 4G Info window produces theAdvanced Mobile 4G Info window (shown below). This window provides advanced informationfor troubleshooting a Mobile 4G connection.Rx PowerThe strength of the signal received.CINRCarrier to Interference + Noise Ratio. This is an indication of how strong the desired signal iscompared to any interfering signals and noise. This gives a slightly more accurate indication ofthe overall quality of the signal received than just the signal strength by itself.BSIDBase Station ID. The ID of the base station you are currently connected to.TX PowerThe level of power your <strong>XFINITY</strong> Mobile 4G Internet Device is using to transmit.Preamble IndexThe Preamble Index of the Mobile 4G base station sector you are currently connected to.– 64 –
About <strong>XFINITY</strong> <strong>Connection</strong> <strong>Manager</strong>Select About <strong>XFINITY</strong> <strong>Connection</strong> <strong>Manager</strong> from the Help menu to see the version number ofthe <strong>XFINITY</strong> <strong>Connection</strong> <strong>Manager</strong> software as well as the website for <strong>XFINITY</strong> customerservice.Click the System Info button to see information about your computer's current configuration,which may be useful to a customer service representative in resolving a problem.– 65 –
TroubleshootingProcedures9Numbered ErrorsThe most commonly-reported connection errors are listed below, along with some advice ontheir resolution.Error 67Possible causes for this error include the following:• Mobile Internet Device account credentials have changed.• Mobile Internet Device is no longer provisioned for service.Resolution• Select Update Services from the Tools > Settings > Update tab to manually update yourservice profile and parameters for your device.• Contact <strong>XFINITY</strong> Internet 2go Technical Support at 1-866-206-2182 to ensure that yourdevice is properly provisioned and that there are no problems with the account.Error 131Your Mobile Internet Device account credentials may have changed.Resolution• Select Update Services from the Tools > Settings > Update tab to manually update yourservice profile and parameters for your device.• Contact <strong>XFINITY</strong> Internet 2go Technical Support to ensure that your device is properlyprovisioned and that there are no problems with the account.Error 619A connection to the remote computer could not be established, so the port used for thisconnection was closed. Possible causes for this error include the following:– 66 –
• Network resources are unavailable.• Attempting to reconnect before your Mobile Internet Device has finished disconnectingfrom a previous call.• Your Mobile Internet Device may be malfunctioning.Resolution• Wait 30 seconds, and then try to connect again.• Remove the Mobile Internet Device and reattach it to the computer.• Reboot the computer.Error 628The connection was terminated by the remote computer before it could be completed. Possiblecauses for this error include the following:• Call was dropped due to poor signal.• Call was dropped due to network congestion.Resolution• If indoors, move closer to a window, exterior wall or move to a higher level. Re-orientingthe computer/wireless device may help as well.• Wait 30 seconds, and then try to connect again.Error 633The device is already in use or is not configured properly. Possible causes for this errorinclude:• There is a problem with the drivers installed for the wireless device.• Another application such as a fax program or PDA device software is attempting to usethe port.Resolution• Shut down all FAX and PDA software and launch the again. Examples of commonapplications that can cause this type of problem include: PalmSource Hotsync, MicrosoftActiveSync, and Blackberry Desktop <strong>Manager</strong>.– 67 –
• Uninstall any other wireless device connection management software installed on thecomputer.• Reinstall the <strong>XFINITY</strong> <strong>Connection</strong> <strong>Manager</strong>.Error 635The device is already in use or is not configured properly.Possible causesUnknown error. Possible causes for this error include:• Resuming the computer system from standbyResolution• Close the <strong>XFINITY</strong> <strong>Connection</strong> <strong>Manager</strong>.• Remove the Mobile Internet Device.• Re-open the <strong>XFINITY</strong> <strong>Connection</strong> <strong>Manager</strong>.• Connect the Mobile Internet Device.• Reboot the computer if the steps above do no work.Error 668The connection was dropped. Possible causes for this error include:• Recent service change to the device.• Poor signal.• Network congestion.Resolution• If a service change has been requested recently, you may need to update your serviceprofile and parameters for your device by selecting the Update Services option from theError Dialog.• Select Update Services from the Tools > Settings > Update tab to manually update yourservice profile and parameters for your device.• If indoors, move closer to a window, exterior wall, or a higher level. Reorienting thecomputer or wireless device may help as well.– 68 –
• Reboot the computer.• Contact <strong>XFINITY</strong> Internet 2go Technical Support at 1-866-206-2182 to ensure that yourdevice is properly provisioned.Error 678The remote computer is not responding. Possible causes for this error include:• Recent service change to the device.• Poor signal.• Network resources are unavailable.Resolution• If a service change has been requested recently, you may need to update your serviceprofile and parameters for your device by selecting the Update Services option from theError Dialog.• Select Update Services from the Tools > Settings > Update tab to manually update yourservice profile and parameters for your device.• If indoors, move closer to a window or exterior wall or move to a higher level. Reorientingthe computer or wireless device may help as well.• Wait 30 seconds, and then try to connect again.• Contact <strong>XFINITY</strong> Internet 2go Technical Support at 1-866-206-2182 to ensure that yourdevice is properly provisioned.Error 691Access was denied because user name and/or password supplied is invalid on the domain.Possible causes for this error include:• Poor signal.• Mobile Internet Device account credentials have changed.Resolution• If indoors, move closer to a window or exterior wall or move to a higher level. Re-orientingthe computer/wireless device may help as well.• Reboot the computer.– 69 –
• Select Update Services from the Tools > Settings > Update tab to manually update yourservice profile and parameters for your device.• Contact <strong>XFINITY</strong> <strong>XFINITY</strong> Internet 2go Technical Support to ensure that your device isproperly provisioned.Error 692There was a hardware failure in the device. Possible causes of this error include:• Wireless device is defective or broken.• Problem with PC Card Slot, ExpressCard slot, or USB port.Resolution• Close the <strong>XFINITY</strong> <strong>Connection</strong> <strong>Manager</strong>, reinsert the device, and launch the <strong>XFINITY</strong><strong>Connection</strong> <strong>Manager</strong> again.• Reboot the computer.• Try connecting the device to another slot (or port).Error 718PPP/Network Timeout. Possible causes for this error include:• Recent service change to the device.• Poor signal.• Network resources are unavailable.Resolution• If a service change has been requested recently, you may need to update your serviceprofile and parameters for your device by selecting the Update Services option from theError Dialog.• Select Update Services from the Tools > Settings > Update tab to manually update yourservice profile and parameters for your device.• If indoors, move closer to a window or exterior wall or move to a higher level. Reorientingthe computer or wireless device may help as well.• Wait 30 seconds, and then try to connect again.• Reboot the computer.– 70 –
Error 719PPP termination by remote machine. Possible causes for this error include the following:• Poor signal.• Network resources are unavailable.Resolution• If indoors, move closer to a window or exterior wall, or move to a higher level. Reorientingthe computer or wireless device may help as well.• Wait 30 seconds, and then try to connect again.• Reboot the computer.Error 777The connection attempt failed because the connecting device on the remote computer is out oforder. Possible causes for this error include:• Poor signal.• Network resources are unavailable.• There is a problem with one of the wireless device drivers.Resolution• If indoors, move closer to a window or exterior wall, or move to a higher level. Reorientingthe computer or wireless device may help as well.• Wait 30 seconds, then try to connect again.• Close the <strong>XFINITY</strong> <strong>Connection</strong> <strong>Manager</strong>, reinsert the wireless device and launch the<strong>XFINITY</strong> <strong>Connection</strong> <strong>Manager</strong> again.• Reboot the computer.• Uninstall any other software that manages wireless connections (if any are present on thecomputer).• Reinstall the <strong>XFINITY</strong> <strong>Connection</strong> <strong>Manager</strong>.Application Launch IssuesIn some instances you may encounter application launch issues which can easily be resolved.– 71 –
Auto launching of the <strong>XFINITY</strong> <strong>Connection</strong> <strong>Manager</strong> at StartupThe <strong>XFINITY</strong> <strong>Connection</strong> <strong>Manager</strong> installation can be configured to allow the application toautomatically launch when a computer boots up or when a new user logs into the machine.This may (or may not) be the way you prefer it to behave.Resolution — You can access the setting that controls this behavior by selecting Settings fromthe Tools menu and then choosing the General tab. Check (or uncheck) the Automatically runthis application on machine startup box to specify whether the <strong>XFINITY</strong> <strong>Connection</strong> <strong>Manager</strong>should be automatically launched.Windows XP's native WiFi management is shut down at startupThis behavior is intentional. <strong>XFINITY</strong> <strong>Connection</strong> <strong>Manager</strong> provides significantly more powerfulWiFi management than XP's native WiFi engine. However, if you prefer XP's native tool, youcan disable the <strong>XFINITY</strong> <strong>Connection</strong> <strong>Manager</strong>'s WiFi management entirely.Device IssuesIn some circumstances, the <strong>XFINITY</strong> <strong>Connection</strong> <strong>Manager</strong> will not be able to use your WiFi,Mobile 3G or Mobile 4G Device.A network name displayed in the main window will turn gray when the corresponding device’spresence has been disabled or if the device's presence is not detected by the <strong>XFINITY</strong><strong>Connection</strong> <strong>Manager</strong>.• Device Disabled (Top FAQs “Why is my device disabled?” on page 76)• No Wireless Device Detected (Top FAQs “Why is my wireless device not detected?” onpage 77)– 72 –
Support10Support InformationSupport for the <strong>XFINITY</strong> <strong>Connection</strong> <strong>Manager</strong> can be obtained through <strong>XFINITY</strong>'s website athttp://customer.comcast.com/2goVisit the FAQ section for troubleshooting tips on Top FAQs to connect to the <strong>XFINITY</strong> Internet2go service.Further assistance is available by phone at 1-866-206-2182When contacting <strong>XFINITY</strong> Internet 2go Technical Support be sure to include the version ofWindows and the type of wireless device you are using as well a description of the problem youare experiencing.– 73 –
FAQs11Frequently Asked QuestionsI Cannot Connect.If this is the first time the device is used, it may take 3-5 minutes for the device to be installed,configured and activated.• Option 1: Re-insert Mobile Broadband device– Remove device, wait 10 seconds, re-insert device and try to connect again.– If above did not work: Remove device, then File > Exit the <strong>XFINITY</strong> <strong>Connection</strong><strong>Manager</strong> and wait 20 sec. Re-launch the <strong>XFINITY</strong> <strong>Connection</strong> <strong>Manager</strong>, re-insert deviceto a different USB port if available, and try again.• Option 2: Reboot computer– Remove device and reboot computer. With the <strong>XFINITY</strong> <strong>Connection</strong> <strong>Manager</strong> running,re-insert device, and try to connect again.• Option 3: Update the service– If you have a Mobile 3G Broadband device, the device profile may need to be updated.– Start <strong>XFINITY</strong> <strong>Connection</strong> <strong>Manager</strong>, insert device. Select Update Services from Tools >Settings > Update tab to manually update service profile and parameters for your device.– Once the update process is complete, the device will restart and attempt to connect.• Option 4: Update <strong>XFINITY</strong> <strong>Connection</strong> <strong>Manager</strong> (must have Internet available)– Start <strong>XFINITY</strong> <strong>Connection</strong> <strong>Manager</strong>, click on Tools > Check for Updates– If an update is available, download and install it.– Launch <strong>XFINITY</strong> <strong>Connection</strong> <strong>Manager</strong>, re-insert device and try to connect again.• Option 5: Disable WiFi on machine– Click the start menu and open control panel.– Click on "Network and Internet <strong>Connection</strong>s" or "Network <strong>Connection</strong>"• In Windows 7 and Vista– 74 –
– Click the "View Network Status and Tasks" to open Network Sharingcenter.– Click Change Adapter Settings on the left menu– Right click on WiFi adapter and disable• In Windows XP– The network connections window lists all High-Speed Internetconnections– Right click the "Wireless Network <strong>Connection</strong>" and disable– You can right click on WiFi adapter and re-enable it at any time.– Launch <strong>XFINITY</strong> <strong>Connection</strong> <strong>Manager</strong>, re-insert device and try to connectagain.If you are trying to connect to the 4G network you must have a Dual Mode device. Single Modedevices can only connect to the 3G network. If you are interested in 4G service please contactbilling to change your plan and get the appropriate device.Which operating systems does the <strong>XFINITY</strong> <strong>Connection</strong> <strong>Manager</strong>support?The <strong>XFINITY</strong> <strong>Connection</strong> <strong>Manager</strong> supports Windows XP, Windows Vista 32-bit and 64-bit,and Windows 7 32-bit and 64-bit systems. See Top FAQs for more information on supportedsystem configurations.The <strong>XFINITY</strong> <strong>Connection</strong> <strong>Manager</strong> launched, but no wireless deviceis detected.For troubleshooting instructions, see “Why is my wireless device not detected?” on page 77.How do I stop the <strong>XFINITY</strong> <strong>Connection</strong> <strong>Manager</strong> from launching everytime I restart my computer?Follow these steps:1. Select Tools > Settings from the main menu.2. Select the General tab.3. Remove the check from the Automatically run this application on machine startup box.4. Click the OK button.– 75 –
Why Does the <strong>XFINITY</strong> <strong>Connection</strong> <strong>Manager</strong> keep scanning for WiFinetworks?The <strong>XFINITY</strong> <strong>Connection</strong> <strong>Manager</strong> will continue to scan until it finds one or more availablenetworks or hot spots. If it keeps scanning, there are most likely no WiFi networks or hot spotsin the area. “Closed” networks are a special case. Although the <strong>XFINITY</strong> <strong>Connection</strong> <strong>Manager</strong>can detect whether closed networks are in the area, it cannot actually identify (or connect to)individual closed networks without probing for these networks using their exact names. Toenable this, you have to create a profile for the network you wish to connect to. See “WiFi Info”on page 23 for more information.Why do I keep losing my connection?This may be due to interference by other devices like cordless phones, microwave ovens, andother 2.4GHz band devices. Move a few feet away from such devices. Interference can also becaused when in steel frame buildings, on fast moving trains, in rural or mountainous areas, onunderground subways and near high voltage lines.Why am I unable to connect to a network that I can see in the <strong>XFINITY</strong><strong>Connection</strong> <strong>Manager</strong>?Signal strength from the wireless Access Point may not be strong enough to allow reliableconnections. It may not be a publicly available Access Point. Many companies or campusesuse wireless networking within their buildings, but will not grant public access.Why is my device disabled?In some circumstances, the <strong>XFINITY</strong> <strong>Connection</strong> <strong>Manager</strong> will not be able to use your Wi-Fi,Mobile 3G Internet Device or Mobile 4G Internet Device. A network name displayed in the mainwindow will turn gray when the corresponding device has been disabled or if the device’spresence is not currently detected by the <strong>XFINITY</strong> <strong>Connection</strong> <strong>Manager</strong>. All the devices usedby the <strong>XFINITY</strong> <strong>Connection</strong> <strong>Manager</strong> can be disabled by Microsoft Windows. If this is the case,you can re-enable the device. If this is the case, you can re-enable the device. You can enablean attached wireless device by selecting Enable Mobile 3G, Enable Mobile 4G or Enable WiFifrom the File menu.– 76 –
Note: On Windows Vista systems, these options may be grayed out at all times. This may bebecause of security restrictions in your Microsoft Vista security configuration. Running theapplication as an administrator may allow access to these options.Follow these steps:1. Close the <strong>XFINITY</strong> <strong>Connection</strong> <strong>Manager</strong>.2. Right click on the <strong>XFINITY</strong> <strong>Connection</strong> <strong>Manager</strong> icon on your computer’s desktop. A shortmenu appears.3. Select Run As Administrator from this menu.Why is my wireless device not detected?Failure to detect the device may result from any of the following causes:• Devices that must be tethered to your computer with a data cable (such as USB), but arenot currently properly connected. Make sure the cables for devices that require them areproperly attached to both your computer and the device.• External devices that are not currently powered on. Make sure external devices areswitched on. Make sure the batteries of battery-powered devices are charged. Make suredevices that must be plugged into an electrical outlet are plugged in.• PC Card, USB, or Express Card devices that are not properly inserted. Make sure suchdevices are firmly seated in the appropriate slots.• The wrong device is selected in the Hardware Tab of the Settings Window. Ordinarily,automatic selection should be specified in the “Selected” column. If Manual selection isspecified, verify that the selected device is the device you are trying to use. See “Settings:Hardware” on page 44 for more information.• No driver or incorrect driver installed. Ensure that the latest drivers for the device arecorrectly installed according to the instructions of the device’s manufacturer.I am receiving PPP errors when trying to connect to Mobile 3GIf a service change has been requested recently, you may need to update your service profileand parameters for your device by selecting the Update Services option.If a temporary network problem causes the connection error, use Retry <strong>Connection</strong> to connectto 3G again after 30 seconds.– 77 –
Use the Click Here link to view more troubleshooting topics and suggestions.Why can't the <strong>XFINITY</strong> <strong>Connection</strong> <strong>Manager</strong> find a WiFi network?The <strong>XFINITY</strong> <strong>Connection</strong> <strong>Manager</strong> will continue to scan until it finds one or more availablenetworks or Hot Spots. Most likely, there are no WiFi Hot Spots within range.Does <strong>XFINITY</strong> <strong>Connection</strong> <strong>Manager</strong> support WEP encryption?Yes, <strong>XFINITY</strong> <strong>Connection</strong> <strong>Manager</strong> supports ASCII 64, 128 and HEX 64, 128.Can I leave my card in the USB slot all the time even when not usingit?No, you should only have the card inserted when you are going to use it.My card feels very hot when I remove it from the USB slot after use.This is normal and will not affect your card.Can I use my card on another laptop?Yes. You will need to install the <strong>XFINITY</strong> <strong>Connection</strong> <strong>Manager</strong> software on the laptop you planto use.– 78 –
Will I be charged for the time I use the card?It depends on the plan you subscribe to. All plans offer an initial amount of data included in theplan and after you reach that limit you will be charged overage.The LED light on my card is off.The card has no power or is off. Remove the card and reinsert it.The LED light on my card is solid?An error has occurred. Remove the card and reinsert it.The LED light on my card is blinking?The card is ready to use.– 79 –