Service Bulletin - Hartzell Engine Technologies
Service Bulletin - Hartzell Engine Technologies
Service Bulletin - Hartzell Engine Technologies
- No tags were found...

You also want an ePaper? Increase the reach of your titles
YUMPU automatically turns print PDFs into web optimized ePapers that Google loves.
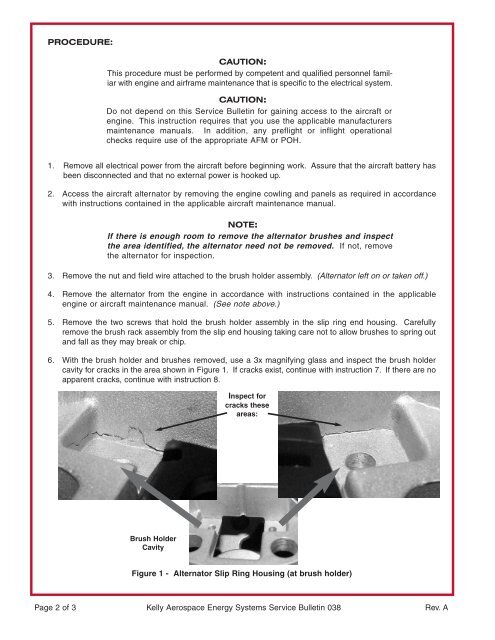
PROCEDURE:CAUTION:This procedure must be performed by competent and qualified personnel familiarwith engine and airframe maintenance that is specific to the electrical system.CAUTION:Do not depend on this <strong>Service</strong> <strong>Bulletin</strong> for gaining access to the aircraft orengine. This instruction requires that you use the applicable manufacturersmaintenance manuals. In addition, any preflight or inflight operationalchecks require use of the appropriate AFM or POH.1. Remove all electrical power from the aircraft before beginning work. Assure that the aircraft battery hasbeen disconnected and that no external power is hooked up.2. Access the aircraft alternator by removing the engine cowling and panels as required in accordancewith instructions contained in the applicable aircraft maintenance manual.NOTE:If there is enough room to remove the alternator brushes and inspectthe area identified, the alternator need not be removed. If not, removethe alternator for inspection.3. Remove the nut and field wire attached to the brush holder assembly. (Alternator left on or taken off.)4. Remove the alternator from the engine in accordance with instructions contained in the applicableengine or aircraft maintenance manual. (See note above.)5. Remove the two screws that hold the brush holder assembly in the slip ring end housing. Carefullyremove the brush rack assembly from the slip end housing taking care not to allow brushes to spring outand fall as they may break or chip.6. With the brush holder and brushes removed, use a 3x magnifying glass and inspect the brush holdercavity for cracks in the area shown in Figure 1. If cracks exist, continue with instruction 7. If there are noapparent cracks, continue with instruction 8.Inspect forcracks theseareas:Brush HolderCavityFigure 1 - Alternator Slip Ring Housing (at brush holder)Page 2 of 3 Kelly Aerospace Energy Systems <strong>Service</strong> <strong>Bulletin</strong> 038 Rev. A