Business VoiceEdge⢠User Guide - Comcast Business
Business VoiceEdge⢠User Guide - Comcast Business
Business VoiceEdge⢠User Guide - Comcast Business
- No tags were found...

Create successful ePaper yourself
Turn your PDF publications into a flip-book with our unique Google optimized e-Paper software.
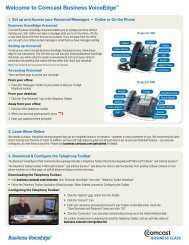
FOCUS ON YOURBUSINESS, NOTYOUR BUSINESSCOMMUNICATIONS.Welcome to <strong>Comcast</strong><strong>Business</strong> VoiceEdge
Table of ContentsWelcome to <strong>Comcast</strong> <strong>Business</strong> VoiceEdge ........................................... 5Quick Start: VoiceEdge Common Basic Features..................................... 6–8Introduction to Your Phone....................................................... 6–7Placing a Call .................................................................. 7Voicemail Set Up................................................................ 7Listening to Voicemail............................................................ 8Call Transfer................................................................... 83-Way Calling.................................................................. 8Quick Start: VoiceEdge Common Advanced Features................................ 9–12Telephony Toolbar............................................................ 9–10Speed Dial. ............................................................... 10–11Be Anywhere ...............................................................11–12VoiceEdge Mobile App .......................................................... 12Messages — On the Phone.................................................... 13–15Setting Up Voicemail............................................................ 13First Time Voicemail Activation..................................................... 13Setting Your Personalized Name.................................................... 13Accessing Voicemail............................................................ 13Managing Voicemail ............................................................ 14Using Your Voicemail Box to Forward Calls............................................ 15To Make a Call from the Voice Portal ................................................ 15Leaving Messages for Other <strong>User</strong>s in Your Group ....................................... 15Messages — Online.......................................................... 16–17Greetings. ................................................................... 17Features — On the Phone..................................................... 18–20Call Transfer without Consultation .................................................. 18Call Transfer with Consultation..................................................... 18Call Transfer Direct to Voicemail.................................................... 18Call Hold. .................................................................... 18Call Return. .................................................................. 19Call Waiting .................................................................. 19Caller ID and Caller ID with Call Waiting .............................................. 19Do Not Disturb ................................................................ 20Extension Dialing............................................................... 20Extensions — Standard Seat...................................................... 20Directed Call Pickup with Barge-In.................................................. 20Features — Online and/or Using the Telephony Toolbar............................. 21–35Downloading the Telephony Toolbar................................................. 21System Requirements to Run the Toolbar............................................. 21Using the Telephony Toolbar ...................................................... 22Services Menu................................................................ 23Be Anywhere .............................................................. 23–25Remote Office.............................................................. 26–27Click to Dial from Microsoft Outlook................................................. 27Alternate Numbers ............................................................. 27Basic Call Logs................................................................ 27Busy Lamp Field............................................................ 27–28Shared Call Appearance ......................................................... 28Multiple Call Arrangement........................................................ 28Table of Contents 2
Automatic Callback............................................................. 28Push to Talk .................................................................. 29Automatic Hold and Retrieve...................................................... 29Call Forwarding Always.......................................................... 30Call Forwarding Busy............................................................ 30Call Forwarding No Answer....................................................... 31Call Forwarding Selective. . . . . . . . . . . . . . . . . . . . . . . . . . . . . . . . . . . . . . . . . . . . . . . . . . . . . . . . . 31Sequential Ring................................................................ 32Call Notify. ................................................................... 32Distinctive Ringing.............................................................. 33Hoteling. ................................................................. 33–34Directory . ................................................................... 35Call Queue Agent .............................................................. 35<strong>Comcast</strong> Softphone.......................................................... 36–42System Requirements........................................................... 36Login. ...................................................................... 37Softphone Basics.............................................................. 38Placing a Call ................................................................. 39Answering a Call............................................................... 39Controlling Calls............................................................... 40Three-Way Calling.............................................................. 41Voicemail. ................................................................... 42Adding Video to Your Call......................................................... 42Reception Console........................................................... 43–45Launching Reception Console for the First Time........................................ 43Accessing Reception Console via Desktop Icon......................................... 43Reception Console Overview...................................................... 44Receptionist Monitored <strong>User</strong>s ..................................................... 44Managing Calls with Reception Console.............................................. 45System Requirements........................................................... 45Tech Admin................................................................. 46–55<strong>Business</strong> VoiceEdge Auto Attendant.............................................. 46–48Hunt Group — Automatically Handled ............................................ 48–50Call Pickup. .................................................................. 50On-Hold Music................................................................ 51Call Park. .................................................................... 51Call Park and Retrieve........................................................... 51Call Queue Agent ........................................................... 52–55<strong>Business</strong> Voice Continuity..................................................... 56–57Call Forwarding Not Reachable .................................................... 56Additional <strong>Business</strong> Voice Continuity Features.......................................... 57Privacy .................................................................... 58–59Caller ID Blocking per Call........................................................ 58Caller ID Blocking per Line........................................................ 58Anonymous Call Rejection........................................................ 58Barge In Block. . . . . . . . . . . . . . . . . . . . . . . . . . . . . . . . . . . . . . . . . . . . . . . . . . . . . . . . . . . . . . . . . 59Directory Privacy............................................................... 59Table of Contents 3
Billing Features ................................................................ 60Online Bill Access.............................................................. 60Block Calls to 900/976 Numbers................................................... 60Block Collect Calls and Bill to Third Party Calls......................................... 60International Calling Plans........................................................ 60More Services............................................................... 61–63<strong>Business</strong> Level Support.......................................................... 61Directory Listings .............................................................. 61Directory Assistance............................................................ 61Directory Assistance Call Completion................................................ 61Diversion Inhibitor.............................................................. 61Enhanced Directory Assistance.................................................... 61IP Phone Information............................................................ 62911 Emergency Calls......................................................... 62–63Toll Free Service............................................................... 63Help Tab and Useful Links........................................................ 63Useful Tips. ................................................................ 64–65Last Number Redial............................................................. 64Lists. ....................................................................... 64Domestic Dialing............................................................... 64International Dialing............................................................. 64Operator Services.............................................................. 64Feature Access Codes........................................................ 64–65Index. ..................................................................... 66–68Table of Contents 4
Quick Start: VoiceEdge Common Basic FeaturesGet familiar with your new <strong>Business</strong> VoiceEdge service and phones by reading this quick start section.Introduction to Your PhoneThe <strong>Business</strong> VoiceEdge service comes with Polycom ® IP Phones. Please refer to the diagrams below to getquickly introduced to the buttons and functions of popular VoiceEdge phones.Polycom 335 Series PhoneDisplayHandsetFeature ButtonsNavigation ArrowsMuteSoftkeysLine KeysHoldHeadsetSpeaker PhoneVolume KeysPolycom VVX500 Series PhoneTouchscreen DisplayHandsetDialpadMessage Waiting IndicatorHome ButtonHeadsetSpeaker PhoneMuteVolume KeysAdditional supported phones include the Polycom 670 (6-line phone) and the VVX1500 (6-line phone).For more information on these devices, please visit business.comcast.com/getstarted.Your new Polycom IP phone will operate similar to other phones for the basic functions. In addition, thePolycom IP phones use a touchscreen to display interactive features that become available as needed. <strong>User</strong>scan use the navigation arrows as well as the soft keys to help navigate through each feature. The navigationarrows will be your main tool for navigating the different setup menus while the soft keys will be used for morecall related options.Quick Start 6
Navigation ArrowsIf you are not in any Menu lists your Navigation Arrows act as a quick access tool for your recent call logs. Bypressing each of the Navigation Arrows you can access Placed calls, Missed calls, Received calls and SpeedDial. All calls are ordered in order by time stamp with the most recent appearing at the top of the list.Arrow Key▷ Right arrow▽ Down arrow◁ Left arrow△ Up arrowCall LogPlaced callsMissed callsReceived callsSpeed dialSoft KeysYour Polycom phone is equipped with a number of soft keys. The soft keys are the buttons directly below thescreen, and the display changes depending on the current call state. For example, if you are on a call, the softkeys may display transfer or conference as options. As the phone goes through different states, the soft keysprovide different options. To use a soft key, press the button below the screen that corresponds to the optionyou would like to select.Placing a CallThere are many ways to place a call — you can pick up the handset and dial, you can select the soft key for“new call”, you can hit the speaker button and dial, and more. To see a short video on time-saving tricks toplace calls, please visit business.comcast.com/getstarted.Placing calls using the number padTo place a call using your phone number pad simply pick up the handset and dial your desired telephonenumber or extension using the number pad. If you would like to use a headset or speaker phone, activate theheadset or speaker phone by pressing the appropriate button and then dial the number or extension.Dialing from Call LogsTo place a call from a number that is stored in your call logs, enter a call log of your choice by pressing thecorresponding Navigation Arrow key. Using the Navigation Arrow keys scroll up or down to highlight thenumber you wish to dial. And then, press the Dial soft key.Voicemail Set Up<strong>Comcast</strong> <strong>Business</strong> VoiceEdge voicemail enables you to manage your time without missing your calls. Callerscan leave a message while you’re on the phone, off-site, or just need phone-free time to focus on a project.If you are away from the office, you can opt to be notified via email that you have messages waiting. Voicemailis included with a Unified Communication seat, and can be added as an a la carte item to a Standard seat,Hunt Group or Auto Attendant.Activate your voicemail accountTo setup your voicemail for the first time you have to be physically present at your desk phone. For voicemailactivation:1. Press the “Messages” button on your phone or dial your extension or 10-digit telephone number.2. A tutorial will guide you through the setup of your new voicemail service.Note: You will be prompted to enter a password, which will be the “Be Anywhere/Voicemail PIN” listed on the welcome email thatcontained your VoiceEdge credentials. Should you need this information resent, please contact your Technical Administrator or callCustomer Care. Once you’re in the system, listen carefully to the recorded instructions. You will be prompted to create a password,record your name and record a customized business greeting.Quick Start 7
Listening to VoicemailWhen a voicemail has been recorded, your phone will alert you by flashing the red messages light.To listen to your voicemail:1. Push the “Messages” button on your phone.2. When prompted enter your passcode and press the key.3. Follow the prompts to listen to your messages.To access your voicemail while you are away from your desk phone:1. Dial your office telephone number.2. When your personal greeting starts, press the key.3. Enter your passcode when prompted.If you are a Unified Communications user, voicemail to email will be activated so that you will receive a copyof your voicemail delivered to your email in a WAV format file. You can then listen to this voicemail on yoursmartphone or wherever you check email. You can also manage your voicemail from within the VoiceEdgeportal, visit business.comcast.com/bveportal or see pages 16-17 of this guide for more details.Call Transfer<strong>Business</strong> VoiceEdge allows users to quickly and easily transfer callers to the appropriate party. <strong>User</strong>s have theoption to blind transfer or transfer with a consultation. Blind transfers send the caller to a coworker withoutknowledge of the call, while a consultative transfer allows the coworker to talk with the destination party priorto transferring the call.To blind transfer a call to another team member or to an off-site facility:1. Press the “Transfer” button on your phone.2. Dial the phone number or extension of the destination party.3. Press the “Transfer” button again.To transfer with consultation:1. Press the “Transfer” button on your phone.2. Dial the phone number of the destination party.3. When the second party answers, you will be speaking privately.4. When you are ready to connect all parties press the “Transfer” button once again.5. Hang up. The transfer will be complete.3-Way CallingOften it’s more efficient to get your colleagues or clients on the phone at the same time. 3-Way Calling makesit easy for multiple parties to collaborate on a call.To connect a three-party conference:1. Connect to the first party.2. Press the “Conference” button on your phone.3. Dial the second party.4. When the second party answers press the “Conference” button again.Note: VoiceEdge equipment is compatible with Polycom and other cordless headsets.Quick Start 8
Quick Start: VoiceEdge Common Advanced Features<strong>Business</strong> VoiceEdge has many advanced features that can help enhance your productivity and this section willguide you through using the most common features.Most of these features are set up and accessed through the Telephony Toolbar or the portal. You will findreference to activating features in either place.Telephony ToolbarThe Telephony Toolbar is a tool that gives you quick access to many of your <strong>Business</strong> VoiceEdge functionsand features. The Toolbar is available through an online download and installs to your browser and MicrosoftOutlook ® , Internet Explorer ® or Mozilla Firefox ® . Follow the instructions below to access and download yourtoolbar.Note: The Telephony Toolbar is a PC-only application. Please refer to page 21 for minimum PC requirements.Downloading the Telephony Toolbar• Visit business.comcast.com/bveportal, click “downloads”, then click “Toolbars” to run the exe.After you have installed the Telephony Toolbar you will notice a new menu bar in your browser, as picturedbelow.Configuring the Telephony Toolbar• Click the “Options” button from the Toolbar.• Click the “Account” icon.• Enter your username and password found in your VoiceEdge Credentials email. Should you need thisinformation resent, please contact your Technical Administrator or call Customer Care. Check the “Save<strong>User</strong>name and Password” boxes and click “OK”.• Click the “Connection” icon and confirm the following URL is in the Hosted Address field: http://bve-web.wdv.comcast.net. Also confirm that the Port Field displays 2208. Then click “Apply” and “OK”.The buttons on the Telephony Toolbar will no longer be gray and will light up. To view a short video outliningthese steps, please visit business.comcast.com/getstarted.Dialing from the Telephony ToolbarUnified Communication seats have the ability to make calls from the Telephony Toolbar and other methodsincluding Click to Dial from Microsoft Outlook and calling telephone numbers that appear on your screen.To dial from your toolbar:1. Enter the destination number into the Dial Number area of the Telephony Toolbar.2. Press Enter on your keyboard.To dial a Microsoft Outlook contact:1. In your Microsoft Outlook click on “Contacts”.2. Find the contact you wish to call.3. Right-click (or alternate mouse-click) on the contact information.4. Select “Call”.Quick Start 9
To call phone numbers on a web page:1. Highlight the number you wish to call.2. Right click.3. Select “Call”.For even more ways to call please see the self-help video about time saving tricks for placing calls atbusiness.comcast.com/getstarted.Speed Dial<strong>Business</strong> VoiceEdge includes functionality for One Digit Speed Dial or Two Digit Speed Dial. One Digit SpeedDial is used for programming up to 8 telephone numbers into your phone for quick dialing using single digits.Two Digit Speed Dial does the same as One Digit Speed Dial, only it stores up to 100 numbers and you dialthem using two digits. You can do either or both as long as you follow the appropriate set up for each.One Digit Speed DialingTo set up One Digit Speed Dialing from your phone:1. Lift the receiver and listen for the dial tone.2. Press and listen for the stutter dial tone.3. Enter a speed dial digit between 2 and 9.4. Dial the phone number you would like the digit to represent. (Remember to include the area code and anyother numbers necessary to place the call.)5. Listen for the voice prompt confirmation.6. To add the next number, repeat steps 2 through 5.To set up One Digit Speed Dialing fromyour computer:1. Log on to business.comcast.com/bveportal.2. From the Main Navigation Page, select “FeatureSettings”.3. Click “Speed Dial” from the tab of features. One DigitSpeed Dialing is listed at the top.4. Enter the appropriate phone numbers in the boxescorresponding with digits 2 through 9 and the person’sname in the Name box.5. Click “Save Changes”.To use One Digit Speed Dialing:1. Lift the receiver and listen for the dial tone.2. Press the digit (2 through 9) that represents the number you wish to call, then press .Note: Speed Dial can also be used on the Telephony Toolbar.Quick Start 10
Two Digit Speed DialingTo set up Two Digit Speed Dialing from your phone:1. Lift the receiver and listen for the dial tone.2. Press and listen for the stutter dial tone.3. Enter any two digits through 99.4. Dial the phone number you would like the digits to represent. (Remember to include the area code and anyother numbers necessary to place the call.)5. Listen for the voice prompt confirmation.6. To add the next number, repeat steps 2 through 5.To set up Two Digit Speed Dialing from your computer:1. Log on to business.comcast.com/bveportal, and select “Feature Settings” from theMain Navigation Page.2. Click “Speed Dial” from the tab of features.3. Scroll down to the “Two Digit Speed Dialing”, and select “Add New”.4. Type a name or description for the Speed Dial number in the Description text box.5. Type the phone number and the person’s name you are assigning to your Speed Dial code.6. Click “Save Changes”.To use Two Digit Speed Dialing:1. Dial and then your 2-digit speed dial number.2. Then lift the receiver / go off-hook to have the speed dial number called.Note: Speed Dial can also be used on the Telephony Toolbar.Be AnywhereThe Be Anywhere service allows you (as a Unified Communications seat user) to make and receive calls fromany device at any location with only one phone number. Be Anywhere lets you make and receive calls fromcolleagues, prospects and customers on any phone using your office number.Receiving <strong>Business</strong> Calls on Your MobileYou can receive business calls on your mobile phone by adding your mobile number to the Be AnywhereLocations List. In addition, you can also receive calls on another phone number (it does not have to be yourmobile number).To add a number to the Be Anywhere Locations List:From the Telephony ToolbarFrom the VoiceEdge Portal1. Click the “Services” button on the Telephony 1. Log on to business.comcast.com/bveportal.Toolbar.2. Select “Be Anywhere”. 2. Select “Feature Settings”.3. Click “Add”. 3. From the “Work Remote” tab, click “Add New”under “Manage Be Anywhere”.4. Enter your mobile phone number and adescription.4. Enter your mobile phone number and adescription.5. Ensure Enable is checked. 5. Click “Save Changes”.6. Select “Apply”. 6. Toggle the device “On” or “Off”.Quick Start 11
Note: You can also enable “Answer Confirmation” which requires that a human physically confirms the call prior to answering. Thisprevents a call from inadvertently hitting your mobile or other telephone voicemail instead of your work voicemail and, since youneed to press a key to answer these calls, you can then easily determine which calls are from your VoiceEdge number.Make <strong>Business</strong> Calls from Your MobileYou can make calls from your mobile phone using your <strong>Business</strong> VoiceEdge business number as the calling line ID.From your mobile, dial your Be Anywhere portal number and wait for the dial tone. Once you hear the tone,dial the destination number or business extension. The called party sees your <strong>Business</strong> VoiceEdge businessnumber (not your mobile number) as the calling line ID. Many users save the Be Anywhere portal number as afavorite or speed dial number for easy reference.Note: Your Be Anywhere portal number is displayed in the VoiceEdge portal or in the Telephony Toolbar under the Be Anywhere section.Move Call from One Phone to Another PhoneThis functionality enhances your personal productivity. For example, you may move a business call you placedthrough the Be Anywhere portal on your mobile while you are on lunch, and upon returning to the office, youmay choose to move the call to your desk phone.Move Active Call from Your Mobile to Your Desk Phone or Softphone:While engaged in a call you placed through the Be Anywhere portal via your mobile, dialfromyour desk phone or softphone. The call is seamlessly moved to the new phone and the mobile call leg is dropped.You may also move a call that was placed to your business line that you answered on your mobile phone fromBe Anywhere, using the same process as above.Note: You cannot move calls placed directly to your mobile number, since Be Anywhere and the VoiceEdge platform have no knowledge ofthe call.Move Active Call from Your Desk Phone or Softphone to Your Mobile:From your mobile, dial your Be Anywhere portal number and wait for the dial tone. Once you hear the tone,dialmanually.VoiceEdge Mobile AppThe VoiceEdge Mobile App lets you make calls from your smartphone using your VoiceEdge business number,just as if you were in your office. You can check your business voicemail, set your smartphone and otherphones as your ring to devices, change and record your voicemail greetings, see your call logs, and have easyaccess to your VoiceEdge phone directory, all from your smartphone.Following are some of the other features that the VoiceEdge Mobile App provides:• Use the keypad for extension dialing• Record and select your VoiceEdge No Answer greetings• Get notifications when you have an incoming call and new voicemail• Turn Do Not Disturb on and off for privacy• Get notified if service is set in a way that may result in missed callsFor information on how to download and use the VoiceEdge Mobile App, see our VoiceEdge Mobile AppQuick Reference <strong>Guide</strong> that is posted with other VoiceEdge training resources at business.comcast.com/getstarted.Quick Start 12
Messages — On the Phone<strong>Comcast</strong> <strong>Business</strong> VoiceEdge voicemail enables you to manage your time without missing your calls. Callerscan leave a message while you’re on the phone, off-site, or just need phone-free time to focus on a project. Ifyou are away from the office, you can opt to be notified via email that you have messages waiting.Setting Up VoicemailTo set up your new <strong>Comcast</strong> <strong>Business</strong> VoiceEdge voicemail service, follow these easy-to-use instructions.The first time you call into your <strong>Comcast</strong> <strong>Business</strong> VoiceEdge voicemail, you will be asked to create a newpassword and record your name to personalize the greeting that callers will hear when they reach yourvoicemail.Note: Each line may have its own voicemail and would need to be set up individually.First Time Voicemail ActivationFrom your office:1. Press the “Messages” button on your phone or dial your extension or 10-digit telephone number.2. A tutorial will guide you through the setup of your new voicemail service.Note: You will be prompted to enter a password, which will be the “Be Anywhere/Voicemail PIN” listed on the welcome email thatcontained your VoiceEdge credentials. Should you need this information resent, please contact your Technical Administrator or callCustomer Care. Once you’re in the system, listen carefully to the recorded instructions. You will be prompted to create a password,record your name and record a customized business greeting.Setting Your Personalized NamePress to record new Personalized Name.Press to listen to current Personalized Name.Press to delete Personalized Name.Press to return to the Main Menu.Press to repeat the Main Menu.Accessing VoicemailThere are three ways to access your voicemail:From your office:1. Press the “Messages” button on your phone or dial your 4-6 digit extension or 10-digit telephone number.From your desktop:1. Click the “Dial Voicemail” icon on the Telephony Toolbar. Or visit business.comcast.com/bveportal toaccess voicemail online.Away from your office:1. Dial your office telephone number.2. When your personal greeting starts, press .3. Enter your password when prompted.End <strong>User</strong> 13
Managing VoicemailWhen you access <strong>Comcast</strong> <strong>Business</strong> VoiceEdge voicemail by phone, you will be in the Main Menu. This menuwill prompt you with a set of options to use in managing your messages. Once you’ve made a selection fromthe Main Menu, you will hear prompts to guide you through further options. The following is a list of optionsavailable to you from the Main Menu.Main Menu options:Press to access voice messaging.Press to change password.Press to exit.Press to repeat the Main Menu.Once you’ve made a selection from the Main Menu, you will hear prompts to guide you through further options.Message options:Press to review your new messages. While playing the message you can:• Press to skip backwards 3 seconds.• Press to pause playback of a message.• Press to skip forward 3 seconds.• Press to skip to the beginning of a message.• Press to skip to the end of a message.• Press to delete the message.• Press to save the message.After you’ve listened to your new messages, you have the following options:• Press to replay the message. While playing the message you can:• Press to return to the previous message.• Press to skip to the next message.• Press to call the sender of your message.• Press to hear more options.• Press to return to the Main Menu.• Press to repeat the Main Menu.Greeting options:Press for message management options, like updating your various greeting messages. You then havethe following options:• Press for the line busy Greeting Menu.• Press for the no answer Greeting Menu.• Press for the Compose Message Menu.Note: You can also upload or record your greeting directly from the VoiceEdge portal.End <strong>User</strong> 14
Using Your Voicemail Box to Forward CallsIf you are a Unified Communications seat user, you may use your voicemail box to activate and deactivate CallForwarding options when you are out of the office or when your office phone is already in Call Forwarding mode.To activate Call Forwarding:1. Access your voicemail box.2. You will be prompted to enter your mailbox number, which is your 10-digit office telephone number.3. Enter your password when prompted.4. From the Main Menu, dial for Call Forwarding.5. Follow the prompts to activate or deactivate Call Forwarding Always to the current destination number.Note: The destination numbers can only be domestic telephone numbers; international numbers are not allowed.To Make a Call from the Voice Portal1. Enter the destination digits. While engaged in a call, press to terminate and make another call.2. Press to return to the Main Menu.Leaving Messages for Other <strong>User</strong>s in Your GroupDuring greeting:1. Press to interrupt the greeting and start recording a new voice message.2. Press to transfer out of the greeting to your voicemail box password prompt.3. Press to transfer out of the greeting to a pre-configured number.While recording message:1. Press to cancel the recording and transfer to voicemail box password prompt.2. Press to cancel the recording and transfer to a pre-configured number.3. Press to stop recording and review your message.End <strong>User</strong> 15
Messages — OnlineWith VoiceEdge, some feature management is available through the portal, and this section will go throughthose features. From the portal you can turn on and off specific features, listen to voicemail, review call logs,view your company directory and more.1. To access the VoiceEdge portal, log on tobusiness.comcast.com/bveportal.2. Sign in with your user credentials provided in theWelcome Email, and the same credentials used for theTelephony Toolbar.3. The first time you login, you will need to set yoursecurity questions for quick and easy passwordretrieval. Once the security questions are established,you will be directed to the portal dashboard.Note: Your username and password were emailed to you upon installation. Should you need this information resent, please contact<strong>Comcast</strong> Customer Care.Listen, delete or download voicemail from either the dashboard or the voicemail section of the portal. Thevoicemail section of the portal provides a more detailed view and the ability to listen to ALL your voicemessages while the dashboard contains only your most recent voice messages. To access the Voicemailsection, click the Voicemail tab from the main VoiceEdge navigation. The different tabs in the voicemailsection grants you more control over your voicemail options. You may also record or upload a new voicemailrecording through the VoiceEdge portal. Please refer to the next section for more detail.Set up atelephonenumber orextension forcallers to betransferredto when theydial 0 at yourmessagepromptSet up emailnotificationswhenvoicemailsare receivedListen,download, ordelete yourrecordedvoicemailmessagesStores deletedvoicemail untilpermanentlydeletedManage NoAnswer andBusy greetingsas well asother greetingoptionsEnd <strong>User</strong> 16
GreetingsThe platform also allows you to record and upload personal WAV files as greetings to use when people reachyour voice messaging box. You may provide alternate no answer recordings, although you can access only oneof these greetings at a time.To record or upload greetings:1. From the Voicemail Page, select the “Greetings” tab.2. If you want callers to hear a standard greeting, select “Standard Greeting”.3. To have callers hear your personalized greeting, select “Personal Greeting”.4. Click “Record Your Greeting” to record using your computer microphone.5. To upload a pre-recorded greeting, select “Upload Your Greeting”, and then browse for the appropriate file.Note: To create a WAV file using your PC requires specific settings in Windows Sound Editor. The file must be saved using u-law 8-bitmono settings. To record your greetings on your phone, please refer to the instructions on page 7 and 13. The maximum greetinglength is five minutes.End <strong>User</strong> 17
Features — On the PhoneThe features listed below are configurable through your advanced IP phone.Call Transfer without ConsultationQuickly respond to customers by transferring incoming calls to the appropriate party or to an off-site facility.To use Call Transfer without Consultation:1. Press the “Transfer” button on your phone.2. Dial the phone number or extension of your destination party. Use the “Transfer” button to designate theend of your number.Call Transfer with ConsultationAnnounce your caller to a colleague or briefly explain a caller issue to be resolved.To use Call Transfer with Consultation:1. Press the “Transfer” button. Your caller is now on hold.2. Dial the phone number or extension of your destination party.3. When the second party answers, you can speak privately before you connect to your original caller. Whenyou are ready to connect all parties, press the “Transfer” button.4. Hang up and your transfer is complete.Call Transfer Direct to VoicemailQuickly transfer the caller to a specific voicemail box.To use Call Transfer Direct to Voicemail:1. Put the call on hold.2. Dial and the phone number or extension of your destination party.3. Hang up and the incoming caller will be transferred directly to the destination voicemail box.Call HoldCall Hold enables you to quickly telephone a second number or check information while a customer is onthe line.To use Call Hold:1. Press the “Hold” button on your phone.2. Your customer is now on hold. You can dial a second number.3. To deactivate Call Hold and return to your original call, press the “Resume” button on your phone.End <strong>User</strong> 18
Call ReturnCall Return enables you to call the last party that called. To call back the last party that called, the user dials arecall feature access code. The system stores the number of the last party that called and attempts to connectthe user to that party. This service also allows the user to delete the last incoming number using a featureaccess code.To use Call Return:1. Dial from your phone. The last call received will attempt to be placed, if the number wasavailable. For example, Anonymous or Restricted callers would not have an available number to call back.2. Dial from your phone if you would like to delete the last called number.Call WaitingTake a second call without disconnecting the first. When you’re on the phone, a Call Waiting tonealerts you that you have an incoming call. Call Waiting enables you to put the first caller on hold and answerthe second call. If you’re on an important call and do not wish to answer the incoming call, you can simplycontinue talking.You can also temporarily cancel Call Waiting so that you will not be disturbed during a critical call. If youtemporarily cancel Call Waiting, incoming calls will be forwarded directly to your voicemail. Call Waiting isautomatically restored for the next call.To activate/deactivate Call Waiting online:1. Log on to business.comcast.com/bveportal.2. From the Main Navigation Page, select“Feature Settings”.3. Click on the “Privacy” tab.4. Click to toggle the Call Waiting feature “On” or“Off”, then click “Save Changes”.To use Call Waiting:1. When you hear the Call Waiting tone, press the “Hold” button or the flash hook.2. Your first call will be placed on hold. Press the “Answer” button to answer the second call.3. You can alternate the two calls as often as you’d like by using the “Resume” and “End Call” buttons.To temporarily cancel Call Waiting from your phone:1. Lift the receiver and listen for the dial tone.2. Press , then dial the party you wish to call.3. Call Waiting is canceled for the current call only.Note: Call Waiting is also available with Standard seats. Call Waiting is not available with Hunt Group.Caller ID and Caller ID with Call WaitingWhen you hear the Call Waiting tone, Caller ID with Call Waiting enables you to see the number, and whereavailable, the name of your incoming caller. If you decide you want to answer the second call, place the firstcaller on hold by using the “Hold” button, then press the “Answer” button. If you choose not to answer the call,the caller will be forwarded directly to your voicemail.End <strong>User</strong> 19
Do Not DisturbWhen the Do Not Disturb service is activated, all calls are processed as if your line is busy and cannot receivecalls. Your incoming calls will go directly to your mailbox.Note: If your line is on Do Not Disturb, Hunt Group will automatically skip over your line to the next available one.To activate/deactivate Do Not Disturb from your phone:Dial to activate and to deactivate. The system will play a confirmationannouncement before you hang up. If you have a Polycom VVX500, VVX1500, or 670 phone, you may alsouse the Do Not Disturb button to quickly activate/deactivate this feature.To activate/deactivate Do Not Disturb online:1. Log on to business.comcast.com/bveportal.2. From the Main Navigation Page, select “Feature Settings”.3. Click on the “Privacy” tab.4. Click to toggle the Do Not Disturb feature “On” or “Off”. Click the checkbox if you want to hear a splashring on your phone to remind you that the feature is active, then click “Save Changes”. Or, you can toggleDo Not Disturb on or off by using the button on the Telephony Toolbar. To play a reminder when a call isforwarded, check that box in the Telephony Toolbar services when you toggle Do Not Disturb on. It willremind you that calls are forwarded.Note: Your phone will not ring until you deactivate Do Not Disturb.Extension DialingExtension dialing speeds intra-office communications and several of the <strong>Business</strong> VoiceEdge features youwill use are enabled by extension dialing. An extension is designated as the last four to six digits of any phonenumber in your account group. Your organization will have selected whether extensions are 4, 5 or 6 digits.To place an intra-office extension call, dial the last four digits of the phone number you wish to reach. Somecustomers may have selected five or six digit dialing options, if this is the case, dial the appropriate quantity ofdigits for intra-office calling.Extensions — Standard SeatA Standard seat is a voice line without a 10-digit telephone number. Instead, it has an extension numberthat can be called from within the customer group, and is reached from the outside world through an AutoAttendant or Hunt Group (see Auto Attendant, page 46 or Hunt Group, page 48).A Standard seat includes the following services: Calling Line Identification, Call Transfer, Call Waiting and E911Support. A 10-digit number and/or a voicemail box can be added to a Standard seat as an a la carte item.Directed Call Pickup with Barge-InThe Directed Call Pickup service allows you to pick up a ringing call at a specific extension of your call pickupgroup.The Barge-In feature allows a user to join a call with a warning tone or silently. Once joined to an in-progresscall, the behavior is that of a 3-way call.When the Warning Tone is “On”, the caller hears a tone before you barge in to an ongoing call.Another attribute of Directed Call Pick-up and Barge-In is Automatic Target Selection. When the AutomaticTarget Selection is “On”, you need only dial the feature access code (no extension is required). The systemautomatically selects the ongoing call and attempts to barge in. If the system cannot automatically select acall (for example, when there are two ongoing calls), you will hear a stutter dial tone and you must enter theextension. A user with Barge-In Exempt enabled cannot have their calls joined.Note: To barge in, dial followed by the two-digit code that is assigned for this service. This code can be viewed on the FeatureAccess Code page. The default is .End <strong>User</strong> 20
Features — Online and/or Using the Telephony ToolbarDownloading the Telephony ToolbarThe <strong>Business</strong> VoiceEdge Unified Communications package includes a Toolbar that is fully integrated withMicrosoft Outlook ® and Internet Explorer ® .The Telephony Toolbar resides in Microsoft Outlook ® , Mozilla Firefox ® and Internet Explorer ® and allows forclick-to-dial functionality from existing Outlook contacts or from phone numbers on a Web page, as well asadvanced feature control and setup.See page 9 of this guide for more details.System Requirements to Run the ToolbarSoftware RequirementsCitrix PresentationServer PlatformCitrix ICA ClientWorkstation PlatformWindows 2000 with SP4 (or higher), Windows XP, Windows Vista, Windows 7 or CitrixPresentation Server 3 or 4Windows Installer 2.0Internet Explorer (IE) — 6.0, 7.0, or 8.0 (required to use the toolbar in IE)Mozilla Firefox 2.0, 3.0, 3.1, 3.5, 3.6, 4.0 (required to use the toolbar in Firefox)Outlook 2000 SP3, 2002/XP SP2, 2003, 2007, 2010 (required to use the toolbar inOutlook)32 and 64-bit Outlook & IEMicrosoft Active Directory has been tested and supported for LDAP integrationSquid Proxy Server has been tested and supported for silent upgradesThe application can be published on a Citrix server via the Management Console forMetaFrame.No additional software requirements.Note: When the toolbar is run on a 64-bit version of Windows 7 and uses a Firefox browser the <strong>User</strong> Account Control (UAC) must be setto “Never Notify.”End <strong>User</strong> 21
Using the Telephony Toolbar1 2 3 5 6 7 8 9 10 11 12 13 14 151. Connect: This button is red if you are not logged in; click to automatically log in.2. Options: Pre-configured general connection settings; where you enter login during initial setup.3. Services: Configure incoming call control features and/or voice messaging.4. Portal Login: Log on to the <strong>Business</strong> VoiceEdge portal from Internet Explorer or Firefox.5. Be Anywhere: Set up one number that rings all your phones; use the Be Anywhere voice portal to makeand place calls using your office line while you are mobile.6. Remote Office: Enable a remote location to act as your work phone.7. Call Forwarding Always: Turn on/off the ability to send calls directly to a specified phone number.8. Call Forwarding No Answer: Turn on/off the ability to forward all incoming calls to a specified phonenumber if your phone isn’t answered.9. Call Forwarding Busy: Turn on/off the ability to forward all incoming calls if you are on a call.10. Do Not Disturb: Turn on/off the ability to send calls directly to voicemail (busy greeting).11. Speed Dial: Dial from the speed dial directory.12. Call History: View missed, dialed and received calls.13. Personal Directory: Access your personal directory.14. Group Directory: Access the company-wide group directory.15. Search: Enables you to search for a previously searched user/contact directly or to specify an ad hocuser/contact query.Call Controls1 2 3 4 5 6 7 8 91. Dial Contact: Click to dial an Outlook contact’s business, home or mobile phone number.2. Dial Other: Displays the last 10 dialed numbers for quick selection.3. Answer: Answer a call.4. Hold: Place a call on hold.5. Voicemail: Dial voicemail.6. Transfer: Transfer a call to another extension.7. 3-Way: Initiate a 3-way conference call.8. End: Terminate a call.9. Call Line: When a call is placed or received, the call line selector will automatically select a call andprovide the name of the party (if available).End <strong>User</strong> 22
Services MenuAnonymous Call Rejection: Enables a user to reject calls fromanonymous parties who have explicitly restricted their CallerID. Callers without available caller ID are informed that the user is notaccepting calls at that time. The user’s phone does not ring and theuser sees or hears no indication of the attempted call.To set up the feature, click on the item and turn it “On” or “Off”.Call Forwarding Always: Enables a user to redirect all incomingcalls to another phone number. If activated, a user must specify theforwarding number.Call Forwarding No Answer: Enables a user to redirect calls toanother destination when an incoming call is not answered within aspecified number of rings.To set up the feature, click on the item and turn it “On” or “Off”. Enterthe forwarding telephone number and the number of rings before thecall should be forwarded.Call Forwarding Busy: Enables a user to redirect calls to another destination when an incoming callencounters a busy condition. If activated, a user must specify the forwarding number.To set up the feature, click on the item and turn it “On” or “Off”, then supply the forwarding number.Do Not Disturb: Allows users to set their station as unavailable so that incoming calls are given a busytreatment.To set up the feature, click on the item and turn it “On” or Off”.External Calling Line ID Delivery: Provides calling line ID information of an external caller. To set up thefeature, click on the item and turn it “On” or “Off”.Internal Calling Line ID Delivery: Provides calling line ID information of an internal caller. To set up thefeature, click on the item and turn it “On” or “Off”.Be AnywhereThe Be Anywhere service allows you (as a Unified Communications seat user) to make and receive calls fromany device at any location with only one phone number. Be Anywhere always offers colleagues, prospects andcustomers your office number, and then the platform will ring through to your mobile or home office phonewithout having to give these numbers out directly. Other benefits of Be Anywhere include:• The ability to call colleagues from your mobile using their 4-digit extension.• Move a call seamlessly from your desk to your mobile.• Move a call from your mobile to your desk phone (for calls placed via your cell phone through the BeAnywhere portal).End <strong>User</strong> 23
1. Alert all Locations for Click-to-Dial calls: The check box specifies whether Be Anywhere locationslisted should be alerted for the Click-to-Dial service. This means (when enabled) that when you place a callall of your Be Anywhere devices will ring, however you will not be able to use the auto-answer capability onyour desk phone.2. View Available Portal List: The link displays the page below, which lists the Be Anywhere portalavailable to you. Add this contact to your cell phone Contact list or as a Speed Dial for use when you wouldlike to place a call from your cell phone, but have it appear as if it is coming from your office phone.3. Be Anywhere Locations List: Allows you to add, delete or modify your Be Anywhere location phonenumbers. The phone numbers added here will ring when you receive a call to your business number.4. Advanced Options per Location: Contains a list of advanced options that can be enabled or disabledseparately for each Be Anywhere location.• Enable Diversion Inhibitor — This feature is not applicable. No need to enable.• Require Answer Confirmation — Enabling this feature requires that the user press a button on their cellphone to accept a call. By doing this, in the event there is no answer the caller returns to your businessvoicemail box, and is not dropped into your cell phone voicemail.• Use BroadWorks-based Call Control Services — This feature is not applicable. No need to enable.• Outbound Alternate Number/SIP URI — This feature is not applicable. No need to enable.Note: If you have Be Anywhere enabled, be sure to DISABLE Remote Office and/or Call Forwarding Always for the duration, as it will havea service interaction and not work as expected.Make <strong>Business</strong> Calls from Your MobileYou can make calls from your mobile phone using your <strong>Business</strong> VoiceEdge business number as the callingline ID.From your mobile, dial your Be Anywhere portal number and wait for the dial tone. Once you hear the tone,dial the destination number or business extension. The called party sees your <strong>Business</strong> VoiceEdge businessnumber (not your mobile number) as the calling line ID. Calls placed this way can also utilize the Call Pullfeature and may be moved to your desk phone using, and the instructions on the next page.End <strong>User</strong> 24
Control Your Ability to Be ReachedThe Be Anywhere solution allows you to make or receive business calls from your desk phone, mobile, orsoftphone, allowing you to be productive from any location, at any time.However, there are times when you may not want to be reached. Perhaps you are several time zones away onthe other side of the world and you do not want your daily flurry of business calls alerting your mobile.Be Anywhere allows you to activate and deactivate your ability to be reached from your phone so that on thoselong business trips, you can “deactivate” your mobile at night. This way calls to your business number do notreach you. Calls go to your other phones as always, and callers receive a standard voicemail if you do notanswer. In the morning, you simply reactivate your mobile and you start receiving calls sent to your businessnumber.Activate or Deactivate Be Anywhere Online:From the VoiceEdge portal, you can manage our Be Anywhere phones and toggle them on or off.Deactivate a Be Anywhere Phone:From the phone to be deactivated, dial .Activate a Be Anywhere Phone:From the phone to be activated, dial .Move Call from One Phone to Another PhoneThis functionality enhances your personal productivity. For example, you may move a business call you placedthrough the Be Anywhere portal on your mobile while you are on lunch, and upon returning to the office, youmay choose to move the call to your desk phone.Move Active Call from Your Mobile to Your Desk Phone or Softphone:While engaged in a call you placed through the Be Anywhere portal via your mobile, dialfrom your desk phone or softphone. The call is seamlessly moved to the new phone and the mobile call leg isdropped.You may also move a call that was placed to your business line that was answered on your cell from BeAnywhere, using the same process as above.Note: If someone dials your mobile number directly (instead of your VoiceEdge desk number that rings on your mobile device), you will notbe able to move the call, since Be Anywhere and the <strong>Business</strong> VoiceEdge platform have no knowledge of the call.Move Active Call from Your Desk Phone or Softphone to Your Mobile:From your mobile, dial your Be Anywhere portal number and wait for the dial tone. Once you hear the tone,dialmanually.End <strong>User</strong> 25
Remote OfficeThe Remote Office feature enables users to access and use their <strong>Business</strong> VoiceEdge service from any endpoint, on-net or off-net (e.g., home office, mobile phone). This service is especially useful for mobile workers,as it enables them to use all of their advanced features while working remotely (e.g., extension dialing,transfers, conference calls, Outlook Integration, directories, etc.).To set up Remote Office from the toolbar:15243Step 1: Click the “Services” button from the Toolbar.Step 2: Select “Remote Office”.Step 3: Turn the feature “On”.Step 4: Enter the telephone number to which calls shouldbe forwarded. Click “OK” when finished.Step 5: Once configured via the Services Menu, RemoteOffice can be turned “On” or “Off” via theRemote Office button on the Toolbar.Note: If you have Remote Office enabled, be sure to DISABLE Be Anywhere for the duration, as it will have a service interaction and notwork as expected.To set up Remote Office online:1. Log on to business.comcast.com/bveportal.2. From the Main Navigation Page, select “FeatureSettings”.3. Click on the “Work Remote” tab.4. Scroll down and click to toggle the Remote Officefeature “On” or “Off”, then click “Save Changes”.Outbound Dialing with Remote OfficeOutbound dialing requires access to the Telephony Toolbar. Enter the number in the Dial Contact field andhit the enter key on your keyboard. Alternately, you may click on “Telephony Toolbar” from an open contactrecord, then select the phone number of the contact you wish to dial by clicking the icon of the phone numberyou wish to dial (business, home or mobile).The Remote Office service will first dial your Remote Office line (mobile or home number), and when youanswer your Remote Office line, it will start ringing the number you entered into the Toolbar. The remotecalling party will see your office line caller ID.Note: With Remote Office, the call is placed through the VoiceEdge platform. Callers will see your VoiceEdge telephone number and thecall will be included as part of your VoiceEdge unlimited nationwide calling plan (includes U.S. Territories).End <strong>User</strong> 26
Receiving Inbound Calls with Remote OfficeAll calls to your office line will ring to your Remote Office line (mobile or home number) assigned in the Toolbar.Note: It is important to turn off Remote Office if you leave the location of the Remote Office line. Incoming calls to your business line willcontinue to ring at the Remote Office number until you turn off the feature.Click to Dial from Microsoft OutlookFrom within the Contacts Menu of Outlook, users havethe ability to click on the contact and have the contact’stelephone number dialed automatically. You may also dialfrom an open contact record by clicking on theTelephony Toolbar tab of the contact record, thenclicking on the <strong>Business</strong>, Home or Mobile icons in theupper left-hand corner of the contact record to dial therespective phone numbers.Alternate NumbersAlternate Numbers allows you to have up to ten alternate phone numbers or extensions assigned, in additionto your main phone number. A user can be reached (receive an inbound call) through any of the phonenumbers. The first number is the main or primary phone number, while the additional ten numbers are theuser’s alternate or secondary phone numbers. Each alternate phone number can be a direct inward dialingnumber (DID) or an extension. Outbound calls use the main number only.For each alternate number, the user can associate one of four ring patterns. All calls to the main number resultin the normal ring pattern. Calls to the alternate numbers result in a distinctive ring pattern that corresponds tothe number that was used.If a user is busy (and Call Waiting is enabled) an incoming call to the main number results in the usual callwaiting tone, while an incoming call to any of the alternate numbers results in a distinctive call waiting tone.<strong>Business</strong> VoiceEdge Customer Care can provision or update an Alternate Number. Once provisioned, you cansee any Alternate Numbers provisioned to your main line on the VoiceEdge portal by viewing Feature Settings,then Advanced Settings.Basic Call LogsThe Basic Call Logs service allows for you to see the 20 last missed, placed or dialed calls. The maximumnumber is 20 entries per call type. These Basic Call logs are viewable by Unified Communications seat usersin the Telephony Toolbar or on the VoiceEdge portal.Busy Lamp FieldBusy Lamp Field (BLF) enables IP attendant console phones or Reception Console to subscribe to a list ofresources (users) to monitor, and receive presence notifications on the state of the monitored resources. TheBLF service is a user service that supports the provisioning of an ordered list of monitored users.The order of monitored users corresponds to the line appearance order of the monitored user on the SIPattendant console phone.The list of available users to be monitored is determined by the users within the enterprise or group of the userwho is assigned the BLF service. The maximum number of monitored users that can be provisioned is fifty.End <strong>User</strong> 27
Busy Lamp Field ConfigurationThe Busy Lamp Field area of the portal allows a user to manage and add and remove the monitored users fordisplay on a sidecar or IP Phone.To set up Busy Lamp Field:1. Log on to business.comcast.com/bveportal.2. From the Main Navigation Page, select “FeatureSettings”.3. Click “Advanced Settings”.4. Next to Busy Lamp Field, click “Show more”.5. Check the box next to the users that you want tomonitor their status.6. Click on “Add People”.7. Click “Save”.Shared Call AppearanceThe Shared Call Appearance service allows you to provision up to 35 locations (identity/device profiles) for auser. These locations share the same line appearance, so they all behave as extensions of a single line,or user.One of these provisioned locations is the user’s primary location, while the other locations are called alternatelocations. <strong>User</strong>s can be assigned any identity/device profile for their primary and alternate locations.Note: There is a one-time set-up charge for this feature.To have a Shared Call Appearance configured, call into the <strong>Business</strong> VoiceEdge Support Center with thefollowing information:1. Which Unified Communications seat user requires the Shared Call Appearance?a. What is their telephone number?b. How many available lines does their phone have? For example, the Polycom 335 is a 2-line phone, thePolycom VVX500 is a 12-line phone, the Polycom 670 is a 6-line phone, and the VVX1500 is a 6-linephone.c. What number do you want in Position 1 (line 1) of the phone?Note: It is recommended that this be the device’s primary <strong>User</strong>.d. What telephone number do you want in position 2? Position 3, etc.?Multiple Call ArrangementThe Multiple Call Arrangement (MCA) is an overlay to the Shared Call Appearance (SCA) feature. SCA withMCA service provides the ability for multiple calls to be handled concurrently on different SCA locations for auser. No single SCA location is considered the active location, so all locations are allowed to originate calls andreceive new incoming calls when they have an available call appearance, regardless of the activity at the otherlocations.Automatic CallbackWhen enabled in the Web portal, you are prompted to activate Automatic Callback when you get a busy signalwhile calling another intra-group user. This feature will monitor and notify you with a distinctive ring when theuser becomes available.End <strong>User</strong> 28
Push to TalkPush to Talk allows people to call each other and have the phone answer automatically via the speaker phone.You can control which users call you this way through the VoiceEdge portal.To set up Push to Talk:1. Log on to business.comcast.com/bveportal.2. From the Main Navigation Page, select “FeatureSettings”.3. Click “Advanced Settings”.4. Next to Push to Talk, click “Show more”.5. Check the box next to the users that you want to callusing Push to Talk.6. Click on “Add People”.7. Click “Save”.Note: Once your Push to Talk settings are established, you can turn the feature on or off by selecting “On” or “Off”. To make a Push-to-Talk call, presson your phone, and the user’s extension for any person that has added you to their Push to Call list.Automatic Hold and RetrieveThe Automatic Hold and Retrieve service provides an alternate method to hold and retrieve calls without usingfeature access codes or flash hook.To set up Automatic Hold and Retrieve:1. Log on to business.comcast.com/bveportal.2. From the Main Navigation Page, select “FeatureSettings”.3. Click “Advanced Settings”.4. Next to Automatic Hold and Retrieve, click“Show more”.5. To turn on Automatic Hold and Retrieve, turn the switchto “On”.6. Select the number of seconds to hold, between six andsix hundred.7. Click “Save”.End <strong>User</strong> 29
Call Forwarding AlwaysCall Forwarding Always enables you to forward ALL of your incoming calls.To activate Call Forwarding Always from your phone:1. Lift the receiver and listen for the dial tone.2. Press and wait for the voice prompts.3. Dial the number to which your calls will be forwarded. You will hear a voice prompt confirmation.4. If you want to change the “forward to” number, repeat steps 1 through 3.To deactivate Call Forwarding Always from your phone:1. Lift the receiver and listen for the dial tone.2. Press . Call Forwarding Always is now turned off.Note: While Call Forwarding Always is active, you will hear a splash ring on your phone to remind you that the feature is active. You willnot be able to answer any calls on your line while Call Forwarding Always is active. To resume receiving calls on your businessline, cancel Call Forwarding Always. If you have Be Anywhere enabled, be sure to DISABLE Remote Office and/or Call ForwardingAlways for the duration, as it will have a service interaction and not work as expected.To activate/deactivate Call Forwarding Always online:1. Log on to business.comcast.com/bveportal.2. From the Main Navigation Page, select “Feature Settings”.3. Click the “Call Forwarding” tab.4. Next to Call Forwarding Always, enter the “forward to” number and select a ring reminder option.5. Toggle “On” to activate Call Forwarding of ALL calls, or “Off” to deactivate Call Forwarding.6. Click “Save”.Call Forwarding BusyWhen you’re waiting for a critical call, but still need to use your telephone, Call Forwarding Busy enables youto send all incoming calls to an alternate number when you’re using your line. Simply activate Call ForwardingBusy before making your call, or activate Call Forwarding Busy online while speaking if your call becomesunexpectedly lengthy.To activate Call Forwarding Busy from your phone:1. Pick up the phone and press .2. Dial the number to which you want to direct your call.To deactivate Call Forwarding Busy from your phone:1. Pick up the phone and press .2. Hang up. Your incoming calls may now be received normally.To activate/deactivate Call Forwarding Busy online:1. Log on to business.comcast.com/bveportal.2. From the Main Navigation Page, select “Feature Settings”.3. Click the “Call Forwarding” tab.4. Next to Call Forwarding Busy, enter the number to which incoming calls should go, click “On”,then click “Save”.End <strong>User</strong> 30
Call Forwarding No AnswerRedirect incoming calls to another telephone number when you are unable to answer. When youknow you won’t be back in time for a critical call, you can program and activate Call Forwarding No Answer toring your current location, your cell phone or a colleague.To activate Call Forwarding No Answer from your phone:1. Pick up the phone and press .2. Dial the number to which you want to direct your call. (Be sure to include any access numbers and areacodes you normally use to call this number).To deactivate Call Forwarding No Answer from your phone:1. Pick up the phone and press .2. Hang up to deactivate. Incoming calls may now be received normally.To activate/deactivate Call Forwarding No Answer online:1. Log on to business.comcast.com/bveportal.2. From the Main Navigation Page, select “Feature Settings”.3. Click the “Call Forwarding” tab.4. Next to Call Forwarding No Answer, enter the number to which incoming calls should go, click “On”,then click “Save”.Call Forwarding SelectiveForward only those calls you don’t want to miss. Call Forwarding Selective allows you to create a listof people whose calls will be forwarded to a number you designate. When you activate this feature, only callsfrom the individuals on your list will be forwarded.To activate/deactivate Call ForwardingSelective:1. Log on to business.comcast.com/bveportal.2. From the Main Navigation Page, select “FeatureSettings”.3. Click the “Call Forwarding” tab.4. Scroll down to Call Forwarding Selective, and add thenumber to which you want to forward calls.5. Toggle the number “On” or “Off”, and click “Save”.End <strong>User</strong> 31
Sequential RingSequential Ring enables you to define a “find me” list of phone numbers or URLs, which are alertedsequentially when you receive an incoming call. If an incoming call to your line is not answered within a givennumber of rings, your calling party will hear an announcement stating the system is attempting to locate you.If your last Sequential Ring number remains unanswered, your caller is sent to your voicemail.To set up Sequential Ring:1. Log on to business.comcast.com/bveportal.2. From the Main Navigation Page, select “Feature Settings”.3. Click on “Advanced Settings”.4. Next to “Sequential Ring”, click “Show More”. Check the “Ring Office Phone First” if that is yourpreference.• If the check box is selected, your base location phone rings first in the ring sequence.• If the check box is cleared, the first phone in the ring sequence rings first.5. Select the number of rings before incoming calls are redirected to your “find me” phone numbers.6. Enter your “find me” phone numbers in the order most likely to reach you first.7. Enter the number of rings before your incoming call is redirected to the next line. Check “AnswerConfirmation Required” if you want to prevent a call from being dropped into voicemail. If you select thisoption, if a human does NOT verify the call, it will move to the next number in the sequence.8. Click “Save Changes”.To deactivate Sequential Ring:1. Uncheck the “Ring Office Phone First” and uncheck the “Continue search process if Office Phone is busy”.2. Click “Save Changes”.Call NotifyThere are certain incoming calls you want to know about as soon as possible. Call Notify sends an email whenspecific calls you designate come in. You specify the pre-defined criteria such as phone number, time of theday or day of the week. Call Notify will send an email only when all of the pre-defined criteria are met.To set up Call Notify:1. Log on to business.comcast.com/bveportal.2. From the Main Navigation Page, select “FeatureSettings”.3. Click “Advanced Settings”.4. Next to Call Notify, click the to show more, andthen click “Add New”.5. Enter a title to describe the specific criteria.6. Enter the timeframe and holiday schedule.7. Enter up to 10 specific phone numbers.8. Click “Save Now”.Note: Once your Call Notify settings are established, you can turn the feature on or off by selecting either the “Notify” or “Do Not Notify”buttons.End <strong>User</strong> 32
Distinctive RingingDistinctive Ringing enables you to make your phone utilize a different ring tone based on pre-defined criteria.Use this service if you want to know when anyone from a specific company calls or any member of a group isworking on a critical project. Distinctive Ringing can be a list of up to 12 phone numbers or digit patterns aswell as a specified time schedule. All criteria for an entry must be true for the phone to ring with a differenttone (phone number plus day of the week and time of the day).To set up Distinctive Ringing:1. Log on to business.comcast.com/bveportal.2. From the Main Navigation Page, select “FeatureSettings”.3. Click “Advanced Settings”.4. Next to Distinctive Ringing, click “Show more”.5. To create a new Distinctive Ringing treatment, click“Add New”.6. Enter a Description (or name).7. Click “Use Distinctive Ring”.8. Select “Time Schedule” or “Holiday Schedule”(if applies).9. Select “Any Phone Number” or “Selected Numbers”.10. If “Selected Numbers” was selected, provide numbersthat when they call you, Distinctive Ringing treatmentwill be applied.11. Click “Save Changes”.HotelingHoteling allows users to associate their service profiles with devices other than their own. For example, yourenterprise can set up a visitor’s office with a phone. The user account associated with this phone would havethe Hoteling Host service assigned. A salesperson, with the Hoteling Guest service assigned, can associatetheir service profile with the phone in the visitor’s office for when that employee is using that phone.Hoteling consists of two separate services, Hoteling Host and Hoteling Guest. The first service, HotelingHost, is used to designate a particular user as a host and is a feature of the Unified Communications seat,allowing other users, with the Hoteling Guest service assigned, to associate their service profile with the Hostuser’s device. The second service, Hoteling Guest, is used to allow a Hoteling Guest user to associate theirservice profile with a Hoteling Host user’s device.Note: A user who is both a Hoteling Host and a Hoteling Guest cannot associate their Hoteling Guest service to themselves as a Host.Therefore, even if you are provisioned with both, Hoteling Guest and Hoteling Host services; when you as a Hoteling Guest, list allavailable Hoteling Hosts, your name does not appear in the list of available Hosts.End <strong>User</strong> 33
Hoteling Host and Hoteling GuestTo set up Hoteling Host and Hoteling Guest:1. Log on to business.comcast.com/bveportal.2 From the Main Navigation Page, click “FeatureSettings”.3. Click the “Hoteling” tab.4. To set up Hoteling Guest, turn feature “On”.5 Select time to limit association (in hours).6. Select who will be the Hoteling Host.7. To set up Hoteling Host, turn feature “On”.8. Select time to limit association (in hours).Hoteling Guest Voice Portal CommandsOnce associated, the guest can use the voice portal menu to manage services.The <strong>User</strong> — Hoteling Guest voice portal controls are as follows:Voice Portal Main Menu (If Hoteling Guest is Assigned)Default Key Option1 Access Voice Messaging2 Change CommPilot Express Profile3 Record Personalized Name4 Change Call Forwarding Options6 Make Call7 Access Hoteling8 Change Passcode9 Exit Voice Portal# Repeat MenuHoteling MenuDefault Key Option1 Check Host Status2 Associate With Host3 Dissassociate From Host4 Return to Main Menu# Repeat MenuEnd <strong>User</strong> 34
DirectoryThe Directory provides access to your company’s directory. It is available on both the dashboard and theDirectory section of the VoiceEdge portal.To find a phone number:1. Use the scroll bar to search.2. Use the alphabet to narrow by last name.3. Use the search function to search by name.Call Queue AgentThe My Queues tab enables users to join and unjoin call queues. When joined, the user will receive calls fromthe queue. If a user is assigned to multiple queues, those queues will be displayed here.To join a Call Queue:1. Log on to business.comcast.com/bveportal.2. From the Main Navigation Page, click “FeatureSettings”.3. Click the “My Queues” tab.4. Select the Call Queues that you want to receivecalls from.5. Click “Save”.End <strong>User</strong> 35
<strong>Comcast</strong> SoftphoneThe <strong>Comcast</strong> Softphone is a powerful desktop application that, when integrated with <strong>Business</strong> VoiceEdgeservice, is a feature-rich communications tool available with the Unified Communications seat. The Softphoneallows a user’s computer to act as their work telephone, whether in the office or traveling. The Softphone isideal for a remote office user or a secondary device for someone frequently on the go.System RequirementsPC RequirementsProcessorMemoryMinimum: Pentium 4 ® 2.4 GHz or equivalentOptimal: Intel Core 2 Duo or equivalent. Video card with DirectX 9.0c supportRecommended to support HD video: Intel Core 2 Duo or equivalent with minimum3.0 GHz, or a triple- or quad-core processor; Video Card with DirectX 9.0c supportMinimum: 1 GB RAMOptimal: 2 GB RAMHard Disk Space 50MBOperating System Microsoft Windows XP Service Pack 2Microsoft Windows Vista, 32-bits and 64-bits archMicrosoft Windows 7ConnectionIP network connection (broadband, LAN, wireless); Constant Internet connectionSound CardFull-duplex, 16-bit or use USB headsetMAC RequirementsMemoryHard Disk SpaceOperating SystemConnectionMinimum: 2 GB RAM100 MBMAC OS 10.5 or aboveIP network connection (broadband, LAN, wireless); Constant Internet connection2 MBps is recommended for HD Video connectionMultimedia Device RequirementsThe Softphone requires both speakers and a microphone to make calls. Any of the following configurationsare acceptable:• External speakers and microphone• Built-in speakers and microphone• Dual-jack multimedia headset• Bluetooth ® multimedia headset• USB multimedia headset• USB phoneCalls made with the Softphone will work without a video camera, but a video camera is necessary to allowother parties to see your image. The Softphone will work with most USB video cameras.End <strong>User</strong> 36
LoginInstallation and First Time Login1. Login to business.comcast.com/bveportal, and clickthe “Downloads” tab.2. Click on the link for the appropriate Softphone - eitherWindows or MAC. If the Softphone downloads do notappear on the download page, please call our supportgroup at 877-761-7401.3. Select “Run”, and select “Run” again.4. Select the language from the pull down list (English isthe default).5. Click on “Next” on the install wizard.6. Read and check your acceptance of the terms of theend user license agreement, then click “Next”.7. On the Destination Folder, accept the Destinationfolder provided:a. Select “Create a shortcut for this program on thedesktop” if you’d like an icon on desktop to launchthe program.b. Select “Launch this program when Windows starts”to have this program run every time you log intoWindows.c. Select “Create a shortcut in Quick Launch” if youwant this available in the “Start” menu.8. Select “Next” to continue installation when you have completed your selections.9. Click “Install” to begin the installation process.10. Click the “Finish” button to complete installation. Locate the Softphone on your desktop with thefollowing icon .11. The first time you login, in the username field enter your username which is your portal login withthe following appended to the username: @bve.wdv.comcast.net (For Example if your portal login is630432331 than your Softphone login will be 630432331@bve.wdv.comcast.net. Your password will bethe same as your portal password).12. In the Password field enter the password.13. To have your computer remember your username and password select “Remember login information”.14. To have your computer automatically login and launch the application, check “Log In Automatically”.15. Press the Login button.End <strong>User</strong> 37
Softphone BasicsSoftphone MenuCall PanelDial PadAdditional Panel SelectionsDetach PanelCall HistoryEnd <strong>User</strong> 38
Placing a CallThere are many ways to place calls using the Softphone.Method Where InstructionsDial a Number Call Panel Dial Pad 1. If the Dial pad isn’t visible, press “Show or Hide Dialpad” button to view dial pad .2. Use the Dial pad to enter in the extension or the tendigit number and press the call button.Key in a Number Call Panel 1. Type in a number using your keyboard and press“Enter”.2. To make a video call select the call options in the callbutton.Drag and Drop aContactAddress Book Contacts,History and FavoritesDrag an entry from the address book tab into the callpanel and the call shall be placed immediately.Double Click a Contact Addres Book Contacts 1. Double-click on the name to immediately place a call inthese tabs.2. Alternately, right click and select video or audio callfrom the menu.Click a Number Call History, Group Directory Click the underlined number to immediately place a call.Placing a Concurrent CallIf you want to place a concurrent call while you have an active call, just dial another number and the first callwill be put on hold and the new call will dial out.Ending a CallPress the red “End Call” button on the call panel.Answering a CallThe Softphone must be running to answer incoming calls. When the Softphone rings a box alerts you of anincoming call, with this box you can accept to answer or decline the call. Declining the call will treat the calllike an unanswered call (for example it will send the call to voicemail if you have a voice mailbox).Auto AnswerIf you select Auto Answer from the More Call Options Menu then the Softphone will automatically answer andconnect you to any incoming calls. An icon will appear on your Softphone under the More Call Options menuthat looks like this:More Call Options MenuThe auto answer feature is automatically turned off when you shut down or log off, you’ll need to manually turnit back on each time you log back in.End <strong>User</strong> 39
Controlling CallsRaise or Lower VolumeClick on the volume icon on the active call and either drag the volume up or down or use the arrows on yourkeyboard.Mute the CallClick on the microphone icon to mute your voice on the call.Turn On/Off The SpeakerphoneIf your computer is equipped with a speaker phone, click the speaker icon to turn on or off.Hold callTo hold a call click the “Hold” button, the call information will then be minimized within the Softphone, tounhold the call click “Resume.”Add a ContactClick the yellow plus sign next to the active calling party’s name to add them to your contact list. A dialog boxwill appear to allow you to add additional information.Transfer a CallClick on the call transfer button to transfer a call. Clicking on this icon will put the caller on hold and changethe window to allow you to enter in the party to transfer. There is a box to enter in a phone number or drag acontact into the box.Note: Click to dial in your group directory will not work as a transfer address, you’ll need to enter in the number in the transfer box.Consultative TransferClick the “Call First” button when the call is connected and you will be able to tell the person who you aretransferring to who the party is you are transferring. When you are ready to transfer the call then hit the“Transfer Now” button and the two parties will be speaking.Note: Your calling line ID will be delivered to the party you are transferring to. Press “Cancel” to stop the transfer and then you canreconnect with the original party.Blind TransferA blind transfer will allow you to transfer the call to the other party without speaking to that party first.The calling line ID information will show up as the transferred party when you use this capability. Click the“Transfer” button as described above and populate the number you are transferring to. Click the arrow next tothe green box that is populated as call first and select Transfer Now, which will automatically send the call andend your call with the transferred party.End <strong>User</strong> 40
Three-Way CallingTo add another caller onto an existing call for a three-way call, in the bottom right corner click the arrow andselect “Invite to Conference Call”.A dial box will show up where you can either drag a contact to the box or type in the number.When your three-party call is established your Softphone will show Conference Call: 3 Participants and listthose whom are on the call in the active call window.Merging Two Active CallsIf you have two active calls (with one on hold) use the call options in the lower right hand corner and selectmerge calls, and it will allow you to merge the two active parties into a three-way call.Splitting a Three-Way CallClick the arrow next to any participant and it will allow you to split the call or end the call with both parties.Upon splitting, one party will be active and the other will be on hold.End <strong>User</strong> 41
VoicemailIf your service includes voicemail, then when you have voicemail messages, an envelope icon will appearnear the top of your Softphone and will indicate the number of voice messages you have. Click the icon toautomatically connect to voicemail to listen to your messages.Note: To enter in your passcode for the voicemail system you must click in the call status window prior to entering in your passcode.Adding Video to Your CallEither you or the other party can add video to your active call at any time during the call. To add video click the“Start Sending Your Video” button. This will send your video to the other party (if they have video capability). Avideo panel will open and show the video being sent in the corner and if the other party is sending video theywill be in the larger image. The video panel is separate from the Softphone panel.Pausing and Resuming VideoTo pause or resume video, click the camera icon to stop sending your video.End <strong>User</strong> 42
Reception ConsoleThe Reception Console is a software based platform that allows your receptionist or office manager tomanage calls with ease. This is an additional service that is provided in conjunction with <strong>Business</strong> VoiceEdge.This section includes information to get started with the Reception Console tool. For more detailedinformation, please also download the Reception Console user guide at business.comcast.com/getstarted.Launching Reception Console for the First TimeThe Reception Console is launched directly from the portal; therefore, there is no need to distribute theapplication for installation on end-users’ PC. When initially launched, a desktop icon as pictured below, iscreated for convenient access to the application.1. Log in to the portal account associated with the Reception Console software. Typically, this is the accountof the main line or reception end user, and you will use the same user credentials provided in the WelcomeLetter for that user.2. From the Main Navigation Page, click on “Downloads” and then the Reception Console. Reception Consolewill start and you are automatically logged in.Accessing Reception Console via Desktop IconAfter the initial launch, you will have a Reception Console icon on your desktop. You can access the ReceptionConsole by double-clicking the shortcut on your desktop or by selecting it from the Start menu.1. Click the Reception Console shortcut. Reception Console starts and you are presented with the followinglogin interface:2. Enter your username and password.Note: You can also select the Remember Me (or Forget Me) and the Remember my Password options so that your username andpassword are remembered on your computer, and therefore you will be auto-logged in.3. Click “Sign In”.End <strong>User</strong> 43
Reception Console Overview12 34567The Reception Console interface contains the following work areas:1. Switchboard panel2. Company Notes and Profile area3. Queue panel4. Contact Directory panel5. Alphabetical Index filter6. Options panel7. Control panelReceptionist Monitored <strong>User</strong>sTo select the users to monitor their phone status on the Reception Console, use the process below.To set up Receptionist Monitored <strong>User</strong>s:1. Log on to business.comcast.com/bveportal.2. From the Main Navigation Page, select “FeatureSettings”.3. Click “Advanced Settings”.4. Next to Receptionist Monitored <strong>User</strong>s, click“Show more”.5. Check the box next to the users that you want tomonitor their status.6. Click on “Add People”.7. Click “Save”.End <strong>User</strong> 44
Managing Calls with Reception ConsoleYou manage calls using a combination of the panels in a top to bottom workflow style. You should be able todistribute calls using this workflow for most of the common activities.For more information about the user interface please see the full Reception Console user guide atbusiness.comcast.com/getstarted.System RequirementsProcessorMemoryHard Disk SpaceAdditionalRecommendationsSoftware RequirementsMinimum: Pentium 3 ® 1.2 GHz or higher or compatible CPUMinimum: 512 MB of RAM60MBVideo graphics card with minimum of 8 MB of RAMSuper VGA monitor (15 inches or larger)800 x 600 screen resolution minimumWindows 2000 with SP4 (or higher), Windows XP, or Windows VistaSun Microsystems 32-bit Java Runtime Edition, Version 6 Update 23, or laterOutlook 2000 SP3, 2002/XP SP2, 2003, 2007 (required for Outlook contact directory)Microsoft Excel (Optional)Flash Player 9 Runtime (ActiveX Control)Note: Reception Console is compatible with Java version 6, and may have issues prior to Java version 7 update 11.End <strong>User</strong> 45
Tech Admin<strong>Business</strong> VoiceEdge gives Tech Administrators the ability to manage and designate group level features suchas Auto Attendants, Hunt Groups, and On-Hold Music. The Tech Admin also can change feature settings ofusers of the group he/she manages, which is useful in helping an individual troubleshoot issues with theirservice.Note: The tech admin level is set up during the provisioning process. If you need to change the access/permission rights of an employee,contact Customer Care.<strong>Business</strong> VoiceEdge Auto AttendantAuto Attendant ensures that incoming calls receive prompt, consistent and professional treatment.Customers route themselves via menu prompts directly to the specific information or department they seek.Auto Attendants can provide information frequently asked for like hours of operation, make sales and daily“specials” announcements or give detailed directions to your location.Auto Attendant gives your company the “Big <strong>Business</strong>” sound of multiple departments with a receptionist orfrees your receptionist for other duties.Note: There is a monthly charge for this feature.Auto Attendant Options can be routed to internal company telephone numbers, cellular telephone numbersand other external numbers, voicemail boxes and Hunt Groups.Incoming callOption 1Option 2Option 3Option 4Option 5Customer Service Hunt GroupExt. 317303-555-1234Ext. 525Event Planning Auto AttendantAgent 1Agent 2Agent 3Option 1Option 2Option 3Option 4‘Press 1 for Corporate Events’‘Press 2 for Event Billing’Etc.Etc.Note: Auto Attendants have the ability to provide nine (9) different locations for calls to go. If you require more than nine options, you mayneed to purchase additional Auto Attendants to create a stacked or tiered Auto Attendant.Tech Admin 46
On the VoiceEdge portal, you can easily program, change greetings or manage Auto Attendant timeschedules. To navigate to Auto Attendant settings when logged in as an administrator, select Group Accountat the top of your screen and then select Auto Attendant.Greetings and Keypad SetupThe Auto Attendant has a standard greeting, but we advise you record your own greeting to announce yourcompany name and tell your callers what their options are.To change or update your Auto AttendantGreeting:1. Select either the “<strong>Business</strong> Hours” or “After Hours”greeting to change that greeting. To use the standardgreeting select “Standard Greeting”.2. To record your own greeting:a. Select “Personal Greeting”.b. Press the “Record Greeting” icon.c. Press the “Record” button.d. Record using the microphone on your computer.e. Press the “Record” button again to stop recording.f. Use the “Play” button to review.g. Press the “Save Changes” button.3. To Upload your own greeting:a. Select “Personal Greeting”.b. Press the “Upload” icon.c. Press the “Browse” button.d. Browse to the WAV file you wish to upload.e. Press “Save” when selected.Auto Attendant greetings can also be managed via the voice portal. To do so, hit messages on your phone andlogin using the “Be Anywhere /Voicemail Group PIN” provided in the technical administrator’s credentials.Tech Admin 47
To change your Auto Attendant routing options:1. Select either the “<strong>Business</strong> Hours” or “After Hours” section.2. For each number that has a function, write a description for the action when a user presses the key.3. For each number and *, # that has a function select the appropriate option. (Note: Not all numbers have tobe used).4. For transfer options, you must enter in an extension or 10-digit phone number to route the call to theappropriate number.5. For transfer options enter in an extension or telephone number to transfer to. Note: To transfer directly tovoicemail use the Feature Access Code *55 before the extension in the box provided.6. Press “Save Changes” when finished.Below is the list of prompt options, the message the caller hears, and a description of the action the platformtakes.Description Key Prompt Played To Caller Description Of What HappensTransfer to Operator “Please wait while your call isEnds with the message “Your call cannot betransferred to the operator”transferred, please try again later”Transfer with Prompt“Please wait while your call istransferred”Ends with the message “Your call cannot betransferred, please try again later”Transfer without Prompt None Ends with the message “Your call cannot betransferred, please try again later”Name Dialing None Access to name dialing. First or Last NameExtension Dialing None Access to extension dialingExit “Thank you for calling” Call is releasedRepeat Menu None Menu greeting is replayedHunt Group — Automatically HandledA busy signal is an opportunity lost. But with Hunt Group, when an incoming call reaches a busy signal, thecall is automatically routed to the next open line. Hunt Group allows incoming calls to ring a group of users in aspecific pattern.When you place your <strong>Business</strong> VoiceEdge order for multiple lines, Hunt Group will be set up to ensure swiftand timely answers to all your customer calls.Note: A Hunt Group is an INCLUDED feature of each <strong>Business</strong> VoiceEdge seat you purchase. If you require more Hunt Groups you maypurchase additional Hunt Groups for a monthly charge.As a Tech Admin you can change your hunt group call routing type and manage the users in your various huntgroups through the Hunt Group settings on the VoiceEdge portal. To navigate to the hunt group settings pagewhen logged in as an administrator navigate to Group Account at top of the screen and select Hunt Group.Tech Admin 48
Hunt Group Routing Types and Settings:1. Enter or edit the hunt group name so that is easily identifiable, such as “Sales” or “Customer Service”.2. Enter in the Hunt Group Call Line ID First Name and Last Name.3. Select the language of the hunt group for the standard greeting and prompts.4. Select the time zone of the hunt group.5. Select Hunt Group Type from the following options:RegularRings each user in the order theyappear on the <strong>User</strong> ListIncoming call<strong>User</strong> 1 <strong>User</strong> 2 <strong>User</strong> 3 <strong>User</strong> 4SimultaneousRings all users at onceIncoming call<strong>User</strong> 1 <strong>User</strong> 2 <strong>User</strong> 3 <strong>User</strong> 4CircularNotes the last user to answer acall then rings the next user onthe <strong>User</strong> ListIncoming call<strong>User</strong> 1 <strong>User</strong> 2 <strong>User</strong> 3 <strong>User</strong> 4UniformRings the user that has been idlethe longestIncoming call<strong>User</strong> 1 <strong>User</strong> 2 <strong>User</strong> 3 <strong>User</strong> 46. Select “Enable Call Waiting For Hunt Group <strong>User</strong>s” if you want the hunt group to route calls regardless ifthat user is on another call.7. Press the “Save” button when complete.The name of the Hunt Group is passed to users along with the Caller ID number so they know what type of callis incoming (e.g., “Sales Group” or “Customer Care Group”).Note: One Hunt Group is included with each seat purchased. Additional Hunt Groups are available for a monthly charge.Tech Admin 49
Managing Hunt Group <strong>User</strong>sTo add a user to a Hunt Group:1. Select the user(s) in the Directory Box.2. Click on “Add People”.3. Click “Save”.To remove a Hunt Group user:1. Check the names of the users in the Hunt Group <strong>User</strong>sbox.2. Click on “Remove <strong>User</strong>s”.3. Click “Save” to complete.No Answer SettingsThese settings will define how calls that aren’t picked up by a hunt group participant are treated.1. Click “Skip to the Next Agent” and select rings to define how long the hunt group shall try to reach eachparticipant.2. Click “Forward Call after waiting” and enter in between 0-7200 seconds to minimize the time a caller isrouted in the hunt group.3. Enter in an Extension or Telephone number for forward calls to after the waiting period has expired.4. Click “Save” to complete.Directory Number HuntingThis service allows users in the group to be called directly. When assigned to a Directory Number Huntinggroup, except for the Be Anywhere policy, the call is handled by the existing Hunt Group policies and the calleduser, if unavailable, is skipped. For the Be Anywhere policy, an unavailable agent is not skipped.Note: A member of a Hunt Group can be assigned to only one Directory Hunting Group in the system.Call PickupCall Pickup allows users to answer any ringing line within their call-pickup group. A call pickup group isdefined by your site administrator and is a subset of the users in your group and configured by <strong>Comcast</strong>VoiceEdge Customer Care.To pick up a ringing call coming to another user of the group, users go off-hook and dial the Call Pickupfeature access code, which connects them to the ringing party. If more than one line in the call pickup groupis ringing, the call that has been ringing the longest is picked up. <strong>User</strong>s already engaged in a two-way call canflash the switch hook to put the other party on hold and dial the Call Pickup feature access code to answer anincoming call to the call pickup group. <strong>User</strong>s then flash the switch hook to toggle between the two parties. TheCall Park and Directed Call Pickup feature enhances the Call Pickup service so that its scope encompasses anenterprise as opposed to being restricted to a group.Note: A single group can have multiple Call Pickup groups defined simultaneously, but a given user can only belong to a single CallPickup group.Tech Admin 50
On-Hold Music<strong>Comcast</strong> <strong>Business</strong> VoiceEdge enables a generic music stream for people to hear when on hold. As a technicaladministrator, you can manage on-hold music in the VoiceEdge portal. The On-Hold Music section allows youto upload your own music to play while customers are on hold and to define when on hold music should beplayed. Note: You are responsible for appropriate music licensing for on-hold music.To navigate to the On-Hold Music settings page, login as an administrator and navigate to Group Account,then select Advanced Settings and then the On-Hold Music tab.To add a Custom On-Hold Music File:1. Click on the “Upload Your On-Hold Music File”.2. Use the browser to find the file to upload.3. Once file is selected using the dialog box press Open.The audio file must have the following attributes:• May not be longer than 10 minutes.• The WAV file must be saved using u-law 8-bit monosettings. This can be done using Windows soundeditor, or other audio editing software.Options to select On-Hold Music include:a. Click “Play Custom Music File” to play a file that has been uploaded.b. Click “Play System Default” to play the system defined on-hold music.Call ParkCall Park is the ability to place a call on hold and retrieve it in another location. A call can be parked to a singledestination or to a group.To have Call Park configured you need to collect the following information prior to calling Customer Care:1. What would you like to name your Call Park Group?2. Which seat or group of seats (users) would you like to have as a part of this Call Park Group?3. What would you like the recall timer set to? The value needs to be in seconds. When the Call Park RecallTimer expires, the call is recalled to the person that parked it. The Recall Timer option has a range from 30through 600 seconds. The default is “45 seconds”.Call Park and RetrievePlace a call on hold with the intent of retrieving it from another extension or location. The call can be parkedon your own extension or any other within an enterprise group. As a user on the platform, you may place a callon park using *68 flash/star code. Use *88 to retrieve the parked call from a different location.For example:1. <strong>User</strong> A is talking to <strong>User</strong> B.2. <strong>User</strong> A flashes to originate another call and dials the Call Park FAC (*68).3. <strong>User</strong> A parks <strong>User</strong> B against <strong>User</strong> X’s phone by dialing <strong>User</strong> X’s phone number.4. <strong>User</strong> C retrieves <strong>User</strong> B by dialing the Call Park Retrieve FAC (*88) and <strong>User</strong> X’s phone number.5. <strong>User</strong> C is now talking to <strong>User</strong> B.Tech Admin 51
Call Queue AgentCall queues are used to temporarily hold calls in the cloud when all users assigned to receive calls from thequeue are unavailable. Queued calls are routed to an available agent when he or she is no longer on an activecall. These queues include greeting and message options that play to callers as they wait in queue.Each call queue can be assigned a unique phone number, which outside callers can dial to reach the agentsassigned to the call queue. Call queues are also assigned an extension which internal callers can dial to reachagents in the call queue.Setting up Call Queues requires the completion of 4 steps:1. Configuring the call queue settings.2. Assigning agents.3. Configuring the call flow for the queue.4. Assigning greetings and messages to the queue.To modify your call queue settings go to business.comcast.com/bveportal.Then enter your assigned administrator user name and password and click “Sign In”. Then click “GroupAccount”.If you are an administrator that is managing multiple locations, select your location from the drop-down menu.Then click “Call Queue”.All call queues that have been assigned to this location are displayed in the drop-down menu. Select the CallQueue to modify.Configuring Call Queue SettingsStart by configuring the call queue settings.1. Enter a name for the call queue. For example, MainLine Queue.2. Select your time zone from the drop-down menu.3. Select the call queue policy. This determines the orderin which calls are presented to available agents. Thereare five options to choose from.• Circular: If this option is selected, queued calls are sent to user following the last user to receive a call.When the end of the list is reached, the hunting circles back to the first user in the list. The hunting endswhen an idle user is found or all the users have been visited.• Regular: If this option is selected, the phones ring one at a time, always starting with the same userand ringing in the same order. The user configured at the top of the Selected Call Queue Agent List ringsfirst, followed by the users listed beneath, in sequential order.• Simultaneous: If this option is selected, all phones ring the agents in the queue at the same time.Once a user has answered the call, all other phones stop alerting.• Uniform: If this option is selected, the call is sent to the user who has been idle (specifically, has nottaken a queued call) the longest. If that user doesn’t answer, the call is sent based on who has been idlethe longest in the call queue.• Weighted: If this option is selected, calls are sent to agents based on an assigned percentage. Thesepercentages are assigned in the ‘Assigning Agents’ page.4. Click “Save” to save your changes and “Next” to advance to the next page.Tech Admin 52
Assigning Agents to Call Queues<strong>User</strong>s that have been assigned the Call Queue feature are listed in the ‘Available Call Queue Agents’ list.To add an agent to the call queue, check the box next to theagent or agents, and click the “Add People” button.To remove agents from the call queue, select the agent toremove and click the “Remove People” button.To change the order of the agents, use the “Move up” or“Move down” buttons.If you have selected the Weighted Call Queue Policy, you can assign percentages to agents here. For example,if Andrew is to receive 90% of the calls and the Receptionist is to receive the other 10%, you would enterthose weights here.Note: The percentages must total 100%. Agents that are assigned a 0% weight only receive calls if all other agents are on a call.Scroll down to modify your Call Waiting preference. If call waiting is enabled, then calls are sent to agentseven if they are already on the phone.If you would like to allow agents to join or removethemselves from this queue, click “Allow Agents to Join CallQueue”. Agents can perform this function by logging in tothe portal and making their ‘join’ selection.Click “Save” to save your changes and “Next” to advance to the next page.Note: If an agent is not joined to a call queue they will not receive any queued calls.Configuring the Call Flow for the QueueThe call flow configuration page allows you to configure rules for routing calls during particular situations.The first setting is the size of the queue. This determineshow many callers can be in the queue before those calls getrouted to another destination. Make a selection from thedrop down menu. If you select 15, the 16th caller is routedto the overflow treatment destination. We will be coveringthe overflow treatment settings below.Next, enable or disable Call Forwarding Busy. Then enter the number or extension you want to forward callsto. This feature is used if the overflow policy is set to ‘Perform Busy Treatment’.To play the ringing tone to the caller when the call is being offered to an agent, select “Play Ringing WhenOffering a Call”.Now, configure the overflow policy. This determines where callers are routed when the queue size limit isexceeded or the queue timer is reached.The Queue Timer setting is configured here. Check this boxif you want to send callers to the overflow destination afterthey have been in queue for a specific number of seconds.Select the number of seconds from the drop down menu.Next, select the Perform Busy Treatment option if youwould like callers to be routed to the Call Forwarding Busydestination that was configured above.To route callers to another destination, such as another extension or an external ten digit phone number, click“On” and enter the destination.Tech Admin 53
To configure your overflow policy to play ringing to callers until they hang up, select that option.Optionally, you can allow callers to press a configured digit if they wish to escape from the call queue andleave a voicemail message. To enable this functionality for callers, turn on “Escape From Queue”. Then enterthe digit that callers press to escape from the queue. This can be zero through nine, star or pound.Finally, you can choose to preserve the callers wait time. This setting is applied if overflow calls are routed toanother call queue. When enabled, those callers retain their wait time when they move to the next call queue.Click “Save” to save your changes and “Next” to advance to the next page.Assigning Greetings and Messages to the QueueEach call queue includes options for assigning 3 unique greeting files to the call queue – an entrance greeting,a comfort message and music on hold. These are audio files that callers hear when they reach the queue.These can be customized for your business and uploaded from this page.The first greeting file to configure is the EntranceGreeting. If enabled, callers that reach the call queue hearthis message before they hear the comfort greeting andmusic on hold. To enable this greeting, click “On”. To usethe default greeting option click “Standard”.To customize the entrance greeting, click “Custom”. Fromhere, you can either record your greeting from the webportal or upload a prerecorded file.To record your greeting from the web portal, click the “Record Your Greeting” link. If prompted, click “Allow”then “Close” to enable the Adobe Flash setting that allows you to record from your computer.Then click the “Microphone” button to begin recording. Click it again to stop recording. Click “OK”.To listen to your greeting, click the “Play” button.To upload a prerecorded greeting, click the “Upload your Greeting” link.Note: You must have your greeting file saved in C.C.I.T.T. u-law settings with eight kilohertz, eight bit-mono attributes as a WAV file. Tosave a recording in this format, you may need to use a basic sound recorder.Once you have saved your file in the proper format, click “Browse” and find the file on your computer. Thenclick “Open” to upload the file. Click “Save” to save your changes.Next configure your Comfort Message. This is themessage callers hear after the entrance message, butbefore the music on hold. To enable this message, click“On”.To use the default comfort message, click “On”.To customize the comfort message, click “Custom”. Fromhere, you can either record your greeting from the webportal or upload a prerecorded file.To record your message from the web portal, click the “Record Your Greeting” link. If prompted, click “Allow”then “Close” to enable the Adobe Flash setting that allows you to record from your computer.Then click the “Microphone” button to begin recording. Click it again to stop recording. Click “OK”.To listen to your greeting, click the “Play” button.To upload a prerecorded message, click the “Upload your Greeting” link.Note: You must have your message file saved in C.C.I.T.T. u-law settings with eight kilohertz, eight bit-mono attributes as a WAV file. Tosave a recording in this format, you may need to use a basic sound recorder.Tech Admin 54
Once you have saved your file in the proper format, click “Browse” and find the file on your computer. Thenclick “Open” to upload the file.Next, configure the time between messages. This is the time that the music on hold (if enabled) plays beforethe comfort message repeats. Enter the number, in seconds. Then click “Save” to save your changes.Next configure your Music On Hold settings. Music onhold is the audio file callers hear after the comfortmessage. To enable music on hold, click “On”.To use the default music on hold file, click “Standard”.To customize the music on hold, click “Custom”. Then clickthe “Upload Your Greeting” link.Note: You must have your music on hold file saved in C.C.I.T.T. u-law settings with eight kilohertz, eight bit-mono attributes as a WAV file.To save a recording in this format, you may need to use a basic sound recorder.Once you have saved your file in the proper format, click” Browse” and find the file on your computer. Thenclick “Open” to upload the file. Click “Save” to save your changes and “Done” to complete the configuration ofyour call queue.Tech Admin 55
<strong>Business</strong> Voice Continuity<strong>Business</strong> VoiceEdge has many user-level features that ensure <strong>Business</strong> Continuity. Technical Administratorsmay want to ensure that users understand these features and how they may impact a broader <strong>Business</strong>Continuity plan.Note: These are user level features that can be controlled by the individual users.Call Forwarding Not ReachableThere are several features that ensure your business voice continuity. The most important of these featuresis Call Forwarding Not Reachable. With Call Forwarding Not Reachable, your incoming phone calls areautomatically routed to a pre-determined destination in the event of power outages, broadband outages,device outages or natural disasters causing outages. No human intervention is needed. The service is set upduring the provisioning of your VoiceEdge service. However, users can change the settings at any time.Note: The forwarding phone number must be permitted by your outgoing calling plan.You can activate or change the phone number for this feature on the VoiceEdge portal, or by using FeatureAccess Codes on your device.To activate or change Call Forwarding NotReachable online:1. Log on to business.comcast.com/bveportal.2. From the Main Navigation Page, click “FeatureSettings”.3. Select “Call Forwarding” to display the forwardingoptions, and scroll to Call Forwarding Not Reachable.4. Enter or change the telephone number that you wantcalls routed to in the case of your business line notbeing reachable. This could be a cell phone, a homephone or an alternate business location.5. Click “Save”.6. Call Forwarding Not Reachable has now been updated. All incoming calls will be routed to the number youentered if your phone device should become unreachable.Feature Access Code activation of Call Forwarding Not Reachable:1. Lift the receiver and listen for the dial tone.2. Press .3. A menu of options will guide you in managing this feature. The prompts will enable you to activate anddeactivate the feature as well as add and delete the numbers on your list.To deactivate Call Forwarding Not Reachable:1. Lift the receiver and listen for the dial tone.2. Press .3. When prompted, press to turn the feature off.Note: When entering the “forward to” number, remember to dial 1 and/or the area code before the number if it’s necessary to place thecall. When creating your list, enter the area code plus the 7-digit number for both local and long-distance numbers.<strong>Business</strong> Voice Continuity 56
Additional <strong>Business</strong> Voice Continuity FeaturesIn addition to Call Forwarding Not Reachable, there are several other features that help ensure your businessvoice continuity. Options may include:For <strong>User</strong>s with Voicemail:• Voicemail to Email Integration: Receive voice messages in your email inbox on your computer orhandheld device as a WAV file.• Message Notification: Receive a short email message informing you that a message has been left, withthe date and time the message was sent.For Unified Communications Seat <strong>User</strong>s:• Call Forwarding Selective: Automatically forward calls based on incoming call number, time of day orday of the week.• Call Notify: Send an email with the caller’s name and number to a specified email address whenpredefined criteria such as phone number, time of day or day of the week are met.• Be Anywhere: If your main line, hunt groups or first responders are not answered by a set number ofrings, ring alternate numbers simultaneously to ensure calls are not missed.• Sequential Ring: If your main line, hunt groups or first responders are not answered by a set number ofrings, ring alternate numbers sequentially to ensure calls are not missed.To manage these features through the VoiceEdge portal, log on to business.comcast.com/bveportal.<strong>Business</strong> Voice Continuity 57
PrivacyCaller ID Blocking per CallYou control when your business name and number appear on Caller ID. Caller ID Blocking enablesyou to block your business name and number from appearing on select calls you place. You may also want toemploy Caller ID Blocking per Line so that EVERY call from a specific line is anonymous.To use Caller ID Blocking per Call:To ensure your business name and number are marked “Private” or “Anonymous” on select calls:1. Lift the receiver and listen for the dial tone.2. Press .3. When you hear a second dial tone, dial the number you wish to call.4. Your business name and number will be blocked for the current call only.Note: Caller ID Blocking per Call may not be available on some calls, including calls to 911.Caller ID Blocking per LineCaller ID Blocking per Line ensures that your business name and number are marked “Private” or“Anonymous” on ALL outgoing calls on a specific line. Some clients and businesses may reject incomingcalls that are marked “Private” or “Anonymous”, and, in these instances, you can temporarily cancel CallerID Blocking per Line to enable you to call those numbers. Your Caller ID Blocking per Line function isautomatically restored for the next call.To activate/deactivate Caller ID Blocking:1. Log on to business.comcast.com/bveportal.2. From the Main Navigation Page, click “FeatureSettings”.3. Click the “Privacy” tab.4. Click to toggle Caller ID Blocking “On” or “Off”.To cancel Caller ID Blocking per Line from your phone:1. Lift the receiver and listen for the dial tone.2. Press .3. When you hear a second dial tone, dial the number you want to call.4. Your business name and number will appear on your party’s Caller ID display for this call only.Anonymous Call RejectionAnonymous Rejection announces to callers who block the display of their name and number that you are notaccepting anonymous calls and instructs them to unblock their information and dial you again.To activate/deactivate Anonymous Rejection:1. Log on to business.comcast.com/bveportal.2. From the Main Navigation Page, click “Feature Settings”.3. Click the “Privacy” tab.4. Click to toggle Anonymous Call Rejection “On” or “Off”.XXXX Privacy 58
Barge In BlockBarge In Block allows you to prohibit others from interrupting your conversations by entering your calls.To activate/deactivate Barge In Block:1. Log on to business.comcast.com/bveportal.2. From the Main Navigation Page, click “Feature Settings”.3. Click the “Privacy” tab.4. Click to toggle Barge In Block “On” or “Off”.Directory PrivacyTurning on Directory Privacy will exclude your name and number and other contact information from thecompany directory which can be accessed through the user portal, toolbar and softphone.To activate/deactivate Directory Privacy:1. Log on to business.comcast.com/bveportal.2. From the Main Navigation Page, click “Feature Settings”.3. Click the “Privacy” tab.4. Click to toggle Directory Privacy “On” or “Off”.Privacy 59
Billing FeaturesOnline Bill AccessIf you are the billing administrator for your company, you may have access to the VoiceEdge monthlystatement. It will include a summary of charges you’ve incurred for the month. You can view the bill online, oryou may choose to receive a paper invoice. Please note, to view detailed call records, you will need to accessyour bill online. Registration is fast, easy and free. First-time users will be prompted to create a user profileand password. Returning users can log in by entering their username and password.1. Go to www.comcastpaymentcenter.com or clickthe <strong>Comcast</strong> Payment Center link from within theVoiceEdge portal.2. To set up an account, click on the link for new users,and enter your account number and your invoicenumber (both are found on a recent invoice).3. Follow the prompts to view billing statements, makepayments, order services and more.Block Calls to 900/976 NumbersAll <strong>Comcast</strong> business phone lines come with 900/976 Call Blocking activated so that calls to these numbersare automatically blocked. Call Blocking to these numbers cannot be removed. There is no charge for thisservice.Block Collect Calls and Bill to Third Party CallsCollect calls and bill to third party calls are blocked. For more information, contact <strong>Business</strong> Customer Care.International Calling Plans<strong>Business</strong> VoiceEdge offers three settings for international calling. This may be set by phone line or extension.It is important that you select the appropriate international calling option, as potential means to limit theexpense, if fraudulent calls are made from your phone.1. No international calls may be placed from the device.2. Standard — limited international calling access to major international destinations.3. Expanded — this offers the largest list of international destinations that may be placed from a device.International Calling can be restricted by your <strong>Business</strong> VoiceEdge Technical Administrator on a per userbasis.To navigate to International Long Distance settings whenlogged in as an administrator, select “Group Account” atthe top of your screen and then select “Advanced Settings”,and “International Long Distance”.Billing Features 60
More Services<strong>Business</strong> Level SupportYour dedicated <strong>Business</strong> Technical Support Team is available to assist you 24 hours a day, 7 days a week. Tocontact Tech Support, call 877-761-7401.Directory ListingsA simple directory listing in both the White Pages and Yellow Pages is included with your <strong>Comcast</strong> <strong>Business</strong>VoiceEdge service. Blue Pages/Government listings are available for such entities. A Directory Listing for anaddress that is not local to the telephone number (foreign listing), is also available.Directory AssistanceDialfor access to local, long-distance and international numbers.Directory Assistance Call CompletionDialfor access to both local and long-distance numbers, then press the indicated key andyour call will be connected.Diversion InhibitorThe Diversion Inhibitor service prevents calls, redirected by a user, to be redirected again by the called party.This service is especially useful to help prevent calls from being answered by another user’s voicemail whenusing Sequential Ring.A feature access code (FAC) can be activated as a dial prefix on a per-call basis or as a static prefix for thedestination number for the caller’s redirection services. The FAC is *80. There is no provisioning configurationfor the service and can only be used on a per-call basis via the FAC dial prefix.The following services can be inhibited with the Diversion Inhibitor FAC:• Call Forwarding No Answer, Busy, Always• Selective Call Forwarding• Voicemail• Sequential RingingThe following redirection services are not affected by the FAC and cannot be inhibited:• Remote Office• Hunt Group• Auto Attendant• Call Pickup (all variations)Enhanced Directory AssistanceNow when you dial, you can get even more valuable information like fully interactive, turn‐byturndriving directions from a live operator.Note: Directory Assistance calls are charged on a per use basis. For prices, call <strong>Comcast</strong> Customer Support.XXXX More Services 61
IP Phone InformationYour VoiceEdge IP phone has many capabilities. To view the different models, capabilities, data sheets,videos, quick reference guides and end-user training, please visit business.comcast.com/getstarted. If youwant to upgrade your device, please call 877-761-7401.Please feel free to visit the Basic Configuration at menu->settings->basic to customize your phonefor backlight, ring tone and other basic settings. Note: We recommend that you leave everything in theAdvanced Configuration as is to prevent service issues. Advanced settings include SSL Security, NetworkConfiguration and other settings that can negatively change how your service is delivered.Headsets: <strong>Comcast</strong> does not offer headsets for cordless capability, but your VoiceEdge IP device iscompatible with many headset options. Please reference materials offered by Polycom to learn more aboutcompatible headsets at www.polycom.com.911 Emergency CallsIn most major cities, emergency police, fire and medical services can be reached by dialing 911. Enhanced911 (E911) automatically provides the emergency service with your telephone number and location whenyou dial 911 from your business phone. Remember, dialimmediately in case of any emergency.<strong>Comcast</strong> <strong>Business</strong> Enhanced Voice Services, including <strong>Business</strong> VoiceEdge (“Enhanced Voice Services”) may have the E911 limitations specified below:• In order for 911 calls to be properly directed to emergency services using Enhanced Voice Services,<strong>Comcast</strong> must have the correct service address (i.e. street address, floor and/or office number) for eachtelephone number and extension used by the Customer with the Enhanced Voice Services. If EnhancedVoice Services are moved to a different location without Customer providing the correct information,911 calls may be directed to the wrong emergency authority, may transmit the wrong address, and/or Enhanced Voice Services (including 911) may fail altogether. Customer is solely responsible forprogramming its telephone system to map each telephone number and extension to the correct location,and for updating the system as necessary to reflect moves or additions of stations within the premises.• Enhanced Voice Services uses electrical power in the Customer’s premises. If there is an electrical poweroutage, 911 calling may be interrupted if the battery back-up in the associated multimedia terminal adapteris not installed, fails, or is exhausted after several hours.• Enhanced Voice Services calls, including calls to 911, may not be completed if there is a problem withnetwork facilities, including network congestion, network/equipment/power failure, or another technicalproblem.• <strong>Comcast</strong> only supports 911 emergency calling with Enhanced Voice Services in those areas in the U.S.where <strong>Comcast</strong> can direct your company’s 911 call to the appropriate PSAP in a manner consistent withapplicable laws, rules, and regulations, including, without limitation, FCC rules and requirements. In anarea where <strong>Comcast</strong> cannot support 911 calls, Customer will be notified before the completion of theupdate call. In this case, Customer must use an alternative means of accessing 911.• Failure by Customer to make subsequent address updates, including updates to restore service addressto the original registered Service Location, or failure to allot sufficient time for the Service Location updateprovisioning to complete may result in emergency services being dispatched to the incorrect ServiceLocation.• If the Registered Service Location provided in conjunction with the user of nomadic <strong>Comcast</strong> Equipmentis deemed to be in an area <strong>Comcast</strong> cannot support for 911 calls, Customer will be notified before thecompletion of the update call. In this case, Customer must use an alternative means of accessing 911.• Customers should call <strong>Comcast</strong> at 1-877-761-7401 (for Customers using nomadic functionality) if theyhave any questions or need to update a service address in the E911 system.• Customers can change their E911 registered location by using the following process:More Services 62
To change your E911 Registered Location:1. Log on to business.comcast.com/bveportal.2. On the Main Navigation Page, select “Update” in theE911 Registered Location box.3. Provide new E911 Registered Location information.4. Click “Save”.Toll Free ServiceCan help you generate more calls and more business opportunity. Toll Free Service can help youexpand your business by enabling your customers to place orders via a toll free number. Many customersinclude their toll free numbers on their website, as it makes them easier to do business with. A <strong>Comcast</strong><strong>Business</strong> Toll Free line for your company is as fast and easy as a toll free call to your <strong>Business</strong> CustomerSupport Team at 877-761-7401.Help Tab and Useful LinksTo get access to Help and Useful Links:1. Log on to business.comcast.com/bveportal.2. From the Main Navigation Page, select “Help”.3. Click “Useful Links”.From here you will have access to Animations, GettingStarted Page, <strong>User</strong> <strong>Guide</strong>, Videos and Live and Recordedwebinars.More Services 63
Useful TipsLast Number RedialPolycom SoundPoint 335: <strong>User</strong> may press the “Dial” button and last number dialed is displayed and maybe dialed.Polycom SoundPoint VVX500, VVX1500 or 670: <strong>User</strong> may press the “Redial” button to dial the lastnumber dialed.ListsSome of the calling features require you to create a list (e.g.: priority list, block list, etc.). These lists aredistinct from one another and remain stored so that each time you activate a particular feature, the feature willrefer to the list created for it.Domestic DialingDial as you normally would. You can also reference your local telephone book for more information on dialinginstructions and calling areas. Dialing a “1” before dialing the area code and number is not required.International DialingTo place the call yourself, dial, plus the country code, then the phone number.Operator ServicesTo contact the operator, press for local calls and for long-distance calls. An operator can helpyou place certain types of calls such as:• Collect calls — The operator will connect you and request payment from the called party.• Person-to-person calls — The operator will connect you to a specific person.• Bill to third party calls — The operator will connect you and request payment from a third party.Note: Services may not be available in all areas. Additional charges will depend on the service requested. For prices, call Customer Care.Feature Access CodesFeature Activation DeactivationAnonymous Call Rejection *77 *87Automatic Callback n/a #8Automatic Callback Menu Access #9 n/aBroadWorks Anywhere E.164 Dialing *14 n/aCall Bridge *15 n/aCall Forwarding Always *72 *73Call Forwarding Always Interrogation *21* n/aCall Forwarding Always To Voicemail *21 #21Call Forwarding Busy *90 *91Call Forwarding Busy Interrogation *67* n/aCall Forwarding Busy To Voicemail *40 #40Call Forwarding No Answer *92 *93Call Forwarding No Answer Interrogation *61* n/aCall Forwarding No Answer To Voicemail *41 #41Call Forwarding Not Reachable *94 *95Call Forwarding Selective #76 #77XXXX Useful Tips 64
Feature Activation DeactivationCalling Line ID Delivery Blocking per Call *67 n/aCalling Line ID Delivery Blocking Persistent *31 #31Calling Line ID Delivery per Call *65 n/aCall Park *68 n/aCall Park Retrieve *88 n/aCall Pickup *98 n/aCall Retrieve *11 n/aCall Return *69 n/aCall Return Number Deletion #92# n/aCall Waiting Persistent *43 #43Cancel Call Waiting *70 n/aClear Voice Message Waiting Indicator *99 n/aCustomer Originated Trace *57 n/aDirected Call Pickup *97 n/aDirected Call Pickup with Barge-In *33 n/aDirect Voicemail Transfer *55 n/aDiversion Inhibitor *80 n/aDo Not Disturb *78 *79Flash Call Hold *22 n/aGroup Call Park #58 n/aLast Number Redial *66 n/aLocation Control *12 *13On-Hold Music Per-Call n/a *60No Answer Timer *610 n/aPush to Talk *50 n/aSpeed Dial 8 *74 n/aSpeed Dial 100 *75 n/aSustained Authorization Code (calls unlocking) *47 *37Voice Portal Access *62 n/aUseful Tips 65
Index3–Way Calling 8Alternate Numbers 27Anonymous Call Rejection 58Auto Attendant 46–48Automatic Callback 28Automatic Hold and Retrieve 29Barge In Block 59Basic Call Logs 27Be Anywhere 11–12, 23–25Block Calls 60<strong>Business</strong> Level Support 61Busy Lamp Field 27–28Call Forwarding Always 30Call Forwarding Busy 30Call Forwarding No Answer 31Call Forwarding Not Reachable 56Call Forwarding Selective 31Call Hold 18Call Notify 32Call Park 51Call Park and Retrieve 51Call Pickup 50Call Queue Agent 35, 52–55Call Return 19Call Transfer 8Call Transfer Direct to Voicemail 18Call Transfer with Consultation 18Call Transfer without Consultation 18Call Waiting 19Caller ID Blocking per Call 58Caller ID Blocking per Line 58Caller ID with Call Waiting 19Click to Dial from Microsoft Outlook 27Directed Call Pickup with Barge–In 20XXXX Index 66
Directory 35Directory Assistance 61Directory Listings 61Directory Privacy 59Distinctive Ringing 33Diversion Inhibitor 61Do Not Disturb 20Domestic Dialing 64Emergency Calls 62–63Enhanced Directory Assistance 61Extension Dialing 20Extensions–Standard Seat 20Feature Access Codes 64–65Greetings 17Help Tab and Useful Links 63Hoteling 33–34Hunt Group 48–50International Calling 60, 64IP Phone Information 62Last Number Redial 64Lists 64Multiple Call Arrangement 28On-Hold Music 51Online Bill Access 60Operator Services 64Placing a Call 7Polycom ® IP Phones 6Push to Talk 29Reception Console 43–45Remote Office 26–27Sequential Ring 32Services Menu 23Shared Call Appearance 28Softphone 36–42Speed Dial 10–11Index 67
Telephony Toolbar 9–10, 21–22Toll Free Service 63VoiceEdge Mobile App 12Voicemail 7–8, 13–17© 2013 <strong>Comcast</strong>. All rights reserved.BC BVE POR Rev. 10.13