IMPORTANT NOTICE - Hotchkis Sport Suspension
IMPORTANT NOTICE - Hotchkis Sport Suspension
IMPORTANT NOTICE - Hotchkis Sport Suspension
- No tags were found...

You also want an ePaper? Increase the reach of your titles
YUMPU automatically turns print PDFs into web optimized ePapers that Google loves.
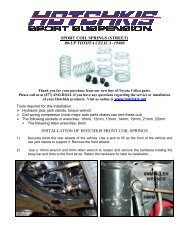
Reinstall the spring, positioning the top of the coil first. The <strong>Hotchkis</strong> a‐arm includes a modular spacerand spring isolator. The spacer allows you to lower your ride height by ½” if removed. If you wouldlike to retain the same ride height, then leave the single spacer in place. The polyurethane isolator canbe clocked so that the spring can seat properly in the a‐arm.Support the bottom side of the lower a‐arm with a floor jack. You should hold the coil spring inposition and ready for compression.You will need to raise the lower a‐arm using your floor jack until the ball joint inserts into the spindle.Make sure your coil spring is properly seated in the top and bottom. Spin the included castle nut onthe stud and fully tighten. Make sure to line up the castle nut with the cotter pin hole. Insert thecotter pin and bend to lock.Reinstall the shocks and wheels.Continue to the next page to begin the center link installation. You should not install the <strong>Hotchkis</strong>lower a‐arms without installing the <strong>Hotchkis</strong> center link. You will have adverse bumpsteer otherwise.You may keep the front end jacked up off the ground for the time being.Continue to next pageInstallation of <strong>Hotchkis</strong> Centerlink