Download - Olimex
Download - Olimex
Download - Olimex
- No tags were found...

You also want an ePaper? Increase the reach of your titles
YUMPU automatically turns print PDFs into web optimized ePapers that Google loves.
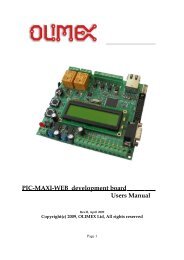
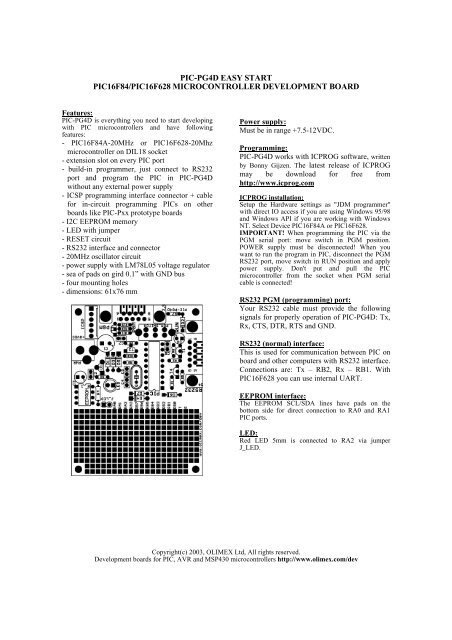
PIC-PG4D EASY STARTPIC16F84/PIC16F628 MICROCONTROLLER DEVELOPMENT BOARDFeatures:PIC-PG4D is everything you need to start developingwith PIC microcontrollers and have followingfeatures:- PIC16F84A-20MHz or PIC16F628-20Mhzmicrocontroller on DIL18 socket- extension slot on every PIC port- build-in programmer, just connect to RS232port and program the PIC in PIC-PG4Dwithout any external power supply- ICSP programming interface connector + cablefor in-circuit programming PICs on otherboards like PIC-Pxx prototype boards- I2C EEPROM memory- LED with jumper- RESET circuit- RS232 interface and connector- 20MHz oscillator circuit- power supply with LM78L05 voltage regulator- sea of pads on gird 0.1” with GND bus- four mounting holes- dimensions: 61x76 mmPower supply:Must be in range +7.5-12VDC.Programming:PIC-PG4D works with ICPROG software, writtenby Bonny Gijzen. The latest release of ICPROGmay be download for free fromhttp://www.icprog.comICPROG installation:Setup the Hardware settings as "JDM programmer"with direct IO access if you are using Windows 95/98and Windows API if you are working with WindowsNT. Select Device PIC16F84A or PIC16F628.IMPORTANT! When programming the PIC via thePGM serial port: move switch in PGM position.POWER supply must be disconnected! When youwant to run the program in PIC, disconnect the PGMRS232 port, move switch in RUN position and applypower supply. Don't put and pull the PICmicrocontroller from the socket when PGM serialcable is connected!RS232 PGM (programming) port:Your RS232 cable must provide the followingsignals for properly operation of PIC-PG4D: Tx,Rx, CTS, DTR, RTS and GND.RS232 (normal) interface:This is used for communication between PIC onboard and other computers with RS232 interface.Connections are: Tx – RB2, Rx – RB1. WithPIC16F628 you can use internal UART.EEPROM interface:The EEPROM SCL/SDA lines have pads on thebottom side for direct connection to RA0 and RA1PIC ports.LED:Red LED 5mm is connected to RA2 via jumperJ_LED.Copyright(c) 2003, OLIMEX Ltd, All rights reserved.Development boards for PIC, AVR and MSP430 microcontrollers http://www.olimex.com/dev
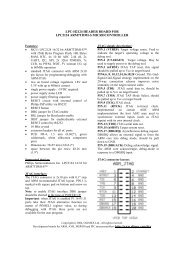
ICSP connector layout:The ICD/ICSP connector is 6 pin with 0,1" step.It may be used to program other boards withPICs via PIC-PG4D. The PIN.1 is marked withsquare pad on bottom and arrow on top. ICSPsignals are: 1- MCLR, 2- VDD, 3- VSS/GND, 4-PGD/RB7, 5- PGC/RB6, 6- PGM/RB3.ICSP programming:Please note that in your target circuit MCLRshould be not directly connected to VCC, asprogrammer try to rise MCLR to 13VDC to enterin programming mode. If MCRL on target boardis connected to VCC and you attempt to do ICSPprogramming you may destroy PIC-PG4Dprogrammer.Ordering codes:PIC-PG4D-84PIC-PG4D-628- assembled and tested withPIC16F84A microcontroller- assembled and tested withPIC16F628 microcontrollerCopyright(c) 2003, OLIMEX Ltd, All rights reserved.Development boards for PIC, AVR and MSP430 microcontrollers http://www.olimex.com/dev