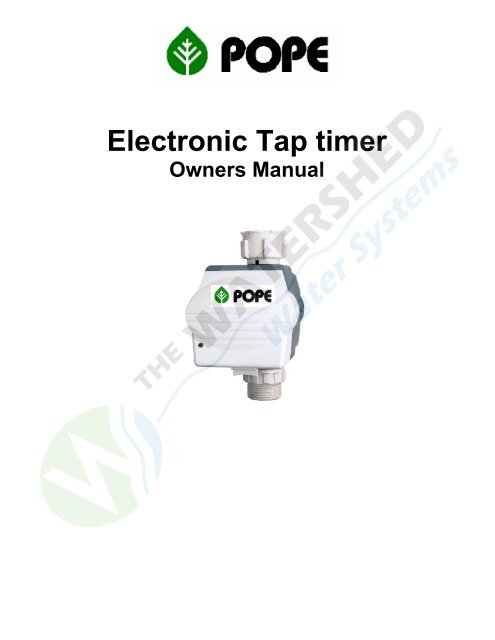
Electronic Tap Timer (1010332).pdf - Pope Products
Electronic Tap Timer (1010332).pdf - Pope Products
Electronic Tap Timer (1010332).pdf - Pope Products
- No tags were found...

Create successful ePaper yourself
Turn your PDF publications into a flip-book with our unique Google optimized e-Paper software.
<strong>Pope</strong> ® <strong>Electronic</strong> <strong>Tap</strong> <strong>Timer</strong>This booklet contains all you need to know to install and programyour <strong>Pope</strong> <strong>Electronic</strong> <strong>Tap</strong> <strong>Timer</strong>.It’s easy if you follow the steps – but take a moment to readthrough the section ”Understanding your Water <strong>Timer</strong>” beforeyou start.Contents:Understanding your water timer ………………………... 3Batteries ……………………………………………… … 6Connecting the <strong>Timer</strong> ……………………………………. 7Programming the <strong>Timer</strong> …………………………………. 8Manual Watering …………………………………………. 13Trouble Shooting …………………………………………. ?If you have any questions or require and assistance in gettingstarted, please call ourFree Help Line: 1300 134 8802.
Understanding your Water <strong>Timer</strong>The Key Pad1. SUMMER/WINTER enables you to adjust thecurrent time for daylight savings.2. on/off ON/OFF is used to select the watering dayswhen programming the user’s cycle (U) and whenselecting watering duration in the manual mode.3. mode MODE is used to select functions (see below)and is identified on the display by the more bar.4. set SET is used to set the current time and day aswell as watering times during the programmingfunction.5. enter ENTER is used to confirm selected times anddata.The DisplayFunctions All functions can be selected by pressing MODE.6. CLOCK Symbol: Select this function to set thecurrent time. Note that the timer operates on a 24 hourclock. The time in this display is 2.30pm.7. A Automatic Function: When this option isselected watering will take place according to the cycleand programs programmed by the user.3.
Understanding your Water <strong>Timer</strong>8. P Programming Function: Enables the user toprogram cycles and programs into the timer9. Manual: When this function has been selected thehand symbol appears, enabling the user to waterindependently of the programmed times and cycle.Display Symbols10. Day of Week: Indicates the current day of the weekand the days selected for watering by the user in ‘U’cycle. The current day of the week on this display isWednesday.11. Off Watering Symbol: Displayed when wateringis not in progress and when setting the finishing timefor watering during the programming function.4.
Understanding your Water <strong>Timer</strong>12. On Watering Symbol Displayed when wateringin progress and when setting the starting time forwatering during the programming function.13. Cycle: The number displayed indicates the wateringfrequency that has been selected by the user.There are 7 available:1 – Every Day 5 – Every Five Days2 – Every Two Days 6 – Every Six Days3 – Every Three Days U – User’s own cycle4 – Every Four Days14. PROG The number displayed indicated the program(or watering duration) from 1-6 that has been set bythe user.Note: If left in the programming mode for one minute,the mode bar will automatically move to the A symboland convert to the automatic mode.5.
BatteriesInstalling the Batteries• Remove battery compartment cover and install 3 x AAsize alkaline batteries.• Match the +/- signs as indicated on the batterycompartment cover.• Replace the battery compartment cover.• The timer will automatically run a “Low Battery” TestReplacing Batteries• To prevent corrosion, always remove the batteries whenthe timer is not to be used for long periods of time or whenbatteries are low.• It is recommended that new batteries are installed if youare going away for an extended period of time. This willensure that watering continues as programmed.• When removing old batteries “PO” will flash on the display,indicating that you have two minutes to install the newbatteries without losing any programmed data• If batteries are removed or fail during a programmedwatering session, ensure they are replaced within twominutes otherwise the timer will not turn off the water.6.
Connecting your Water <strong>Timer</strong>Step 1• Remove reducing bushfrom the base of the<strong>Electronic</strong> <strong>Tap</strong> <strong>Timer</strong>.Step 2• Connect reducing bush totap (if required).Step 3• Screw nut on the top of the<strong>Electronic</strong> <strong>Tap</strong> <strong>Timer</strong> to thereducing bush until firm.7.
Programming the <strong>Timer</strong>Step 1Setting the Time and DaySetting the Day• Press MODE until mode bar is above the clock• Press SET to move through the days of the week.• Once you have reached the current day, press ENTER toconfirm.Setting the Time• Press SET to select the current hour. Press ENTER toconfirm.• Press SET to select the minutes. Press ENTER to confirm.Adjusting for Daylight Saving• Press MODE until mode bar is above the clock or A• Press Summer/Winter to advance or bring back thecurrent time by one hour.• Alternatively, adjust the current time according to theinstructions above.8.
Programming the <strong>Timer</strong>Step 2Select the Frequency of WateringThe frequency of watering (CYCLE) determines the day of theweek that the timer will water.• Use MODE to select programming function PPress SET to scroll through the7 available cycles. Cycle 2 isshown here.• See “Understanding your water <strong>Timer</strong>” for a list of theavailable cycles.• You can choose one of the cycles already programmed intothe timer or you can create your own.To Select a programmed cycle.• Select on e of the programmed cycles from 1-6 and thenpress ENTER.This show that Cycle 2 (everytwo days) has been selected.Now proceed to step 3.• Note that the first day of watering will be determined by thestart time as entered in Step 3.9.
Programming the <strong>Timer</strong>For exampleIf the start time is 5 pm and the current time is 8 pm,watering will not commence until 5 pm the next day.To Create you own cycle.• Select the U cycle and press ENTER• Press ON/OFF to switch between [On Watering Symbol] and[Off Watering Symbol].Pressing SET now will confirmSunday as a watering day.• Press ON/OFF to switch to [Off Watering Symbol] and thebar will move to the next day.Pressing SET now will confirmMonday as a non-wateringday.• Continue until all days have been allocated.• To confirm you complete selection press ENTER.Now proceed to Step 3.This show Monday,Wednesday and Friday aswatering days.10.
Programming the <strong>Timer</strong>Step 3Select the Watering DurationThis function allows you to set the duration (program) of up to 6watering sessions per day.This display indicated that you areabout to enter the start time forprogram 1.Press ENTER to confirmPress SET to select start hour.Press ENTER to confirmPress SET to select the minutesPress ENTER to confirm(eg starting time for watering is2.30pm)This display indicated that you areabout to enter the finish time forprogram 1. Press SET to select thefinish hour. Press ENTER to confirm.Press SET to select the finish minutesPress ENTER to confirm (eg finishingtime for watering is 3.30pm)You can now enter up to five moreprograms by repeating this procedure.This screen is for program 2.11.
Programming the <strong>Timer</strong>• Once you have set the required programs, press MODE toreturn to A• Your timer is now ready for use. Re-attach the time faceplateand turn on you tap.Step 4Reviewing the Program and Making Changes• At any time you can review and change the cycles andprograms that you have in place.To Review• Press MODE to select the programming function P• Press ENTER to view the programs you have in place. Anychanges you require can be carried out by performing thesame steps listed in the programming step.To Clear ProgramsTo clear any of the programs that you have in place simply:• Change the off time to the same as the on time.• Press MODE to return to A12.
Manual Watering• Return the timer to the tape and watering will commence• At any time during watering you can remove the timerand re-wet the watering duration by using ON/OFF• Remember that you will need to re-select the Automaticfunction by pressing MODE to recommence theprogrammed cycles.2. Manual Override Button• Press the ‘Manual Operation’ button on the exterior of thetimer (see “Connecting the <strong>Timer</strong>” for location). Thisfunction commences watering immediately and continuesuntil the button is pressed again.• This function will not activate if a programmed wateringsession is in progress.• If a programmed watering session is due to commencewhilst Manual Override is in progress, the timer will revertback to the programmed times. Thus watering may finishsooner than required.14.
Trouble ShootingIf you are experiencing difficulties with your timer, consult thetable below.Problem Reason SolutionNo LCDNot watering atscheduled times• Batteries flat• Batteriesincorrectlyinstalled• Batteries flat• Programs lostduring batteryreplacement• Start & finish timesor programs maybe incorrectlyprogrammed• <strong>Tap</strong> turned off•• Replacebatteries• Re-installbatteries• Replacebatteries• Re-programtimer• Check times &re-enter ifrequiredWatering sessionnot being turned offby timer• Batteries failedduring wateringsession• Batteries changedduring wateringand programs lost• Turn tap on• Replacebatteries• Re-programtimer15.