PCI 4 port universal RS232 adapter_20081017.pdf - Decision ...
PCI 4 port universal RS232 adapter_20081017.pdf - Decision ...
PCI 4 port universal RS232 adapter_20081017.pdf - Decision ...

Create successful ePaper yourself
Turn your PDF publications into a flip-book with our unique Google optimized e-Paper software.
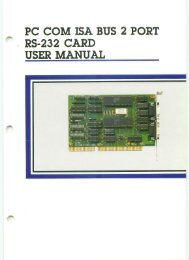
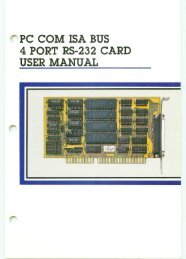
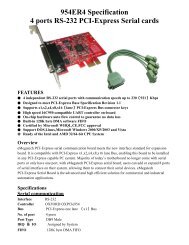
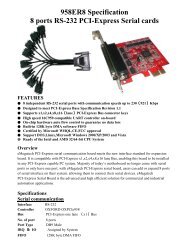
Operations ManualPCCOM <strong>PCI</strong> 4 <strong>port</strong> <strong>universal</strong> <strong>RS232</strong> cardPCCOM <strong>PCI</strong> 4 PORTUNIVERSAL <strong>RS232</strong> ADAPTEROPERATION MANUALDECISIONComputer International Co., Ltd.DECISION Computer International 5/21/2005i
Operations ManualPCCOM <strong>PCI</strong> 4 <strong>port</strong> <strong>universal</strong> <strong>RS232</strong> cardSuitable for SCO UNIX, Linux, MS/DOS, WINDOWSNT/2000/XP, WINDOWS 95/98/ME, OS/2... etc.Pentium hardware compatibles.On board XR16C854 chip.Provides four 16850 <strong>port</strong>s that contains 128 bytes FIFO foreach <strong>port</strong>.External or internal clock rate selectable.Quadruple speed (clock rate is 7.3728MHZ) board that itsbaud rate up to 460K. Octal speed board (clock rate is14.7456 MHZ) that its baud rate up to 1M.Provides <strong>RS232</strong> interface for 3.3V internal voltage, whichhas lower power consume.Up to 4 boards be installed in one computer system.Software compatible with PCCOM98/2000.Operating temperature 0 to 60 ºC.Storage temperature -20 to 70 degree °C.Humidity 5% to 95% in non-condensing.2DECISION Computer International 5/21/2005
Operations ManualPCCOM <strong>PCI</strong> 4 <strong>port</strong> <strong>universal</strong> <strong>RS232</strong> cardCHAPTER 2UNPACKING INFORMATION Check that your PCCOM package includes the followingitems:PCCOM <strong>PCI</strong> bus 4 <strong>port</strong> <strong>universal</strong> <strong>RS232</strong> <strong>adapter</strong>, select oneof the follows:Quadruple speed (clock rate is 7.3728MHZ) boardOctal speed board (clock rate is 14.7456 MHZ) boardSCSI-II cable with standard DB9 pin connectors.User manual.<strong>Decision</strong> Studio CD for PCCOM software.Warranty form.DECISION Computer International 5/21/2005 3
Operations ManualPCCOM <strong>PCI</strong> 4 <strong>port</strong> <strong>universal</strong> <strong>RS232</strong> cardCHAPTER 3SYSTEM REQUIREMENTS Before installing your PCCOM <strong>PCI</strong> bus 4 <strong>port</strong> <strong>universal</strong><strong>RS232</strong> <strong>adapter</strong>, make sure that:The host computer is a Pentium or its compatibles.The switch and the jumpers are properly configured.The operating system you intend to use is capable of drivingmultiple serial <strong>port</strong>s.4DECISION Computer International 5/21/2005
Operations ManualPCCOM <strong>PCI</strong> 4 <strong>port</strong> <strong>universal</strong> <strong>RS232</strong> cardCHAPTER 4HARDWARE INSTALLATIONYour PCCOM <strong>PCI</strong> bus 4 <strong>port</strong> <strong>universal</strong> <strong>RS232</strong> <strong>adapter</strong> is designedto be inserted in any available <strong>PCI</strong> slot in your Pentium orcompatibles. You must plug this board to your computer beforeinstalling PCCOM software. In order to gain access to the expansionslots, follow the steps listed below:1. Turn off all power to your computer and all peripheraldevices before installing your PCCOM <strong>PCI</strong> bus 4 <strong>port</strong><strong>universal</strong> <strong>RS232</strong> <strong>adapter</strong>.2. Remove the cover of the computer.3. Set the SW1 to identify card number.4. Set the JP2 to select clock source.5. Insert the PCCOM <strong>PCI</strong> bus 4 <strong>port</strong> <strong>universal</strong> <strong>RS232</strong> <strong>adapter</strong>into any available <strong>PCI</strong> slot. Make sure the <strong>adapter</strong> is firmlyseated in the chosen slot.6. Replace the cover of the computer.7. Connect cables to DB9 connectors as required.8. Turn on the power of your computer.DECISION Computer International 5/21/2005 5
Operations ManualPCCOM <strong>PCI</strong> 4 <strong>port</strong> <strong>universal</strong> <strong>RS232</strong> cardCHAPTER 5SWITCH AND JUMPER SETTINGThe Plug and Play features let hardware configuration for IRQ andI/O address is detected by BIOS automatically, so that it need notswitch and jumper setting. The on board switch can be used toidentify card number by the users (if you do not set the switch, thePnP BIOS will assign card number automatically).JP2 (Jumper 2)Select external clock or internal clock.SW1 (Switch 1)Identifies card number.Do not set up jumpers and switch under power on condition,otherwise it may defective your computer system.6DECISION Computer International 5/21/2005
Operations ManualPCCOM <strong>PCI</strong> 4 <strong>port</strong> <strong>universal</strong> <strong>RS232</strong> cardDECISION Computer International 5/21/2005 7
Operations ManualPCCOM <strong>PCI</strong> 4 <strong>port</strong> <strong>universal</strong> <strong>RS232</strong> card1. Select External Clock or Internal ClockJP23 .2 .1 .The JP2 is used to select external clock or internal clock; to selectexternal clock, please short pin 1 and 2, to select internal clock,please short pin 2 and 3. When internal clock is selected, thecommunication speed is divided by 4..Pin ModeShort 1,2 External ClockShort 2,3 Internal Clock8DECISION Computer International 5/21/2005
Operations ManualPCCOM <strong>PCI</strong> 4 <strong>port</strong> <strong>universal</strong> <strong>RS232</strong> carda. Quadruple Speed Board for Internal ClockJP23 .2 .1 .The clock rate is 7.3728MHZ. The baud rate speed up to 115200.Under this configuration, the user setting baud rate is the same as<strong>RS232</strong> baud rate. We list in the following.Original <strong>RS232</strong> on board baud rate50 50300 300600 6001200 12002400 24004800 48009600 960019.2K 19.2K38.4K 38.4K57.6K 57.6K115.2K 115.2KDECISION Computer International 5/21/2005 9
Operations ManualPCCOM <strong>PCI</strong> 4 <strong>port</strong> <strong>universal</strong> <strong>RS232</strong> cardb. Quadruple Speed Board for External ClockJP23 .2 .1 .The clock rate is 7.3728MHZ. The baud rate speed up to 460K.Under this configuration, the user setting baud rate maps to on board<strong>RS232</strong> baud rate are list in the following. Please note that, youdevice driver may re<strong>port</strong> original baud rate, however the speed ofcommunication line is quadruple speed.Original <strong>RS232</strong> on board baud rate50 200300 1200600 24001200 48002400 96004800 19.2 K9600 38.4 K19.2K 76.8 K38.4K 153.6K57.6K 230.4K115.2K 460.8K10 DECISION Computer International 5/21/2005
Operations ManualPCCOM <strong>PCI</strong> 4 <strong>port</strong> <strong>universal</strong> <strong>RS232</strong> cardd. Octal Speed for Eternal ClockJP23 .2 .1 .The clock rate is 14.7456MHZ. The baud rate speed up to 1M.Under this configuration, the user setting baud rate maps to on board<strong>RS232</strong> baud rate are list in the following. Please note that, youdevice driver may re<strong>port</strong> original baud rate, however the speed ofcommunication line is octal speed.Original <strong>RS232</strong> on board baud rate50 400300 2400600 48001200 96002400 19.2 K4800 38.6 K9600 76.8 K19.2K 153.6K38.4K 230.4K57.6K 460.8K115.2K 921.6K12 DECISION Computer International 5/21/2005
Operations ManualPCCOM <strong>PCI</strong> 4 <strong>port</strong> <strong>universal</strong> <strong>RS232</strong> cardON OFF ON OFF 10OFF ON ON OFF 9ON ON ON OFF 8OFF OFF OFF ON 7ON OFF OFF ON 6OFF ON OFF ON 5ON ON OFF ON 4OFF OFF ON ON 3ON OFF ON ON 2OFF ON ON ON 1ON ON ON ON 0 The card number starts from 0 to 15..14 DECISION Computer International 5/21/2005
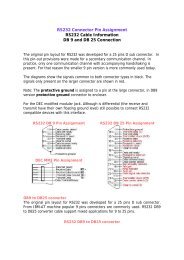
Operations ManualPCCOM <strong>PCI</strong> 4 <strong>port</strong> <strong>universal</strong> <strong>RS232</strong> cardCHAPTER 6<strong>RS232</strong> CABLING INFORMATION6.1 DB25 ConnectorThe communication interface follows the EIA <strong>RS232</strong> standard. Thesignal assignments for a standard DB9 connector are shown below:DB9RS-232C SignalPin # Signal NameName Direction1 Data Carrier Detect(DCD) CF Input2 Receive Data(RxD) BB Input3 Transmit Data(TxD) BA Output4 Data Terminal Ready(DTR) CD Output5 Signal Ground(SG) AB Common6 Data Set Ready(DSR) CC Input7 Request to Send(RTS) CA Output8 Clear to Send(CTS) CB Input9 Ring Indicator(RI) CE InputDECISION Computer International 5/21/2005 15
Operations ManualPCCOM <strong>PCI</strong> 4 <strong>port</strong> <strong>universal</strong> <strong>RS232</strong> cardTo connect the PCCOM <strong>adapter</strong> to other DATA TERMINALEQUIPMENT (DTE) devices, we recommend using a DTE to DTEconnection as shown below:Signal Pin # Pin # SignalDTEDTETxD 3 2 RxDRxD 2 3 TxDDTR 4 6 DSRDSR 6 4 DTRSG 5 5 SGDCD 1 7 RTS8 CTSRTS 7CTS 8 1 DCD16 DECISION Computer International 5/21/2005
Operations ManualPCCOM <strong>PCI</strong> 4 <strong>port</strong> <strong>universal</strong> <strong>RS232</strong> card6.2 Null Modem Connections: <strong>RS232</strong>If the software supplier or operating system does not specify aparticular cable configuration, we recommend you use the following“null modem” cable when XON/XOFF is utilized.HOST REMOTE2 33 24 45 56 67 78 8If hardware handshaking is necessary, use the following cable:HOST REMOTE2 33 24 66 45 57 78 8DECISION Computer International 5/21/2005 17
Operations ManualPCCOM <strong>PCI</strong> 4 <strong>port</strong> <strong>universal</strong> <strong>RS232</strong> card6.3 Modem ConnectionsA straight through cable is required, e.g. pin 2 to pin 2, pin 3 to pin3, etc.HOSTREMOTE2 23 34 45 56 67 78 818 DECISION Computer International 5/21/2005
Operations ManualPCCOM <strong>PCI</strong> 4 <strong>port</strong> <strong>universal</strong> <strong>RS232</strong> cardAPPENDIX APCCOM DIAGNOSTIC UNDER MS/DOSThe TESTCOM is a diagnostic program, provide routines to testyour PCCOM <strong>PCI</strong> 4 <strong>port</strong> serial <strong>adapter</strong> under MS-DOS. It has bothinternal and external loopback tests. During external loopback test, aloop back plug must be connected to each <strong>port</strong> being tested. You canalso select different hardware settings during testing from theSETUP <strong>RS232</strong> menu.User can get TESTCOM program from <strong>Decision</strong> Studio CD. To test your PCCOM 4 <strong>port</strong> <strong>adapter</strong> under MS/DOS, please typeTESTCOMThe TestCom menu will appear.Setup <strong>RS232</strong> – is used to setup the baud rate, etc.Internal loop test – is used to test the IC.External loop test – is used to test the <strong>port</strong>s.Auto – is used to test the IC and the <strong>port</strong>s of the card.DECISION Computer International 5/21/2005 19
Operations ManualPCCOM <strong>PCI</strong> 4 <strong>port</strong> <strong>universal</strong> <strong>RS232</strong> cardAPPENDIX BPCCOM DEVICE DRIVER FOR MS/DOSB.1 PCCOM SoftwareThe PCCOM software is a high performance, easy to use<strong>RS232</strong>/RS422 device driver for PC/486, Pentium or compatibles.Under MS/DOS environment, you can set up your serial <strong>port</strong>s byPCCOM device driver, and these serial <strong>port</strong>s can be treated asCOM1: and COM2: devices. The setup procedure provides flexiblefunctions to specify the configuration of multi-serial card, that is,the hardware configurations of I/O <strong>port</strong> number, I/O <strong>port</strong> address,interrupt and interrupt vector are user selectable.After the device driver is installed, It takes over communicationbetween CPU and multi-serial cards such as four <strong>port</strong> card, eight<strong>port</strong> card, ... etc. For each I/O <strong>port</strong>, the service routine handles a ringbuffer to keep track of all I/O data. Moreover, the PCCOM softwareprovides library routines (C, PASCAL, BASIC, FoxPro) and DOScommunication interface (DOS device driver, BIOS call) for severalaccess levels. For more details, please refer PCCOM manual.20 DECISION Computer International 5/21/2005
Operations ManualPCCOM <strong>PCI</strong> 4 <strong>port</strong> <strong>universal</strong> <strong>RS232</strong> cardB.2 Software InstallationWhen the board is installed, please install software drivers asfollows:STEP 1: Prepare <strong>PCI</strong>.OPT fileThe <strong>PCI</strong>.OPT file contents are :/B:4/D:COM3/P:[:4:(2k:9600:N-8-1:RTS+DTR:XON) * 4]STEP 2: Prepare CONFIG.SYS fileInsert statement into CONFIG.SYS fileFor normal speedDEVICE = PCCOM.SYS @c:\pci.optFor high speedDEVICE = PCCOMH.SYS @c:\pci.optThe syntax of PnP function is/P:[Card_id:Portno:Port]DECISION Computer International 5/21/2005 21
Operations ManualPCCOM <strong>PCI</strong> 4 <strong>port</strong> <strong>universal</strong> <strong>RS232</strong> cardThe Card_id field is defined as 1 or 2 or 3 or 4 or nil, if you use PnPmode, just fill nil in card_id field that like step 1, otherwise you canspecify card_id to match the card identifier switch. The Portno fieldis used to specify number of <strong>port</strong>s in this <strong>adapter</strong>. The Port field isdefined as PCCOM V2.0. If more than one PCCOM board is installed, Please repeatdirective /P of the step 1.22 DECISION Computer International 5/21/2005
Operations ManualPCCOM <strong>PCI</strong> 4 <strong>port</strong> <strong>universal</strong> <strong>RS232</strong> cardAPPENDIX CXENIX / UNIX CONFIGURATIONThe distribution CD contains SCO UNIX driver. Our drivers alsoprovide transparent printer features that let user to connect localprinter from auxiliary <strong>port</strong> of terminal. The <strong>PCI</strong> BIOS will assigncard number automatically when you use PnP method, otherwiseyou can use card identifier switch to set your card number. Thesoftware installation procedures are shown is the bellows.C.1 Hardware Configuration1. First <strong>adapter</strong>Port Device Name MODEM Name TransparentPrinter Name1 /dev/ttyj11 /dev/ttyJ11 /dev/lpj112 /dev/ttyj12 /dev/ttyJ12 /dev/lpj123 /dev/ttyj13 /dev/ttyJ13 /dev/lpj134 /dev/ttyj14 /dev/ttyJ14 /dev/lpj142. Second AdapterPort Device Name MODEM Name TransparentPrinter Name1 /dev/ttyj21 /dev/ttyJ21 /dev/lpj212 /dev/ttyj22 /dev/ttyJ22 /dev/lpj223 /dev/ttyj23 /dev/ttyJ23 /dev/lpj234 /dev/ttyj24 /dev/ttyJ24 /dev/lpj24DECISION Computer International 5/21/2005 23
Operations ManualPCCOM <strong>PCI</strong> 4 <strong>port</strong> <strong>universal</strong> <strong>RS232</strong> card3. Third AdapterPort Device Name MODEM Name TransparentPrinter Name1 /dev/ttyj31 /dev/ttyJ31 /dev/lpj312 /dev/ttyj32 /dev/ttyJ32 /dev/lpj323 /dev/ttyj33 /dev/ttyJ33 /dev/lpj334 /dev/ttyj34 /dev/ttyJ34 /dev/lpj344. Fourth AdapterPort Device Name MODEM Name TransparentPrinter Name1 /dev/ttyj41 /dev/ttyJ41 /dev/lpj412 /dev/ttyj42 /dev/ttyJ42 /dev/lpj423 /dev/ttyj43 /dev/ttyJ43 /dev/lpj434 /dev/ttyj44 /dev/ttyJ44 /dev/lpj44C.2 Software Installation The installation procedure for the device drivers is described asfollows: Login as a root user. Insert distribution CD (which contains device drivers) intoCD-ROM drive d:, then copy the files from the distributionCD to a temporary directory.#cd /# doscp d:dc.tz ./dc.tar.Z# zcat dc.tar / tar xvfp -24 DECISION Computer International 5/21/2005
Operations ManualPCCOM <strong>PCI</strong> 4 <strong>port</strong> <strong>universal</strong> <strong>RS232</strong> card After installation, please enable each <strong>port</strong> by enablecommand and disable <strong>port</strong> by disable command.#disable ttyj11 To change baud rate, please update /etc/inittab and/etc/conf/cf.d/init.base files.C.3 Transparent PrinterThe default device names to Transparent Printer(TP) are/dev/lpXYY, that is, the prefix name is changed from "tty" to "lp"but the other "XYY" is the same. e.g. under default device names,the corresponding TTY line of /dev/lpj11 is /dev/ttyj11.By multiplexing a serial line, there are two sorts of data channels forTTY data(by /dev/ttyXYY) and TP data(by /dev/lpXYY). If the/dev/ttyj11 is used for a TTY, it has to be enabled before you wouldlike to print data through /dev/lpj11 to a printer that connected to theterminal that is operated via /dev/ttyj11.The channel for TP data that is uni-directional is used to transmit thedata from a host to a terminal only. The differentiates of TTY dataand TP data in the same serial line is that TP data are encapsulatedwithin a couple of PRINT-ON and PRINT-OFF escape strings thatare recognized by connected terminals. The PRINT-ON and PRINT-OFF is defined by connected terminals.The scheme to multiplex a serial line for these two channels is basedon time-division method. The time slices for TTY or TP data aregenerated according to the entry procedure, polling, in the PCCOMdriver, which is periodically called by system clock. The period of26 DECISION Computer International 5/21/2005
Operations ManualPCCOM <strong>PCI</strong> 4 <strong>port</strong> <strong>universal</strong> <strong>RS232</strong> cardInterval for TTY : 50Interval for TP : 1PRINT - ON escape : “\033[5i” (ESC[5i)PRINT – OFF escape : “\033[4i” (ECS[4i) The examples to invoke lpx Set 60 time slices reserved for /dev/ttyj11# lpx -t 60 /dev/ttyj11 Set 2 time slices reserved for /dev/lpj11# lpx –12 /dev/lpj11 Get the time slices reserved for /dev/lpj11# lpx –L /dev/lpj11 Set PRINT-ON string for /dev/lpj11# lpx –n “\033[51” /dev/lpj11 Get PRINT-OFF string for /dev/lpj11# lpx –F /dev/lpj11 \033[4i28 DECISION Computer International 5/21/2005
Operations ManualPCCOM <strong>PCI</strong> 4 <strong>port</strong> <strong>universal</strong> <strong>RS232</strong> cardAPPENDIX DWINDOWS95/98 CONFIGURATIONWelcome to the <strong>Decision</strong> PCCOM <strong>PCI</strong> cards series. This seriesenables you to utilize the built in plug and play functionality ofWindows 95/98, combined with the power of <strong>PCI</strong> based serialcommunication.D.1 Installation1. For optimum PnP functionality, please install one card at a time.2. Unplug your PC, open it and install one <strong>Decision</strong> PCCOM <strong>PCI</strong>card.3. Start your computer and wait until Windows 95/98 is loaded.4. Windows 95/98 will detect the new <strong>PCI</strong> card that is installed inyour computer, and will prompt you for a proper driver.5. Insert the device driver CD into your computer, and make sureWindows 95/98 finds the drivers by eventually browsingthrough the directory structure of the CD.6. After installing the core device drivers for the <strong>PCI</strong> card,Windows 95/98 will detect and install software for each COM<strong>port</strong> on the card. This may take 5 to 10 seconds per <strong>port</strong>.7. After Windows 95/98 has detected and configured all <strong>port</strong>s, youmay begin using the <strong>PCI</strong> card. To verify that the installationprocess completed successfully, please proceed into the ControlPanel / System / Device Manager.8. Locate the additional COM <strong>port</strong>s in the <strong>port</strong>s section. If you need install more than one card, please run aboveprocedure again. Never try to install 2 or more cards at the sametime for you will have errors in installation.DECISION Computer International 5/21/2005 29
Operations ManualPCCOM <strong>PCI</strong> 4 <strong>port</strong> <strong>universal</strong> <strong>RS232</strong> cardD.2 Remove Ports1. Go to [Control Panel Applet]\[System]\[DeviceManager]\[Ports].2. Select the <strong>port</strong> you want to remove then press “Remove” todelete specified <strong>port</strong>. Reboot for changes to take effect.30 DECISION Computer International 5/21/2005
Operations ManualPCCOM <strong>PCI</strong> 4 <strong>port</strong> <strong>universal</strong> <strong>RS232</strong> cardAPPENDIX EWINDOWS2000 CONFIGURATIONWelcome to the <strong>Decision</strong> PCCOM <strong>PCI</strong> cards series. This seriesenables you to utilize the built in plug and play functionality ofWindows 2000, combined with the power of <strong>PCI</strong> based serialcommunication. During the boot-up of Windows 2000 the hardwarewill be automatically detected by the WINDOWS 2000, just ignorethis dialog box by clicking cancel and during login, use theadministrator user name for installationE.1 Installation1. For optimum PnP functionality, please install one card at a time.2. Unplug your PC, open it and install one <strong>Decision</strong> PCCOM <strong>PCI</strong>card.3. Start your computer and wait until Windows 2000 is loaded.4. Windows 2000 will detect the new <strong>PCI</strong> card that is installed inyour computer, and will prompt you for a proper driver.5. Insert the device driver CD into your computer, and make sureWindows 2000 finds the drivers by eventually browsing throughthe directory structure of the CD.6. After installing the core device drivers for the <strong>PCI</strong> card,Windows 2000 will detect and install software for each COM<strong>port</strong> on the card.7. After Windows 2000 has detected and configured all <strong>port</strong>s, youmay begin using the <strong>PCI</strong> card. Inside the Control Panel, you willsee the Icon of <strong>Decision</strong> PCCOM Adapters, indicating that thedriver has been successfully installed..8. Double click the Icon <strong>Decision</strong> PCCOM Adapters, anotherwindow will appear on screen and will display an installed cardwith corresponding COM <strong>port</strong>.DECISION Computer International 5/21/2005 31
Operations ManualPCCOM <strong>PCI</strong> 4 <strong>port</strong> <strong>universal</strong> <strong>RS232</strong> card If you need install more than one card, please run aboveprocedure again. Never try to install 2 or more cards at the sametime for you will have errors in installation.E.2 Remove Ports1. Go to [Control Panel Applet]\[<strong>Decision</strong> PCCOM Adapters].2. Select the <strong>port</strong> you want to remove then press “Remove Port” todelete specified <strong>port</strong>. Reboot for changes to take effect.32 DECISION Computer International 5/21/2005
Operations ManualPCCOM <strong>PCI</strong> 4 <strong>port</strong> <strong>universal</strong> <strong>RS232</strong> cardAPPENDIX FWINDOWS/NT CONFIGURATION V3.5 upWelcome to the <strong>Decision</strong> PCCOM <strong>PCI</strong> cards series. This seriesenables you to utilize the built in plug and play functionality ofWindows NT, combined with the power of <strong>PCI</strong> based serialcommunication.F.1 Installation1. For optimum PnP functionality, please install one card at a time.2. Unplug your PC, open it and install one <strong>Decision</strong> PCCOM <strong>PCI</strong>card.3. Start your computer and wait until Windows NT is loaded.4. Insert the device driver CD into your computer. The CD is autorun, so you just wait until <strong>Decision</strong> Studio Applet appears.5. Click “Device Drive” button, “Windows Operating System”then a selection of windows operating system platform appears.6. Click “Windows NT” |button to view the device list of differenthardware products.7. Select “PCCOM Multi Port Serial Card”. Install Shield will doinstallation, for you just click “Next” When windows promptsyou to resume installation procedure.8. To configure, go to [Control Panel]\[<strong>Decision</strong> PCCOMAdapters]. Click the “+” of the card you want configure, thenselect which COM <strong>port</strong> you want to set.F.2 Remove PortsGo to [Control Panel]\[Ports] then select what you want to removeand click “Delete” to remove <strong>port</strong>s.DECISION Computer International 5/21/2005 33
Operations ManualPCCOM <strong>PCI</strong> 4 <strong>port</strong> <strong>universal</strong> <strong>RS232</strong> cardF.3 UninstallEnter [Control Panel]\[<strong>Decision</strong> PCCOM Adapter], and click[Completely Remove Driver].34 DECISION Computer International 5/21/2005
Operations ManualPCCOM <strong>PCI</strong> 4 <strong>port</strong> <strong>universal</strong> <strong>RS232</strong> cardAPPENDIX GOS/ 2 CONFIGURATIONUnder OS/2 2.x and OS/2 Warp operating system, the PCCOMdevice driver provides total 96 <strong>port</strong>s and baud rate up to 115200.PCCOM also sup<strong>port</strong>s device driver for high speed card, and thebaud rate can be up to 1M. The device driver works for 8250,16450, 16550 (FIFO), 16850(FIFO) etc.G.1 InstallationThe installation procedures are shown in the following.1. Add command into CONFIG.SYS file then reboot.DEVICE=C:\PCCOM4PC.SYS[/Cxx] [/Syy] [/4] xx Assign the first <strong>port</strong> name (1 to 92) yy The switch used to set <strong>PCI</strong> card number 4 High speed card used only If "/C" is not use, the first <strong>port</strong> is COM3. If you only install one card, you can ignore /S parameters. If you install more than one card, you must set different cardnumber. (Please refer chapter 5)Switch: Set card numberDECISION Computer International 5/21/2005 35
Operations ManualPCCOM <strong>PCI</strong> 4 <strong>port</strong> <strong>universal</strong> <strong>RS232</strong> card2. To set up communication parameters, please use theMODE.COM command from OS/2, or use PCCOM.EXEcommand. We highly recommend to use PCCOM.EXEcommand, because MODE.COM can be used only forCOM1 to COM9 and for maximum baud rate to 57600.The PCCOM.EXE can be used to set COM1 to COM96. Thesyntax of PCCOM.EXE is the same as MODE.COM. For example :1. Set one <strong>PCI</strong> 4 <strong>port</strong> card from COM3 to COM6.DEVICE=C:\PCCOM4PC.SYS2. Set two cards. One card is <strong>PCI</strong> 4 <strong>port</strong> card, which is setfrom COM12 to COM15, and its card number is 0. Onecard is <strong>PCI</strong> 8 <strong>port</strong> card, which is set from COM20 toCOM27, and its card number is 1.DEVICE=C:\PCCOM4PC.SYS /C12/S0DEVICE=C:\PCCOM8PC.SYS /C20/S13. Set up communication parameters.C:\PCCOM COMx:38400,N,8,1,TO=OFF,XON=OFF,IDSR=ON, ODSR=ON, OCTS=ON, RTS=OFF,DTR=OFFC:\PCCOM COMx:115200,N,136 DECISION Computer International 5/21/2005
Operations ManualPCCOM <strong>PCI</strong> 4 <strong>port</strong> <strong>universal</strong> <strong>RS232</strong> cardG.2 UtilitiesCOMTEST.EXE is a general testing program for COM <strong>port</strong>. It willcreate the threads associated with each communication <strong>port</strong> that willbe test. The testing function includes OPEN / CLOSE / READ /WRITE / Non-Destructive Read / Non-Destructive WRITE / GetStatus / Device IOCTL. Due to lack of OS/2 API, Non-DestructiveI/O is not sup<strong>port</strong> for OS/2 even this device driver has implementedthis feature.In the COMTEST program, you can use up-right arrow to choice theoption, and use enter/escape to start/stop the program.The ComSent / ComRecv are a pair of communication programs fortesting the performance of communication <strong>port</strong>. You have toconnect the test <strong>port</strong>s with a null modem before you testcommunication <strong>port</strong>. You can use PCCOM.EXE to change theparameters of communication <strong>port</strong>. Then use this program to testheavy (transmission) duty on communication <strong>port</strong>.G.3 API Communication FunctionsIn the following, there are API communication functions, for moredetail information, please refer to Control Program ProgrammingRef. of OS/2, and programming Guide Vol. I-III of OS/2. DosClose - Close a Handle to a File, Pipe, or Devices#define INCL_DOSFILEMGR APIRET DosClose(HFILEFileHandle); DosDevConfig - Get Information about Attached Devices#define INCL_DOSPROCESS APIRET DosDevConfig(PVOIDpDeviceInfo, ULONG ulDeviceType);DECISION Computer International 5/21/2005 37
Operations ManualPCCOM <strong>PCI</strong> 4 <strong>port</strong> <strong>universal</strong> <strong>RS232</strong> card DosDevIOCtl - Perform Control Function on a DeviceSpecified by an Opened Device Handle#define INCL_DOSPROCESS APIRET DosDevIOCtl(HFILEDevHandle, ULONG ulCategory, ULONG ulFunction, PVOIDpParmList, ULONG ulParmLengthMax, PULONGpParmLengthInOut, PVOID pDataArea, ULONGulDataLengthMax, PULONG pDataLengthInOut); DosOpen - Open a File#define INCL_DOSFILEMGR APIRET DosOpen(PSZpszFileName, PHFILE ppFileHandle, PULONG pActionTaken,ULONG ulFileSize, ULONG ulFileAttribute,ULONGulOpenFlag, ULONG ulOpenMode, PEAOP2 ppEABuf); DosRead - Read from a File, Pipe, or Device to a Buffer#define INCL_DOSFILEMGR APIRET DosRead(HFILEFileHandle, PVOID pBufferAre, ULONG ulBufferLength,PULONG pByteRead); DosWrite - Write to a File from a Buffer#define INCL_DOSFILEMGR APIRET DosWrite(HFILEFileHandle, PVOID pBufferArea, ULONG ulBufferLength,PULONG pByteWritte);38 DECISION Computer International 5/21/2005
Operations ManualPCCOM <strong>PCI</strong> 4 <strong>port</strong> <strong>universal</strong> <strong>RS232</strong> cardAPPENDIX HLINUX CONFIGURATIONThe PCCOM 4 <strong>port</strong> <strong>adapter</strong> can be installed in the Linux by usingserial device driver sup<strong>port</strong>ed by Linux. For more details, pleaserefer to 'setserial' man-pages. Please uncomment the appropriate lines in /etc/rc.d/rc.serial toenable auto-configuration of PCCOM <strong>PCI</strong> bus 4 <strong>port</strong> card.For example, uncomment the following lines for PCCOM <strong>PCI</strong> bus 4<strong>port</strong> card.${SETSERIAL} /dev/cua4 ${AUTO_IRQ}autoconfig${STD_FLAGS}${SETSERIAL} /dev/cua5 ${AUTO_IRQ}autoconfig${STD_FLAGS}${SETSERIAL} /dev/cua6 ${AUTO_IRQ}autoconfig${STD_FLAGS}${SETSERIAL} /dev/cua7 ${AUTO_IRQ}autoconfig${STD_FLAGS}DECISION Computer International 5/21/2005 39
Operations ManualPCCOM <strong>PCI</strong> 4 <strong>port</strong> <strong>universal</strong> <strong>RS232</strong> cardAPPENDIX IDIAGNOSTIC UNDER WINDOWSAfter installing the PCCOM <strong>PCI</strong> 4 <strong>port</strong> <strong>adapter</strong> to your computer,you can test it if it is functioning correctly via HyperTerminal (aWindows package communication program), or by using the<strong>Decision</strong> Terminal (a software of the <strong>Decision</strong> ComputerInternational Co. Ltd.) included on the CD. Just make sure thatthere is a loop back plug connected to the COM Port under test.I.1 Using Hyper TerminalTo test the card using the Hyper Terminal. Please do the followingsteps:1. Run the HyperTerminal program.2. During connection, the program will ask you to enter yourname and choose an icon for the connection. Enter anyname and select any icon.3. After entering your name and selecting icon you will be askfor country code, area code, phone number and connectusing what. Ignore all edit box except for the connect using,click the combo box and select Direct to COMx (You canuse any <strong>port</strong> but usually the COM1 and COM2 is used bythe computer motherboard).4. Put the proper COM x properties.5. You can now begin to type any message. Take note that40 DECISION Computer International 5/21/2005
Operations ManualPCCOM <strong>PCI</strong> 4 <strong>port</strong> <strong>universal</strong> <strong>RS232</strong> cardwhatever you type must appear to the textbox as long asyou have a loop back on the COM <strong>port</strong> of your card!I.2 Using <strong>Decision</strong> TerminalTo test the card using the <strong>Decision</strong> Terminal. Please do thefollowing steps:1. Install the software using the <strong>Decision</strong> Studio (It is insidethe CD AutoOpen program).2. Run the program (<strong>Decision</strong> Terminal) at the program menuof the start menu.3. Setup the COM <strong>port</strong> properties by selecting the setupoption on the File menu.4. You can now begin to type any message to transmittextbox. Take note that whatever you type must appear toreceive textbox as long as you have a loop back on theCOM <strong>port</strong> of your card.5. You can also click the Test button to test your cardautomatically.DECISION Computer International 5/21/2005 41
Operations ManualPCCOM <strong>PCI</strong> 4 <strong>port</strong> <strong>universal</strong> <strong>RS232</strong> cardAPPENDIX JSOFTWARE DEVELOPMENTINFORMATIONIn the <strong>Decision</strong> Studio CD, it contains PCCOM device driver forWINDOWS 3.1/95/98/2000/NT/ME/XP, DOS, OS/2, UNIX, Linux,and the development tools for serial communication andtelecommunication.J.1 PCCOM ProfessionalThe PCCOM Professional is the Serial Communication SoftwareDevelopment Tool Kits Under Windows 95/98/2000/NT/ME/XP. Itcontains Complete OCX and DLL Microsoft Win32 API softwareaccessory function for application software developer. It is an easyto use tool and speed up serial communication application softwaredevelopment time and cost. Wide compatibility range hardwaresup<strong>port</strong> for PCCOM multi<strong>port</strong> serial card and any standard <strong>port</strong>, andsup<strong>port</strong> Zmodem and Kermit file transfer protocols for ASCII, Textand Executable file.J.2 PCCOM RemoteComThe PCCOM RemoteCom is an OCX programming developmenttool for made application software. That will use to enhance RS-232/422 serial communication through Internet or Intranet by standaloneprogram or by browser through World Wide Web (WWW)under Windows 95/98/2000/NT/ME/XP. User may call OCXfunctions to communicate with RemoteCOM both Server and Clientusing Internet communication; or encapsulate OCX function andremote serial ActiveX Control, then run development application42 DECISION Computer International 5/21/2005
Operations ManualPCCOM <strong>PCI</strong> 4 <strong>port</strong> <strong>universal</strong> <strong>RS232</strong> cardprogram under Internet browser (IE and Netscape).J.3 PCCOM TeleComThe PCCOM TeleCom is an OCX software accessory suitable forsoftware engineer to develop application program under Windows95/98/2000/NT/ME/XP environment. It really makes computer andcommunication application combine together. Wide compatibilityrange hardware sup<strong>port</strong> for PCCOM multi<strong>port</strong> serial card and anystandard <strong>port</strong>. The PCCOM TeleCom software kit sup<strong>port</strong>s fivemajor telecommunication functions, which can be used to1. Send message to “PAGER”(BB Call).2. Send and receive “VOICE MAIL” from computer to telephone or<strong>port</strong>able phone.3. Send and receive E-MAIL.4. Send and receive FAX.5. Receive DTMF.J.4 PCCOM RemoTeleComThe PCCOM Remote TeleCom is an OCX programmingdevelopment tool for made application software. That will use toenhance PCCOM TeleCOM functions (Pager, E-mail, Voice mail,Fax) through Internet or Intranet by stand-alone program or bybrowser through World Wide Web (WWW) under Windows95/98/2000/NT/ME/XP. User may call OCX functions tocommunicate with Remote devices both Server and Client usingInternet communication; or encapsulate OCX function and remoteActiveX Control, then run development application program underInternet browser (IE and Netscape).DECISION Computer International 5/21/2005 43
Operations ManualPCCOM <strong>PCI</strong> 4 <strong>port</strong> <strong>universal</strong> <strong>RS232</strong> cardJ.5 PCCOM SCOPEPCCOM SCOPE is a software that monitors all the data and signalsbetween two interacting devices, or a single device. With PCCOMSCOPE you can transform your PC into a total RS-232 analyzerwithout the need of expensive hardware or plug in boards. PCCOMSCOPE creates an unsurpassed tool for RS-232 device driver,communications protocol and traffic analysis.J.6 REMOTE CONTROL SOFTWAREWe also provide other hardware with complete Internet/Intranetremote control software tool for more function availability<strong>Decision</strong> Industrial InterfaceThe <strong>Decision</strong> Industrial Interface was created to provide a standardway to access the functionality provided by all data acquisitionproducts.<strong>Decision</strong> Industrial ControlDevelop a program controlling the Industrial digital and analogcards remotely at any part of the world using the Internettechnology! Done it in your application program or via Internetbrowser! It extends <strong>Decision</strong> Industrial Interface from singlecomputer development environment to client-server developmentenvironment.Remote VoiceLong distance call will not be expensive as before. There is nocheaper way to talk to your friend from another country than to talkthrough Internet! And the good news is that you can develop yourown software with Remote sound!44 DECISION Computer International 5/21/2005
Operations ManualPCCOM <strong>PCI</strong> 4 <strong>port</strong> <strong>universal</strong> <strong>RS232</strong> cardRemote ChatThis development tool is used for chatting / communicating withanother computer in the Internet / Intranet.Remote White BoardThis development tool uses client – server remote drawing board,every client can shared their image drawn on server drawing board.Remote Image CaptureThis development tool allows you to capture images taken from theCCD camera via Internet.PingerThis development tool make it possible for you to make a programthat check if your still connected to the network or internet andcheck the speed of the response of your connection!Internet Location ServerThis development tool is used to find an IP address of a particularclient / computer in the Internet by just specifying its email address!Remote Access ServerThis development tool use to dial-up like and phone dialertechnology, able to dial an ISP and monitor some of some IPaddress on networkDECISION Computer International 5/21/2005 45
Operations ManualPCCOM <strong>PCI</strong> 4 <strong>port</strong> <strong>universal</strong> <strong>RS232</strong> cardK.1 CopyrightAPPENDIX KWARRANTY INFORMATIONCopyright DECISION COMPUTER INTERNATIONAL CO.,LTD. All rights reserved. No part of PCCOM software and manualmay be reproduced, transmitted, transcribed, or translated into anylanguage or computer language, in any form or by any means,electronic, mechanical, magnetic, optical, chemical, manual, orotherwise, without the prior written permission of DECISIONCOMPUTER INTERNATIONAL CO., LTD.Each piece of PCCOM package permits user to use PCCOM only ona single computer, a registered user may use the program on adifferent computer, but may not use the program on more than onecomputer at the same time.Corporate licensing agreements allow duplication and distribution ofspecific number of copies within the licensed institution.Duplication of multiple copies is not allowed except throughexecution of a licensing agreement. Welcome call for details.K.2 Warranty InformationDECISION warrants that for a period of one year from the date ofpurchase (unless otherwise specified in the warranty card) that thegoods supplied will perform according to the specifications definedin the user manual. Furthermore that the PCCOM product will besupplied free from defects in materials and workmanship and befully functional under normal usage.46 DECISION Computer International 5/21/2005
Operations ManualPCCOM <strong>PCI</strong> 4 <strong>port</strong> <strong>universal</strong> <strong>RS232</strong> cardIn the event of the failure of a PCCOM product within the specifiedwarranty period, DECISION will, at its option, replace or repair theitem at no additional charge. This limited warranty does not coverdamage resulting from incorrect use, electrical interference,accident, or modification of the product.All goods returned for warranty repair must have the serial numberintact. Goods without serial numbers attached will not be coveredby the warranty.Trans<strong>port</strong>ation costs for goods returned must be paid by thepurchaser. Repaired goods will be dispatched at the expense ofPCCOM.To ensure that your PCCOM product is covered by the warrantyprovisions, it is necessary that you return the Warranty card.Under this Limited Warranty, DECISION's obligations will belimited to repair or replacement only, of goods found to be defectiveas specified above during the warranty period. DECISION is notliable to the purchaser for any damages or losses of any kind,through the use of, or inability to use, the PCCOM product.DECISION reserves the right to determine what constituteswarranty repair or replacement.Return Authorization: It is necessary that any returned goods areclearly marked with an RA number that has been issued byDECISION. Goods returned without this authorization will not beattended to.DECISION Computer International 5/21/2005 47