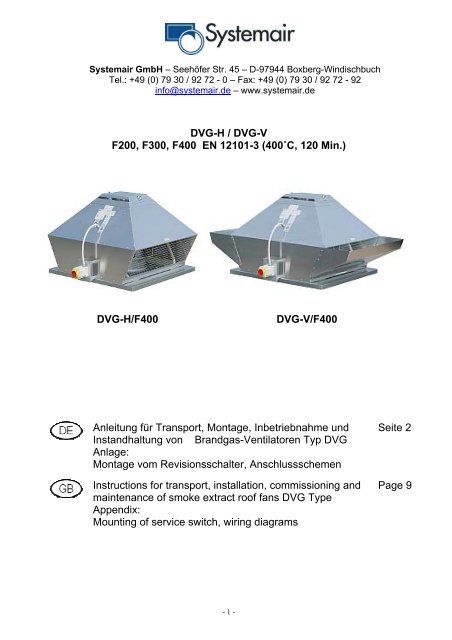
DVG-H / DVG-V F200, F300, F400 EN 12101-3 - Systemair
DVG-H / DVG-V F200, F300, F400 EN 12101-3 - Systemair
DVG-H / DVG-V F200, F300, F400 EN 12101-3 - Systemair

You also want an ePaper? Increase the reach of your titles
YUMPU automatically turns print PDFs into web optimized ePapers that Google loves.
Gültigkeit der Gewährleistung muss der Betreiber der Anlage auch das ausgefüllte undunterschriebene Kontrollblatt vorlegen.Wir bitten Sie, die Installation sorgfältig durchführen zu lassen, denn nurdamit kann ein ungestörter und sicherer Betrieb gewährleistet undzugesichert werden.- 8 -
Index 1.0 APPLICATION 10 2.0 TECHNICAL DESCRIPTION 10 3.0 TRANSPORT AND STORAGE 103.1 Transport 103.2 Storage 11 4.0 INSTRUCTIONS FOR INSTALLATION 114.1 Inspection before installation 114.2 Safety instructions for installation, commissioning,maintenance and controlling 114.3 Installation of the fan 114.4 Instructions for installation 12 5.0 COMMISSIONING 12 6.0 APPROVAL 13 7.0 MAINT<strong>EN</strong>ANCE AND PERIODIC CONTROL 13 8.0 SYSTEM MALFUNCTIONS DURING OPERATION 14 9.0 GUARANTEE 14Attachment:• Guarantee• Control report• Declaration of incorporation- 9 -
1.0 APPLICATIONSmoke extract roof fans are designed for use in powered smoke and heat exhaustventilating systems in the event of fire, and ventilating in normal conditions. Ventilated areasand emergency exits contribute to easier evacuation of people and equipment in the eventof fire, and to faster and more efficient fire extinguishing; they protect the building structureand equipment against excessive temperatures and decrease fire escalation to thesurrounding areas.• Fire resistance of fans: 400C, 120 min;• 8 different sizes from impeller diameter 315 up to 630;• installation on roofs over heated buildings;• horizontal outlet (<strong>DVG</strong>-H) or vertical outlet (<strong>DVG</strong>-V);• daily ventilation of medium with temperature from -20 up to 120°C,• the fans <strong>DVG</strong> must not be mounted in explosion hazardous zones;• if the electric motor has two speeds, normally the low speed is used to provide dailyventilation (for aggressive medium acid protection needed), high speed in case of fire;• if PTC is built-in (on request), regulation via frequency converter is possible for dailyventilation only.Not intended or unprofessional use can be dangerous for life of user orthird person. It can lead to damage of the fan. The risk for this carries theoperator alone.2.0 TECHNICAL DESCRIPTIONCasingElectric motor with impeller is fastened to a sturdy supporting construction. The casingcover is made of see water resistant aluminium.ImpellerImpeller of <strong>DVG</strong> fan is manufactured from galvanized steel. It is fastened with Taper bushand secured screw directly on to the motor shaft. Dynamically balanced in accordance withISO 1940 T1, class G6,3.Electric motorFans are serial equipped with electric motors for three-phase current 400 V, 50 Hz withoutbuilt–in thermal protection. Protection class: IP 54 or IP 55. Insulation class F (IEC).Thermal protection on request (PTC or thermal relay).3.0 TRANSPORT AND STORAGE3.1 TransportFans are delivered in wooden crates or cardboard boxes. It is recommended to leave thefans in original packing during transport to the place of installation as well as to load andunload them carefully to avoid any possible damage. The fans must be transported in ahorizontal position only. During transport and loading/unloading the weight of the fan mustbe considered.On receipt the fan must be visually inspected, and the shipment must be checked for properquantity.- 10 -
3.2 StorageStore the fans in a dry, weather and dust protected place. If this is impossible, it is importantto raise the fan above the ground surface and cover it with a PE foil.4.0 INSTRUCTIONS FOR INSTALLATION4.1 Inspection before installationEach fan is controlled by the manufacturer before delivery.After unpacking and before installing, check the following:• if any eventual damage occurred during transport;• mounting of service switch and vertical outlets (<strong>DVG</strong>-V only) up to Appendix 1;• check by hand if impeller is rotating smoothly.4.2 Safety instructions for installation, commissioning, maintenance and controllingInstallation and electrical connection must be accomplished only byauthorized technical personnel and in agreement with the valid regulations.Any hazard of unintended touching the impeller (risk of injury!) has to beprevented (with a duct long enough or a protective guard)!Comissioning is allowed only after installation into the ventilation system orafter installation of protective guard (<strong>EN</strong> 294). After installation impeller mustnot be more accessible.During installation, commissioning, maintenance and controlling,unauthorized personell should not have access to the fan and installationplace.Any risk of unintended start-up of the fan and any risk of touching theimpeller during above mentioned works has to be excluded (switch off thefan and exclude possibility of unintended start-up).Before removing the casing cover, protective guard on the pressure side oran eventual protective guard on the suction side make sure the fan isseparated from the mains supply.Common rules for safety work have to be strictly observed.4.3 Installation of the fan• Fans type <strong>DVG</strong> <strong>F400</strong> should be installed outside fire zones (on roofs over heated buildings);• fans <strong>DVG</strong> must not be mounted in explosion hazardous zones;• before installation check the carrying capacity and stability of the roof;• fans must be installed upright in a vertical position and raised above the roof surface on a basewith minimum height of 250 mm (respectively according to expected snow height);• The fan shall be fixed to the base with 4 screws on the corners;• The fan housing should not be deformed during mounting;• Check, if impeller rotating smoothly;• Access to the fan for maintenance must be assured.- 11 -
Protective glasses are needed to avoid any injury of the eyes.If the direction of rotation of the impeller is wrong, change the supply connection of 2phases. Re-start the fan and check it for proper operation (smoothly rotating impeller,current at all speeds, eventual vibrations, noise).Fill in attached control report and file it.6.0 APPROVALIt is particularly important to prove the proper function of system andcontrol devices as well as compliance with requirements of the project andregulations.When the system is approved, file the reports. Make sure that onlyauthorised personnel can handle with on/off switch.7.0 MAINT<strong>EN</strong>ANCE AND PERIODIC CONTROLUnintended start-up during installing, controlling, maintenance or repair ofthe fan has to be prevented!The following must be controlled periodically (once a year):1. Check if screws between impeller and hub got loose and tighten them if needed;2. Tighten the screw between wheel hub and shaft if needed;3. Remove dirt from the fan impeller if there is any;4. Check the functionality of protective devices;5. Check the functionality of control devices;6. Winding resistance;7. Current during operation;8. Eventual vibrations;9. Noise which might appear in el. motor bearings.The function of the system and control devices (all poles) has to be checked according tosystem maintenance book, minimum every 3 months. Operation at least 15 minutes eachtime, once a year 3 hours recommended, if possible.Checking points 1 to 4 can be done only if the supply voltage is switched offand possibility of unintended start-up is excluded.Parameters of items 5 to 9 must not deviate from the starting values (at installation). In casethat parameters deviate, the electric motor or the impeller have to be replaced or repaired.This must only be done by an authorised customer service, otherwise the manufacturer'sguarantee is invalid.The electric motor has to be maintained according to the attached instructions of themanufacturer of the electric motor.- 13 -
8.0 SYSTEM MALFUNCTIONS DURING OPERATIONFor all inspections, point 4.2. must be considered.Possible malfunctions and solutions:The fan doesnot operateAir volume istoo lowThermalprotectionswitches offNoiseVibrationsCheck connection to the mains and thermal protection. If ok. checkelectric motor. If a motor with separated windings is installed, check allspeeds. If necessary get the electric motor repaired.Check the direction of rotation. If wrong, change the supply connection ofany 2 phases. Check if current is similar all phases. If ok. checkoperating point and system design.Compare the data of electric motor with setting of thermal protection. Ifok. check power supply and electric motor (short-circuit, damage to thebearings, impeller blocked or touching the casing). Get the electric motoror if necessary the complete fan repaired.Overcurrent. Check the direction of rotation. If wrong, change the supplyconnection of any 2 phases. Check if current is similar all phases.Damage to the bearings, impeller blocked or touching the casing.Get the electric motor or if necessary the complete fan repaired.Check operating point and system construction. If the actual pressuredrop of the system is higher than supposed, the fan could operate in aninstable area of the fan curve. Inform customer service of themanufacturer.Damage or dust layer on impeller.Clean the impeller, if necessary balance it or replace it.If the reason for the malfunction can not be clearly determined, inform the customer serviceof the manufacturer.After a case of fire the fan must be checked by the manufacturer.9.0 GUARANTEEGuarantee will be valid only if transport, storage, installation, connection and periodicalmaintenance have been executed in compliance with the above instructions and localregulations regarding electric installation and fire protection. For validity of the guaranteeduly filled and signed control report has to be submitted.It is very important that the installation of the fan is done with all necessarycare, to ensure uninterrupted and safe operation.- 14 -
Anlage 1. Montage des Revisionsschalters / Montage der Umlenkungsbleche bei <strong>DVG</strong>-VAppendix 1. Mounting of service switch / Mounting of vertical outlets for <strong>DVG</strong>-V
Anlage 2. Anschlussschemen <strong>DVG</strong> / Appendix 2. Wiring diagrams <strong>DVG</strong>U2 V2 W2U2V2W2Motor ohne thermischenSchutzU1 V1 W1L1 L2 L3 PE NO NCL1 L2 L3 PE NO NCDahlanderU1L1L1V1L2L2W1L3L3PE NO NCPE NO NCW2 U2 V2U1 V1 W1L1 L2 L3 PE NO NCU V WL1 L2 L3PE NO NCU2U1L1V2V1L2W2W1L3PE NO NCElectric motor withoutthermal protection built-inElektrisk motor utantermokontaktmotorskyddU2 V2 W2U1 V1 W1U2 V2 W2U1 V1 W1Двигатель безвстроеннойтермозащитыMotor mit PTCU2 V2 W2U2 V2 W2U1 V1 W1U1 V1 W1Electric motor with PTCbuilt-inL1 L2 L3L1 L2 L3U2 V2 W2U1 V1 W1PE PTC NO NCmax. 2,5VPE PTC NO NCDahlanderL1 L2 L3 PE PTC NO NCmax. 2,5VL1 L2 L3 PE PTC NO NCU2 V2 W2U1 V1 W1W2U1L1U2V1L2V2W1L3PE PTC NO NCmax. 2,5VU V W PTC PTCL1 L2 L3 PTC PTC PE NO NCmax. 2,5VU2 V2 W2U1 V1 W1L1 L2 L3 PE PTC NO NCmax. 2,5VElektrisk motor medinbyggd PTCДвигатель свстроеннойтермозащитой(термистор)U2 V2 W2U2V2W2Motor mitThermokontaktU1 V1 W1L1 L2 L3 PEL1 L2 L3 PETKTKNO NCNO NCDahlanderU1L1L1V1L2L2W1L3L3PEPETKTKNO NCNO NCW2 U2 V2U1 V1 W1L1 L2 L3 PETKNO NCU V W TK TKL1 L2 L3 TK TKPE NO NCU2U1L1V2V1L2W2W1L3PETKNO NCElectric motor withthermal relay built-inElektrisk motor medinbyggd termokontaktU2 V2 W2U1V1W1U2V2W2U1 V1 W16/8, 4/6 4/8 (Dahlander) einstufiger Motor > 3 kW einstufiger Motor = 3 kW einstufiger Motor < 3 kWsingle speed > 3 kW single speed = 3 kW single speed < 3 kWenhastighets motor > 3 kW enhastighets motor = 3 kW enhastighets motor < 3 kWодноскоростной двиг. > 3 кВт односкоростной двиг. = 3 кВт односкоростной двиг. < 3 кВтДвигатель свстроеннойтермозащитой(термальный контакт)