Device Cut Sheet Download - Panel - Ross Video
Device Cut Sheet Download - Panel - Ross Video
Device Cut Sheet Download - Panel - Ross Video
- No tags were found...

You also want an ePaper? Increase the reach of your titles
YUMPU automatically turns print PDFs into web optimized ePapers that Google loves.
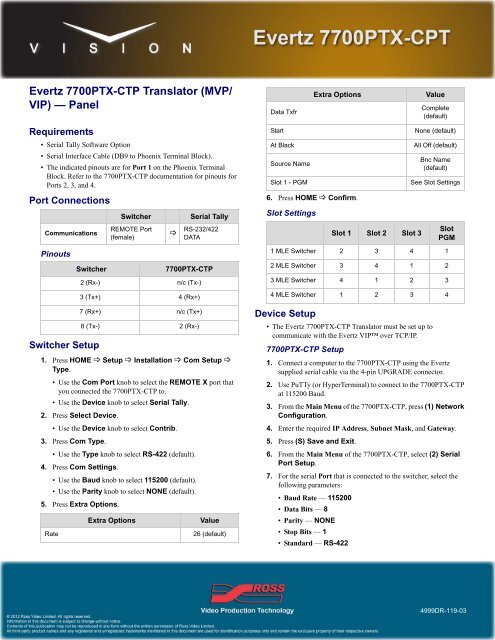
Evertz 7700PTX-CTP Translator (MVP/VIP) — <strong>Panel</strong>Requirements• Serial Tally Software Option• Serial Interface Cable (DB9 to Phoenix Terminal Block).• The indicated pinouts are for Port 1 on the Phoenix TerminalBlock. Refer to the 7700PTX-CTP documentation for pinouts forPorts 2, 3, and 4.Port ConnectionsCommunicationsSwitcherREMOTE Port(female)Serial TallyRS-232/422DATAData TxfrStartAt BlackSource NameSlot 1 - PGM6. Press HOME Confirm.Slot SettingsExtra OptionsSlot 1 Slot 2 Slot 3ValueComplete(default)None (default)All Off (default)Bnc Name(default)See Slot SettingsSlotPGMPinoutsSwitcher7700PTX-CTP2 (Rx-) n/c (Tx-)3 (Tx+) 4 (Rx+)1 MLE Switcher 2 3 4 12 MLE Switcher 3 4 1 23 MLE Switcher 4 1 2 34 MLE Switcher 1 2 3 4Switcher Setup7 (Rx+) n/c (Tx+)8 (Tx-) 2 (Rx-)1. Press HOME Setup Installation Com Setup Type.•Use the Com Port knob to select the REMOTE X port thatyou connected the 7700PTX-CTP to.•Use the <strong>Device</strong> knob to select Serial Tally.2. Press Select <strong>Device</strong>.•Use the <strong>Device</strong> knob to select Contrib.3. Press Com Type.•Use the Type knob to select RS-422 (default).4. Press Com Settings.•Use the Baud knob to select 115200 (default).•Use the Parity knob to select NONE (default).5. Press Extra Options.RateExtra OptionsValue26 (default)<strong>Device</strong> Setup• The Evertz 7700PTX-CTP Translator must be set up tocommunicate with the Evertz VIP over TCP/IP.7700PTX-CTP Setup1. Connect a computer to the 7700PTX-CTP using the Evertzsupplied serial cable via the 4-pin UPGRADE connector.2. Use PuTTy (or HyperTerminal) to connect to the 7700PTX-CTPat 115200 Baud.3. From the Main Menu of the 7700PTX-CTP, press (1) NetworkConfiguration.4. Enter the required IP Address, Subnet Mask, and Gateway.5. Press (S) Save and Exit.6. From the Main Menu of the 7700PTX-CTP, select (2) SerialPort Setup.7. For the serial Port that is connected to the switcher, select thefollowing parameters:• Baud Rate — 115200• Data Bits — 8• Parity — NONE• Stop Bits — 1• Standard — RS-4224999DR-119-03
8. Press (S) Save and Exit.9. From the Main Menu of the 7700PTX-CTP, select(3) Contribution Tally Protocol Settings Setup.10. Select the following parameters:• VGPI Image <strong>Video</strong> Dsp Id — 500• VGPI Refresh Count — 750• Program Output Number — 5• Program VGPI Offset — 0• Tx Program UMD — n• Program UMD Dsp Id — 129• Preview Output Number — 6• Preview VGPI Offset — 100• Tx Preview UMD — n• Preview UMD Dsp Id — 130• Tx Source Names — y• Src Names Refresh Count — 750• Src Names Dsp Id Offset — 0• Include Non-Physical Sources with VPGIs and SourceNames — n11. Press (S) Save and Exit.12. From the Main Menu of the 7700PTX-CTP, select (4) UnderMonitor Display Peer Setup.13. Select UMD Peer Setup via Ethernet 1.14. Enter the IP Address and TCP Port for the MVP/VIP that the7700PTX-CTP is connecting to.15. Press (S) Save and Exit.16. Restart the 7700PTX-CTP to apply the settings.MVP/VIP Setup• The MVP/VIP Maestro application must be configured so thatthe UMD Labels and Tally indicators are set for Protocol Id, andthe correct PID or VGPI is used.CompatibilitySwitchersVision MD/X --Vision QMD/X 12.1aVision Multi<strong>Panel</strong> Support --AutomationOverDrive --Port ExpandersBSS4Comtrol <strong>Device</strong>MasterSerial TallyVersionEvertz 7700PTX-CTP Translator --SwitchersSynergy 1 SD --Synergy Series SD --Synergy MD/X --6